Laser Confocal Fluorescent Microscope
|
|
|
- Gilbert Dean
- 6 years ago
- Views:
Transcription


1
, 635nm (10mW), 559nm Scanning: 2 galvanometer scanning mirrors Pixel size: 256 256-1024 1024 Scanning speed: 1.")
2 Laser Confocal Fluorescent Microscope Olympus Fluoview FV10i-LIV Laser Light Source: Ultraviolet/Visible light LD lasers - 405nm (18mW), 473nm (12.5mW), 635nm (10mW), 559nm Scanning: 2 galvanometer scanning mirrors Pixel size: Scanning speed: 1.1 s / frame (for pixel size , High Speed scanning mode) Focusing scanning: High frame rate scan by Y- direction interlace scanning ( 1, 2, 4) Dimension: XYT, XYZ, XYZT Rotation scanning: in 0.1 increments Detection: Fluorescence: 2 channels Phase Contrast: 1 channel
3 Analog integration detection by Photomultiplier Single motorized pinhole. Pinhole diameter: ø50-800μm automatic setting (adjustable to 1.0, 1.5, 2.0, and 2.5) Optical zoom: 10 objective: 1 6 in 0.1x increments and 60 objective: 1 10 in 0.1x increments Automatic Exposure Focus: Z-drive motorized focus with minimum increment: 0.01μm Objectives: exclusively designed 10 phase contrast objective NA 0.4 (equivalent to UPLSAPO 10x) Exclusively designed 60 phase contrast water-immersion objective NA 1.2 (equivalent to UPLSAPO 60 W) Remote switching from software by electric revolver Automatic detection of cover glass thickness and automatic setting of motorized correction collar. Automatic detection of interface between specimen and cover glass by laser reflection light detection Manual oil supply for 60x lens. As supporting mechanism, automatic moving of XY stage to oil supply position when switching to 60x Motorized XY stage module by stepping motor Minimum increment: 0.3μm Specimen Holder: Only the dedicated specimen holder can be mounted For three glass bottom dishes with 35mm diameter For a single cover glass chamber with 8 wells For a single glass slide or well slide with 8 wells Culture pod (for a glass bottom dish with 35mm diameter) XY Stage Environment: Temperature: C,0.5 Humidity: more than 90% CO2 concentration: 5% (recommended)
4 Controller: Dedicated controller PC/AT-compatible OS: Windows Vista Business, 32 bit CPU: Intel Core2Duo 3.0GHz RAM: 2GB 2 DVD-Multi drive built-in 24 inch LCD monitor x 1, WUXGA (1920x1200) Image acquisition mode: map image, one shot, time-lapse (XYT), Z-stack (XYZ), Z- stack time-lapse (XYZT), multi area time-lapse (Multi Area XYT), multi area Z- stack time-lapse (Multi Area XYZT) Software: Automatic setting for fluorescence channel and laser according to dye selected from list Automatic selection of map image of 3 3 9x9 fields according to 10 objective lens, and manual selection of map acquisition area Image display by channel, overlaid channels display, image in progress review Save file formatted as OLYMPUS image format (OIF, OIB), Multi-TIFF format (8/16 bit grey scale, index color, 24/32/48 bit color), JPEG, BMP, TIFF Image editing using pseudo color setting, contrast adjustment, Comment: inputting graphic, text, scale etc., image extraction, combination 3D image construction: alpha Blend method, Maximum intensity projection method, 3D animation display, free orientation of cross section display Room Environment: C 30-80% (non-condensing) humidity

5 LCFM Diagram Excitation pinhole Unused Light Dichroic Mirror (Bean Splitter) Laser Light Laser light source (4 possible wavelengths) Galvanometer scanning mirrors Lens Point of interest 2 lasers can emit at one time. Both laser beams will act the same, but each will be treated by a different galvanometer scanning mirror. This diagram shows one laser beam. Sample Fluorescent light from sample Objective Photomultiplier Pinhole Confocal Plane Detector This is the lens on the machine. It is where the laser light source will come from that the sample is exposed to. Within the machine you can find the dichroic mirror and the galvanometer. This is the objective and the detector part of the machine. It will let in light, process it, and send it out to the computer monitor as our image
6 1. A Laser provides high energy excitation light. 2. The laser s directed through an excitation pinhole that splits the beam. 3. Next, the light goes through a dichroic mirror (beam splitter) to separate out unneeded light and refocus the necessary light. 4. The light is focused by a lens onto a point of interest on the galvanometer mirror that is associated with a specific point on the sample 5. The light is then focused to a point on the galvanometer scanning mirror, which rasterizes an image in that region. 6. Then the light is refocused through another lens onto the sample. 7. The fluorophores in the sample are then excited and emit fluorescence. The fluorescent light is emitted through the objective. 8. That fluorescent light goes through a pinhole confocal plane and a photomultiplier before it is able to be recorded by the detector. Only the light that is able to go through the pinhole is detected, thus allowing us to view only single points of our sample, creating a 2D image. This method is useful when imaging specific sections/depths of a sample. This microscope allows for much more specificity when imaging a sample; as well as provides information about the chemical makeup of a material. However, there is a greater risk of photo bleaching due to the higher intensity energy that is entering the system. The photomultiplier allows us to adjust the sensitivity of light absorption for specific wavelengths so that we can attain high quality images.
7 μm


8


9

10 Aspex EXplorer Performance Specifications: Particle detection efficiency greater than 95% Particle detection range 30nm to 5mm Detectors SED, Quad BSED, SDD EDX Accelerating voltage 0.2 to 25 kev Continuous High vacuum and variable pressure EDX Resolution 135 ev


11 X-ray production and detection during SEM operation. The white circle represents the atom s nucleus. The thin white rings represent electron shells. The thick yellow circles represent electrons. The thin yellow circles represent electron holes. The green circle represents an x-ray photon Electrons penetrate the lower energy shells of the atom Low energy electrons are ejected from their shell out of the atom resulting in an electron hole. An electron from a higher energy shell drops down to a lower energy shell to fill the void During this process of moving from a higher energy to a lower energy state the electron emits an x-ray photon Bombarding electrons penetrate the surface atom s lower electron shells ejecting other electrons and creating holes in the process. These shells are then filled by higher energy electrons which create X-ray energy as a byproduct of their migration. The EDS system determines the elements present in the sample by detecting the energy levels of emitted X-rays and counting the number of x-ray photons detected at that energy level. Combining this data with the known characteristic energy value that each element emits when bombarded with electrons we are able to determine the composition of the sample.
12 SEM Diagram A beam of electrons is generated by the electron gun. This beam goes through condenser lenses that focus the beam down to the desired diameter on the sample s surface. The focused beam then hits the sample causing the different reactions that allow us to produce an image. Either electrons are displaced creating secondary electrons and X-rays, or the bombarding electrons bounce off the surface of the sample. This information is recorded and is used to generate an image. The angles and velocities from which certain particles have been detected are the primary piece of data that can be analyzed and converted into a topographic image. Backscattered electrons are used for an image s contrast because the intensity of the signal being recorded from the electrons depends on the angle between the incident beam and the sample surface. So the resolution is limited by the wavelength of an electron. If the beam is able to penetrate into a feature we will likely see that feature due to the backscattered electrons. But once we get to a certain small size we will see less electron able to permeate into a feature, which will not yield any backscattering from that feature and thus no image. Two characteristic interactions can occur once an electron hits the surface of the sample. The interaction can be either elastic or inelastic. Elastic interactions occur when the beam hits the sample and there is a change in direction but not in the energy level of the electron. These are called backscattered electrons. These penetrate the sample and are affected by subsurface features, thus they cannot yield very high resolution images. Inelastic interactions occur when an electron hits the orbital of an atom and ejecting another electron that was weakly bonded, these are called secondary electrons. Secondary electrons are created near the surface of the sample and thus provide a lot of information of the finer details on a sample s surface, yielding a high resolution image. These inelastic interactions can also occur with photons. An electron will hit an atom which causes it to become excited and emit x-rays which can then be detected. X-rays are used for chemical analysis because the magnitude of an X-ray is dependent upon the type of material that produces it.

13 AFM Cantilever Tip

14 Beetle Limb

15 304 Stainless Steel


16 NBS SRM 115 ANSI 316 Stainless Steel Calibration Standard Sample Bombarding electrons penetrate the surface atom s lower electron shells ejecting other electrons and creating holes in the process. These shells are then filled by higher energy electrons which create X-ray energy as a byproduct of their migration. The EDS system determines the elements present in the sample by detecting the energy levels of emitted X-rays and counting the number of photons detected at that energy level. Combining this data with the known characteristic energy value that each element emits when bombarded with electrons we are able to determine the composition of the sample. These peaks represent the composition of the sample material. The x axis represents the energy level, in kev, of the detected photons. The y axis represents the number of photons detected at different energy levels. Higher peaks mean a greater concentration of that atom. On this graph we can see that iron has the highest peak and makes up roughly 60.0% of the samples composition. This makes sense for the 316 stainless steel sample, which typically has an iron composition of %. All other elements measured in this sample are within a reasonable range of the actual composition of 316 stainless steel.

, const. amplitude (topography), const.")
17 The Nanosurf EasyScan 2 AFM Specifications: Electronics Spectroscopy modes: single point measurements or multiple measurements along a vector Scan speed: up to 60ms / line at 128 data-points / line Spectroscopy data points: up to 2048 Display Line graph, color map, 3D view and various others charts of the scan data can be displayed simultaneously XY resolution <.5um Modules Imaging modes include dynamic force (intermittent contact, etc.), const. amplitude (topography), const. height (amplitude), static force (contact), const. force (topography), const. height (deflection)

18 Atomic Force Microscope Piezoelectric xyz scanning Mirror Laser Diode Laser Light Focusing Lens Oscillating cantilever Laser light deflected by cantilever Photodiode detector Sample Surface AFM Apparatus Cantilever and Laser Diode Stage Vibration Isolation
19 AFM functionality is fairly easy to understand. At its core the AFM is simply recording the changes in the interactions between the AFM tip and sample of which it is imaging. First, the AFM will touch down on the surface of the sample. At this point a laser diode emits a beam on the cantilever which reflects back to the photo-detector, which acts as the base angle from which topography and surface amplitude can be measured. Next, in the software the user has to select the size of the area on the sample that they want to image. Once the area has been set, the oscillating cantilever will go line by line over the selected area. The AFM tip is so small that it is able to detect the changes in the atomic forces as it moves over the sample. These changes will change the orientation of the cantilever. That change in orientation will change the angle of deflection of the laser, which is recorded by the photo detector. During this entire imaging process the cantilever is measuring two things. First is the angle of laser deflection which helps us determine the surface topography of the sample. The second is the actual motion of the cantilever, which helps us determine the surface amplitude of the sample. So at every single point on the sample the AFM will be mapping the change in the z direction of the probe, giving us the depth of the sample at a given point, and detecting the angle of deflection by the laser off of the cantilever. In the end, we have not actually taken any sort of optical image. Instead we have a set of data, that when combined, can yield topographic, amplitude and 3D images of your sample.


20 Microstructure Canals Amplitude View Topographic View 3D View Color Coded Topographic View


21 Microstructure Square Grid Amplitude View Topographic View 3D View Color Coded Topographic View


22 Amplitude View CD Microstructure Topographic View 3D View (Inversed) Color Coded Topographic View

 Stylus Options Stylus radius options from 50nm to 25_m; High Aspect Ratio (HAR) tips 10_m x 2_m and 200_m x 20_m; Custom")
23 Bruker DektakXT Specifications: Measurement Technique: Stylus profilometry (contact measurement) Measurement Capability: Two-dimensional surface profile measurements; Optional three-dimensional measurement/analyses Sample Viewing Digital magnification, to 2.2mm vertical FOV Stylus Sensor Low Inertia Sensor (LIS 3) Stylus Force 1 to 15mg with LIS 3 sensor Low Force Option N-Lite+ Low Force with 0.03 to 15mg (optional) Stylus Options Stylus radius options from 50nm to 25_m; High Aspect Ratio (HAR) tips 10_m x 2_m and 200_m x 20_m; Custom tips available upon request
24 Sample X/Y Stage Manual 100mm (4 in.) X/Y, manual leveling; Motorized 150mm (6 in.) X/Y, manual leveling Sample R-Theta Stage Manual, continuous 360 degrees; Motorized, continuous 360 degrees Computer System 64-bit multi-core parallel processor, Windows 7.0; Optional 23in. flat panel display Software Vision64 Operation and Analysis Software; Stress Measurement; Microform; Optional: Stitching; 3D Mapping; 3D Stress Vibration Isolation Vibration isolation solutions available Scan Length Range 55mm (2in.); 200mm (8in.) with scan stitching capability Data Points Per Scan 120,000 maximum Max. Sample Thickness 50mm (1.95in.) Max. Wafer Size 200mm (8in.) Step Height Repeatability <5Å, 1sigma on 0.1μm step Vertical Range 1mm (0.039in.) Vertical Resolution 1Å max. 6.55_m range) Input Power VAC, 50 60Hz Temperature Range Operating Range, 20 and 25 C (68 to 77 F) Humidity Range _80%, non-condensing System Dimensions and Weight 455mm W x 550mm D x 370mm H (17.9in. W x 22.6in. D x 14.5in. H); 34kg (75lbs.); Enclosure: 550mm L x 585mm W x 445mm H (21.6in. L x 23in. W x 17.5in. H); 5.0kg (11lbs.)

25 Profilometer Linear Variable Differential Transducer Pivot Profilometer Stylus Sample Surface The profilometer s stylus is attached to the core of the LVDT. Around the core are displacement transducers that have equal voltages in opposition yielding a net voltage of zero. As the stylus moves across the sample surface it causes this core to move up or down. This change in magnetic fields generates flux which causes a voltage. Based on the variation and the changes in voltages the machine can then determine the height of a feature. The profilometer rasters and image line by line, allowing it to create a 3D image by combining all of the line scans.

26 Vinyl Record


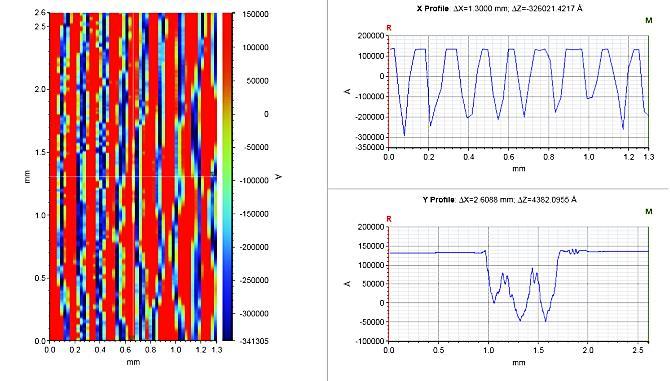
27 Sputter Coater Deposition Thickness Investigation We took a 2.5 cm x 7.5 cm glass slide and sputter coated it with gold for 11 minutes. We then took a needle and made scratches along the slide at different distances from the edge. Below are the results from the profilometer. In Image 1 you can see the initial results. We can see that the entire data set curves, which indicates curvature in the glass slide. From this data we can also see how the thickness of gold is changing as we approach the center of the glass slide. Image 2 is this same information but leveled out so that we could analyze that data easier. There is approximately a 20nm standard deviation with the data. Image 1 Image 2
28 Thickness (Angstroms) The graph below shows the results from the profilometer. It shows that as we move closer to the center of the slide the thickness of gold deposited by the sputter coater decreases. This is likely due to the fact that during sputter coating the bombarding particles are directed at the center of the gold target which causes the gold particles to fall in a cone shape. This is why we see a greater concentration of particles near the edge of the glass slide compared to the center Distence from Edge of Slide vs Thickness of Deposited Gold Distance From Edge of Slide (cm)
29 Fluoview fv10i specifications. (n.d.). Retrieved from Work Cited


30 NORTH SEATTLE COMMUNITY COLLEGE Standard Operating Procedures Olympus Fluoview FV10i Confocal Microscope Prepared by: Anton Leitner 6/7/2013
31 Startup Procedure: 1. Turn on the Fluoview Confocal Microscope Press and hold power button The red light will begin flashing green and the second light will stay a solid orange After about 10 minutes both lights will remain a solid color, and the machine is ready to use
 Username: fluoview Password:")
32 2. Turn on the computer tower 3. Log in to computer (The password is always the same as the user name) Username: fluoview Password: fluoview 4. Insert Sample into the microscope stage (Look to Section 2)


33 5. Open imaging program FV10i-SW.exe 6. Sign in to program User ID: Administrator Password: Administrator

34 Sample Stage Preparation: 1. Gather necessary resources For small cylindrical sample holders For glass slides Sample Locks Hold sample firmly in place Sample Site Where the sample is held on the stage during imaging Oil deposition site where oil is deposited before using the 60x Objective Stage key Used to align to microscope when inserting stage
35 2. Place sample into sample site on the stage For small cylindrical sample holders place the sample onto the sample site and lock it in with the sample locks For glass slides, place sample into sample site so that the area you are interested in imaging is located near the 3 marker on the stage (this is good practice because the machine will start imaging at this center point). Ensure that the cover slip side of the glass slide is facing down away from you. One aspect is absolutely essential; you must make sure that your cover slip has a height equal to or less than a #1.5 cover slip, otherwise you run the risk of damaging the sample and the instrument. Once slide is in place, secure it in place by using the sample locks.
36 3. Open microscope hood and insert stage Hood open button Align the stage key hole with the cylindrical piece of metal on the microscope that fits inside it. They will line up and snuggly fit together. Close the hood, and now the sample is ready to be imaged


37 Dye Selection: 1. Select Set From Dye Data Base tab, near the top left of the yellow highlighted window above. 2. Identify the type of dye of which the sample is stained. If no dye is given, select a wavelength of light that is known to excite fluorophores in that sample. If that information is unknown then you will first test the four basic excitation wavelengths provided (Blue, Green, Red and FarRed). 3. Select a dye name on the list and then click Apply The dye name will now be registered on the Selected Dyes list (denoted by the green highlighted window in the image above) No more than four and at least two wavelengths must be selected before imaging can begin. 4. Click Start, near the bottom center of the screen (denoted by the red highlighted window in the image above).


38 Acquisition of Map Image: 1. Select dyes for mapping When 3 or more dyes have been selected then you must choose a combination of two for the initial image mapping. Click on the combination you want and then click OK at the bottom of the window.

39 2. Select container of interest For glass slides, the number on the stage of which you have already placed the glass slide corresponds to the container number. Whichever container, indicated by the light grey box in the image to the left, is selected will be the container that is mapped. You can look at other parts of the glass slide by switching containers, or you can click register to mark down all the containers that you would like to map. Use the Delete button to remove registered containers.

40 3. Start map acquisition In this window you can adjust the brightness of your map image Under the Scanning Order section you can select to either image the current container, containers that you have registered, or you can manually pick out the sections of the container that you would like to image. If you chose to manually select sections then you simply double click on the acquisition screen inside one of the large squares and the machine will raster that site. You are now ready to acquire the map image. Click Start located at the bottom left of this window.

41 4. During map acquisition Once you have clicked start you will see a progress bar on the bottom of the screen, which indicates the machine is conducting autofocus and auto brightness. Once the progress bar disappears, the map image acquisition will begin. It is at this point that you can manually select the boxes for the machine to raster if Manual was selected. At any time you can click Stop. If you find the feature that you re looking for and want to move on, or if you see some mistakes and want to move back. Stop can be an excellent time saver, allowing you to move forward or backward in the imaging process whenever you like.

42 5. Before we move on: Look to the section of the window indicated by the green square above. In this area you can select the channels that the image is being displayed on. By turning these channels on and off you will see very different images and features. Try turning off the phase contrast first. If most of your image is in phase contrast then it means you need to select a new set of dyes that will cause the sample to fluoresce, unless your primary concern is a phase contrast image. When you re ready to move on click NEXT, indicated by the red box on the image above. DO NOT CLICK Start or you will have to start this acquisition process over.

43 Observation Window Layout: The highlighted sections of this window are explained on the following pages

44 1. This window is the image map created during the previous steps. In this window you can navigate your way around your sample in order to find the points of interest. Double click anywhere on the image to focus the lasers at that point. Use the channel buttons above the image to adjust which wavelength you are observing. Use the Zoom bar on the side to identify important features first. You do not want to waste time using the laser to look around your image; it is a slow process and it can damage your sample. Use the container selection tool, located at the very top of this window, to change the container, and thus area of the slide, of which you are observing.
45 2. This is one of the most important features to utilize during the imaging process. This is the Repeat button which determines the rate at which the microscope rasters an image. At 1x the machine rasters at a standard speed and yields much clearer images. When you set it to 4x the image is generated much quicker but the resolution is poor. This tool is used to locate and isolate features that you want to image, so the raster speed does not effect your final image. However, the raster speed does have an effect on the rate of photobleaching of the sample. A quicker rastering speed means more passes by the laser over the area of interest. More passes means more excitation which inevitably leads to photobleaching, resulting in an unimagable section of your sample. 3. In this area you can select the channels that the image is being displayed on. By turning these channels on and off you will see very different images and features. When multiple dyes were selected you can only have two activated at one time during image observation. As you switch between lasers an image is generated that combines all the different channels into a single image.

46 4. This is the area of observation. As you move around the map image you will see this image change (Make sure Reapeat is ON). Each square represents a different wavelength being recorded. The bottom right square combines all other images into one. By adding and removing channels you will affect individual squares that are associated with those channels, and you will alter the combined image. Again, this will not effect your final image capture. By clicking and dragin within these squares you can move the focus of the laser which alows for precise feature alignment. 5. This section affects the depth of focus and the magnification being used. By clicking on the 10x button you will activate the 60x magnification. If 60x magnification is activated, click on the button to change it back to 10x magnification. Look to 60x Lens Oil Deposition section bfore changing magnification. By clicking Drop Oil you will prepare the 60x lense for oil deposition. By sliding the bar, located at the very bottom, you will either zoom in or out at the lasers point of focus.


47 7. Depth Tab AF arrow indicates the point of autofocus. If you slide this arrow up and down you will change the depth of focus, being able to see the top and bottom of a feature. End and Start bars are used to take stacks of images. Stacks can be used to generate 3D images. 6. Other Parameter Tab Use Image Size menu to choose the desired size for saved images. Higher resolution means a much larger file size and a much longer image acquisition period. Speed & Quality is responsible for image quality. We will typically always see this on High Quality Confocal Aperture affects the size of the aperture. Smaller aperture means less light is being captured. We typically want to see this set at x1.0


48 7. Sensitivity Tab This tab is used to change the sensitivity of the machine to specific lasers being emitted onto the sample. A higher sensitivity means the machine will detect more photons at that wavelength. This feature can be useful when isolating areas of interest on the sample. 8. Laser Tab This tab is used to change the intensity of specific lasers being emitted onto the sample. A higher intensity means more photons of that wavelength are being emitted. Be careful not to have these too high. High energy lasers can cause easy photobleaching effects and other sample damage.

49 60x Lens Selection and Oil Deposition: 1. Look to Area 5 on the Observation Window Layout 2. Click on the 10x button 3. A window will pop up saying Please replenishes objective lens with oil 4. Open the microscope hood 5. Look to the sample stage and find the oil deposition site


50 6. Take the vial of Olympus brand oil. Push the fluid out until the bubbles in the shaft are gone and a small drop is at the tip. Wipe this drop off on a tissue as shown below 7. Push another drop out onto the tip and gently place it on the oil deposition site, do not touch the lens with the plastic vial. 8. Close the hood, press ok, and now you are ready to image at 60x magnification.
51 Basic 2D Image Observation and Acquisition: (Reference image acquisition window layout) 1. In Area 1 use the map image to locate an area on your sample that you would like image. 2. Use the Repeat button in Area 2 to start generating an image. The image will appear in Area 4 3. Use the channel buttons in Area 3 to isolate specific wavelengths that are of interest. 4. Area 4 will contain the images from all channels. Click and drag your mouse around this area to move around the sample. 5. Use the focus bar in Area 5 to zoom up on the feature of interest. Use the 10x button if you would like a deeper zoom. Reference 60x lens oil deposition section before changing the magnification. 6. In Area 6 select the Other Parameter tab and change the image size to 1024x1024. Change Speed & Quality to High Quality. Change the Confocal Aperture to x1.0 Use the depth tab if you would like to change the depth of focus.
52 7. In Area 7 adjust the sensitivity and the laser intensity. There is no formula for this. Use simple trial and error to find the best possible image quality. Before you re ready to save, go back to Area 2 and turn the repeat to 1x. This will give you a good idea of what the final saved image will look like. 8. Area 8 is relatively straightforward. There are two lines. The first asks you to select a save location. The second line asks for the file name. Series Start is only used during 3D image acquisition. One Shot is used when only taking a single image. When you re ready to image click One Shot and move away from the computer to avoid vibrations. It may take a few minutes depending on some of the settings
53 Basic 3D Image Observation and Acquisition: (Reference image observation window layout) 1. In Area 1 use the map image to locate an area on your sample that you would like image. 2. Use the Repeat button in Area 2 to start generating an image. The image will appear in Area 4 3. Use the channel buttons in Area 3 to isolate specific wavelengths that are of interest. 4. Area 4 will contain the images from all channels. Click and drag your mouse around this area to move around the sample. 5. Use the focus bar in Area 5 to zoom up on the feature of interest. Use the 10x button if you would like a deeper zoom. Reference 60x lens oil deposition section before changing the magnification. 6. In Area 6 First select the Other Parameter tab and change the image size to 1024x1024. Change Speed & Quality to High Quality. Change the Confocal Aperture to x1.0 Adjust the End and Start bars located under the Depth tab in Area 6. These are the z-stack markers. For a complete

54 3D image you will want to move these markers to the highest and lowest points of the observed feature. Once you find a place where you can barely make out the feature then you have reached one of these extremes, so click the Set button to anchor that marker in place. Adjust the Step section. More steps mean a more complete image, but a longer imaging period. Fewer steps is quicker, but will only image a limited number of slices between the two specified heights and thus the resolution will not be as good. Look to the Time & Number section located right below Area 7. As you adjust the max/min points and change the number of steps you will see the timeframe change. Often your image quality will be limited to the amount of available time you have to take images. 7. In Area 7 adjust the sensitivity and the laser intensity. There is no formula for this. Use simple trial and error to find the best possible image quality. Before you re ready to save, go back to Area 2 and turn the repeat to 1x. This will give you a good idea of what the final saved image will look like.

55 8. Area 8 is relatively straightforward. There are two lines. The first asks you to select a save location. The second line asks for the file name. Series Start is only used during 3D image acquisition. When you re ready to image click Series Start and move away from the computer to avoid vibrations. The machine will begin taking images between the two specified points. You will know how long it takes by looking at the Time & Number section.


56 Image Editing: 1. Open Editing Program FV10-ASW Sign in to program User ID: Administrator Password: Administrator 3. You will now see this window


57 4. Navigate the Explore window and locate where you saved your image. Double click on it to open it. 5. You will now see a window like this

 The red highlighted arrow button opens the 2D control panel.")
58 6. Using the toolbar b c d a a) The orange highlighted area is the channel select bar. Turning these channels on and off has the same effect as it does when acquisitioning an image. Only the wavelengths selected will be displayed. b) The red highlighted arrow button opens the 2D control panel. Features in this window have not been thoroughly explored, so as far as image editing goes it will entail a lot of trial and error.

 The pink highlighted button with the pencil on it is the basic shapes tool bar. Here you can draw a number of different shapes.")
59 c) The green highlighted rainbow button with the scale on it opens the LUT window. In this window you have the freedom to color your image in any way. Each channel has its own set of RGB settings, and each of those has their own sub-settings. Image editing is preferential, and this window allows you to cater your images to your own style. There is no define method for maximizing image quality here, so trial and error will be your primary tool to maximize the quality. d) The pink highlighted button with the pencil on it is the basic shapes tool bar. Here you can draw a number of different shapes. Our primary concern in this toolbar is the Scale feature and the Text feature. Click on the giant A near the top of the toolbar. It will ask you to specify the location of the text. Once you ve clicked somewhere a window opens where you can write your text Click on the ruler at the bottom of the toolbar. Once selected just click and drag across the area where you want the scale bar to go

60 7. Saving your image Right click on the screen to pull up the available saving options. Clicking Save and Save As will save only the image. Anything you added to it will not be saved. Clicking on either either of the Export buttons will allow you to save the image as you have edited it and in various formats. Clicking Save Display will capture whatever is on the image screen at that time


61 3D Image Editing: All the previous editing techniques can also be applied to 3D images 1. When you open a 3D image you will see a slightly different window. Two boxes in the top right corner will now be highlighted. The box to the left opens 3D Animation. This takes your entire stack of images and creates a slideshow that makes them appear as one rotating image The box to the right combines all the images into a 3D rendering for further editing. After clicking the right box your window will look like the one below. In this view you can click and drag around the image to rotate it 360 degrees in any direction. In this view you also have access to the 3D control panel and the 3D image settings, and you can access these panels the same way as you did in the 2D view. In the 3D Control Panel try switching between the two rendering modes, both will give you a unique image. In the 3D Image Settings window go to the Image tab and try adjusting the resolution with the slide bar. This usually helps increase the image quality

62 2. Right click on the image to open up more settings. We are mainly concerned with the scale bar. Write down the dimensions of you feature. When converting back to a 2D image the scale does not carry over, and so you will have to manually create a scale bar. 3. Once you have oriented and edited your image the way you like, go to the top left of the 3D window. You will see a button the shows a box turning into a square, this is the 3D to 2D button. Once you have converted your image to 2D, it behaves the same way as all other 2D images, with one small difference. If you try and add a scale bar now, it will only give you dimension in pixels. There is a pixel to distance conversion, but all aspects of the image quality must be known. This is why we must manually create a scale bar using the scale bar function and the text function
63 Item Supplier Item Number Price #1.5 Cover Slips VWR $ oz Confocal Supplies Order Quantity Order Location Lens Cleaning Tissues VWR $ Sheets 001 Light-Duty Tissue Wipers VWR $ Sheets Nitrile Gloves VWR $ Gloves Olympus Immersion Oil Type-F Sparkle Lens Cleaner Olympus Contact Olympus Direct Home Depot $ cc phone: visit: Cleaner-50104/ #.Ua-2uUCsiSo
64 Olympus Technician: Tim Murphy Instrument Model: FV10C-O3 Serial Number: 2B08862
65 Anton Wolfe Leitner st Ave NE Seattle, Washington, Skills Various Photolithography Techniques (UV, X-Ray, E-beam) Silicon Wafer Preparation (Cleaning, Surface Oxide Treatment, Spin Coating) Wet and Dry Resist Stripping Techniques Etch-Back and Lift-Off Etching Techniques Chemical Vapor Deposition Scanning Electron Microscopy EDX Material Characterization Sputter Coating Profilometry AFM Microscopy Statistical Data Analysis Confocal Microscopy AutoCAD for Mechanical and Electrical Building Design Education North Seattle Community College Seattle, Wa Nanotechnology Associate Degree of Applied Science expected 2013 Clvl GPA: 3.7 Member of Vice President s/dean s list Professional Experience Rushing Company, Seattle, WA January Present Administrative Assistant Manage day to day administrative operations such as filing, document formatting, preparing company credentials for potential clients, routine maintenance, and office organization Preparing standard operating procedures for various devices around the office such as large document printers, airflow meters, multimeters and CO2 detectors. Maintain wireless network functionality by establishing and monitoring network drives, running frequent scans, addressing connectivity issues and setting up phones lines. Handle clients, vendors and support personnel while they are in the office.
66 Provide support to all other employees in the office for whatever they may need by learning new information and techniques in order to complete a task for which I had no previous knowledge. UW Department of Bioengineering, Seattle, WA April Present Lab Assistant Assisted in synthesizing various solutions Used fluorescent microscope to conduct experiments Gather, analyze and present data Use AutoCAD to create experimental apparatuses UW Electrical Engineering Department, Seattle, WA January 2012 March 2012 Lab technician Developed photo-detectors and micro-fluidic chemical mixing chambers in a research oriented environment Utilized silicon wafer preparation, photolithography techniques, CVD, sputter coating, etching techniques and profilometry Approximately 30 hours of lab experience in this cleanroom Rushing Company, Seattle, WA January 2008 September 2009 Mechanical and electrical systems drafter Interpreted engineering hand drawn schematic designs into a mechanical or electrical digital format building schematics for use during the construction process. Happily worked under the pressure of a deadlines Utilized AutoCAD to create the 3D digital format building schematics Managed a group of 3 fellow trainees in order to define our objectives and develop a path to meet those objectives. Activities SHINE (Seattle Hub for Industry-driven Nanotechnology Education), 2010 Present Developed experiments that catered to the various audiences to which we presented (elementary school through high school levels) Interacted with the audience in order to convey a clear message that could be easily understood Practice presentation techniques and etiquette Seattle s Austrian Club, 2004 Present Help prepare large gatherings by soliciting information from our members Cooked for large gatherings
 07 Setting Place a specimen, and select a fluorescence dye. The FV10i automatically selects the most suitable imaging conditions based on the fluorescence dye selection. Set Image mapping menu Just click
Quality Performance, Innovative Design
 Dimensions Confocal Laser Scanning Biological Microscope Table size (mm): 1400(W) 800(D) * Table is not available from Olympus. Avoid placing the controller directly on the floor. Dimensions / Weight /
Things to check before start-up.
 Byeong Cha Page 1 11/24/2009 Manual for Leica SP2 Confocal Microscope Enter you name, the date, the time, and the account number in the user log book. Things to check before start-up. Make sure that your
UNIVERSITY OF WATERLOO Physics 360/460 Experiment #2 ATOMIC FORCE MICROSCOPY
 UNIVERSITY OF WATERLOO Physics 360/460 Experiment #2 ATOMIC FORCE MICROSCOPY References: http://virlab.virginia.edu/vl/home.htm (University of Virginia virtual lab. Click on the AFM link) An atomic force
Standard Operating Procedure of Atomic Force Microscope (Anasys afm+)
") Standard Operating Procedure of Atomic Force Microscope (Anasys afm+) The Anasys Instruments afm+ system incorporates an Atomic Force Microscope which can scan the sample in the contact mode and generate
Standard Operating Procedure of Atomic Force Microscope (Anasys afm+) The Anasys Instruments afm+ system incorporates an Atomic Force Microscope which can scan the sample in the contact mode and generate
Zeiss 780 Training Notes
 Zeiss 780 Training Notes Turn on Main Switch, System PC and Components Switches 780 Start up sequence Do you need the argon laser (458, 488, 514 nm lines)? Yes Turn on the laser s main power switch and
Microscopy from Carl Zeiss
 Microscopy from Carl Zeiss Contents Page Contents... 1 Introduction... 1 Starting the System... 2 Introduction to ZEN Efficient Navigation... 5 Setting up the microscope... 10 Configuring the beam path
Practical work no. 3: Confocal Live Cell Microscopy
 Practical work no. 3: Confocal Live Cell Microscopy Course Instructor: Mikko Liljeström (MIU) 1 Background Confocal microscopy: The main idea behind confocality is that it suppresses the signal outside
Leica SP8 TCS Users Manual
 Version : 07/08/0 Leica SP8 TCS Users Manual Start up:. Turn the PC Microscope, Scanner Power, Laser Power, and the Laser Emission key to on (bottom right of desk).. Turn on the fluorescent lamp (top left
Leica TCS SP8 Quick Start Guide
 Leica TCS SP8 Quick Start Guide Leica TCS SP8 System Overview Start-Up Procedure 1. Turn on the CTR Control Box, Fluorescent Light for the microscope stand. 2. Turn on the Scanner Power (1) on the front
Operating Instructions for Zeiss LSM 510
 Operating Instructions for Zeiss LSM 510 Location: GNL 6.312q (BSL3) Questions? Contact: Maxim Ivannikov, maivanni@utmb.edu 1 Attend A Complementary Training Before Using The Microscope All future users
Operation Guide for the Leica SP2 Confocal Microscope Bio-Imaging Facility Hunter College October 2009
 Operation Guide for the Leica SP2 Confocal Microscope Bio-Imaging Facility Hunter College October 2009 Introduction of Fluoresence Confocal Microscopy The first confocal microscope was invented by Princeton
Training Guide for Leica SP8 Confocal/Multiphoton Microscope
 Training Guide for Leica SP8 Confocal/Multiphoton Microscope LAS AF v3.3 Optical Imaging & Vital Microscopy Core Baylor College of Medicine (2017) Power ON Routine 1 2 Turn ON power switch for epifluorescence
Lecture 20: Optical Tools for MEMS Imaging
 MECH 466 Microelectromechanical Systems University of Victoria Dept. of Mechanical Engineering Lecture 20: Optical Tools for MEMS Imaging 1 Overview Optical Microscopes Video Microscopes Scanning Electron
b. Turn the power switch and key to on position for blue laser.
 OLYMPUS FLUOVIEW 300 CONFOCAL MICOSCOPE OPERATION PROCEDURE 1. Turn ON microscope in this order: 1) Turn on mercury lamp (Note: once the mercury lamp is turned off, DO NOT turn it back on for at least
Supplemental Figure 1: Histogram of 63x Objective Lens z axis Calculated Resolutions. Results from the MetroloJ z axis fits for 5 beads from each
 Supplemental Figure 1: Histogram of 63x Objective Lens z axis Calculated Resolutions. Results from the MetroloJ z axis fits for 5 beads from each lens with a 1 Airy unit pinhole setting. Many water lenses
ScanArray Overview. Principle of Operation. Instrument Components
 ScanArray Overview The GSI Lumonics ScanArrayÒ Microarray Analysis System is a scanning laser confocal fluorescence microscope that is used to determine the fluorescence intensity of a two-dimensional
Guide to Confocal 5. Starting session
 Guide to Confocal 5 Remember that when booking and before starting session you can check for any problems at https://www.bris.ac.uk/biochemistry/uobonly/cif/index.html Starting session Switch on microscope
Leica TCS SP8 Quick Start Guide
 Leica TCS SP8 Quick Start Guide Leica TCS SP8 System Overview Start-Up Procedure 1. Turn on the CTR Control Box, EL6000 fluorescent light source for the microscope stand. 2. Turn on the Scanner Power
SHORT INSTRUCTIONS FOR OPERATING LSM1/2 (Zeiss LSM510) AT CIAN Version 1.4, September 2014
 AT CIAN Version 1.4, September 2014") CIAN LSM1 or LSM2 short instructions, version 1.4, September 2014 page 1 of 6 SHORT INSTRUCTIONS FOR OPERATING LSM1/2 (Zeiss LSM510) AT CIAN Version 1.4, September 2014 Before starting To work with LSM1
CIAN LSM1 or LSM2 short instructions, version 1.4, September 2014 page 1 of 6 SHORT INSTRUCTIONS FOR OPERATING LSM1/2 (Zeiss LSM510) AT CIAN Version 1.4, September 2014 Before starting To work with LSM1
Training Guide for Carl Zeiss LSM 5 LIVE Confocal Microscope
 Training Guide for Carl Zeiss LSM 5 LIVE Confocal Microscope AIM 4.2 Optical Imaging & Vital Microscopy Core Baylor College of Medicine (2017) Power ON Routine 1 2 Verify that main power switches on the
Imaging Carbon Nanotubes Magdalena Preciado López, David Zahora, Monica Plisch
 Imaging Carbon Nanotubes Magdalena Preciado López, David Zahora, Monica Plisch I. Introduction In this lab you will image your carbon nanotube sample from last week with an atomic force microscope. You
LSM 780 Confocal Microscope Standard Operation Protocol
 LSM 780 Confocal Microscope Standard Operation Protocol Basic Operation Turning on the system 1. Sign on log sheet according to Actual start time 2. Check Compressed Air supply for the air table 3. Switch
Zeiss LSM 880 Protocol
 Zeiss LSM 880 Protocol 1) System Startup Please note put sign-up policy. You must inform the facility at least 24 hours beforehand if you can t come; otherwise, you will receive a charge for unused time.
Nikon AZ100. Laser Scanning Macro Confocal Microscope. Jordan Briscoe Adam Fries Kyle Marchuk Kaitlin Corbin. May 2017.
 Nikon AZ100 Laser Scanning Macro Confocal Microscope Jordan Briscoe Adam Fries Kyle Marchuk Kaitlin Corbin May 2017 Contents 1 Introduction 2 2 Hardware - Startup 2 3 Software/Operation 4 3.1 Multidimensional
ZEISS LSM510META confocal manual
 ZEISS LSM510META confocal manual Switching on the system 1) Switch on the Remote Control button located on the table to the right of the microscope. This is the main switch for the whole system including
Olympus LEXT OLS 4000 Confocal Laser Microscope
 Olympus LEXT OLS 4000 Confocal Laser Microscope The Olympus LEXT OLS4000 is a confocal microscope capable of taking high-resolution 3D images. The magnification (Optical and Digital) of this microscope
Leica SP8 TCS Users Manual
 Leica SP8 TCS Users Manual Follow the procedure for start up and log on as posted in the lab. Please log on with your account only and do not share your password with anyone. We track and confirm usage
LSM 510 Meta Training Notes
 LSM 510 Meta Training Notes Turning on the system Turn on X-Cite power supply. This supplies light for epifluorescence for viewing your samples through the microscope. Turn on the remote control switch.
LSM 710 Confocal Microscope Standard Operation Protocol
 LSM 710 Confocal Microscope Standard Operation Protocol Basic Operation Turning on the system 1. Switch on Main power switch 2. Switch on System / PC power button 3. Switch on Components power button 4.
Cell Biology and Bioimaging Core
 Cell Biology and Bioimaging Core Leica TCS SP5 Operating Instructions Starting up the instrument 1. First, log in the log book located on the confocal desk. Include your name, your lab s PI, an account
TRAINING MANUAL. Olympus FV1000
 TRAINING MANUAL Olympus FV1000 September 2014 TABLE OF CONTENTS A. Start-Up Procedure... 1 B. Visual Observation under the Microscope... 1 C. Image Acquisition... 4 A brief Overview of the Settings...
Contents STARTUP MICROSCOPE CONTROLS CAMERA CONTROLS SOFTWARE CONTROLS EXPOSURE AND CONTRAST MONOCHROME IMAGE HANDLING
 Operations Guide Contents STARTUP MICROSCOPE CONTROLS CAMERA CONTROLS SOFTWARE CONTROLS EXPOSURE AND CONTRAST MONOCHROME IMAGE HANDLING Nikon Eclipse 90i Operations Guide STARTUP Startup Powering Up Fluorescence
Model SU3500 Scanning Electron Microscope
 Model SU3500 Scanning Electron Microscope Modified and Parts taken from Hitachi Easy Operation Guide. Before using the Model SU3500 SEM, be sure to read the [GENERAL SAFETY GUIDELINES] in the instruction
Standard Operating Procedure
 Standard Operating Procedure Nanosurf Atomic Force Microscopy Operation Facility NCCRD Nanotechnology Center for Collaborative Research and Development Department of Chemistry and Engineering Physics The
SCIENTIFIC INSTRUMENT NEWS. Introduction. Design of the FlexSEM 1000
 SCIENTIFIC INSTRUMENT NEWS 2017 Vol. 9 SEPTEMBER Technical magazine of Electron Microscope and Analytical Instruments. Technical Explanation The FlexSEM 1000: A Scanning Electron Microscope Specializing
Zeiss 880 Training Notes Zen 2.3
 Zeiss 880 Training Notes Zen 2.3 1 Turn on the HXP 120V Lamp 2 Turn on Main Power Switch Turn on the Systems PC Switch Turn on the Components Switch. 3 4 5 Turn on the PC and log into your account. Start
Supplemental Method Information Zeiss LSM710
 Supplemental Method Information Zeiss LSM710 1 Under the Light Path window set up the confocal for imaging a green dye (Alexa488-EGFP). For example, set up the light path as shown here using the 488 nm
Full-screen mode Popup controls. Overview of the microscope user interface, TEM User Interface and TIA on the left and EDS on the right
 Quick Guide to Operating FEI Titan Themis G2 200 (S)TEM: TEM mode Susheng Tan Nanoscale Fabrication and Characterization Facility, University of Pittsburgh Office: M104/B01 Benedum Hall, 412-383-5978,
Nikon Ti-E Microscope Manual. Rightmire Hall Ohio State University. Director: Tony Brown Rightmire
 Nikon Ti-E Microscope Manual Rightmire Hall Ohio State University Director: Tony Brown Rightmire 060 292-1205 brown.2302@osu.edu Facility Manager: Paula Monsma Rightmire 062 293-0939 292-1367 monsma.1@osu.edu
INTRODUCTION We believe that every laboratory working in the field of nanotechnology needs an SEM, therefore we would like to introduce to you our IEM
 INTRODUCTION We believe that every laboratory working in the field of nanotechnology needs an SEM, therefore we would like to introduce to you our IEM series of SEM. In short space of time, our device
KEYENCE VKX LASER-SCANNING CONFOCAL MICROSCOPE Standard Operating Procedures (updated Oct 2017)
") KEYENCE VKX LASER-SCANNING CONFOCAL MICROSCOPE Standard Operating Procedures (updated Oct 2017) 1 Introduction You must be trained to operate the Laser-scanning confocal microscope (LSCM) independently.
KEYENCE VKX LASER-SCANNING CONFOCAL MICROSCOPE Standard Operating Procedures (updated Oct 2017) 1 Introduction You must be trained to operate the Laser-scanning confocal microscope (LSCM) independently.
Leica SPEII confocal microscope. Short Manual
 Leica SPEII confocal microscope Short Manual Switching ON sequence: 1. Turn on the Workstation under the bench (top, far right). 2. Turn on the Supply Unit - Laser box (big green switch first and then
LSM 510 Training Notes
 LSM 510 Training Notes Turning on the system Turn on the arc lamp, found on the bench top left of the microscope. This supplies light for epifluorescence for viewing your samples through the microscope.
Quick Guide. LSM 5 MP, LSM 510 and LSM 510 META. Laser Scanning Microscopes. We make it visible. M i c r o s c o p y f r o m C a r l Z e i s s
 LSM 5 MP, LSM 510 and LSM 510 META M i c r o s c o p y f r o m C a r l Z e i s s Quick Guide Laser Scanning Microscopes LSM Software ZEN 2007 August 2007 We make it visible. Contents Page Contents... 1
Zeiss LSM 780 Protocol
 Zeiss LSM 780 Protocol 1) System Startup F Please note the sign-up policy. You must inform the facility at least 24 hours beforehand if you can t come; otherwise, you will receive a charge for unused time.
Atomic Force Microscopy (Bruker MultiMode Nanoscope IIIA)
") Atomic Force Microscopy (Bruker MultiMode Nanoscope IIIA) This operating procedure intends to provide guidance for general measurements with the AFM. For more advanced measurements or measurements with
Atomic Force Microscopy (Bruker MultiMode Nanoscope IIIA) This operating procedure intends to provide guidance for general measurements with the AFM. For more advanced measurements or measurements with
Horiba Jobin-Yvon LabRam Raman Confocal Microscope (GERB 120)
") Horiba Jobin-Yvon LabRam Raman Confocal Microscope (GERB 120) Please contact Dr. Amanda Henkes for training requests and assistance: 979-862-5959, amandahenkes@tamu.edu Hardware LN 2 FTIR FTIR camera 1
Horiba Jobin-Yvon LabRam Raman Confocal Microscope (GERB 120) Please contact Dr. Amanda Henkes for training requests and assistance: 979-862-5959, amandahenkes@tamu.edu Hardware LN 2 FTIR FTIR camera 1
Imaging Beyond the Basics: Optimizing Settings on the Leica SP8 Confocal
 Imaging Beyond the Basics: Optimizing Settings on the Leica SP8 Confocal Todays Goal: Introduce some additional functionalities of the Leica SP8 confocal HyD vs. PMT detectors Dye Assistant Scanning By
Renishaw InVia Raman microscope
 Laser Spectroscopy Labs Renishaw InVia Raman microscope Operation instructions 1. Turn On the power switch, system power switch is located towards the back of the system on the right hand side. Wait ~10
Akinori Mitani and Geoff Weiner BGGN 266 Spring 2013 Non-linear optics final report. Introduction and Background
 Akinori Mitani and Geoff Weiner BGGN 266 Spring 2013 Non-linear optics final report Introduction and Background Two-photon microscopy is a type of fluorescence microscopy using two-photon excitation. It
Microscopic Structures
 Microscopic Structures Image Analysis Metal, 3D Image (Red-Green) The microscopic methods range from dark field / bright field microscopy through polarisation- and inverse microscopy to techniques like
Scanning electron microscope
 Scanning electron microscope 5 th CEMM workshop Maja Koblar, Sc. Eng. Physics Outline The basic principle? What is an electron? Parts of the SEM Electron gun Electromagnetic lenses Apertures Detectors
Measurement of Microscopic Three-dimensional Profiles with High Accuracy and Simple Operation
 238 Hitachi Review Vol. 65 (2016), No. 7 Featured Articles Measurement of Microscopic Three-dimensional Profiles with High Accuracy and Simple Operation AFM5500M Scanning Probe Microscope Satoshi Hasumura
Title: Leica SP5 Confocal User Manual
 Title: Leica SP5 Confocal User Manual Date of first issue: 23/10/2015 Date of review: Version: Admin For assistance or to report an issue Office: CG07 or 05 Email: Igmm-imaginghelpdesk@igmm.ed.ac.uk Website:
Training Guide for Carl Zeiss LSM 510 META Confocal Microscope
 Training Guide for Carl Zeiss LSM 510 META Confocal Microscope AIM 4.2 Optical Imaging & Vital Microscopy Core Baylor College of Medicine (2017) Power ON Routine 1 2 Turn ON Components and System/PC switches
Quick Start Guide. Leica SP5 X
 Quick Start Guide Leica SP5 X Please note: Some of the information in this guide was taken from Leica Microsystems Leica TCS SP5 LAS AF Guide for New Users. This work is licensed under the Creative Commons
FRAUNHOFER AND FRESNEL DIFFRACTION IN ONE DIMENSION
 FRAUNHOFER AND FRESNEL DIFFRACTION IN ONE DIMENSION Revised November 15, 2017 INTRODUCTION The simplest and most commonly described examples of diffraction and interference from two-dimensional apertures
Observing Microorganisms through a Microscope LIGHT MICROSCOPY: This type of microscope uses visible light to observe specimens. Compound Light Micros
 PHARMACEUTICAL MICROBIOLOGY JIGAR SHAH INSTITUTE OF PHARMACY NIRMA UNIVERSITY Observing Microorganisms through a Microscope LIGHT MICROSCOPY: This type of microscope uses visible light to observe specimens.
START-UP PROCEDURE 1 THE MICROSCOPE STAND 3 OBJECTIVES 5 STARTING WITH LAS (SOFTWARE) AND SETTING UP THE MICROSCOPE STAND 7
 AND SETTING UP THE MICROSCOPE STAND 7") Leica DMI AF6000LX Table of contents START-UP PROCEDURE 1 THE MICROSCOPE STAND 3 OBJECTIVES 5 STARTING WITH LAS (SOFTWARE) AND SETTING UP THE MICROSCOPE STAND 7 ACQUIRE MODULE 6 SETTING THE LIGHTPATH 6
Leica DMI AF6000LX Table of contents START-UP PROCEDURE 1 THE MICROSCOPE STAND 3 OBJECTIVES 5 STARTING WITH LAS (SOFTWARE) AND SETTING UP THE MICROSCOPE STAND 7 ACQUIRE MODULE 6 SETTING THE LIGHTPATH 6
INDIAN INSTITUTE OF TECHNOLOGY BOMBAY
 IIT Bombay requests quotations for a high frequency conducting-atomic Force Microscope (c-afm) instrument to be set up as a Central Facility for a wide range of experimental requirements. The instrument
BX-61: Brightfield Instruction /Continue to scroll for Fluorescent Instuctions
 BX-61: Brightfield Instruction /Continue to scroll for Fluorescent Instuctions Starting up: Schematic of Olympus BX-61. 1. Turn on Olympus microscope power box (left of microscope) with toggle switch on
RENISHAW INVIA RAMAN SPECTROMETER
 STANDARD OPERATING PROCEDURE: RENISHAW INVIA RAMAN SPECTROMETER Purpose of this Instrument: The Renishaw invia Raman Spectrometer is an instrument used to analyze the Raman scattered light from samples
Zeiss LSM 510 Confocor III Training Notes. Center for Cell Analysis & Modeling
 Zeiss LSM 510 Confocor III Training Notes Center for Cell Analysis & Modeling Confocor 3 Start Up Go to System Module Turn on Main Switch, System/ PC, and Components Switches Do you need the arc lamp?
1 Set up the confocal light path for imaging a green dye (Alexa488-EGFP). For example, the
. For example, the") 1 Set up the confocal light path for imaging a green dye (Alexa488-EGFP). For example, the light path as shown here using the 488 nm LASER (Laser Unit 1) reflecting off of the 405/488 nm Dichroic mirror
1 Set up the confocal light path for imaging a green dye (Alexa488-EGFP). For example, the light path as shown here using the 488 nm LASER (Laser Unit 1) reflecting off of the 405/488 nm Dichroic mirror
Basic Users Manual for Tecnai-F20 TEM
 Basic Users Manual for Tecnai-F20 TEM NB: This document contains my personal notes on the operating procedure of the Tecnai F20 and may be used as a rough guide for those new to the microscope. It may
MICROSCOPE LAB. Resolving Power How well specimen detail is preserved during the magnifying process.
 AP BIOLOGY Cells ACTIVITY #2 MICROSCOPE LAB OBJECTIVES 1. Demonstrate proper care and use of a compound microscope. 2. Identify the parts of the microscope and describe the function of each part. 3. Compare
Examination, TEN1, in courses SK2500/SK2501, Physics of Biomedical Microscopy,
 KTH Applied Physics Examination, TEN1, in courses SK2500/SK2501, Physics of Biomedical Microscopy, 2009-06-05, 8-13, FB51 Allowed aids: Compendium Imaging Physics (handed out) Compendium Light Microscopy
TRAINING MANUAL. Multiphoton Microscopy LSM 510 META-NLO
 TRAINING MANUAL Multiphoton Microscopy LSM 510 META-NLO September 2010 Multiphoton Microscopy Training Manual Multiphoton microscopy is only available on the LSM 510 META-NLO system. This system is equipped
Operating Checklist for using the Scanning Electron Microscope, JEOL JSM 6400.
 Smith College August 2005 Operating Checklist for using the Scanning Electron Microscope, JEOL JSM 6400. CONTENT, page no. Pre-Check, 1 Specimen Insertion, 1 Startup, 2 Filament Saturation, 2 Beam Alignment,
OPERATING INSTRUCTIONS
 Zeiss LSM 510 M eta Confocal M icroscope OPERATING INSTRUCTIONS Starting the System: 1. Turn the black knob on the laser box one-quarter turn from Off to On. You will hear the laser cooling mechanisms
Training Guide for Carl Zeiss LSM 7 MP Multiphoton Microscope
 Training Guide for Carl Zeiss LSM 7 MP Multiphoton Microscope ZEN 2009 Optical Imaging & Vital Microscopy Core Baylor College of Medicine (2017) Power ON Routine 1 2 Turn Chameleon TiS laser key from Standby
SECONDARY ELECTRON DETECTION
 SECONDARY ELECTRON DETECTION CAMTEC Workshop Presentation Haitian Xu June 14 th 2010 Introduction SEM Raster scan specimen surface with focused high energy e- beam Signal produced by beam interaction with
Bi/BE 227 Winter Assignment #3. Adding the third dimension: 3D Confocal Imaging
 Bi/BE 227 Winter 2016 Assignment #3 Adding the third dimension: 3D Confocal Imaging Schedule: Jan 20: Assignment Jan 20-Feb 8: Work on assignment Feb 10: Student PowerPoint presentations. Goals for this
Quick Operation Guide
 Quick Operation Guide Power ON Mounting specimens Set the specimen on the sample holder, and install the sample holder to the holder frame. Attach the holder frame to the XY stage. Type of holder Main
Scanning electron microscope
 Scanning electron microscope 6 th CEMM workshop Maja Koblar, Sc. Eng. Physics Outline The basic principle? What is an electron? Parts of the SEM Electron gun Electromagnetic lenses Apertures Chamber and
RAITH e-line OPERATING INSTRUCTIONS
 RAITH e-line OPERATING INSTRUCTIONS 1) LOADING A SAMPLE a. Start the system i. On the Column PC (Right side monitor [R]), select the SmartSEM icon to on the desktop to begin the column software. ii. On
Point Spread Function. Confocal Laser Scanning Microscopy. Confocal Aperture. Optical aberrations. Alternative Scanning Microscopy
 Bi177 Lecture 5 Adding the Third Dimension Wide-field Imaging Point Spread Function Deconvolution Confocal Laser Scanning Microscopy Confocal Aperture Optical aberrations Alternative Scanning Microscopy
Optical Microscope. Active anti-vibration table. Mechanical Head. Computer and Software. Acoustic/Electrical Shield Enclosure
 Optical Microscope On-axis optical view with max. X magnification Motorized zoom and focus Max Field of view: mm x mm (depends on zoom) Resolution : um Working Distance : mm Magnification : max. X Zoom
(Refer Slide Time: 00:10)
") Fundamentals of optical and scanning electron microscopy Dr. S. Sankaran Department of Metallurgical and Materials Engineering Indian Institute of Technology, Madras Module 03 Unit-6 Instrumental details
Fundamentals of optical and scanning electron microscopy Dr. S. Sankaran Department of Metallurgical and Materials Engineering Indian Institute of Technology, Madras Module 03 Unit-6 Instrumental details
Horiba LabRAM ARAMIS Raman Spectrometer Revision /28/2016 Page 1 of 11. Horiba Jobin-Yvon LabRAM Aramis - Raman Spectrometer
 Page 1 of 11 Horiba Jobin-Yvon LabRAM Aramis - Raman Spectrometer The Aramis Raman system is a software selectable multi-wavelength Raman system with mapping capabilities with a 400mm monochromator and
OPERATION OF THE HITACHI S-450 SCANNING ELECTRON MICROSCOPE. by Doug Bray Department of Biological Sciences University of Lethbridge
 OPERATION OF THE HITACHI S-450 SCANNING ELECTRON MICROSCOPE by Doug Bray Department of Biological Sciences University of Lethbridge Revised September, 2000 Note: The terms in bold in this document represent
Instructions for easyscan Atomic Force Microscope
 UVA's Hands-on Introduction to Nanoscience Instructions for easyscan Atomic Force Microscope (revision 8 November 2012) NOTE: Instructions assume software is pre-configured per "UVA Instructor Guide for
Manufacturing Metrology Team
 The Team has a range of state-of-the-art equipment for the measurement of surface texture and form. We are happy to discuss potential measurement issues and collaborative research Manufacturing Metrology
Be aware that there is no universal notation for the various quantities.
 Fourier Optics v2.4 Ray tracing is limited in its ability to describe optics because it ignores the wave properties of light. Diffraction is needed to explain image spatial resolution and contrast and
End-of-Chapter Exercises
 End-of-Chapter Exercises Exercises 1 12 are conceptual questions designed to see whether you understand the main concepts in the chapter. 1. Red laser light shines on a double slit, creating a pattern
Rotary Fixture M/V/X CLASS LASER SYSTEMS. Installation and Operation Instructions
 Rotary Fixture M/V/X CLASS LASER SYSTEMS Installation and Operation Instructions 02/01/2000 Introduction The Rotary Fixture controls in the Printer Driver are used along with the optional Rotary Fixture
Operating Checklist for using the Laser Scanning Confocal Microscope. Leica TCS SP5.
 Smith College August 2010 Operating Checklist for using the Laser Scanning Confocal Microscope Leica TCS SP5. CONTENT, page no. Startup, 1 Initial set-up, 1 Software, 2 Microscope Specimen observation
SEM Training Notebook
 SEM Training Notebook Lab Manager: Dr. Perry Cheung MSE Fee-For-Service Facility Materials Science and Engineering University of California, Riverside December 21, 2017 (rev. 3.4) 1 Before you begin Complete
Fluorescence Imaging of Single Spins in Nitrogen-Vacancy centers using a Confocal Microscope. Advanced Lab Course University of Basel
 Fluorescence Imaging of Single Spins in Nitrogen-Vacancy centers using a Confocal Microscope Advanced Lab Course University of Basel October 6, 2015 Contents 1 Introduction 2 2 The Confocal Microscope
Brightfield Microscopy and Image Acquisition on Spotcam1. by Ryan Taylor/Nancy Kleene Last modified 10/02/05 by Birgit Ehmer
 Brightfield Microscopy and Image Acquisition on Spotcam1 by Ryan Taylor/Nancy Kleene Last modified 10/02/05 by Birgit Ehmer Log onto the computer. Enter your username and password to log onto the server.
Nikon Eclipse Ti2-E Widefield/Spinning Disk Confocal Microscope Standard Operation Protocol
 Nikon Eclipse Ti-E Widefield/Spinning Disk Confocal Microscope Standard Operation Protocol Please sign on the log sheet before switching on system. Turn on system Turn on A only if confocal mode or laser
EE119 Introduction to Optical Engineering Fall 2009 Final Exam. Name:
 EE119 Introduction to Optical Engineering Fall 2009 Final Exam Name: SID: CLOSED BOOK. THREE 8 1/2 X 11 SHEETS OF NOTES, AND SCIENTIFIC POCKET CALCULATOR PERMITTED. TIME ALLOTTED: 180 MINUTES Fundamental
1. Preliminary sample preparation
 FEI Helios NanoLab 600 standard operating procedure Nicholas G. Rudawski ngr@ufl.edu (352) 392 3077 (office) (805) 252-4916 (cell) Last updated: 03/02/18 What this document provides: an overview of basic
Scanning Electron Microscopy SEM. Warren Straszheim, PhD MARL, 23 Town Engineering
 Scanning Electron Microscopy SEM Warren Straszheim, PhD MARL, 23 Town Engineering wesaia@iastate.edu 515-294-8187 How it works Create a focused electron beam Accelerate it Scan it across the sample Map
nanovea.com PROFILOMETERS 3D Non Contact Metrology
 PROFILOMETERS 3D Non Contact Metrology nanovea.com PROFILOMETER INTRO Nanovea 3D Non-Contact Profilometers are designed with leading edge optical pens using superior white light axial chromatism. Nano
Instructions for Tecnai a brief start up manual
 Instructions for Tecnai a brief start up manual Version 3.0, 8.12.2015 Manual of Tecnai 12 transmission electron microscope located at Aalto University's Nanomicroscopy Center. More information of Nanomicroscopy
A Laser-Based Thin-Film Growth Monitor
 TECHNOLOGY by Charles Taylor, Darryl Barlett, Eric Chason, and Jerry Floro A Laser-Based Thin-Film Growth Monitor The Multi-beam Optical Sensor (MOS) was developed jointly by k-space Associates (Ann Arbor,
Contents. Introduction
 Contents Page Contents... 1 Introduction... 1 Starting the System... 2 Introduction to ZEN Efficient Navigation... 5 Setting up the microscope... 10 Configuring the beam path and lasers... 12 Scanning
Scanning Electron Microscopy
 Scanning Electron Microscopy For the semiconductor industry A tutorial Titel Vorname Nachname Titel Jobtitle, Bereich/Abteilung Overview Scanning Electron microscopy Scanning Electron Microscopy (SEM)