|
|
|
- Harry Webb
- 6 years ago
- Views:
Transcription
1


2
3

4


5


6

7


8 07
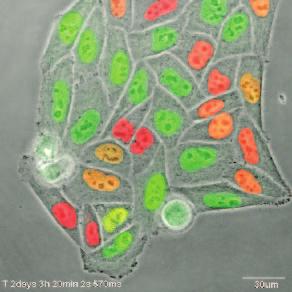
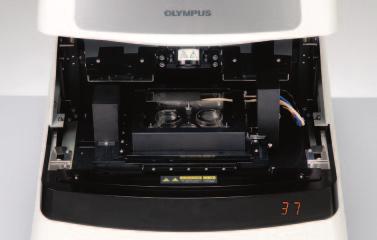
9 Setting Place a specimen, and select a fluorescence dye. The FV10i automatically selects the most suitable imaging conditions based on the fluorescence dye selection. Set Image mapping menu Just click a <Start> button, and a map image of the specimen is created automatically. Users can easily identify the point he or she wants to capture. Se elect Image capturing Through the sophisticated operating software, the image capture area or zoom magnification can be set quickly and then click of a button to complete image capturing. Capture Stress-free operation for every user. sticated display e and expertise, tic focus or ation mode, guiding the operating 08


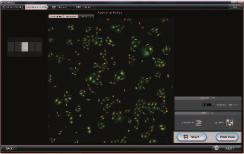
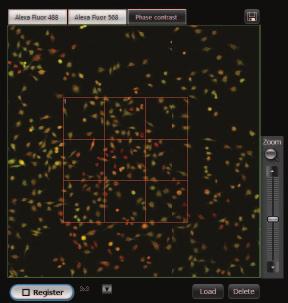
10 is created automatically with k of the button. You can select the area you want to capture rather than having to search for it. When the setting is completed, then click the <Start> button. When loading of the specimen is completed, just click the <Start> button in the "Acquire Map Image" window. The creation of the map image of the specimen will begin automatically. With this bird's eye view of the cell, the user can quickly and easily select the imaging area he or she wants to capture. Mapping area selection The area is displayed according to the type of specimen holder used, such as a 35mm dia. dish or glass slide. Clicking the area you want to scan will display the area on the Map Image screen. You can also change of the area with just a single click operation. Fluorescence dye change The display of the map image can be switched for each fluorescence dye. The images can also be overlaid with each other. 09


 can")
11 Acquire Map Image Image mapping tool Scanning order setting You can select one of the following two scanning orders. depending on the experimental requirements. Automatic A map image is automatically created from the center in a spiral pattern. Even a first-time user can easily identify the confocal view area. Manual You can select the area that you want to view from the map at random. Selection is possible for a maximum 9 9 areas. Manual selection is more efficient, because the ROI (Region of Interest) can be narrowed down in advance. The maximum area varies in accordance to the specimen holder used. 10


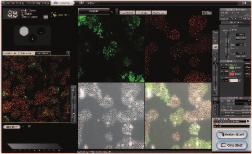
12 quired with the FV10i even histicated confocal imaging. The navigation function leads a first-time user to operate the FV10i perfectly. You can zoom or frame the imaging area with use of sophisticated menus. You can quickly choose the region you want to using the map image and live image screens. Setting the imaging area is performed easily and quickly with the intuitive operating system, utilizing zooming and point shifting. Furthermore, the system is equipped with user friendly navigation functions allowing even a first-time user to capt Observation mode selection Five types of observation modes can be selected including time-lapse, Z-stack, and multi-area. Time-lapse In time-lapse mode, images are continuously acquired at predetermined intervals. Z-stack In Z-stack mode, images are repeatedly acquired in different focus positions. Threedimensional images can be constructed. Z-stack - time-lapse The imaging which integrates Z-stack and timelapse is possible. Multi-area-time-lapse Time-lapse imaging is performed automatically at pre-selected points. Multi-area Z-stack - time-lapse The imaging where all three functions are performed. Multi-area setting Map image Register the areas for imaging in multi-area mode. You can set the appropriate imaging conditions for each area. The image acquired in [Acquire Map Image] is displayed. You can choose a region for closer examination. 11


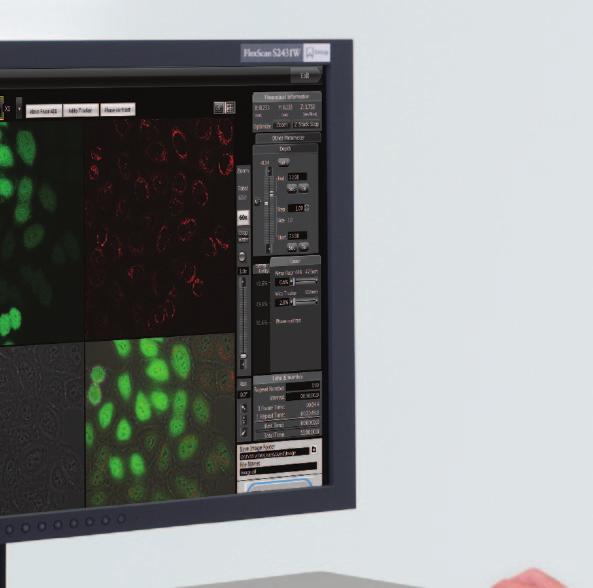
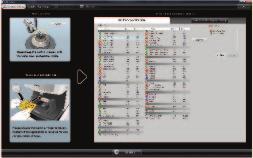
13 Observe Image capturing Control screen Imaging conditions can be set in detail with operation of various controllers. Main settings include: Zoom Focus Laser output Photomultiplier sensitivity Time-lapse condition Navigation function You can efficiently capture images from the first day using the FV10i. The system is equipped with a user friendly navigation function. Clicking the <Start> button in the Navigation function shows the operational procedure and highlights the operational button Just follow the navigational guidance to easily complete your imaging. Live image Displays the selected point on the left lower map image screen and determines the imaging area by using the framing and zooming functions. You can switch between the displays for each type of fluorescence dye. 12
14

15


16
17


.")


18 for exclusive use for w is provided to easily perform various editing / analysis operations. Review Editing / analysis software Olympus original software for editing and analysis is provided as part of the standard specifications. You can edit and analyze images taken by FV10i in various ways. 3D display function The FV10i supports the Alpha Blend method and Maximum Intensity Projection method for 3D display function. Also, the system is equipped with various display functions which allows you to freely change the angle of 3D images and section the image at any spot. Easy image searching Thumbnail list is possible with the main screen. You can easily search for previous image data. 2D analysis tool Background correction Subtracts background. Region Measurement Measures the size and intensity of regions designated as ROI (Region of Interest). Intensity Profile Displays an intensity profile of regions designated with ROI or Line. Histogram Displays histogram of intensity values of region designated as ROI or Line Series Analysis Analyzes variation in intensity along the Z-axis / time- axis in regions designated with ROI or Line. Line Series Analysis Analyzes variation in intensity along the Z-axis / time- axis on a designated Line. File input/output Data manager The data manager displays thumbnails and various file information with clarity. OIF (Olympus Image format) is employed to store various parameter settings and images together. This software supports a wide range of well-used formats with high interchangeability including TIFF, BMP and JPEG. Co-localization Analyzes in the degree of overlap of pixels at or higher than a level of certain intensity between two channels. Ratio Creates an image using the intensity ratio between two channels. 17
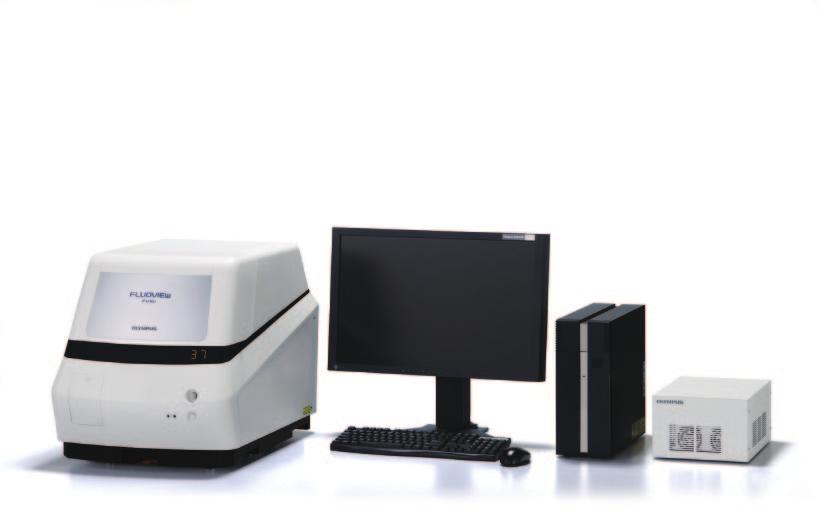
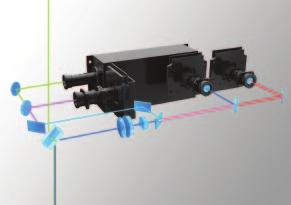
19 Main specifications FV10i-LIV Laser light LD lasers: 405nm(17.1mW),473nm(11.9mW),559nm(15mW),635nm(9.5mW) source Modulation: Continuously Variable by the LD direct modulation (0.1%-100%, 0.1% inclement) Line return period - laser OFF Scanning Scanning method 2 galvanometer scanning mirrors FV10i-DOC Scanning mode Pixel size: Scanning speed: 1.1 s / frame (for pixel size , High Speed scanning mode) Focusing scanning: High frame rate scan by Y- direction interlace scanning ( 1, 2, 4) Dimension: XYT, XYZ, XYZT Rotation scanning: in 0.1 increments Detection Detector module Fluorescence: 2 channels, Phase Contrast: 1 channel Variable barrier filter mechanism for fluorescence channel by diffraction grating and slit Detection method Analog integration detection by Photomultiplier Pinhole Single motorized pinhone Pinhole diameter: ø50-800µm automatic setting (adjustable to 1.0, 1.5, 2.0, and 2.5) Field number 18 Optical zoom 10 objectives: 1 6 in 0.1 increments 60 objectives: 1 10 in 0.1 increments Automatic Exposure Automatic setting of the laser intensity and photomultiplier sensitivity to fluorescence intensity. Focus Z-drive Motorized focus Minimum increment: 0.01µm Objectives Exclusively designed 10 phase contrast objective / NA 0.4 (equivalent to UPLSAPO 10x) Exclusively designed 60 phase contrast water-immersion objective / NA 1.2 (equivalent to UPLSAPO 60 W) / with motorized correction collar Remote switching from software by electric revolver Automatic focus (AF) Automatic detection of interface between specimen and cover glass by laser reflection light detection Automatic detection of cover glass thickness and automatic setting of motorized correction collar Water supply Automatic water supply and air cleaning mechanism for 60 Water-immersion objective Oil supply XY stage XY driving method Motorized XY stage module by stepping motor Minimum increment: 0.3µm Specimen holder Only the dedicated specimen holder can be mounted For three glass bottom dishes with 35mm diameter For a glass slide, For one set of cover glass chamber (8 wells type) For Well slide (8 wells type), Culture pod(for a glass bottom dish with 35mm diameter) Incubator Room environment: Temperature: C,-0.5 C (can be switched off) Humidity: more than 90% CO2 concentration: 5% (recommended), 1 joint fitting (ø2mm) for exterior CO2 adjustor Heating method Non-contact heating by resistive heater mounted on frame section Exclusively designed 10 phase contrast objective / NA 0.4 (equivalent to UPLSAPO 10x) Exclusively designed 60 phase contrast oil-immersion objective / NA 1.35 (equivalent to UPLSAPO 60 O) Remote switching from software by electric revolver Automatic detection of interface between specimen and cover glass by laser reflection light detection Manual As supporting mechanism, automatic moving of XY stage to oil supply position when switching to 60x Only the dedicated specimen holder can be mounted For a glass bottom dish with 35mm diameter For a glass slide, For Well slide (8 wells type) Control device Controller Dedicated controller PC/AT-compatible OS: Windows Vista Business, 32 bit (English version), CPU: Intel Core2Duo 3.0GHz RAM: 2GB 2, HDD: 500GB 2, Special PCI-Express I/F board built-in, Optical drive: DVD-Multi drive built-in LCD monitor 24 inch LCD monitor 1, WUXGA ( ) Main software feature Room environment Image acquisition mode Specimen setting Map image acquisition Multi area time-lapse Image acquisition area Image display Cross talk reduction Acquisition image file type Image file type available for viewing Image editing 3D image construction Image processing Image analysis Temperature Humidity Map image, one shot, time-lapse (XYT), Z-stack (XYZ), Z-stack time-lapse (XYZT), multi area time-lapse (Multi Area XYT), multi area Z-stack time-lapse (Multi Area XYZT) Automatic setting for fluorescence channel and laser according to Dye selected from Dye list Automatic selection of map image of 3 3 9x9 fields according to 10 objective lens (The maximum area varies in accordance to the specimen holder used), and manual selection of map acquisition area Automatic multi area time-lapse by motorized XY stage Setting for each registered point: Image size, scanning speed, cross talk reduction, pinhole diameter, rotation angle, galvano zoom, acquisition channel, laser power, PMT sensitivity, Z condition Maximum resister number: 10 items per one container Maximum interval time: one hour Maximum acquisition number of times: 3000 times per one point Area appointment: All area, clipping square area (minimum area: pixels) Display by channel, overlapping display, image in progress review Line sequential action (2 channel), or frame sequential action (3 channel and 4 channel) OLYMPUS image format (OIF) OLYMPUS image format (OIF, OIB), Multi-TIFF format (8/16 bit grey scale, index color, 24/32/48 bit color), JPEG, BMP, TIFF LUT: pseudo color setting, contrast adjustment, Comment: inputting graphic, text, scale etc., image extraction, combination 3D display: AlphaBrend method, Maximum intensity projection method 3D animation display, free orientation of cross section display Various types of image filter: Median, Enhanced Edge, etc. Calculations: inter-image, arithmetic and logical operation Area and perimeter measurement, time-lapse measurement, colocalization analysis C(fluctuation ±2 C) 30-80% (non condensing) 18
20 Dimensions Dimensions / Weight / Power consumption Description Model Dimensions (mm) Weight [kg] Power consumption Notes FV10i-LIV main unit FV10C-W3 470(W) 680(D) 505(H) Approx. 73 (Powered via FV10C-PSU) Minimum installation clearance: top 200 mm, back 120 mm FV10i-DOC main unit FV10C-O3 470(W) 680(D) 495(H) Approx. 60 (Powered via FV10C-PSU) Minimum installation clearance: top 200 mm, back 120 mm Power supply unit FV10C-PSU 230(W) 330(D) 150(H) Approx. 7.5 AC / V 50/60Hz 5.0A/2.5A Minimum installation clearance: back 150 mm Controller FV10C-CU 136(W) 380(D) 329(H) Approx. 8.5 AC / V 50/60Hz 4.3A/1.8A Minimum installation clearance: back 150 mm Display FV10i-DISP 566(W) 209(D) (H) Approx AC / V 50/60Hz 1.1A/0.55A M1720E-1210TP
Quality Performance, Innovative Design
 Dimensions Confocal Laser Scanning Biological Microscope Table size (mm): 1400(W) 800(D) * Table is not available from Olympus. Avoid placing the controller directly on the floor. Dimensions / Weight /
LSM 780 Confocal Microscope Standard Operation Protocol
 LSM 780 Confocal Microscope Standard Operation Protocol Basic Operation Turning on the system 1. Sign on log sheet according to Actual start time 2. Check Compressed Air supply for the air table 3. Switch
Supplemental Figure 1: Histogram of 63x Objective Lens z axis Calculated Resolutions. Results from the MetroloJ z axis fits for 5 beads from each
 Supplemental Figure 1: Histogram of 63x Objective Lens z axis Calculated Resolutions. Results from the MetroloJ z axis fits for 5 beads from each lens with a 1 Airy unit pinhole setting. Many water lenses
Leica TCS SP8 Quick Start Guide
 Leica TCS SP8 Quick Start Guide Leica TCS SP8 System Overview Start-Up Procedure 1. Turn on the CTR Control Box, EL6000 fluorescent light source for the microscope stand. 2. Turn on the Scanner Power
1 Set up the confocal light path for imaging a green dye (Alexa488-EGFP). For example, the
. For example, the") 1 Set up the confocal light path for imaging a green dye (Alexa488-EGFP). For example, the light path as shown here using the 488 nm LASER (Laser Unit 1) reflecting off of the 405/488 nm Dichroic mirror
1 Set up the confocal light path for imaging a green dye (Alexa488-EGFP). For example, the light path as shown here using the 488 nm LASER (Laser Unit 1) reflecting off of the 405/488 nm Dichroic mirror
Laser Confocal Fluorescent Microscope
 Laser Confocal Fluorescent Microscope Olympus Fluoview FV10i-LIV Laser Light Source: Ultraviolet/Visible light LD lasers - 405nm (18mW), 473nm (12.5mW), 635nm (10mW), 559nm Scanning: 2 galvanometer scanning
LSM 710 Confocal Microscope Standard Operation Protocol
 LSM 710 Confocal Microscope Standard Operation Protocol Basic Operation Turning on the system 1. Switch on Main power switch 2. Switch on System / PC power button 3. Switch on Components power button 4.
Leica SP8 TCS Users Manual
 Version : 07/08/0 Leica SP8 TCS Users Manual Start up:. Turn the PC Microscope, Scanner Power, Laser Power, and the Laser Emission key to on (bottom right of desk).. Turn on the fluorescent lamp (top left
Confocal imaging on the Leica TCS SP8. 1) Turn the system on. 2) Use TCS user account. 3) Start LAS X software:
 Turn the system on. 2) Use TCS user account. 3) Start LAS X software:") Confocal imaging on the Leica TCS SP8 1) Turn the system on. 2) Use TCS user account. 3) Start LAS X software: 4) Do not touch the microscope while the software is initializing. Choose your options: Turn
Confocal imaging on the Leica TCS SP8 1) Turn the system on. 2) Use TCS user account. 3) Start LAS X software: 4) Do not touch the microscope while the software is initializing. Choose your options: Turn
Things to check before start-up.
 Byeong Cha Page 1 11/24/2009 Manual for Leica SP2 Confocal Microscope Enter you name, the date, the time, and the account number in the user log book. Things to check before start-up. Make sure that your
LSM 800 Confocal Microscope Standard Operation Protocol
 LSM 800 Confocal Microscope Standard Operation Protocol Turning on the system 1. Switch on the Main switch (labeled 1 and 2 ) mounted on the wall. 2. Turn the Laser Key (labeled 3 ) 90 clockwise for power
TRAINING MANUAL. Olympus FV1000
 TRAINING MANUAL Olympus FV1000 September 2014 TABLE OF CONTENTS A. Start-Up Procedure... 1 B. Visual Observation under the Microscope... 1 C. Image Acquisition... 4 A brief Overview of the Settings...
Training Guide for Leica SP8 Confocal/Multiphoton Microscope
 Training Guide for Leica SP8 Confocal/Multiphoton Microscope LAS AF v3.3 Optical Imaging & Vital Microscopy Core Baylor College of Medicine (2017) Power ON Routine 1 2 Turn ON power switch for epifluorescence
Leica TCS SP8 Quick Start Guide
 Leica TCS SP8 Quick Start Guide Leica TCS SP8 System Overview Start-Up Procedure 1. Turn on the CTR Control Box, Fluorescent Light for the microscope stand. 2. Turn on the Scanner Power (1) on the front
Guide to Confocal 5. Starting session
 Guide to Confocal 5 Remember that when booking and before starting session you can check for any problems at https://www.bris.ac.uk/biochemistry/uobonly/cif/index.html Starting session Switch on microscope
Quick Operation Guide
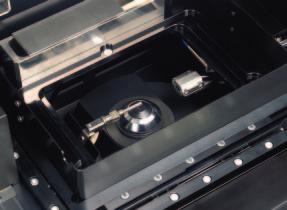
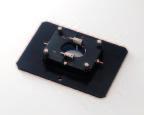
 Quick Operation Guide Power ON Mounting specimens Set the specimen on the sample holder, and install the sample holder to the holder frame. Attach the holder frame to the XY stage. Type of holder Main
Leica SP8 TCS Users Manual
 Leica SP8 TCS Users Manual Follow the procedure for start up and log on as posted in the lab. Please log on with your account only and do not share your password with anyone. We track and confirm usage
Zeiss 880 Training Notes Zen 2.3
 Zeiss 880 Training Notes Zen 2.3 1 Turn on the HXP 120V Lamp 2 Turn on Main Power Switch Turn on the Systems PC Switch Turn on the Components Switch. 3 4 5 Turn on the PC and log into your account. Start
Nikon A1Rsi Confocal Start-Up Sequence
 1. Turn the key on the Nikon LUN-V Laser Launch. Nikon A1Rsi Confocal Start-Up Sequence 2. Press the button the left side of the A1Rsi Controller unit. 3. Turn on the power strip underneath the microscope.
Operating Instructions for Zeiss LSM 510
 Operating Instructions for Zeiss LSM 510 Location: GNL 6.312q (BSL3) Questions? Contact: Maxim Ivannikov, maivanni@utmb.edu 1 Attend A Complementary Training Before Using The Microscope All future users
Leica SP8 Resonant Confocal. Quick-Start Guide
 Leica SP8 Resonant Confocal Quick-Start Guide Contents Start-up Preparing for Imaging Part 1 On the scope Part 2 Software interface Part 3 Heat & CO2 incubation Part 4 Other hardware options Shut-down
Supplemental Method Information Zeiss LSM710
 Supplemental Method Information Zeiss LSM710 1 Under the Light Path window set up the confocal for imaging a green dye (Alexa488-EGFP). For example, set up the light path as shown here using the 488 nm
Operation Guide for the Leica SP2 Confocal Microscope Bio-Imaging Facility Hunter College October 2009
 Operation Guide for the Leica SP2 Confocal Microscope Bio-Imaging Facility Hunter College October 2009 Introduction of Fluoresence Confocal Microscopy The first confocal microscope was invented by Princeton
ZEISS LSM 710 CONFOCAL MICROSCOPE USER MANUAL
 ZEISS LSM 710 CONFOCAL MICROSCOPE USER MANUAL START THE SYSTEM... 2 START ZEN SOFTWARE... 3 SET THE TEMPERATURE AND THE CO2 CONTROLLERS... OBSERVATION AT OCULARS... 5 STATIF PRESENTATION... 6 ACQUIRE ONE
Nikon SIM-E & A1-R System
 Nikon SIM-E & A1-R System USER GUIDE LSU Health Sciences Center Shreveport Research Core Facility June 01 2017 Chaowei Shang 1 Table of Content 1. Start Up the System... Page 3 Hardware and microscope
ZEISS LSM510META confocal manual
 ZEISS LSM510META confocal manual Switching on the system 1) Switch on the Remote Control button located on the table to the right of the microscope. This is the main switch for the whole system including
Huvitz Digital Microscope HDS-5800
 Huvitz Digital Microscope HDS-5800 Dimensions unit : mm Huvitz Digital Microscope HDS-5800 HDS-MC HDS-SS50 The world s first, convert the magnification from 50x to 5,800x with a zoom lens HDS-TS50 Huvitz
Title: Leica SP5 Confocal User Manual
 Title: Leica SP5 Confocal User Manual Date of first issue: 23/10/2015 Date of review: Version: Admin For assistance or to report an issue Office: CG07 or 05 Email: Igmm-imaginghelpdesk@igmm.ed.ac.uk Website:
fsx.olympus-global.com
 Bio Imaging Navigator fsx.olympus-global.com Visit our Web site for on-line demonstration of FSX100. FSX100 is the environmental conscious product according to OLYMPUS's own standards. Main features of
Microscopy from Carl Zeiss
 Microscopy from Carl Zeiss Contents Page Contents... 1 Introduction... 1 Starting the System... 2 Introduction to ZEN Efficient Navigation... 5 Setting up the microscope... 10 Configuring the beam path
3 Choose the Channels button and set the Channel Settings. Set the Pinhole to 1 Airy unit.
 1 Set up the confocal light path for imaging a green dye (e.g. Alexa488-EGFP). For example, under the Configuration Control window the light path could be set up as shown here using the 488 nm LASER (found
Practical work no. 3: Confocal Live Cell Microscopy
 Practical work no. 3: Confocal Live Cell Microscopy Course Instructor: Mikko Liljeström (MIU) 1 Background Confocal microscopy: The main idea behind confocality is that it suppresses the signal outside
Training Guide for Carl Zeiss LSM 510 META Confocal Microscope
 Training Guide for Carl Zeiss LSM 510 META Confocal Microscope AIM 4.2 Optical Imaging & Vital Microscopy Core Baylor College of Medicine (2017) Power ON Routine 1 2 Turn ON Components and System/PC switches
b. Turn the power switch and key to on position for blue laser.
 OLYMPUS FLUOVIEW 300 CONFOCAL MICOSCOPE OPERATION PROCEDURE 1. Turn ON microscope in this order: 1) Turn on mercury lamp (Note: once the mercury lamp is turned off, DO NOT turn it back on for at least
Camera Overview. Digital Microscope Cameras for Material Science: Clear Images, Precise Analysis. Digital Cameras for Microscopy
 Digital Cameras for Microscopy Camera Overview For Materials Science Microscopes Digital Microscope Cameras for Material Science: Clear Images, Precise Analysis Passionate about Imaging: Olympus Digital
MIF ZEISS LSM510 CONFOCAL USER PROTOCOL
 MIF ZEISS LSM510 CONFOCAL USER PROTOCOL START-UP Turn on the Mercury Bulb Power Supply (if needed). Power-on the Control Box. Turn on the computer. Open the LSM 510 software. Choose Scan New Images and
Bi/BE 227 Winter Assignment #3. Adding the third dimension: 3D Confocal Imaging
 Bi/BE 227 Winter 2016 Assignment #3 Adding the third dimension: 3D Confocal Imaging Schedule: Jan 20: Assignment Jan 20-Feb 8: Work on assignment Feb 10: Student PowerPoint presentations. Goals for this
Camera Overview. Digital Microscope Cameras for Material Science: Clear Images, Precise Analysis. Digital Cameras for Microscopy
 Digital Cameras for Microscopy Camera Overview For Materials Science Microscopes Digital Microscope Cameras for Material Science: Clear Images, Precise Analysis Passionate about Imaging: Olympus Digital
Zeiss 780 Training Notes
 Zeiss 780 Training Notes Turn on Main Switch, System PC and Components Switches 780 Start up sequence Do you need the argon laser (458, 488, 514 nm lines)? Yes Turn on the laser s main power switch and
Zeiss LSM 510 Confocor III Training Notes. Center for Cell Analysis & Modeling
 Zeiss LSM 510 Confocor III Training Notes Center for Cell Analysis & Modeling Confocor 3 Start Up Go to System Module Turn on Main Switch, System/ PC, and Components Switches Do you need the arc lamp?
Usermanual for Leica SP8 confocal
 Usermanual for Leica SP8 confocal Contact information: hege.dale@uib.no & endy.spriet@uib.no 1 Table of content Important information 3 Start up procedure 4 Shut down procedure 5 Operating the DMI 8 microscope
Quick Guide for Zeiss 710 Laser Scanning Confocal MGH Cancer Center
 Quick Guide for Zeiss 710 Laser Scanning Confocal MGH Cancer Center For any questions or concerns, please contact: Linda Nieman lnieman@mgh.harvard.edu Office: (617) 643-9684 Cell: (512) 565-8076 Chenyue
Olympus Fluoview 1000S Spectral Confocal Microscope Introduction to the NRI-MCDB Microscopy Facility Spectral Confocal Microscope
 Olympus Fluoview 1000S Spectral Confocal Microscope Introduction to the NRI-MCDB Microscopy Facility Spectral Confocal Microscope Improved Optics More Lasers 405 diode 440 diode 488 Argon 515 Argon 559
Operating Checklist for using the Laser Scanning Confocal Microscope. Leica TCS SP5.
 Smith College August 2010 Operating Checklist for using the Laser Scanning Confocal Microscope Leica TCS SP5. CONTENT, page no. Startup, 1 Initial set-up, 1 Software, 2 Microscope Specimen observation
User Guide to the IBIF Leica TCS SP8 MP Confocal Microscope
 User Guide to the IBIF Leica TCS SP8 MP Confocal Microscope This version: 7.24.14. Introduction The IBIF confocal microscope is made available on a fee-for-use-hour basis to all users who have been trained.
Training Guide for Carl Zeiss LSM 5 LIVE Confocal Microscope
 Training Guide for Carl Zeiss LSM 5 LIVE Confocal Microscope AIM 4.2 Optical Imaging & Vital Microscopy Core Baylor College of Medicine (2017) Power ON Routine 1 2 Verify that main power switches on the
LEICA TCS SP5 AOBS TANDEM USER MANUAL
 LEICA TCS SP5 AOBS TANDEM USER MANUAL STARTING THE SYSTEM...2 THE LAS AF SOFTWARE...3 THE «ACQUIRE» MENU...5 CHOOSE AND CREATE A SETTING...6 THE CONTROL PANEL...8 THE DMI6000B MICROSCOPE...10 ACQUIRE ONE
Zeiss LSM880 Operating Instructions. UTMB Optical Microscopy Core Jan. 16, 2018
 Zeiss LSM880 Operating Instructions UTMB Optical Microscopy Core Jan. 16, 2018 1 1. Power up the microscope Sing the LOGBOOK Steps below will provide power to the computer and all of the microscope components.
Nikon. King s College London. Imaging Centre. N-SIM guide NIKON IMAGING KING S COLLEGE LONDON
 N-SIM guide NIKON IMAGING CENTRE @ KING S COLLEGE LONDON Starting-up / Shut-down The NSIM hardware is calibrated after system warm-up occurs. It is recommended that you turn-on the system for at least
Topics. - How to calibrate the LSM scanner. - How to clean the microscope. - How to adjust the pinhole alignment. - How to adjust the Collimator
 Topics - How to calibrate the LSM scanner - How to measure the PSF - How to clean the microscope - How to adjust the pinhole alignment - How to adjust the Collimator How to calibrate the LSM scanner The
Quick Start Guide. Leica SP5 X
 Quick Start Guide Leica SP5 X Please note: Some of the information in this guide was taken from Leica Microsystems Leica TCS SP5 LAS AF Guide for New Users. This work is licensed under the Creative Commons
Quick Guide. LSM 5 MP, LSM 510 and LSM 510 META. Laser Scanning Microscopes. We make it visible. M i c r o s c o p y f r o m C a r l Z e i s s
 LSM 5 MP, LSM 510 and LSM 510 META M i c r o s c o p y f r o m C a r l Z e i s s Quick Guide Laser Scanning Microscopes LSM Software ZEN 2007 August 2007 We make it visible. Contents Page Contents... 1
Title: Nikon A1R Confocal User Manual
 Title: Nikon A1R Confocal User Manual Date of first issue: 23/10/2015 Date of review: Version: Admin For assistance or to report an issue Office: CG.07 or CG.05 Email: Igmm-imaginghelpdesk@igmm.ed.ac.uk
Nikon AZ100. Laser Scanning Macro Confocal Microscope. Jordan Briscoe Adam Fries Kyle Marchuk Kaitlin Corbin. May 2017.
 Nikon AZ100 Laser Scanning Macro Confocal Microscope Jordan Briscoe Adam Fries Kyle Marchuk Kaitlin Corbin May 2017 Contents 1 Introduction 2 2 Hardware - Startup 2 3 Software/Operation 4 3.1 Multidimensional
Quick Start FLUOVIEW FV1000
 Quick Start FLUOVIEW FV1000 CONFOCAL LASER SCANNING BIOLOGICAL MICROSCOPE FV10-ASW Ver1.3 Petition Thank you for your purchase of Olympus microscope at this time. Prior to using this microscope, read this
Zeiss LSM 880 Protocol
 Zeiss LSM 880 Protocol 1) System Startup Please note put sign-up policy. You must inform the facility at least 24 hours beforehand if you can t come; otherwise, you will receive a charge for unused time.
LSM 510 Meta Training Notes
 LSM 510 Meta Training Notes Turning on the system Turn on X-Cite power supply. This supplies light for epifluorescence for viewing your samples through the microscope. Turn on the remote control switch.
Quick Guide for Zeiss 710 Laser Scanning Confocal MGH Cancer Center
 Quick Guide for Zeiss 710 Laser Scanning Confocal MGH Cancer Center For any questions or concerns, please contact: Linda Nieman lnieman@mgh.harvard.edu Office: (617) 643-9684 Cell: (512) 565-8076 Chenyue
Imaging Beyond the Basics: Optimizing Settings on the Leica SP8 Confocal
 Imaging Beyond the Basics: Optimizing Settings on the Leica SP8 Confocal Todays Goal: Introduce some additional functionalities of the Leica SP8 confocal HyD vs. PMT detectors Dye Assistant Scanning By
Zeiss LSM 780 Protocol
 Zeiss LSM 780 Protocol 1) System Startup F Please note the sign-up policy. You must inform the facility at least 24 hours beforehand if you can t come; otherwise, you will receive a charge for unused time.
LSM 510 Training Notes
 LSM 510 Training Notes Turning on the system Turn on the arc lamp, found on the bench top left of the microscope. This supplies light for epifluorescence for viewing your samples through the microscope.
Swept-Field User Guide
 Swept-Field User Guide Note: for more details see the Prairie user manual at http://www.prairietechnologies.com/resources/software/prairieview.html Please report any problems to Julie Last (jalast@wisc.edu)
OPERATING INSTRUCTIONS
 Zeiss LSM 510 M eta Confocal M icroscope OPERATING INSTRUCTIONS Starting the System: 1. Turn the black knob on the laser box one-quarter turn from Off to On. You will hear the laser cooling mechanisms
Information & Instructions
 KEY FEATURES 1. USB 3.0 For the Fastest Transfer Rates Up to 10X faster than regular USB 2.0 connections (also USB 2.0 compatible) 2. High Resolution 4.2 MegaPixels resolution gives accurate profile measurements
DIGITAL-MICROSCOPY CAMERA SOLUTIONS USB 3.0
 DIGITAL-MICROSCOPY CAMERA SOLUTIONS USB 3.0 PixeLINK for Microscopy Applications PixeLINK will work with you to choose and integrate the optimal USB 3.0 camera for your microscopy project. Ideal for use
START-UP PROCEDURE 1 THE MICROSCOPE STAND 3 OBJECTIVES 5 STARTING WITH LAS (SOFTWARE) AND SETTING UP THE MICROSCOPE STAND 7
 AND SETTING UP THE MICROSCOPE STAND 7") Leica DMI AF6000LX Table of contents START-UP PROCEDURE 1 THE MICROSCOPE STAND 3 OBJECTIVES 5 STARTING WITH LAS (SOFTWARE) AND SETTING UP THE MICROSCOPE STAND 7 ACQUIRE MODULE 6 SETTING THE LIGHTPATH 6
Leica DMI AF6000LX Table of contents START-UP PROCEDURE 1 THE MICROSCOPE STAND 3 OBJECTIVES 5 STARTING WITH LAS (SOFTWARE) AND SETTING UP THE MICROSCOPE STAND 7 ACQUIRE MODULE 6 SETTING THE LIGHTPATH 6
1 Co Localization and Working flow with the lsm700
 1 Co Localization and Working flow with the lsm700 Samples -1 slide = mousse intestine, Dapi / Ki 67 with Cy3/ BrDU with alexa 488. -1 slide = mousse intestine, Dapi / Ki 67 with Cy3/ no BrDU (but with
QAQC LAB 589 Rappahannnock Drive White Stone Va TEL (866)
") OCCHIO Pharma CLICK FOR PRODUCT DEMO 400 OCCHIO Pharma O. O. O. O. OCCHIO Pharma 4 G 00 NANO OCCHIO 500 Occhio 500nano TECHNICAL DATASHEET Reference code: OCC023 Occhio500nano Technical specifications
OCCHIO Pharma CLICK FOR PRODUCT DEMO 400 OCCHIO Pharma O. O. O. O. OCCHIO Pharma 4 G 00 NANO OCCHIO 500 Occhio 500nano TECHNICAL DATASHEET Reference code: OCC023 Occhio500nano Technical specifications
Morphologi. Advanced image analysis for high sensitivity particle characterization. Particle size. Particle shape
 Particle size Particle shape Morphologi detailed specification sheets from www.malvern.co.uk Introducing a new concept in image analysis The Morphologi high sensitivity particle analyzer is more than just
Cell Biology and Bioimaging Core
 Cell Biology and Bioimaging Core Leica TCS SP5 Operating Instructions Starting up the instrument 1. First, log in the log book located on the confocal desk. Include your name, your lab s PI, an account
Training Guide for Carl Zeiss LSM 7 MP Multiphoton Microscope
 Training Guide for Carl Zeiss LSM 7 MP Multiphoton Microscope ZEN 2009 Optical Imaging & Vital Microscopy Core Baylor College of Medicine (2017) Power ON Routine 1 2 Turn Chameleon TiS laser key from Standby
ZEISS LSM 710 NLO Multiphoton microscope Manual/Quick guide
 ZEISS LSM 710 NLO Multiphoton microscope Manual/Quick guide Matyas Molnar, Biovis 2016 Starting the microscpe 1. Check the microscope if everything looks clean and normal. If not, report it in the logbook.
User manual for Olympus SD-OSR spinning disk confocal microscope
 User manual for Olympus SD-OSR spinning disk confocal microscope Ved Prakash, PhD. Research imaging specialist Imaging & histology core University of Texas, Dallas ved.prakash@utdallas.edu Once you open
Nikon Eclipse Ti A1-A Confocal Operating Manual. Start-up. Microscope
 Nikon Eclipse Ti A1-A Confocal Operating Manual Start-up 1. Turn on Excite Fluorescent light power supply- metal halide. a. Cool down as for mercury bulb b. Wheel closed liquid light guide 2. Turn on power
Opterra. Multipoint Scanning Confocal Microscope. Innovation with Integrity. Cell-Friendly, High-Speed, High-Resolution Imaging
 Opterra Multipoint Scanning Confocal Microscope Cell-Friendly, High-Speed, High-Resolution Imaging Innovation with Integrity Fluorescence Microscopy Opterra Multipoint Scanning Confocal Microscope Superior
Achieving 100,000 : 1 contrast measurement
 NEW Spectroradiometer Highly precise spectral radiance/chromaticity measurement possible from 0.003 cd/m 2 Achieving 100,000 : 1 contrast measurement World's top level capability to detect extremely low
Renishaw InVia Raman microscope
 Laser Spectroscopy Labs Renishaw InVia Raman microscope Operation instructions 1. Turn On the power switch, system power switch is located towards the back of the system on the right hand side. Wait ~10
Diskovery Spinning Disk Guide
 Diskovery Spinning Disk Guide qbi.microscopy@uq.edu.au Getting started The microscope and its peripherals (Fig. 1a) should always be turned on, but if they are not, turn them on in the following way: 1.
11Beamage-3. CMOS Beam Profiling Cameras
 11Beamage-3 CMOS Beam Profiling Cameras Key Features USB 3.0 FOR THE FASTEST TRANSFER RATES Up to 10X faster than regular USB 2.0 connections (also USB 2.0 compatible) HIGH RESOLUTION 2.2 MPixels resolution
Horiba Jobin-Yvon LabRam Raman Confocal Microscope (GERB 120)
") Horiba Jobin-Yvon LabRam Raman Confocal Microscope (GERB 120) Please contact Dr. Amanda Henkes for training requests and assistance: 979-862-5959, amandahenkes@tamu.edu Hardware LN 2 FTIR FTIR camera 1
Horiba Jobin-Yvon LabRam Raman Confocal Microscope (GERB 120) Please contact Dr. Amanda Henkes for training requests and assistance: 979-862-5959, amandahenkes@tamu.edu Hardware LN 2 FTIR FTIR camera 1
Systematic Workflow via Intuitive GUI. Easy operation accomplishes your goals faster than ever.
 Systematic Workflow via Intuitive GUI Easy operation accomplishes your goals faster than ever. 16 With the LEXT OLS4100, observation or measurement begins immediately once the sample is placed on the stage.
See what you need to see, and see it anywhere.
 See what you need to see, and see it anywhere. Fujifilm Computed Radiography (FCR) that makes the best use of Fujifilm s unique image processing technology has become even more convenient. In addition
Contents. Introduction
 Contents Page Contents... 1 Introduction... 1 Starting the System... 2 Introduction to ZEN Efficient Navigation... 5 Setting up the microscope... 10 Configuring the beam path and lasers... 12 Scanning
Basics of confocal imaging (part I)
") Basics of confocal imaging (part I) Swiss Institute of Technology (EPFL) Faculty of Life Sciences Head of BIOIMAGING AND OPTICS BIOP arne.seitz@epfl.ch Lateral resolution BioImaging &Optics Platform Light
Basics of confocal imaging (part I) Swiss Institute of Technology (EPFL) Faculty of Life Sciences Head of BIOIMAGING AND OPTICS BIOP arne.seitz@epfl.ch Lateral resolution BioImaging &Optics Platform Light
CS-2000/2000A. Spectroradiometer NEW
 Spectroradiometer NEW CS-000/000A The world's top-level capability spectroradiometers make further advances with addition of second model to lineup. World's top level capability to detect extremely low
NIS-Elements C (For CONFOCAL MICROSCOPE A1) Instructions (Ver. 4.40)
 Instructions (Ver. 4.40)") M487E 15.4.NF.17 (1/4) *M487EN17* NIS-Elements C (For CONFOCAL MICROSCOPE A1) Instructions (Ver. 4.40) Preface Thank you for purchasing the Nikon products. This instruction manual has been prepared for
M487E 15.4.NF.17 (1/4) *M487EN17* NIS-Elements C (For CONFOCAL MICROSCOPE A1) Instructions (Ver. 4.40) Preface Thank you for purchasing the Nikon products. This instruction manual has been prepared for
CMI STANDARD OPERATING PROCEDURE. Fluoview 300 laser scanning confocal microscope
 CMI STANDARD OPERATING PROCEDURE Fluoview 300 laser scanning confocal microscope CMI documentid:sop001 CONTACT INFORMATION: Peter Owens: 091 494036 (office) Peter.owens@nuigalway.ie Kerry Thompson: 091
Nikon Eclipse Ti2-E Widefield/Spinning Disk Confocal Microscope Standard Operation Protocol
 Nikon Eclipse Ti-E Widefield/Spinning Disk Confocal Microscope Standard Operation Protocol Please sign on the log sheet before switching on system. Turn on system Turn on A only if confocal mode or laser
Spectroradiometer CS-2000/2000A. The world's top-level capability spectroradiometers make further advances with addition of second model to lineup.
 Spectroradiometer /000A The world's top-level capability spectroradiometers make further advances with addition of second model to lineup. World's top level capability to detect extremely low luminance
Training Guide for Carl Zeiss LSM 880 with AiryScan FAST
 Training Guide for Carl Zeiss LSM 880 with AiryScan FAST ZEN 2.3 Optical Imaging & Vital Microscopy Core Baylor College of Medicine (2018) Power ON Routine 1 2 Turn ON Main Switch from the remote control
4 Use the adjustable Focus meter tool to take the subjectivity out of focusing the image, to get the best possible image
 Standard Edition VISIONx INC. www.visionxinc.com Real-Time Full Color Image Acquisition 4 Full support for NTSC and PAL cameras with Composite, Y/C (i.e. S-Video) and RGB video signal formats 4 Image display
Confocal NEXIV VMZ-K Series. CNC Video Measuring System CONFOCAL NEXIV. VMZ-K Series
 Confocal NEXIV VMZ-K Series CNC Video Measuring System CONFOCAL NEXIV VMZ-K Series 3D FOV Measurements Generated with Confocal Images The Confocal NEXIV VMZ-K series, a ground-breaking multifunctional
Ideal for display mura (nonuniformity) evaluation and inspection on smartphones and tablet PCs.
 evaluation and inspection on smartphones and tablet PCs.") 2D Color Analyzer 8 Ideal for display mura (nonuniformity) evaluation and inspection on smartphones and tablet PCs. Accurately and easily measures the distribution of luminance and chromaticity. Advanced
2D Color Analyzer 8 Ideal for display mura (nonuniformity) evaluation and inspection on smartphones and tablet PCs. Accurately and easily measures the distribution of luminance and chromaticity. Advanced
Turnkey Solution for Technical Cleanliness Inspection
 Technical Cleanliness Inspection System CIX90 OLYMPUS CIX series Turnkey Solution for Technical Cleanliness Inspection Simplify Your Technical Cleanliness Standard process for cleanliness inspection: preparation
SMX-1000 Plus SMX-1000L Plus
 Microfocus X-Ray Inspection Systems SMX-1000 Plus SMX-1000L Plus C251-E023A Taking Innovation to New Heights with Shimadzu X-Ray Inspection Systems Microfocus X-Ray Inspection Systems SMX-1000 Plus SMX-1000L
Contents STARTUP MICROSCOPE CONTROLS CAMERA CONTROLS SOFTWARE CONTROLS EXPOSURE AND CONTRAST MONOCHROME IMAGE HANDLING
 Operations Guide Contents STARTUP MICROSCOPE CONTROLS CAMERA CONTROLS SOFTWARE CONTROLS EXPOSURE AND CONTRAST MONOCHROME IMAGE HANDLING Nikon Eclipse 90i Operations Guide STARTUP Startup Powering Up Fluorescence
Ideal for display mura (nonuniformity) evaluation and inspection on smartphones and tablet PCs.
 evaluation and inspection on smartphones and tablet PCs.") 2D Color Analyzer Ideal for display mura (nonuniformity) evaluation and inspection on smartphones and tablet PCs. Accurately and easily measures the distribution of luminance and chromaticity. The included
2D Color Analyzer Ideal for display mura (nonuniformity) evaluation and inspection on smartphones and tablet PCs. Accurately and easily measures the distribution of luminance and chromaticity. The included
Boulevard du Temple Daguerrotype (Paris,1838) a busy street? Nyquist sampling for movement
 a busy street? Nyquist sampling for movement") Boulevard du Temple Daguerrotype (Paris,1838) a busy street? Nyquist sampling for movement CONFOCAL MICROSCOPY BioVis Uppsala, 2017 Jeremy Adler Matyas Molnar Dirk Pacholsky Widefield & Confocal Microscopy
Boulevard du Temple Daguerrotype (Paris,1838) a busy street? Nyquist sampling for movement CONFOCAL MICROSCOPY BioVis Uppsala, 2017 Jeremy Adler Matyas Molnar Dirk Pacholsky Widefield & Confocal Microscopy
Confocal NEXIV VMZ-K Series. CNC Video Measuring System CONFOCAL NEXIV. VMZ-K Series
 Confocal NEXIV VMZ-K Series CNC Video Measuring System CONFOCAL NEXIV VMZ-K Series The VMZ-K series enables microscopic height measurements using various objective lenses, with two models to choose from,