Leica TCS SP8 Quick Start Guide
|
|
|
- Norman McCoy
- 6 years ago
- Views:
Transcription

1 Leica TCS SP8 Quick Start Guide


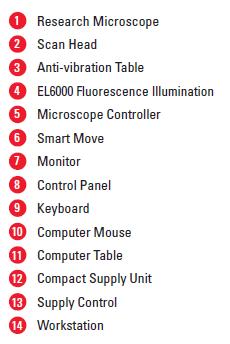
2 Leica TCS SP8 System Overview
3
 4. Enable the lasers by turning the key from the Off position to the On position (3). 5. Turn on Workstation and Monitor 6. Log into user profile 7.")
 11. A message will appear asking whether you want to initialize the stage.")
4 Start-Up Procedure 1. Turn on the CTR Control Box, EL6000 fluorescent light source for the microscope stand. 2. Turn on the Scanner Power (1) on the front of the Compact Supply Unit (CSU) 3. Turn on the Laser Power (2) 4. Enable the lasers by turning the key from the Off position to the On position (3). 5. Turn on Workstation and Monitor 6. Log into user profile 7. Double click on the LAS X icon to start the software. 8. Select Machine for the Configuration and DMi8 for the Microscope. (the simulator is used to view and analyze images and not acquistition) 10. Click OK to start the initialization of the LAS AF (Leica Application Suite for Advanced Fluorescence) 11. A message will appear asking whether you want to initialize the stage. Initializing the stage is required to activate the Tiling and Mark & Find features in the software. If you select yes, the stage is going to move to all 4 corners to calibrate the position of the stage. Make sure there is nothing on the stage that will hit the condenser before you select yes!

5 Shut-Down Procedure 1. Turn off the lasers in the software 2. Lower the objective to the lowest position, remove specimen and clean all of the objectives 3. Save all unsaved data and exit LAS X. NOTE: Do not turn off scanner and/or CTR control box for the microscope before the software is closed 4. Turn off the switches on the front of the laser supply unit in the reverse order (#3-#1) of start-up (ie. turn key off, then turn off Laser Power and then turn off Scanner Power) 5. Turn off microscope control box


6 The LAS X software will open in the Acquire tab. There are 3 portions to this window: Scan Parameters Light Path Image

 with the appropriate laser line(s)")
7 Turning on the Lasers: 1. Click on the + in the Laser Lines Box in the Beam Path Settings Window to directly open the main Laser Control Window 2. Activate the lasers you require NOTE: Only turn on the laser(s) with the appropriate laser line(s) that will excite the fluorophores you are using 3. Alternatively, click on the Configuration tab and the Laser icon to open the main Laser Control Window


8 Additional Tools in the Configuration Tab 1. Customize the USB Control Panel - assign various parameter and sensitivities to the various knobs of the control panel Save and Load the customized settings Alternatively, click on the Control Panel Icon in the Beam Path Settings Window as a short cut to the USB Control Panel Window 2. Specifications of the Objectives equipped on the microscope


 Another great resource is")
9 Additional Tools in the Configuration Tab Continued 3. Dye Database with the excitation and emission spectra of common fluorochromes Emission spectrum from a lambda scan can be added to the dye database. Many manufacturer s will also provide the data for fluorophores that can added to the database (see LAS AF Help) Another great resource is the Leica FluoScout interactive tool
 by moving the slider up or by directly entering the level (start low as a suggestion). 3. Select the appropriate objective 4.")
 from the dye data base to use as a guide 7.")
10 Beam Path Setting Option #1: Manual setting of the beam path configuration 1. Click On to activate the lasers 2. Adjust the laser intensity of the appropriate laser line(s) by moving the slider up or by directly entering the level (start low as a suggestion). 3. Select the appropriate objective 4. Use Autoselect to select the beam splitter (inactivate and manually select if BSC is red) 5. Click On to activate the appropriate detector(s) 6. Select the appropriate emission spectrum (if available) from the dye data base to use as a guide 7. Select the Pseudocolour Keep in mind that the emission spectra displayed are to be used as a guide and are not defining the wavelengths collected. The specific wavelengths collected are determined by the position of the gates. 8. Define the of emission to be collected with the sliders Alternatively, double click on the slider to open a window that allows you to directly enter the start and end position of the gates.


11 Beam Path Setting Option #2: Dye Assistant to set beam path configuration The Dye Assistant offers suggestion on system configuration based on the spectral characteristics of the fluorescent dyes being used. The user can select the appropriate option for his or her application 1. Activate the Dye Assistant. Select the dye from the database Select the type of detector (if applicable) Use the + or - to add or delete a dye The different configuration options for acquisition are suggested here and the overlap is shown graphically: Yield: Intensity yield of the individual dyes Crosstalk: Intensity of the crosstalk in other channels Edit and Apply the settings. (see next page)
 for the respective fluorescent dyes\ All other settings for image acquisition are made")
12 The following settings are mode for image acquisition when clicking Apply: Selection of the laser lines Selection of the detectors Setting for the detection range Assignment of the fluorescent dyes to the respective detectors Assignment of the appropriate colour look-up table (LUT) for the respective fluorescent dyes\ All other settings for image acquisition are made as usual

 To Load the instrument parameter settings, click on the arrow keys beside Load/Save single settings")
13 Beam Path Setting Option #3: Load/Save specific settings The settings can be saved for subsequent experiments with the same or similar specimens. Click on the diskette icon to save a setting SUGGESTION: Include your name or initials when saving the settings to identify who created the configuration. Alternatively, save an image as a sample configuration image and apply those settings from the Experiment tab (ie. Save an image and open it to apply the settings) To Load the instrument parameter settings, click on the arrow keys beside Load/Save single settings and select the appropriate setting

 3.")


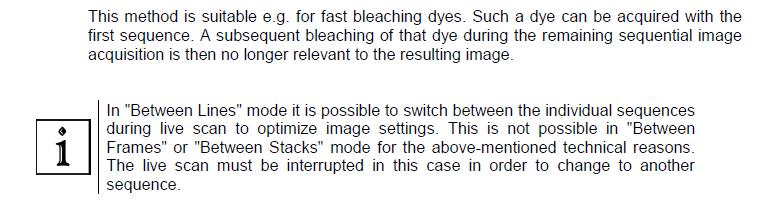
14 Beam Path Setting - Sequential Acquisition 1. Click SEQ to open the Sequential Scan control window 2. Set the light path configuration for the first sequence (ie laser, beam splitter, detector, emission window, etc,) 3. Select switching mode and click + to add a sequential scan Turning on or off lasers and detectors is very fast whereas changing the beam splitter and/or position of the detection gates is much slower. Therefore, in order to switch image acquisition after each line, these componentsmustbethesameforeach of the scans 4. Set the light path configuration for the new scan 5. Repeat if necessary NOTE: Sequential scan settings can be saved and loaded as an alternative.
15

 Panning to position specimen in image window NOTE: Averaging removes noise and in general, less averaging is required with a lower")
16 Acquisition Parameters Format or # of pixels in the image (start with 512 x 512) Scan Speed (start with Hz) Option for bidirectional for ~2x faster acquisition (may need to adjust phase) Adjust zoom factor various ways by: Adjusting slider Entering specific zoom factor Activating the Zoom In and drawing a ROI in image Zoom knob on Control Panel The Image Size and Pixel Size will change accordingly as the Format and/or Zoom Factor is adjusted Select Optimize xy Format to set the optimal # of pixels correctly oversample (resolution depends on NA of objective) Set Average and/or Accumulation Rotate image if necessary (Optical rotation) Panning to position specimen in image window NOTE: Averaging removes noise and in general, less averaging is required with a lower gain setting for the detectors. The HyDs have very little, if any, noise and therefore requires less averaging than the PMTs. The pinhole will automatically default to 1 Airy unit (optimal) and will adjust accordingly with the different objectives. The diameter can be be adjusted manually with the slider (or control panel)


17 Acquisition Modes: Select the appropriate Acquisition Mode xyz single image or z-stack xzy xz image xyt time series xyzt -- z-stack and time series xy lambda scan ZStack(xyz) 1. Select xyz as the Acquisition Mode 2. Use the Control Panel to move the focus position to beginning position of the stack 3. Click Begin to set the start position 4. Use the Control Panel or the SmartMoveto move the focus position to the end position of the stack and click End 5. Select Z-Wide to indicate the focus drive of the microscope stage will be used to control z position during the stack. Note: Z-Galvo refers to Z-control through a Super Z Galvo Focusing stage, which in not configured with the particular system. 7. Manually define the number of images of a z-stack (Nr. of steps) and the distance between the images (z-step size), or have them optimized automatically (System Optimized). 6. Zoom in to help visualize the schematic representation of the z stack

 2. Set the Time Interval (for no delay between images, select Minimize) 3.")
18 Z Stack (xyz) continued Use arrows to move to the set Begin or End position Use Set Focus to define current position as the focal plane Move to set focal position Delete Begin and End Positions Move to centre position of stack Change direction of acquisition of the stack Use mouse to move position of objective Alternative to setting the Begin and End position, a stack can be define around current position. Activate Z Around Current and indicate the size of the stack Time Series (xyt, xyzt, etc.) 1. Select the appropriate acquisition mod that includes time (t) 2. Set the Time Interval (for no delay between images, select Minimize) 3. Define the parameter for acquisition to stop

19 Additional Acquisition Mode Tile Scan 1. Activate Tile Scan acquisition mode NOTE: the stage must be initialized during the start-up Option 1 1. Move the specimen to the position that will a corner of the tile scan using the SmartMove and Mark the Position 2. Move the specimen to the opposite corner of the tile scan and mark the new position. The # of tiles will be calculated to accommodate the marked positions. Additional positions can be marked if necessary 3. Click on Start to begin the acquisition Option 2 (easiest): Adjust Zoom slide to visualize better the current stage posistion Activate Merge Images for automatic stitching and smoothing of seams after acquisition is complete. Both the single images and merged images are added to the data container. The single images can be re-tiled using the Merge tool in the Process Tab. 1. Move the specimen to the position that will be the centre of the tile scan using the SmartMove 2. Enter the dimensions of the tile scan (ie. 2 x 2 for a 2 image by 2 image tile scan) 3. Click on Start to begin the acquisition The % overlap used for the automated stitching can be set under the Configuration Tab in the Stage Control window

20 Additional Acquisition Mode Mark & Find 1. Activate Mark & Find in acquisition mode NOTE: the stage must be initialized during the start-up Move the stage using the SmartMove and mark the position of interest. Repeat as many times as necessary Click to delete current saved position or all saved positions with the trash can Adjust Zoom slide to visualize better the current stage position Move the stage to a specific saved position Z-position set with Z-Galvo stage is also save with the xy coordinates
 in image (use tools at top of image window) 2.")
 for each ROI and adjust the laser intensity with the sliders (in the")
21 Region-of-Interest (ROI) Scanning 1. Turn on ROI Scanning and draw ROI(s) in image (use tools at top of image window) 2. Open the ROI Configuration window by clicking on the +. Check on/off the laser line(s) for each ROI and adjust the laser intensity with the sliders (in the light pathway window) 3. To adjust the laser intensity for the background, turn on Set Background and then adjust the laser intensity sliders.

22 Transmitted Light Image Brightfield or DIC Go to the following link for a tutorial on the basic concepts of DIC 1. Ensure Koehler Illumination of the microscope is set correctly 2. Activate a laser line 3. Turn on Transmitted PMT and select Scan-BF or Scan-DIC 4. Move the appropriate DIC optics (condenser prism, objective prism and polarizer) Please refer to the DIC with the DMi8 CEL stand for a detailed description. 4. Adjust Gain of detector
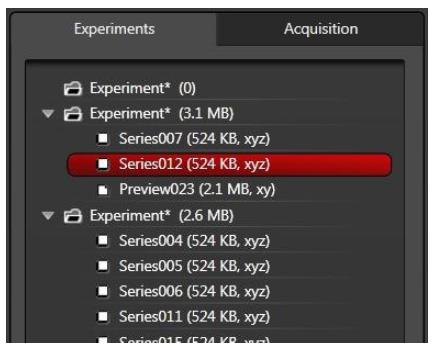
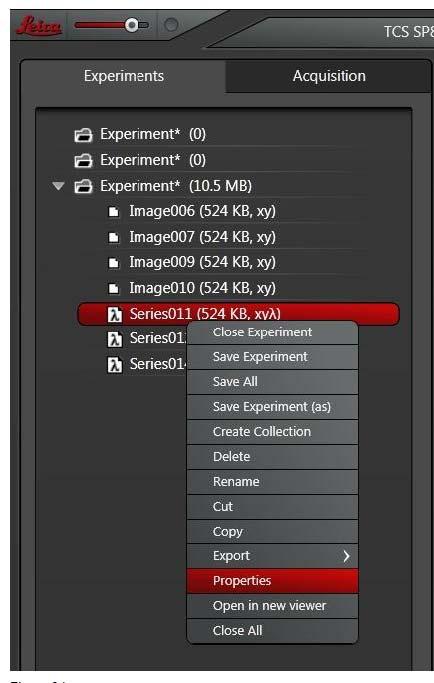
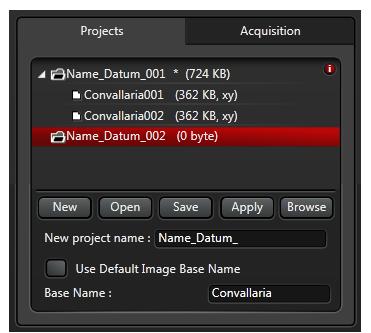
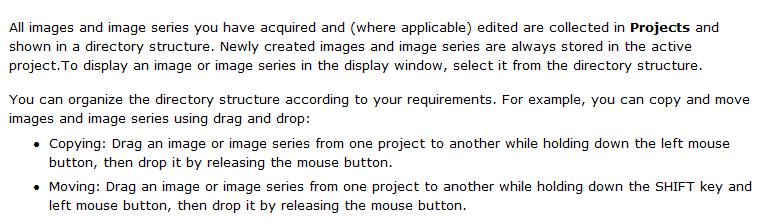
23 Experiment/Project Tree Saving Images Right Click on an image for more options
24


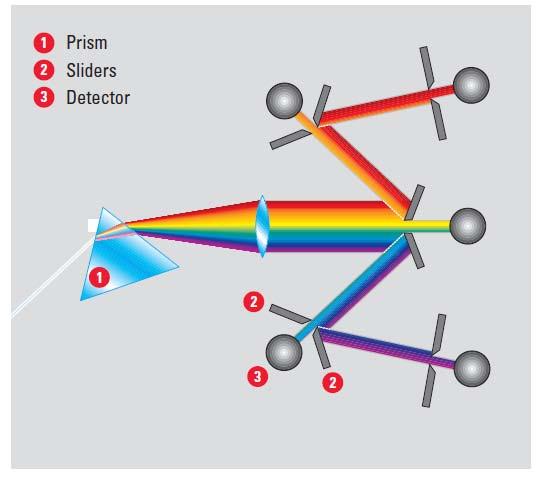
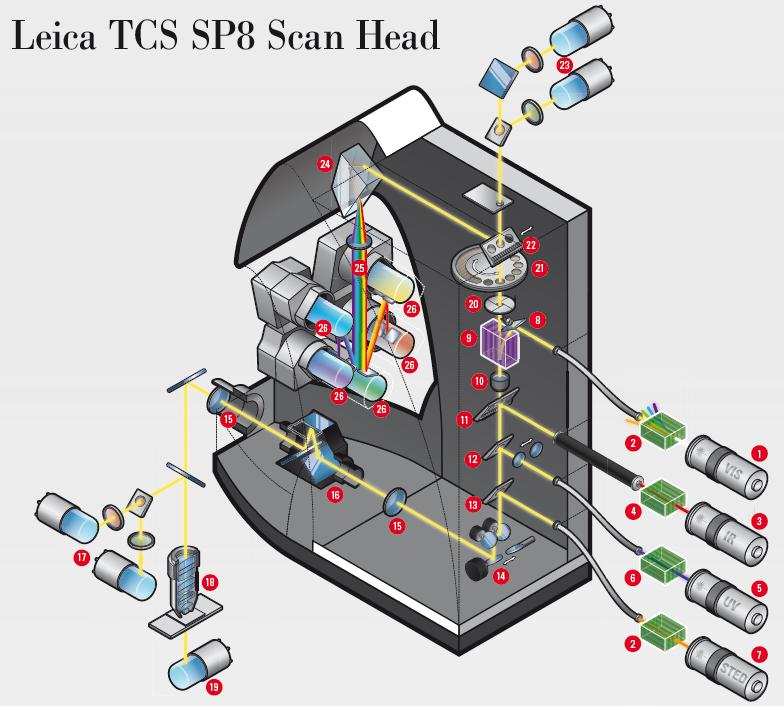
25 Additional Information - Spectral (SP) Detection System This particular system has 3 separate internal detectors for confocal imaging The Leica TCS SP8 does not use emission filters to define the wavelengths of emission collected, but rather utilizes a prism-based approach. The wavelengths of emission are dispersed across the entire visible spectrum and each detector has a set of gates that are positioned and width adjusted to collect the desired wavelengths. 3 PMT PMT Emission from the specimen is dispersed by a prism 2 PMT EMISSION 1 PMT Sliders are adjusted to determine the wavelengths of the emission collected in each of the detection channels

")
26 Optimizing Pixel Format (Resolution) Since the PSF for confocal is ~30% smaller due to the pinhole and the following formula applies Requires a sampling frequency of at least 2x-3x the highest spatial frequency to accurately preserve the spatial resolution in the resulting digital image Too few pixels pixel size is too large for maximal resolution Too many pixels oversampling does not add spatial resolution Optimal # of pixels 2-3x the resolution limit Optimize the pixel size to for optimal resolution by adjusting the zoom and format (#pixels) of the image
27
28
29
30
Leica TCS SP8 Quick Start Guide
 Leica TCS SP8 Quick Start Guide Leica TCS SP8 System Overview Start-Up Procedure 1. Turn on the CTR Control Box, Fluorescent Light for the microscope stand. 2. Turn on the Scanner Power (1) on the front
Confocal imaging on the Leica TCS SP8. 1) Turn the system on. 2) Use TCS user account. 3) Start LAS X software:
 Turn the system on. 2) Use TCS user account. 3) Start LAS X software:") Confocal imaging on the Leica TCS SP8 1) Turn the system on. 2) Use TCS user account. 3) Start LAS X software: 4) Do not touch the microscope while the software is initializing. Choose your options: Turn
Confocal imaging on the Leica TCS SP8 1) Turn the system on. 2) Use TCS user account. 3) Start LAS X software: 4) Do not touch the microscope while the software is initializing. Choose your options: Turn
Leica SP8 TCS Users Manual
 Version : 07/08/0 Leica SP8 TCS Users Manual Start up:. Turn the PC Microscope, Scanner Power, Laser Power, and the Laser Emission key to on (bottom right of desk).. Turn on the fluorescent lamp (top left
Operating Checklist for using the Laser Scanning Confocal Microscope. Leica TCS SP5.
 Smith College August 2010 Operating Checklist for using the Laser Scanning Confocal Microscope Leica TCS SP5. CONTENT, page no. Startup, 1 Initial set-up, 1 Software, 2 Microscope Specimen observation
Training Guide for Leica SP8 Confocal/Multiphoton Microscope
 Training Guide for Leica SP8 Confocal/Multiphoton Microscope LAS AF v3.3 Optical Imaging & Vital Microscopy Core Baylor College of Medicine (2017) Power ON Routine 1 2 Turn ON power switch for epifluorescence
Leica SPEII confocal microscope. Short Manual
 Leica SPEII confocal microscope Short Manual Switching ON sequence: 1. Turn on the Workstation under the bench (top, far right). 2. Turn on the Supply Unit - Laser box (big green switch first and then
LEICA TCS SP5 AOBS TANDEM USER MANUAL
 LEICA TCS SP5 AOBS TANDEM USER MANUAL STARTING THE SYSTEM...2 THE LAS AF SOFTWARE...3 THE «ACQUIRE» MENU...5 CHOOSE AND CREATE A SETTING...6 THE CONTROL PANEL...8 THE DMI6000B MICROSCOPE...10 ACQUIRE ONE
Cell Biology and Bioimaging Core
 Cell Biology and Bioimaging Core Leica TCS SP5 Operating Instructions Starting up the instrument 1. First, log in the log book located on the confocal desk. Include your name, your lab s PI, an account
TRAINING MANUAL. Olympus FV1000
 TRAINING MANUAL Olympus FV1000 September 2014 TABLE OF CONTENTS A. Start-Up Procedure... 1 B. Visual Observation under the Microscope... 1 C. Image Acquisition... 4 A brief Overview of the Settings...
Leica SP8 TCS Users Manual
 Leica SP8 TCS Users Manual Follow the procedure for start up and log on as posted in the lab. Please log on with your account only and do not share your password with anyone. We track and confirm usage
Quick Start Guide. Leica SP5 X
 Quick Start Guide Leica SP5 X Please note: Some of the information in this guide was taken from Leica Microsystems Leica TCS SP5 LAS AF Guide for New Users. This work is licensed under the Creative Commons
Leica Sp5 II Confocal User Guide
 Leica Sp5 II Confocal User Guide Turning on the Confocal System (instructions are posted in the room) 1. Turn on Laser Power Button 2. Turn Key to On position 3. Turn on Scanner Power Button 4. Turn on
Things to check before start-up.
 Byeong Cha Page 1 11/24/2009 Manual for Leica SP2 Confocal Microscope Enter you name, the date, the time, and the account number in the user log book. Things to check before start-up. Make sure that your
Zeiss 880 Training Notes Zen 2.3
 Zeiss 880 Training Notes Zen 2.3 1 Turn on the HXP 120V Lamp 2 Turn on Main Power Switch Turn on the Systems PC Switch Turn on the Components Switch. 3 4 5 Turn on the PC and log into your account. Start
Guide to Confocal 5. Starting session
 Guide to Confocal 5 Remember that when booking and before starting session you can check for any problems at https://www.bris.ac.uk/biochemistry/uobonly/cif/index.html Starting session Switch on microscope
Title: Leica SP5 Confocal User Manual
 Title: Leica SP5 Confocal User Manual Date of first issue: 23/10/2015 Date of review: Version: Admin For assistance or to report an issue Office: CG07 or 05 Email: Igmm-imaginghelpdesk@igmm.ed.ac.uk Website:
User Guide to the IBIF Leica TCS SP8 MP Confocal Microscope
 User Guide to the IBIF Leica TCS SP8 MP Confocal Microscope This version: 7.24.14. Introduction The IBIF confocal microscope is made available on a fee-for-use-hour basis to all users who have been trained.
Leica SP8 Resonant Confocal. Quick-Start Guide
 Leica SP8 Resonant Confocal Quick-Start Guide Contents Start-up Preparing for Imaging Part 1 On the scope Part 2 Software interface Part 3 Heat & CO2 incubation Part 4 Other hardware options Shut-down
Microscopy from Carl Zeiss
 Microscopy from Carl Zeiss Contents Page Contents... 1 Introduction... 1 Starting the System... 2 Introduction to ZEN Efficient Navigation... 5 Setting up the microscope... 10 Configuring the beam path
LSM 780 Confocal Microscope Standard Operation Protocol
 LSM 780 Confocal Microscope Standard Operation Protocol Basic Operation Turning on the system 1. Sign on log sheet according to Actual start time 2. Check Compressed Air supply for the air table 3. Switch
Zeiss 780 Training Notes
 Zeiss 780 Training Notes Turn on Main Switch, System PC and Components Switches 780 Start up sequence Do you need the argon laser (458, 488, 514 nm lines)? Yes Turn on the laser s main power switch and
LSM 710 Confocal Microscope Standard Operation Protocol
 LSM 710 Confocal Microscope Standard Operation Protocol Basic Operation Turning on the system 1. Switch on Main power switch 2. Switch on System / PC power button 3. Switch on Components power button 4.
Confocal Application Notes Vol. 5 July 2010
 Tile Scan Prepared by Myriam Gastard, PhD Application and Technical Support Group, Leica Microsystems, Inc. In this issue of our Confocal Application Notes, proper set up of the Tile function enables you
ZEISS LSM 710 CONFOCAL MICROSCOPE USER MANUAL
 ZEISS LSM 710 CONFOCAL MICROSCOPE USER MANUAL START THE SYSTEM... 2 START ZEN SOFTWARE... 3 SET THE TEMPERATURE AND THE CO2 CONTROLLERS... OBSERVATION AT OCULARS... 5 STATIF PRESENTATION... 6 ACQUIRE ONE
Supplemental Method Information Zeiss LSM710
 Supplemental Method Information Zeiss LSM710 1 Under the Light Path window set up the confocal for imaging a green dye (Alexa488-EGFP). For example, set up the light path as shown here using the 488 nm
Imaging Beyond the Basics: Optimizing Settings on the Leica SP8 Confocal
 Imaging Beyond the Basics: Optimizing Settings on the Leica SP8 Confocal Todays Goal: Introduce some additional functionalities of the Leica SP8 confocal HyD vs. PMT detectors Dye Assistant Scanning By
LSM 800 Confocal Microscope Standard Operation Protocol
 LSM 800 Confocal Microscope Standard Operation Protocol Turning on the system 1. Switch on the Main switch (labeled 1 and 2 ) mounted on the wall. 2. Turn the Laser Key (labeled 3 ) 90 clockwise for power
Training Guide for Carl Zeiss LSM 5 LIVE Confocal Microscope
 Training Guide for Carl Zeiss LSM 5 LIVE Confocal Microscope AIM 4.2 Optical Imaging & Vital Microscopy Core Baylor College of Medicine (2017) Power ON Routine 1 2 Verify that main power switches on the
DIC Imaging using Laser Scanning Microscopes (LSMs) on Axio Imager Stands
 on Axio Imager Stands") DIC Imaging using Laser Scanning Microscopes (LSMs) on Axio Imager Stands Differential Interference Contrast (DIC) imaging is a technique used to increase contrast in brightfield images. In confocal systems,
DIC Imaging using Laser Scanning Microscopes (LSMs) on Axio Imager Stands Differential Interference Contrast (DIC) imaging is a technique used to increase contrast in brightfield images. In confocal systems,
Supplemental Figure 1: Histogram of 63x Objective Lens z axis Calculated Resolutions. Results from the MetroloJ z axis fits for 5 beads from each
 Supplemental Figure 1: Histogram of 63x Objective Lens z axis Calculated Resolutions. Results from the MetroloJ z axis fits for 5 beads from each lens with a 1 Airy unit pinhole setting. Many water lenses
Quick Guide. LSM 5 MP, LSM 510 and LSM 510 META. Laser Scanning Microscopes. We make it visible. M i c r o s c o p y f r o m C a r l Z e i s s
 LSM 5 MP, LSM 510 and LSM 510 META M i c r o s c o p y f r o m C a r l Z e i s s Quick Guide Laser Scanning Microscopes LSM Software ZEN 2007 August 2007 We make it visible. Contents Page Contents... 1
Zeiss LSM 880 Protocol
 Zeiss LSM 880 Protocol 1) System Startup Please note put sign-up policy. You must inform the facility at least 24 hours beforehand if you can t come; otherwise, you will receive a charge for unused time.
Leica TCS SL Confocal Training. Neuroscience Imaging Core Staff. Core Director. Facility Manager
 Leica TCS SL Confocal Training Neuroscience Imaging Facility The Ohio State University Rightmire Hall 614-292-1367 Staff Core Director Anthony Brown, Ph. D. 060 Rightmire Hall 614-292-1205 brown.2302@osu.edu
Operation Guide for the Leica SP2 Confocal Microscope Bio-Imaging Facility Hunter College October 2009
 Operation Guide for the Leica SP2 Confocal Microscope Bio-Imaging Facility Hunter College October 2009 Introduction of Fluoresence Confocal Microscopy The first confocal microscope was invented by Princeton
Training Guide for Carl Zeiss LSM 510 META Confocal Microscope
 Training Guide for Carl Zeiss LSM 510 META Confocal Microscope AIM 4.2 Optical Imaging & Vital Microscopy Core Baylor College of Medicine (2017) Power ON Routine 1 2 Turn ON Components and System/PC switches
Practical work no. 3: Confocal Live Cell Microscopy
 Practical work no. 3: Confocal Live Cell Microscopy Course Instructor: Mikko Liljeström (MIU) 1 Background Confocal microscopy: The main idea behind confocality is that it suppresses the signal outside
3 Choose the Channels button and set the Channel Settings. Set the Pinhole to 1 Airy unit.
 1 Set up the confocal light path for imaging a green dye (e.g. Alexa488-EGFP). For example, under the Configuration Control window the light path could be set up as shown here using the 488 nm LASER (found
LSM 510 Training Notes
 LSM 510 Training Notes Turning on the system Turn on the arc lamp, found on the bench top left of the microscope. This supplies light for epifluorescence for viewing your samples through the microscope.
3. are adherent cells (ie. cells in suspension are too far away from the coverslip)
") Before you begin, make sure your sample... 1. is seeded on #1.5 coverglass (thickness = 0.17) 2. is an aqueous solution (ie. fixed samples mounted on a slide will not work - not enough difference in refractive
Before you begin, make sure your sample... 1. is seeded on #1.5 coverglass (thickness = 0.17) 2. is an aqueous solution (ie. fixed samples mounted on a slide will not work - not enough difference in refractive
Nikon AZ100. Laser Scanning Macro Confocal Microscope. Jordan Briscoe Adam Fries Kyle Marchuk Kaitlin Corbin. May 2017.
 Nikon AZ100 Laser Scanning Macro Confocal Microscope Jordan Briscoe Adam Fries Kyle Marchuk Kaitlin Corbin May 2017 Contents 1 Introduction 2 2 Hardware - Startup 2 3 Software/Operation 4 3.1 Multidimensional
Quick Guide for Zeiss 710 Laser Scanning Confocal MGH Cancer Center
 Quick Guide for Zeiss 710 Laser Scanning Confocal MGH Cancer Center For any questions or concerns, please contact: Linda Nieman lnieman@mgh.harvard.edu Office: (617) 643-9684 Cell: (512) 565-8076 Chenyue
ZEISS LSM 710 NLO Multiphoton microscope Manual/Quick guide
 ZEISS LSM 710 NLO Multiphoton microscope Manual/Quick guide Matyas Molnar, Biovis 2016 Starting the microscpe 1. Check the microscope if everything looks clean and normal. If not, report it in the logbook.
Operation Of The Leica SP8 Multiphoton Confocal System Using Single Or Multiple Fluorochromes
 University of South Carolina Scholar Commons Theses and Dissertations 2018 Operation Of The Leica SP8 Multiphoton Confocal System Using Single Or Multiple Fluorochromes Amy E. Rowley University of South
Training Guide for Carl Zeiss LSM 880 with AiryScan FAST
 Training Guide for Carl Zeiss LSM 880 with AiryScan FAST ZEN 2.3 Optical Imaging & Vital Microscopy Core Baylor College of Medicine (2018) Power ON Routine 1 2 Turn ON Main Switch from the remote control
Instructions for the Leica SP5 II laser scanning confocal microscope
 Instructions for the Leica SP5 II laser scanning confocal microscope Content: Check-in and Start up Set up acquistion parameters Optimize acquistion parameters Acquire a z-stack Sequential scan Check out
Basics of confocal imaging (part I)
") Basics of confocal imaging (part I) Swiss Institute of Technology (EPFL) Faculty of Life Sciences Head of BIOIMAGING AND OPTICS BIOP arne.seitz@epfl.ch Lateral resolution BioImaging &Optics Platform Light
Basics of confocal imaging (part I) Swiss Institute of Technology (EPFL) Faculty of Life Sciences Head of BIOIMAGING AND OPTICS BIOP arne.seitz@epfl.ch Lateral resolution BioImaging &Optics Platform Light
DIC Imaging using Laser Scanning Microscopes (LSM) on Inverted Stands
 on Inverted Stands") DIC Imaging using Laser Scanning Microscopes (LSM) on Inverted Stands Differential Interference Contrast (DIC) imaging is a technique used to increase contrast in brightfield images. In confocal systems,
DIC Imaging using Laser Scanning Microscopes (LSM) on Inverted Stands Differential Interference Contrast (DIC) imaging is a technique used to increase contrast in brightfield images. In confocal systems,
BASICS OF CONFOCAL IMAGING (PART I)
") BASICS OF CONFOCAL IMAGING (PART I) INTERNAL COURSE 2012 LIGHT MICROSCOPY Lateral resolution Transmission Fluorescence d min 1.22 NA obj NA cond 0 0 rairy 0.61 NAobj Ernst Abbe Lord Rayleigh Depth of field
BASICS OF CONFOCAL IMAGING (PART I) INTERNAL COURSE 2012 LIGHT MICROSCOPY Lateral resolution Transmission Fluorescence d min 1.22 NA obj NA cond 0 0 rairy 0.61 NAobj Ernst Abbe Lord Rayleigh Depth of field
Usermanual for Leica SP8 confocal
 Usermanual for Leica SP8 confocal Contact information: hege.dale@uib.no & endy.spriet@uib.no 1 Table of content Important information 3 Start up procedure 4 Shut down procedure 5 Operating the DMI 8 microscope
LSM 510 Meta Training Notes
 LSM 510 Meta Training Notes Turning on the system Turn on X-Cite power supply. This supplies light for epifluorescence for viewing your samples through the microscope. Turn on the remote control switch.
Zeiss LSM 510 Confocor III Training Notes. Center for Cell Analysis & Modeling
 Zeiss LSM 510 Confocor III Training Notes Center for Cell Analysis & Modeling Confocor 3 Start Up Go to System Module Turn on Main Switch, System/ PC, and Components Switches Do you need the arc lamp?
OPERATING INSTRUCTIONS
 Zeiss LSM 510 M eta Confocal M icroscope OPERATING INSTRUCTIONS Starting the System: 1. Turn the black knob on the laser box one-quarter turn from Off to On. You will hear the laser cooling mechanisms
Nikon Eclipse Ti A1-A Confocal Operating Manual. Start-up. Microscope
 Nikon Eclipse Ti A1-A Confocal Operating Manual Start-up 1. Turn on Excite Fluorescent light power supply- metal halide. a. Cool down as for mercury bulb b. Wheel closed liquid light guide 2. Turn on power
Title: Nikon A1R Confocal User Manual
 Title: Nikon A1R Confocal User Manual Date of first issue: 23/10/2015 Date of review: Version: Admin For assistance or to report an issue Office: CG.07 or CG.05 Email: Igmm-imaginghelpdesk@igmm.ed.ac.uk
Nikon A1Rsi Confocal Start-Up Sequence
 1. Turn the key on the Nikon LUN-V Laser Launch. Nikon A1Rsi Confocal Start-Up Sequence 2. Press the button the left side of the A1Rsi Controller unit. 3. Turn on the power strip underneath the microscope.
TRAINING MANUAL. Multiphoton Microscopy LSM 510 META-NLO
 TRAINING MANUAL Multiphoton Microscopy LSM 510 META-NLO September 2010 Multiphoton Microscopy Training Manual Multiphoton microscopy is only available on the LSM 510 META-NLO system. This system is equipped
The Zeiss AiryScan System, Confocal Four.
 The Zeiss AiryScan System, Confocal Four. Overview. The Zeiss AiryScan module is a segmented, radially stacked GaASP detector and collector system designed to subsample the airy disk of a point emission
Zeiss LSM880 Operating Instructions. UTMB Optical Microscopy Core Jan. 16, 2018
 Zeiss LSM880 Operating Instructions UTMB Optical Microscopy Core Jan. 16, 2018 1 1. Power up the microscope Sing the LOGBOOK Steps below will provide power to the computer and all of the microscope components.
START-UP PROCEDURE 1 THE MICROSCOPE STAND 3 OBJECTIVES 5 STARTING WITH LAS (SOFTWARE) AND SETTING UP THE MICROSCOPE STAND 7
 AND SETTING UP THE MICROSCOPE STAND 7") Leica DMI AF6000LX Table of contents START-UP PROCEDURE 1 THE MICROSCOPE STAND 3 OBJECTIVES 5 STARTING WITH LAS (SOFTWARE) AND SETTING UP THE MICROSCOPE STAND 7 ACQUIRE MODULE 6 SETTING THE LIGHTPATH 6
Leica DMI AF6000LX Table of contents START-UP PROCEDURE 1 THE MICROSCOPE STAND 3 OBJECTIVES 5 STARTING WITH LAS (SOFTWARE) AND SETTING UP THE MICROSCOPE STAND 7 ACQUIRE MODULE 6 SETTING THE LIGHTPATH 6
Operating Instructions for Zeiss LSM 510
 Operating Instructions for Zeiss LSM 510 Location: GNL 6.312q (BSL3) Questions? Contact: Maxim Ivannikov, maivanni@utmb.edu 1 Attend A Complementary Training Before Using The Microscope All future users
Multifluorescence The Crosstalk Problem and Its Solution
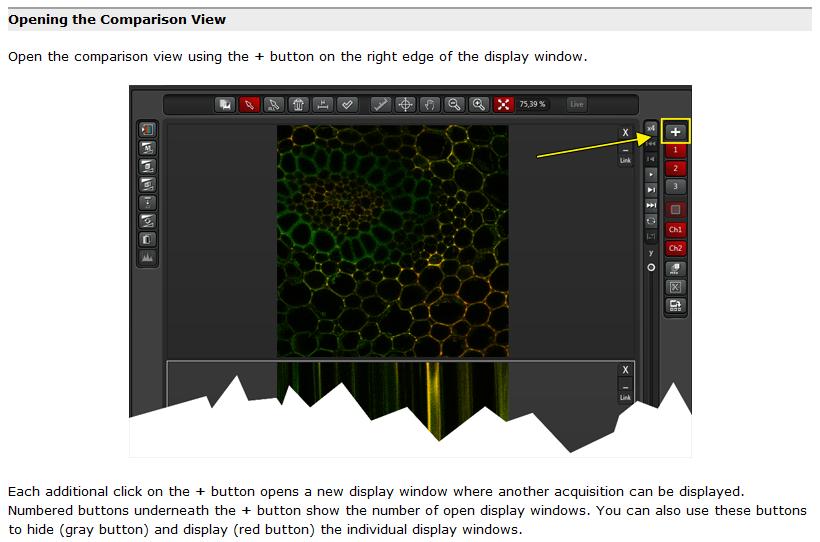
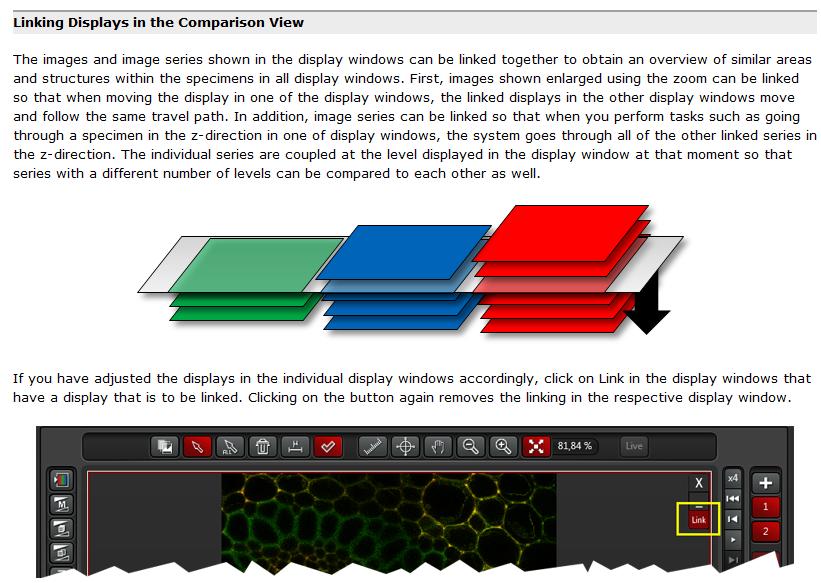
 Multifluorescence The Crosstalk Problem and Its Solution If a specimen is labeled with more than one fluorochrome, each image channel should only show the emission signal of one of them. If, in a specimen
Contents. Introduction
 Contents Page Contents... 1 Introduction... 1 Starting the System... 2 Introduction to ZEN Efficient Navigation... 5 Setting up the microscope... 10 Configuring the beam path and lasers... 12 Scanning
ZEN 2012 SP5 black edition Hotfix 12
 Information about the software ZEN 2012 SP5 black edition Hotfix 12 Software name: ZEN 2012 Service Pack 5 black edition Hotfix 12 Software version: The software version in ZEN Help About changes to 14.0.12.201
Quick Guide for Zeiss 710 Laser Scanning Confocal MGH Cancer Center
 Quick Guide for Zeiss 710 Laser Scanning Confocal MGH Cancer Center For any questions or concerns, please contact: Linda Nieman lnieman@mgh.harvard.edu Office: (617) 643-9684 Cell: (512) 565-8076 Chenyue
Brief manual how to start and close the Leica sp2 Confocal. (TCS SP2 AOBS system mounted on a DM IRE2)
") Brief manual how to start and close the Leica sp2 Confocal (TCS SP2 AOBS system mounted on a DM IRE2) A. Switching on hardware B. Acquiring and saving images C. Switching off the microscope D. Good working
Brief manual how to start and close the Leica sp2 Confocal (TCS SP2 AOBS system mounted on a DM IRE2) A. Switching on hardware B. Acquiring and saving images C. Switching off the microscope D. Good working
Nikon. King s College London. Imaging Centre. N-SIM guide NIKON IMAGING KING S COLLEGE LONDON
 N-SIM guide NIKON IMAGING CENTRE @ KING S COLLEGE LONDON Starting-up / Shut-down The NSIM hardware is calibrated after system warm-up occurs. It is recommended that you turn-on the system for at least
Bi/BE 227 Winter Assignment #3. Adding the third dimension: 3D Confocal Imaging
 Bi/BE 227 Winter 2016 Assignment #3 Adding the third dimension: 3D Confocal Imaging Schedule: Jan 20: Assignment Jan 20-Feb 8: Work on assignment Feb 10: Student PowerPoint presentations. Goals for this
Leica Confocal - 2. Instructions for Leica SP2 Confocal Equipped with Visible Laser Lines
 Leica Confocal - 2 Instructions for Leica SP2 Confocal Equipped with Visible Laser Lines Imaging Technology Group Revised as of 08/2011 by Dianwen Zhang (Email: zhangdw@illinois.edu) Revision History Authors
1 Co Localization and Working flow with the lsm700
 1 Co Localization and Working flow with the lsm700 Samples -1 slide = mousse intestine, Dapi / Ki 67 with Cy3/ BrDU with alexa 488. -1 slide = mousse intestine, Dapi / Ki 67 with Cy3/ no BrDU (but with
Training Guide for Carl Zeiss LSM 7 MP Multiphoton Microscope
 Training Guide for Carl Zeiss LSM 7 MP Multiphoton Microscope ZEN 2009 Optical Imaging & Vital Microscopy Core Baylor College of Medicine (2017) Power ON Routine 1 2 Turn Chameleon TiS laser key from Standby
Topics. - How to calibrate the LSM scanner. - How to clean the microscope. - How to adjust the pinhole alignment. - How to adjust the Collimator
 Topics - How to calibrate the LSM scanner - How to measure the PSF - How to clean the microscope - How to adjust the pinhole alignment - How to adjust the Collimator How to calibrate the LSM scanner The
Renishaw InVia Raman microscope
 Laser Spectroscopy Labs Renishaw InVia Raman microscope Operation instructions 1. Turn On the power switch, system power switch is located towards the back of the system on the right hand side. Wait ~10
Leica TCS SP2 User Manual 1.1. Markus Friedrich and James Lee. Department of Biological Sciences Wayne State University
 Leica TCS SP2 User Manual 1.1 Markus Friedrich and James Lee Department of Biological Sciences Wayne State University Confocal Manual 1 Helpful hints The confocal room is cold. Bring a sweater. Confocaling
Training Guide for Carl Zeiss AxioZoom V16 Stereo Microscope
 Training Guide for Carl Zeiss AxioZoom V16 Stereo Microscope ZEN 2012 Optical Imaging & Vital Microscopy Core Baylor College of Medicine (2017) Power ON Routine 1 2 If you require fluorescence imaging,
Zeiss LSM 780 Protocol
 Zeiss LSM 780 Protocol 1) System Startup F Please note the sign-up policy. You must inform the facility at least 24 hours beforehand if you can t come; otherwise, you will receive a charge for unused time.
Why and How? Daniel Gitler Dept. of Physiology Ben-Gurion University of the Negev. Microscopy course, Michmoret Dec 2005
 Why and How? Daniel Gitler Dept. of Physiology Ben-Gurion University of the Negev Why use confocal microscopy? Principles of the laser scanning confocal microscope. Image resolution. Manipulating the
Quality Performance, Innovative Design
 Dimensions Confocal Laser Scanning Biological Microscope Table size (mm): 1400(W) 800(D) * Table is not available from Olympus. Avoid placing the controller directly on the floor. Dimensions / Weight /
1 Set up the confocal light path for imaging a green dye (Alexa488-EGFP). For example, the
. For example, the") 1 Set up the confocal light path for imaging a green dye (Alexa488-EGFP). For example, the light path as shown here using the 488 nm LASER (Laser Unit 1) reflecting off of the 405/488 nm Dichroic mirror
1 Set up the confocal light path for imaging a green dye (Alexa488-EGFP). For example, the light path as shown here using the 488 nm LASER (Laser Unit 1) reflecting off of the 405/488 nm Dichroic mirror
Swept-Field User Guide
 Swept-Field User Guide Note: for more details see the Prairie user manual at http://www.prairietechnologies.com/resources/software/prairieview.html Please report any problems to Julie Last (jalast@wisc.edu)
ScanArray Overview. Principle of Operation. Instrument Components
 ScanArray Overview The GSI Lumonics ScanArrayÒ Microarray Analysis System is a scanning laser confocal fluorescence microscope that is used to determine the fluorescence intensity of a two-dimensional
ZEISS LSM510META confocal manual
 ZEISS LSM510META confocal manual Switching on the system 1) Switch on the Remote Control button located on the table to the right of the microscope. This is the main switch for the whole system including
Confocal Application Letter No. 13. Sequential Scan for Leica TCS NT/SP systems
 Confocal Application Letter No. 13 Sequential Scan for Leica TCS NT/SP systems Leica Microsystems Heidelberg GmbH Im Neuenheimer Feld 518 D-69120 Heidelberg Telephone +49 6221 4148 0 Fax +49 6221 414833
MIF ZEISS VIOLET CONFOCAL ZEN 2009 PROTOCOL
 MIF ZEISS VIOLET CONFOCAL ZEN 2009 PROTOCOL START-UP On the Switchbox, turn both black switches to the ON position. Wait for the microscope to boot up completely (watch the screen on the side of the microscope).
Contents STARTUP MICROSCOPE CONTROLS CAMERA CONTROLS SOFTWARE CONTROLS EXPOSURE AND CONTRAST MONOCHROME IMAGE HANDLING
 Operations Guide Contents STARTUP MICROSCOPE CONTROLS CAMERA CONTROLS SOFTWARE CONTROLS EXPOSURE AND CONTRAST MONOCHROME IMAGE HANDLING Nikon Eclipse 90i Operations Guide STARTUP Startup Powering Up Fluorescence
 07 Setting Place a specimen, and select a fluorescence dye. The FV10i automatically selects the most suitable imaging conditions based on the fluorescence dye selection. Set Image mapping menu Just click
Motorized Axio Observer Start-up instructions
 Start-up instructions 1. If using fluorescence turn on Fluorescent light source. TL light Source (Hal 100) 2. Turn on microscope using switch on lower left side of the microscope. 3. If imaging, turn on
NIS-Elements C (For CONFOCAL MICROSCOPE A1) Instructions (Ver. 4.40)
 Instructions (Ver. 4.40)") M487E 15.4.NF.17 (1/4) *M487EN17* NIS-Elements C (For CONFOCAL MICROSCOPE A1) Instructions (Ver. 4.40) Preface Thank you for purchasing the Nikon products. This instruction manual has been prepared for
M487E 15.4.NF.17 (1/4) *M487EN17* NIS-Elements C (For CONFOCAL MICROSCOPE A1) Instructions (Ver. 4.40) Preface Thank you for purchasing the Nikon products. This instruction manual has been prepared for
LSM 510 META in Chang Gung University
 Content LSM 510 META in Chang ung University LSM 510 META 路 理 The features and applications of LSM 510 META 01-09 Introduction of the hardware 10-12 Fluorescence observation in conventional microscope
Microscope Confocal LSM510 META
 Microscope Confocal LSM510 META Welcome to the Zeiss LSM 510 Meta Confocal tutorial. Before using the LSM 510 META, Log off any other computer that is open with your personal login. You will need to put
Overview. About other software. Administrator password. 58. UltraVIEW VoX Getting Started Guide
 Operation 58. UltraVIEW VoX Getting Started Guide Overview This chapter outlines the basic methods used to operate the UltraVIEW VoX system. About other software Volocity places great demands on the computer
Nikon SIM-E & A1-R System
 Nikon SIM-E & A1-R System USER GUIDE LSU Health Sciences Center Shreveport Research Core Facility June 01 2017 Chaowei Shang 1 Table of Content 1. Start Up the System... Page 3 Hardware and microscope
Horiba Jobin-Yvon LabRam Raman Confocal Microscope (GERB 120)
") Horiba Jobin-Yvon LabRam Raman Confocal Microscope (GERB 120) Please contact Dr. Amanda Henkes for training requests and assistance: 979-862-5959, amandahenkes@tamu.edu Hardware LN 2 FTIR FTIR camera 1
Horiba Jobin-Yvon LabRam Raman Confocal Microscope (GERB 120) Please contact Dr. Amanda Henkes for training requests and assistance: 979-862-5959, amandahenkes@tamu.edu Hardware LN 2 FTIR FTIR camera 1
Nikon A1R. Multi-Photon & Laser Scanning Confocal Microscope. Kyle Marchuk Adam Fries Jordan Briscoe Kaitlin Corbin. April 2017.
 Nikon A1R Multi-Photon & Laser Scanning Confocal Microscope Kyle Marchuk Adam Fries Jordan Briscoe Kaitlin Corbin April 2017 Contents 1 Introduction 2 2 Start-Up 2 3 Imaging 4 3.1 Sample Alignment...........................................
OPT3: Operating Procedure for Horiba Jobin Yvon LabRam Aramis Raman/PL System See LabSpec_6_2 General User Quick Start Guide on the computer desktop
 OPT3: Operating Procedure for Horiba Jobin Yvon LabRam Aramis Raman/PL System See LabSpec_6_2 General User Quick Start Guide on the computer desktop 1. Log in usage using the SMIF web site 2. Turn power
MIF ZEISS LSM510 CONFOCAL USER PROTOCOL
 MIF ZEISS LSM510 CONFOCAL USER PROTOCOL START-UP Turn on the Mercury Bulb Power Supply (if needed). Power-on the Control Box. Turn on the computer. Open the LSM 510 software. Choose Scan New Images and
Simplified Instructions: Olympus Widefield Microscope S1230
 Contents General Microscope Operation Simple Image Capture Multi-Wavelength Capture Z-Series Timelapse Combining Capture Modes Synopsis of Other Functions Pages 2-23 24-40 41-47 48-56 57-59 60-68 69-83
Nikon C1si Spectral Laser Scanning Confocal Microscope. User Guide
 Nikon C1si Spectral Laser Scanning Confocal Microscope User Guide Contents: C1Si Turn-On/ShutDown Procedures... 2 Overview... 4 Setup for epi-illumination to view through the eyepieces:... 5 Setup for
Characterization Microscope Nikon LV150
 Characterization Microscope Nikon LV150 Figure 1: Microscope Nikon LV150 Introduction This upright optical microscope is designed for investigating up to 150 mm (6 inch) semiconductor wafers but can also
RENISHAW INVIA RAMAN SPECTROMETER
 STANDARD OPERATING PROCEDURE: RENISHAW INVIA RAMAN SPECTROMETER Purpose of this Instrument: The Renishaw invia Raman Spectrometer is an instrument used to analyze the Raman scattered light from samples
Locating Molecules Using GSD Technology Project Folders: Organization of Experiment Files...1
 .....................................1 1 Project Folders: Organization of Experiment Files.................................1 2 Steps........................................................................2