Title: Nikon A1R Confocal User Manual
|
|
|
- Merryl Fletcher
- 6 years ago
- Views:
Transcription

1 Title: Nikon A1R Confocal User Manual Date of first issue: 23/10/2015 Date of review: Version: Admin For assistance or to report an issue Office: CG.07 or CG.05 Website: Download a PDF copy of manual: \\smbhost\microscope-users\microscope user manuals\nikon A1R Facility Usage Policy 1. You must have the relevant Risk Assessment/COSHH form for the work you are undertaking before using imaging facility resources 2. Users must be trained before using facility equipment 3. Please leave the microscope clean and tidy for the next user 4. Please report any issue, even if it seems minor, to facility staff 5. Any clinical waste must be placed in the orange bins provided 1
2 Table of Contents System Startup... 3 List of devices... 4 System Shutdown... 5 Mounting a sample... 5 Finding the sample by eye... 6 Nis-Elements software layouts... 7 Selecting a confocal channel setup... 7 Adding a brightfield channel... 8 Capture an image... 8 Pre-scan acquisition settings... 9 Optimising scan settings for best image quality Image Saturation Capture a single XY image Image Window Options Adding a scale bar Capture images with Optical Zoom Z Stack Acquisition Z stack viewing options XYZT Experiments Multi-position XYZT Experiments Tile-Scan Experiments FRAP/Bleaching Experiments Appendix Saving Images Export images in tiff format Kohler Illumination Perfect Focus System (PFS) Operation Frequently Asked Questions My images look noisy, what can I do to improve image quality? I can't see anything down the microscope I can't fit all of the tissue into the field of view
3 System Startup *See the next page for labelled images of all devices 1. Nikon Intensilight Mercury lamp (fluorescence) 2. Brightfield power supply (only if required) 3. Lasers-Turn the key on the front of the laser bed clockwise to the horizontal position (405/458/488/514/561 excitation lines) 4. A1 Controller (button on left side of tower) 5. XY stage controller 6. PC Additional devices required for Live Cell Imaging Incubation chamber heater (chamber doors must be on while heater is in use) CO2 controllers (see labelled diagram) CO2 flow valve on wall (see labelled diagram) 7. Log in to Windows using the User account 8. Launch Nis-Elements from the desktop icon. If you have been trained then you will have a username to log in to Elements 3

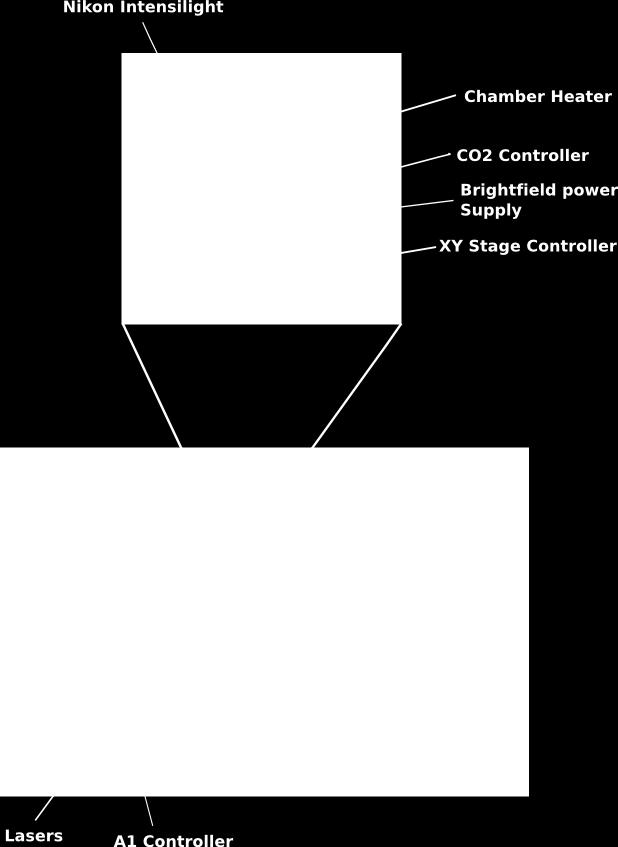
4 List of devices 4
5 System Shutdown 1. Clean any oil immersion lenses used with the lens tissue 2. Close Nikon Nis-Elements 3. Shutdown the PC Incubation chamber heater and CO2 supply if used 4. XY stage controller 5. A1 Controller 6. Brightfield power supply 7. Lasers Turn the key on the front of the laser bed anticlockwise to the vertical position 8. Nikon Intensilight Mercury Lamp (fluorescence) 5


 in Elements to select a wavelength to view. The Eyes heading indicates the relevant buttons. 2.")

6 Mounting a sample 1. Ensure the correct stage insert is mounted (see facility staff if unsure) 2. Select a low magnification (10-20x) lens from the touchpad objective menu 3. Use the joystick to move the stage if necessary. Change the speed of the stage by twisting the joystick. 4. Before mounting the slide on the stage, turn the microscope focus knob, if the Z value on the microscopes front LCD display doesn't change as you turn, the lens is in the Escape position. Press the Refocus button on the right side of the microscope body. 5. Remember to invert your slide so that the cover glass is the closest surface to the lens Finding the sample by eye 1. Use the shortcut buttons (OC Panel) in Elements to select a wavelength to view. The Eyes heading indicates the relevant buttons. 2. Open the FL shutter by pressing the Epi Shutter open button on the Nikon Intensilight control pad next to the microscope 3. Set the microscope focus to course movement using the button the right side of the microscope body. 4. It may not be obvious in which direction you need to move the lens to find the focal plane. If you are unsure, lower the lens (nosepiece) as far as it will go using the microscope focus knob (turn away from you to move the lens down). When it will not lower any more (Z position on microscopes LCD display stays constant) start to turn the focus knob towards you while looking down the eyepieces. 5. Use the OC Panel to check your labelling at each wavelength 6

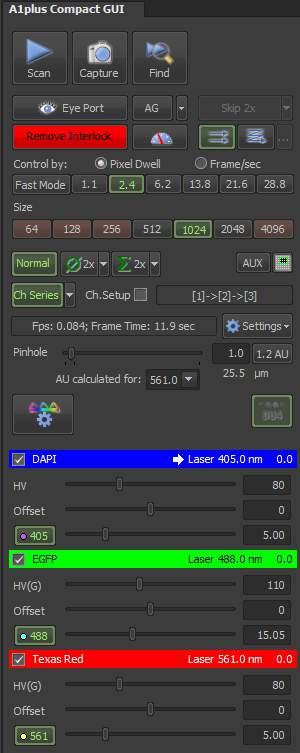
7 6. You can check brightfield by eye using the Brightfield button 7. Use the Shutter button on the Intensilight control pad to shutter the light when not viewing to minimise photobleaching 8. At this point you can either change to a higher magnification lens if required or begin the scanning process 9. Lenses 60x and above always require a drop of oil between the lens and the coverglass. 40X lenses can be either a dry or oil type. The touchpad used to select the lenses tells you if the lens requires oil. Nis-Elements software layouts 1. Nis-Elements has many toolbars which need to be changed depending on the experiment you are carrying out. The Layout tabs at the bottom left side of the screen allow you to change the software layout which essentially changes the toolbars visible too you. 2. When you start Elements the Confocal layout will be selected by default. This contains all of the toolbars required to capture confocal images. The padlock icon denotes that the Confocal layout cannot be altered. 3. The User layout can be selected if you want to customise the layout of the software. If you change this layout profile, any changes will only be applied within your Nis-Elements user account. Selecting a confocal channel setup 1. Some default channel presets are available from the OC Panel under the Confocal- Channel-Settings heading. Selecting one will initialise the relevant lasers/detectors. Ask facility staff if the defaults are not suitable for your application. 2. The number of detectors and lasers that are active will display in the A1Plus Compact GUI in the right hand margin on the screen 7

8 Adding a brightfield channel 1. Press the Channel Settings button in the A1 Compact GUI window 2. Press the Transmitted Detector In button to add a Brightfield channel 3. Select Ok to confirm 4. You will see that a TD detector has appeared in the list of channels and signifies that a brightfield image will be scanned 5. If the Transmitted Detector is active and you wish to view the sample looking down the microscope under brightfield illumination, press the Brightfield(Eyes) Optical Config button 6. Press the Eye Port button at the top of the A1 Compact GUI window Capture an image 1. Before you can scan with the lasers you have to remove the laser interlock by pressing the red Remove Interlock button 2. You can see the live image at any time by pressing the Scan button 3. To acquire an image press the Capture button 4. The captured image is displayed as a merge of all the channels by default. You can view individual channel images by selecting the channel tabs at the bottom of the image window. 5. To see a montaged view of all channels, select this icon from the top of the image window. 8
9 Pre-scan acquisition settings *Consult the labelled diagram of the A1 Compact GUI (page 11) if you're not sure where any of the buttons mentioned below are 1. Before you can scan with the lasers you have to remove the laser interlock by pressing the red Remove Interlock button. 2. The scan direction buttons indicate unidirectional and bidirectional scanning. When bidirectional mode is selected the image acquisition frame rate doubles. Only consider bidirectional mode when carrying out a live cell experiment. 3. Select an image size (e.g. 512x512 pixels in xy). The size affects the xy image sampling with larger sizes resulting in smaller um/pixel values and thus better spatial resolution but the scan time is also increased. The most commonly used sizes are 512 or Now choose a scan speed, start by selecting the lowest number when the control by Pixel dwell option is enabled. Higher values represent a longer pixel dwell and hence a slower scan. You may need to use a slower scan speed if your signal is low but this could increase the photobleaching rate. 5. Ensure that the Normal and Ch Series buttons are enabled (green). Channel Series enables sequential scanning mode which means only one laser is scanning at any particular time. If Channel Series is turned off then all lasers scan simultaneously which can lead to fluorescence crosstalk where emission from one fluorophore is detected by more than one detector. 6. Press the Optimal Pinhole button, this sets the detection pinhole to a diameter that gives the best compromise between light throughput, noise and resolution. Closing the pinhole results in a thinner optical section and better lateral and axial resolution due to rejection of out of focus light. 9
10 Optimising scan settings for best image quality 1. Press the Scan button (lasers scan and the live image is constantly refreshed). Pressing Scan again will stop the scanning process. 2. The Find button can be used to increase the live image refresh rate by decreasing the size of the scanned area and the image quality. Use this option if you cannot find the sample by scanning with the continuous Scan button. 3. Each detector, signified by the coloured band and labelled with the fluorophore name in the compact GUI, generates its own image. The Live window shows the merged colour image of all the active detectors. 4. The default detector settings, HV (Gain), Offset and Laser power are set conservatively. If the live window is black this usually means the detector settings need to be adjusted. 5. It is recommended that you optimise one channel (detector) at a time. An easy way to do this is to enable the Channel Setup tick box. When selected the square tick box next to each detector changes to a radio button (circle), the active detector is the one with the filled in grey circle. You can toggle between the different channels by clicking in the circle next to the channel heading. 6. Note that when Channel Setup is enabled you will only see the image generated by that selected detector. 7. If the image is black you can raise the HV (Gain) of the detector to a higher value until you can see an image. Alternatively you can use the AutoGain (AG) button at the top of the Compact GUI to calculate the optimal Gain value based on the current laser power. 8. Note that increasing gain leads to increased image noise and eventually a lower signal to noise ratio (SNR). Therefore the best image quality is usually attained by adjusting several parameters, namely the gain, laser power and the scan speed. 9. Keep laser power as low as possible to minimise bleaching of the sample. Gain should be set so that image noise is negligible. Offset at zero and scan speed 6.2 pixel dwell or faster. 10
11 11
-4095 (white). The aim is to set the scan parameters so that the pixels are just below saturation level (4095). 2.")
12 Image Saturation 1. As well as the image being too dark, it can also be too bright. The confocal acquires 12bit images. This means that any pixel in the image can have an intensity value between 0 (black)-4095 (white). The aim is to set the scan parameters so that the pixels are just below saturation level (4095). 2. In the right hand margin in the software below the Compact GUI is the LUTs tab. Select the tab and click on the Pixel Saturation Indicator button. When active this will colour any pixels in the image that have reached the 4095 maximum intensity value. The colour given to over saturated pixels can be selected through the down arrow next to the button. An image window must be open in order for the Pixel Saturation Indicator button to appear. 3. Images showing the saturation indicator turned on and off. Saturated pixels in this case have been coloured yellow. 4. Continue to scan using the Channel Setup option, switch between the detectors optimising each image so that it is just below saturation intensity level (no or minimal pixels at 4095 intensity). 5. If you stop scanning this automatically turns off the Channel Setup option and pressing Scan again will activate all lasers/detectors. 12

13 Capture a single XY image 1. Once the scan parameters have been optimised, press the Capture button to acquire a single scan of each active channel. Image Window Options 1. The captured image is displayed as a merge of all the channels by default. You can view individual channel images by selecting the channel tabs at the bottom of the image window. 2. To see a montaged view of all channels, select this icon from the top of the image window. Adding a scale bar 1. Every Nis-Elements image window contains a scale bar icon. Press the button to add a scale bar to the image 2. To adjust the scale bars length, width or colour, select the down arrow next to the icon and select Scale Properties 3. The scale bar is an image overlay so can be switched on/off by selecting the scale bar icon in the image window on which the scale appears 13

14 Capture images with Optical Zoom 1. Optical zoom enables capture of a ROI within your image at higher magnification without the need to change the objective lens. Optical zoom can improve spatial resolution by changing the pixel size but can also increase photobleaching rates. 2. The easiest way to apply a useful level of zoom is to use the Nyquist XY button found in the A1Plus Scan Area window. 3. Nyquist xy sets the zoom level based on the optimal pixel size for the selected lens. 4. A green ROI in the Scan Area window shows the area of the image that will be included in the new zoomed in image. A text box displays the actual zoom level applied, in this case 2.92x. 5. If you move the green ROI zoom box or shrink/enlarge it, it turns red. Right click on the image or within the A1plus Scan Area window to apply the new zoom settings. 14

15 Z Stack Acquisition 1. To acquire a 3D dataset you need to define a Z stack acquisition 2. Enable only the Z Stack tick box within the ND Acquisition window 3. Press the Reset button to clear any pre-existing values 4. Select the Defined by Top-Bottom button 5. Press Scan 6. Turn the focus knob towards you to move to the top of the sample then press the Top button 7. Now move the focus away from you to move to the bottom of the sample then press the Bottom button 8. Press Scan again to halt the scanning process 9. To set the optimal step size between slices press this button. The calculated size determines what step is required to produce optimal sampling according to the Nyquist-Shannon theorem 10. To acquire the Z stack press the Run Now button at the bottom of the ND Acquisition window 11. While the stack is being acquired a progress window will appear. Pressing Abort will stop the acquisition and close the z stack window. Pressing Finish will stop the z stack but the stack window will remain open. 15
16 Z stack viewing options 1. You can view the different slices of the stack by left clicking with the mouse on the horizontal blue bars running along the bottom of the z stack image window 2. A z stack can be viewed in various ways. Pressing the Slices View button will display the XY and YZ orthogonal views as well as the standard XY view 3. To display a volume rendering of the stack press the Volume View button 4. To see all slices of the stack displayed as a montage, press the Tiles View button 5. To generate a Maximum Intensity Projection press this button 6. To save an image of any of these views, select Edit>Create new document from current view. Then Select File>Save As from the top menu, choose either ND2 or Tiff as the file format. 16

17 XYZT Experiments 1. Set up the scan settings as required 2. Enable both the Z and Time check boxes in the ND Acquisition window 3. Select the Time tab and tick the box under the Phase column. You can add multiple time phases which will run sequentially. 4. The Interval time sets the delay between image captures 5. Set the total time lapse time under the Duration column 6. Once these parameters are filled in, the number of loops will be calculated 7. Tick the Save to file check box and input a destination for the data 8. Select the Run Now button to start the time lapse 17

18 Multi-position XYZT Experiments 1. Enable the Z and Time options and set up these parameters as described above 2. Enable the XY check box in the ND Acquisition window 3. Here you can add multiple stage positions. Move to the position of interest and select the check box under the Point Name column 4. Repeat this process to add multiple xy positions to the list 5. If you enable the Move Stage to Selected Point check box, when you select a position in the list the stage will move to that point 6. To update a positions XYZ coordinates select it from the list, adjust the focus/position on the microscope and then press the horizontal arrows that point towards the XY and Z coordinates. 18
 3.")

 from which you will decide how big an area you will tile at a high magnification (Scanning). 3.")
19 Tile-Scan Experiments Basic Tiling 1. Enable the Large Image tick box in the ND Acquisition panel 2. Choose whether the tiled area is defined by the number of consecutive fields of view or by absolute area (mm x mm) 3. Enable the Stitch option if you want the output image to be the montage of all the tiles joined together 4. Select an overlap of between 10-15% 5. You can also enable any of the other ND Acquisition tabs to combine experiment types i.e. tiling z stacks or time lapse experiments 6. Select Run Now to start the acquisition Advanced Tiling 1. Select Acquire>Scan Large Image from the top menu 2. In the Capturing section select the lens to use to capture a low magnification overview (Macro image) from which you will decide how big an area you will tile at a high magnification (Scanning). 3. At this stage you can also choose the high magnification lens to be used for the actual tile scan (Scanning) 4. You can see the live image and choose your position to tile by pressing the preview button 5. Select Capture in the Stage Overview with Macro Image section. This will capture a single image at the stage's current location and display the macro image result. 6. Red squares will appear on the image representing the fields of view to be scanned at the currently selected Scanning lens. 19


20 7. You can alter the number of fields of view to be scanned in the Area section and the number of fields of view on the macro image is automatically updated. 8. The Fields Placement option determines whether the tiling is around the current stage position or if the current position is the top left corner of entire tile scan. 9. Set a degree of overlap for stitching in the Overlap section (10-15%) 10. Select whether the final output is the tiled image or the individual tiles 11. You can select whether the tile scan is automatically saved if you set up a file path 12. To acquire a tiled Z stack enable the Z Series option 13. Select the number of Z planes and the step size 14. The Z stack will be acquired symmetrically around the current Z plane 15. If the ultimate aim is to generate a maximum intensity projection of the tiled z stack then you can just enable the Max IP option. Note that the MIP will be generated automatically and you will lose the individual z stack images. 16. To begin the tiling experiment press the Scan button 20


21 FRAP/Bleaching Experiments 1. This section of the manual describes how to enable and use the bleaching features of the confocal and only serves as a reference if you have already been trained to perform FRAP experiments by facility staff 2. Select the FRAP-FRET layout from the bottom left corner of the screen. This will show you additional toolbars required to carry out a FRAP experiment 3. A FRAP acquisition usually consists of several phases which are run sequentially: Acquisition-A few frames are acquired of the cell before bleaching Bleaching-A number of scans are acquired at high laser power of an ROI containing the area to be bleached Acquisition-Many frames are acquired post bleaching in order to monitor the fluorescence recovery within the bleached area 4. Use the ND Stimulation window to configure the required phases. Select the tick box under the phase column to add a phase 5. Under the Acq/Stim heading you can select what procedure happens during that particular phase i.e. acquisition or bleaching 6. The Interval, Duration and Loops columns are used to configure over what time period that particular phase runs 7. So for an Acquisition phase the images will be acquired with the capture settings you have configured in the A1Plus Compact GUI 8. Tick the Perform Time Measurement box so that the intensity values within the ROI(s) are monitored during the entire experiment. 9. The capture settings used during the bleaching phase are configured using the A1plus Stimulation window 10. Select the Synchronize lasers tick box if you'd like the same laser lines/power to be used on all image bleaching ROIs 21
22 11. HV Mode should be set to Keep HV. This feature selects whether the detector gain is set to zero during the non-acquisition bleaching phase to avoid detector overload which can occur if too much light hits the detector. 12. To select a laser line for bleaching press the wavelength button i.e. 405 then set % power you would like to bleach with. Multiple lasers can be used for bleaching simultaneously if required. 13. The Scan Speed drop down box refers to the scan speed (frames per second) used when bleaching the ROI. A slower scan speed will increase the bleaching rate but may be less suitable if the recovery of the protein of interest is dynamic. 14. Manual Shift Alignment can be configured by facility staff if you find that the bleach ROI you place on the image doesn't perfectly align with the area actually bleached. 15. Find an area on the sample that you'd like to bleach then select the down arrow next to the ROI button found in the right margin of the live window. Select the Simple ROI Editor menu option. 16. Select either the Rectangle or Ellipse ROI tool and draw the ROI onto the image. The ROI can be resized by moving to the edge of the ROI when the cursor changes to a double headed arrow. The ROI can be moved around the image when the cursor changes to a four headed arrow. 17. To Delete a single ROI click on it then press the Delete key on the keyboard 18. To delete all ROIs press the Clear button in the Simple ROI Editor tool panel 19. Press Finish when you have finished editing the ROIs 20. Ideally you should have a minimum of 3 ROIs. One assigned as the bleach region and two others, the first being a Background ROI and the second being a Reference ROI. 21. Right click on the Bleach ROI and select Use as stimulation ROI 22. Ensure that the Background ROI is placed on a black area of the image where there are no cells. Then right click this ROI and select Use as background ROI 22


23 23. Place the third ROI on another cell which won't be bleached, then right click on it and select use as Reference ROI 24. Note that each ROI now has a label that denotes its function, S1, R2 and B3 25. Now that a Stimulation ROI has been defined, the Apply Stimulation Settings button is available in the ND Stimulation menu. When this button is pressed the Run Now button becomes available. 26. Press Run Now to start the FRAP experiment 23

24 Appendix Saving Images 1. Select the image window to save then select File>Save As from the top menu. Enter a file name and select ND2 as the file format. Export images in tiff format 1. Open the Image to be exported then select File>Import/Export>ND export to tiff Under Output select Browse to choose where the tiffs will be stored and use the File Prefix box to name the file 3. Index order allows you to choose whether separate tiff images are created for each plane of a z stack or whether a multi-page tiff is created (single tiff stack image containing all z planes) 4. Tiff Compatibility Options determines at what bit depth the tiff files will be stored. Keep bit depth- If you want to keep the raw intensity data for quantification then use this option. This will save the images as a 16bit tiff but the pixel intensities will not be changed and remain within the 12bit range as they were when the image was acquired. Scale 12bit to 16bit- A 16bit tiff is created and the intensities will be within the 16bit range. You cannot use this image for intensity quantification Scale 12bit to 8bit- An 8bit tiff is created and the intensities are scaled within the 8bit range, This can be useful if you want a copy of the image that can be viewed in any program. Again the raw intensity data is lost with this option. 5. Channels determines how the different channels are handled in the exported tiff Mono image for each channel- A tiff image is created for each channel and is greyscale Merge channels to RGB image- A single tiff image is created which will show a colour merge of the channels. This still contains the raw data if you select to keep bit depth as well 24

25 Keep image as multchannel- Results in a multiplane tiff file where each frame of the stack is a channel and displayed in grey scale. The image contains the raw data if the keep bit depth option has also been selected Kohler Illumination 1. Select the brightfield optical config 2. Ensure the condenser aperture turret is set to the A position 3. Focus the sample 4. Open the condenser aperture fully 5. Close down the field aperture fully 6. If the image of the field aperture is not in sharp focus, adjust the focus by moving the condenser up/down 7. Centre the image of the field aperture using the centring screws 8. Open the field aperture until you can see the full field of view but no more 9. Remove an eyepiece and look down, if you open and close the condenser aperture you can now see its image 10. Close the condenser aperture until ~70% of the back illuminated area is filled 11. Reinsert the eyepiece 12. Kohler should be adjusted whenever you change the lens 25


26 Perfect Focus System (PFS) Operation PFS provides real time focus correction on a plane of interest during time lapse experiments carried out above room temperature. PFS is required because the microscope components expand as they heat which can cause the focus to drift. The coverslip/medium interface is tracked and the distance from the interface to the plane of focus is recorded as an offset value. If a change in the distance from the coverslip interface is detected, the lens will move in the same direction to compensate, this maintains the same offset value and therefore the focal plane is unchanged. 1. Focus on the sample 2. On the front of the microscope a green LED will light next to the word Focus if the PFS can be turned on. This indicates the refractive index interface has been found. 3. Press the On button the front of the microscope to enable PFS 4. Check the focus again now PFS has been turned on, you may have to adjust it again 5. To change focus while PFS is enabled, use the PFS offset controller wheel 6. The blue button on the side of the controller toggles between course/fine focus 26
27 Frequently Asked Questions 1. My images look noisy, what can I do to improve image quality? 1. Noise in an image comes from various sources but becomes more obvious when the sample signal is very low and you have to set a high gain value on the detector. Averaging captures multiple images of each channel but only displays the average of the total number captured. The addition of noise to an image is a random process and by taking the average intensity of several images with varying noise values the noise is cancelled out to a degree. 2. Enable the Average button in the A1Plus Compact GUI. 3. You can select how many images per channel are acquired and used in the averaging process from the drop down arrow. 4. You will only see the average result but the capture will take 4x as long to acquire in this case. 5. Note that when Averaging is turned on, it applies it to the continuous scan as well as the captured image, so the live refresh rate will be affected. 6. Only use averaging when necessary and turn it on just before acquiring the final image. Remember that it decreases the frame rate by the factor of averaging applied and could also increase the rate of photobleaching. 2. I can't see anything down the microscope 1. Ensure you have selected one of the Optical Configuration buttons specific for viewing by eye 2. If you don't see any light emission from the lens then make sure the fluorescence shutter on the Intensilight control pad is open. The shutter is open when the green LED is lit above the Open button. 3. If you can see light at the objective check that the stage is positioned over the cells/tissue and that the focus hasn't changed 4. If you are trying to view brightfield by eye remember that if you are using the transmitted detector you will need to press the Eye Port button as well as the Brightfield OC button 27
28 3. I can't fit all of the tissue into the field of view 1. You can scan an area that is bigger than the field of view at the current magnification either by switching to a lower magnification lens or if you want to maintain the resolution you can perform a tiling experiment. See the section on tiling for how to set this up. 28
Title: Leica SP5 Confocal User Manual
 Title: Leica SP5 Confocal User Manual Date of first issue: 23/10/2015 Date of review: Version: Admin For assistance or to report an issue Office: CG07 or 05 Email: Igmm-imaginghelpdesk@igmm.ed.ac.uk Website:
TRAINING MANUAL. Olympus FV1000
 TRAINING MANUAL Olympus FV1000 September 2014 TABLE OF CONTENTS A. Start-Up Procedure... 1 B. Visual Observation under the Microscope... 1 C. Image Acquisition... 4 A brief Overview of the Settings...
Nikon A1Rsi Confocal Start-Up Sequence
 1. Turn the key on the Nikon LUN-V Laser Launch. Nikon A1Rsi Confocal Start-Up Sequence 2. Press the button the left side of the A1Rsi Controller unit. 3. Turn on the power strip underneath the microscope.
Nikon SIM-E & A1-R System
 Nikon SIM-E & A1-R System USER GUIDE LSU Health Sciences Center Shreveport Research Core Facility June 01 2017 Chaowei Shang 1 Table of Content 1. Start Up the System... Page 3 Hardware and microscope
Guide to Confocal 5. Starting session
 Guide to Confocal 5 Remember that when booking and before starting session you can check for any problems at https://www.bris.ac.uk/biochemistry/uobonly/cif/index.html Starting session Switch on microscope
Leica SP8 TCS Users Manual
 Version : 07/08/0 Leica SP8 TCS Users Manual Start up:. Turn the PC Microscope, Scanner Power, Laser Power, and the Laser Emission key to on (bottom right of desk).. Turn on the fluorescent lamp (top left
Nikon Eclipse Ti A1-A Confocal Operating Manual. Start-up. Microscope
 Nikon Eclipse Ti A1-A Confocal Operating Manual Start-up 1. Turn on Excite Fluorescent light power supply- metal halide. a. Cool down as for mercury bulb b. Wheel closed liquid light guide 2. Turn on power
Nikon AZ100. Laser Scanning Macro Confocal Microscope. Jordan Briscoe Adam Fries Kyle Marchuk Kaitlin Corbin. May 2017.
 Nikon AZ100 Laser Scanning Macro Confocal Microscope Jordan Briscoe Adam Fries Kyle Marchuk Kaitlin Corbin May 2017 Contents 1 Introduction 2 2 Hardware - Startup 2 3 Software/Operation 4 3.1 Multidimensional
LSM 780 Confocal Microscope Standard Operation Protocol
 LSM 780 Confocal Microscope Standard Operation Protocol Basic Operation Turning on the system 1. Sign on log sheet according to Actual start time 2. Check Compressed Air supply for the air table 3. Switch
LSM 800 Confocal Microscope Standard Operation Protocol
 LSM 800 Confocal Microscope Standard Operation Protocol Turning on the system 1. Switch on the Main switch (labeled 1 and 2 ) mounted on the wall. 2. Turn the Laser Key (labeled 3 ) 90 clockwise for power
Zeiss LSM 880 Protocol
 Zeiss LSM 880 Protocol 1) System Startup Please note put sign-up policy. You must inform the facility at least 24 hours beforehand if you can t come; otherwise, you will receive a charge for unused time.
Leica SP8 TCS Users Manual
 Leica SP8 TCS Users Manual Follow the procedure for start up and log on as posted in the lab. Please log on with your account only and do not share your password with anyone. We track and confirm usage
Things to check before start-up.
 Byeong Cha Page 1 11/24/2009 Manual for Leica SP2 Confocal Microscope Enter you name, the date, the time, and the account number in the user log book. Things to check before start-up. Make sure that your
LSM 710 Confocal Microscope Standard Operation Protocol
 LSM 710 Confocal Microscope Standard Operation Protocol Basic Operation Turning on the system 1. Switch on Main power switch 2. Switch on System / PC power button 3. Switch on Components power button 4.
Operating Checklist for using the Laser Scanning Confocal Microscope. Leica TCS SP5.
 Smith College August 2010 Operating Checklist for using the Laser Scanning Confocal Microscope Leica TCS SP5. CONTENT, page no. Startup, 1 Initial set-up, 1 Software, 2 Microscope Specimen observation
Quick Guide for Zeiss 710 Laser Scanning Confocal MGH Cancer Center
 Quick Guide for Zeiss 710 Laser Scanning Confocal MGH Cancer Center For any questions or concerns, please contact: Linda Nieman lnieman@mgh.harvard.edu Office: (617) 643-9684 Cell: (512) 565-8076 Chenyue
Microscopy from Carl Zeiss
 Microscopy from Carl Zeiss Contents Page Contents... 1 Introduction... 1 Starting the System... 2 Introduction to ZEN Efficient Navigation... 5 Setting up the microscope... 10 Configuring the beam path
Nikon A1R. Multi-Photon & Laser Scanning Confocal Microscope. Kyle Marchuk Adam Fries Jordan Briscoe Kaitlin Corbin. April 2017.
 Nikon A1R Multi-Photon & Laser Scanning Confocal Microscope Kyle Marchuk Adam Fries Jordan Briscoe Kaitlin Corbin April 2017 Contents 1 Introduction 2 2 Start-Up 2 3 Imaging 4 3.1 Sample Alignment...........................................
Zeiss LSM 780 Protocol
 Zeiss LSM 780 Protocol 1) System Startup F Please note the sign-up policy. You must inform the facility at least 24 hours beforehand if you can t come; otherwise, you will receive a charge for unused time.
Training Guide for Leica SP8 Confocal/Multiphoton Microscope
 Training Guide for Leica SP8 Confocal/Multiphoton Microscope LAS AF v3.3 Optical Imaging & Vital Microscopy Core Baylor College of Medicine (2017) Power ON Routine 1 2 Turn ON power switch for epifluorescence
Quick Guide for Zeiss 710 Laser Scanning Confocal MGH Cancer Center
 Quick Guide for Zeiss 710 Laser Scanning Confocal MGH Cancer Center For any questions or concerns, please contact: Linda Nieman lnieman@mgh.harvard.edu Office: (617) 643-9684 Cell: (512) 565-8076 Chenyue
Leica TCS SP8 Quick Start Guide
 Leica TCS SP8 Quick Start Guide Leica TCS SP8 System Overview Start-Up Procedure 1. Turn on the CTR Control Box, EL6000 fluorescent light source for the microscope stand. 2. Turn on the Scanner Power
ZEISS LSM 710 CONFOCAL MICROSCOPE USER MANUAL
 ZEISS LSM 710 CONFOCAL MICROSCOPE USER MANUAL START THE SYSTEM... 2 START ZEN SOFTWARE... 3 SET THE TEMPERATURE AND THE CO2 CONTROLLERS... OBSERVATION AT OCULARS... 5 STATIF PRESENTATION... 6 ACQUIRE ONE
Contents STARTUP MICROSCOPE CONTROLS CAMERA CONTROLS SOFTWARE CONTROLS EXPOSURE AND CONTRAST MONOCHROME IMAGE HANDLING
 Operations Guide Contents STARTUP MICROSCOPE CONTROLS CAMERA CONTROLS SOFTWARE CONTROLS EXPOSURE AND CONTRAST MONOCHROME IMAGE HANDLING Nikon Eclipse 90i Operations Guide STARTUP Startup Powering Up Fluorescence
Nikon Eclipse Ti2-E Widefield/Spinning Disk Confocal Microscope Standard Operation Protocol
 Nikon Eclipse Ti-E Widefield/Spinning Disk Confocal Microscope Standard Operation Protocol Please sign on the log sheet before switching on system. Turn on system Turn on A only if confocal mode or laser
Quick Start Guide. Leica SP5 X
 Quick Start Guide Leica SP5 X Please note: Some of the information in this guide was taken from Leica Microsystems Leica TCS SP5 LAS AF Guide for New Users. This work is licensed under the Creative Commons
Nikon. King s College London. Imaging Centre. N-SIM guide NIKON IMAGING KING S COLLEGE LONDON
 N-SIM guide NIKON IMAGING CENTRE @ KING S COLLEGE LONDON Starting-up / Shut-down The NSIM hardware is calibrated after system warm-up occurs. It is recommended that you turn-on the system for at least
Cell Biology and Bioimaging Core
 Cell Biology and Bioimaging Core Leica TCS SP5 Operating Instructions Starting up the instrument 1. First, log in the log book located on the confocal desk. Include your name, your lab s PI, an account
Diskovery Spinning Disk Guide
 Diskovery Spinning Disk Guide qbi.microscopy@uq.edu.au Getting started The microscope and its peripherals (Fig. 1a) should always be turned on, but if they are not, turn them on in the following way: 1.
Zeiss 880 Training Notes Zen 2.3
 Zeiss 880 Training Notes Zen 2.3 1 Turn on the HXP 120V Lamp 2 Turn on Main Power Switch Turn on the Systems PC Switch Turn on the Components Switch. 3 4 5 Turn on the PC and log into your account. Start
Leica SPEII confocal microscope. Short Manual
 Leica SPEII confocal microscope Short Manual Switching ON sequence: 1. Turn on the Workstation under the bench (top, far right). 2. Turn on the Supply Unit - Laser box (big green switch first and then
Zeiss 780 Training Notes
 Zeiss 780 Training Notes Turn on Main Switch, System PC and Components Switches 780 Start up sequence Do you need the argon laser (458, 488, 514 nm lines)? Yes Turn on the laser s main power switch and
Quick Guide. LSM 5 MP, LSM 510 and LSM 510 META. Laser Scanning Microscopes. We make it visible. M i c r o s c o p y f r o m C a r l Z e i s s
 LSM 5 MP, LSM 510 and LSM 510 META M i c r o s c o p y f r o m C a r l Z e i s s Quick Guide Laser Scanning Microscopes LSM Software ZEN 2007 August 2007 We make it visible. Contents Page Contents... 1
Leica Sp5 II Confocal User Guide
 Leica Sp5 II Confocal User Guide Turning on the Confocal System (instructions are posted in the room) 1. Turn on Laser Power Button 2. Turn Key to On position 3. Turn on Scanner Power Button 4. Turn on
START-UP PROCEDURE 1 THE MICROSCOPE STAND 3 OBJECTIVES 5 STARTING WITH LAS (SOFTWARE) AND SETTING UP THE MICROSCOPE STAND 7
 AND SETTING UP THE MICROSCOPE STAND 7") Leica DMI AF6000LX Table of contents START-UP PROCEDURE 1 THE MICROSCOPE STAND 3 OBJECTIVES 5 STARTING WITH LAS (SOFTWARE) AND SETTING UP THE MICROSCOPE STAND 7 ACQUIRE MODULE 6 SETTING THE LIGHTPATH 6
Leica DMI AF6000LX Table of contents START-UP PROCEDURE 1 THE MICROSCOPE STAND 3 OBJECTIVES 5 STARTING WITH LAS (SOFTWARE) AND SETTING UP THE MICROSCOPE STAND 7 ACQUIRE MODULE 6 SETTING THE LIGHTPATH 6
Nikon C1si Spectral Laser Scanning Confocal Microscope. User Guide
 Nikon C1si Spectral Laser Scanning Confocal Microscope User Guide Contents: C1Si Turn-On/ShutDown Procedures... 2 Overview... 4 Setup for epi-illumination to view through the eyepieces:... 5 Setup for
Leica TCS SP8 Quick Start Guide
 Leica TCS SP8 Quick Start Guide Leica TCS SP8 System Overview Start-Up Procedure 1. Turn on the CTR Control Box, Fluorescent Light for the microscope stand. 2. Turn on the Scanner Power (1) on the front
Zeiss AxioImager.Z2 Brightfield Protocol
 Zeiss AxioImager.Z2 Brightfield Protocol 1) System Startup Please note put sign-up policy. You must inform the facility at least 24 hours beforehand if you can t come; otherwise, you will receive a charge
Training Guide for Carl Zeiss LSM 510 META Confocal Microscope
 Training Guide for Carl Zeiss LSM 510 META Confocal Microscope AIM 4.2 Optical Imaging & Vital Microscopy Core Baylor College of Medicine (2017) Power ON Routine 1 2 Turn ON Components and System/PC switches
LSM 510 Training Notes
 LSM 510 Training Notes Turning on the system Turn on the arc lamp, found on the bench top left of the microscope. This supplies light for epifluorescence for viewing your samples through the microscope.
Using the Nikon TE2000 Inverted Microscope
 Wellcome Trust Centre for Human Genetics Molecular Cytogenetics and Microscopy Core Using the Nikon TE2000 Inverted Microscope Fluorescence image acquisition using Scanalytic s IPLab software and the B&W
Training Guide for Carl Zeiss LSM 5 LIVE Confocal Microscope
 Training Guide for Carl Zeiss LSM 5 LIVE Confocal Microscope AIM 4.2 Optical Imaging & Vital Microscopy Core Baylor College of Medicine (2017) Power ON Routine 1 2 Verify that main power switches on the
LEICA TCS SP5 AOBS TANDEM USER MANUAL
 LEICA TCS SP5 AOBS TANDEM USER MANUAL STARTING THE SYSTEM...2 THE LAS AF SOFTWARE...3 THE «ACQUIRE» MENU...5 CHOOSE AND CREATE A SETTING...6 THE CONTROL PANEL...8 THE DMI6000B MICROSCOPE...10 ACQUIRE ONE
ZEISS LSM 710 NLO Multiphoton microscope Manual/Quick guide
 ZEISS LSM 710 NLO Multiphoton microscope Manual/Quick guide Matyas Molnar, Biovis 2016 Starting the microscpe 1. Check the microscope if everything looks clean and normal. If not, report it in the logbook.
Leica SP8 Resonant Confocal. Quick-Start Guide
 Leica SP8 Resonant Confocal Quick-Start Guide Contents Start-up Preparing for Imaging Part 1 On the scope Part 2 Software interface Part 3 Heat & CO2 incubation Part 4 Other hardware options Shut-down
QUICKSTART GUIDE: WIDEFIELD HWF1 Zeiss Cell Observer Live Cell Imaging System (HAMMERSMITH, L BLOCK, ROOM 314) Imperial College London
 Imperial College London") Imperial College London Facility for Imaging by Light Microscopy QUICKSTART GUIDE: WIDEFIELD HWF1 Zeiss Cell Observer Live Cell Imaging System (HAMMERSMITH, L BLOCK, ROOM 314) Observing Life As It Happens
Imperial College London Facility for Imaging by Light Microscopy QUICKSTART GUIDE: WIDEFIELD HWF1 Zeiss Cell Observer Live Cell Imaging System (HAMMERSMITH, L BLOCK, ROOM 314) Observing Life As It Happens
REMEMBER: You have 5GB of disk space on this microscope. Check before you start if you have room for your experiment. If not delete your old data.
 1 Use of the Zeiss LSM 510 Inverted Firstly please be aware that this microscope should be treated with respect and care at all times. Rules of use: This Microscope can only be used by Masters by Research
LSM 510 Meta Training Notes
 LSM 510 Meta Training Notes Turning on the system Turn on X-Cite power supply. This supplies light for epifluorescence for viewing your samples through the microscope. Turn on the remote control switch.
Training Guide for Carl Zeiss LSM 7 MP Multiphoton Microscope
 Training Guide for Carl Zeiss LSM 7 MP Multiphoton Microscope ZEN 2009 Optical Imaging & Vital Microscopy Core Baylor College of Medicine (2017) Power ON Routine 1 2 Turn Chameleon TiS laser key from Standby
Training Guide for Carl Zeiss LSM 880 with AiryScan FAST
 Training Guide for Carl Zeiss LSM 880 with AiryScan FAST ZEN 2.3 Optical Imaging & Vital Microscopy Core Baylor College of Medicine (2018) Power ON Routine 1 2 Turn ON Main Switch from the remote control
Contents. Introduction
 Contents Page Contents... 1 Introduction... 1 Starting the System... 2 Introduction to ZEN Efficient Navigation... 5 Setting up the microscope... 10 Configuring the beam path and lasers... 12 Scanning
Zeiss LSM 510 Confocor III Training Notes. Center for Cell Analysis & Modeling
 Zeiss LSM 510 Confocor III Training Notes Center for Cell Analysis & Modeling Confocor 3 Start Up Go to System Module Turn on Main Switch, System/ PC, and Components Switches Do you need the arc lamp?
MIF ZEISS LSM510 CONFOCAL USER PROTOCOL
 MIF ZEISS LSM510 CONFOCAL USER PROTOCOL START-UP Turn on the Mercury Bulb Power Supply (if needed). Power-on the Control Box. Turn on the computer. Open the LSM 510 software. Choose Scan New Images and
OPERATING INSTRUCTIONS
 Zeiss LSM 510 M eta Confocal M icroscope OPERATING INSTRUCTIONS Starting the System: 1. Turn the black knob on the laser box one-quarter turn from Off to On. You will hear the laser cooling mechanisms
Simplified Instructions: Olympus Widefield Microscope S1230
 Contents General Microscope Operation Simple Image Capture Multi-Wavelength Capture Z-Series Timelapse Combining Capture Modes Synopsis of Other Functions Pages 2-23 24-40 41-47 48-56 57-59 60-68 69-83
ZEISS LSM510META confocal manual
 ZEISS LSM510META confocal manual Switching on the system 1) Switch on the Remote Control button located on the table to the right of the microscope. This is the main switch for the whole system including
Olympus xcellence Software - basic user guide
 Olympus xcellence Software - basic user guide This is a basic overview of setting up time lapse experiments using Olympus's xcellence software on BIU's IX81 inverted phase contrast system - the software
3. are adherent cells (ie. cells in suspension are too far away from the coverslip)
") Before you begin, make sure your sample... 1. is seeded on #1.5 coverglass (thickness = 0.17) 2. is an aqueous solution (ie. fixed samples mounted on a slide will not work - not enough difference in refractive
Before you begin, make sure your sample... 1. is seeded on #1.5 coverglass (thickness = 0.17) 2. is an aqueous solution (ie. fixed samples mounted on a slide will not work - not enough difference in refractive
Swept-Field User Guide
 Swept-Field User Guide Note: for more details see the Prairie user manual at http://www.prairietechnologies.com/resources/software/prairieview.html Please report any problems to Julie Last (jalast@wisc.edu)
Confocal imaging on the Leica TCS SP8. 1) Turn the system on. 2) Use TCS user account. 3) Start LAS X software:
 Turn the system on. 2) Use TCS user account. 3) Start LAS X software:") Confocal imaging on the Leica TCS SP8 1) Turn the system on. 2) Use TCS user account. 3) Start LAS X software: 4) Do not touch the microscope while the software is initializing. Choose your options: Turn
Confocal imaging on the Leica TCS SP8 1) Turn the system on. 2) Use TCS user account. 3) Start LAS X software: 4) Do not touch the microscope while the software is initializing. Choose your options: Turn
Nasmyth Ultraview Vox User Protocol
 Nasmyth Ultraview Vox User Protocol Switch on all wall sockets labelled Nasmyth, switch camera on (power supply located on table behind monitor), switch on laser switch in laser rack, switch computer on
NIS-Elements C (For CONFOCAL MICROSCOPE A1) Instructions (Ver. 4.40)
 Instructions (Ver. 4.40)") M487E 15.4.NF.17 (1/4) *M487EN17* NIS-Elements C (For CONFOCAL MICROSCOPE A1) Instructions (Ver. 4.40) Preface Thank you for purchasing the Nikon products. This instruction manual has been prepared for
M487E 15.4.NF.17 (1/4) *M487EN17* NIS-Elements C (For CONFOCAL MICROSCOPE A1) Instructions (Ver. 4.40) Preface Thank you for purchasing the Nikon products. This instruction manual has been prepared for
MIF ZEISS VIOLET CONFOCAL ZEN 2009 PROTOCOL
 MIF ZEISS VIOLET CONFOCAL ZEN 2009 PROTOCOL START-UP On the Switchbox, turn both black switches to the ON position. Wait for the microscope to boot up completely (watch the screen on the side of the microscope).
Confocal Application Notes Vol. 5 July 2010
 Tile Scan Prepared by Myriam Gastard, PhD Application and Technical Support Group, Leica Microsystems, Inc. In this issue of our Confocal Application Notes, proper set up of the Tile function enables you
Bi/BE 227 Winter Assignment #3. Adding the third dimension: 3D Confocal Imaging
 Bi/BE 227 Winter 2016 Assignment #3 Adding the third dimension: 3D Confocal Imaging Schedule: Jan 20: Assignment Jan 20-Feb 8: Work on assignment Feb 10: Student PowerPoint presentations. Goals for this
BX-61: Brightfield Instruction /Continue to scroll for Fluorescent Instuctions
 BX-61: Brightfield Instruction /Continue to scroll for Fluorescent Instuctions Starting up: Schematic of Olympus BX-61. 1. Turn on Olympus microscope power box (left of microscope) with toggle switch on
QUICKSTART GUIDE: WIDEFIELD WF3 Zeiss Cell Observer Live Cell Imaging System (SAF, ROOM 409) Imperial College London
 Imperial College London") Imperial College London Facility for Imaging by Light Microscopy QUICKSTART GUIDE: WIDEFIELD WF3 Zeiss Cell Observer Live Cell Imaging System (SAF, ROOM 409) Observing Life As It Happens Startup procedure...
Imperial College London Facility for Imaging by Light Microscopy QUICKSTART GUIDE: WIDEFIELD WF3 Zeiss Cell Observer Live Cell Imaging System (SAF, ROOM 409) Observing Life As It Happens Startup procedure...
1 Co Localization and Working flow with the lsm700
 1 Co Localization and Working flow with the lsm700 Samples -1 slide = mousse intestine, Dapi / Ki 67 with Cy3/ BrDU with alexa 488. -1 slide = mousse intestine, Dapi / Ki 67 with Cy3/ no BrDU (but with
b. Turn the power switch and key to on position for blue laser.
 OLYMPUS FLUOVIEW 300 CONFOCAL MICOSCOPE OPERATION PROCEDURE 1. Turn ON microscope in this order: 1) Turn on mercury lamp (Note: once the mercury lamp is turned off, DO NOT turn it back on for at least
Nikon Ti-E Microscope Manual. Rightmire Hall Ohio State University. Director: Tony Brown Rightmire
 Nikon Ti-E Microscope Manual Rightmire Hall Ohio State University Director: Tony Brown Rightmire 060 292-1205 brown.2302@osu.edu Facility Manager: Paula Monsma Rightmire 062 293-0939 292-1367 monsma.1@osu.edu
Everest System / Slidebook Operating Procedures
 Everest System / Slidebook Operating Procedures NOTICE: This guide is meant to supplement training, not replace it. All users must be trained first hand by a core employee. Training of others in your lab
Operation Guide for the Leica SP2 Confocal Microscope Bio-Imaging Facility Hunter College October 2009
 Operation Guide for the Leica SP2 Confocal Microscope Bio-Imaging Facility Hunter College October 2009 Introduction of Fluoresence Confocal Microscopy The first confocal microscope was invented by Princeton
Leica TCS SL Confocal Training. Neuroscience Imaging Core Staff. Core Director. Facility Manager
 Leica TCS SL Confocal Training Neuroscience Imaging Facility The Ohio State University Rightmire Hall 614-292-1367 Staff Core Director Anthony Brown, Ph. D. 060 Rightmire Hall 614-292-1205 brown.2302@osu.edu
Zeiss Axio Imager.A1 manual
 Zeiss Axio Imager.A1 manual Power-up protocol 1. Mercury lamp 2. Power strip on shelf 3. Computer The Mercury lamp should always be first-on and last-off. This prevents any electrical surges caused by
Usermanual for Leica SP8 confocal
 Usermanual for Leica SP8 confocal Contact information: hege.dale@uib.no & endy.spriet@uib.no 1 Table of content Important information 3 Start up procedure 4 Shut down procedure 5 Operating the DMI 8 microscope
Widefield-NikonEclipseTE200-ORCA Nikon Eclipse TE200 Inverted Microscope with Hamamatsu 1394 Orca-ER Cooled CCD Camera and Micromanager Software
 Widefield-NikonEclipseTE200-ORCA Nikon Eclipse TE200 Inverted Microscope with Hamamatsu 1394 Orca-ER Cooled CCD Camera and Micromanager Software September 2007 Check website for most current User Guide
Supplemental Method Information Zeiss LSM710
 Supplemental Method Information Zeiss LSM710 1 Under the Light Path window set up the confocal for imaging a green dye (Alexa488-EGFP). For example, set up the light path as shown here using the 488 nm
CONFOCAL MICROSCOPE (Zeiss LSM 510 META v4.2)
") Wellcome Trust Centre for Human Genetics Molecular Cytogenetics and Microscopy Core CONFOCAL MICROSCOPE (Zeiss LSM 510 META v4.2) 1) STARTING THE SYSTEM Abridged INSTRUCTIONS Switch on the mercury bulb
Wellcome Trust Centre for Human Genetics Molecular Cytogenetics and Microscopy Core CONFOCAL MICROSCOPE (Zeiss LSM 510 META v4.2) 1) STARTING THE SYSTEM Abridged INSTRUCTIONS Switch on the mercury bulb
Horiba LabRAM ARAMIS Raman Spectrometer Revision /28/2016 Page 1 of 11. Horiba Jobin-Yvon LabRAM Aramis - Raman Spectrometer
 Page 1 of 11 Horiba Jobin-Yvon LabRAM Aramis - Raman Spectrometer The Aramis Raman system is a software selectable multi-wavelength Raman system with mapping capabilities with a 400mm monochromator and
EPIFLUORESCENCE &/OR BRIGHTFIELD MICROSCOPY
 EPIFLUORESCENCE &/OR BRIGHTFIELD MICROSCOPY TURN ON THE FOLLOWING EQUIPMENT The fluorescent light (if needed) The power strip for the microscope and accessories The CoolSNAP HQ camera on the right (Turn
Zeiss Axiovert 135 Fluorescence Microscope Quick Guide / Operations Manual (v. 1.0 February 09)
") University of Chicago Integrated Light Microscopy Core Dr. Vytas Bindokas, Director http://digital.bsd.uchicago.edu By: Christine Labno, Assistant Director Room: AB-129 Phone: 4-9040 Zeiss Axiovert 135
University of Chicago Integrated Light Microscopy Core Dr. Vytas Bindokas, Director http://digital.bsd.uchicago.edu By: Christine Labno, Assistant Director Room: AB-129 Phone: 4-9040 Zeiss Axiovert 135
SHORT INSTRUCTIONS FOR OPERATING LSM1/2 (Zeiss LSM510) AT CIAN Version 1.4, September 2014
 AT CIAN Version 1.4, September 2014") CIAN LSM1 or LSM2 short instructions, version 1.4, September 2014 page 1 of 6 SHORT INSTRUCTIONS FOR OPERATING LSM1/2 (Zeiss LSM510) AT CIAN Version 1.4, September 2014 Before starting To work with LSM1
CIAN LSM1 or LSM2 short instructions, version 1.4, September 2014 page 1 of 6 SHORT INSTRUCTIONS FOR OPERATING LSM1/2 (Zeiss LSM510) AT CIAN Version 1.4, September 2014 Before starting To work with LSM1
Thor. Nikon Inverted Structured Illumination (N-SIM) & A1 Laser Scanning Confocal Microscope User Guide. v. 1.0 (12/2015)
 & A1 Laser Scanning Confocal Microscope User Guide. v. 1.0 (12/2015)") Thor Nikon Inverted Structured Illumination (N-SIM) & A1 Laser Scanning Confocal Microscope User Guide v. 1.0 (12/2015) Objectives 10x/0.45NA (WD 4 mm) Plan Apo 20x/0.75NA (WD 1 mm) Plan Apo 40x/0.95NA
Thor Nikon Inverted Structured Illumination (N-SIM) & A1 Laser Scanning Confocal Microscope User Guide v. 1.0 (12/2015) Objectives 10x/0.45NA (WD 4 mm) Plan Apo 20x/0.75NA (WD 1 mm) Plan Apo 40x/0.95NA
Practical work no. 3: Confocal Live Cell Microscopy
 Practical work no. 3: Confocal Live Cell Microscopy Course Instructor: Mikko Liljeström (MIU) 1 Background Confocal microscopy: The main idea behind confocality is that it suppresses the signal outside
Operating Instructions for Zeiss LSM 510
 Operating Instructions for Zeiss LSM 510 Location: GNL 6.312q (BSL3) Questions? Contact: Maxim Ivannikov, maivanni@utmb.edu 1 Attend A Complementary Training Before Using The Microscope All future users
Axioscan - Startup. 1. Turn on the Axioscan (button to the left) and turn on the computer. 2. Log on and start the ZEN Blue software from the desktop
 and turn on the computer. 2. Log on and start the ZEN Blue software from the desktop") Axioscan - Startup 1. Turn on the Axioscan (button to the left) and turn on the computer 2. Log on and start the ZEN Blue software from the desktop 3. Press ZEN slidescan and Start System 4. Start by changing
Axioscan - Startup 1. Turn on the Axioscan (button to the left) and turn on the computer 2. Log on and start the ZEN Blue software from the desktop 3. Press ZEN slidescan and Start System 4. Start by changing
Internal Medicine Imaging Core Emory University Department of Medicine
 Internal Medicine Imaging Core Emory University Department of Medicine 1 OPERATION OF THE ZEISS LSM 510 META YOU MUST SIGN UP TO USE THE MICROSCOPE OR COMPUTER EVERY TIME NO EXCEPTIONS Before attempting
RENISHAW INVIA RAMAN SPECTROMETER
 STANDARD OPERATING PROCEDURE: RENISHAW INVIA RAMAN SPECTROMETER Purpose of this Instrument: The Renishaw invia Raman Spectrometer is an instrument used to analyze the Raman scattered light from samples
Before you start, make sure that you have a properly calibrated system to obtain high-quality images.
 CONTENT Step 1: Optimizing your Workspace for Acquisition... 1 Step 2: Tracing the Region of Interest... 2 Step 3: Camera (& Multichannel) Settings... 3 Step 4: Acquiring a Background Image (Brightfield)...
Microscope Confocal Sp2 Upright.
 Microscope Confocal Sp2 Upright. Welcome to the Leica Sp2 Confocal Upright tutorial. Before using the Sp2 Invert, You will need to put down your name on the reservation system = http://svintranet.epfl.ch/index.php?optio
ISCapture User Guide. advanced CCD imaging. Opticstar
 advanced CCD imaging Opticstar I We always check the accuracy of the information in our promotional material. However, due to the continuous process of product development and improvement it is possible
DIC Imaging using Laser Scanning Microscopes (LSMs) on Axio Imager Stands
 on Axio Imager Stands") DIC Imaging using Laser Scanning Microscopes (LSMs) on Axio Imager Stands Differential Interference Contrast (DIC) imaging is a technique used to increase contrast in brightfield images. In confocal systems,
DIC Imaging using Laser Scanning Microscopes (LSMs) on Axio Imager Stands Differential Interference Contrast (DIC) imaging is a technique used to increase contrast in brightfield images. In confocal systems,
Nikon E800 Operating Instructions.
 Nikon E800 Operating Instructions. You can request electronic copies of this manual by contacting lshats@jhsph.edu Copies are also available on the JHU MMI Department web site. Please send your comments
CAPTURING IMAGES ON THE HIGH-MAGNIFICATION MICROSCOPE
 University of Virginia ITC Academic Computing Health Sciences CAPTURING IMAGES ON THE HIGH-MAGNIFICATION MICROSCOPE Introduction The Olympus BH-2 microscope in ACHS s microscope lab has objectives from
Simplified Instructions: Zeiss Brightfield Microscope S1000
 Contents General Microscope Set-Up Adjust Illumination Focus Condenser Open Software Image Capture Settings Shading & Color Corrections Image Capture & Viewing Scaling and Measurements Synopsis of Other
Zeiss Deconvolution Microscope: A Quick Guide
 Zeiss Deconvolution Microscope: A Quick Guide Start-up Uncover microscope. Do not put dust cover on the floor. Plug in both cameras. The default camera is the AxioCam HRm (monochrome camera) for fluorescence
1 Set up the confocal light path for imaging a green dye (Alexa488-EGFP). For example, the
. For example, the") 1 Set up the confocal light path for imaging a green dye (Alexa488-EGFP). For example, the light path as shown here using the 488 nm LASER (Laser Unit 1) reflecting off of the 405/488 nm Dichroic mirror
1 Set up the confocal light path for imaging a green dye (Alexa488-EGFP). For example, the light path as shown here using the 488 nm LASER (Laser Unit 1) reflecting off of the 405/488 nm Dichroic mirror
KEYENCE VKX LASER-SCANNING CONFOCAL MICROSCOPE Standard Operating Procedures (updated Oct 2017)
") KEYENCE VKX LASER-SCANNING CONFOCAL MICROSCOPE Standard Operating Procedures (updated Oct 2017) 1 Introduction You must be trained to operate the Laser-scanning confocal microscope (LSCM) independently.
KEYENCE VKX LASER-SCANNING CONFOCAL MICROSCOPE Standard Operating Procedures (updated Oct 2017) 1 Introduction You must be trained to operate the Laser-scanning confocal microscope (LSCM) independently.
MAKE SURE YOUR SLIDES ARE CLEAN (TOP & BOTTOM) BEFORE LOADING DO NOT LOAD SLIDES DURING SOFTWARE INITIALIZATION
 BEFORE LOADING DO NOT LOAD SLIDES DURING SOFTWARE INITIALIZATION") Olympus VS120-L100 Slide Scanner Standard Operating Procedure Startup 1) Red power bar switch (behind monitor) 2) Computer 3) Login: UserVS120 account (no password) 4) Double click: WAIT FOR INITIALIZATION
Olympus VS120-L100 Slide Scanner Standard Operating Procedure Startup 1) Red power bar switch (behind monitor) 2) Computer 3) Login: UserVS120 account (no password) 4) Double click: WAIT FOR INITIALIZATION
Zeiss LSM880 Operating Instructions. UTMB Optical Microscopy Core Jan. 16, 2018
 Zeiss LSM880 Operating Instructions UTMB Optical Microscopy Core Jan. 16, 2018 1 1. Power up the microscope Sing the LOGBOOK Steps below will provide power to the computer and all of the microscope components.