Title: Leica SP5 Confocal User Manual
|
|
|
- Leona Newton
- 6 years ago
- Views:
Transcription

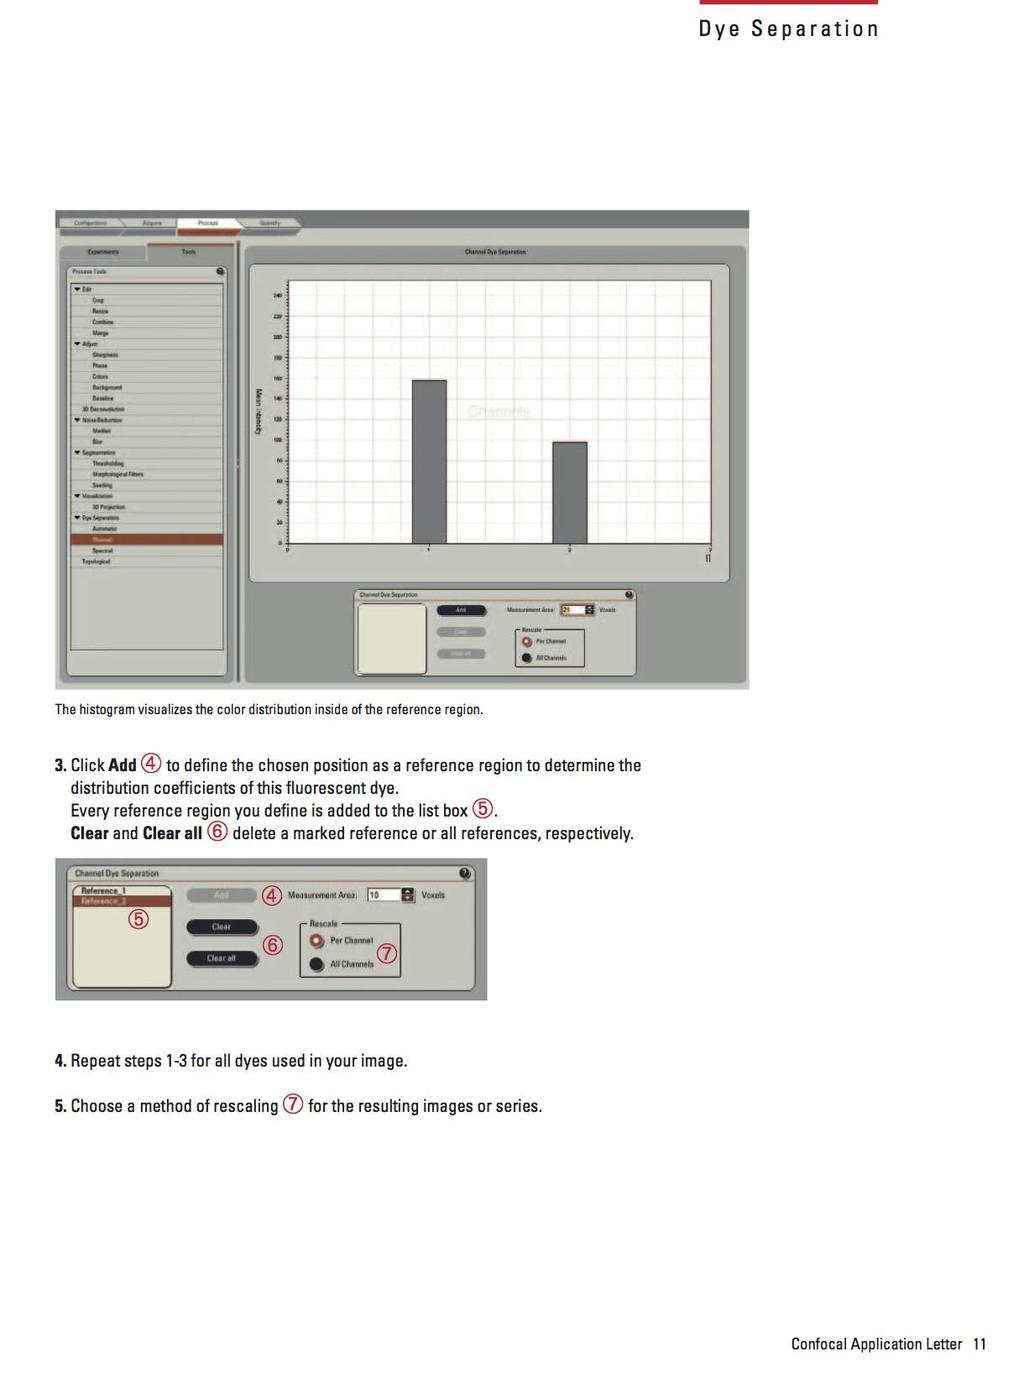
1 Title: Leica SP5 Confocal User Manual Date of first issue: 23/10/2015 Date of review: Version: Admin For assistance or to report an issue Office: CG07 or 05 Website: Download a PDF copy of manual: \\igmm-smbhost\microscope-users\microscope user manuals\leica SP5 Facility Usage Policy 1. You must have the relevant Risk Assessment/COSHH form for the work you are undertaking before using imaging facility resources 2. Users must be trained before using facility equipment 3. Please leave the microscope clean and tidy for the next user 4. Please report any issue, even if it seems minor, to facility staff 5. Any clinical waste must be placed in the orange bins provided 1
2 Table of Contents System Startup... 3 System Shutdown... 4 Mounting a sample... 5 Finding the sample by eye... 5 Configuration Menu... 6 Turning the Lasers on... 6 Setting Image Bit Depth... 6 Selecting a beam path setting... 6 Scanning a live image... 8 Creating a new beam path setting... 8 Simultaneous vs Sequential scanning modes... 8 Setting up Sequential Scanning (Recommended)... 9 Image Optimisation Procedure Capturing a Multi- Wavelength 2D Image (Optical Slice) Saving Images Capturing a Multi- Wavelength 3D Image (Z Stack) Acquiring Images at different stage positions (Mark and Find) Acquiring a Time- Lapse Appendix Exporting Images FRAP FRET Acceptor Photobleaching FRET Sensitised Emission Spectral Imaging
 -PC/Microscope, Scanner Power and Laser Power Turn the Laser Emission key to the ON position")

3 System Startup * See the labelled image below for location of each switch 1. Mercury-Metal Halide Fluorescence Lamp 2. Green confocal control switches found on the right side of the desk (from left to right) -PC/Microscope, Scanner Power and Laser Power Turn the Laser Emission key to the ON position 3. The PC will boot automatically, login using your windows user account. If you have been trained on the system a user account will have been created for you. 4. Launch LAS AF using the Desktop icon 5. The software initialises devices during start up, when messages appear click OK to proceed. 6. Select the Configuration tab and laser. Tick the boxes of the lasers you want to turn on. Move the Argon slide bar to 50% output 3

4 System Shutdown 1. Check the booking system to see if anyone is booked on the system within the next hour. If not shutdown. 2. Select Configuration>Laser and drop the Argon slider back to standby 3. Close the LAS-AF program and shut down the PC 4. Turn the Laser Emission key to the horizontal position 5. DO NOT SWITCH OFF THE LASER POWER SWITCH UNTIL THE ARGON FAN HAS STOPPED. Continue to next step while waiting. 6. Switch off Scanner Power 7. Switch off PC/Microscope (Ensure PC is off before doing this) 8. Switch off the Mercury-Metal Halide Fluorescence Lamp via the power switch 4


5 Mounting a sample 1. Ensure the correct stage insert is mounted (see facility staff if unsure) 2. Remember to invert your slide so that the cover glass is the closest surface to the lens 3. Select the objective lens either using the two buttons behind the right focus wheel or in the software within the Acquire tab then select the Objective text to see a drop down list of lenses 4. Use the joystick to move the stage if necessary. Change the XY speed of the stage by pressing the black buttons on the left side of the joystick base. The black buttons on the right change the speed in Z. Z X Y Finding the sample by eye 1. Choose a fluorescence filter cube via the buttons on the front of the microscope. Push the shutter button to toggle open/close shutter. I3 = FITC N2.1 = TxRd A = DAPI Filters Fluorescence shutter BF intensity (Controller on LHS of microscope Observation mode BF/FL Focus speed (course/fine) Z position 2. Once the sample is in focus you can record this Z position by holding the two outer Set Z buttons on the right side of the microscope. This sets this Z position to 5

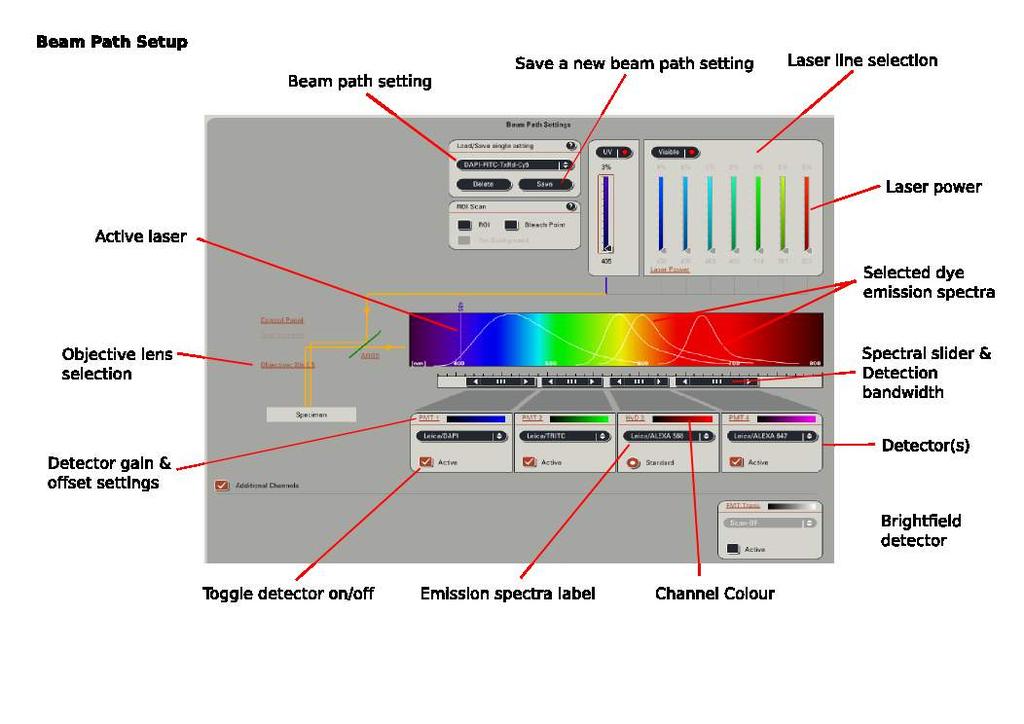
6 zero. Pressing the lower Z set button drops the lens to its lowest position. This is useful when you want to change to a different cover glass on the same slide if you re using an oil immersion lens. Dropping the lens is always good practice when changing slides too. 3. To view brightfield select an empty filter cube position using the buttons on the front of the microscope. 4. Switch on the transmitted light using the TL/IL button on the left side of the microscope. Adjust the intensity up/down with the INT buttons. 5. At this point you can either change to a higher magnification lens if required or begin the scanning process 6. Lenses 60x and above always require a drop of oil between the lens and the coverglass. 40x lenses can be either a dry or oil type. The software menu used to select the lenses tells you if the lens requires oil. Configuration Menu Turning the Lasers on 1. Select Configuration tab>laser 2. Tick the boxes next to the lasers you want to use 3. If using the Argon laser (458/488/514 lines) set the percentage output to 50% in the text box next to the power slide bar then press enter Setting Image Bit Depth 1. Select Configuration tab>settings 2. From the Image Resolution drop down list select 12bit 3. The detectors have a 12bit analogue to digital converter so if you select 12bit image resolution this ensures the full dynamic range of the detector can be utilised Selecting a beam path setting 1. Under the Beam Path Settings heading select the drop down list and scroll down to the heading User Settings, here you will find the personal beam path settings you have already configured. 6
7 7
8 Scanning a live image 1. To see a continuously scanned live image of the sample press the Live button at the bottom of the screen. You can change any of the capture parameters with or without Live mode enabled. Creating a new beam path setting 1. Activate the laser lines required by moving the vertical slide bars to >0%, the laser line will be added to the spectral diagram 2. Activate as many detectors as required using the tick box below each detector 3. Select the emission spectrum label for each channel, choose the fluorophore/protein you re using if possible. This will add the emission spectrum of the dye to the diagram. 4. By moving the spectral sliders you can adjust the detectors detection bandwidth. Click and drag a slider to move it. Hover the cursor over the edge of a slider to allow the width to be adjusted. Try to match the width of the slider to the emission spectrum of the dye. Avoid overlapping the spectral sliders with the excitation laser lines (5nm min separation). 5. Select the Channel colour box for each detector if you d like to channel the image colour (Lookup table) 6. Press a detectors PMT text to access that detectors Gain and Offset values 7. Use the Save button to store the adjusted beam path setting. This new setting will appear below the User Settings heading at the bottom of the drop down list. Simultaneous vs Sequential scanning modes 1. The process of setting up the beam path setting above describes the setup for simultaneous scanning. This means that all active laser lines and detectors scan and acquire simultaneously. This has the advantage of speed but the disadvantage is that fluorescence cross-talk (signal from one fluorophore recorded in more than one detector) is more likely. 2. In Sequential scanning mode only one detector/laser is active at any one time, making cross-talk much less likely but at the expense of speed. 8


9 Setting up Sequential Scanning (Recommended) 1. From the left hand margin of the screen under Acquisition Mode select the Seq button to open the sequential mode window 2. Select the + button which will add a scan. Each scan corresponds to a single laser/detector combination. Therefore if you are imaging in 2 channels then you will need to add 2 sequential scans. 3. For a GFP-RFP setup for example you would select the newly added Scan 1 button then configure the beam path setup so that only the 488nm laser and the detector assigned to GFP are active. Use the vertical slide bars to turn all other laser lines off. Uncheck the other detectors to inactivate them. 4. Now select the Scan 2 button and repeat the procedure but this time enable the laser line and detector for RFP and switch off the first detector and 488 laser by setting to 0% power. 5. Now when you scan the lasers/detectors are sequentially turned on and off rapidly to avoid cross talk. 6. Note that there are 3 sequential scan options: Between lines- (Recommended) The laser currently scanning switches on a line by line basis. I.e. one line of the GFP channel is imaged, then one line of the RFP channel etc. Between frames-an entire image of one channel is created first, then the laser switches and acquires an image of the second channel. Between stacks-if acquiring a Z stack, then the stack of Scan 1 (GFP) is acquired first then the stack of Scan 2 is acquired (RFP). 7. Press the Save button in the sequential scan window and save to your folder on the D: Disk. Include which wavelengths the sequential scan settings relate too, to make it easy to select another time. 9


10 Acquisition Settings 1. Select the XY window in the left hand margin 2. Format changes the size of the image in pixels. For better xy sampling choose 1024x1024. For speed choose 512x Speed determines how long the laser spot dwells over any particular part of the sample. The higher the frequency the lower the dwell time and thus the lower the exposure. Optimal values can range between Hz. 4. Tick the Pinhole box which will expand the Pinhole window. Press the 1 Airy button. This selects the best compromise between light throughout, resolution and noise. It is also responsible for determining the optical section thickness with higher values increasing the thickness of the optical section. 5. Use the Zoom Factor slider to increase the image magnification. This can increase resolution because the pixel size decreases (microns per pixel). 6. Line/Frame Averaging can be used to reduce the image noise level by scanning each channel a number of times and averaging the resulting signal. Only use if you have a noisy image. Image capture time is increased as is the likelihood of phoobleaching. 7. Rotation allows the whole scanned field of view to be rotated, if you need to rotate your image while scanning. Image Optimisation Procedure 1. Start with a format of 512x512 and a speed of 400Hz. Set the laser power between 5-10% for a each channel. Do not apply zoom or averaging at this stage. 2. Press the Live button hopefully you will see an image of each channel displayed on the right hand monitor. Each channel has its own window by default and you can toggle them off/on using the panel on the far right of the image monitor. The lowest button pictured here toggles the merged view on/off. 3. Check the detector gain settings for each channel by clicking on the PMT text at the top of each detector window. Gain is used to amplify the signal thus the image brightness will increase. 4. However, high gain levels will increase the noise level in the images therefore achieving optimum exposure is always a compromise between laser power, gain and scan speed. 10

11 5. The Offset is also found in the PMT settings menu and controls the image black level. As an example setting an offset of zero means that pixel intensity values between have a grey scale value and will be visible in the image. If you set the offset to -10% this means that any pixel with an intensity lower than (4095 x 0.10) will be set to black (zero). You can use this to reduce background fluorescence but be aware that you can cancel out specific signal if not set correctly. 6. You can determine if the signal fills the dynamic range of the detectors by using the saturation indicator which is found in the toolbar to the left of the images. Press the button once and the indicator will be activated. Now any pixels which have an intensity of 4095 (max) will be coloured blue. 7. The aim is to set each channel image so that the pixel intensities are just under saturation level (4095). It s not a concern if there are a few blue pixels. Press the saturation indicator button again twice to see the channel images in their original colours. Capturing a Multi- Wavelength 2D Image (Optical Slice) 1. If you have followed the sections above you just need to decide if the image is to be captured simultaneously or sequentially. 2. Press the Capture Image button at the bottom right of the left monitor and a single scan of each channel will be acquired. Saving Images 1. Captured images will be added to the experiment. You can access the experiment images by selecting the Experiments tab in the top left corner of the left monitor. 2. Images are given a default name Image followed by an incremental number unless you uncheck the Default image basename option. 3. You can rename an image by right clicking on it then select rename. 4. Images in the experiment are stored temporarily so you must ensure you save the experiment to disk at regular intervals and at the end of the session using the Save All option at the bottom of the experiment window. 5. Images are stored as Leica LIF format by default which can be opened with FIJI s Bio-Formats plugin. 11

12 Capturing a Multi- Wavelength 3D Image (Z Stack) 1. Adjust scan parameters as for 2D image capture. 2. When optimising the image intensity for a z stack, move through focus while live scanning to find the focal plane with the highest signal intensity. Turn on the pixel saturation indicator to aid in this process. 3. Ensure the Z stack panel is visible. View the live image and move in one direction through focus using the joystick Z control until you find the top/bottom of your sample. Click on the Begin arrow on the diagram to record that position. Then move to the opposite end of the sample and click the End arrow. Stop scanning. 4. You can change the number of steps or step size by typing in the relevant boxes. It is recommended that you use the System Optimised option. This will calculated the step size and number of steps automatically according to the Nyquist-Shannon sampling theorem. 5. Click Start button to acquire the Z stack. 6. Z stacks appear in the experiment folder with the name series by default. 12

13 Capturing a Tile Scan Image (Image Stitching) 1. Enable the tile scan option in the Acquisition mode window. The tile scan window will appear. 2. Here you can see an image of the stages travel range. The cross hairs point to a small square box which represents your current XY position. Click on the + magnifying glass to zoom in on the box. 3. Clicking the mouse anywhere within the scaled region will cause the stage to move to that position, USE WITH CAUTION. Only click small distances from the current position (indicated by cross hair). 4. The Scan Field box allows you to define how many images should be captured in XY. For example type 2x2 for a square grid of 4 tiles. 5. Click on the rubbish bin button to remove the scan field setting. 6. You can customise the region to be tile scanned further by using the Mark Position button. For example to define your own xy grid, begin live scanning and move to the top left corner of the region you want to scan by using the xy joystick. Your current position is updated within the tile scan window. Click Mark Position, then move to the bottom right corner of the region you want to scan, click Mark Position again. 7. The software will calculate how many xy tiles are required to scan the area you have defined. Once finished the tiles will be stitched together. 13

14 Acquiring Images at different stage positions (Mark and Find) 1. Enable the Mark and Find option in the Acquisition Mode window. The mark and find window will appear. 2. Here you can see an image of the stages travel range. The cross hairs point to a small square box which represents your current XY position. Click on the + magnifying glass to zoom in on the box. 3. Clicking the mouse anywhere within the scaled region will cause the stage to move to that position, USE WITH CAUTION. Only click small distances from the current position (indicated by cross hair). 4. To mark a field of view to be captured click the Mark Position button. 5. Continue to add further positions to be scanned by using the joystick to move around. The positions are added to a dropdown list, selecting a position from the list will move the stage to that position. 6. The Show All Positions button will highlight within the stage area the fields of view you have marked for scanning. 7. You can delete a single position using the Clear Position button or delete all using the rubbish bin button. 8. If acquiring a Z stack at each position you can either use the same stack dimensions as defined for one position at all positions or define individual Z stacks per position. This is set using the Same Stack For All tick box. Acquiring a Time- Lapse 1. Select a beam path setting and configure each wavelength channel as required. Follow the sections above to add a tile scan, mark and find etc. 2. In the Acquisition Mode window choose the relevant time experiment from the dropdown list xt, xyt, xyzt etc. 3. This will open the Time window. Define the total duration of the time lapse and the frequency of captures in the Interval box. 4. The minimise tick box will set the shortest possible delay based on your scan speed etc. 5. The Stacks option allows you to choose how many time points you collect instead of having to input a duration + interval. 14

15 Appendix Adding a scale bar to an image 1. On an open image select the Scale icon from the set of tools left of the displayed image 2. Hold the left mouse button and drag across the image to draw a scale bar 3. To edit the length or position of the bar select the Cursor icon then click on one end of the scale bar to adjust its length or in the middle of the scale bar to move it within the image 4. To delete the scale bar select the bar using the cursor tool then select the Delete button 5. To save a copy of the image with the scale bar, right click on the image then select Snapshot all Exporting Images 1. To export an experiment or single image, right click on it in the Experiments view then select Export>As TIFF. 2. Select the destination folder for the exported images. 3. The Overlay Channels option will save a single file (RGB colour) that contains all of the wavelength channels captured. This is not the raw data and cannot be used for quantitative intensity analysis. 4. If the Overlay Channels option is not ticked then a Raw data check box appears, select this option. The greyscale 16bit images will be saved as individual TIFF files. 15
16 FRAP 16
17 17
18 18
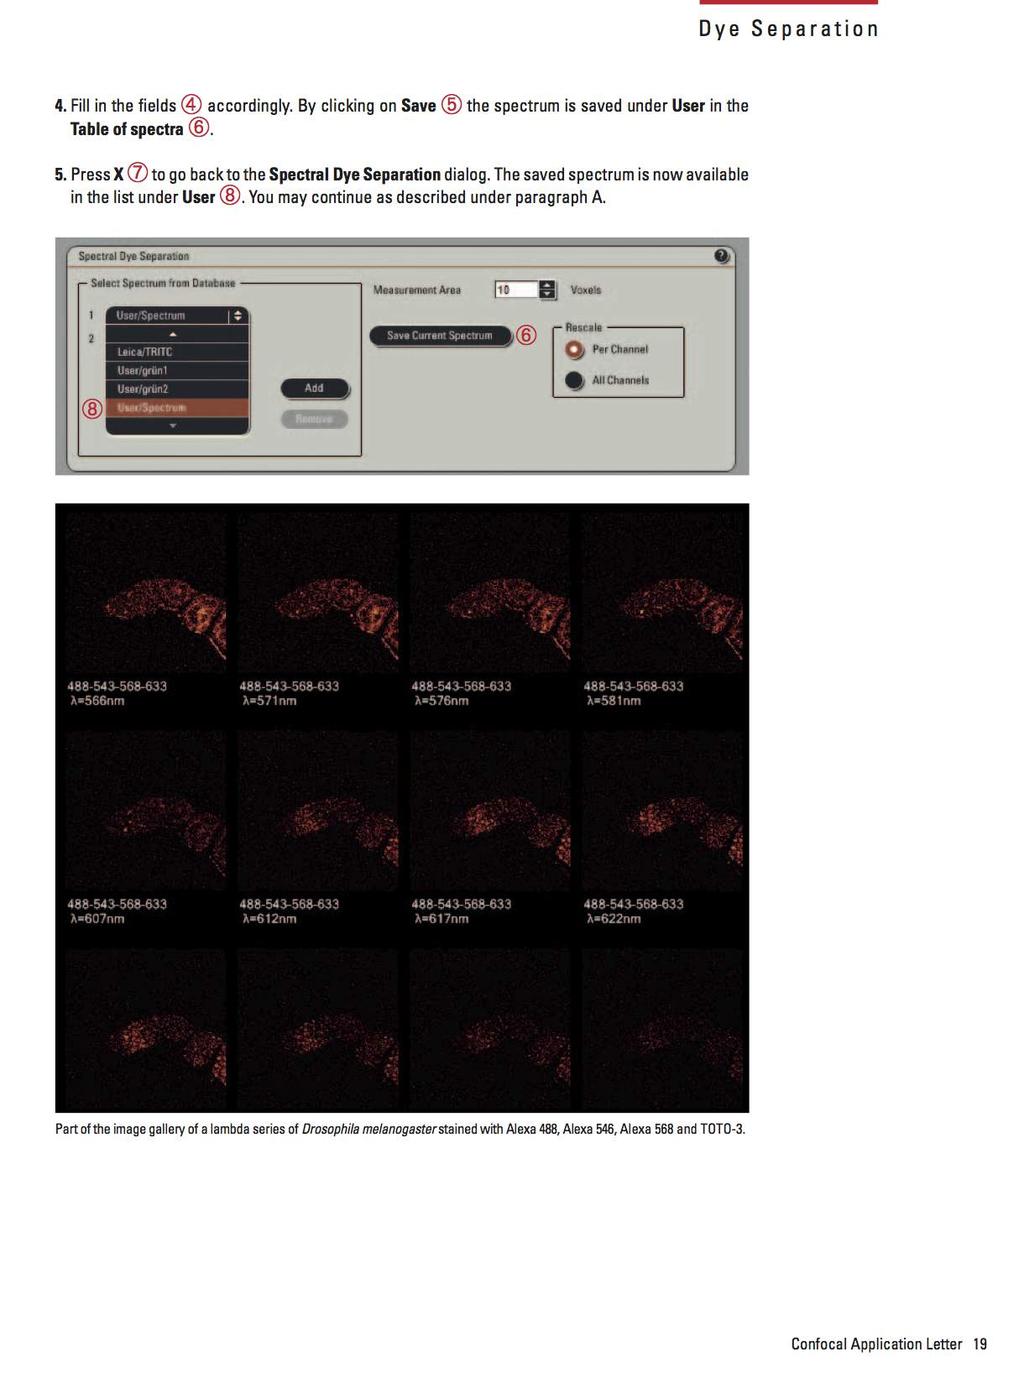
19 19
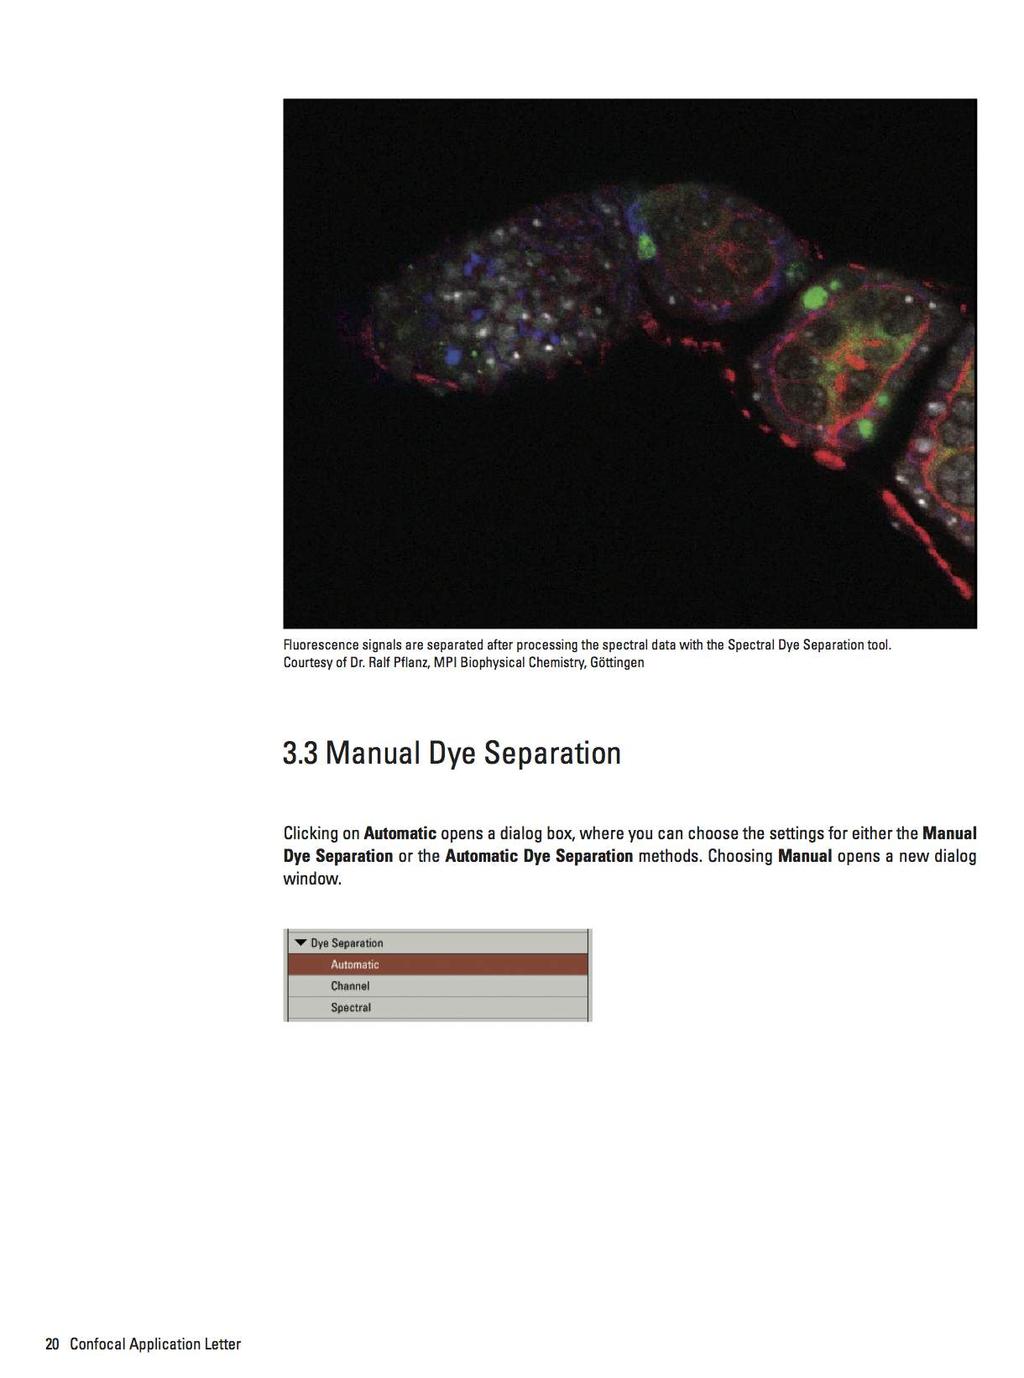
20 20
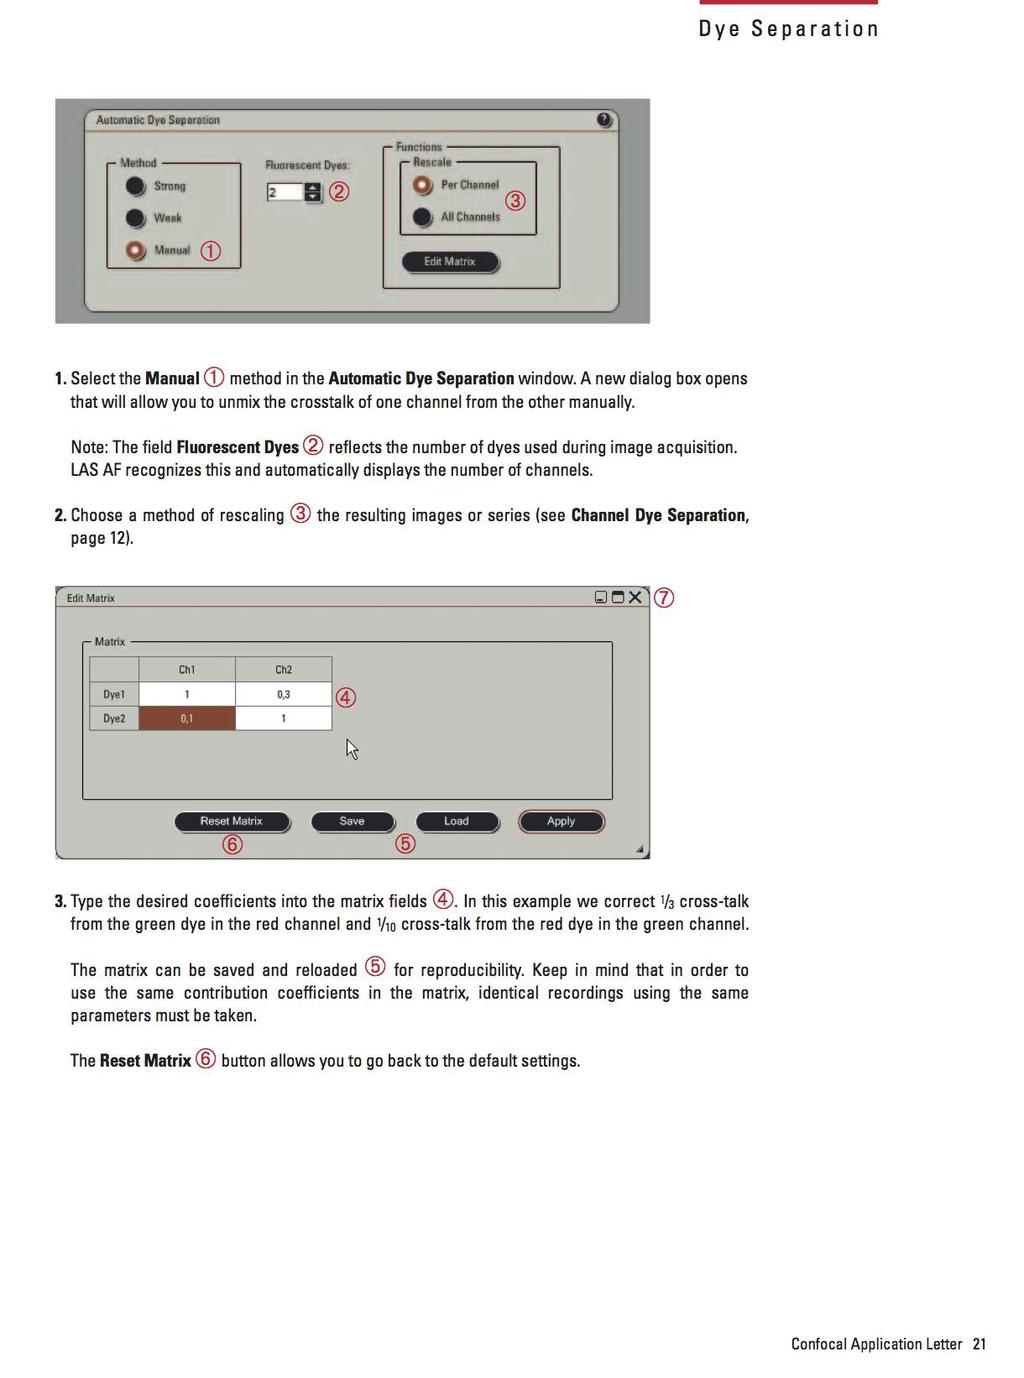
21 21
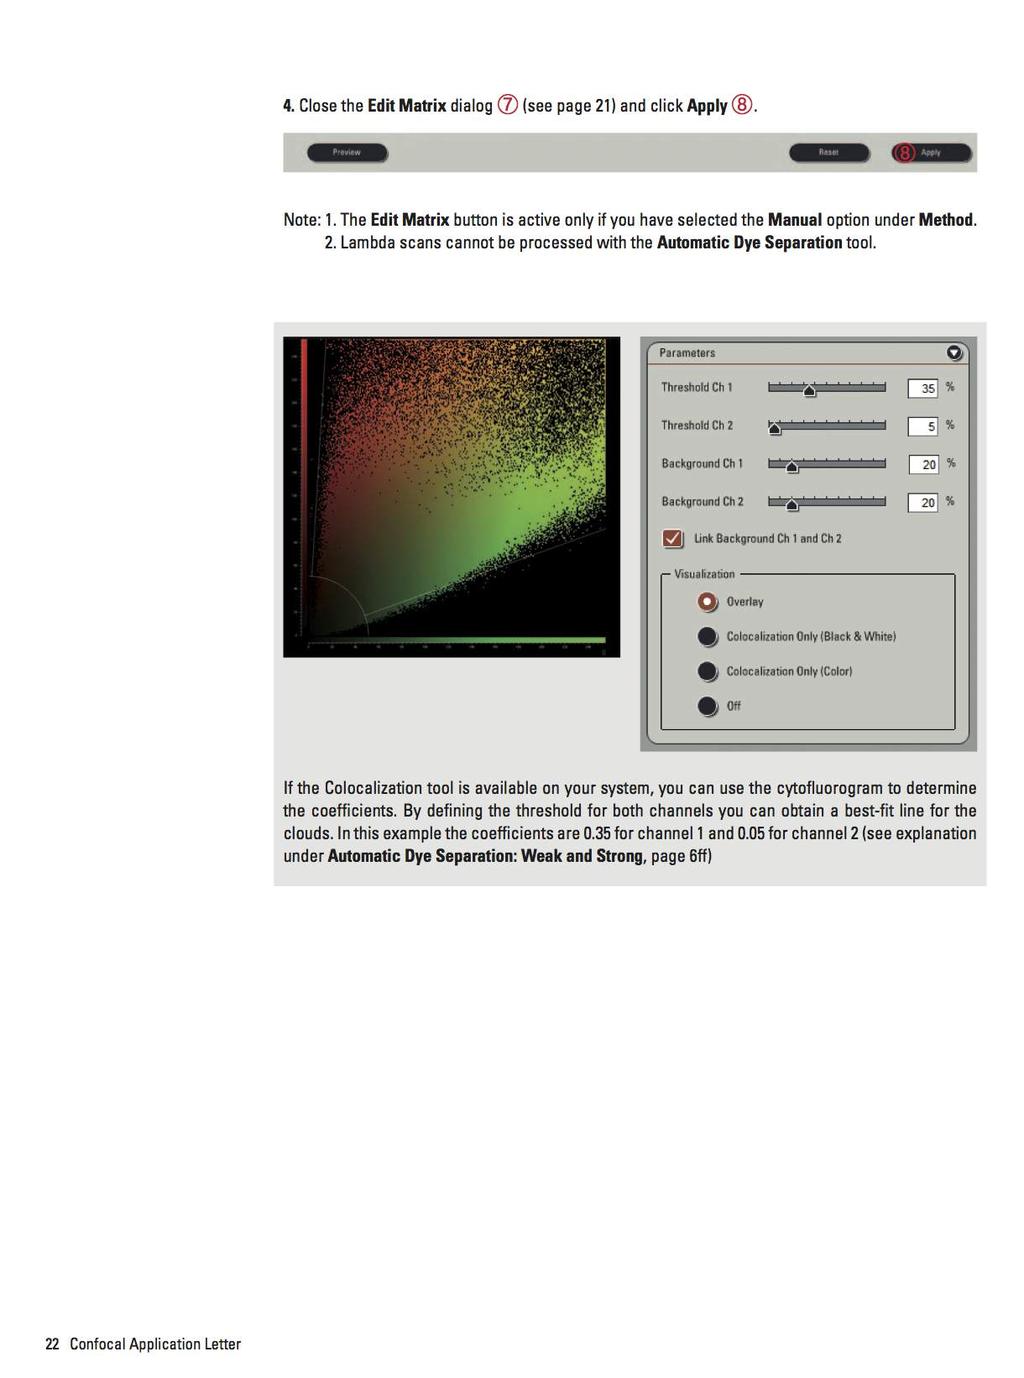
22 22
23 23
24 24

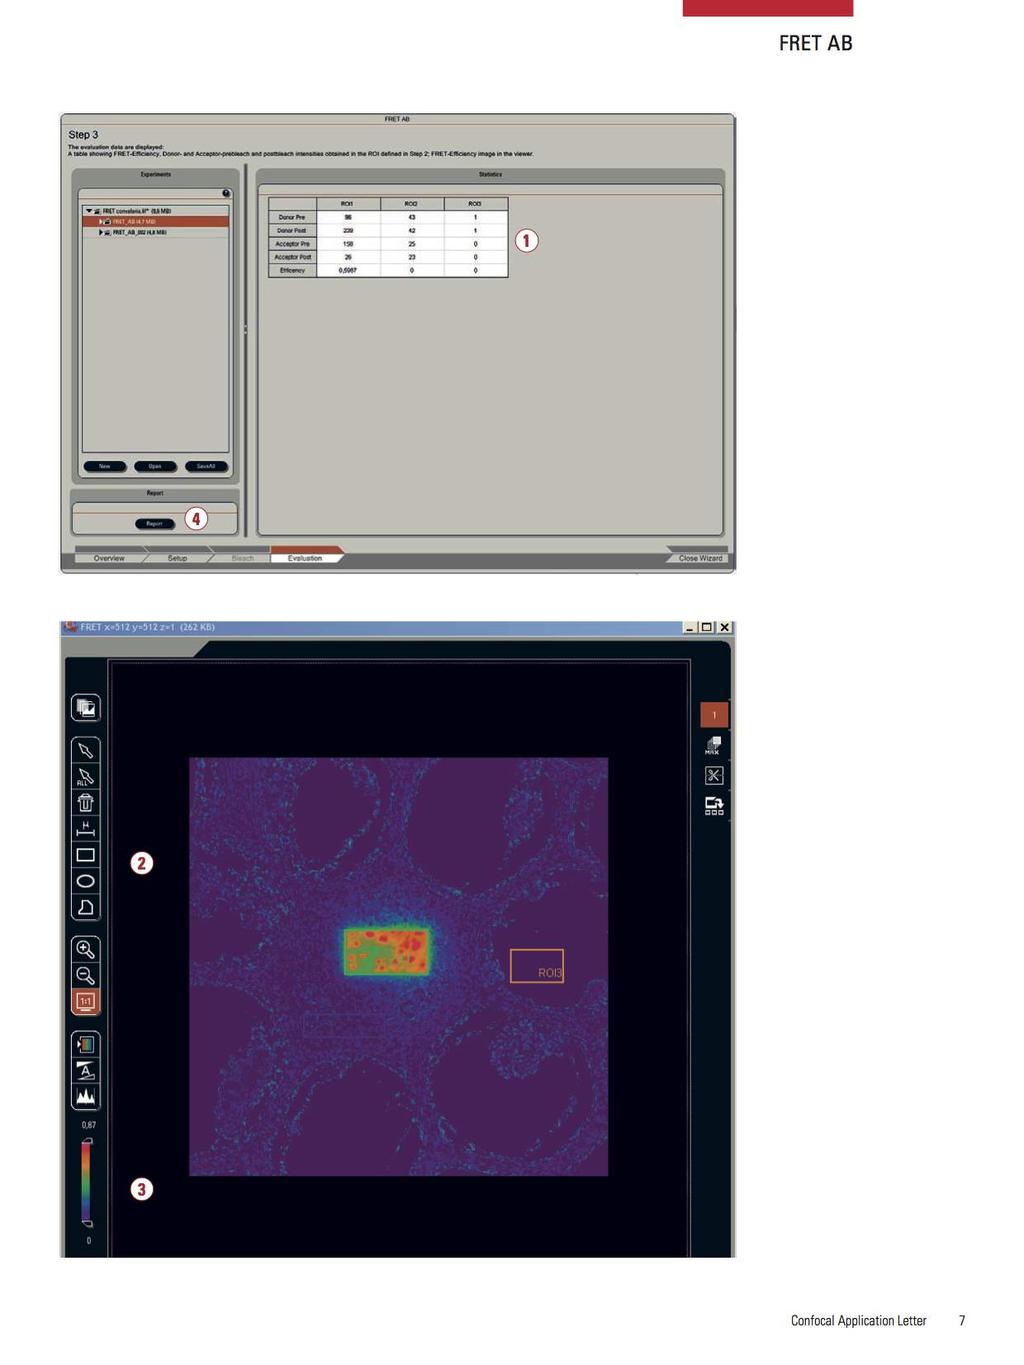
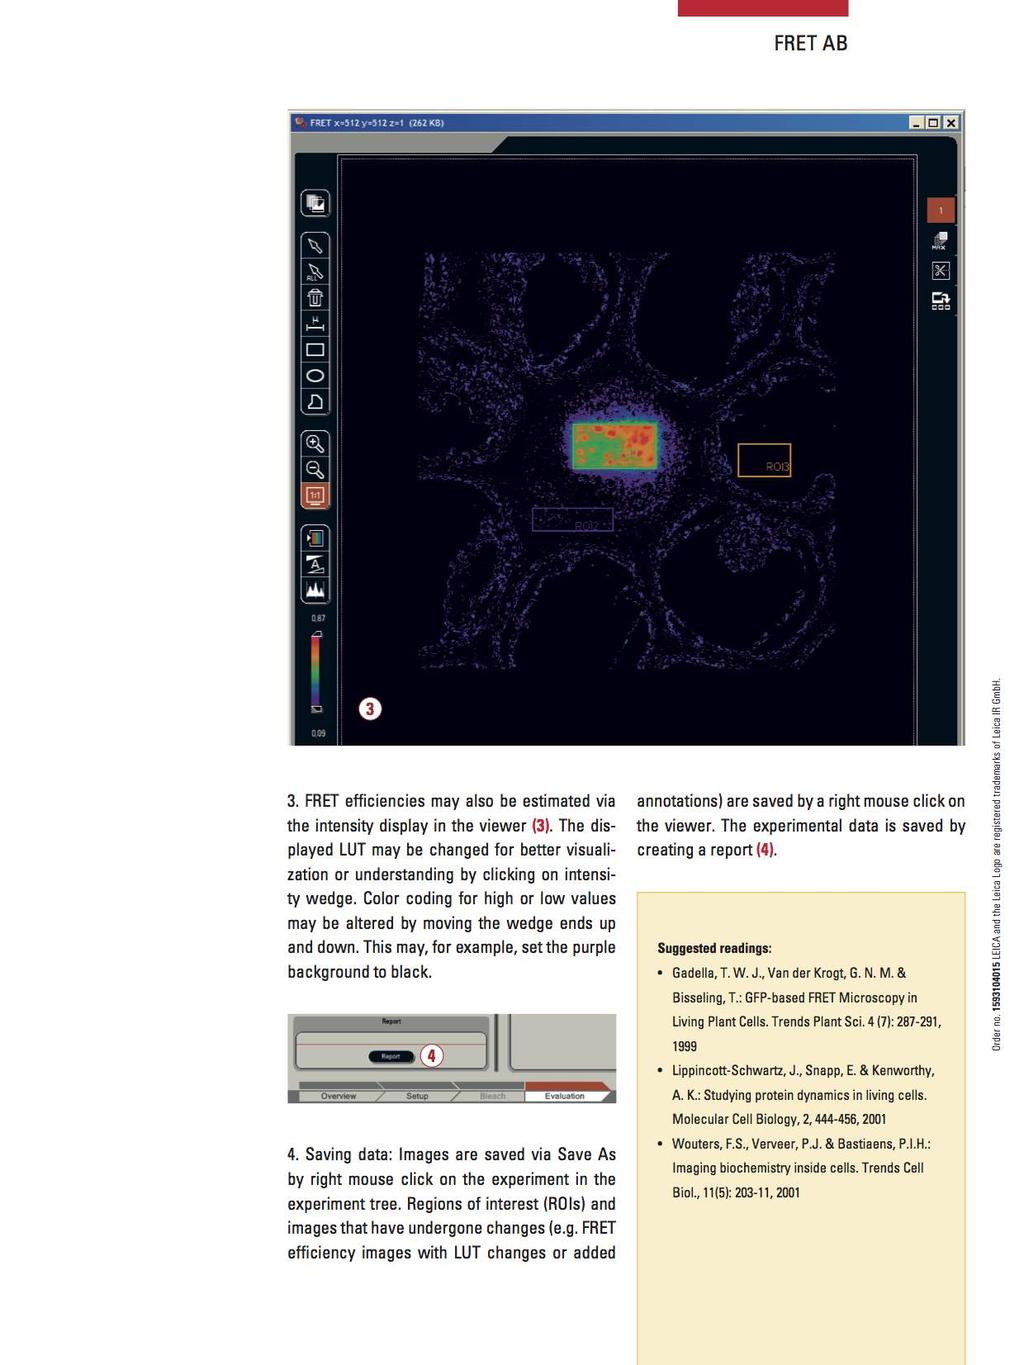
25 FRET Acceptor Photobleaching 25
26 26
27 27
28 28
29 29
30 30
31 31
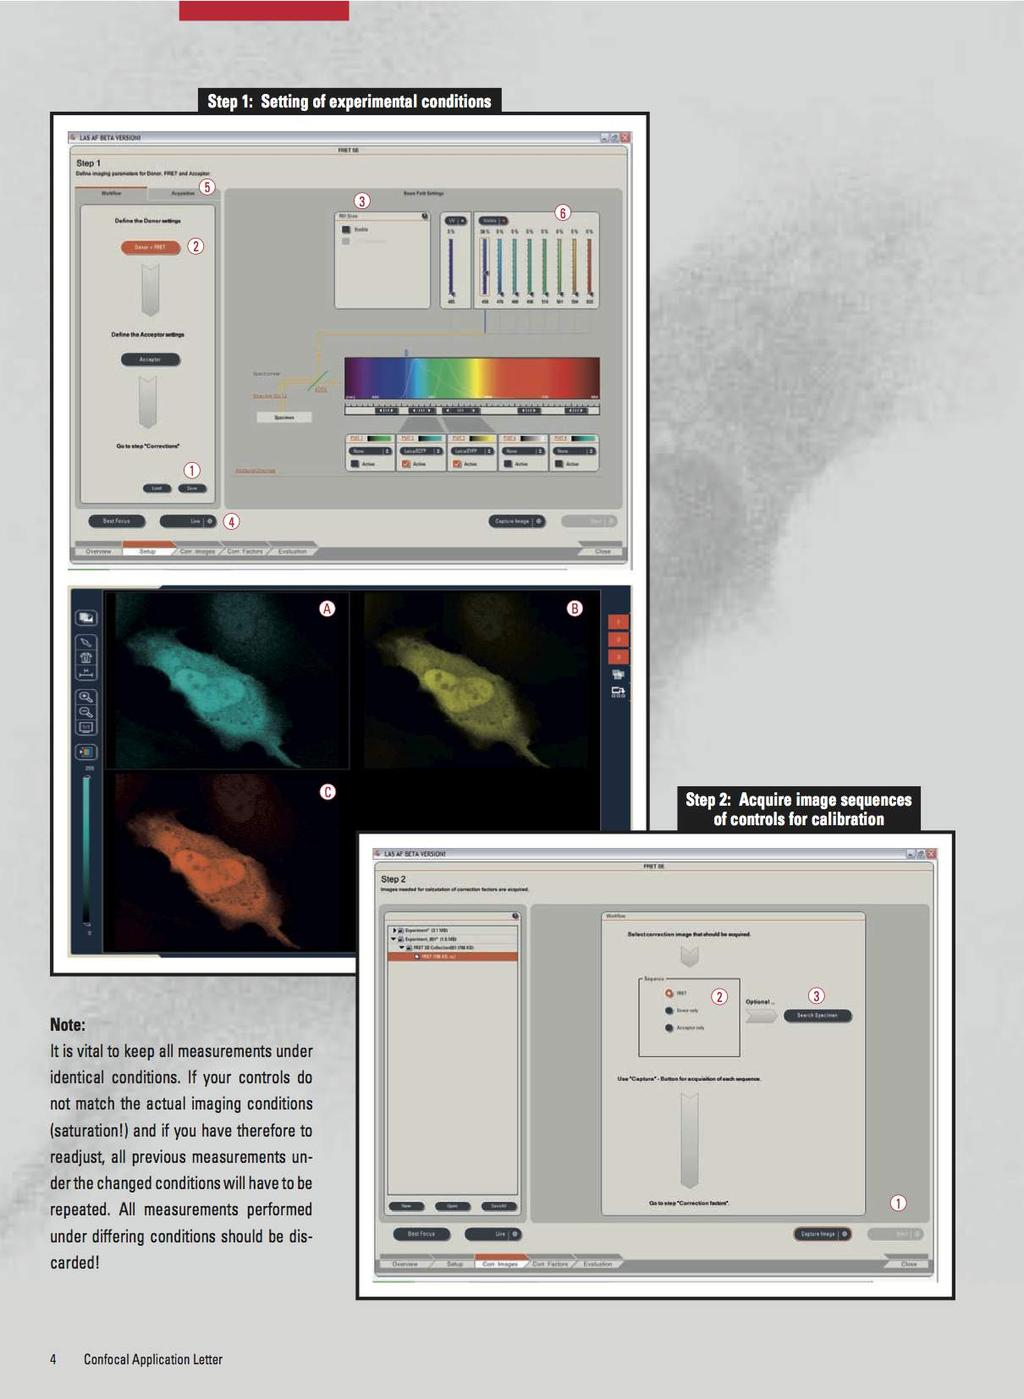
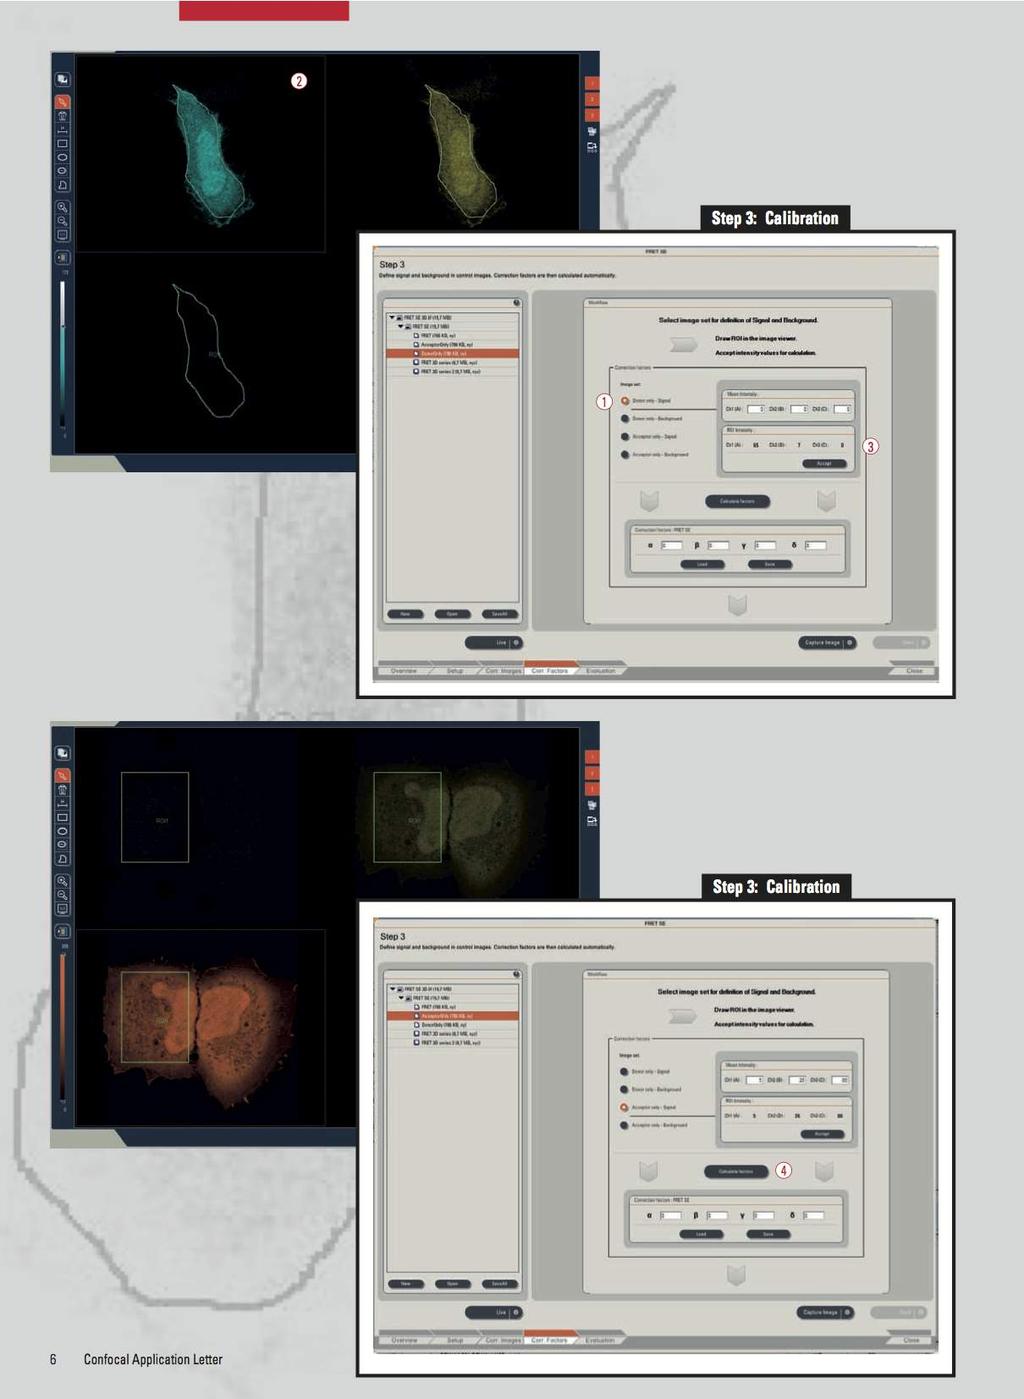
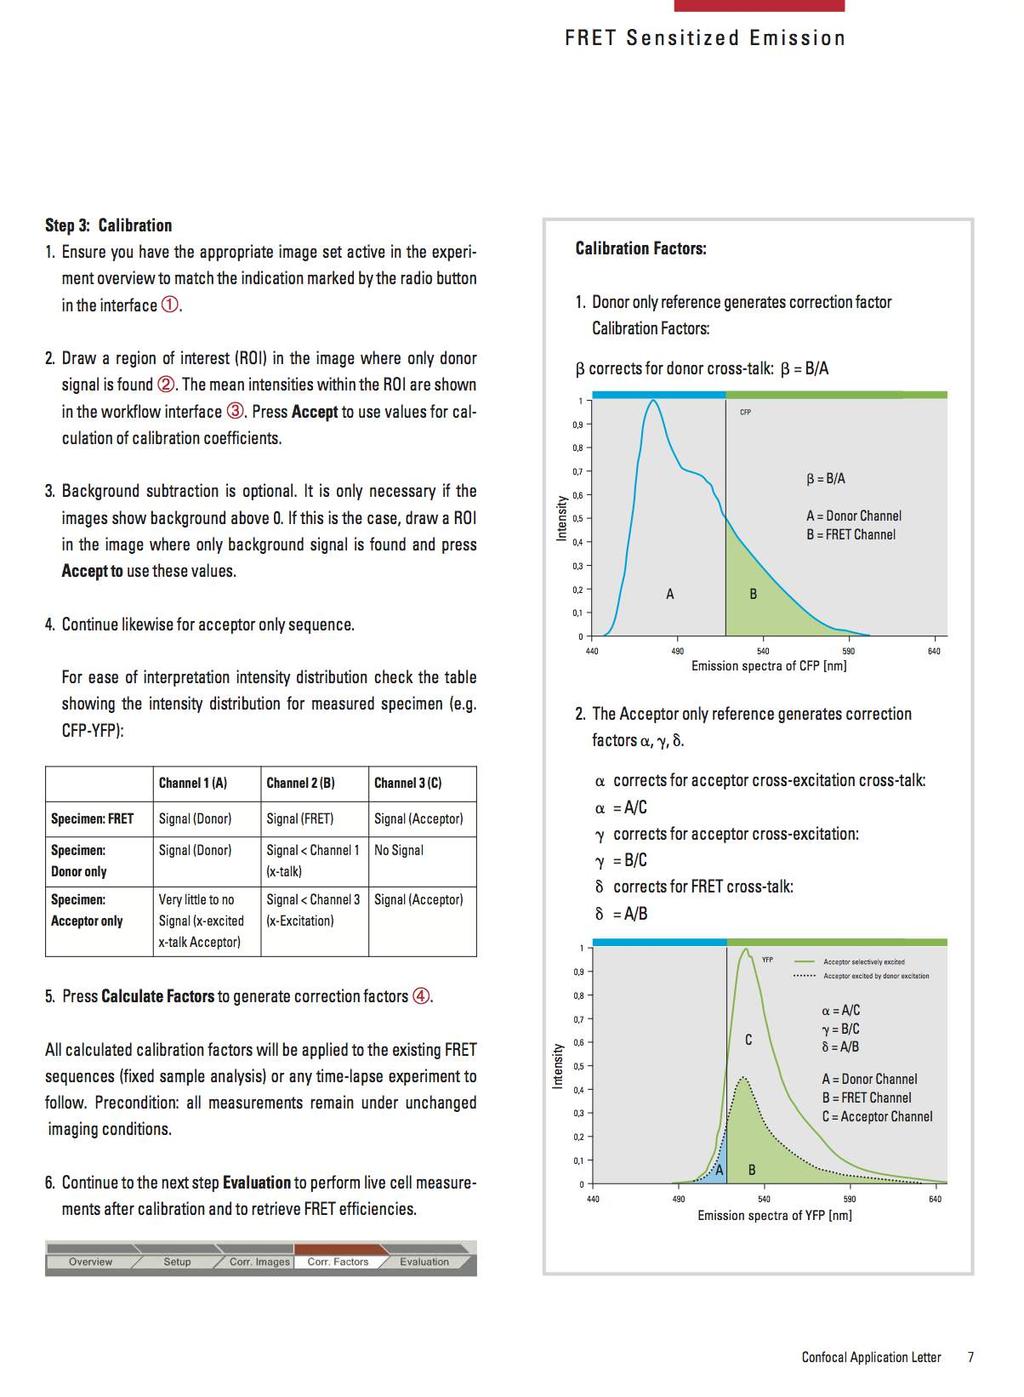
32 FRET Sensitised Emission 32
33 33
34 34

35 35
36 36
37 37
38 38
39 39
40 40
41 41
42 Spectral Imaging 42
43 43
44 44
45 45
46 46
47 47
48 48
49 49
50 50
51 51
52 52
53 53
54 54
55 55
56 56
57 57
58 58
59 59
60 60
61 61
62 62
63 63
64 64
65 65
Title: Nikon A1R Confocal User Manual
 Title: Nikon A1R Confocal User Manual Date of first issue: 23/10/2015 Date of review: Version: Admin For assistance or to report an issue Office: CG.07 or CG.05 Email: Igmm-imaginghelpdesk@igmm.ed.ac.uk
Guide to Confocal 5. Starting session
 Guide to Confocal 5 Remember that when booking and before starting session you can check for any problems at https://www.bris.ac.uk/biochemistry/uobonly/cif/index.html Starting session Switch on microscope
Training Guide for Leica SP8 Confocal/Multiphoton Microscope
 Training Guide for Leica SP8 Confocal/Multiphoton Microscope LAS AF v3.3 Optical Imaging & Vital Microscopy Core Baylor College of Medicine (2017) Power ON Routine 1 2 Turn ON power switch for epifluorescence
Quick Start Guide. Leica SP5 X
 Quick Start Guide Leica SP5 X Please note: Some of the information in this guide was taken from Leica Microsystems Leica TCS SP5 LAS AF Guide for New Users. This work is licensed under the Creative Commons
Leica Sp5 II Confocal User Guide
 Leica Sp5 II Confocal User Guide Turning on the Confocal System (instructions are posted in the room) 1. Turn on Laser Power Button 2. Turn Key to On position 3. Turn on Scanner Power Button 4. Turn on
LEICA TCS SP5 AOBS TANDEM USER MANUAL
 LEICA TCS SP5 AOBS TANDEM USER MANUAL STARTING THE SYSTEM...2 THE LAS AF SOFTWARE...3 THE «ACQUIRE» MENU...5 CHOOSE AND CREATE A SETTING...6 THE CONTROL PANEL...8 THE DMI6000B MICROSCOPE...10 ACQUIRE ONE
Cell Biology and Bioimaging Core
 Cell Biology and Bioimaging Core Leica TCS SP5 Operating Instructions Starting up the instrument 1. First, log in the log book located on the confocal desk. Include your name, your lab s PI, an account
Things to check before start-up.
 Byeong Cha Page 1 11/24/2009 Manual for Leica SP2 Confocal Microscope Enter you name, the date, the time, and the account number in the user log book. Things to check before start-up. Make sure that your
Leica SP8 TCS Users Manual
 Version : 07/08/0 Leica SP8 TCS Users Manual Start up:. Turn the PC Microscope, Scanner Power, Laser Power, and the Laser Emission key to on (bottom right of desk).. Turn on the fluorescent lamp (top left
LSM 710 Confocal Microscope Standard Operation Protocol
 LSM 710 Confocal Microscope Standard Operation Protocol Basic Operation Turning on the system 1. Switch on Main power switch 2. Switch on System / PC power button 3. Switch on Components power button 4.
Zeiss 880 Training Notes Zen 2.3
 Zeiss 880 Training Notes Zen 2.3 1 Turn on the HXP 120V Lamp 2 Turn on Main Power Switch Turn on the Systems PC Switch Turn on the Components Switch. 3 4 5 Turn on the PC and log into your account. Start
Leica SP8 TCS Users Manual
 Leica SP8 TCS Users Manual Follow the procedure for start up and log on as posted in the lab. Please log on with your account only and do not share your password with anyone. We track and confirm usage
Quick Guide for Zeiss 710 Laser Scanning Confocal MGH Cancer Center
 Quick Guide for Zeiss 710 Laser Scanning Confocal MGH Cancer Center For any questions or concerns, please contact: Linda Nieman lnieman@mgh.harvard.edu Office: (617) 643-9684 Cell: (512) 565-8076 Chenyue
LSM 780 Confocal Microscope Standard Operation Protocol
 LSM 780 Confocal Microscope Standard Operation Protocol Basic Operation Turning on the system 1. Sign on log sheet according to Actual start time 2. Check Compressed Air supply for the air table 3. Switch
TRAINING MANUAL. Olympus FV1000
 TRAINING MANUAL Olympus FV1000 September 2014 TABLE OF CONTENTS A. Start-Up Procedure... 1 B. Visual Observation under the Microscope... 1 C. Image Acquisition... 4 A brief Overview of the Settings...
Operating Checklist for using the Laser Scanning Confocal Microscope. Leica TCS SP5.
 Smith College August 2010 Operating Checklist for using the Laser Scanning Confocal Microscope Leica TCS SP5. CONTENT, page no. Startup, 1 Initial set-up, 1 Software, 2 Microscope Specimen observation
Leica SPEII confocal microscope. Short Manual
 Leica SPEII confocal microscope Short Manual Switching ON sequence: 1. Turn on the Workstation under the bench (top, far right). 2. Turn on the Supply Unit - Laser box (big green switch first and then
Leica TCS SP8 Quick Start Guide
 Leica TCS SP8 Quick Start Guide Leica TCS SP8 System Overview Start-Up Procedure 1. Turn on the CTR Control Box, EL6000 fluorescent light source for the microscope stand. 2. Turn on the Scanner Power
Training Guide for Carl Zeiss LSM 7 MP Multiphoton Microscope
 Training Guide for Carl Zeiss LSM 7 MP Multiphoton Microscope ZEN 2009 Optical Imaging & Vital Microscopy Core Baylor College of Medicine (2017) Power ON Routine 1 2 Turn Chameleon TiS laser key from Standby
Training Guide for Carl Zeiss LSM 510 META Confocal Microscope
 Training Guide for Carl Zeiss LSM 510 META Confocal Microscope AIM 4.2 Optical Imaging & Vital Microscopy Core Baylor College of Medicine (2017) Power ON Routine 1 2 Turn ON Components and System/PC switches
Confocal imaging on the Leica TCS SP8. 1) Turn the system on. 2) Use TCS user account. 3) Start LAS X software:
 Turn the system on. 2) Use TCS user account. 3) Start LAS X software:") Confocal imaging on the Leica TCS SP8 1) Turn the system on. 2) Use TCS user account. 3) Start LAS X software: 4) Do not touch the microscope while the software is initializing. Choose your options: Turn
Confocal imaging on the Leica TCS SP8 1) Turn the system on. 2) Use TCS user account. 3) Start LAS X software: 4) Do not touch the microscope while the software is initializing. Choose your options: Turn
Zeiss LSM 880 Protocol
 Zeiss LSM 880 Protocol 1) System Startup Please note put sign-up policy. You must inform the facility at least 24 hours beforehand if you can t come; otherwise, you will receive a charge for unused time.
Training Guide for Carl Zeiss LSM 5 LIVE Confocal Microscope
 Training Guide for Carl Zeiss LSM 5 LIVE Confocal Microscope AIM 4.2 Optical Imaging & Vital Microscopy Core Baylor College of Medicine (2017) Power ON Routine 1 2 Verify that main power switches on the
Quick Guide for Zeiss 710 Laser Scanning Confocal MGH Cancer Center
 Quick Guide for Zeiss 710 Laser Scanning Confocal MGH Cancer Center For any questions or concerns, please contact: Linda Nieman lnieman@mgh.harvard.edu Office: (617) 643-9684 Cell: (512) 565-8076 Chenyue
Zeiss LSM 780 Protocol
 Zeiss LSM 780 Protocol 1) System Startup F Please note the sign-up policy. You must inform the facility at least 24 hours beforehand if you can t come; otherwise, you will receive a charge for unused time.
Operation Guide for the Leica SP2 Confocal Microscope Bio-Imaging Facility Hunter College October 2009
 Operation Guide for the Leica SP2 Confocal Microscope Bio-Imaging Facility Hunter College October 2009 Introduction of Fluoresence Confocal Microscopy The first confocal microscope was invented by Princeton
ZEISS LSM510META confocal manual
 ZEISS LSM510META confocal manual Switching on the system 1) Switch on the Remote Control button located on the table to the right of the microscope. This is the main switch for the whole system including
LSM 510 Training Notes
 LSM 510 Training Notes Turning on the system Turn on the arc lamp, found on the bench top left of the microscope. This supplies light for epifluorescence for viewing your samples through the microscope.
Zeiss 780 Training Notes
 Zeiss 780 Training Notes Turn on Main Switch, System PC and Components Switches 780 Start up sequence Do you need the argon laser (458, 488, 514 nm lines)? Yes Turn on the laser s main power switch and
Microscopy from Carl Zeiss
 Microscopy from Carl Zeiss Contents Page Contents... 1 Introduction... 1 Starting the System... 2 Introduction to ZEN Efficient Navigation... 5 Setting up the microscope... 10 Configuring the beam path
LSM 510 Meta Training Notes
 LSM 510 Meta Training Notes Turning on the system Turn on X-Cite power supply. This supplies light for epifluorescence for viewing your samples through the microscope. Turn on the remote control switch.
Quick Guide. LSM 5 MP, LSM 510 and LSM 510 META. Laser Scanning Microscopes. We make it visible. M i c r o s c o p y f r o m C a r l Z e i s s
 LSM 5 MP, LSM 510 and LSM 510 META M i c r o s c o p y f r o m C a r l Z e i s s Quick Guide Laser Scanning Microscopes LSM Software ZEN 2007 August 2007 We make it visible. Contents Page Contents... 1
LSM 800 Confocal Microscope Standard Operation Protocol
 LSM 800 Confocal Microscope Standard Operation Protocol Turning on the system 1. Switch on the Main switch (labeled 1 and 2 ) mounted on the wall. 2. Turn the Laser Key (labeled 3 ) 90 clockwise for power
Leica TCS SP8 Quick Start Guide
 Leica TCS SP8 Quick Start Guide Leica TCS SP8 System Overview Start-Up Procedure 1. Turn on the CTR Control Box, Fluorescent Light for the microscope stand. 2. Turn on the Scanner Power (1) on the front
MIF ZEISS LSM510 CONFOCAL USER PROTOCOL
 MIF ZEISS LSM510 CONFOCAL USER PROTOCOL START-UP Turn on the Mercury Bulb Power Supply (if needed). Power-on the Control Box. Turn on the computer. Open the LSM 510 software. Choose Scan New Images and
START-UP PROCEDURE 1 THE MICROSCOPE STAND 3 OBJECTIVES 5 STARTING WITH LAS (SOFTWARE) AND SETTING UP THE MICROSCOPE STAND 7
 AND SETTING UP THE MICROSCOPE STAND 7") Leica DMI AF6000LX Table of contents START-UP PROCEDURE 1 THE MICROSCOPE STAND 3 OBJECTIVES 5 STARTING WITH LAS (SOFTWARE) AND SETTING UP THE MICROSCOPE STAND 7 ACQUIRE MODULE 6 SETTING THE LIGHTPATH 6
Leica DMI AF6000LX Table of contents START-UP PROCEDURE 1 THE MICROSCOPE STAND 3 OBJECTIVES 5 STARTING WITH LAS (SOFTWARE) AND SETTING UP THE MICROSCOPE STAND 7 ACQUIRE MODULE 6 SETTING THE LIGHTPATH 6
MIF ZEISS VIOLET CONFOCAL ZEN 2009 PROTOCOL
 MIF ZEISS VIOLET CONFOCAL ZEN 2009 PROTOCOL START-UP On the Switchbox, turn both black switches to the ON position. Wait for the microscope to boot up completely (watch the screen on the side of the microscope).
Zeiss LSM 510 Confocor III Training Notes. Center for Cell Analysis & Modeling
 Zeiss LSM 510 Confocor III Training Notes Center for Cell Analysis & Modeling Confocor 3 Start Up Go to System Module Turn on Main Switch, System/ PC, and Components Switches Do you need the arc lamp?
REMEMBER: You have 5GB of disk space on this microscope. Check before you start if you have room for your experiment. If not delete your old data.
 1 Use of the Zeiss LSM 510 Inverted Firstly please be aware that this microscope should be treated with respect and care at all times. Rules of use: This Microscope can only be used by Masters by Research
ZEISS LSM 710 CONFOCAL MICROSCOPE USER MANUAL
 ZEISS LSM 710 CONFOCAL MICROSCOPE USER MANUAL START THE SYSTEM... 2 START ZEN SOFTWARE... 3 SET THE TEMPERATURE AND THE CO2 CONTROLLERS... OBSERVATION AT OCULARS... 5 STATIF PRESENTATION... 6 ACQUIRE ONE
Nikon Eclipse Ti A1-A Confocal Operating Manual. Start-up. Microscope
 Nikon Eclipse Ti A1-A Confocal Operating Manual Start-up 1. Turn on Excite Fluorescent light power supply- metal halide. a. Cool down as for mercury bulb b. Wheel closed liquid light guide 2. Turn on power
Practical work no. 3: Confocal Live Cell Microscopy
 Practical work no. 3: Confocal Live Cell Microscopy Course Instructor: Mikko Liljeström (MIU) 1 Background Confocal microscopy: The main idea behind confocality is that it suppresses the signal outside
Training Guide for Carl Zeiss LSM 880 with AiryScan FAST
 Training Guide for Carl Zeiss LSM 880 with AiryScan FAST ZEN 2.3 Optical Imaging & Vital Microscopy Core Baylor College of Medicine (2018) Power ON Routine 1 2 Turn ON Main Switch from the remote control
Widefield 1. Switching on
 Widefield 1 Switching on 1. Ignite DG5 lamp - must be switched on first (if previous user has switched off, wait 30 min before igniting) 2. Wait 5s and then turn on the main DG5 controller switch. 3. DG5
OPERATING INSTRUCTIONS
 Zeiss LSM 510 M eta Confocal M icroscope OPERATING INSTRUCTIONS Starting the System: 1. Turn the black knob on the laser box one-quarter turn from Off to On. You will hear the laser cooling mechanisms
Nikon AZ100. Laser Scanning Macro Confocal Microscope. Jordan Briscoe Adam Fries Kyle Marchuk Kaitlin Corbin. May 2017.
 Nikon AZ100 Laser Scanning Macro Confocal Microscope Jordan Briscoe Adam Fries Kyle Marchuk Kaitlin Corbin May 2017 Contents 1 Introduction 2 2 Hardware - Startup 2 3 Software/Operation 4 3.1 Multidimensional
Contents STARTUP MICROSCOPE CONTROLS CAMERA CONTROLS SOFTWARE CONTROLS EXPOSURE AND CONTRAST MONOCHROME IMAGE HANDLING
 Operations Guide Contents STARTUP MICROSCOPE CONTROLS CAMERA CONTROLS SOFTWARE CONTROLS EXPOSURE AND CONTRAST MONOCHROME IMAGE HANDLING Nikon Eclipse 90i Operations Guide STARTUP Startup Powering Up Fluorescence
ZEISS LSM 710 NLO Multiphoton microscope Manual/Quick guide
 ZEISS LSM 710 NLO Multiphoton microscope Manual/Quick guide Matyas Molnar, Biovis 2016 Starting the microscpe 1. Check the microscope if everything looks clean and normal. If not, report it in the logbook.
Training Guide for Carl Zeiss AxioZoom V16 Stereo Microscope
 Training Guide for Carl Zeiss AxioZoom V16 Stereo Microscope ZEN 2012 Optical Imaging & Vital Microscopy Core Baylor College of Medicine (2017) Power ON Routine 1 2 If you require fluorescence imaging,
Operating Instructions for Zeiss LSM 510
 Operating Instructions for Zeiss LSM 510 Location: GNL 6.312q (BSL3) Questions? Contact: Maxim Ivannikov, maivanni@utmb.edu 1 Attend A Complementary Training Before Using The Microscope All future users
Nikon SIM-E & A1-R System
 Nikon SIM-E & A1-R System USER GUIDE LSU Health Sciences Center Shreveport Research Core Facility June 01 2017 Chaowei Shang 1 Table of Content 1. Start Up the System... Page 3 Hardware and microscope
Instructions for the Leica SP5 II laser scanning confocal microscope
 Instructions for the Leica SP5 II laser scanning confocal microscope Content: Check-in and Start up Set up acquistion parameters Optimize acquistion parameters Acquire a z-stack Sequential scan Check out
SHORT INSTRUCTIONS FOR OPERATING LSM1/2 (Zeiss LSM510) AT CIAN Version 1.4, September 2014
 AT CIAN Version 1.4, September 2014") CIAN LSM1 or LSM2 short instructions, version 1.4, September 2014 page 1 of 6 SHORT INSTRUCTIONS FOR OPERATING LSM1/2 (Zeiss LSM510) AT CIAN Version 1.4, September 2014 Before starting To work with LSM1
CIAN LSM1 or LSM2 short instructions, version 1.4, September 2014 page 1 of 6 SHORT INSTRUCTIONS FOR OPERATING LSM1/2 (Zeiss LSM510) AT CIAN Version 1.4, September 2014 Before starting To work with LSM1
User Guide to the IBIF Leica TCS SP8 MP Confocal Microscope
 User Guide to the IBIF Leica TCS SP8 MP Confocal Microscope This version: 7.24.14. Introduction The IBIF confocal microscope is made available on a fee-for-use-hour basis to all users who have been trained.
Contents. Introduction
 Contents Page Contents... 1 Introduction... 1 Starting the System... 2 Introduction to ZEN Efficient Navigation... 5 Setting up the microscope... 10 Configuring the beam path and lasers... 12 Scanning
Bi/BE 227 Winter Assignment #3. Adding the third dimension: 3D Confocal Imaging
 Bi/BE 227 Winter 2016 Assignment #3 Adding the third dimension: 3D Confocal Imaging Schedule: Jan 20: Assignment Jan 20-Feb 8: Work on assignment Feb 10: Student PowerPoint presentations. Goals for this
MAKE SURE YOUR SLIDES ARE CLEAN (TOP & BOTTOM) BEFORE LOADING DO NOT LOAD SLIDES DURING SOFTWARE INITIALIZATION
 BEFORE LOADING DO NOT LOAD SLIDES DURING SOFTWARE INITIALIZATION") Olympus VS120-L100 Slide Scanner Standard Operating Procedure Startup 1) Red power bar switch (behind monitor) 2) Computer 3) Login: UserVS120 account (no password) 4) Double click: WAIT FOR INITIALIZATION
Olympus VS120-L100 Slide Scanner Standard Operating Procedure Startup 1) Red power bar switch (behind monitor) 2) Computer 3) Login: UserVS120 account (no password) 4) Double click: WAIT FOR INITIALIZATION
Microscope Confocal Sp2 Upright.
 Microscope Confocal Sp2 Upright. Welcome to the Leica Sp2 Confocal Upright tutorial. Before using the Sp2 Invert, You will need to put down your name on the reservation system = http://svintranet.epfl.ch/index.php?optio
Nikon Eclipse Ti2-E Widefield/Spinning Disk Confocal Microscope Standard Operation Protocol
 Nikon Eclipse Ti-E Widefield/Spinning Disk Confocal Microscope Standard Operation Protocol Please sign on the log sheet before switching on system. Turn on system Turn on A only if confocal mode or laser
CONFOCAL MICROSCOPE (Zeiss LSM 510 META v4.2)
") Wellcome Trust Centre for Human Genetics Molecular Cytogenetics and Microscopy Core CONFOCAL MICROSCOPE (Zeiss LSM 510 META v4.2) 1) STARTING THE SYSTEM Abridged INSTRUCTIONS Switch on the mercury bulb
Wellcome Trust Centre for Human Genetics Molecular Cytogenetics and Microscopy Core CONFOCAL MICROSCOPE (Zeiss LSM 510 META v4.2) 1) STARTING THE SYSTEM Abridged INSTRUCTIONS Switch on the mercury bulb
Diskovery Spinning Disk Guide
 Diskovery Spinning Disk Guide qbi.microscopy@uq.edu.au Getting started The microscope and its peripherals (Fig. 1a) should always be turned on, but if they are not, turn them on in the following way: 1.
Microscope Confocal LSM510 META
 Microscope Confocal LSM510 META Welcome to the Zeiss LSM 510 Meta Confocal tutorial. Before using the LSM 510 META, Log off any other computer that is open with your personal login. You will need to put
Nikon C1si Spectral Laser Scanning Confocal Microscope. User Guide
 Nikon C1si Spectral Laser Scanning Confocal Microscope User Guide Contents: C1Si Turn-On/ShutDown Procedures... 2 Overview... 4 Setup for epi-illumination to view through the eyepieces:... 5 Setup for
Leica SP8 Resonant Confocal. Quick-Start Guide
 Leica SP8 Resonant Confocal Quick-Start Guide Contents Start-up Preparing for Imaging Part 1 On the scope Part 2 Software interface Part 3 Heat & CO2 incubation Part 4 Other hardware options Shut-down
3. are adherent cells (ie. cells in suspension are too far away from the coverslip)
") Before you begin, make sure your sample... 1. is seeded on #1.5 coverglass (thickness = 0.17) 2. is an aqueous solution (ie. fixed samples mounted on a slide will not work - not enough difference in refractive
Before you begin, make sure your sample... 1. is seeded on #1.5 coverglass (thickness = 0.17) 2. is an aqueous solution (ie. fixed samples mounted on a slide will not work - not enough difference in refractive
Use of the HSW5 Spinning Disk Confocal Microscope Updated last May 25, 2010 OK
 Use of the HSW5 Spinning Disk Confocal Microscope Updated last May 25, 2010 OK Getting Started: 2 Starting Micromanager and Loading a Configuration 3 The Main Micromanager GUI 3 Configuration Settings
KEYENCE VKX LASER-SCANNING CONFOCAL MICROSCOPE Standard Operating Procedures (updated Oct 2017)
") KEYENCE VKX LASER-SCANNING CONFOCAL MICROSCOPE Standard Operating Procedures (updated Oct 2017) 1 Introduction You must be trained to operate the Laser-scanning confocal microscope (LSCM) independently.
KEYENCE VKX LASER-SCANNING CONFOCAL MICROSCOPE Standard Operating Procedures (updated Oct 2017) 1 Introduction You must be trained to operate the Laser-scanning confocal microscope (LSCM) independently.
Swept-Field User Guide
 Swept-Field User Guide Note: for more details see the Prairie user manual at http://www.prairietechnologies.com/resources/software/prairieview.html Please report any problems to Julie Last (jalast@wisc.edu)
ScanArray Overview. Principle of Operation. Instrument Components
 ScanArray Overview The GSI Lumonics ScanArrayÒ Microarray Analysis System is a scanning laser confocal fluorescence microscope that is used to determine the fluorescence intensity of a two-dimensional
Widefield-NikonEclipseTE200-ORCA Nikon Eclipse TE200 Inverted Microscope with Hamamatsu 1394 Orca-ER Cooled CCD Camera and Micromanager Software
 Widefield-NikonEclipseTE200-ORCA Nikon Eclipse TE200 Inverted Microscope with Hamamatsu 1394 Orca-ER Cooled CCD Camera and Micromanager Software September 2007 Check website for most current User Guide
b. Turn the power switch and key to on position for blue laser.
 OLYMPUS FLUOVIEW 300 CONFOCAL MICOSCOPE OPERATION PROCEDURE 1. Turn ON microscope in this order: 1) Turn on mercury lamp (Note: once the mercury lamp is turned off, DO NOT turn it back on for at least
RENISHAW INVIA RAMAN SPECTROMETER
 STANDARD OPERATING PROCEDURE: RENISHAW INVIA RAMAN SPECTROMETER Purpose of this Instrument: The Renishaw invia Raman Spectrometer is an instrument used to analyze the Raman scattered light from samples
Zeiss LSM880 Operating Instructions. UTMB Optical Microscopy Core Jan. 16, 2018
 Zeiss LSM880 Operating Instructions UTMB Optical Microscopy Core Jan. 16, 2018 1 1. Power up the microscope Sing the LOGBOOK Steps below will provide power to the computer and all of the microscope components.
Using the Nikon TE2000 Inverted Microscope
 Wellcome Trust Centre for Human Genetics Molecular Cytogenetics and Microscopy Core Using the Nikon TE2000 Inverted Microscope Fluorescence image acquisition using Scanalytic s IPLab software and the B&W
Nikon A1R. Multi-Photon & Laser Scanning Confocal Microscope. Kyle Marchuk Adam Fries Jordan Briscoe Kaitlin Corbin. April 2017.
 Nikon A1R Multi-Photon & Laser Scanning Confocal Microscope Kyle Marchuk Adam Fries Jordan Briscoe Kaitlin Corbin April 2017 Contents 1 Introduction 2 2 Start-Up 2 3 Imaging 4 3.1 Sample Alignment...........................................
Horiba LabRAM ARAMIS Raman Spectrometer Revision /28/2016 Page 1 of 11. Horiba Jobin-Yvon LabRAM Aramis - Raman Spectrometer
 Page 1 of 11 Horiba Jobin-Yvon LabRAM Aramis - Raman Spectrometer The Aramis Raman system is a software selectable multi-wavelength Raman system with mapping capabilities with a 400mm monochromator and
Simplified Instructions: Olympus Widefield Microscope S1230
 Contents General Microscope Operation Simple Image Capture Multi-Wavelength Capture Z-Series Timelapse Combining Capture Modes Synopsis of Other Functions Pages 2-23 24-40 41-47 48-56 57-59 60-68 69-83
Olympus Fluoview 1000S Spectral Confocal Microscope Introduction to the NRI-MCDB Microscopy Facility Spectral Confocal Microscope
 Olympus Fluoview 1000S Spectral Confocal Microscope Introduction to the NRI-MCDB Microscopy Facility Spectral Confocal Microscope Improved Optics More Lasers 405 diode 440 diode 488 Argon 515 Argon 559
Zeiss Axio Imager.A1 manual
 Zeiss Axio Imager.A1 manual Power-up protocol 1. Mercury lamp 2. Power strip on shelf 3. Computer The Mercury lamp should always be first-on and last-off. This prevents any electrical surges caused by
Leica TCS SL Confocal Training. Neuroscience Imaging Core Staff. Core Director. Facility Manager
 Leica TCS SL Confocal Training Neuroscience Imaging Facility The Ohio State University Rightmire Hall 614-292-1367 Staff Core Director Anthony Brown, Ph. D. 060 Rightmire Hall 614-292-1205 brown.2302@osu.edu
Olympus xcellence Software - basic user guide
 Olympus xcellence Software - basic user guide This is a basic overview of setting up time lapse experiments using Olympus's xcellence software on BIU's IX81 inverted phase contrast system - the software
QUICKSTART GUIDE: WIDEFIELD HWF1 Zeiss Cell Observer Live Cell Imaging System (HAMMERSMITH, L BLOCK, ROOM 314) Imperial College London
 Imperial College London") Imperial College London Facility for Imaging by Light Microscopy QUICKSTART GUIDE: WIDEFIELD HWF1 Zeiss Cell Observer Live Cell Imaging System (HAMMERSMITH, L BLOCK, ROOM 314) Observing Life As It Happens
Imperial College London Facility for Imaging by Light Microscopy QUICKSTART GUIDE: WIDEFIELD HWF1 Zeiss Cell Observer Live Cell Imaging System (HAMMERSMITH, L BLOCK, ROOM 314) Observing Life As It Happens
Nikon A1Rsi Confocal Start-Up Sequence
 1. Turn the key on the Nikon LUN-V Laser Launch. Nikon A1Rsi Confocal Start-Up Sequence 2. Press the button the left side of the A1Rsi Controller unit. 3. Turn on the power strip underneath the microscope.
BX-61: Brightfield Instruction /Continue to scroll for Fluorescent Instuctions
 BX-61: Brightfield Instruction /Continue to scroll for Fluorescent Instuctions Starting up: Schematic of Olympus BX-61. 1. Turn on Olympus microscope power box (left of microscope) with toggle switch on
Overview. About other software. Administrator password. 58. UltraVIEW VoX Getting Started Guide
 Operation 58. UltraVIEW VoX Getting Started Guide Overview This chapter outlines the basic methods used to operate the UltraVIEW VoX system. About other software Volocity places great demands on the computer
Zeiss Axiovert 135 Fluorescence Microscope Quick Guide / Operations Manual (v. 1.0 February 09)
") University of Chicago Integrated Light Microscopy Core Dr. Vytas Bindokas, Director http://digital.bsd.uchicago.edu By: Christine Labno, Assistant Director Room: AB-129 Phone: 4-9040 Zeiss Axiovert 135
University of Chicago Integrated Light Microscopy Core Dr. Vytas Bindokas, Director http://digital.bsd.uchicago.edu By: Christine Labno, Assistant Director Room: AB-129 Phone: 4-9040 Zeiss Axiovert 135
Zeiss LSM 510 Multiphoton Confocal Microscope
 Zeiss LSM 510 Multiphoton Confocal Microscope Quick Start User Guide LSU Health Sciences Research Core Facility Table of Contents 1 Safety... Page 3 2 Turn On the System... Page 4 3 Start Up the ZEN Software.
Nasmyth Ultraview Vox User Protocol
 Nasmyth Ultraview Vox User Protocol Switch on all wall sockets labelled Nasmyth, switch camera on (power supply located on table behind monitor), switch on laser switch in laser rack, switch computer on
The Zeiss AiryScan System, Confocal Four.
 The Zeiss AiryScan System, Confocal Four. Overview. The Zeiss AiryScan module is a segmented, radially stacked GaASP detector and collector system designed to subsample the airy disk of a point emission
Standard Operating Procedure (SOP) for Shared Equipment: Spinning Disk Confocal Microscope
 for Shared Equipment: Spinning Disk Confocal Microscope") Standard Operating Procedure (SOP) for Shared Equipment: Spinning Disk Confocal Microscope This document is to be used as a supplementary guide and not as a replacement for formal training. DO NOT operate
Standard Operating Procedure (SOP) for Shared Equipment: Spinning Disk Confocal Microscope This document is to be used as a supplementary guide and not as a replacement for formal training. DO NOT operate
Confocal Application Notes Vol. 5 July 2010
 Tile Scan Prepared by Myriam Gastard, PhD Application and Technical Support Group, Leica Microsystems, Inc. In this issue of our Confocal Application Notes, proper set up of the Tile function enables you
QUICKSTART GUIDE: WIDEFIELD WF3 Zeiss Cell Observer Live Cell Imaging System (SAF, ROOM 409) Imperial College London
 Imperial College London") Imperial College London Facility for Imaging by Light Microscopy QUICKSTART GUIDE: WIDEFIELD WF3 Zeiss Cell Observer Live Cell Imaging System (SAF, ROOM 409) Observing Life As It Happens Startup procedure...
Imperial College London Facility for Imaging by Light Microscopy QUICKSTART GUIDE: WIDEFIELD WF3 Zeiss Cell Observer Live Cell Imaging System (SAF, ROOM 409) Observing Life As It Happens Startup procedure...
Supplemental Method Information Zeiss LSM710
 Supplemental Method Information Zeiss LSM710 1 Under the Light Path window set up the confocal for imaging a green dye (Alexa488-EGFP). For example, set up the light path as shown here using the 488 nm
Everest System / Slidebook Operating Procedures
 Everest System / Slidebook Operating Procedures NOTICE: This guide is meant to supplement training, not replace it. All users must be trained first hand by a core employee. Training of others in your lab
Usermanual for Leica SP8 confocal
 Usermanual for Leica SP8 confocal Contact information: hege.dale@uib.no & endy.spriet@uib.no 1 Table of content Important information 3 Start up procedure 4 Shut down procedure 5 Operating the DMI 8 microscope
Topics. - How to calibrate the LSM scanner. - How to clean the microscope. - How to adjust the pinhole alignment. - How to adjust the Collimator
 Topics - How to calibrate the LSM scanner - How to measure the PSF - How to clean the microscope - How to adjust the pinhole alignment - How to adjust the Collimator How to calibrate the LSM scanner The
SPINNING DISK CSU-X1 USER MANUAL
 SPINNING DISK CSU-X1 USER MANUAL Starting the temperature controller... 2 Starting the CO2 controller... 3 Start the spinning disk... 4 Sample observation with the oculars... 5 Spatial sampling, Pixel
1 Co Localization and Working flow with the lsm700
 1 Co Localization and Working flow with the lsm700 Samples -1 slide = mousse intestine, Dapi / Ki 67 with Cy3/ BrDU with alexa 488. -1 slide = mousse intestine, Dapi / Ki 67 with Cy3/ no BrDU (but with
Nikon. King s College London. Imaging Centre. N-SIM guide NIKON IMAGING KING S COLLEGE LONDON
 N-SIM guide NIKON IMAGING CENTRE @ KING S COLLEGE LONDON Starting-up / Shut-down The NSIM hardware is calibrated after system warm-up occurs. It is recommended that you turn-on the system for at least
Axioscan - Startup. 1. Turn on the Axioscan (button to the left) and turn on the computer. 2. Log on and start the ZEN Blue software from the desktop
 and turn on the computer. 2. Log on and start the ZEN Blue software from the desktop") Axioscan - Startup 1. Turn on the Axioscan (button to the left) and turn on the computer 2. Log on and start the ZEN Blue software from the desktop 3. Press ZEN slidescan and Start System 4. Start by changing
Axioscan - Startup 1. Turn on the Axioscan (button to the left) and turn on the computer 2. Log on and start the ZEN Blue software from the desktop 3. Press ZEN slidescan and Start System 4. Start by changing