Leica Sp5 II Confocal User Guide
|
|
|
- Annice Maxwell
- 5 years ago
- Views:
Transcription
1 Leica Sp5 II Confocal User Guide Turning on the Confocal System (instructions are posted in the room) 1. Turn on Laser Power Button 2. Turn Key to On position 3. Turn on Scanner Power Button 4. Turn on PC Microscope Button 5. Turn on EL6000 (fluorescent lamp) You will need a password to log onto the computer. These will be assigned by the confocal support staff. To Launch the Software Click on LAS AF icon A menu will appear with some selections on it If you are using the resonant scanner, make sure the resonance scanner box is checked NOTE - The resonance scanner has a maximum image size of 1k x 1k.The conventional Scanner allows up to 8k x 8k images. Stand> make sure DMI6000 is checked Configuration> make sure Machine is checked (this makes sure that all the hardware is recognized to run the system. The other option is a simulation that only runs the software without the hardware). You will then be asked if you want to initialize the stage. This is very important for timelapse imaging if you are using multiple stage positions and also for tiling (montage) imaging. Using the Microscope Stand/putting samples onto the stage, etc. Samples must be cultured on or mounted under a 0.17mm coverslip. If you are using microscope slides, these need to be inverted so that the coverslip is facing downwards towards the objective. If you need to use nail varnish or other sealants to seal your coverslip on, make sure they are COMPLETELY DRY before putting the slide on the microscope stage. Use the universal sample holder for most applications. If you need a different sample holder, you must ask for assistance of the confocal support staff to change it. 1
.")
.")

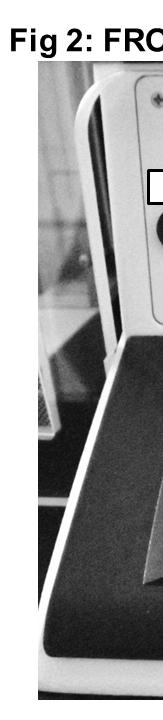
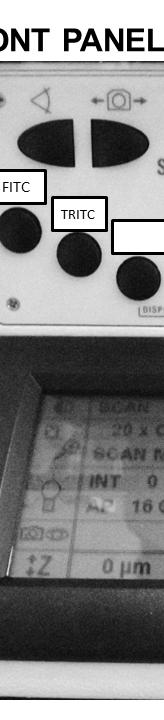
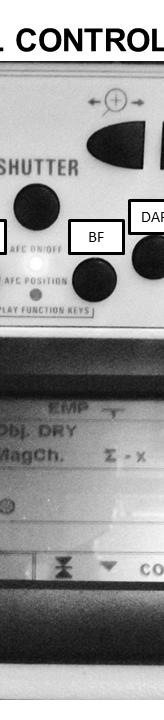
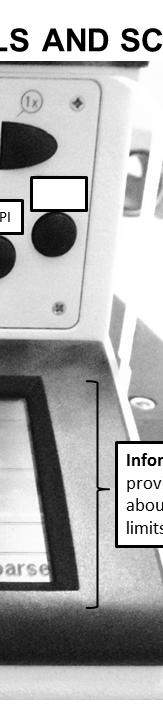
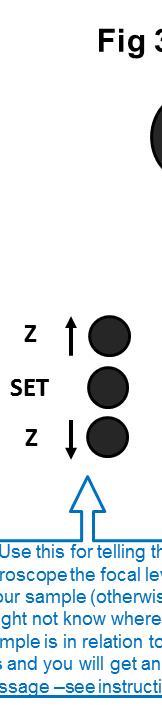
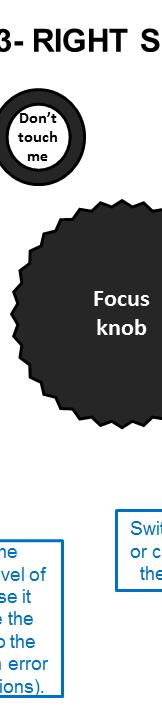
2 NOTE BE VERY GENTLEE WHEN LOADING SAMPLES ONTO THE STAGE HOLDER. DO NOT PRESSS DOWN ON THE STAGE AS THIS MAY CAUSE THE Z-GALVO TO HAVE AN ERROR AND COULD DAMAGE THE GALVO. To see Transmitted light through the eye pieces, press the TL/IL button located on the lower left side of the microscope stand (see fig 1). It is better to start by winding up the lens close to the coverslip and then winding the lens downwards to focus (thatt way you will avoid crashing the lens into the sample). To use the fluorescence light, make sure you have selected the appropriate cube using the control panel on the front of the microscope(see fig 2). Then press the shutter button to direct the fluorescence light onto the sample IMPORTANT: - Setting the zero position for the focus: o After you have focused on your sample, you should set a zero point for the microscope. (this tells the microscope where your sample is in relation to the lens - if you don t set the zero position, you may get an error messagee later) o On the right side of the microscope stand there are a seriess of three set Z buttons (see fig 3). o First you need to clear the current zero position - press and hold the center button and press top button one time. o Next, to set the current focus as the zero position - press and hold the center button and press the top button one time. 2


3 3
4 Operating the Confocal From Within the Software: There are two main tabs that you will be working in, called ACQUISITION and EXPERIMENTS. There are also other tabs that are used for setting up the configuration of your experiment. Once the software has launched you must first turn on the lasers under the CONFIGURATION tab. Click on the lasers icon Either turn on all of the lasers by checking them, or if you know that you only need specific ones for your application just check those. Give 25% power to the Argon laser if you need that laser. If you want further information about the lenses, you can find that under the OBJECTIVES icon (e.g. this gives you information about their optical limits, etc) WORKING IN THE ACQUISITION TAB Most of the work in setting up your image acquisition is performed in the ACQUISITION TAB. The laser controls are in two panels at the top of the ACQUISITION TAB. You need to activate the shutters for both the U.V. and the visible lasers (click on the round dots in the top left corner). When you set up your imaging parameters, you will need to adjust the power of the lasers you want to use. The table below gives information on the maximum power settings for each of the laser lines (these are the maximum powers to use if you want to avoid bleaching the sample): LASER Comments Recommended Power mwatt=very powerful laser line Not more than 15% 488 Not more than 15% mwatt Not more than 15% 458 Not more than 20% 514 Not more than 20% 476 Weaker laser line Not more than 30% 496 Weaker laser line Not more than 30% mwatt 50-60% is O.K mwatt 50-60% is O.K. 4
5 Imaging Procedure (5 step sequence) Step 1: - Show the spectrum of the dye(s) you want to image Do this by selecting the dye from drop down lists on the PMT tabs (you can make new entries if your dye is not already listed). The default view is the emission spectrum only (if you want, you can also display the excitation spectrum by right clicking on the graph but this can make the display to busy). Step 2: Turn on Lasers The laser you want must always be a wavelength that is to the left of the emission maximum of your dye. Click on the laser line that you think is appropriate and move the slider up to give some power to the laser (use the table on the previous page to help you decide how much power to use you should always start low and then go up only if you need to later when you optimize your live image). The laser line will then be illustrated on the spectrum so that you can make sure it is to the left of your emission peak. You can try a couple of different ones to determine which looks the best (you may also want to display the excitation spectrum of the dye [see step 1] to help you decide). Step 3:Turn on PMTs and configure the detection There are two HyD detectors (higher sensitivity and lower background compared to standard PMTs) so you want to use these for your weakest dye(s). Select the PMTs that you plan to use (maximum of 5) and assign them to the dyes you want to image (they have to go in order blue to red from the left). You can skip a PMT (i.e. not use it), but you can t assign dyes in the wrong left-right order. Adjust the spectral collection window for each PMT using the sliders (if you are skipping any PMTs, just make the window as small as possible). You can also double click on the slider to see the wavelength range you have selected and alter the numbers manually. DO NOT overlap the collection window for any dye with any of the excitation laser lines, otherwise you will collect a lot of the excitation light rather than the light emitted by the dye (the collection window needs to be at least 5nm shifted from the laser line wavelength) If your collection window falls between two excitation laser lines, do not overlap the collection window with either laser line. Avoid overlapping your PMT collection window with other dye emissions as this can lead to bleedthrough of the dyes from one image into another. If your dyes are very close in wavelength, it may be better to do a sequential acquisition(s) (see later description in the guide). Assign a pseudocolor to each PMT (this will be the color that will be displayed during the acquisition, but in reality all the images are monochrome greyscale images) 5
6 Step 4:Configure your imaging formats This is done using the tabs in the acquisition menu (left side of screen) File format the default is 512 x 512. The maximum for the resonant scanner is 1024 x 1024 (conventional scanner can go up to 9600 x 9600). If you are using the resonant scanner with more than two dyes, you can only do up to 512 x 512 imaging. If you want a higher resolution, you can split into sequential acquisitions (see description later in this guide) Resonance scanner can only do 12 bit imaging Scanner speed - (default is 8000 Hz this cannot be adjusted for the resonant scanner) Line averaging - Use at least 4 to 8 for LIVE imaging/looking at your sample initially and optimizing settings NOTE if you want the line averaging to be applied during the LIVE image acquisition, you need to go to the CONFIGURATION tab>settings > check line averaging during live imaging. Otherwise, the line averaging for live imaging will default to 1. Pinhole no need to adjust for most applications. The pinhole always defaults to 1 Airy unit (which is optimized for each objective). If you do need to alter the pinhole size for your application it is recommended not to go above 2 airy units. When you have configured the PMTs and acquisition parameters, it is now time to get a live image to see what it looks like and then optimize Click the LIVE button Step 5 Optimizing the Image A lot of the optimizing is done using the dial controls on the control panel that is located behind the computer keyboard Adjust the focus using the Z-focus dial (Clockwise = to go from the coverslip into the sample, counter clockwise = to go towards the coverslip. You can move around to center the feature of interest using the x,y stage controller (joystick) (you can press ctrl T to display a crosshair that you can use to find the center of the image). Gain Adjustment -To increase the signal intensity, you should adjust the gain settings (dial on control panel) before resorting to increasing the laser power. To do this, click the mouse on the image (dye) that you want to adjust and then increase gain using the smart gain control dial. Use the glow over/under display setting when adjusting gain (QUICK LUT icon at top left of image screen) which pseudocolors the image to show saturated pixels in blue and zero pixels in green. You should adjust the gain until you can just see a few saturated blue pixels (or none). Gain recommendations not more than 100% for HyD detectors. Smart Offset Adjustment- Use this to adjust the zero value for the conventional PMTs (don t go below -0.6). Adjust it until most of the background pixels look green (it is resetting the zero value of the background). This cannot be used for the HyD detectors, as their background is virtually zero anyway. While adjusting the gain and smart offset you can toggle between the glow over/under display or the monochrome or pseudocolored images to make sure they look good. 6
7 NOTE 1 remember that your live image only has 4-8 line averaging, so it will look pretty grainy and ugly. The low line averaging is to avoid bleaching your sample and also so that the screen refresh rate is sufficiently fast for you to make the adjustments easily. When you have optimized the live image, you will change the line averaging to a higher value which will give a much higher quality image. NOTE 2 A cool feature of the Leica Sp5 II system is that you can set separate gain adjustments for all 5 PMTs. Many conventional LSCM microscopes can only apply a single gain to all the detectors. NOTE 3 - When you are optimizing the image look out for potential bleed through of your dyes into the other channels. For example, DAPI has a very wide emission spectrum and often bleeds through into the GFP or FITC channel and even into the TRITC channel. You should suspect bleedthrough if your images have features that look very similar (e.g. you can see nuclei in the GFP channel, but you know your GFP should only be in the cell membrane). If you think a dye is bleeding through into another channel, you can check by turning off its excitation laser. If the other image is not affected, then there is probably no bleedthrough, but if the other image changes this is probably indicating a bleedthtough problem. If this happens you may be able to stop it by reducing the laser power on the dye that is bleeding through. Otherwise, you can set up a sequential acquisition where you image one or more dyes separately from the others. When you have finished optimizing the image, you can change the line averaging to a larger number (e.g. 32, 64, 96) and then take a snapshot image by clicking on the capture image icon to see if you like the result. If not, you can do more optimizing. Pixel Size and Resolution (NyquistPrinciple) Each objective has a limit of resolution. It is recommended that when you are zooming in on your samples you do not set your pixel size lower than: objective resolution 2.3 If you set it lower than this it will lead to over sampling and can cause artifact in the image.this is the Nyquist Principle. If you don t know the objective resolution, it can be calculated by: Objective resolution = 0.61 x emission wavelength NA of objective lens Therefore an overall formula that you can use to calculate the smallest pixel size is: Smallest pixel size for max.resolution = 0.61 x emission wavelength NA of objective lens 2.3 7
8 The resolution can be changed either by changing the pixel dimensions (e.g. 512 x 512 changed to 1024 x 1024) or by changing the zoom. Once you reach the maximum resolution, you can increase the line averaging to improve the image quality. NOTE below is a table of recommended values for the smallest pixel size of our confocal s objectives with some of the commonly used fluorochromes for your reference. Recommended Pixel Sizes (nm) for Optimal Resolution Fluorophore DAPI Emission 455 GFP Emission 507 FITC Emission 519 TRITC Emission 572 Cy3 Emission 570 Cy5 Emission 670 Objective 5x (DRY) 10x (DRY) 20x (DRY) 40x (OIL) 100x (OIL) NA 0.15 NA 0.4 NA 0.7 NA 1.25 NA Z-stack Imaging Use the Z-stack acquisition menu tab for setting this up. On this menu there is a cube that shows you what your imaging volume looks like. You can set the begin and end positions of a z-stack by focusing up or down through the sample and defining where you want the acquisition to start and end. NOTES - you do not have to set top and Bottom - the software can start at the bottom and work up if you want or it canstart at the top and work down if you prefer. -If you are imaging deep into the tissue, the signal may be fainter and in that case it may be better to set the start point in the deeper parts first and work down towards the coverslip so as to image the fainter areas before they get bleached by the laser exposure. 8
9 Once you have set the top and bottom, you will be able to see what the total thickness is that you are imaging, The system will suggest a default optimum stepsize. You can override that and set your own desired step size if you want. The number of slices that will be needed for the z-stack should also be displayed. If you are doing Z-stack imaging rather than capturing images from a single plane, you will have to click on the START icon to initiate the image acquisition Compensation Click on compensation at the bottom of the Z-stack panel. Select compensation type. AOTF controls the laser intensity, and Gain adjusts the detector sensitivity. Choose both to optimize for signal to noise and photobleaching simultaneously. Add beginning and end. Go to beginning of stack or whatever position is closest to coverslip. Turn on live imaging. With the quicklut view selected begin moving away from the coverslip up the z-stack until the intensity begins to visibly fall off. At this point adjust the gain and laser power to match beginning points. Add point in the compensation menu. Repeat until you have reached the top of a stack and close out the compensation menu. o Note: the more points you select the more uniform the intensity of the stack will be. Adaptive Focus Turn on the adaptive focus by clicking on the adaptive focus icon (arrow pointing down at three lines) at the top right of the acquisition panel. Set to On demand mode The button with the arrows circling the T is used to set the time points at which you wish the adaptive focus to be used. The button with the arrows circling the tiling symbol is used to designate the positions you wish the adaptive focus to be used. Select a position using the Mark and Find tab Go to the middle of the z-stack In the adaptive focus tab check the Set Experimental Position box. Delete AFC positions to remove any of the previous ones. Store AFC position to store the new position you ve selected. Go to the Mark and Find tab. Click the button with the arrow pointing to one of two boxes to redefine the position with the new settings. Repeat for each position. 9
10 Sequential Acquisitions This is useful for applications where you are having a bleedthrough problem with one or more of the dyes. You can split out your acquisition into one or more sequential acquisitions so that you do not image dyes that bleed into one another at the same time. It is often better to set up and optimize the imaging parameters together as a single acquisition initially and then to split it out into sequential acquisitions (that way all the other parameters that you have set will be preserved in the sequential acquisitions). Click on the Seq tab to open up the sequential acquisitions menu There is an icon with - scan 1 + on it. To add another scan, click on the + button. This will duplicate the current acquisition you have set up. Then you can go into each scan and turn off the excitation laser and PMT that you don t need. Example: scan 1 = GFP, mcherry(turn off DAPI laser and PMT due to bleedthrough into GFP) scan 2 = DAPI (turn off GFP and mcherry lasers and PMTs) For sequential acquisitions you can pick one of the following: Between lines- scans one line of GFP, mcherry, then changes lasers and does one line of DAPI Between frames- scans a whole frame of GFP and mcherry, then changes lasers and does a whole frame of DAPI Between stacks scans a whole Z-stack of GFP and mcherry, then changes lasers and does a whole Z-stack of DAPI NOTE SLD s experience is that the between stacks may not be ideal because if there is any slight drift of the sample and if the acquisition time is long, the two sets of acquisitions might be slightly shifted and not properly aligned. This might lead to problems when you try to merge/overlay the channels, etc. If you want to save the parameters/settings you have set up and optimized for a sequential image scan, go to the save tab on the sequential scan tab. Then you can reload the same acquisition parameters if you have a similar imaging application in the future. 10
11 Using HyD Detectors in Different Modes You should use the HyD PMTS in standard mode for most applications If you have samples that have a large dynamic range (e.g. very bright and very faint information on the same image) the HyD can be used in other modes that enhance the signal of the lower intensity pixels (GREAT for generating beautiful images, but may not be a good option if you want to get quantitative data) BrightR mode this does a nice job of bringing out the lower intensity pixels without affecting the higher intensity pixels. Photon Counting mode this mode counts all the photons that hit the PMT in a particular location as a function of time and builds up the image by accumulating photon counts. If you want to use this mode, go to: configuration>settings> then uncheck max integration time. This will make the photon counting mode available. Then you can select this mode on the PMT tab When using the HyD in photon counting mode you do not want to have any line averaging, so this should be changed to zero. You can alter the number of accumulations by changing the line accumulation and frame accumulations (more accumulations gives a better sampling). Tiling and Mark and Find For tiling (montage imaging) click on the grid icon Spectral Imaging Select x,y, λ mode (or similar) Set the range of wavelengths by moving the edge of the gray area or click and type in the range. In the spectral imaging panel set the bandwidth (Recommended is 10 nm) Set the step size. Acquire image Use of the Processing features will allow you to determine spectra of various ROIs as well as doing spectral unmixing etc. Turning off the Confocal System (instructions are posted in the room) 1. Exit the LAS-AF software 2. Shut down the computer 3. Turn laser key to off position 4. When the computer is shut down, turn scanner power off 5. Turn off PC/microscope button 6. Turn off fluorescence lamp 7. Wait about 20 min (or until you hear the laser fan shut off) before you shut off the laser power. 11
Cell Biology and Bioimaging Core
 Cell Biology and Bioimaging Core Leica TCS SP5 Operating Instructions Starting up the instrument 1. First, log in the log book located on the confocal desk. Include your name, your lab s PI, an account
Quick Start Guide. Leica SP5 X
 Quick Start Guide Leica SP5 X Please note: Some of the information in this guide was taken from Leica Microsystems Leica TCS SP5 LAS AF Guide for New Users. This work is licensed under the Creative Commons
Things to check before start-up.
 Byeong Cha Page 1 11/24/2009 Manual for Leica SP2 Confocal Microscope Enter you name, the date, the time, and the account number in the user log book. Things to check before start-up. Make sure that your
LEICA TCS SP5 AOBS TANDEM USER MANUAL
 LEICA TCS SP5 AOBS TANDEM USER MANUAL STARTING THE SYSTEM...2 THE LAS AF SOFTWARE...3 THE «ACQUIRE» MENU...5 CHOOSE AND CREATE A SETTING...6 THE CONTROL PANEL...8 THE DMI6000B MICROSCOPE...10 ACQUIRE ONE
LSM 710 Confocal Microscope Standard Operation Protocol
 LSM 710 Confocal Microscope Standard Operation Protocol Basic Operation Turning on the system 1. Switch on Main power switch 2. Switch on System / PC power button 3. Switch on Components power button 4.
Title: Leica SP5 Confocal User Manual
 Title: Leica SP5 Confocal User Manual Date of first issue: 23/10/2015 Date of review: Version: Admin For assistance or to report an issue Office: CG07 or 05 Email: Igmm-imaginghelpdesk@igmm.ed.ac.uk Website:
Confocal imaging on the Leica TCS SP8. 1) Turn the system on. 2) Use TCS user account. 3) Start LAS X software:
 Turn the system on. 2) Use TCS user account. 3) Start LAS X software:") Confocal imaging on the Leica TCS SP8 1) Turn the system on. 2) Use TCS user account. 3) Start LAS X software: 4) Do not touch the microscope while the software is initializing. Choose your options: Turn
Confocal imaging on the Leica TCS SP8 1) Turn the system on. 2) Use TCS user account. 3) Start LAS X software: 4) Do not touch the microscope while the software is initializing. Choose your options: Turn
Leica TCS SP8 Quick Start Guide
 Leica TCS SP8 Quick Start Guide Leica TCS SP8 System Overview Start-Up Procedure 1. Turn on the CTR Control Box, EL6000 fluorescent light source for the microscope stand. 2. Turn on the Scanner Power
Leica SP8 TCS Users Manual
 Version : 07/08/0 Leica SP8 TCS Users Manual Start up:. Turn the PC Microscope, Scanner Power, Laser Power, and the Laser Emission key to on (bottom right of desk).. Turn on the fluorescent lamp (top left
Zeiss 880 Training Notes Zen 2.3
 Zeiss 880 Training Notes Zen 2.3 1 Turn on the HXP 120V Lamp 2 Turn on Main Power Switch Turn on the Systems PC Switch Turn on the Components Switch. 3 4 5 Turn on the PC and log into your account. Start
Guide to Confocal 5. Starting session
 Guide to Confocal 5 Remember that when booking and before starting session you can check for any problems at https://www.bris.ac.uk/biochemistry/uobonly/cif/index.html Starting session Switch on microscope
Leica SPEII confocal microscope. Short Manual
 Leica SPEII confocal microscope Short Manual Switching ON sequence: 1. Turn on the Workstation under the bench (top, far right). 2. Turn on the Supply Unit - Laser box (big green switch first and then
LSM 780 Confocal Microscope Standard Operation Protocol
 LSM 780 Confocal Microscope Standard Operation Protocol Basic Operation Turning on the system 1. Sign on log sheet according to Actual start time 2. Check Compressed Air supply for the air table 3. Switch
Operating Checklist for using the Laser Scanning Confocal Microscope. Leica TCS SP5.
 Smith College August 2010 Operating Checklist for using the Laser Scanning Confocal Microscope Leica TCS SP5. CONTENT, page no. Startup, 1 Initial set-up, 1 Software, 2 Microscope Specimen observation
Leica SP8 Resonant Confocal. Quick-Start Guide
 Leica SP8 Resonant Confocal Quick-Start Guide Contents Start-up Preparing for Imaging Part 1 On the scope Part 2 Software interface Part 3 Heat & CO2 incubation Part 4 Other hardware options Shut-down
ZEISS LSM510META confocal manual
 ZEISS LSM510META confocal manual Switching on the system 1) Switch on the Remote Control button located on the table to the right of the microscope. This is the main switch for the whole system including
Leica TCS SP8 Quick Start Guide
 Leica TCS SP8 Quick Start Guide Leica TCS SP8 System Overview Start-Up Procedure 1. Turn on the CTR Control Box, Fluorescent Light for the microscope stand. 2. Turn on the Scanner Power (1) on the front
TRAINING MANUAL. Olympus FV1000
 TRAINING MANUAL Olympus FV1000 September 2014 TABLE OF CONTENTS A. Start-Up Procedure... 1 B. Visual Observation under the Microscope... 1 C. Image Acquisition... 4 A brief Overview of the Settings...
Leica SP8 TCS Users Manual
 Leica SP8 TCS Users Manual Follow the procedure for start up and log on as posted in the lab. Please log on with your account only and do not share your password with anyone. We track and confirm usage
Zeiss 780 Training Notes
 Zeiss 780 Training Notes Turn on Main Switch, System PC and Components Switches 780 Start up sequence Do you need the argon laser (458, 488, 514 nm lines)? Yes Turn on the laser s main power switch and
OPERATING INSTRUCTIONS
 Zeiss LSM 510 M eta Confocal M icroscope OPERATING INSTRUCTIONS Starting the System: 1. Turn the black knob on the laser box one-quarter turn from Off to On. You will hear the laser cooling mechanisms
Quick Guide for Zeiss 710 Laser Scanning Confocal MGH Cancer Center
 Quick Guide for Zeiss 710 Laser Scanning Confocal MGH Cancer Center For any questions or concerns, please contact: Linda Nieman lnieman@mgh.harvard.edu Office: (617) 643-9684 Cell: (512) 565-8076 Chenyue
Operation Guide for the Leica SP2 Confocal Microscope Bio-Imaging Facility Hunter College October 2009
 Operation Guide for the Leica SP2 Confocal Microscope Bio-Imaging Facility Hunter College October 2009 Introduction of Fluoresence Confocal Microscopy The first confocal microscope was invented by Princeton
MIF ZEISS VIOLET CONFOCAL ZEN 2009 PROTOCOL
 MIF ZEISS VIOLET CONFOCAL ZEN 2009 PROTOCOL START-UP On the Switchbox, turn both black switches to the ON position. Wait for the microscope to boot up completely (watch the screen on the side of the microscope).
LSM 510 Meta Training Notes
 LSM 510 Meta Training Notes Turning on the system Turn on X-Cite power supply. This supplies light for epifluorescence for viewing your samples through the microscope. Turn on the remote control switch.
Nikon AZ100. Laser Scanning Macro Confocal Microscope. Jordan Briscoe Adam Fries Kyle Marchuk Kaitlin Corbin. May 2017.
 Nikon AZ100 Laser Scanning Macro Confocal Microscope Jordan Briscoe Adam Fries Kyle Marchuk Kaitlin Corbin May 2017 Contents 1 Introduction 2 2 Hardware - Startup 2 3 Software/Operation 4 3.1 Multidimensional
Training Guide for Leica SP8 Confocal/Multiphoton Microscope
 Training Guide for Leica SP8 Confocal/Multiphoton Microscope LAS AF v3.3 Optical Imaging & Vital Microscopy Core Baylor College of Medicine (2017) Power ON Routine 1 2 Turn ON power switch for epifluorescence
LSM 510 Training Notes
 LSM 510 Training Notes Turning on the system Turn on the arc lamp, found on the bench top left of the microscope. This supplies light for epifluorescence for viewing your samples through the microscope.
Zeiss LSM 510 Confocor III Training Notes. Center for Cell Analysis & Modeling
 Zeiss LSM 510 Confocor III Training Notes Center for Cell Analysis & Modeling Confocor 3 Start Up Go to System Module Turn on Main Switch, System/ PC, and Components Switches Do you need the arc lamp?
Quick Guide for Zeiss 710 Laser Scanning Confocal MGH Cancer Center
 Quick Guide for Zeiss 710 Laser Scanning Confocal MGH Cancer Center For any questions or concerns, please contact: Linda Nieman lnieman@mgh.harvard.edu Office: (617) 643-9684 Cell: (512) 565-8076 Chenyue
Practical work no. 3: Confocal Live Cell Microscopy
 Practical work no. 3: Confocal Live Cell Microscopy Course Instructor: Mikko Liljeström (MIU) 1 Background Confocal microscopy: The main idea behind confocality is that it suppresses the signal outside
LSM 800 Confocal Microscope Standard Operation Protocol
 LSM 800 Confocal Microscope Standard Operation Protocol Turning on the system 1. Switch on the Main switch (labeled 1 and 2 ) mounted on the wall. 2. Turn the Laser Key (labeled 3 ) 90 clockwise for power
Imaging Beyond the Basics: Optimizing Settings on the Leica SP8 Confocal
 Imaging Beyond the Basics: Optimizing Settings on the Leica SP8 Confocal Todays Goal: Introduce some additional functionalities of the Leica SP8 confocal HyD vs. PMT detectors Dye Assistant Scanning By
Microscopy from Carl Zeiss
 Microscopy from Carl Zeiss Contents Page Contents... 1 Introduction... 1 Starting the System... 2 Introduction to ZEN Efficient Navigation... 5 Setting up the microscope... 10 Configuring the beam path
Operating Instructions for Zeiss LSM 510
 Operating Instructions for Zeiss LSM 510 Location: GNL 6.312q (BSL3) Questions? Contact: Maxim Ivannikov, maivanni@utmb.edu 1 Attend A Complementary Training Before Using The Microscope All future users
Nikon SIM-E & A1-R System
 Nikon SIM-E & A1-R System USER GUIDE LSU Health Sciences Center Shreveport Research Core Facility June 01 2017 Chaowei Shang 1 Table of Content 1. Start Up the System... Page 3 Hardware and microscope
Leica TCS SL Confocal Training. Neuroscience Imaging Core Staff. Core Director. Facility Manager
 Leica TCS SL Confocal Training Neuroscience Imaging Facility The Ohio State University Rightmire Hall 614-292-1367 Staff Core Director Anthony Brown, Ph. D. 060 Rightmire Hall 614-292-1205 brown.2302@osu.edu
Usermanual for Leica SP8 confocal
 Usermanual for Leica SP8 confocal Contact information: hege.dale@uib.no & endy.spriet@uib.no 1 Table of content Important information 3 Start up procedure 4 Shut down procedure 5 Operating the DMI 8 microscope
Supplemental Method Information Zeiss LSM710
 Supplemental Method Information Zeiss LSM710 1 Under the Light Path window set up the confocal for imaging a green dye (Alexa488-EGFP). For example, set up the light path as shown here using the 488 nm
Nikon A1R. Multi-Photon & Laser Scanning Confocal Microscope. Kyle Marchuk Adam Fries Jordan Briscoe Kaitlin Corbin. April 2017.
 Nikon A1R Multi-Photon & Laser Scanning Confocal Microscope Kyle Marchuk Adam Fries Jordan Briscoe Kaitlin Corbin April 2017 Contents 1 Introduction 2 2 Start-Up 2 3 Imaging 4 3.1 Sample Alignment...........................................
MIF ZEISS LSM510 CONFOCAL USER PROTOCOL
 MIF ZEISS LSM510 CONFOCAL USER PROTOCOL START-UP Turn on the Mercury Bulb Power Supply (if needed). Power-on the Control Box. Turn on the computer. Open the LSM 510 software. Choose Scan New Images and
Bi/BE 227 Winter Assignment #3. Adding the third dimension: 3D Confocal Imaging
 Bi/BE 227 Winter 2016 Assignment #3 Adding the third dimension: 3D Confocal Imaging Schedule: Jan 20: Assignment Jan 20-Feb 8: Work on assignment Feb 10: Student PowerPoint presentations. Goals for this
Zeiss LSM 880 Protocol
 Zeiss LSM 880 Protocol 1) System Startup Please note put sign-up policy. You must inform the facility at least 24 hours beforehand if you can t come; otherwise, you will receive a charge for unused time.
Zeiss LSM 780 Protocol
 Zeiss LSM 780 Protocol 1) System Startup F Please note the sign-up policy. You must inform the facility at least 24 hours beforehand if you can t come; otherwise, you will receive a charge for unused time.
Quick Guide. LSM 5 MP, LSM 510 and LSM 510 META. Laser Scanning Microscopes. We make it visible. M i c r o s c o p y f r o m C a r l Z e i s s
 LSM 5 MP, LSM 510 and LSM 510 META M i c r o s c o p y f r o m C a r l Z e i s s Quick Guide Laser Scanning Microscopes LSM Software ZEN 2007 August 2007 We make it visible. Contents Page Contents... 1
Training Guide for Carl Zeiss LSM 510 META Confocal Microscope
 Training Guide for Carl Zeiss LSM 510 META Confocal Microscope AIM 4.2 Optical Imaging & Vital Microscopy Core Baylor College of Medicine (2017) Power ON Routine 1 2 Turn ON Components and System/PC switches
Nikon Eclipse Ti A1-A Confocal Operating Manual. Start-up. Microscope
 Nikon Eclipse Ti A1-A Confocal Operating Manual Start-up 1. Turn on Excite Fluorescent light power supply- metal halide. a. Cool down as for mercury bulb b. Wheel closed liquid light guide 2. Turn on power
b. Turn the power switch and key to on position for blue laser.
 OLYMPUS FLUOVIEW 300 CONFOCAL MICOSCOPE OPERATION PROCEDURE 1. Turn ON microscope in this order: 1) Turn on mercury lamp (Note: once the mercury lamp is turned off, DO NOT turn it back on for at least
User Guide to the IBIF Leica TCS SP8 MP Confocal Microscope
 User Guide to the IBIF Leica TCS SP8 MP Confocal Microscope This version: 7.24.14. Introduction The IBIF confocal microscope is made available on a fee-for-use-hour basis to all users who have been trained.
Supplemental Figure 1: Histogram of 63x Objective Lens z axis Calculated Resolutions. Results from the MetroloJ z axis fits for 5 beads from each
 Supplemental Figure 1: Histogram of 63x Objective Lens z axis Calculated Resolutions. Results from the MetroloJ z axis fits for 5 beads from each lens with a 1 Airy unit pinhole setting. Many water lenses
TRAINING MANUAL. Multiphoton Microscopy LSM 510 META-NLO
 TRAINING MANUAL Multiphoton Microscopy LSM 510 META-NLO September 2010 Multiphoton Microscopy Training Manual Multiphoton microscopy is only available on the LSM 510 META-NLO system. This system is equipped
Microscope Confocal Sp2 Upright.
 Microscope Confocal Sp2 Upright. Welcome to the Leica Sp2 Confocal Upright tutorial. Before using the Sp2 Invert, You will need to put down your name on the reservation system = http://svintranet.epfl.ch/index.php?optio
3. are adherent cells (ie. cells in suspension are too far away from the coverslip)
") Before you begin, make sure your sample... 1. is seeded on #1.5 coverglass (thickness = 0.17) 2. is an aqueous solution (ie. fixed samples mounted on a slide will not work - not enough difference in refractive
Before you begin, make sure your sample... 1. is seeded on #1.5 coverglass (thickness = 0.17) 2. is an aqueous solution (ie. fixed samples mounted on a slide will not work - not enough difference in refractive
Zeiss LSM880 Operating Instructions. UTMB Optical Microscopy Core Jan. 16, 2018
 Zeiss LSM880 Operating Instructions UTMB Optical Microscopy Core Jan. 16, 2018 1 1. Power up the microscope Sing the LOGBOOK Steps below will provide power to the computer and all of the microscope components.
Microscope Confocal LSM510 META
 Microscope Confocal LSM510 META Welcome to the Zeiss LSM 510 Meta Confocal tutorial. Before using the LSM 510 META, Log off any other computer that is open with your personal login. You will need to put
Contents. Introduction
 Contents Page Contents... 1 Introduction... 1 Starting the System... 2 Introduction to ZEN Efficient Navigation... 5 Setting up the microscope... 10 Configuring the beam path and lasers... 12 Scanning
START-UP PROCEDURE 1 THE MICROSCOPE STAND 3 OBJECTIVES 5 STARTING WITH LAS (SOFTWARE) AND SETTING UP THE MICROSCOPE STAND 7
 AND SETTING UP THE MICROSCOPE STAND 7") Leica DMI AF6000LX Table of contents START-UP PROCEDURE 1 THE MICROSCOPE STAND 3 OBJECTIVES 5 STARTING WITH LAS (SOFTWARE) AND SETTING UP THE MICROSCOPE STAND 7 ACQUIRE MODULE 6 SETTING THE LIGHTPATH 6
Leica DMI AF6000LX Table of contents START-UP PROCEDURE 1 THE MICROSCOPE STAND 3 OBJECTIVES 5 STARTING WITH LAS (SOFTWARE) AND SETTING UP THE MICROSCOPE STAND 7 ACQUIRE MODULE 6 SETTING THE LIGHTPATH 6
ZEISS LSM 710 CONFOCAL MICROSCOPE USER MANUAL
 ZEISS LSM 710 CONFOCAL MICROSCOPE USER MANUAL START THE SYSTEM... 2 START ZEN SOFTWARE... 3 SET THE TEMPERATURE AND THE CO2 CONTROLLERS... OBSERVATION AT OCULARS... 5 STATIF PRESENTATION... 6 ACQUIRE ONE
Everest System / Slidebook Operating Procedures
 Everest System / Slidebook Operating Procedures NOTICE: This guide is meant to supplement training, not replace it. All users must be trained first hand by a core employee. Training of others in your lab
Training Guide for Carl Zeiss LSM 880 with AiryScan FAST
 Training Guide for Carl Zeiss LSM 880 with AiryScan FAST ZEN 2.3 Optical Imaging & Vital Microscopy Core Baylor College of Medicine (2018) Power ON Routine 1 2 Turn ON Main Switch from the remote control
Nikon C1si Spectral Laser Scanning Confocal Microscope. User Guide
 Nikon C1si Spectral Laser Scanning Confocal Microscope User Guide Contents: C1Si Turn-On/ShutDown Procedures... 2 Overview... 4 Setup for epi-illumination to view through the eyepieces:... 5 Setup for
Renishaw InVia Raman microscope
 Laser Spectroscopy Labs Renishaw InVia Raman microscope Operation instructions 1. Turn On the power switch, system power switch is located towards the back of the system on the right hand side. Wait ~10
Horiba LabRAM ARAMIS Raman Spectrometer Revision /28/2016 Page 1 of 11. Horiba Jobin-Yvon LabRAM Aramis - Raman Spectrometer
 Page 1 of 11 Horiba Jobin-Yvon LabRAM Aramis - Raman Spectrometer The Aramis Raman system is a software selectable multi-wavelength Raman system with mapping capabilities with a 400mm monochromator and
1 Co Localization and Working flow with the lsm700
 1 Co Localization and Working flow with the lsm700 Samples -1 slide = mousse intestine, Dapi / Ki 67 with Cy3/ BrDU with alexa 488. -1 slide = mousse intestine, Dapi / Ki 67 with Cy3/ no BrDU (but with
Nikon A1Rsi Confocal Start-Up Sequence
 1. Turn the key on the Nikon LUN-V Laser Launch. Nikon A1Rsi Confocal Start-Up Sequence 2. Press the button the left side of the A1Rsi Controller unit. 3. Turn on the power strip underneath the microscope.
Instructions for the Leica SP5 II laser scanning confocal microscope
 Instructions for the Leica SP5 II laser scanning confocal microscope Content: Check-in and Start up Set up acquistion parameters Optimize acquistion parameters Acquire a z-stack Sequential scan Check out
Using the Nikon TE2000 Inverted Microscope
 Wellcome Trust Centre for Human Genetics Molecular Cytogenetics and Microscopy Core Using the Nikon TE2000 Inverted Microscope Fluorescence image acquisition using Scanalytic s IPLab software and the B&W
Training Guide for Carl Zeiss LSM 5 LIVE Confocal Microscope
 Training Guide for Carl Zeiss LSM 5 LIVE Confocal Microscope AIM 4.2 Optical Imaging & Vital Microscopy Core Baylor College of Medicine (2017) Power ON Routine 1 2 Verify that main power switches on the
ScanArray Overview. Principle of Operation. Instrument Components
 ScanArray Overview The GSI Lumonics ScanArrayÒ Microarray Analysis System is a scanning laser confocal fluorescence microscope that is used to determine the fluorescence intensity of a two-dimensional
1 Set up the confocal light path for imaging a green dye (Alexa488-EGFP). For example, the
. For example, the") 1 Set up the confocal light path for imaging a green dye (Alexa488-EGFP). For example, the light path as shown here using the 488 nm LASER (Laser Unit 1) reflecting off of the 405/488 nm Dichroic mirror
1 Set up the confocal light path for imaging a green dye (Alexa488-EGFP). For example, the light path as shown here using the 488 nm LASER (Laser Unit 1) reflecting off of the 405/488 nm Dichroic mirror
Why and How? Daniel Gitler Dept. of Physiology Ben-Gurion University of the Negev. Microscopy course, Michmoret Dec 2005
 Why and How? Daniel Gitler Dept. of Physiology Ben-Gurion University of the Negev Why use confocal microscopy? Principles of the laser scanning confocal microscope. Image resolution. Manipulating the
ZEISS LSM 710 NLO Multiphoton microscope Manual/Quick guide
 ZEISS LSM 710 NLO Multiphoton microscope Manual/Quick guide Matyas Molnar, Biovis 2016 Starting the microscpe 1. Check the microscope if everything looks clean and normal. If not, report it in the logbook.
Nikon Eclipse Ti2-E Widefield/Spinning Disk Confocal Microscope Standard Operation Protocol
 Nikon Eclipse Ti-E Widefield/Spinning Disk Confocal Microscope Standard Operation Protocol Please sign on the log sheet before switching on system. Turn on system Turn on A only if confocal mode or laser
Confocal Application Letter No. 13. Sequential Scan for Leica TCS NT/SP systems
 Confocal Application Letter No. 13 Sequential Scan for Leica TCS NT/SP systems Leica Microsystems Heidelberg GmbH Im Neuenheimer Feld 518 D-69120 Heidelberg Telephone +49 6221 4148 0 Fax +49 6221 414833
Multifluorescence The Crosstalk Problem and Its Solution
 Multifluorescence The Crosstalk Problem and Its Solution If a specimen is labeled with more than one fluorochrome, each image channel should only show the emission signal of one of them. If, in a specimen
Training Guide for Carl Zeiss LSM 7 MP Multiphoton Microscope
 Training Guide for Carl Zeiss LSM 7 MP Multiphoton Microscope ZEN 2009 Optical Imaging & Vital Microscopy Core Baylor College of Medicine (2017) Power ON Routine 1 2 Turn Chameleon TiS laser key from Standby
Diskovery Spinning Disk Guide
 Diskovery Spinning Disk Guide qbi.microscopy@uq.edu.au Getting started The microscope and its peripherals (Fig. 1a) should always be turned on, but if they are not, turn them on in the following way: 1.
BX-61: Brightfield Instruction /Continue to scroll for Fluorescent Instuctions
 BX-61: Brightfield Instruction /Continue to scroll for Fluorescent Instuctions Starting up: Schematic of Olympus BX-61. 1. Turn on Olympus microscope power box (left of microscope) with toggle switch on
Overview. About other software. Administrator password. 58. UltraVIEW VoX Getting Started Guide
 Operation 58. UltraVIEW VoX Getting Started Guide Overview This chapter outlines the basic methods used to operate the UltraVIEW VoX system. About other software Volocity places great demands on the computer
Title: Nikon A1R Confocal User Manual
 Title: Nikon A1R Confocal User Manual Date of first issue: 23/10/2015 Date of review: Version: Admin For assistance or to report an issue Office: CG.07 or CG.05 Email: Igmm-imaginghelpdesk@igmm.ed.ac.uk
Zeiss Deconvolution Microscope: A Quick Guide
 Zeiss Deconvolution Microscope: A Quick Guide Start-up Uncover microscope. Do not put dust cover on the floor. Plug in both cameras. The default camera is the AxioCam HRm (monochrome camera) for fluorescence
3 Choose the Channels button and set the Channel Settings. Set the Pinhole to 1 Airy unit.
 1 Set up the confocal light path for imaging a green dye (e.g. Alexa488-EGFP). For example, under the Configuration Control window the light path could be set up as shown here using the 488 nm LASER (found
MAKE SURE YOUR SLIDES ARE CLEAN (TOP & BOTTOM) BEFORE LOADING DO NOT LOAD SLIDES DURING SOFTWARE INITIALIZATION
 BEFORE LOADING DO NOT LOAD SLIDES DURING SOFTWARE INITIALIZATION") Olympus VS120-L100 Slide Scanner Standard Operating Procedure Startup 1) Red power bar switch (behind monitor) 2) Computer 3) Login: UserVS120 account (no password) 4) Double click: WAIT FOR INITIALIZATION
Olympus VS120-L100 Slide Scanner Standard Operating Procedure Startup 1) Red power bar switch (behind monitor) 2) Computer 3) Login: UserVS120 account (no password) 4) Double click: WAIT FOR INITIALIZATION
Contents STARTUP MICROSCOPE CONTROLS CAMERA CONTROLS SOFTWARE CONTROLS EXPOSURE AND CONTRAST MONOCHROME IMAGE HANDLING
 Operations Guide Contents STARTUP MICROSCOPE CONTROLS CAMERA CONTROLS SOFTWARE CONTROLS EXPOSURE AND CONTRAST MONOCHROME IMAGE HANDLING Nikon Eclipse 90i Operations Guide STARTUP Startup Powering Up Fluorescence
RENISHAW INVIA RAMAN SPECTROMETER
 STANDARD OPERATING PROCEDURE: RENISHAW INVIA RAMAN SPECTROMETER Purpose of this Instrument: The Renishaw invia Raman Spectrometer is an instrument used to analyze the Raman scattered light from samples
Internal Medicine Imaging Core Emory University Department of Medicine
 Internal Medicine Imaging Core Emory University Department of Medicine 1 OPERATION OF THE ZEISS LSM 510 META YOU MUST SIGN UP TO USE THE MICROSCOPE OR COMPUTER EVERY TIME NO EXCEPTIONS Before attempting
Olympus Fluoview 1000S Spectral Confocal Microscope Introduction to the NRI-MCDB Microscopy Facility Spectral Confocal Microscope
 Olympus Fluoview 1000S Spectral Confocal Microscope Introduction to the NRI-MCDB Microscopy Facility Spectral Confocal Microscope Improved Optics More Lasers 405 diode 440 diode 488 Argon 515 Argon 559
Topics. - How to calibrate the LSM scanner. - How to clean the microscope. - How to adjust the pinhole alignment. - How to adjust the Collimator
 Topics - How to calibrate the LSM scanner - How to measure the PSF - How to clean the microscope - How to adjust the pinhole alignment - How to adjust the Collimator How to calibrate the LSM scanner The
REMEMBER: You have 5GB of disk space on this microscope. Check before you start if you have room for your experiment. If not delete your old data.
 1 Use of the Zeiss LSM 510 Inverted Firstly please be aware that this microscope should be treated with respect and care at all times. Rules of use: This Microscope can only be used by Masters by Research
SHORT INSTRUCTIONS FOR OPERATING LSM1/2 (Zeiss LSM510) AT CIAN Version 1.4, September 2014
 AT CIAN Version 1.4, September 2014") CIAN LSM1 or LSM2 short instructions, version 1.4, September 2014 page 1 of 6 SHORT INSTRUCTIONS FOR OPERATING LSM1/2 (Zeiss LSM510) AT CIAN Version 1.4, September 2014 Before starting To work with LSM1
CIAN LSM1 or LSM2 short instructions, version 1.4, September 2014 page 1 of 6 SHORT INSTRUCTIONS FOR OPERATING LSM1/2 (Zeiss LSM510) AT CIAN Version 1.4, September 2014 Before starting To work with LSM1
CONFOCAL MICROSCOPE (Zeiss LSM 510 META v4.2)
") Wellcome Trust Centre for Human Genetics Molecular Cytogenetics and Microscopy Core CONFOCAL MICROSCOPE (Zeiss LSM 510 META v4.2) 1) STARTING THE SYSTEM Abridged INSTRUCTIONS Switch on the mercury bulb
Wellcome Trust Centre for Human Genetics Molecular Cytogenetics and Microscopy Core CONFOCAL MICROSCOPE (Zeiss LSM 510 META v4.2) 1) STARTING THE SYSTEM Abridged INSTRUCTIONS Switch on the mercury bulb
Zeiss Axiovert 135 Fluorescence Microscope Quick Guide / Operations Manual (v. 1.0 February 09)
") University of Chicago Integrated Light Microscopy Core Dr. Vytas Bindokas, Director http://digital.bsd.uchicago.edu By: Christine Labno, Assistant Director Room: AB-129 Phone: 4-9040 Zeiss Axiovert 135
University of Chicago Integrated Light Microscopy Core Dr. Vytas Bindokas, Director http://digital.bsd.uchicago.edu By: Christine Labno, Assistant Director Room: AB-129 Phone: 4-9040 Zeiss Axiovert 135
Zeiss AxioObserver with ApoTome
 Zeiss AxioObserver with ApoTome Quick Start User Guide LSU Health Sciences Center-Shreveport Research Core Facility (RCF) Microscopy Table of Contents 1 Start up the system.. Page 3 2 Touch screen controller
Improving Image Quality on the UACC Leica SP5 confocal
 Improving Image Quality on the UACC Leica SP5 confocal Douglas Cromey, MS (UACC TACMASR Microscopy) Some days it is difficult to come up with a brightly stained sample. This document contains some strategies
Brief manual how to start and close the Leica sp2 Confocal. (TCS SP2 AOBS system mounted on a DM IRE2)
") Brief manual how to start and close the Leica sp2 Confocal (TCS SP2 AOBS system mounted on a DM IRE2) A. Switching on hardware B. Acquiring and saving images C. Switching off the microscope D. Good working
Brief manual how to start and close the Leica sp2 Confocal (TCS SP2 AOBS system mounted on a DM IRE2) A. Switching on hardware B. Acquiring and saving images C. Switching off the microscope D. Good working
SPINNING DISK CSU-X1 USER MANUAL
 SPINNING DISK CSU-X1 USER MANUAL Starting the temperature controller... 2 Starting the CO2 controller... 3 Start the spinning disk... 4 Sample observation with the oculars... 5 Spatial sampling, Pixel
NIS-Elements C (For CONFOCAL MICROSCOPE A1) Instructions (Ver. 4.40)
 Instructions (Ver. 4.40)") M487E 15.4.NF.17 (1/4) *M487EN17* NIS-Elements C (For CONFOCAL MICROSCOPE A1) Instructions (Ver. 4.40) Preface Thank you for purchasing the Nikon products. This instruction manual has been prepared for
M487E 15.4.NF.17 (1/4) *M487EN17* NIS-Elements C (For CONFOCAL MICROSCOPE A1) Instructions (Ver. 4.40) Preface Thank you for purchasing the Nikon products. This instruction manual has been prepared for
SlideBook 5. FRAP Imaging Module
 SlideBook 5 FRAP Imaging Module for Windows XP User s Manual (Latest Revision 7.9.09) 1 Table of Contents TABLE OF CONTENTS...2 CONTACTING INTELLIGENT IMAGING INNOVATIONS, INC...3 MANUAL CONVENTIONS...4
Leica TCS SP2 User Manual 1.1. Markus Friedrich and James Lee. Department of Biological Sciences Wayne State University
 Leica TCS SP2 User Manual 1.1 Markus Friedrich and James Lee Department of Biological Sciences Wayne State University Confocal Manual 1 Helpful hints The confocal room is cold. Bring a sweater. Confocaling
Before you start, make sure that you have a properly calibrated system to obtain high-quality images.
 CONTENT Step 1: Optimizing your Workspace for Acquisition... 1 Step 2: Tracing the Region of Interest... 2 Step 3: Camera (& Multichannel) Settings... 3 Step 4: Acquiring a Background Image (Brightfield)...