Leica TCS SL Confocal Training. Neuroscience Imaging Core Staff. Core Director. Facility Manager
|
|
|
- Wilfred McLaughlin
- 6 years ago
- Views:
Transcription
1 Leica TCS SL Confocal Training Neuroscience Imaging Facility The Ohio State University Rightmire Hall Staff Core Director Anthony Brown, Ph. D. 060 Rightmire Hall Facility Manager Paula Monsma 062 Rightmire Hall
2 Leica TCS SL Confocal Training... 1 Staff... 1 Core Director... 1 Facility Manager... 1 Access... 4 Access to the room... 4 Scheduling time... 4 Contact numbers... 5 What is fluorescence?... 6 How does a fluorescence microscope work?... 6 The principal behind confocal microscopy:... 7 How does a confocal microscope work?... 7 Why use Confocal Imaging... 8 The Microscope... 9 Z-Galvo stage... 9 Why use an inverted microscope? Benefits Cautions Specimen Mounting Fixed Specimen Living Specimen Objectives Understanding Objectives Care of Objectives Epifluorescence Filter Cubes Phase and DIC The Confocal Microscope and Workstation Layout AOTF Spectral Detectors Crosstalk Getting Started Start the Leica Confocal Software Left Monitor Information Window Beam Path Setting Window Format Button Obj button MicCtrl Button Pinh Button Speed Button Right Monitor Viewer Toolbar Collecting an image
3 The Beam Path Settings Window Take the first image Create an overlay of the two channels Optimize the gain and offset of the two channels Averaging Crosstalk Check for Crosstalk Check for crosstalk from the other laser line Adjust beam path settings for crosstalk Change the detection slot Set up a sequential scan Optimize the settings for each channel Save the sequential setting Load the sequential scan settings Acquire an image using the sequential scan settings Zoom Functions Zooming on a specific area Centered Zoom DIC Saving the Data Saving the experiment Saving the overlay image Experiments Create a new experiment Open a saved experiment Renaming images Browsing all the images in an experiment Adding a scale bar Taking a Z series Set the Start and End Points Set the number of sections Collect the series Viewing the Z-series Create a 3D Projection and Animation Select the Projection Type Preview the Projection Export an Animation Logging off of the computer Shutting Down Alternate Shut Down Procedure:
4 Access Access to the Confocal Microscope Supervised Unsupervised Mon-Fri 9a-5p Mon-Fri 9a-5p Evenings and Weekends Required Experience Trainee Standard user X X Seminar & minimum of 2 supervised sessions. Advancement decided on case by case basis Seminar & minimum of 10 unsupervised sessions. Advancement decided on case by case basis Experienced user X X Advancement decided on case by case basis Access to the room Key card access. Contact Paula Scheduling time Use Google Calendar. Contact Paula for access. 4
5 Contact numbers Question about how to use the microscope, i.e. software questions Contact Paula or a-5p, M-F Leica OneCall a-5p, M-F Physical problem with microscope, i.e., it s broken Contact Paula or a-5p, M-F Problem after hours Contact Paula Computers Two workstations Online -for imaging (Leica Confocal) Offline -for analyzing data (Leica Offline) Windows XP operating system protected by a firewall Data storage Send to your computer over the network Archive to an external hard drive using firewire or USB ports Archive to CD/DVD using CD/DVD burner DVD+R, DVD-R, up to 8x CD-R, CD-RW, up to 40x Users All users will have a user name and password User name PI name + lab (eg, McKinney lab ) Password last five digits of the lab phone number Rules All files must be saved to the user files on the D drive, files stored elsewhere will be deleted Files saved to the D drive will be deleted after one week 5
6 What is fluorescence? Absorb high energy photon Emit low energy photon (longer wavelength) Excite with high energy photon (shorter wavelength) Emit lower energy photon (higher wavelength) How does a fluorescence microscope work? Specimen Mercury arc lamp Objective Excitation filter Dichroic mirror (beamsplitter) Filter cube Emission filter 6 Eyepieces or camera
7 The principal behind confocal microscopy: Elimination of out of focus light Object in focal plane Pinhole aperture in conjugate focal plane Object out of focal plane Most out of focus light is rejected How does a confocal microscope work? 7

8 Why use Confocal Imaging The detector in a confocal microscope is a point detector and only sees one point in the specimen at a time. By scanning that point, you create an image in which diffuse fluorescence due to out of focus signal is excluded. A series of optical sections of the specimen can be taken and processed into a three dimensional image of the specimen. Image A: Drosophila melanogaster, FITC, non-confocal Image B: Drosophila melanogaster, FITC, confocal 3D projection 8
 Filter cube turret Laser scan head with 3 spectral detectors Side port Z-Galvo stage Focus knob Halogen")

9 The Microscope Halogen lamp Transmitted light detector Eyepieces Transmitted light illumination column (tilts back for better access to stage) Condenser lens lens Z- galvo stage (detachable) Filter cube turret Laser scan head with 3 spectral detectors Side port Z-Galvo stage Focus knob Halogen lamp intensity adjustment wheel Microscope control panel -Sample holder that fits on the stage -Removable -Physically moves the sample up and down rapidly with high precision -Range of 170 m -Permits a more rapid acquisition of a Z-series than using the microscope focusing mechanism (ie, moving the objectives) 9


10 Why use an inverted microscope? Benefits -More flexibility, can image both open and closed chambers -Better suited to imaging living cells than upright microscope -Can image live cells and organisms in open dishes using high NA objectives -Can accommodate a variety of different chambers Cautions -Location of objective makes it more possible for liquids (oil, water, media, etc) to find their way inside the objective, possibly rendering it unusable -More care must be taken using the immersion objectives -Specimens on slides are inverted to take advantage of the best optics and must be sealed to prevent leakage -More difficult to apply oil when specimen is in place Specimen Mounting Fixed Specimen -Coverslip #1.5 ~0.17mm -Permanent mounting media -Mounting media that does not dry should be sealed with nail polish Living Specimen -Buy/make culture dish with a glass bottom -Heated chamber and objective heater Can be used for perfusion Culture cells on a #1.5 coverslip from Bioptechs, mount in chamber 10
11 Objectives The following objectives are on the objective turret: 10x HC Plan Fluotar Ph1 (dry) 40x HCX Plan Fluotar Ph2 (dry) 20x HC Plan Apo CS multi-imm 40x HCX Plan Apo CS oil 63x HCX Plan Apo CS oil 100x HCX Plan Apo CS oil We have an additional objective (63x water immersion) that can installed with Paula s assistance. Understanding Objectives Quality -Objectives are highest quality = expensive -Image is only as good as the objective Numerical Aperture (NA) Measure of the width of the cone of light that the objective can gather -High NA objectives have: High resolution Brighter image Shorter working distance -NA > 1.0 generally are immersion objectives Correction collars -The following objectives have NA correction collars: 40x oil, 63x oil, 100x oil. Adjusting this collar will affect the resolution and brightness of the image, as well as the working distance. We recommend always leaving these collars in the maximum position. When looking at down at the objective, turning the collar completely clockwise will put collar in the maximum NA position. -The 20x objective has a correction collar for different immersion media : oil, water, glycerol. 11

12 Immersion medium correction collar NA correction collar Immersion medium correction collar is labelled. The NA correction collar is not. To make sure that it is in the highest NA setting, turn it clockwise when looking at it from above. If the NA is not at the highest setting, you will see a reduction in brightness and resolution of your image 12

13 Care of Objectives Do not remove objectives -If you need a different objective than what is on the turret, contact Paula before scheduled use so it can be installed and available. Immersion objectives -Use oil for all the immersion objectives -To use the 63x water objective, contact Paula for instructions -To use the 20x multi-immersion objective with water, contact Paula for instructions Using oil -Always use Leica oil do not mix oils -Use minimum amount necessary -Clean slides after use -Use only lens tissue to clean objectives blot, don t rub -Always clean objective after use with oil -Don t drag dry objectives through the oil on the slide Epifluorescence Filter Cubes The following filter cubes are installed on the turret. I3 Fluorochromes: Alexa 488, Cy2, YFP N2.1 Fluorochromes: Alexa 546, TRITC, Cy3 DAPI Fluorochromes: DAPI We have two additional filter cubes (CFP and CY5) that can installed with Paula s assistance. 13

")
14 Phase and DIC Phase Contrast -Available with the dry objectives -Reveals the relative refractive index -Generates high contrast, which depends in part on the thickness of the specimen -Less suitable than DIC for overlaying with fluorescent images DIC -Available with the immersion objectives -Reveals gradients in refractive index, so the resulting image tends to show edges -Generates low contrast -Better for overlaying with fluorescent images than phase Blue-Green (Spirulina) Algae 14
15 The Confocal Microscope and Workstation Layout Nitrogen tank Mercury bulb power supply (top) Scan Head 3 Fluorescent PMTs Transmitted Light PMT Control Panel Laser Launch -3 lasers -6 laser lines CPU Microscope Power supply (bottom) 15


16 AOTF In place of excitation filters, our confocal system has an acoustooptical tunable filter -Allows for independently attenuating each laser line -Less Crosstalk with multi-color stainings -Less bleaching by optimized excitation intensity -Fast switching While the laser is scanning, it can be turned on in one spot and the next spot it can be turned off -Region-of-interest Scan Sample protection Bleaching experiments (FRAP, FRET) Activation/uncaging Spectral Detectors In place of emission filters, our confocal system has spectral detectors. -Three confocal spectral detection channels -Stepless adjustable spectral emission bands -No limitations caused by filter characteristics -Adjust detection bandwidth manually or with pre-sets -Laser lines are blocked out 16

17 This example shows two confocal spectral detectors and one transmitted light detector in an upright microscope configuration. Our confocal system has three confocal spectral detectors and one transmitted light detector in an inverted microscope configuration. 1. Laser 2. AOTF 3. Excitation Pinhole 4. Dichroic mirror (beam splitter) 5. K -scanner with rotator 6. Microscope and objective 7. Confocal detection pinhole 8. Prism 9. Spectral detector (PMT 1) 10. Spectral detector (PMT 2) 11. Transmitted light detector 17
18 Crosstalk Fluorochromes excite and emit over a broad range of wavelengths, so there is always the possibility of crosstalk. Types -Excitation Excitation wavelength activates two or more fluorophores 488 FITC 543 TRITC -Emission Emission curve overlaps detection bandwidth of another fluorophore Alexa 488 Spectra 48 Solutions -Dyes Choose dyes with Minimal overlap of excitation and emission spectra -Hardware Use spectral detectors Use sequential scanning Alexa 546 Spectra 488 FITC 543 TRITC -Software Adaptive Dye Separation Spectral Dye Separation 18
 (On for 30 min, off for 30 min) 3.")
 6. Turn on the computer, if it is off. 7.")
19 Getting Started 1. Turn on the nitrogen tank valve 2. Turn on the mercury bulb (top) (On for 30 min, off for 30 min) 3. Turn on the microscope (bottom) 4.Turn on the fans for the lasers (red switches) 5. Turn on the three lasers (keys) 6. Turn on the computer, if it is off. 7. Log in as a user Start the Leica Confocal Software Double click on the Leica Confocal Software icon. 19

20 Left Monitor Pull down menus and buttons- Many of the functions here can be done somewhere else in the software. The most important button here is the SAVE button. Experiments Window Images are sent here as files. Images can be saved, renamed, deleted and exported from this window. Blank area for opened windows to be placed so that they don t cover up other information. Information Window All of the settings for the current image are available here. 20
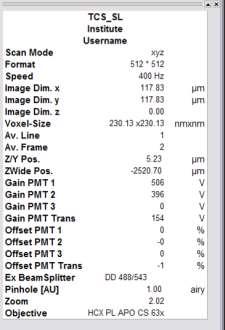
21 Information Window 21
22 Menu buttons Each opens a new set of tools. Generally, these are used in a left to right order. Z Series controls Tools for acquiring images. 22

23 Beam Path Setting Window Laser Line Settings- Indicates which laser lines are active and at what power. Window-Saved beam path settings. Save your own settings here. Transmitted light PMT make active to take DIC images. Dichroic (Beam Splitter) 23

24 Format Button Choose the resolution of the image to be collected. The default is 512 x 512. Obj button Displays the objective currently in use. Also, can change the objective in use by clicking on the desired objective. 24

25 MicCtrl Button To easily change the microscope settings between scanning and looking at your sample thru the eyepieces, select the MicCtrl button. Choose Scan if you want acquire images with the confocal software. Choose Visual if you want to look through the eyepieces of the microscope. If you get an error message when you try to acquire an image in the software check this setting to make sure that Scan is selected. Pinh Button Displays the current pinhole setting. The default for each objective is 1 Airy Disk. Increasing the pinhole will increase the signal, but will also reduce the confocality of the image. 25

26 Speed Button Displays the current scan speed, which is equivalent to exposure. Default is 400 Hz. Increasing the speed will decrease photobleaching and brightness of image, as well as the time it takes to acquire the image. 26

27 Right Monitor The Viewer Window Viewer Toolbar- Buttons that will facilitate taking and displaying an image. Viewer Window The acquired images will be displayed here. 27

28 Viewer Toolbar Single, Tiled, Gall. and Ovl Ways of determining the type of view that you would like in the viewer window. Ch 1 thru Ch 4 Selecting/Deselecting will determine which channels are displayed in the viewer window. Q LUT and Lut Buttons for optimizing the gain and offset, as well as adjusting the display of the image. Buttons for acquiring images. Many buttons are duplications of what is under the Acquire menu. 28


29 This shows a tiled view with an overlay. Three channels are displayed. Collecting an image Select the MicCtrl button. Set it to scan. 29
30 The Beam Path Settings Window Select the Beam button. The Beam Path Settings window will open. To select excitation and detection settings, double click on one of the options under the Leica directory in the Beam Path Settings window (blue arrow). The settings for FITC-TRITC are selected here. Take the first image Select Single Scan to take one scan of your image. 30


31 The first scan on the right monitor. This image will be flipped on a horizontal axis as compared to what is seen through the eyepieces of the microscope. Create an overlay of the two channels Choose the Ovl button to create a merged image of the two channels. 31

32 Optimize the gain and offset of the two channels Select the Q LUT button. This will create an image where pixels of maximum value are displayed as blue and pixels with a value of zero are displayed as green. Pixels with values in the mid ranges are displayed as reds and whites. Adjusting this will change the way the data is collected by the detectors. This is not simply changing the way the image looks on the screen. Select Continuous to start a continuous scan. Select each channel, and using the control panel, use the smart gain knob and adjust the gain to show maximum values and use the smart offset to adjust the offset to show minimum values. Select the other channel and adjust the gain and offset for that channel. 32


33 This image has been adjusted, so that there are some maximum pixels and some minimum pixels, but nothing is saturated. To change the display back to colored image, simply click on Q LUT twice more. The gain and offset will need to be checked and adjusted each time a setting is changed. Averaging Averaging taking a single image Select Aver Select single scan. Choose the number of frames you would like to average. Averaging two to four frames is most common. Select Single Scan. An image will be created in the Experiments window. 33


34 The single scan is saved as an image in the Experiments window. The small red check on the file icon indicates that this is the image that is currently being shown on the right monitor. Crosstalk Check for Crosstalk Reduce the 488 laser line to zero. Take a scan. Check the gain and offset. 34


35 Because there is no signal in the FITC channel, we would say that there isn t crosstalk in this direction. Check for crosstalk from the other laser line Reduce the 543 laser line to zero. Set the 488 laser line to its previous setting. Take a single scan. 35
36 Because we see a signal in the TRITC channel, this shows crosstalk. Since we see signal in this channel it can mean that the 488 laser line is also exciting TRITC (excitation crosstalk) or that the emission curve for FITC is so large and the signal so strong that the detection slot for TRITC is actually detecting FITC. Adjust beam path settings for crosstalk Reduce the 488 laser line to 7% to see if that helps. The 488 laser line is very powerful and is generally used at a low level. Take a scan, adjust the gain and offset. 36


37 There is still a large amount of crosstalk. Change the detection slot Using the slider, change the detection slot for the TRITC channel, so that the tail of the FITC emission is no longer being detected. Take a scan. 37
38 The signal in the TRITC channel is reduced, but there is still some crosstalk. Because the emission tail of the FITC is so large and there is so much overlap into the TRITC channel, this would be a good situation to use sequential scan. 38


39 Set up a sequential scan A sequential scan will take a scan with the settings for one channel and then the settings for another channel. It s a good way to reduce crosstalk between channels. Optimize the settings for each channel Here, we are optimizing the settings for the FITC channel. We widened the detection slot and set the laser setting at reasonable level. Take a scan. Optimize the gain and offset. 39
 and click OK. The setting will be saved under User (red arrow) in the Beam Path Settings window.")
40 Save the sequential setting Select Save (blue arrow) in the Beam Path Settings window. The Name of Parameter Setting (yellow arrow) dialog will open. Name the setting (here Seq Green Convallaria) and click OK. The setting will be saved under User (red arrow) in the Beam Path Settings window. Here we are optimizing the settings for the TRITC channel. 40
 in the Beam Path Settings window.")
 and click Add (yellow")
41 The resulting image. Save this setting as for the other channel. Load the sequential scan settings Select Seq (blue arrow) in the Beam Path Settings window. The Sequential Scan Settings window will open. Select one of the channel settings that you saved (red arrow and highlighted) and click Add (yellow arrow) in the Sequential Scan Settings window. Then select the settings for the other channel and click Add. 41


42 Here the settings for both channels have been added. Now choose a mode. 42

43 Acquire an image using the sequential scan settings With the Sequential Scan Settings window open, select Single Scan or Continuous. The resulting image will be collected using the sequential scan settings. The resulting image. Check and adjust the gain and offset. 43
44 Zoom Functions Zooming on a specific area To choose an area to zoom in on, select Z. In. Go to your image and draw a box around the desired area. Collect an image using either Single Scan or Continuous scan. This is not simply zooming in on the already acquired image, it is scanning smaller area with the same resolution. Resulting zoomed image. 44


45 The amount of zoom is indicated in the information box. Centered Zoom Select the Zoom button. It will tell you what the current zoom is, as well as allow you to choose a specific zoom. This will zoom in on the center of the image. This is handy if you have several areas of interest in one larger image because you can use it to reduce the zoom to 1.00, so that you can see your original image again. 45


46 DIC Take a DIC image To take a DIC image, make sure that the the objective prism and the condenser prism are correct for the objective you are using, the transmitted light detector selection knob is set to scan, and that the analyzer is not in the light path. Then check the Active box for the transmitted light PMT. DIC Image Overlay Image Take an image, adjust the gain and offset. 46

47 Saving the Data Saving the experiment The program places all the images that you acquire in temporary memory until you save them. The images that are automatically sent to the experiment are the individual channels. If you have created an overlay of both channels, you will need to specifically save that. If the program crashes, upon restart it will notify you that there are temporary files and it will ask if you want to save them. If you exit out of the program purposely and choose not to save your images, they are not recoverable. To save the experiment Select Save at the top of the screen. Shortcut Icon on the desktop Each lab will have a user folder on the D drive in the users folder, as well as a shortcut to that folder on the desktop. Save images only on the D drive. Here, McKinney lab is the user folder. To save, select McKinney lab. 47

48 Rename the experiment (red arrow) and click Save (blue arrow). The experiment will be saved as a folder. The folder will contain all of the images acquired in the experiment. The software creates a file that tells what the names of the files are in the experiment folder. If you wish to change the name of your files and still be able to open those files in the Leica software, you must rename them from within the Leica software. If you go into Windows and rename the individual files there, when you try to reopen these images in the Leica software you will not be able to see them. A good way to eliminate this problem is to create a permanent archival copy of your raw data on CD or DVD. When you want to use the images, make a copy of the image and change that. 48

49 Saving the overlay image In order to save an image that looks like the Viewer window, right click on the images in the right monitor. Choose Send to, then Experiment, and then All(snapshot). This will send an image that when you open it in Photoshop, will have the individual channels as well as the overlay in one composite image. The icon for the snapshot (arrow) in the experiment window. 49

50 Experiments Create a new experiment This would be useful if you have several very different projects you want to image during the same session. You can rename the experiment so that it s clear which set of images came from which experiment without having to rename each image that is taken. Select New to create a new experiment. The new experiment will be created in the Experiment window. 50

51 Open a saved experiment Select Open. An open window will open. Browse until you find your experiment folder. Select it and open it. Here MolProbesSlide was selected. When the experiment folder is open, only the.lei file is visible. Double click it to open. This will open all the images in this folder in the Leica software. 51


52 Renaming images To rename an image, right click on the name of the file and select rename. Browsing all the images in an experiment Choose Browse. This will display all the images in the experiment in a thumbnail format. 52
. A Scale Bar dialog will open.")
53 Adding a scale bar Check Scale in the Display menu, under Settings. A scale bar will be added to your images. To format the scale bar to a specific length, choose the Scale button (arrow). A Scale Bar dialog will open. 53


54 Type in the length of the scale bar and choose apply. The resulting scale bar. In order to save the scale bar, you must right click on the image and send it to the experiment as a snapshot. 54
 button. This will bring up the Setting Z/Y-Position for Spatial Image Series dialog. Start a Continuous scan.")
55 Taking a Z series A Z series is a set of optical slices through the specimen, each at a different Z plane. It provides a more three-dimensional picture of the specimen. Set the Start and End Points Select the Series (red arrow) button. This will bring up the Setting Z/Y-Position for Spatial Image Series dialog. Start a Continuous scan. Using the control panel knob, change the Z position until you are at the top of the specimen. Select the Begin button (green arrow) to set this as the beginning of the Z series. Change the Z position in the opposite direction until you are at the bottom of the specimen and choose the End button (blue arrow) to set this as the end of the Z series. 55


56 Set the number of sections Here the beginning and end points have already been chosen. Select the Sect button to choose the number of sections or slices that will be taken. The software automatically chooses an optimized number of sections. To change the number of sections, select Others and the Z-configuration dialog will open. Select the number of sections. A good rule of thumb is to double the optimized step size. 56


57 Here, the step size has been changed to This decreases the number of sections to 194. Collect the series Select the Series button to start the collection of the Z-series. The Setting Z/Y-Position for Spatial Image Series will show the progress of the Z-series. The green line in the box is the begin point. The red line in the box is the end point. The yellow line in the box is the current position. 57

58 Viewing the Z-series These are all the images in the Z-series. The select this view, choose Gall for the gallery view, Single to only have one image, both Ch 1 and Ch 2 since both channels are being captured and Ovl to have the overlay image. The Z series file is named Series with a number, in this case Series
59 Create a 3D Projection and Animation Select the Process menu. Choose 3D Visualization and Animation. In 3D Visualization and Animation, choose Projections with Animation. 59

 to create a preview in the Result window.")
60 Select the Projection Type There are six different choices of how the projection is created. Each of the windows displays a preview of what the projection will look like with that method. In this case, Average Proj. was chosen. Preview the Projection Choose Preview (blue arrow) to create a preview in the Result window. Choose Apply (red arrow) to create a file in the Experiments window that can be saved (red circle). 60


61 A finished 3D rendering. The projection will also be displayed in the Viewer window. 61

 has been chosen. Choose Save.")
62 Export an Animation Right click on the 3D Animation file in the Experiments window. Here it is named 3DAnimAver_00. Choose Export. A Save As window will open. Name the animation and choose from the Save as type menu. Here Export-Animation-Avi (*.avi) has been chosen. Choose Save. The animation will be saved as an AVI file. 62


63 Logging off of the computer After exiting out of the confocal software, log off of the computer. Click on the Start button. Choose Log Off. 63
64 Shutting Down 7. Turn off the nitrogen tank 4. Turn off the microscope (bottom) 5. Turn off the mercury bulb (top) 3.Turn off the lasers (keys), but not the red buttons 6. At least 15 minutes after #3! Turn off the fans for the lasers (red switches) 1. Shut down the Leica software 2. Log out as a user 8. Put the cover back on microscope after the lamp housing has cooled Alternate Shut Down Procedure: When finished taking images, shut off the lasers (the keys, step #3 above) and the mercury bulb (step #5 above). Proceed with the remainder of the steps (turn off the microscope, turn off the nitrogen tank, back up data, etc), except don t turn off the fans (step#6)! When 15 minutes have elapsed, you may turn off the fans and cover the microscope. 64
Things to check before start-up.
 Byeong Cha Page 1 11/24/2009 Manual for Leica SP2 Confocal Microscope Enter you name, the date, the time, and the account number in the user log book. Things to check before start-up. Make sure that your
Leica SP8 TCS Users Manual
 Version : 07/08/0 Leica SP8 TCS Users Manual Start up:. Turn the PC Microscope, Scanner Power, Laser Power, and the Laser Emission key to on (bottom right of desk).. Turn on the fluorescent lamp (top left
Cell Biology and Bioimaging Core
 Cell Biology and Bioimaging Core Leica TCS SP5 Operating Instructions Starting up the instrument 1. First, log in the log book located on the confocal desk. Include your name, your lab s PI, an account
Quick Start Guide. Leica SP5 X
 Quick Start Guide Leica SP5 X Please note: Some of the information in this guide was taken from Leica Microsystems Leica TCS SP5 LAS AF Guide for New Users. This work is licensed under the Creative Commons
Guide to Confocal 5. Starting session
 Guide to Confocal 5 Remember that when booking and before starting session you can check for any problems at https://www.bris.ac.uk/biochemistry/uobonly/cif/index.html Starting session Switch on microscope
Operation Guide for the Leica SP2 Confocal Microscope Bio-Imaging Facility Hunter College October 2009
 Operation Guide for the Leica SP2 Confocal Microscope Bio-Imaging Facility Hunter College October 2009 Introduction of Fluoresence Confocal Microscopy The first confocal microscope was invented by Princeton
Leica SP8 TCS Users Manual
 Leica SP8 TCS Users Manual Follow the procedure for start up and log on as posted in the lab. Please log on with your account only and do not share your password with anyone. We track and confirm usage
Leica Sp5 II Confocal User Guide
 Leica Sp5 II Confocal User Guide Turning on the Confocal System (instructions are posted in the room) 1. Turn on Laser Power Button 2. Turn Key to On position 3. Turn on Scanner Power Button 4. Turn on
Leica SPEII confocal microscope. Short Manual
 Leica SPEII confocal microscope Short Manual Switching ON sequence: 1. Turn on the Workstation under the bench (top, far right). 2. Turn on the Supply Unit - Laser box (big green switch first and then
LSM 710 Confocal Microscope Standard Operation Protocol
 LSM 710 Confocal Microscope Standard Operation Protocol Basic Operation Turning on the system 1. Switch on Main power switch 2. Switch on System / PC power button 3. Switch on Components power button 4.
Using the Nikon TE2000 Inverted Microscope
 Wellcome Trust Centre for Human Genetics Molecular Cytogenetics and Microscopy Core Using the Nikon TE2000 Inverted Microscope Fluorescence image acquisition using Scanalytic s IPLab software and the B&W
Microscopy from Carl Zeiss
 Microscopy from Carl Zeiss Contents Page Contents... 1 Introduction... 1 Starting the System... 2 Introduction to ZEN Efficient Navigation... 5 Setting up the microscope... 10 Configuring the beam path
Leica TCS SP8 Quick Start Guide
 Leica TCS SP8 Quick Start Guide Leica TCS SP8 System Overview Start-Up Procedure 1. Turn on the CTR Control Box, EL6000 fluorescent light source for the microscope stand. 2. Turn on the Scanner Power
ZEISS LSM510META confocal manual
 ZEISS LSM510META confocal manual Switching on the system 1) Switch on the Remote Control button located on the table to the right of the microscope. This is the main switch for the whole system including
Nikon Ti-E Microscope Manual. Rightmire Hall Ohio State University. Director: Tony Brown Rightmire
 Nikon Ti-E Microscope Manual Rightmire Hall Ohio State University Director: Tony Brown Rightmire 060 292-1205 brown.2302@osu.edu Facility Manager: Paula Monsma Rightmire 062 293-0939 292-1367 monsma.1@osu.edu
Operating Checklist for using the Laser Scanning Confocal Microscope. Leica TCS SP5.
 Smith College August 2010 Operating Checklist for using the Laser Scanning Confocal Microscope Leica TCS SP5. CONTENT, page no. Startup, 1 Initial set-up, 1 Software, 2 Microscope Specimen observation
TRAINING MANUAL. Olympus FV1000
 TRAINING MANUAL Olympus FV1000 September 2014 TABLE OF CONTENTS A. Start-Up Procedure... 1 B. Visual Observation under the Microscope... 1 C. Image Acquisition... 4 A brief Overview of the Settings...
LSM 780 Confocal Microscope Standard Operation Protocol
 LSM 780 Confocal Microscope Standard Operation Protocol Basic Operation Turning on the system 1. Sign on log sheet according to Actual start time 2. Check Compressed Air supply for the air table 3. Switch
Zeiss 880 Training Notes Zen 2.3
 Zeiss 880 Training Notes Zen 2.3 1 Turn on the HXP 120V Lamp 2 Turn on Main Power Switch Turn on the Systems PC Switch Turn on the Components Switch. 3 4 5 Turn on the PC and log into your account. Start
Brief manual how to start and close the Leica sp2 Confocal. (TCS SP2 AOBS system mounted on a DM IRE2)
") Brief manual how to start and close the Leica sp2 Confocal (TCS SP2 AOBS system mounted on a DM IRE2) A. Switching on hardware B. Acquiring and saving images C. Switching off the microscope D. Good working
Brief manual how to start and close the Leica sp2 Confocal (TCS SP2 AOBS system mounted on a DM IRE2) A. Switching on hardware B. Acquiring and saving images C. Switching off the microscope D. Good working
Leica TCS SP8 Quick Start Guide
 Leica TCS SP8 Quick Start Guide Leica TCS SP8 System Overview Start-Up Procedure 1. Turn on the CTR Control Box, Fluorescent Light for the microscope stand. 2. Turn on the Scanner Power (1) on the front
OPERATING INSTRUCTIONS
 Zeiss LSM 510 M eta Confocal M icroscope OPERATING INSTRUCTIONS Starting the System: 1. Turn the black knob on the laser box one-quarter turn from Off to On. You will hear the laser cooling mechanisms
Practical work no. 3: Confocal Live Cell Microscopy
 Practical work no. 3: Confocal Live Cell Microscopy Course Instructor: Mikko Liljeström (MIU) 1 Background Confocal microscopy: The main idea behind confocality is that it suppresses the signal outside
TRAINING MANUAL. Multiphoton Microscopy LSM 510 META-NLO
 TRAINING MANUAL Multiphoton Microscopy LSM 510 META-NLO September 2010 Multiphoton Microscopy Training Manual Multiphoton microscopy is only available on the LSM 510 META-NLO system. This system is equipped
Quick Guide. LSM 5 MP, LSM 510 and LSM 510 META. Laser Scanning Microscopes. We make it visible. M i c r o s c o p y f r o m C a r l Z e i s s
 LSM 5 MP, LSM 510 and LSM 510 META M i c r o s c o p y f r o m C a r l Z e i s s Quick Guide Laser Scanning Microscopes LSM Software ZEN 2007 August 2007 We make it visible. Contents Page Contents... 1
Zeiss LSM 880 Protocol
 Zeiss LSM 880 Protocol 1) System Startup Please note put sign-up policy. You must inform the facility at least 24 hours beforehand if you can t come; otherwise, you will receive a charge for unused time.
SHORT INSTRUCTIONS FOR OPERATING LSM1/2 (Zeiss LSM510) AT CIAN Version 1.4, September 2014
 AT CIAN Version 1.4, September 2014") CIAN LSM1 or LSM2 short instructions, version 1.4, September 2014 page 1 of 6 SHORT INSTRUCTIONS FOR OPERATING LSM1/2 (Zeiss LSM510) AT CIAN Version 1.4, September 2014 Before starting To work with LSM1
CIAN LSM1 or LSM2 short instructions, version 1.4, September 2014 page 1 of 6 SHORT INSTRUCTIONS FOR OPERATING LSM1/2 (Zeiss LSM510) AT CIAN Version 1.4, September 2014 Before starting To work with LSM1
LSM 800 Confocal Microscope Standard Operation Protocol
 LSM 800 Confocal Microscope Standard Operation Protocol Turning on the system 1. Switch on the Main switch (labeled 1 and 2 ) mounted on the wall. 2. Turn the Laser Key (labeled 3 ) 90 clockwise for power
LSM 510 META in Chang Gung University
 Content LSM 510 META in Chang ung University LSM 510 META 路 理 The features and applications of LSM 510 META 01-09 Introduction of the hardware 10-12 Fluorescence observation in conventional microscope
Quick Guide for Zeiss 710 Laser Scanning Confocal MGH Cancer Center
 Quick Guide for Zeiss 710 Laser Scanning Confocal MGH Cancer Center For any questions or concerns, please contact: Linda Nieman lnieman@mgh.harvard.edu Office: (617) 643-9684 Cell: (512) 565-8076 Chenyue
LEICA TCS SP5 AOBS TANDEM USER MANUAL
 LEICA TCS SP5 AOBS TANDEM USER MANUAL STARTING THE SYSTEM...2 THE LAS AF SOFTWARE...3 THE «ACQUIRE» MENU...5 CHOOSE AND CREATE A SETTING...6 THE CONTROL PANEL...8 THE DMI6000B MICROSCOPE...10 ACQUIRE ONE
Training Guide for Leica SP8 Confocal/Multiphoton Microscope
 Training Guide for Leica SP8 Confocal/Multiphoton Microscope LAS AF v3.3 Optical Imaging & Vital Microscopy Core Baylor College of Medicine (2017) Power ON Routine 1 2 Turn ON power switch for epifluorescence
Zeiss 780 Training Notes
 Zeiss 780 Training Notes Turn on Main Switch, System PC and Components Switches 780 Start up sequence Do you need the argon laser (458, 488, 514 nm lines)? Yes Turn on the laser s main power switch and
Quick Guide for Zeiss 710 Laser Scanning Confocal MGH Cancer Center
 Quick Guide for Zeiss 710 Laser Scanning Confocal MGH Cancer Center For any questions or concerns, please contact: Linda Nieman lnieman@mgh.harvard.edu Office: (617) 643-9684 Cell: (512) 565-8076 Chenyue
Operating Instructions for Zeiss LSM 510
 Operating Instructions for Zeiss LSM 510 Location: GNL 6.312q (BSL3) Questions? Contact: Maxim Ivannikov, maivanni@utmb.edu 1 Attend A Complementary Training Before Using The Microscope All future users
Olympus Fluoview 1000S Spectral Confocal Microscope Introduction to the NRI-MCDB Microscopy Facility Spectral Confocal Microscope
 Olympus Fluoview 1000S Spectral Confocal Microscope Introduction to the NRI-MCDB Microscopy Facility Spectral Confocal Microscope Improved Optics More Lasers 405 diode 440 diode 488 Argon 515 Argon 559
Zeiss LSM 780 Protocol
 Zeiss LSM 780 Protocol 1) System Startup F Please note the sign-up policy. You must inform the facility at least 24 hours beforehand if you can t come; otherwise, you will receive a charge for unused time.
Nikon Eclipse Ti A1-A Confocal Operating Manual. Start-up. Microscope
 Nikon Eclipse Ti A1-A Confocal Operating Manual Start-up 1. Turn on Excite Fluorescent light power supply- metal halide. a. Cool down as for mercury bulb b. Wheel closed liquid light guide 2. Turn on power
LSM 510 Training Notes
 LSM 510 Training Notes Turning on the system Turn on the arc lamp, found on the bench top left of the microscope. This supplies light for epifluorescence for viewing your samples through the microscope.
START-UP PROCEDURE 1 THE MICROSCOPE STAND 3 OBJECTIVES 5 STARTING WITH LAS (SOFTWARE) AND SETTING UP THE MICROSCOPE STAND 7
 AND SETTING UP THE MICROSCOPE STAND 7") Leica DMI AF6000LX Table of contents START-UP PROCEDURE 1 THE MICROSCOPE STAND 3 OBJECTIVES 5 STARTING WITH LAS (SOFTWARE) AND SETTING UP THE MICROSCOPE STAND 7 ACQUIRE MODULE 6 SETTING THE LIGHTPATH 6
Leica DMI AF6000LX Table of contents START-UP PROCEDURE 1 THE MICROSCOPE STAND 3 OBJECTIVES 5 STARTING WITH LAS (SOFTWARE) AND SETTING UP THE MICROSCOPE STAND 7 ACQUIRE MODULE 6 SETTING THE LIGHTPATH 6
Title: Leica SP5 Confocal User Manual
 Title: Leica SP5 Confocal User Manual Date of first issue: 23/10/2015 Date of review: Version: Admin For assistance or to report an issue Office: CG07 or 05 Email: Igmm-imaginghelpdesk@igmm.ed.ac.uk Website:
Nikon E800 Microscope. Operating Instructions
 Nikon E800 Microscope Operating Instructions B Watson 12/2005 Table of contents: 1. The Nikon E800 Microscope 2. Turning the system ON and OFF 3. Selecting the light path 4. Operating in transmitted light
b. Turn the power switch and key to on position for blue laser.
 OLYMPUS FLUOVIEW 300 CONFOCAL MICOSCOPE OPERATION PROCEDURE 1. Turn ON microscope in this order: 1) Turn on mercury lamp (Note: once the mercury lamp is turned off, DO NOT turn it back on for at least
LSM 510 Meta Training Notes
 LSM 510 Meta Training Notes Turning on the system Turn on X-Cite power supply. This supplies light for epifluorescence for viewing your samples through the microscope. Turn on the remote control switch.
Confocal imaging on the Leica TCS SP8. 1) Turn the system on. 2) Use TCS user account. 3) Start LAS X software:
 Turn the system on. 2) Use TCS user account. 3) Start LAS X software:") Confocal imaging on the Leica TCS SP8 1) Turn the system on. 2) Use TCS user account. 3) Start LAS X software: 4) Do not touch the microscope while the software is initializing. Choose your options: Turn
Confocal imaging on the Leica TCS SP8 1) Turn the system on. 2) Use TCS user account. 3) Start LAS X software: 4) Do not touch the microscope while the software is initializing. Choose your options: Turn
Leica Confocal - 2. Instructions for Leica SP2 Confocal Equipped with Visible Laser Lines
 Leica Confocal - 2 Instructions for Leica SP2 Confocal Equipped with Visible Laser Lines Imaging Technology Group Revised as of 08/2011 by Dianwen Zhang (Email: zhangdw@illinois.edu) Revision History Authors
Nikon E800 Operating Instructions.
 Nikon E800 Operating Instructions. You can request electronic copies of this manual by contacting lshats@jhsph.edu Copies are also available on the JHU MMI Department web site. Please send your comments
Widefield-NikonEclipseTE200-ORCA Nikon Eclipse TE200 Inverted Microscope with Hamamatsu 1394 Orca-ER Cooled CCD Camera and Micromanager Software
 Widefield-NikonEclipseTE200-ORCA Nikon Eclipse TE200 Inverted Microscope with Hamamatsu 1394 Orca-ER Cooled CCD Camera and Micromanager Software September 2007 Check website for most current User Guide
The Leica Confocal Microscope System B46 Weill Hall (revised 4/01/10)
") The Leica Confocal Microscope System B46 Weill Hall (revised 4/01/10) Startup Turn ON 3 red buttons on far right: 1. PC ON 2. Scanner ON 3. Fan ON Turn Laser Power Level to lowest setting (Min) Turn argon
The Leica Confocal Microscope System B46 Weill Hall (revised 4/01/10) Startup Turn ON 3 red buttons on far right: 1. PC ON 2. Scanner ON 3. Fan ON Turn Laser Power Level to lowest setting (Min) Turn argon
Zeiss LSM 510 Confocor III Training Notes. Center for Cell Analysis & Modeling
 Zeiss LSM 510 Confocor III Training Notes Center for Cell Analysis & Modeling Confocor 3 Start Up Go to System Module Turn on Main Switch, System/ PC, and Components Switches Do you need the arc lamp?
Leica SP8 Resonant Confocal. Quick-Start Guide
 Leica SP8 Resonant Confocal Quick-Start Guide Contents Start-up Preparing for Imaging Part 1 On the scope Part 2 Software interface Part 3 Heat & CO2 incubation Part 4 Other hardware options Shut-down
Nikon SIM-E & A1-R System
 Nikon SIM-E & A1-R System USER GUIDE LSU Health Sciences Center Shreveport Research Core Facility June 01 2017 Chaowei Shang 1 Table of Content 1. Start Up the System... Page 3 Hardware and microscope
Contents. Introduction
 Contents Page Contents... 1 Introduction... 1 Starting the System... 2 Introduction to ZEN Efficient Navigation... 5 Setting up the microscope... 10 Configuring the beam path and lasers... 12 Scanning
Nikon AZ100. Laser Scanning Macro Confocal Microscope. Jordan Briscoe Adam Fries Kyle Marchuk Kaitlin Corbin. May 2017.
 Nikon AZ100 Laser Scanning Macro Confocal Microscope Jordan Briscoe Adam Fries Kyle Marchuk Kaitlin Corbin May 2017 Contents 1 Introduction 2 2 Hardware - Startup 2 3 Software/Operation 4 3.1 Multidimensional
Training Guide for Carl Zeiss LSM 510 META Confocal Microscope
 Training Guide for Carl Zeiss LSM 510 META Confocal Microscope AIM 4.2 Optical Imaging & Vital Microscopy Core Baylor College of Medicine (2017) Power ON Routine 1 2 Turn ON Components and System/PC switches
CONFOCAL MICROSCOPE (Zeiss LSM 510 META v4.2)
") Wellcome Trust Centre for Human Genetics Molecular Cytogenetics and Microscopy Core CONFOCAL MICROSCOPE (Zeiss LSM 510 META v4.2) 1) STARTING THE SYSTEM Abridged INSTRUCTIONS Switch on the mercury bulb
Wellcome Trust Centre for Human Genetics Molecular Cytogenetics and Microscopy Core CONFOCAL MICROSCOPE (Zeiss LSM 510 META v4.2) 1) STARTING THE SYSTEM Abridged INSTRUCTIONS Switch on the mercury bulb
Zeiss AxioObserver with ApoTome
 Zeiss AxioObserver with ApoTome Quick Start User Guide LSU Health Sciences Center-Shreveport Research Core Facility (RCF) Microscopy Table of Contents 1 Start up the system.. Page 3 2 Touch screen controller
Microscope Confocal Sp2 Upright.
 Microscope Confocal Sp2 Upright. Welcome to the Leica Sp2 Confocal Upright tutorial. Before using the Sp2 Invert, You will need to put down your name on the reservation system = http://svintranet.epfl.ch/index.php?optio
Zeiss Axiovert 135 Fluorescence Microscope Quick Guide / Operations Manual (v. 1.0 February 09)
") University of Chicago Integrated Light Microscopy Core Dr. Vytas Bindokas, Director http://digital.bsd.uchicago.edu By: Christine Labno, Assistant Director Room: AB-129 Phone: 4-9040 Zeiss Axiovert 135
University of Chicago Integrated Light Microscopy Core Dr. Vytas Bindokas, Director http://digital.bsd.uchicago.edu By: Christine Labno, Assistant Director Room: AB-129 Phone: 4-9040 Zeiss Axiovert 135
Leica TCS SP2 User Manual 1.1. Markus Friedrich and James Lee. Department of Biological Sciences Wayne State University
 Leica TCS SP2 User Manual 1.1 Markus Friedrich and James Lee Department of Biological Sciences Wayne State University Confocal Manual 1 Helpful hints The confocal room is cold. Bring a sweater. Confocaling
Widefield 1. Switching on
 Widefield 1 Switching on 1. Ignite DG5 lamp - must be switched on first (if previous user has switched off, wait 30 min before igniting) 2. Wait 5s and then turn on the main DG5 controller switch. 3. DG5
Bi/BE 227 Winter Assignment #3. Adding the third dimension: 3D Confocal Imaging
 Bi/BE 227 Winter 2016 Assignment #3 Adding the third dimension: 3D Confocal Imaging Schedule: Jan 20: Assignment Jan 20-Feb 8: Work on assignment Feb 10: Student PowerPoint presentations. Goals for this
Why and How? Daniel Gitler Dept. of Physiology Ben-Gurion University of the Negev. Microscopy course, Michmoret Dec 2005
 Why and How? Daniel Gitler Dept. of Physiology Ben-Gurion University of the Negev Why use confocal microscopy? Principles of the laser scanning confocal microscope. Image resolution. Manipulating the
Internal Medicine Imaging Core Emory University Department of Medicine
 Internal Medicine Imaging Core Emory University Department of Medicine 1 OPERATION OF THE ZEISS LSM 510 META YOU MUST SIGN UP TO USE THE MICROSCOPE OR COMPUTER EVERY TIME NO EXCEPTIONS Before attempting
Title: Nikon A1R Confocal User Manual
 Title: Nikon A1R Confocal User Manual Date of first issue: 23/10/2015 Date of review: Version: Admin For assistance or to report an issue Office: CG.07 or CG.05 Email: Igmm-imaginghelpdesk@igmm.ed.ac.uk
Nikon E800 Operating Instructions.
 Nikon E800 Operating Instructions. You can request electronic copies of this manual by contacting imaging@fhcrc.org. Copies are also available on the Scientific Imaging web site. Please send your comments
User Guide to the IBIF Leica TCS SP8 MP Confocal Microscope
 User Guide to the IBIF Leica TCS SP8 MP Confocal Microscope This version: 7.24.14. Introduction The IBIF confocal microscope is made available on a fee-for-use-hour basis to all users who have been trained.
Motorized Axio Observer Start-up instructions
 Start-up instructions 1. If using fluorescence turn on Fluorescent light source. TL light Source (Hal 100) 2. Turn on microscope using switch on lower left side of the microscope. 3. If imaging, turn on
Nikon A1R. Multi-Photon & Laser Scanning Confocal Microscope. Kyle Marchuk Adam Fries Jordan Briscoe Kaitlin Corbin. April 2017.
 Nikon A1R Multi-Photon & Laser Scanning Confocal Microscope Kyle Marchuk Adam Fries Jordan Briscoe Kaitlin Corbin April 2017 Contents 1 Introduction 2 2 Start-Up 2 3 Imaging 4 3.1 Sample Alignment...........................................
MIF ZEISS VIOLET CONFOCAL ZEN 2009 PROTOCOL
 MIF ZEISS VIOLET CONFOCAL ZEN 2009 PROTOCOL START-UP On the Switchbox, turn both black switches to the ON position. Wait for the microscope to boot up completely (watch the screen on the side of the microscope).
Zeiss Axio Imager.A1 manual
 Zeiss Axio Imager.A1 manual Power-up protocol 1. Mercury lamp 2. Power strip on shelf 3. Computer The Mercury lamp should always be first-on and last-off. This prevents any electrical surges caused by
Microscope Confocal LSM510 META
 Microscope Confocal LSM510 META Welcome to the Zeiss LSM 510 Meta Confocal tutorial. Before using the LSM 510 META, Log off any other computer that is open with your personal login. You will need to put
Diskovery Spinning Disk Guide
 Diskovery Spinning Disk Guide qbi.microscopy@uq.edu.au Getting started The microscope and its peripherals (Fig. 1a) should always be turned on, but if they are not, turn them on in the following way: 1.
3. are adherent cells (ie. cells in suspension are too far away from the coverslip)
") Before you begin, make sure your sample... 1. is seeded on #1.5 coverglass (thickness = 0.17) 2. is an aqueous solution (ie. fixed samples mounted on a slide will not work - not enough difference in refractive
Before you begin, make sure your sample... 1. is seeded on #1.5 coverglass (thickness = 0.17) 2. is an aqueous solution (ie. fixed samples mounted on a slide will not work - not enough difference in refractive
Microscopy Suite. The Multi-Photon Confocal Microscope. Instructions for Leica SP2 Microscope #1 By Jon Ekman & Karl Garsha. Start-up.
 Microscopy Suite The Multi-Photon Confocal Microscope Instructions for Leica SP2 Microscope #1 Use of the Multiphoton Laser Scanning Confocal Microscope. Basic operation instructions as of 05/04/2007 Start-up
Confocal Microscopy. Kristin Jensen
 Confocal Microscopy Kristin Jensen 17.11.05 References Cell Biological Applications of Confocal Microscopy, Brian Matsumoto, chapter 1 Studying protein dynamics in living cells,, Jennifer Lippincott-Schwartz
ZEISS LSM 710 CONFOCAL MICROSCOPE USER MANUAL
 ZEISS LSM 710 CONFOCAL MICROSCOPE USER MANUAL START THE SYSTEM... 2 START ZEN SOFTWARE... 3 SET THE TEMPERATURE AND THE CO2 CONTROLLERS... OBSERVATION AT OCULARS... 5 STATIF PRESENTATION... 6 ACQUIRE ONE
Training Guide for Carl Zeiss LSM 880 with AiryScan FAST
 Training Guide for Carl Zeiss LSM 880 with AiryScan FAST ZEN 2.3 Optical Imaging & Vital Microscopy Core Baylor College of Medicine (2018) Power ON Routine 1 2 Turn ON Main Switch from the remote control
CAPTURING IMAGES ON THE HIGH-MAGNIFICATION MICROSCOPE
 University of Virginia ITC Academic Computing Health Sciences CAPTURING IMAGES ON THE HIGH-MAGNIFICATION MICROSCOPE Introduction The Olympus BH-2 microscope in ACHS s microscope lab has objectives from
Usermanual for Leica SP8 confocal
 Usermanual for Leica SP8 confocal Contact information: hege.dale@uib.no & endy.spriet@uib.no 1 Table of content Important information 3 Start up procedure 4 Shut down procedure 5 Operating the DMI 8 microscope
Last updated: May 2014 Y.DeGraaf
 FLINDERS MICROSCOPY BIOMEDICAL SERVICES AVAILABLE MICROSCOPES AND SPECIFICATIONS & INFORMATION REGARDING TRAINING FOR NEW USERS Last updated: May 2014 Y.DeGraaf If you have new staff or students (Honours/Masters
The Zeiss AiryScan System, Confocal Four.
 The Zeiss AiryScan System, Confocal Four. Overview. The Zeiss AiryScan module is a segmented, radially stacked GaASP detector and collector system designed to subsample the airy disk of a point emission
CMI STANDARD OPERATING PROCEDURE. Fluoview 300 laser scanning confocal microscope
 CMI STANDARD OPERATING PROCEDURE Fluoview 300 laser scanning confocal microscope CMI documentid:sop001 CONTACT INFORMATION: Peter Owens: 091 494036 (office) Peter.owens@nuigalway.ie Kerry Thompson: 091
MIF ZEISS LSM510 CONFOCAL USER PROTOCOL
 MIF ZEISS LSM510 CONFOCAL USER PROTOCOL START-UP Turn on the Mercury Bulb Power Supply (if needed). Power-on the Control Box. Turn on the computer. Open the LSM 510 software. Choose Scan New Images and
Training Guide for Carl Zeiss LSM 5 LIVE Confocal Microscope
 Training Guide for Carl Zeiss LSM 5 LIVE Confocal Microscope AIM 4.2 Optical Imaging & Vital Microscopy Core Baylor College of Medicine (2017) Power ON Routine 1 2 Verify that main power switches on the
Zeiss LSM 510 Multiphoton Confocal Microscope
 Zeiss LSM 510 Multiphoton Confocal Microscope User Guide LSU Health Sciences Center-Shreveport Research Core Facility Table of Contents 1 Safety... Page 3 2 Turn On the System... Page 4 3 Start Up the
Nikon C1si Spectral Laser Scanning Confocal Microscope. User Guide
 Nikon C1si Spectral Laser Scanning Confocal Microscope User Guide Contents: C1Si Turn-On/ShutDown Procedures... 2 Overview... 4 Setup for epi-illumination to view through the eyepieces:... 5 Setup for
1 Co Localization and Working flow with the lsm700
 1 Co Localization and Working flow with the lsm700 Samples -1 slide = mousse intestine, Dapi / Ki 67 with Cy3/ BrDU with alexa 488. -1 slide = mousse intestine, Dapi / Ki 67 with Cy3/ no BrDU (but with
Nikon TE300 Eclipse Wide-Field Microscope
 Nikon TE300 Eclipse Wide-Field Microscope User Guide LSU Health Science Center-Shreveport Research Core Facility 1 User manual for Nikon Elements software Equipment: Nikon TE300 Eclipse microscope Photometrics
Instructions for the Leica SP5 II laser scanning confocal microscope
 Instructions for the Leica SP5 II laser scanning confocal microscope Content: Check-in and Start up Set up acquistion parameters Optimize acquistion parameters Acquire a z-stack Sequential scan Check out
Basics of confocal imaging (part I)
") Basics of confocal imaging (part I) Swiss Institute of Technology (EPFL) Faculty of Life Sciences Head of BIOIMAGING AND OPTICS BIOP arne.seitz@epfl.ch Lateral resolution BioImaging &Optics Platform Light
Basics of confocal imaging (part I) Swiss Institute of Technology (EPFL) Faculty of Life Sciences Head of BIOIMAGING AND OPTICS BIOP arne.seitz@epfl.ch Lateral resolution BioImaging &Optics Platform Light
Overview. About other software. Administrator password. 58. UltraVIEW VoX Getting Started Guide
 Operation 58. UltraVIEW VoX Getting Started Guide Overview This chapter outlines the basic methods used to operate the UltraVIEW VoX system. About other software Volocity places great demands on the computer
ANSWER KEY Lab 2 (IGB): Bright Field and Fluorescence Optical Microscopy and Sectioning
: Bright Field and Fluorescence Optical Microscopy and Sectioning") Phys598BP Spring 2016 University of Illinois at Urbana-Champaign ANSWER KEY Lab 2 (IGB): Bright Field and Fluorescence Optical Microscopy and Sectioning Location: IGB Core Microscopy Facility Microscope:
Phys598BP Spring 2016 University of Illinois at Urbana-Champaign ANSWER KEY Lab 2 (IGB): Bright Field and Fluorescence Optical Microscopy and Sectioning Location: IGB Core Microscopy Facility Microscope:
Zeiss LSM 510 Multiphoton Confocal Microscope
 Zeiss LSM 510 Multiphoton Confocal Microscope Quick Start User Guide LSU Health Sciences Research Core Facility Table of Contents 1 Safety... Page 3 2 Turn On the System... Page 4 3 Start Up the ZEN Software.
Training Guide for Carl Zeiss LSM 7 MP Multiphoton Microscope
 Training Guide for Carl Zeiss LSM 7 MP Multiphoton Microscope ZEN 2009 Optical Imaging & Vital Microscopy Core Baylor College of Medicine (2017) Power ON Routine 1 2 Turn Chameleon TiS laser key from Standby
RENISHAW INVIA RAMAN SPECTROMETER
 STANDARD OPERATING PROCEDURE: RENISHAW INVIA RAMAN SPECTROMETER Purpose of this Instrument: The Renishaw invia Raman Spectrometer is an instrument used to analyze the Raman scattered light from samples
ZEISS LSM 710 NLO Multiphoton microscope Manual/Quick guide
 ZEISS LSM 710 NLO Multiphoton microscope Manual/Quick guide Matyas Molnar, Biovis 2016 Starting the microscpe 1. Check the microscope if everything looks clean and normal. If not, report it in the logbook.
Nikon Eclipse Ti2-E Widefield/Spinning Disk Confocal Microscope Standard Operation Protocol
 Nikon Eclipse Ti-E Widefield/Spinning Disk Confocal Microscope Standard Operation Protocol Please sign on the log sheet before switching on system. Turn on system Turn on A only if confocal mode or laser
Zeiss LSM880 Operating Instructions. UTMB Optical Microscopy Core Jan. 16, 2018
 Zeiss LSM880 Operating Instructions UTMB Optical Microscopy Core Jan. 16, 2018 1 1. Power up the microscope Sing the LOGBOOK Steps below will provide power to the computer and all of the microscope components.
Olympus IX71 Microscope and DP71 Camera Instructions
 Olympus IX71 Microscope and DP71 Camera Instructions Microscopy in Medicine (MiM) Core Emory University Department of Medicine 1 Olympus IX71 Image Capture Procedure 2 3 1. STARTING-UP PROCEDURE: Remove