HOW TO MAKE A HARLEY QUINN HAMMER
|
|
|
- Scot Moody
- 5 years ago
- Views:
Transcription


1 4D MODELSHOP MODEL MAKING GUIDE HOW TO MAKE A HARLEY QUINN HAMMER This guide shows you how to cut, shape and stick Styrofoam and Plastazote. A video of this build is available on our website. If you make this hammer we d love to see the results, send to web@modelshop.co.uk See the Cosplay section of our website SHAPING THE STYROFOAM Stick circle templates onto the ends of the sytrofoam, mark on the exterior cut lines and cut out. Draw on cut lines to remove the corners and cut them off then further trim of the edges. With 60 grit sand paper wrapped around a wooden block smooth out the hammer head and finish until fairly smooth.


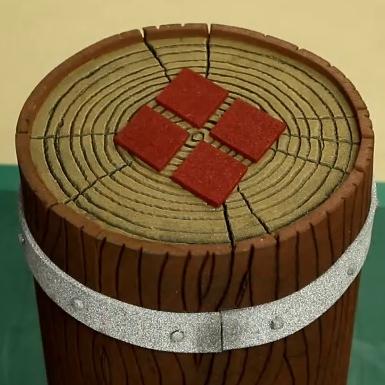
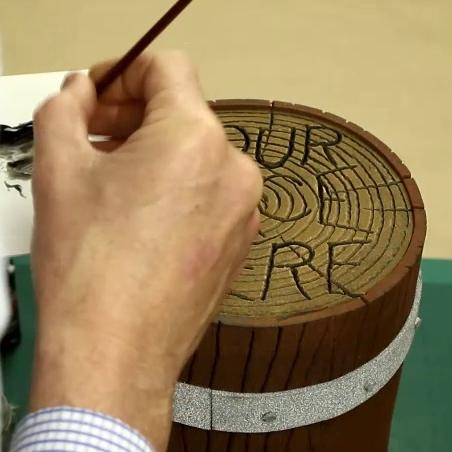
2 ADDING THE PLASTAZOTE From the 6mm plastazote cut out the end pieces and glue onto the styrofoam using UHU POR as a contact adhesive. Using a paper template mark on the centre point and draw on some guide line circles then using the wood burning pen engrave a series of circles. Cut out a slightly over width rectangle from the 6mm plastazote to wrap around the hammer head, trim to length, then start by gluing the first 50mm of the plastazote onto the hammer head. Firmly glue together then apply glue to the rest of the styrofoam and plastazote and when tacky firmly stick together. ADDING DETAIL Then engrave bark lines into the plastazote and a few split lines in the ends. Using a paper template as a guide engrave the text into one end of the hammer head.


3 ADDING DETAIL Spray the ends light brown then when dry mask out and spray the rest of the head dark brown. Cut strips from the 2mm funky foam for the metal bands around the hammer head, using a hole punch cut out some circles and stick to the bands at 50mm intervals then spray silver. Glue the strips onto the head using the UHU POR as a contact adhesive. From the 6mm plastazote cut out a hexagon and circle the diameter of the handle and glue together. Spray silver and glue onto the top of the hammer head 4D modelshop The Arches 120 Leman St London E1 8EU t: e: info@modelshop.co.uk


4 ADDING THE HANDLE On the underside of the hammer head mark on the centre point and using a paddle drill bit drill a hole into the head. Insert the handled onto the head, mark on the depth and cut out some strips from the 2mm funky foam. At the top of the handle glue on a strip then onto this a smaller strip. At the other end cut out and glue on and end cap and another strip over this. Spray the handle brown, mask out and spray the funky foam end caps silver. Stick double sided tape onto the back of the flock paper, cut out 20mm strips and wrap these around the bottom of the handle to form the grip.


5 FINISHING TOUCHES Cut out 4 diamonds from 2mm funky foam, spray red and glue onto the hammer head face. Using watered down black acrylic paint accentuate the groves and add shading to the hammer head. PRODUCTS USED AA00008 AP00022 AP00031 AT20019 FO10700 FS10108 FS10110 FS10111 FS10124 OT00000 RF32160 RL20033 RF40002 RO20005 SR90026 TA10000 TK10065 TM00004 TR10025 TX M PhotoMount UHU Por PVA glue 25mm double sided tape DecoArt Acrylic Black Paint Do-it spray, sand 150ml Do-it spray, dark brown 150ml Do-it spray, terracotta 150ml Do-it spray metallic silver 150ml Pyrography tool 30W Blue styrofoam 2mm black funky foam 6mm black plastazote Beige flock paper 23.8mm wooden rod 60/70 grit sandpaper Scalpel No3 A2 cutting mat Clear rule with steel edge Black Promarker twin-tip pen 4D modelshop The Arches 120 Leman St London E1 8EU t: e: info@modelshop.co.uk
TOOLS AND MATERIALS USED HOW TO MAKE A MOTTE AND BAILEY CASTLE
 HOW TO MAKE A MOTTE AND BAILEY CASTLE TOOLS AND MATERIALS USED The base board RF50034 RW11003 RF10003 AG00051 AC00009 AP00036 FB10008 TR10009 TK10064 White A2 foamboard 5mm thick MDF sheet, 250 x 500 x
#P571 - Victorian Queen Fretwork Clock inspired by 18th century Victorian elegance. 17 H x 21 W. Requires a 3 1/2 clock insert.
 - Victorian Queen Fretwork Clock inspired by 8th century Victorian elegance. 7 H x 2 W. Requires a 3 /2 clock insert. Cut on dashed line for Back Cut on solid line for Frame only. Stock: /8 - /4, cut each
The Lansdowne One Car Garage Assembly Instruction by Laser Dollhouse Designs
 The Lansdowne One Car Garage Assembly Instruction by Laser Dollhouse Designs NOTE 1: Please do a dry assembly using only tape to hold house together. This will get you familiar with parts, location, and
After printing these plans, several pages will need to be taped together to form a larger plan. Below is a diagram of which pages need assembled.
 Watermill Building Plans For complete building instructions and instructional videos, please visit the main web site at www.hirstarts.com/watermill/watermill.html. Using these plans alone will not give
Homemade Weaving Jig By David Dosser
 Homemade Weaving Jig By David Dosser Items needed for a 100 thread weaving jig: 1. 8x10 -.080 Plastic sheet (Optix brand or Lexan). Clear or white Plastic is easier to work with and can be found at most
Craftman One Car Garage Assembly Instruction by Laser Dollhouse Designs
 Craftman One Car Garage Assembly Instruction by Laser Dollhouse Designs NOTE 1: Please do a dry assembly using only tape to hold house together. This will get you familiar with parts, location, and fit.
TOYOTA MOTOR EUROPE CA Products Division Tel : Fax :
 TOYOTA MOTOR EUROPE CA Products Division Tel : + 32 2 745 26 77 Fax : + 33 2 745 26 99 Ordering part numbers Comments Part Numbers Wooden floor one hatch PZ449-D3C42-11 one hatch with carpet PZ449-D3C42-01
TECHNIQUE. Because of the flexibility of the woven paper elements, this necklace moves nicely when worn. BEGINNER PAPER/WOOD. facetjewelry.
 TECHNIQUE FCT-SR-09248-03 BEGINNER PAPER/WOOD Because of the flexibility of the woven paper elements, this necklace moves nicely when worn. 203 Kalmbach Publishing Co. This material may not be reproduced
INSTRUCTIONS for fire lamps 1-8
 INSTRUCTIONS for fire lamps 1-8 1. Lamp from wooden pen holder: Material used: Article Number Quantity:: Pendant lamp holder, 100cm lamp cable with ceiling rose and pendant lamp holder 116013 1 Wooden
Build the Spitfire: Step-By-step. Pack 7 Stages 61-71
 Pack 7 Stages 61-71 1 Stage Contents Page Number 61 212-215 62 216-218 63 219-221 64 222-224 65 225-228 66 229-231 67 232-235 68 236-238 69 239-241 70 242-245 71 246-249 Editorial and design by Continuo
#P536 Mary Wall Plaque Create our beautiful and intricate fretwork wall plaque in honor of the Mother of our Savior. Over 17 tall.
 Mary Wall Plaque Create our beautiful and intricate fretwork wall plaque in honor of the Mother of our Savior. Over 7 tall. Cut on dashed line for Back Cut on solid line for Frame only. Stock: /8 - /4,
#P6-18 Floral Shelf Graceful vines flow and swirl to create the elegant brackets on this Victorian style shelf. 15 wide.
 Floral Shelf Graceful vines flow and swirl to create the elegant brackets on this Victorian style shelf. 15 wide. Cut on dashed line for Back Cut on solid line for Frame only. Stock: 1/8-1/4, cut 1 each
#P2-21 Victorian Wall Pocket Organize and decorate all at the same time with this handy wall pocket. 12 tall.
 Victorian Wall Pocket Organize and decorate all at the same time with this handy wall pocket. 12 tall. Cut on dashed line for Back Cut on solid line for Frame only. Stock: 1/8-1/4, cut 1 each Left pattern
Making Simple Bookbinding Equipment
 Tony Firman 20 1 2 19 Notes Tony Firman Tony Firman Bookbinding 18 3 : 2012 Tony Firman Bookbinding P.O. Box 507 Haslet, TX 76052 www.tonyfirmanbookbinding.com 4. When all the tapes have been pinned in
#P570 - Leavenworth Requires a pendulum movement kit (#A309 - #A312) 24 H x 14 W
 24 H x 14 W") - Leavenworth Requires a pendulum movement kit (#A309 - #A32) 24 H x 4 W Cut on dashed line for Back Cut on solid line for Frame only. Stock: /8 - /4, cut each Left pattern piece. GENERAL SCROLLSAW TIPS
- Leavenworth Requires a pendulum movement kit (#A309 - #A32) 24 H x 4 W Cut on dashed line for Back Cut on solid line for Frame only. Stock: /8 - /4, cut each Left pattern piece. GENERAL SCROLLSAW TIPS
Building Tips This model can be built using the following types of adhesives:
 Page 1 Building Tips This model can be built using the following types of adhesives: Epoxy (with or without microballons) Odorless cyanoacrylate (CA) with accelerator UHU Creativ for Styrofoam (or UHU
Sideboard. Essential design. Sideboard Unique eye-catcher and practical storage space all at once: The sideboard with fashionable multimaterial
 Sideboard Essential design. Sideboard Unique eye-catcher and practical storage space all at once: The sideboard with fashionable multimaterial design. 1 Introduction From multi-material to one of a kind!
3Insert the second rod no. 4
 Yamato: Step-by-step 37 The stern block and searchlight control towers a b c d e f Recommended tools and materials Wood glue Sandpaper (no. 800 grain) Metal file Putty Craft knife For metal: Super Glue
PROJECT PLANS WOODEN GIFT BOX
 PROJECT PLANS WOODEN GIFT BOX Make the gifts you give even more special by presenting them in this one-of-a-kind gift box. In fact, the box may be valued more than whatever it contains. The box is sized
DO-IT-YOURSELF DISNEY-INSPIRED GIFT WRAP DISNEY
 DO-IT-YOURSELF DISNEY-INSPIRED GIFT WRAP YOU WILL NEED*: Printed templates Scissors Tape Glue Craft paper Various ribbon *Additional supplies may be needed for each version and are listed before Step 1.
3Position the hull of the ship as
 Yamato: Step-by-step 25 The hull and stern deck c b d a b d c e e f a Rear frame b Stern deck x 2 c Stern deck x 2 d Side wall x 2 Wood glue Sandpaper (no. 400 grain) Craft knife Pliers d Side wall x 2
How to Use Scotch Photo Splits Applicator for Scrapbooking
 How to Use Scotch Photo Splits Applicator for Scrapbooking This is a versatile scrapbooking design can be created for either a boy or a girl infant or toddler by just changing the color scheme of the paper,
The Park Hotel Instructions for Assembly of N Scale Kit
 The Park Hotel Instructions for Assembly of N Scale Kit Kit Contents: 198 ea. Laser Cut Acrylic Parts, 2 ea. Chimney Parts Sheets, 1 ea.2".040 styrene rod, 5 ea. Sidewalk Parts, 14 ea. Cast Resin Dormers,
Die Cutting an Introduction
 Die-cutting Exam expectations Die-cutting is a regular topic in the examination paper. Although the question only attracts a small numbers of marks it is an area which few candidates score. Die Cutting
5If the protruding part is. 6Place 1 as is shown in the. 7Place what was assembled
 Yamato: Step-by-step 49 The base of the bridge and strakes a c b d a Base of the bridge b Base of the bridge c Base of the bridge d Strakes x 10 THE BASE OF THE BRIDGE 1Smooth 1 to 3, first using the metal
WRIGHT FLYER 1 INSTRUCTIONS FOR THE D10LC KIT
 WRIGHT FLYER 1 INSTRUCTIONS FOR THE D10LC KIT Manufactured in the USA by Easy Built Models PO Box 681744, Prattville, AL 36068-1744 Visit us at www.easybuiltmodels.com Easy Built Models GLUE METHODS Always
Vivian Mansion Assembly Instruction By Laser Dollhouse Designs
 Vivian Mansion Assembly Instruction By Laser Dollhouse Designs NOTE 1: Please do a dry assembly using only tape to hold house together. This will get you familiar with parts, location, and fit. This also
PITTS S2S CONSTRUCTION
 PITTS S2S CONSTRUCTION FUSELAGE CONSTRUCTION 1) Place the right fuselage side over the plan and mark the former positions. Place the left side over the right side and mark the former positions. Glue F1
-1- Coach Instructions.
 -1- Coach Instructions. Insert the bogie pivot pins through the bottom of the coach body ensuring the dimples fit into the recesses. Glue the.06 x.25 short strips each side of the pivot head, bridge the
Hardee s Restaurant kit in HO scale
 Hardee s Restaurant kit in HO scale Parking lot base and cars not included This kit includes all building parts milled in white styrene plastic and laser cut white acrylic, clear acrylic window glazing,
BUILDING A GOAL WALL DO IT YOURSELF! INSTRUCTIONS FOR A GOAL WALL
 INSTRUCTIONS FOR A In just a few steps, we show you how to build your own goal wall and paint it perfectly. COMPILED BY 1 PREPARING Purchase the materials from the enclosed list. The DIY store should be
Step by Step Wing Bagging
 Step by Step Wing Bagging By Evan Shaw 073 589 9339 evanevshaw@gmail.com Preparing the Leading Edge 1. Cut cores. (Cutting of wing cores is covered in another article elsewhere) 2. Sand the LE to a nice
Foam Core Construction
 Tools Tips and Tricks X-Acto knife and blades Your most important tool for working with foam core will be an X-Acto knife with plenty of sharp blades. When choosing a knife, get one with replaceable blades
EZYSTONE WORKSURFACES
 EZYSTONE WORKSURFACES Installation & Maintenance Instructions 1. Tools Required Worktop Edge Finishing Kit Pack 1-100mm Velcro Backing Pad Pack 2-100mm Diamond Dry Cut Velcro Discs (100 Grit Yellow) (200
Specifications Wingspan: 43cm Flying Weight: 33 grams (with battery) Channels: 3 Suggested Receiver: 4Ch Micro Motor: 7mm Brushed Geardrive
 Channels: 3 Suggested Receiver: 4Ch Micro Motor: 7mm Brushed Geardrive") Specifications Wingspan: 43cm Flying Weight: 33 grams (with battery) Channels: 3 Suggested Receiver: 4Ch Micro Motor: 7mm Brushed Geardrive Airframe Kit (Included Contents) * Airframe Parts Sheets (Depron)
Specifications Wingspan: 43cm Flying Weight: 33 grams (with battery) Channels: 3 Suggested Receiver: 4Ch Micro Motor: 7mm Brushed Geardrive Airframe Kit (Included Contents) * Airframe Parts Sheets (Depron)
Legacy Classic Twist Pencil Kit
 Legacy Pencil Kit Description: The pencil is great kit and has features to make it a step-up pen. It is slightly more difficult to make, but still very easy if you follow these instructions carefully.
Instructions for Turning Laminated Bracelets
 Instructions for Turning Laminated Bracelets 1. Start with Design 1. Make a paper template circle for the bracelet. Use this to check the fit on the person you are making the bracelet for. After checking
Legacy Slimline Pencil Kit
 Description: The model is considered one of the most basic pen kits and is a great starter kit for those new to pen turning. Many experienced pen turners use the kit to make elaborate and unusual pens
1Smooth pieces 4, 5 and 6, using
 Yamato: Step-by-step 109 Machine-guns, anti-aircraft guns and decking h e f a b c g d e f a Anti-aircraft gun base x 2 b Anti-aircraft gun (bottom) x 2 c Anti-aircraft gun (top) x 2 d Machine-gun base
Coat Rack. Materials: Directions:
 Coat Rack 2x2 wooden poplar (foundation of the rack) 3/4 inch diameter wood dowels (5-8 depending on how many arms you want) 1/4 inch dowel screw 1/4 inch drill bit Power drill Ruler Pencil Paint/spray
Venturi EVO 2 FPV. Thank you for purchasing the Venturi EVO FPV wing
 Thank you for purchasing the Venturi EVO FPV wing The Venturi FPV is designed for First Person Viewing (FPV) and for UAV/Drone experimentation. There is a power system for this model, see the website for
Tape Measure Metal Clippers Screw Bit Set With Extensions
 IMPORTANT: Read through instructions thoroughly before beginning to replace any damaged material. Minor damage can be fixed with a fiberglass repair kit and color matched paint. Tools Required Tape Measure
CRAFTS. London Double Decker Bus Craft
 London Double Decker Bus Craft CRAFTS A double-decker bus has two levels or 'decks'. Red doubledecker buses are usually associated with London and have become a national symbol of England. This cardboard
Little Briana Cottage Dollhouse assembly instructions
 Little Briana Cottage Dollhouse assembly instructions NOTE 1: Please do a dry assembly using only tape to hold house together. This will get you familiar with parts, location, and fit. This also gives
Seascape Bungalow Assembly instructions. Laser Dollhouse Designs
 Seascape Bungalow Assembly instructions Laser Dollhouse Designs NOTE: Please do a dry assembly using only tape to hold house together. This will get you familiar with parts, location, and fit. This also
(Build Instructions)
") (Build Instructions) Specifications * Wingspan: 58cm * Length: 50cm * Flying Weight: 59 grams * Channels: 3 (Rudder Elevator Throttle) * Suggested Receiver: 4Ch Micro * Motor: 8mm GearDrive * Prop: GWS
(Build Instructions) Specifications * Wingspan: 58cm * Length: 50cm * Flying Weight: 59 grams * Channels: 3 (Rudder Elevator Throttle) * Suggested Receiver: 4Ch Micro * Motor: 8mm GearDrive * Prop: GWS
Contents. Build the Spitfire: Step-By-step
 Pack 2 Stages -20 Contents Stage Page Number 8-0 2 - - 7 8-50 5 5-5 6 5-57 7 58-60 8 6-6 9 6-67 20 68-7 Editorial and design by Continuo Creative, 9- North Road, London N7 9DP All rights reserved 20 De
Triangles. Pendulum. Dangling from handmade curvilinear ear wires, Construct earrings from carefully fitted panels. METAL CLAY EARRINGS
 The front of each earring is impressed with a slightly different pattern than those used on the sides and backs. 1¾ in. (44mm). beginner/intermediate metal clay METAL CLAY EARRINGS Pendulum Triangles Construct
From "American Woodturner" the Journal of the American Association of Woodturners, April 2015, vol 30, no 2 - CUSTOM - TOOL HANDLES
 From "American Woodturner" the Journal of the American Association of Woodturners, April 2015, vol 30, no 2 - CUSTOM - TOOL HANDLES Carl Ford I have found most commercially available tool handles uncomfortable
1Take the keel (3) and
 and") 1 The hull and the bridge 1Take the keel (3) and apply PVA wood glue in the second slot from the left: a toothpick may make it easier. Take care: the left end is the one that has a projection. THE HULL
1 The hull and the bridge 1Take the keel (3) and apply PVA wood glue in the second slot from the left: a toothpick may make it easier. Take care: the left end is the one that has a projection. THE HULL
Rosalina Accessories Tutorial Version March 2011 Martyn
 Rosalina Accessories Tutorial Version 1.0 - March 2011 Martyn Star Brooch Feel free to experiment with these dimensions, you should make a template you are happy with, the method still works. 1) Creating
Legacy Slimline Touch Pen Kit
 Description: The model is considered one of the most basic pen kits and is a great starter kit for those new to pen turning. Many experienced pen turners use the kit to make elaborate and unusual pens
The Gothic Chess Set
 The Gothic Chess Set Please note that this chess set is a fairly difficult and time consuming project. I strongly suggest building one or two easier models before tackling this one! The miniatures used
Building the Circular Tower
 Building the Circular Tower You will need to fill this mold 18 times to have enough blocks to build the circular tower. Be sure the blocks are completely dry before gluing them together. For detailed instructions
The Fyfe Building Instructions for Assembly of the N scale kit.
 The Fyfe Building Instructions for Assembly of the N scale kit. Kit Contents: 150 each laser cut 1/16" acrylic parts. 6 each 020 adhesive backed part 6 each column caps 2 each decorative canopy 1 each.125"
Clock 35 - Toyland. Construction instructions for Clock 35
 This clock has been designed for children, it is a stand-alone unit and can be positioned on a shelf or cabinet out of the reach of very young hands who may be tempted to touch. The clock is shown in two
The Severn Instructions for Assembly of the N scale kit.
 The Severn Instructions for Assembly of the N scale kit. Kit ontents: 172 each laser cut 1/16" acrylic parts 102 each adhesive backed styrene parts 1 each cast entryway 3 each cast balcony 4 each cast
How to Make a Hat Bending Jig
 How to Make a Hat Bending Jig MATERIALS One 2" x 8" x 11" long (Base Block) exact measurements are 7 ½" x 1 ½" x 11" (Pine is OK to use, I have used scrap Walnut for my benders) Four pieces of Oak 1" x
The Hamlin Assembly Instruction By Laser Dollhouse Designs
 The Hamlin Assembly Instruction By Laser Dollhouse Designs NOTE 1: Please do a dry assembly using only tape to hold house together. This will get you familiar with parts, location, and fit. This also gives
Collage Pendant from Recycled Tin
 PROJECT BEGINNER METAL Construct a Collage Pendant from Recycled Tin Cut, stack, and rivet elements from colorful tin containers to create a reversible pendant with a wooden core. by Christine Terrell
Secret Storage Book. Part Lists. The Book
 Secret Storage Book Part Lists Wood Screws ( (Werbilt flat head phillips #4 x ⅜ in) Drills Screwdrivers Hinges (2 medium and 3 small) Corner braces (¾ inches) Paint or scrapbook paper Leather Thick cardboard
Additional Parts List:
 THE TIME MACHINE Additional Parts List: In addition to the cast resin parts enclosed in this kit, there should also be a plastic bag containing the following items needed to complete your time machine
Sky Eagle. User Guide. Cautionary and Warning Statements
 Sky Eagle User Guide 60089 V0613 Cautionary and Warning Statements This kit is designed and intended for educational purposes only. Use only under the direct supervision of an adult who has read and understood
Legacy Polaris Pen Kit
 Description: The Polaris model is a single tube pen kit that uses a 3/8 tube and is a great starter kit for those new to pen turning. They look similar to our Viceroy kit but the body tube is longer which
IMPROVING AND SCRATCHBUILDING AN F4U CORSAIR COCKPIT BY MIKE ASHEY
 IMPROVING AND SCRATCHBUILDING AN F4U CORSAIR COCKPIT BY MIKE ASHEY This article presents some basic techniques for improving and scratchbuilding a cockpit. For this project I used Model Technologies photoetch
BLADE REPAIR INSTRUCTION BOOKLET
 BLADE REPAIR INSTRUCTION BOOKLET Contents Section I: Section II: Section III: Section IV: Section V: Section VI: Removing a Blade Refer to this section if you need to remove the blade from an oar shaft.
Robert Bosch GmbH. Wall organiser
 Wall organiser The organisational talent Wall organiser Say goodbye to messiness! The wall organiser is the ideal place to store everything that tends to lie around. 1 Introduction Wardrobes, drawers and
Build Instructions for Towers of Doom
 Build Instructions for Towers of Doom 1. Measure and cut 4 x 8 sheet of plywood in half (or ask Home Depot to do it!). You will use one 4 x 4 sheet for the course base. 2. Attach a support frame to the
REVISION LIST CHAPTER 25: AFT WINDOWS. The following list of revisions will allow you to update the Legacy construction manual chapter listed above.
 REVISION LIST CHAPTER 25: The following list of revisions will allow you to update the Legacy construction manual chapter listed above. Under the Action column, R&R directs you to remove and replace the
Pachinko Machine. Supplies: Part One: Construction. Optional: (1) 21" x 15.5" piece of wood. jumbo craft sticks. (2) 17" x 1" pieces of wood
 21 x 15.5 piece of wood. jumbo craft sticks. (2) 17 x 1 pieces of wood") Supplies: (1) 21" x 15.5" piece of wood jumbo craft sticks (2) 17" x 1" pieces of wood standard craft sticks (2) 14.5" x 1" pieces of wood 1" wooden craft circles (2) 4" x 2" pieces of wood drill (1) 14.5
Supplies: (1) 21" x 15.5" piece of wood jumbo craft sticks (2) 17" x 1" pieces of wood standard craft sticks (2) 14.5" x 1" pieces of wood 1" wooden craft circles (2) 4" x 2" pieces of wood drill (1) 14.5
August 2008 Greetings to Go Cruisin
 August 2008 Greetings to Go Cruisin Materials: Cruisin Greetings to Go Cruisin Unmounted Font and Borders & Backgrounds Cruisin Wood Mounted Stamp Set Cruisin Wood Mounted Happy Birthday Stamp Tools: Bone
Sword Blade. Leave the bottom of the blade untouched so you can fit it to the crossguard perfectly.
 Sword Blade Trace the pattern onto the wrong side of your foam (if there is a rougher edge) twice and use a sharp knife to cut it out. You will save foam if you make the blade fit twice onto once piece
Max Launch Abort System Prod. No *Kevlar is a registered trademark of Dupont
 Flying Model Parts List Max Launch Abort System Prod. No. 3014 A 11820 - Body Tube 3.5 Diam x 5.5" Long B 11824 - Orange Capsule Base Shoulder Ring C 16032 - Laser-cut Ring motor mount rear D 16033 - Laser-cut
Arctic Maze. The cubs are lost! Help them find their way back to their mother.
 Arctic Maze The cubs are lost! Help them find their way back to their mother. Illustrations copyright 2008 by Vincent Nguyen Time to bloom! Circle the items that will help the flower to grow. Illustrations
Designed by Robin Shakoor
 Designed by Robin Shakoor Graphic 45 Supplies: 1 sheet Vintage Hollywood (4501524) 2 sheets Delightful Debut (4501525) 2 sheets Glitz and Glamour (4501526) 2 sheets Star Studded (4501527) 2 sheets Tinsel
How to install backchecks
 How to install backchecks Note: All pictures can be enlarged for better clarification. Revision 7 8/2009 Backchecks wear out in a piano much like brake pads in an automobile. While wear is a valid reason
House of ATC cards. Michael strong. Design by: 2007 Craft TV Weekly, Inc.
 House of ATC cards Design by: Michael strong House of atc cards 1 Scallops! Michael is building a house of cards for his Artists Trading Cards. Because each card is a work of art in miniature, each deserves
Hotel Belvedere Instructions for Assembly of the HO scale kit. v1.1
 Hotel Belvedere Instructions for Assembly of the HO scale kit. v1.1 Kit Contents: 319 ea. laser cut.090" acrylic parts. 132 ea. laser cut.060" acrylic parts. 8 ea. window glass templates 8 ea. window glazing
The Saint Paul Building
 The Saint Paul Building Instructions for Assembly of The Saint Paul Building. Kit Contents: 65 each laser cut acrylic parts. 1 each sheet of AC roof unit parts. 1 each sidewalk. 3 each Window Glass Templates,
Building the Cathedral
 Building the Cathedral Please note that the cathedral is a fairly difficult and time consuming project. I strongly suggest building one or two easier models before tackling this one! Four molds are needed
San Felipe: Step by Step Pack 6
 Pack 6 Your parts Framing Tools and equipment Glue Knife Sandpaper Superglue Tweezers Clear varnish a Retrieve the grating that you assembled on Page 100. Cut two pieces of 2 x 3 mm wooden strip to fit
The Rubley Building Instructions for Assembly of the N scale kit. v1.1
 The Rubley Building Instructions for Assembly of the N scale kit. v1.1 Kit Contents: 197 ea. laser cut 1/16" acrylic parts. 1ea. adhesive backed.020 styrene part. 10 ea..060 x 1" styrene alignment pins.
Rack 'Em Up. Materials: Tools
 Rack 'Em Up Nice rack! Most Canadian residences are closetunderprovided. Solve this chronic rack-lack by making your own pegged coat rack. You can give it a carved, antiqued finish and add character by
Installation Guide. for E-Series/Eagle Clad Hinged Inswing French Door
 Installation Guide for E-Series/Eagle Clad Hinged Inswing French Door Thank you for choosing Andersen. Instructions are for typical, new wood-framed wall construction with weather protection in place.
Legacy DaVinci Pen Kit
 Description: The DaVinci model is a single tube pen kit that uses a 3/8 tube and is a great starter kit for those new to pen turning. They are look similar to our Viceroy kit with a more intricate design.
Pump Assembly. Lloyd Matthews September 2013
 Pump Assembly Lloyd Matthews September 2013 Before proceeding with this part of the build, the author recommends that Pt. No 227 1 mm diameter Brass Wire Figure H1, is replaced with 0.8 mm straight brass
I am using 2 # polyethylene plank foam for the core of the shield and a Carbon Fiber 1/2 inch thick Core.
 Making a Down-spear Style Madu (with Plastidip covering) First, determine what size/shape you want your Madu, both the Shield portion of your Madu and the overall length of the weapon portion. This step
LAGGING PIPES UP TO 125 mm IN DIAMETER WITH K-FLEX TUBING
 LAGGING PIPES UP TO 125 mm IN DIAMETER WITH K-FLEX TUBING Around 80% of piping used in civilian buildings can be insulated before fitting. This simplifies the task and saves time, taking advantage of the
CVS Pharmacy kit in HO scale
 CVS Pharmacy kit in HO scale Parking lot base and cars not included This kit includes all building parts and wall-mounted signs milled in white styrene plastic, clear window glazing and pre-cut Plastruct
G. Building the Cab, Cab Roof and Cab Boiler Extension Page 14 and Backhead.
 G. Building the Cab, Cab Roof and Cab Boiler Extension Page 14 and Backhead. Cab. In order to ensure that the cab and tender would actually look right, as what often appears on a drawing is not always
Designed by Melissa DiRenzo thesweetescape.ca
 instructions Designed by Melissa DiRenzo thesweetescape.ca YOU WILL NEED 3 -diameter foam ball Christmas sweater Hot glue gun and glue sticks 3/8 -wide satin ribbon Elastic thread: metallic Note: A child
1Use the metal file to smooth
 Yamato: Step-by-step 85 Parts of the bridge and the hull a b c d e f a Part of the bridge b Part of the bridge c Part of the bridge d Radar x 2 e Part of the bridge x 2 f Wire Recommended tools and materials
HALF CASE CARD & TAG KEEPER
 HALF CASE CARD & TAG KEEPER By Debbie Henderson All images copyright 1990-2017 Stampin Up! Stampin Up! Supplies Used: Stamps: Christmas Quilt Inks: Tranquil Tide, Blushing Bride, Pool Party, Whisper White
Wanderlust Suitcase Vanity
 Wanderlust Suitcase Vanity If you re like me, you re always up for an adventure. When I saw some examples of DIY reclaimed suitcases, paired with the exciting new Wanderlust embroidery design collection,
Legacy Hex Pencil Kit
 Description: The Hex pencil is a step-up kit, with similar features to a Slimline Pro Pencil. It has a click mechanism instead of a twist. It uses an 3/8 tube and 2MM pencil lead. It has a heavier feel
MyOutdoorPlans.com. By Julian King [2X4 GARDEN BENCH]
![MyOutdoorPlans.com. By Julian King [2X4 GARDEN BENCH]](/thumbs/75/72876801.jpg "MyOutdoorPlans.com. By Julian King [2X4 GARDEN BENCH]") MyOutdoorPlans.com By Julian King [2X4 GARDEN BENCH] CUT LIST A 2 pieces of 2 4 lumber 24 long, 2 pieces 32 1/2 long LEGS B 2 pieces of 2 4 lumber 45 long, 2 pieces 15 1/2 long, 1 piece 12 1/2 long SEAT
MyOutdoorPlans.com By Julian King [2X4 GARDEN BENCH] CUT LIST A 2 pieces of 2 4 lumber 24 long, 2 pieces 32 1/2 long LEGS B 2 pieces of 2 4 lumber 45 long, 2 pieces 15 1/2 long, 1 piece 12 1/2 long SEAT
Donaldson s Department Store
 Donaldson s Department Store Instructions for Assembly of Donaldson s Department Store Kit Contents: 80 each laser cut acrylic parts. 1 each sheet of canopy parts. 1 each sheet of AC roof unit parts. 1
Nanton Grain Mill Assembly
 ( 1 ) Nanton Grain Mill Assembly Locate package for assembling storage building. These are cut from 1/8 masonite. Inspect and lightly sand edges where it will be bonded. Use white glue or CA glue to bond.
DIY Kalimba Thumb Piano
 DIY Kalimba Thumb Piano By Caleb Schepart of nykalimba.com This DIY Kalimba Thumb Piano build is made using materials, tools, and supplies that are commonly found at a home improvement center, or at a
Build the Spitfire: Step-By-step. Pack 3 Stages 21-30
 Pack Stages 2-0 Contents Stage Page Number 2 72-74 22 75-78 2 79-8 24 82-84 25 85-88 26 89-9 27 92-94 28 95-97 29 98-00 0 0-05 Editorial and design by Continuo Creative, 9-4 North Road, London N7 9DP All