Max Launch Abort System Prod. No *Kevlar is a registered trademark of Dupont
|
|
|
- Suzanna Fields
- 5 years ago
- Views:
Transcription

 N 33069 - Laser-cut Balsa Fin Set - Small O 33070 - Laser-cut Balsa Fin Set - Large P 10008-3")

 BEFORE STARTING ANY ASSEMBLY READ THROUGH ALL THESE INSTRUCTIONS.")


1 Flying Model Parts List Max Launch Abort System Prod. No A Body Tube 3.5 Diam x 5.5" Long B Orange Capsule Base Shoulder Ring C Laser-cut Ring motor mount rear D Laser-cut Ring motor mount forward E Laser-cut Ring nose cone shoulder F FNC2 - Foam Capsule G Yellow Motor Mount Tube H Motor Clip I Blue Thrust Ring J Kevlar* Cord 18" K White Elastic Shock Cord 18" L Kevlar* Nose Cord M Parachute Sub-assy (3) N Laser-cut Balsa Fin Set - Small O Laser-cut Balsa Fin Set - Large P inch launch lug Q Lag Bolt Nose Weight R Kit Instructions S Decal T FNC1 - MMX Foam Nose Cone (2) Assembly Instructions M L K F T P J I Q O H G B E D *Kevlar is a registered trademark of Dupont A S N C Things you'll need to assemble this kit Hobby Knife, Pencil, Paint Brush and Razor Saw Sandpaper (220 or 320 & 400 Grit) Elmer's Carpenter's Wood Filler Wood Glue Alphatic Resin glues work best such as TITEBOND or ELMER'S CARPENTER'S WOOD GLUE Tape & Paint Scotch Magic Tape or Paper Masking Tape and Foam Safe Spray Paint. (See below for Foam Safety Info) BEFORE STARTING ANY ASSEMBLY READ THROUGH ALL THESE INSTRUCTIONS. IT IS BEST TO TEST FIT ALL PARTS BEFORE APPLYING ANY GLUE. READ AND FOLLOW THE N.A.R. MODEL ROCKET SAFETY CODE. Information about Foam Parts, Paint and Fillers Many brands of Spray Paint are not "Foam Safe" and may melt the foam. ALWAYS test the brand you intend to use FIRST before spraying the entire Foam part. We recommend testing your paint on the base of the Large Foam Capsule before starting assembly (it will get covered up by the Orange Shoulder and Cap Ring in STEP 13.) Most brands of "Acrylic" or water based paint will not harm the Foam. Only use water based fillers such as Elmer s Carpenters Wood Filler on your Foam Parts. Elmer s Carpenters Wood Filler is a thick paste, so we recommend thinning it with about 50% water to 50% paste. Test on flat end of cone. PAGE01


2 Flying Model Step 01 A. Place the Blue Thrust Ring up against the side of the Yellow Motor Mount Tube and use it as a guide to cut a 1/8 inch long slit in the side of the Yellow Motor Mount Tube as shown. B. Place the Yellow Motor Mount Tube up against the ruler provided below. Make a pencil mark on the tube 1/2 inch from the uncut end as shown, then draw that all the way around the tube's diameter. C. Insert the Motor Clip into the slit in the Yellow Motor Mount Tube. A. B. D. C. 1/2 inch D. Wrap a piece of tape all the way around the Yellow Motor Mount Tube to hold the Motor Clip in place. Step 02 A. Hold the Yellow Kevlar Cord and the White Shock Cord side by side. Pull one end of each cord so that they are even with each other. While holding the two cords together, tie a single parallel overhand knot approximately one inch from the ends as shown. Yellow Kevlar B. Gently pull on both cords to White Shock set the knot and prevent it from slipping. C. Apply a small amount of Wood Glue on the ends of both cords to prevent them from fraying. Knot Single Parallel Overhand Knot NOTE THIS IS A VERY IMPORTANT STEP. IF YOU TIE A DIFFERENT TYPE OF KNOT THE SHOCK CORDS MAY SEPARATE DURING FLIGHT! Step 03 A. Apply a bead of wood glue around inside edge of Yellow Motor Mount Tube as shown. Apply bead of Wood Glue here B. Insert the Blue Thrust Ring into the Yellow Motor Mount Tube so it is even with the end of the Yellow Motor Mount Tube. Step 04 A. Use two overhand knots to tie the Yellow Kevlar Cord around the Yellow Motor Mount Tube as shown. Place Yellow Motor Mount Tube here. Place pencil mark on tube here. INCHES PAGE02
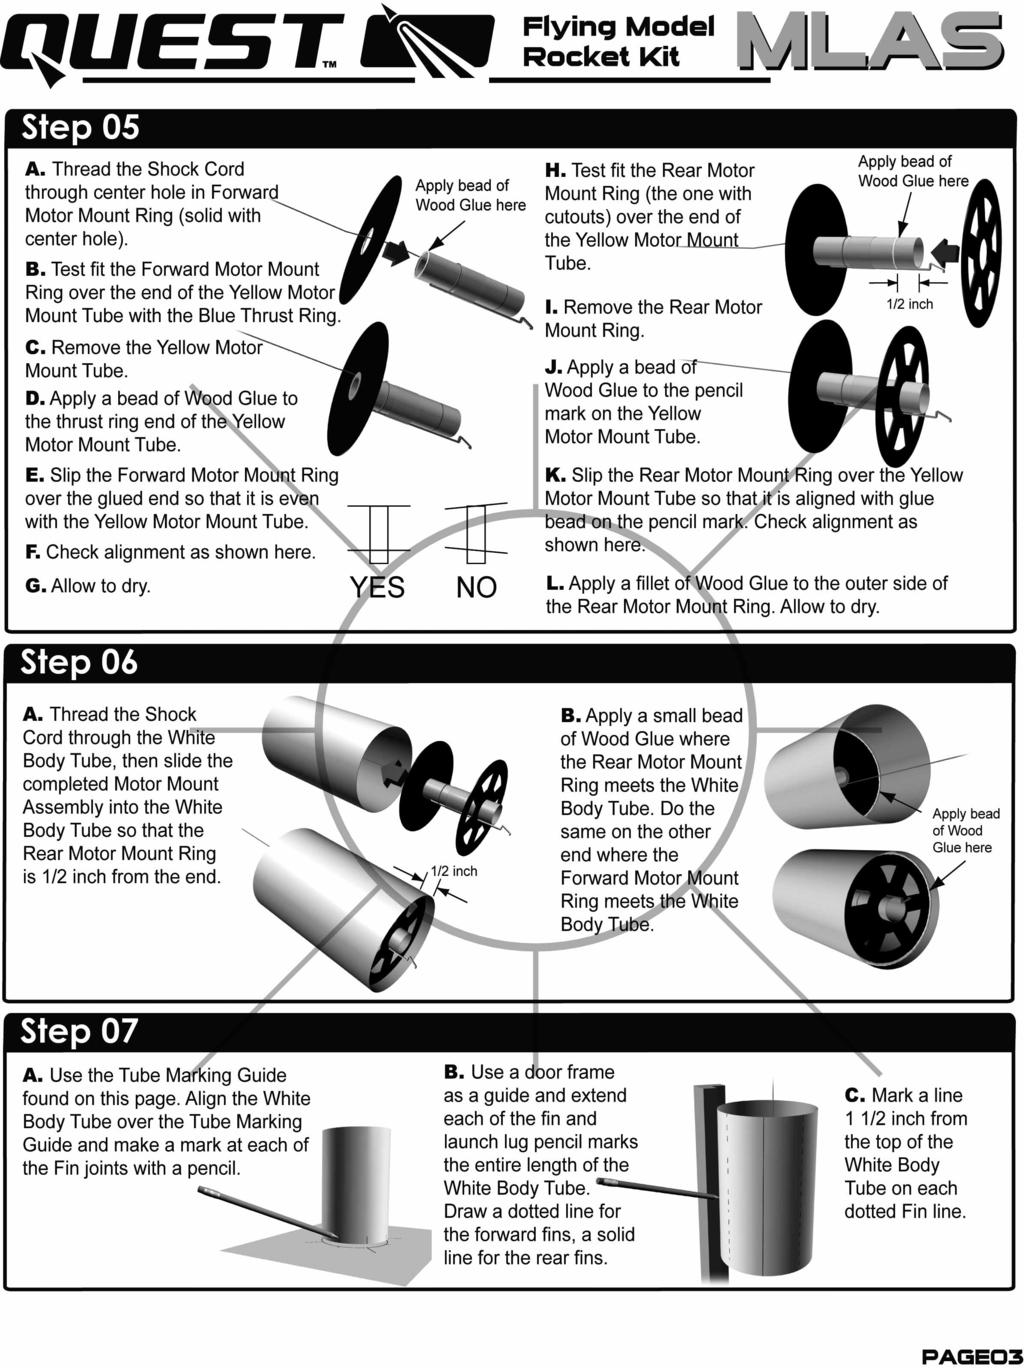
3


4 Flying Model Step 08 A. Carefully remove each of the Laser Cut Balsa Fins from the sheet with a sharp hobby knife. B. Stack like fins together and sand all edges smooth. Slide stack of Fins back and forth across sandpaper Step 09 How to make a "Double Glue Joint" for extra fin strength A. Apply a small line of wood glue to the root edge of the fin. B. Attach it to the body tube in correct position. C. Remove the fin and wipe away any excess glue on the fin and the body tube so there is only a very thin layer of glue left. D. Wait until the glue is dry, then re-apply a new line of glue to the root edge of the fin and re-attach the fin. Starting with Rear Fins, one at a time apply the fins on a solid pencil line so it's trailing edge is even with the end of the White Body Tube. Repeat this step for the remaining Rear Fins. Start with Forward Fins, one at a time apply the fins on the dotted lines so it's leading edge is even with the pencil mark 1 1/2 inches from the front end of the White Body Tube. Repeat this step for the remaining Forward Fins. 1 1/2 inch Step 10 A. Apply a small line of Wood Glue along the root edge of the Launch Lug and position it along the Launch Lug line. Set the Launch Lug so it's leading edge is even with the mark 1 1/2 inches from the end of the White Body Tube. Launch Lug 1 1/2 inch Step 11 A. After the Fin glue joints have completely dried, apply a thin bead of Wood Glue to both sides of a fin-body joint. B. Smooth out the glue with your finger. Wipe excess glue off your finger onto a tissue or paper towel. A. B A PAGE04


5 Flying Model Step 12 A. After all the glue is completely dry, mix a small amount of Wood Filler with very small amount of water until it is like a thin syrup A. Apply a coat of Wood Filler to each Fin. When the Filler is dry, lightly sand each Fin. B. Repeat the sanding and sealing until the surface of each Fin is smooth. Step 13 A. Test fit the Black Capsule Ring Cap by sliding it into the Orange Capsule Shoulder Ring. Make sure the bottom of the Ring Cap is even with bottom edges of the Orange Ring by setting it flat on a table. B. Place a bead of Wood Glue where the Ring Cap meets the inside of the Orange Ring. Allow to dry before continuing. Step 14 C. Put a thin bead of Wood Glue around the inside edge of the open end of the Orange Capsule Shoulder Ring. Then attach it to the Foam Capsule, keeping them aligned and level as shown. Set aside to dry. YES Apply bead of Wood Glue here NO A. Insert the nose weight piece in the hole in the tip of the capsule. Keep it straight while twisting it into the hole in the top center of the Foam Capsule. Leave a small gap between the bolt head and the nose cone tip to allow for a line to be tied around it later. NOTE: BE CAREFUL HANDLING THE FOAM CAPSULE, IT CAN BE FRAGILE AND DENT EASILY. Step 15 A. Test fit (DO NOT GLUE) the Foam Capsule in the open end of the Main Body Tube. B. Make a pencil mark on the Capsule where each Forward Fin Line is. C. Remove the Foam Capsule Assembly from the Main Body Tube. NOTE: BE CAREFUL HANDLING THE FOAM CAPSULE AND COMPONENTS, IT CAN BE FRAGILE AND DENT EASILY. PAGE05


6 Flying Model Step 16 A. Locate the two small foam nose cones. Using a razor saw, carefully cut each one in half lengthwise to create four "thrusters". B. Lightly sand rough edges and mold lines with 400 Grit Sandpaper. NOTE: BE CAREFUL HANDLING THE FOAM NOSE CONE, IT CAN BE FRAGILE AND DENT EASILY. Step 17 A. Using Wood Glue, attach one of the thrusters to the capsule at one of the pencil marks made in Step 15. Be sure it is straight up and down and the flat end is flush with the lip around the capsule. Allow to dry before continuing. B. Using Wood Glue, attach the other thrusters one at a time to the capsule 90o apart. Allow each to dry before continuing. Step 18 A. Mix a small amount of Elmer's Carpenters Wood Filler with water. Elmer s Carpenters Wood Filler is a thick paste, so we recommend thinning it with about 50% water to 50% paste. B. Apply a coat of thinned Wood Filler to the Capsule. When the Filler is dry, lightly sand the Capsule. C. Repeat the sanding and filling until the surface of the Foam Capsule is smooth and no foam is exposed. PAGE06


7 Step 19 Flying Model A. Slip the Capsule Assembly into the Main Body Tube. DO NOT GLUE! B. Paint the entire rocket with Foam Safe Primer. Follow instructions on the spray can for best results. C. After the primer has dried, remove the Capsule Assembly B. by gently twisting and pulling it out or it might remain stuck. D. Once again, slip the Capsule Assembly into the Main Body Tube. DO NOT GLUE! Twist it a few times to ensure the fit is not too tight. E. Paint the entire rocket with Foam Safe Gloss White. Follow instructions on the spray can for best results. F. After the paint has dried, remove the Capsule Assembly by gently twisting and pulling it out or it might remain stuck. Step 20 A. After the Foam Safe Gloss White has completely dried, cover the Body Tube with paper or a plastic bag, with the fins completely exposed. Use Masking Tape to secure the cover to be even with the root of the fins. Leave the bottom open so it gets painted as well, but cover the top so no paint gets inside. B. Insert a rolled up newspaper in the Motor Tube to hold the rocket with while painting. Paint the exposed areas of the rocket with Foam Safe Gloss Black. Follow instructions on the spray can for best results. C. After the paint has dried, remove the Masking tape and paper. Insert a rolled up newspaper in the Motor Tube E. Step 21 A. Using masking tape, mask out the black areas shown here. Also mask the Orange Capsule Shoulder Ring to prevent any paint from getting on it. B. Paint the black areas with Foam Safe Gloss Black Spray Paint. Mask Orange Shoulder Ring Mask Orange Shoulder Ring Mask Orange Shoulder Ring Mask Orange Shoulder Ring PAGE07


8 Flying Model Step 22 A. Remove the Gripper Shroud Line Fasteners from the strip one at a time. Always handle Grippers by the edge so that you don't touch the adhesive. Place each Gripper on one of the six corners of the parachute. B. Firmly squeeze each Gripper and parachute material between your fingers. C. The Shroud Line is pre-cut into three equal lengths. Take one length of the Shroud Line, pass it through the hole in the Gripper and tie one end with two overhand knots. Tie the other end of the shroud line to the nearest Gripper. Repeat for remaining Shroud Lines. A. B. C. Step 23 A. Tie one end of the thin Kevlar cord around the Nose Bolt. B. Tie a 2" loop in the other end of the thin Kelvar cord. C. Pass the Shroud Line loops of one of parachutes through the loop in the Kevlar and pull them straight. D. Repeat Step "C" for second parachute. Step 24 A. Tie a 2" loop in the end of White Shock Cord. A. B. Pass the Shroud Line loops of the third parachute through the loop in the White Shock Cord and pull them straight. B B PAGE08

 remove decal from water and slip from backing into")

9 Flying Model Step 25 A. When all paint is dry, apply the Water Decals. Use scissors to cut out the decals. B. Place the decal in lukewarm water. DO NOT PLACE MORE THAN ONE DECAL AT A TIME IN WATER. The decals will curl when placed in water. When the decal starts to uncurl, (approximately 30 seconds) remove decal from water and slip from backing into position on the rocket. Blot each decal dry with a tissue. A B C A B C E Note: For the best appearence, cut decals as close to the color print as you can. You may have to cut Decal "C" in half to fit it under forward fins. I H D D D G F F B J D "VI" On lower hidden fin C G G J H E J I G A Place anywhere you like F "I" On upper hidden fin C PAGE09
 Quest Launch Controller (No. 7510) Rocket Motor Estimated Altitude B6-2 275 Feet B6-4 300 Feet A. Place 3 sheets of wadding inside the body tube.")
 Quest Rocket Motor: B6-2, B6-4 A. B. Prepping for Launch - Step02 A.")
10 What Else You Will Need Estimated Altitude Prepping for Launch - Step01 Flying Model FLYING YOUR ROCKET To successfully fly your model rocket you will need the following items: Quest Launch Pad (No. 7610) Quest Launch Controller (No. 7510) Rocket Motor Estimated Altitude B Feet B Feet A. Place 3 sheets of wadding inside the body tube. Set them so they are flat against the Black Mounting Ring. B. Crumple up a piece of wadding and gently push down into space at top of Rocket Motor before inserting into rocket. Quest Parachute Recovery Wadding (No. 7021) Quest Rocket Motor: B6-2, B6-4 A. B. Prepping for Launch - Step02 A. Grab the parachute at it's center and pull the shroud lines taut so that the parachute is in long narrow triangle shape. B. Fold the parachute in thirds lengthwise, and DO NOT wrap the shroud lines around the parachute. See the illustration to the right for clarification. TIP: Lightly dust the parachute with Talcum or Baby Powder to keep it from sticking together. This works well in hot and humid or very cold weather. This line runs to tip of Capsule Prepping for Launch - Step03 A. Place the folded parachute for the Main Body Tube in first. Set it directly atop the Wadding inserted in Step 01A. Set the shock cord and shroud lines loosely atop the parachute. B. Now place the two folded Capsule parachutes in the Main Body Tube. Set the shock cord and shroud lines loosely atop the parachutes. C. Now insert the Capsule into the Main Body Tube, making sure that lines and cords do not get caught between the shoulder of the Capsule and the Body Tube, except the Capsule Parachute line, with must pass between the Capsule Shoulder and the Body Tube. Crumple up a piece of wadding and gently push down into space at top of Rocket Motor. READ AND FOLLOW THE ENCLOSED LAUNCHING PROCEDURES SHEET. READ AND FOLLOW THE N.A.R. SAFETY CODE DURING ALL YOUR MODEL ROCKET ACTIVITIES. Manufactured by: Quest Aerospace, Inc. PO Box 2409 Pagosa Springs, CO All Rights Reserved PAGE10
ADVANCED ROCKETRY. Page 01. What you will need to build the Quest MEAN GREEN. Parts and exploded view of the Quest MEAN GREEN. Prod No.
 ADANCED Prod No. 5013 * What you will need to build the Quest MEAN GREEN Hobby Knife * Pencil Straight Edge Aliphatic Resin Wood Sanding Sealer & Brush Spray Paint Parts and exploded view of the Quest
Aliphatic Resin Wood Glue. Launch Lug. Part #10009 Kevlar* Cord. Part #J0053
 ADANCED Prod No. 5014 * What you will need to build the Quest Lil GRUNT Hobby Knife * Pencil Straight Edge Aliphatic Resin Wood Sanding Sealer & Brush Spray Paint Parts and exploded view of the Quest Lil
Assembly Instructions
 Assembly Instructions Parts Included: 1 Nose Cone 1 Body Tube 3 1/8 Balsa Fins 1 Thrust Ring 1 Motor Tube 1 Motor Hook 1 Motor Sleeve 2 Centering Rings 1 Launch Lug 1 Kevlar Shock Cord (yellow) 1 Elastic
Aerospace Speciality Products
 Specifications:! Length: 18.75"/47.6 cm! Diameter: 0.98"/24.9 mm! Weight: 1.5 oz/44 gm! Streamer Recovery! Recommended Engines:!! A8-3; B4-4; B6-4; C6-5! Skill Level: Beginner This is a model rocket kit
Engineering Directive
 Thing-a-ma-Jig Finishing To Finish a model means to apply paint and other decorations to complete the look of your model. Meaning to apply a finish. That is what we will discuss in this section. Applying
Mid-Power Model Rockets
 Kit #5030 Made By: DynaStar Mid-Power Model Rockets A Brand of Apogee Components, Inc. Snarky Aerial Target Drone Rocket Kit Parts List P/N Description Qty 10090 Engine Mount Tube (AT24-3.75) 1 10160 Airframe
Versi-Loader 2 A Competition Payload Model Rocket Kit for 18mm Engines Can be flown single-stage or two-stage.
 Versi-Loader 2 A Competition Payload Model Rocket Kit for 18mm Engines Can be flown single-stage or two-stage. Specifications: Length (Two-Stage)*: 20.5"/52.1 cm Dia.:.739"/18.77 mm Weight (Two-Stage w/payload)*:
1/3 SCALE MODEL EASY AND FUN TO BUILD AND FLY EJECTION BAFFLE GREAT FIRST SCALE MODEL BALSA FINS & NOSE CONE PARACHUTE RECOVERY
 About Semroc Astronautics Corporation Semroc Astronautics Corporation was started by Carl McLawhorn in his college dorm at North Carolina State University in November, 1967. Convincing a small group of
Skill Level 3 Average Skills Needed. Skill Level 3. Skonk Wulf Parts List
 Kit #05153 Skill Level 3 Made In USA Skonk Wulf Parts List Item # Item Name Qty 10091 AT-24/3.75" 1 10186 AT-66/14.2" Body Tube 1 13031 CR 18/24 1 13314 CR 24/66 1/8" Plywood 2 13056 1/4" Launch Lug 1
Central New York Rocket Team Challenge 2018 Rocket Assembly Instructions
 Central New York Rocket Team Challenge 2018 Rocket Assembly Instructions Note: These instructions vary from those provided by the manufacturer of the rocket kits. There is also considerable varying discussion
Mid-Power Model Rockets Fillmore Ridge Heights Colorado Springs, CO USA web site: Kit #5037. LexxJet Parts List
 Kit #5037 LexxJet Parts List P/N Description Qty 10091 Engine Mount Tube (AT-24/3.75) 3 10132 Airframe Tube (AT-33/2.25) 2 10166 Airframe Tube (AT-56/10) 1 13031 Centering Ring (CR18-24) 1 13035 Centering
PARACHUTE RECOVERY. About Centuri Engineering TM HIGH PERFORMANCE PAYLOAD SECTION TWO STAGE BALSA FINS & NOSE CONE. About the Centuri Marauder
 About Centuri Engineering TM Centuri Engineering Company was started in 1961 by Leroy (Lee) Piester in his garage while he was still in college in Phoenix, Arizona. With his wife, Betty, they built Centuri
RFS Class II Rocket Assembly Instructions
 RFS Class II Rocket Assembly Instructions Instructions by: Loc Precision Photos by: Great Lakes Space Port Sheboygan Education Foundation, Inc. Welcome and thank you for joining the Rockets for Schools
PSC s 25th ANNIVERSARY KIT! TWO STAGE CLUSTER DESIGN DESIGNED BY MIKE HARDOBEY ENGINEERED BY JOHN BROHM PARACHUTE RECOVERY
 About Semroc Astronautics TM Semroc Astronautics Corporation was started by Carl McLawhorn in his college dorm at North Carolina State University in November, 1967. Convincing a small group of investors
HIGH PERFORMANCE GREAT ENTRY LEVEL KIT FUN TO BUILD AND FLY. About Centuri Engineering Company. About the Spartan. What is a Retro-Repro?
 About Centuri Engineering Company Centuri Engineering Company was started in 1961 by Leroy (Lee) Piester in his garage while he was still in college in Phoenix, Arizona. With his wife, Betty, they built
Big Oz. Rocket. User Guide V0313
 Big Oz Rocket User Guide 59824 V0313 Materials Included The Big Oz Rocket Kit should include the following materials. If something is missing, contact Customer Service at 800-358-4983. 20-ounce plastic
The Papernator 2003 created and designed by Clive Davis, NAR #80412
 The Papernator 2003 created and designed by Clive Davis, NAR #80412 CG with motor loaded= 3.75 (9.6 cm) from base nose weight = 1/2 oz or 15 grams body tube nose cone shock cord mount fins (4 qty) launch
Please read and understand all instructions before building!
 AGM-256 Pit Bull This kit contains all the parts necessary* to build a flying high power rocket: 1) Pre-slotted main airframe 1) Pre-slotted boat tail 1) Nose cone 4) Main fins 4) Canard fins 1) Piston
Please read and understand all instructions before building!
 D-Region Tomahawk The D-Region Tomahawk kit contains all the parts necessary* to build a flying high power rocket: (1) Pre-slotted main airframe (1) Payload airframe (1) Airframe coupler tube (1) Coupler
MAGNUM SERIES EASY TO BUILD HIGH FLYER BALSA FINS & NOSE CONE PARACHUTE RECOVERY. About Centuri Engineering. What is a Retro-Repro?
 About Centuri Engineering TM Centuri Engineering Company was started in 1961 by Leroy (Lee) Piester in his garage while he was still in college in Phoenix, Arizona. With his wife, Betty, they built Centuri
CLASSIC DOWNSCALE EASY TO BUILD SINGLE STAGE BALSA FINS & NOSE CONE SLOTTED BODY TUBE PARACHUTE RECOVERY
 About Semroc Astronautics Corporation Semroc Astronautics Corporation was started by Carl McLawhorn in his college dorm at North Carolina State University in November, 1967. Convincing a small group of
LUNAR EXPRESS. Little
 Little LUNAR EXPRESS The Little Lunar Express kit contains all the parts necessary* to build a flying high power rocket: 1) Pre-slotted boattail 1) Airframe 5.5" long 1) Nose cone 2) Main fins 2) Stabilizer
CLASSIC DESIGN GREAT DEMO MODEL EASY TO BUILD BALSA FINS & NOSE CONE PARACHUTE RECOVERY
 About Semroc Astronautics Corporation Semroc Astronautics Corporation was started by Carl McLawhorn in his college dorm at North Carolina State University in November, 1967. Convincing a small group of
E S TORMINATOR TORMINATOR. Skill Level 4. EggStorminator Parts List. Skill Level 4 - Slightly Challenging
 Kit #050 Skill Level 4 Made In USA E S TORMINATOR GG TORMINATOR Skill Level 4 - Slightly Challenging The EggStorminator model rocket was designed around the rules of the National Association of Rocketry
Please read and understand all instructions before building!
 The X-Calibur kit contains all the parts necessary* to build a flying high power rocket: (1) Pre-slotted main airframe (1) Payload airframe (1) Airframe coupler tube (1) Coupler bulkplate (1) Coupler hardware
KosRox. Read and follow the NAR safety code during all your model rocketry activities. This model rocket kit is provided free of any warranty.
 This model rocket is a 1/26.5 scale rocket of the Apollo pad abort test rocket. It was use to test the Launch Escape System (LES). The LES rocket consisted of a four nozzle rocket motor set atop a supporting
Parts List. Additional Items Required
 PUNK 18 XXL Created by C. P. McGraw Length Diameter Fin Span Weight 10.073 1.040 4.352 1.0 oz Parts List Nose Cone...BC-1039 Body Tube...ST-1060 Engine Mount...EM-710 Launch Lug...LL-18 Fins...3/32 x 3
Parts List. Additional Items Required:
 Stryker Skill Level 1 Created By C. P. McGraw Length Diameter Fin Span Weight 17.2 1.040 9.080 1.2 oz Parts List Nose Cone...BC-1052 Body Tube...ST-10120 Engine Mount...EM-710 Fin Stock...3/32 Sheet Fin
The Ballistic Blaster Rocket Kit should contain the following items. If anything is missing, call Customer Service at
 Ballistic Blaster User Guide Materials Included The Ballistic Blaster Rocket Kit should contain the following items. If anything is missing, call Customer Service at 800-358-4983. Body tube, 6-1/2" long,
Skill Level 3 Average Skills Needed
 Kit #05150 Skill Level 3 Made In USA Skill Level 3 Average Skills Needed The Legend of Johnny Star Commander by Shrox: One night long ago, in a space cantina far away, the need for a very fast ship was
EASY TO BUILD SINGLE STAGE BALSA FINS & NOSE CONE SLOTTED BODY TUBE PARACHUTE RECOVERY. What is a Retro-Repro?
 About Semroc Astronautics Corporation Semroc Astronautics Corporation was started by Carl McLawhorn in his college dorm at North Carolina State University in November, 1967. Convincing a small group of
Design by Mike Dorffler
 About Estes Industries, Inc. TM In July 1958, G. Harry Stine of Model Missiles, Inc. in Denver, Colorado approached Vern Estes about making model rocket engines for them. On January 15, 1959, Vern s automated
Please read and understand all instructions before building!
 Patriot M i s s i l e The 1/6-Scale Patriot kit contains all the parts necessary* to build a flying high power rocket: (1) Pre-slotted main airframe (1) Nose cone (4) Fins (1) Piston ejection kit: (1)
Design by Gene Street
 About Estes Industries, Inc. In July 1958, G. Harry Stine of Model Missiles, Inc. in Denver, Colorado approached Vern Estes about making model rocket engines for them. On January 15, 1959, Vern s automated
Design by Lee Piester CLASSIC DOWNSCALE PAYLOAD SECTION EASY TO BUILD SINGLE STAGE BALSA FINS & NOSE CONE SLOTTED BODY TUBE PARACHUTE RECOVERY
 About Semroc Astronautics Corporation Semroc Astronautics Corporation was started by Carl McLawhorn in his college dorm at North Carolina State University in November, 1967. Convincing a small group of
FLYING MODEL ROCKET KIT
 About Semroc Astronautics Corporation Semroc Astronautics Corporation was started by Carl McLawhorn in his college dorm at North Carolina State University in November, 1967. Convincing a small group of
1:20 SCALE MODEL HISTORIC MODEL BALSA FINS, NOSE CONE & TAIL CONE PARACHUTE RECOVERY
 About Semroc Astronautics Corporation Semroc Astronautics Corporation was started by Carl McLawhorn in his college dorm at North Carolina State University in November, 1967. Convincing a small group of
Designed by Wayne Kellner
 About Estes Industries, Inc. TM In July 1958, G. Harry Stine of Model Missiles, Inc. in Denver, Colorado approached Vern Estes about making model rocket engines for them. On January 15, 1959, Vern s automated
FLYING MODEL ROCKET KIT. Design by Gene Street FUTURISTIC DESIGN DUCTED EJECTION BALSA FINS & NOSE CONES PARACHUTE RECOVERY
 About Estes Industries, Inc. In July 1958, G. Harry Stine of Model Missiles, Inc. in Denver, Colorado approached Vern Estes about making model rocket engines for them. On January 15, 1959, Vern s automated
Made In USA. Kit #05046 Skill Level 4. Flying Machine Parts List
 Kit #05046 Skill Level 4 Made In USA Skill Level 4 Slightly Challenging The Flying Machine is a fun and stimulating kit to build and fly. It has a steampunk look that will have you speculating how rockets
PARACHUTE RECOVERY. About Centuri Engineering Company SUPER KIT SERIES EASY TO BUILD BALSA FINS & NOSE CONES. What is a Retro-Repro?
 About Centuri Engineering Company Centuri Engineering Company was started in 1961 by Leroy (Lee) Piester in his garage while he was still in college in Phoenix, Arizona. With his wife, Betty, they built
Design by Wayne Kellner
 About Estes Industries, Inc. In July 958, G. Harry Stine of Model Missiles, Inc. in Denver, Colorado approached Vern Estes about making model rocket engines for them. On January 5, 959, Vern s automated
Design by Mark Kellner
 About Estes Industries, Inc. TM In July 1958, G. Harry Stine of Model Missiles, Inc. in Denver, Colorado approached Vern Estes about making model rocket engines for them. On January 15, 1959, Vern s automated
CLASSIC DESIGN GREAT DEMO MODEL EASY TO BUILD BALSA FINS & NOSE CONE PARACHUTE RECOVERY. DESIGNED FOR NEW 29mm ENGINES
 About Semroc Astronautics Corporation Semroc Astronautics Corporation was started by Carl McLawhorn in his college dorm at North Carolina State University in November, 1967. Convincing a small group of
FLYING MODEL ROCKET KIT
 About Semroc Astronautics Corporation Semroc Astronautics Corporation was started by Carl McLawhorn in his college dorm at North Carolina State University in November, 1967. Convincing a small group of
Skill Level 2. Main Parts List. Derived from the Estes Cherokee-D By C. P. McGraw. Revision Date: Dec 8, 2005
 Derived from the Estes Cherokee-D By C. P. McGraw Skill Level 2 Revision Date: Dec 8, 2005 Length Diameter Fin Span Weight 30.90 1.320 6.235 6.5 oz Image created with RockSim v8 Main Parts List Nose Cone...PNC-55AC
Estes Screamer 1.91X Upscale Designed By Jay Goemmer
 Estes Screamer 1.91X Upscale Designed By Jay Goemmer Skill Level 1 Revision Date: February 11, 2006 Length: Diameter: Fin Span: Weight: 15.625 1.040 5.64 0.95 oz Image created with RockSim v8 Main Parts
PARACHUTE RECOVERY. About Centuri Engineering Company CLASSIC DESIGN EASY TO BUILD BALSA FINS & NOSE CONES
 About Centuri Engineering Company TM Centuri Engineering Company was started in 1961 by Leroy (Lee) Piester in his garage while he was still in college in Phoenix, Arizona. With his wife, Betty, they built
EASY TO BUILD BALSA NOSE CONE FUN TO FLY. About the GROONIES PARACHUTE RECOVERY
 About Semroc Astronautics Corporation Semroc Astronautics Corporation was started by Carl McLawhorn in his college dorm at North Carolina State University in November, 1967. Convincing a small group of
EASY TO BUILD BALSA NOSE CONE FUN TO FLY. About the GROONIES PARACHUTE RECOVERY
 About Semroc Astronautics Corporation Semroc Astronautics Corporation was started by Carl McLawhorn in his college dorm at North Carolina State University in November, 1967. Convincing a small group of
FUTURISTIC SCALE-LIKE EASY TO BUILD FUN DEMOS BALSA FINS & NOSE CONE PARACHUTE RECOVERY. About Centuri Engineering. What is a Retro-Repro?
 About Centuri Engineering Centuri Engineering Company was started in 1961 by Leroy (Lee) Piester in his garage while he was still in college in Phoenix, Arizona. With his wife, Betty, they built Centuri
1.9 KIT # Fits Aerotech 1.9 diameter rockets. Uses coupler and payload tube included with select Aerotech Kits. Ebay Parts List Description.
 KIT #0545.9 Fits Aerotech.9 diameter rockets. Uses coupler and payload tube included with select Aerotech Kits. Ebay Parts List P/N Description Qty 5405.9 Ebay Laser Cut Sheet Thin 5406.9 Ebay Laser Cut
Der Dopple Max Designed By C. P. McGraw Skill Level 2
 Der Dopple Max Designed By C. P. McGraw Skill Level 2 Length: Diameter: Fin Span: Weight: Revision Date: Dec 6, 2005 31.75 1.64 8.4 4.25 oz Rocket image drawn using RockSim 8 Main Parts List Nose Cone...PNC-60AH
PITTS S2S CONSTRUCTION
 PITTS S2S CONSTRUCTION FUSELAGE CONSTRUCTION 1) Place the right fuselage side over the plan and mark the former positions. Place the left side over the right side and mark the former positions. Glue F1
Rocket Fabrication. Preparation. Fin Fabrication and Assembly. Materials. Tools
 Rocket Fabrication Preparation 1. Print the templates for your design. Refer to the Print Template Tutorial for instructions. You can find the tutorial by opening the Help menu in the upper right-hand
Monster Marionette ART GRADE LEVEL FOURTH FIFTH MATERIALS
 MATERIALS FOR STUDENT: (one per student unless otherwise noted) FloraCraft Make It: Fun Foam: Rectangular pieces (arms & legs) cut from large Foam Block: Four 1" x 3" x 1" thick, Four 1" x 2 1/2" x 1"
Building an Egg-Lofter Payload Rocket
 Copyright Astralis Rocketry Corp 2007 Building an Egg-Lofter Payload Rocket Liability Agreement The User of this Document agrees unconditionally to these Terms & Conditions. The User is either an Adult
Cobra X Q Construction Tips Construction: Bel y pan
 Cobra X Q Construction Tips : The white plastic in this kit is high impact styrene. It can be painted with most types of coatings if light coats are applied this is necessary due to the thickness of the
1966 World Champion Parachute Duration
 1. Materials. I will use only lightweight, non-metal parts for the nose, body, and fins of my rocket. 2. Motors. I will use only certified, commercially-made model rocket motors, and will not tamper with
Rosalina Accessories Tutorial Version March 2011 Martyn
 Rosalina Accessories Tutorial Version 1.0 - March 2011 Martyn Star Brooch Feel free to experiment with these dimensions, you should make a template you are happy with, the method still works. 1) Creating
Hubble Space Telescope Paper Model Directions Downloads, patterns, and other information at:
 Hubble Space Telescope Paper Model Directions Downloads, patterns, and other information at: www.hubblesite.org/go/model Materials: model pattern printed onto cardstock/coverstock instructions printed
BT-55 KIT # Ebay Parts List P/N Description Qty. Fits diameter rockets (33mm or BT-55)
") KIT #10543 BT-55 Ebay Parts List P/N Description Qty 15403 33mm Ebay Laser-cut Sheet 1 13016 AC-33 (single) 1 13004 33mm Coupler with hole 1 10129 AT-33mm/2 with hole (for Ebay) 1 13066 Weld Nut for Rail
KIT #10543 BT-55 Ebay Parts List P/N Description Qty 15403 33mm Ebay Laser-cut Sheet 1 13016 AC-33 (single) 1 13004 33mm Coupler with hole 1 10129 AT-33mm/2 with hole (for Ebay) 1 13066 Weld Nut for Rail
Thank you for purchasing E.L. Moore Window & Door.
 Thank you for purchasing E.L. Moore Window & Door. Instructions Version 4.28.15 I ve named this kit after one of the greatest modelers I ve ever known, the late Elliot Moore Jr. Rest in peace my friend.
Vivian Mansion Assembly Instruction By Laser Dollhouse Designs
 Vivian Mansion Assembly Instruction By Laser Dollhouse Designs NOTE 1: Please do a dry assembly using only tape to hold house together. This will get you familiar with parts, location, and fit. This also
Swift assembly guide
 Swift assembly guide Download the assembly guide at www.scihighmodels.com/swift.pdf Sample kit shown with aluminium bells (available with the Deluxe kit) Shown here without main tanks Version 10/12/2010
TARC Craftsmanship Skills. Carl A. Curling, Sc.D.
 TARC Craftsmanship Skills Carl A. Curling, Sc.D. Scouting@NOVAAR.org The TARC 2017 challenge features several novel craftsmanship challenges, including: The application of a colored surface finish for
Hobby Lobby Zip Supplementary instructions Please refer to the included drawings while using these assembly instructions
 Materials needed: 15 or 30 minute epoxy Medium CA Masking tape Scotch tape Servo Tape Wax paper Tools Needed: Pencil or marker Flat building surface Hobby knife or razor blade 7/64" or 3mm drill bit 3/16"
BLADE REPAIR INSTRUCTION BOOKLET
 BLADE REPAIR INSTRUCTION BOOKLET Contents Section I: Section II: Section III: Section IV: Section V: Section VI: Removing a Blade Refer to this section if you need to remove the blade from an oar shaft.
Mousetrap Catapult. About this project:
 Designed by: Ritchie Kinmont Project #44 Page 1/19 About this project: The is fun for ages four and up. Using a mousetrap for the spring, this catapult is designed to throw objects such as practice golf
Step by Step Wing Bagging
 Step by Step Wing Bagging By Evan Shaw 073 589 9339 evanevshaw@gmail.com Preparing the Leading Edge 1. Cut cores. (Cutting of wing cores is covered in another article elsewhere) 2. Sand the LE to a nice
1/195 Scale Apollo-Saturn V Assembly Instructions
 1/195 Scale Apollo-Saturn V Assembly Instructions You are about to build a scale model of the Apollo-Saturn V Moon Rocket. This is a 1/195 scale replica of the version used to launch the Apollo J missions,
Cardboard Model Buildings
 Cardboard Model Buildings Get more model kits from http://www.modelbuildings.org PRINTING & ASSEMBLY TIPS: These OO designs can easily be resized by reducing the print percentage as follows: OO scale is
DO-IT-YOURSELF DISNEY-INSPIRED GIFT WRAP DISNEY
 DO-IT-YOURSELF DISNEY-INSPIRED GIFT WRAP YOU WILL NEED*: Printed templates Scissors Tape Glue Craft paper Various ribbon *Additional supplies may be needed for each version and are listed before Step 1.
Sky Eagle. User Guide. Cautionary and Warning Statements
 Sky Eagle User Guide 60089 V0613 Cautionary and Warning Statements This kit is designed and intended for educational purposes only. Use only under the direct supervision of an adult who has read and understood
Seascape Bungalow Assembly instructions. Laser Dollhouse Designs
 Seascape Bungalow Assembly instructions Laser Dollhouse Designs NOTE: Please do a dry assembly using only tape to hold house together. This will get you familiar with parts, location, and fit. This also
The Lansdowne One Car Garage Assembly Instruction by Laser Dollhouse Designs
 The Lansdowne One Car Garage Assembly Instruction by Laser Dollhouse Designs NOTE 1: Please do a dry assembly using only tape to hold house together. This will get you familiar with parts, location, and
EASY TO BUILD AND FLY GREAT FOR SMALL FIELDS PARACHUTE RECOVERY. Made in the U.S.A by Semroc Astronautics Corporation - Knightdale, N.C
 . Materials. I will use only lightweight, non-metal parts for the nose, body, and fins of my rocket. 2. Motors. I will use only certified, commercially-made model rocket motors, and will not tamper with
C-180 Builder s Manual
 C-180 Builder s Manual. May 20, 2002 Last revised July 11, 2002 Copyright! 2002 Douglas Binder, Mountain Models www.mountainmodels.com sales@mountainmodels.com (719) 630-3186 1 Required Equipment! Xacto
WRIGHT FLYER 1 INSTRUCTIONS FOR THE D10LC KIT
 WRIGHT FLYER 1 INSTRUCTIONS FOR THE D10LC KIT Manufactured in the USA by Easy Built Models PO Box 681744, Prattville, AL 36068-1744 Visit us at www.easybuiltmodels.com Easy Built Models GLUE METHODS Always
Applications Engineering Notes
 Applications Engineering Notes Document Title Document Number Operating Instructions for the US Conec AEN-1408 Revision Number 1.0 Effective Date December 15, 2011 THE USE OF SAFETY GLASSES FOR EYE PROTECTION
EXTREME LOAD no. TWO
 1602 - EXTREME LOAD no. TWO Kit Features: 22' 4 " x 14' x 3'-6 Oversize Load 49mm (1.9") actual height Bolt Head Details Welded Load Mounting Fins Painting Handles Tools Required: Hobby Knife Tweezers
Ribbon Beads. Metal Clay Jewelry Projects Chapter 7. Figure 7.64 Remember the wrapped hook clasp directions are available in Chapter 6.
 07 PYMCJ ch07 part2 4/6/08 8:31 PM Page 175 Figure 7.64 Remember the wrapped hook clasp directions are available in Chapter 6. If you d like an ID bracelet that is a little more colorful, consider adding
The Hamlin Assembly Instruction By Laser Dollhouse Designs
 The Hamlin Assembly Instruction By Laser Dollhouse Designs NOTE 1: Please do a dry assembly using only tape to hold house together. This will get you familiar with parts, location, and fit. This also gives
MUDGUN Drywall Finishing System
 Watch the demonstration video online at hydetools.com MUDGUN Drywall Finishing System Quick Start Guide Hyde Tools, Inc. / A Hyde Group Company / 800-872-4933 / custrelations@hydetools.com / hydetools.com
Combat Foamie. An electric powered model made from sheet foam for full contact combat matches. Designed by. Plan by Paul Bradley. Jerry W.
 Combat Foamie An electric powered model made from sheet foam for full contact combat matches Designed by Jerry W. Hagood Plan by Paul Bradley July 2010 Combat Foamie Top View 22.9 CG is 7.3 back from nose
29mm Priority Cinco. Glue all along seam. Tape
 29mm Priority Cinco The 29mm Priority Cinco is a companion to the 29mm Priority Stealth which is made from a used, U.S. Postal Service Priority Mail cardboard box. A clean pizza box would work just as
Your kit contains the following parts. Please check your kit for any missing or damaged parts before starting construction.
 Your kit contains the following parts Please check your kit for any missing or damaged parts before starting construction COMPLETE KIT PARTS LIST 1 Plan Sheet #1 1 Plan Sheet #2 2 Decal Sheet 2 White Tissue
1/2a Control Line Trainer Engine: Cox Black Window.049
 Designed by Bill Osborne & Peter Justin Drawn by Heman Lee 1/2a Control Line Trainer Engine: Cox Black Window.049 This model airplane is made from foam-board that can be purchased at any art-supply store
MAGNUM BOARD INTERIOR INSTALLATION GUIDELINES
 TECHNICAL BULLETIN No.: 090509-1405 Subject: Issue Date: September 4, 2009 Issue No.: II MAGNUM BOARD INTERIOR INSTALLATION GUIDELINES 1. CUTTING MAGNUM BOARD You can easily cut Magnum Board with carbide
Craftman One Car Garage Assembly Instruction by Laser Dollhouse Designs
 Craftman One Car Garage Assembly Instruction by Laser Dollhouse Designs NOTE 1: Please do a dry assembly using only tape to hold house together. This will get you familiar with parts, location, and fit.
Fryer's Trebuchet Paper Kits
 Fryer's Trebuchet Paper Kits Things you will need 7 sheets of card approx. 0.3 mm or 0.01 inches thick 1 sheet of paper to print out to download. 2 x 6-7 mm dowel or pencils 1 paper clip String 6 cms (2.5
SCULL HANDLES AND GRIPS INSTRUCTION BOOKLET
 SCULL HANDLES AND GRIPS INSTRUCTION BOOKLET Contents Section I: Scull Grip Replacement: Fixed Handle or 10 cm Length Adjustment System Refer to this section if you need to replace the grips on your fixed
FUSELAGE CONSTRUCTION
 FUSELAGE CONSTRUCTION Note: prior to building and gluing on the work surface use protective covering on your building surface. (wax paper or clear wrap) Fit the laser cut Fuselage Front and Fuselage Rear
Repairs. Chapter 10 Repairs 10. 1
 10 Repairs Chapter 10 Repairs 10. 1 Repairs As an installer, you will probably be called upon to repair damage to a resilient floor. Here are some of the most common problems and the recommended repairs
Parts Identification
 We are excited to introduce the Model Aero Aqua Sport. This is an excellent sport flyer, equally at home flying from grass fields, water, or even snow! The unique V-tail gives the Aqua Sport a distinctive
Bath Accessory Installation
 Bath Accessory Installation Step 1 - Clean surface using a clean dry cloth or use rubbing alcohol to remove any residue (wax, grease, solvents). Allow to dry one hour. Caution! DO NOT use any household
A Colorful World Illustrated Art Lessons
 A Colorful World Preparing to Paint Materials: paint egg cartons paintbrushes newspaper paper towels water jars paper Gather materials. If possible, provide a variety of brushes: small round, medium round,
PS 5077 cu. ft. Boxcar with EOC device. 1:29 scale resin craftsman kit. by Burl Rice
 PS 5077 cu. ft. Boxcar with EOC device 1:29 scale resin craftsman kit by Burl Rice www.burlrice.com Bill of materials (not included): Thick/medium viscosity CA PL adhesive, or Gorilla Glue Heavy Duty Construction
Tools and Tips: ( 1 )
") Tools and Tips: As you build instructions will show in my many picture manual how to assemble. You can use your own methods as you desire, my results are very good. A smooth, flat work surface is very
Tools and Tips: As you build instructions will show in my many picture manual how to assemble. You can use your own methods as you desire, my results are very good. A smooth, flat work surface is very
OVER THREE FEET TALL! SINGLE STAGE PAYLOAD RUGGED CONSTRUCTION
 TM 1. Materials. I will use only lightweight, non-metal parts for the nose, body, and fins of my rocket. 2. Motors. I will use only certified, commercially-made model rocket motors, and will not tamper