Building Tips This model can be built using the following types of adhesives:
|
|
|
- Karin Carson
- 5 years ago
- Views:
Transcription
1 Page 1
 To minimize weight, try to use as little epoxy as possible on this model, saving it for only critical joints such as wing spars and motor")


2 Building Tips This model can be built using the following types of adhesives: Epoxy (with or without microballons) Odorless cyanoacrylate (CA) with accelerator UHU Creativ for Styrofoam (or UHU POR) 3M 77 spray adhesive Hot glue gun ProBond (or Gorilla Glue) To minimize weight, try to use as little epoxy as possible on this model, saving it for only critical joints such as wing spars and motor mounts. You can also mix microballons into the epoxy to reduce weight considerably and help it fill gaps better. The majority of construction should use a lightweight and quick-drying adhesive such as foam-safe CA, UHU Creativ, or 3M 77. I personally use 3M 77 and UHU Creativ (both pictured at left) for the majority of construction since they are strong and dry very quickly. 3M Satin tape is called out many times in these instructions since it works so well for hinges, leading edge protection, and general strengthening. Make sure to get 3M Satin tape (sometimes called 3M Gift tape), which is sold in the purple container. The common 3M Scotch tape sold in the green container doesn t work nearly as well, nor does common packing tape. Begin construction by cutting out all of the paper parts templates with scissors, trimming them to within approximately 1/8 of the lines. Then test fit all of the templates onto the foam sheet, trying to minimize wasted foam as much as possible. Once you re satisfied with the arrangement, remove each template individually and spray the back of the template LIGHTLY with 3M 77 spray adhesive. Then replace the template onto the same spot on the foam sheet. Repeat for every template. After all the templates are tacked onto the foam, cut out all the pieces by cutting on the lines with a SHARP hobby knife. To help keep track of the parts, keep the paper templates on each piece until you re ready to use it. Page 2
.")

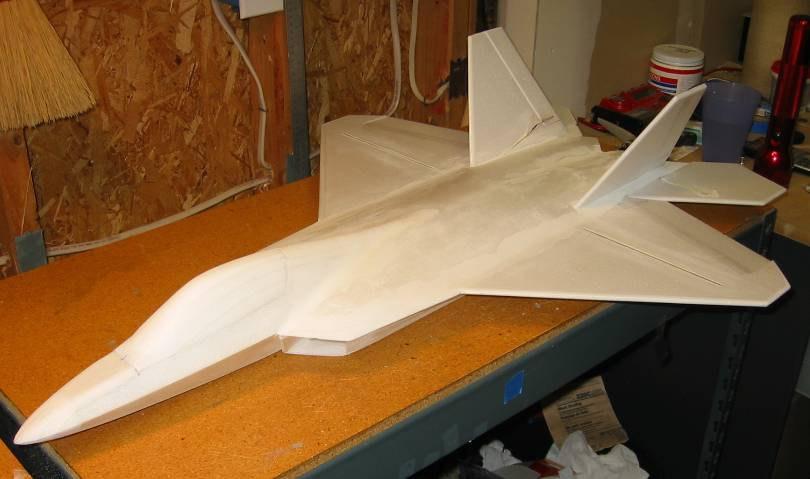
3 1. Begin assembly with the forward fuselage. Start by carefully cutting the beveled edges on all of the forward fuselage pieces as shown on the plans. Draw a reference line on each part that s inset from the edge the distance indicated on the plans (note you can trace the lines from an identical part onto the opposite part). Then cut the bevel with a sharp hobby knife. You can use a straightedge for the straight segments, but the curved segments will need to be cut by hand. It s best to practice with some scrap foam first to get the hang of it before cutting the actual parts. Be sure to make mirror-image left- and right-side pieces! The beveled parts should look like the photo at lower left when done (upper forward fuselage side shown). Page 3
, and a quick")

4 2. Next form the curvatures in the lower forward fuselage sides. Use a heat gun to gently heat and soften the foam and then bend them to the shapes shown. The curves required are a bit complex there should be one gradual curve over the entire piece to form the taper of the fuselage (as seen from the top), and a quick twist at the aft end to match the angled fuselage sides to the vertical fuselage centerline support. Study these photos and the photos in the following pages to guide you. The curves don t have to be exact since the bulkheads will help form the fuselage as well once it s assembled. Again be sure to make mirror-image left- and right-side pieces. Page 4


5 3. Glue the bottom half of the three fuselage bulkheads (the ones with the notch on top) to one of the lower forward fuselage sides at the locations shown on the plans, making sure they are perpendicular. Then set the fuselage sides upright and flat on the workbench, apply glue to the edges of the bulkheads, and then glue the two fuselage sides together. After the glue has dried, glue together the aft ends of the fuselage sides as shown, ensuring they are perfectly vertical. You may need to heat-form the foam a bit more to get things to align just right. 4. Next build the wing. Cut a slot to fit the carbon wing spar and use 30 minute epoxy to spar into place. Mixing some microballons into the epoxy is recommended to reduce weight and help the glue fill gaps better (you can also use ProBond). Place wax paper and some heavy books on top of the wing to hold it perfectly flat as the glue cures. After the glue has cured, sand the leading edge of the wing to a wellrounded shape, as well as the wing tips. Apply a strip of 3M Satin tape around the leading edge for smoothness and improved durability. Cut the flaperons free from the wing. Page 5


6 5. Laminate the two fuselage centerline support pieces together (3M 77 spray adhesive recommended). Then cut bevels on the edges of the aft fuselage sides as indicated on the plans. Place the wing on a flat surface, and then glue the two aft fuselage sides and centerline piece onto the bottom of the wing as shown. Use the four temporary bulkheads provided to ensure the fuselage sides are glued on at the proper angle. Note pins can be used to hold everything together while the glues dries. I recommend using a gap-filling glue such as epoxy with microballons or ProBond for this step. Remove the temporary bulkheads once the glue dries. 6. Glue the forward fuselage lower assembly in place on the front of the wing. Make sure the aft end of the forward fuselage mates with the forward edge of the centerline support piece. Also make sure the curvature is smooth as the angled forward fuselage sides twist to meet the vertical centerline support. Some trimming and additional heat-forming will likely be required to get a smooth curve here. Also note that the top of the forward fuselage droops down a few degrees relative to the wing (see bottom photo at left). This is important for achieving a scale look. As long as the top of the forward fuselage assembly mates flat against the bottom of the wing, this droop will be set automatically. Trim the fuselage sides if necessary to achieve this. Page 6


7 7. Next assemble the thrust vectoring motor mount. This step is optional you may choose to install a straight motor stick if you don t want thrust vectoring. Begin by drilling a hole in the main motor mount stick to fit the aluminum tube bearing. Then glue the bearing in place with thin CA. Cut a small chamfer in the lower edge as shown. Wrap the aft end of this stick with a layer of packing tape to ensure a smooth and low friction surface. Sand the inside surface of the two 1/8 plywood side plates to make them as smooth as possible. Then glue both side plates to the movable portion of the motor mount stick using epoxy. After the glue is dry, drill the pivot hole through the top of both side plates at the same time, making sure it is exactly perpendicular to the plates (using a drill press is highly recommended). The assembled thrust vectoring system is shown in the lower left photo. The movable portion pivots around a small bolt, and the system is actuated via a pushrod and clevis on the bottom. Note that you may need to trim the lower edges of the motor mount to clear the pushrod and clevis. Make sure the system pivots smoothly, and sand or trim as required. IMPORTANT NOTE: It is important that the thrust line of the motor runs directly through the pivot pin. This will minimize strain on the thrust vectoring servo and also prevent pitch trim changes with throttle setting. The parts provided were designed specifically for the Littlescreamers Park Jet Special motor with the stock 3/8 stick mount. If you use a different motor and mount, you may need to make new custom side plates out of 1/8 plywood that raise or lower the movable motor mount stick to realign the thrust line with the pivot pin. If so, this won t be difficult. The design of these plates is very simple (just trim or extend the square upper edge), so it will be easy to make new ones if required. Page 7


8 8. Glue the completed motor mount into the slot in the aft fuselage centerline support, aligning it to a zero-zero thrust line (no left/right or up/down thrust angle). Use 5 minute epoxy. After the glue has dried, press a circular notch along the length of the aft edge of the wing assembly using the aluminum stabilator tube bearings. Then glue the stabilator bearings into place using 5 minute epoxy. Use small strips of tape to hold them in place and insert the carbon tube stabilator pivot into the bearings as the glue dries to make sure they are perfectly aligned. 9. Sand the leading edge of the stabilators to a well-rounded shape, and the trailing to a tapered shape. Apply a strip of 3M Satin tape to the leading edge for smoothness and durability. Note the hardware required for the stabilator pivots. The single carbon tube pivots inside two short pieces of aluminum tube. Two end stop bearings butt up against each aluminum tube to keep the pivot from sliding left/right. A control arm is also installed to allow a pushrod connection to the servo. Both the end stops and control arm can be made from spare nylon servo horns, just drilled out in the center to fit the carbon tube. Lay the wing assembly down on a flat surface as shown. Slide the carbon pivot tube, end stops and control horn through the aluminum bearings. Once everything is in place and aligned, glue the end stops into place with thin CA (but don t glue the control horn yet). Then glue both stabilators to the carbon tube using epoxy (mixing with microballons is recommended). Page 8


9 10. Install the stabilator servo into the slot in the fuselage centerline support (thick CA can be used to hold the servo in place). Make and install a music wire pushrod to the stab control horn. Once everything is properly aligned, glue the stab control horn into place using thin CA. For extra strength, I recommend adding small strips of fiberglass chordwise to the roots of the stabilators, both top and bottom (see the plans for size and location). These aren t required for normal park flying, but if you intend to fly really fast or land in tall grass they add extra insurance against structural failure. 11. Next install the thrust vectoring servo and pushrod. A strong (40+ oz/in torque) metal-geared servo is required since a plastic-geared servo could get stripped if the prop hits the ground during landings. The prototype used a Hitec HS-85MG servo, which worked very well. Install the servo in the slot in the fuselage centerline support, securing it with CA. Make the pushrod from 1/16 threaded music wire, with a large Z-bend at the front end to rise up to the servo arm. Install pushrod guides as shown to eliminate flex in the pushrod (I used scrap carbon fiber tubes from the stabilator pivot rod). Make sure the pushrods guides are very securely attached, or a rough landing could break them free. I used small strips of fiberglass cloth with epoxy over the pushrod guides to provide a very strong attachment. Use a steel threaded clevis to connect the pushrod to the motor mount. Verify that the system moves freely and with minimal slop, and adjust as required. Page 9


10 12. Use a sanding block to lightly sand the top of the lower forward fuselage until it is flat and even. Then glue on the upper half of each of the three forward fuselage bulkheads. Test fit the upper forward fuselage sides, trimming and sanding as required to get a perfect fit. Note the upper and lower pieces should meet to form a sharp edge to give it that scale Raptor look. Once satisfied with the fit, glue the upper forward fuselage sides onto the bulkheads and lower fuselage sides only (don t glue the aft part to the top of the wing yet). Use tape to hold the sides in place as the glue dries. Page 10


11 13. Glue bulkheads F4 and F5 to the top of the wing in the locations shown on the plans. Then glue the aft part of the upper forward fuselage sides to the top of the wing and the bulkheads. Note how the fuselage sides curve inward as they run aft you can heat form the foam slightly to attain this curvature. Pins can be used to hold the foam in place as the glue cures. Cut the bevel in the two turtledeck support pieces and then glue them in place on the top inside edges of the fuselage sides. Then glue the two turtledeck top pieces in place, one at a time so they can be formed to the proper curvature. Once the glue is dry, carve and sand the turtledeck roughly to shape. Install the forward fuselage top (bottom photo). Page 11

 to rough out the basic shape, then move to a finer sandpaper (220 grit) to do the final shaping.")
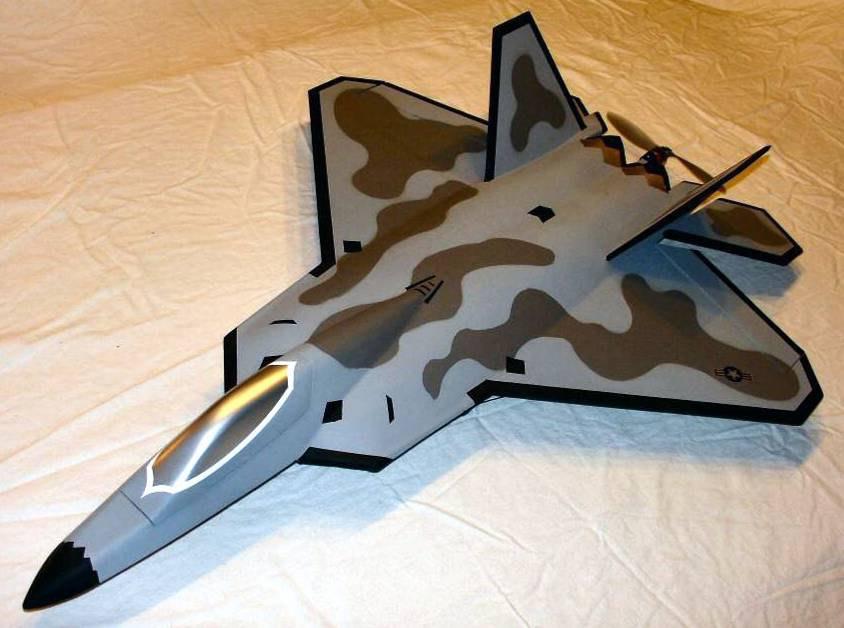
12 14. Laminate all of the nosecone and canopy pieces together using 3M 77 adhesive. Then glue the nosecone block to the front of the fuselage. Once the glue has dried, sand the nosecone to shape. Start by tracing the top outline of the nosecone onto the foam (using the provided template) and cut it to shape with a long knife or saw. Begin with coarse sandpaper (100 grit) to rough out the basic shape, then move to a finer sandpaper (220 grit) to do the final shaping. End with 320 grit sandpaper to do the final polish sanding and provide a very smooth surface. Carve the canopy to shape using a similar procedure. Page 12
Construction Guide for the F/A-22 Raptor Park Jet. By Steve Shumate
 Construction Guide for the F/A-22 Raptor Park Jet By Steve Shumate Building Tips Several types of adhesives can be used to build this model: Epoxy (with or without microballons) Foam-safe cyanoacrylate
SAAB JAS 39 Gripen. Building Instructions Designed by: Steve Shumate. Taken From:
 SAAB JAS 39 Gripen Building Instructions Designed by: Steve Shumate Taken From: http://www.rcgroups.com/forums/showthread.php?t=308830&page=1 Lightly tack glue the paper templates to the foam sheets using
Citabria Pro. Aerobatic Parkflyer. by Joel Dirnberger
 Citabria Pro Aerobatic Parkflyer by Joel Dirnberger Revision C: December 21, 2004 Citabria Pro Building Instructions Length: Wingspan: Wing Area: Flying Weight: Wing Loading: Functions: Specifications:
6mmFlyRC.com Super Bandit Assembly Instructions
 Assembly Instructions Start the assembly with forward fuselage. Lay the two fuselage sides down on a flat surface and glue the foam corner doublers to the locations shown on the plans. Make sure to make
Parts Identification
 We are excited to introduce the Model Aero Aqua Sport. This is an excellent sport flyer, equally at home flying from grass fields, water, or even snow! The unique V-tail gives the Aqua Sport a distinctive
(Build Instructions)
") (Build Instructions) Specifications * Wingspan: 58cm * Length: 50cm * Flying Weight: 59 grams * Channels: 3 (Rudder Elevator Throttle) * Suggested Receiver: 4Ch Micro * Motor: 8mm GearDrive * Prop: GWS
(Build Instructions) Specifications * Wingspan: 58cm * Length: 50cm * Flying Weight: 59 grams * Channels: 3 (Rudder Elevator Throttle) * Suggested Receiver: 4Ch Micro * Motor: 8mm GearDrive * Prop: GWS
FUSELAGE CONSTRUCTION
 FUSELAGE CONSTRUCTION Note: prior to building and gluing on the work surface use protective covering on your building surface. (wax paper or clear wrap) Fit the laser cut Fuselage Front and Fuselage Rear
ParkJet Builder s Manual
 ParkJet Builder s Manual Thank you for purchasing the ParkJet. The ParkJet is a profile ducted fan airplane that can be flown in a larger park. The ParkJet was initially designed by Scott Stoops and modified
C-180 Builder s Manual
 C-180 Builder s Manual. May 20, 2002 Last revised July 11, 2002 Copyright! 2002 Douglas Binder, Mountain Models www.mountainmodels.com sales@mountainmodels.com (719) 630-3186 1 Required Equipment! Xacto
Thank you for your purchase of the Lee Ulinger, FoamtanaS, Yak-55, or Extra 330 3D Depron foam, Aerobatic airplane.
 Thank you for your purchase of the Lee Ulinger, FoamtanaS, Yak-55, or Extra 330 3D Depron foam, Aerobatic airplane. Tools you will need to build Recommended additional items: #11 hobby knife Motor: Hacker
NASTY Build Guide. Supplies needed
 NASTY Build Guide Supplies needed Blucore or Depron Foam. Blucore (Fan Fold Foam) is available at Lowes. Approximately $25 for 50 feet of Blucore. Depron can be ordered on the internet for slightly more.
A High Performance Electric Jet
 Page 1 F-14 Tomcat Park Jet Made In Washington State, USA! Kit# 3DF0F14 A High Performance Electric Jet About This Construction Manual This booklet divides the construction into sub-assemblies; wing, fuselage,
1. Build the bottom first - make sure your table is flat. Build the entire plane using foam safe CA and kicker. The best technique is to spray kicker
 Wxá zç uç `tçué 1. Build the bottom first - make sure your table is flat. Build the entire plane using foam safe CA and kicker. The best technique is to spray kicker on one part and apply a sparing amount
INCLUDED IN THIS KIT: SPECIFICATION: NEEDED BUILDING TOOLS: REQUIRED EQUIPMENT:
 Please review this entire manual before beginning assembly. By doing so it will help you better understand each step as you progress in the actual building of your kit, and you will do a better job in
Revolution 3D-mini ARF
 Revolution 3D-mini ARF 1 Included Hardware 4 Dubro Micro Control Horns #DUB848 2.32 x 18" Linkage Wire (Music Wire) 1 1.5 x 1.25 x 1/8 Balsa Ply (for motor mount) 1 5" piece of Velcro (Optional recommended,
FLITZEBOGEN-2 Assembly instructions
 FLITZEBOGEN-2 Assembly instructions Trim the end of the fuselage to the length of 925mm from the nose. Be careful to avoid splitting the carbon fibers. Sand the base of the stab mount in preparation for
THE APOGEE A 100-INCH AMA DURATION SAILPLANE FROM DYNAFLITE
 THE APOGEE A 100-INCH AMA DURATION SAILPLANE FROM DYNAFLITE Apogee is the intermediate sailplane designed to be competitive in AMA duration contests. Effective spoilers, rudder and full flying stabilizer
Kam Aero 43% Extra 300.
 Stab Sheeting Kam Aero 43% Extra 300. Stabs / Elevator: Make your skins using the same method as you did for the fuselage foam parts. The stabs require 8 sheets (4 per stab) of 4 x 48 A grain sheeting.
Eva. Extremely Versatile Airframe
 Eva Extremely Versatile Airframe Eva Specifications Length: 32 Weight (without battery): ~12oz. Revision History Date Revision Notes/Comments 6/3/05 Document initial creation. Thank you for purchasing
Construction Guide for Quick Build F-22 Raptor Design by Tomas Hellberg
 Construction Guide for Quick Build F-22 Raptor Design by Tomas Hellberg This kit is very simple to put together. The biggest danger in messing up this kit is gluing the pieces to your work bench. But before
PITTS S2S CONSTRUCTION
 PITTS S2S CONSTRUCTION FUSELAGE CONSTRUCTION 1) Place the right fuselage side over the plan and mark the former positions. Place the left side over the right side and mark the former positions. Glue F1
RESolution V2 Manual
 RESolution V2 Manual Note for the German Manual: Yellow Bottle thick CA Pink Bottle Med CA Blue tube 5 minute Epoxy Green tube 90 Minute Epoxy Construction of the Fuselage Step 1: Cover the plan with a
SZD-10 bis CZAPLA ASSEMBLY MANUAL IN PICTURES
 1 RUDDER Plan and parts: 2 Assembly steps: Photo above: glue together rudder spar, ribs and trailing edge. Clamp spar to a flat surface (chipboard on the photo) and make sure the straight aligment of the
4. Bevel the LE face of HS1-HS11 to match the horizontal stab leading edge sweep angle.
 BEFORE YOU BUILD 1. Unroll each sheet of the plans. Roll them inside out so that they will lie flat on the building surface. 2. Assemble the tools that you will need to build each section so that they
Magpie. Foam Trainer. Magpie Specifications
 Magpie Foam Trainer Magpie Specifications Length: 34in. Wingspan (SF): 46in. Wing Area (SF): 414in 2 Wingspan (SP): 40in. Wing Area (SP): 360in 2 Weight (without battery): 12oz. Thank you for purchasing
35 Magnum. Instruction Manual
 EPP EPP 35 35 Magnum Rebel Z Instruction Manual This is how your kit will arrive When cutting the hardware package open use caution. The contents are semi-coiled to fit in the box. They will spring open
Hobby Lobby Zip Supplementary instructions Please refer to the included drawings while using these assembly instructions
 Materials needed: 15 or 30 minute epoxy Medium CA Masking tape Scotch tape Servo Tape Wax paper Tools Needed: Pencil or marker Flat building surface Hobby knife or razor blade 7/64" or 3mm drill bit 3/16"
JAMISON SPECIAL. Building Guide
 JAMISON SPECIAL Building Guide WING Mark then drill holes for wing jig rods. Slide Ribs onto jig rods Mark the rib positions on 1/16 x 1 trailing edge, 1/4 x 1/4 leading edge & 1/4 x 1/4 spars Pin ribs
INCLUDED IN THIS KIT: SPECIFICATION: NEEDED BUILDING TOOLS: REQUIRED EQUIPMENT:
 Please review this entire manual before beginning assembly. By doing so it will help you better understand each step as you progress in the actual building of your kit, and you will do a better job in
BUILDING INSTRUCTIONS FOR FINEWORX. Miles. 2M Class Competition Glider. Congratulations! You have purchased our Miles, 2M Class Competition Glider.
 BUILDING INSTRUCTIONS FOR FINEWORX Miles 2M Class Competition Glider Congratulations! You have purchased our Miles, 2M Class Competition Glider. The Miles is the first offering from FINEWORX, a new company
Taylorcraft Indoor / Cul-De-Sac Flyer
 Taylorcraft Indoor / Cul-De-Sac Flyer Taylocraft Specifications Wingspan: 28.0 in. Wing Area: 117 sq. in. Weight (Ready to Fly): 3.0 3.1 oz. Wing Loading: 3.7 3.8 oz. / sq. ft. LIABILITY RELEASE In that
ULS Cherokee. Ultra Low Speed aircraft for indoor RC flying. Zippkits. Specifications: Required to complete:
 Zippkits ULS Cherokee Ultra Low Speed aircraft for indoor RC flying. Specifications: Span- 28 inches Wing Area- 151 Sq/In Wing Loading- 3.0 ounces/ft Weight- 3.5 ounces RTF Build time- 1-2 Hours Radio-
Specifications Wingspan: 43cm Flying Weight: 33 grams (with battery) Channels: 3 Suggested Receiver: 4Ch Micro Motor: 7mm Brushed Geardrive
 Channels: 3 Suggested Receiver: 4Ch Micro Motor: 7mm Brushed Geardrive") Specifications Wingspan: 43cm Flying Weight: 33 grams (with battery) Channels: 3 Suggested Receiver: 4Ch Micro Motor: 7mm Brushed Geardrive Airframe Kit (Included Contents) * Airframe Parts Sheets (Depron)
Specifications Wingspan: 43cm Flying Weight: 33 grams (with battery) Channels: 3 Suggested Receiver: 4Ch Micro Motor: 7mm Brushed Geardrive Airframe Kit (Included Contents) * Airframe Parts Sheets (Depron)
Construction Guide for Quick Build MIG-29 Design by Tomas Hellberg
 Construction Guide for Quick Build MIG-29 Design by Tomas Hellberg This kit is very simple to put together. The biggest danger in messing up this kit is gluing the pieces to your work bench. But before
34" PELICAN by CRASH TEST HOBBY
 34" PELICAN by CRASH TEST HOBBY The Pelican is a 34" trainer that can level its own wings and put its nose on the horizon once trimmed and balanced. It can handle more wind than most EZ flying planes in
Venturi EVO 2 FPV. Thank you for purchasing the Venturi EVO FPV wing
 Thank you for purchasing the Venturi EVO FPV wing The Venturi FPV is designed for First Person Viewing (FPV) and for UAV/Drone experimentation. There is a power system for this model, see the website for
SPUNKY ASSEMBLY MANUAL
 SPUNKY ASSEMBLY MANUAL Please read the tips section at the back of this manual regarding the use of laser cut parts. The proper removal and preparation of these parts is important. When laser cut, some
The BIPE NX Assembly Manual
 The BIPE NX Assembly Manual Specifications Wing Span: 34 inches Wing Area: 550 in 2 Fuselage Length: 36 inches Weight (ready to fly): 20 to 24 oz. Wing Loading: 5.2 to 6.3 oz/ft 2 Designed by Jim Vigani
SASKATOON, Saskatchewan
 CONSTRUCTION GUIDE AVRO ARROW (CONTEST VERSION) Copyright, Bill Jones, 2004 SASKATOON, Saskatchewan This is a work in progress, so there are a couple of rough areas ( I ll point out those that I m aware
Build the Spitfire: Step-By-step. Pack 7 Stages 61-71
 Pack 7 Stages 61-71 1 Stage Contents Page Number 61 212-215 62 216-218 63 219-221 64 222-224 65 225-228 66 229-231 67 232-235 68 236-238 69 239-241 70 242-245 71 246-249 Editorial and design by Continuo
HIGH-END TECHNOLOGY. Electric ducted fan Starfighter
 HIGH-END TECHNOLOGY RC Electric ducted fan Starfighter First we want to thank and congratulate you with your decision in buying one of our Kits. The Starfighter puts together very easily so there is not
EPP Rebel Z 35. White Red w/ Blue Orange w/ Blue Orange w/burgundy Other. Specs. Color - Bottom White Black Checkers Silver Checkers Other Checkers
 EPP Rebel Z 35 Specs AUW ~10.0oz Width 35.28 Length 34.67 Wing Area 1.44 sqft Horz Area 2.35 sqft Vert Area.91 sqft
Millennium RC presents The New and Improved (now even easier to build and cover!) SSX X-Trainer Build Kit
 SSX X-Trainer Build Kit") Millennium RC presents The New and Improved (now even easier to build and cover!) SSX X-Trainer Build Kit Wing span: Approx. 42 Wing Area: 504 sq. in. Wing Loading: 6.71 oz/ sq. ft. Introduction: The Slow
Millennium RC presents The New and Improved (now even easier to build and cover!) SSX X-Trainer Build Kit Wing span: Approx. 42 Wing Area: 504 sq. in. Wing Loading: 6.71 oz/ sq. ft. Introduction: The Slow
ALBATROSS by CRASHTESTHOBBY.COM
 ALBATROSS by CRASHTESTHOBBY.COM The Albatross is a unique slow flyer designed to put its nose on the horizon and level its own wings without a pilot. It is very quiet and designed to use inexpensive electronics.
Mamba. Combat Wing Glider
 Mamba Combat Wing Glider Congratulations for your purchase of the Mamba radio-controlled combat glider! The Mamba is a very fast and agile glider and yet it can stay up in very light winds when built correctly.
E-AERO EPP PITTS KIT From BP HOBBIES. Parts Included in kit
 E-AERO EPP PITTS KIT From BP HOBBIES Parts Included in kit Thank you for purchasing the BP Hobbies/E-aero EPP Pitts. Please take the time to read through the instruction manual before beginning the build.
Build and fly this exact scale 43-in. control-line version of the popular Cessna private plane.
 Seeing double? Clever photography gives that illusion but actually it s only the model 140 in the foreground. Author Stahl (right) does fly both the job he is holding and his real Cessna 14 pictured in
SGTalon s Enterprise-A Foamie Build Guide. SGTalon s. Enterprise. Enterprise--A. Assembly Instructions
 SGTalon s Enterprise SGTalon s Enterprise--A Enterprise Assembly Instructions Page 1 4-13-2013 SGTalon s Enterprise *******Recommended Hardware******** 2.6oz 250w Motor and Speed Control with 8x6 prop
COMET 24" HELLCAT REPRODUCTION ASSEMBLY GUIDE
 COMET 24" HELLCAT REPRODUCTION A RUBBER POWERED 24" WING SPAN MODEL BY PAUL BRADLEY ASSEMBLY GUIDE AUGUST 2016 CHANGES MADE TO THE ORIGINAL The following changes were made to the original Comet kit structural
Super Sky Surfer 2000 Assembly Instructions
 Super Sky Surfer 2000 Assembly Instructions Note: Plug and Play version of the Sky Surfer comes with fuselage pre-glued and motor/servos installed. If you wish to route antennas or wires through the tail,
I hope you enjoy the Spirit as much as I have. Scott DeTray Model Aero
 We are excited to introduce the Model Aero Spirit. Inspired by the magnificent Northrop Grumman B-2 Spirit Stealth Bomber, the Spirit is a great flyer, on land or water. It tracks like an arrow and is
Sbach 1,2m 3D/aerobatic EPP model Building instructions
 Sbach 1,2m 3D/aerobatic EPP model Building instructions Please refer to the Diagram sheet Diagrams A, B Press 2 carbon strips (1x3x1000 mm) into the grooves in the sides of the fuselage central part (the
Magpie AP. Aerial Photography Airplane
 Magpie AP Aerial Photography Airplane Magpie Specifications Length: 36in. Wingspan: 54in. Wing Area: 486in 2 Weight (without battery): 19 oz. Thank you for purchasing the Magpie AP. This model is an elevator/rudder
Cockpit Kit. Full Depth - Builds Quickly - Light Weight READ THROUGH THIS INSTRUCTION MANUAL FIRST. IT CONTAINS IM- laser cut wood kit
 The Savage Light Sukhoi Su- 27 Cockpit Kit contains everything you need to build a full depth semi scale Su-27 cockpit, yet adds less than an ounce to your finished model s weight (not including pilot).
Piper Cherokee /3 scale. Construction Manual
 Piper Cherokee 140 1/3 scale Construction Manual STAB CONSTRUCTION 1. Remove foam cores from cradle and place on flat surface. Inspect pieces before you epoxy halves together making sure leading and trailing
EXTRA 330SC 60CC. Item No:H G Specifications cc gas DA50,DA60, DLE55, DLE60(twin), 3W55. Description
, 3W55. Description") EXTRA 330SC 60CC Item No:H G060011 Specifications Wing Span Length Wing Area Flying Weight Gasoline Radio Description Carbon Fibre : 92" (2347mm) 84 1/2 " (2060mm) 1526.8 sq in(98.5sq dm) 16 17lbs(7300
EXTRA 330SC 60CC Item No:H G060011 Specifications Wing Span Length Wing Area Flying Weight Gasoline Radio Description Carbon Fibre : 92" (2347mm) 84 1/2 " (2060mm) 1526.8 sq in(98.5sq dm) 16 17lbs(7300
F-16 Falcon 70mm EDF
 F-16 Falcon 70mm EDF Instruction manual Specifications: Winspan: 640 mm Length: 990 mm Weight: 900-1100 gram Ducted fans 70mm x 1 Required tools and components:. 4 ch. Computer Radio system w/ 2 servos.
Fokker Dr1 Master Instructions
 Fokker Dr1 Master Instructions Rev 1 Congratulations on your new project. This Dr1 kit is the finest to date. The construction of the plane is similar and exactly like the original. Take your time and
Chapter 2. Section 3- Ailerons
 Chapter 2 Section 3- Ailerons Material: Hangar 9 servo arms - 8 4-40 x ¼ button head screws - 16 Dubro ¼ scale hinges - 2 pckgs The ailerons are built using 3/32 x 4 x48 balsa sheet. Cut the sheets to
Corvus Racer CC
 Corvus Racer 540 35CC Item No:L-G035008 Specifications Wing Span Length Wing Area Flying Weight Glow Gasoline Electric Radio mm mm 1200sq in (77.4sqdm) 9.9-12lbs(4.5-5.5kg) 91-1.20(2C) 1.10-1.40(4C) 20-40cc
Designed in 2005 by Bernard Burton. Assembly manual Bernard Burton DRAFT 1
 Designed in 2005 by Bernard Burton Assembly manual 2005 - Bernard Burton DRAFT 1 The plans can be requested via this link http://www.gundersonaerodesign.com/m12plansreq.htm The laser kit is available here
Note - the nose ribs and are thinner than the main ribs. These nose ribs will use a thinner rib cap than the ribs. This is per design.
 Stabilizer rev 1.2 The SE5a stabilizer is the heartbeat of the tail and is recreated like the full scale version. All tail pieces depend on the stabilizer. It uses the steel fittings, pulleys, inspection
FireFighter.21 Building Instructions
 A Tom Moorehouse design. Thank-you for purchasing the FireFighter.21. I believe that you will find it to be the best.21 rigger kit available. It has won 1 st place in the 2006 AMPBA nationals! It was designed
Continue gluing the remaining top parts ensuring the angled piece is glued well. Set aside and let dry. See photo below
 Radiator rev 1.1 The SE5a s radiator is one of the most recognized radiators in WW1. It is one of the components that defines the SE5a. The original SE5a has seen multiple radiator designs used during
Combat Foamie. An electric powered model made from sheet foam for full contact combat matches. Designed by. Plan by Paul Bradley. Jerry W.
 Combat Foamie An electric powered model made from sheet foam for full contact combat matches Designed by Jerry W. Hagood Plan by Paul Bradley July 2010 Combat Foamie Top View 22.9 CG is 7.3 back from nose
Dandy Sport Builder s Manual
 Dandy Sport Builder s Manual Thank you for purchasing the Dandy Sport. The Dandy Sport has been designed as an easy to build aileron trainer. Take your time and enjoy building this plane. Specifications:
RSM DISTRIBUTION Presents
 RSM DISTRIBUTION Presents MOSQUITO By Jack Sheeks Photo _ Jack Sheeks Semi Scale Twin Stunter Wing Span: 58" Length: 37-3/4 Area: 579 sq. in. Engine: Two.35 -.40 www.rsmdistribution.com Call (951) 678
Corvus Racer Colour schemes. AeroPlus RC Copyright 2013 All Rights Reserved
 Corvus Racer 540 59 Item No:A E050003 Specifications WING SPAN: 59"(1500mm) LENGTH: 54.1"(1374mm) WING AREA: 654sq.in.(42.2sq.dm.) FLYING WEIGHT: 4.6 5.3lbs(2000 2300g) Electric:Brushless outrunner 8Oz.
HIGH-END TECHNOLOGY. Electric ducted fan rafale
 HIGH-END TECHNOLOGY RC Electric ducted fan rafale First we want to thank and congratulate you with your decision in buying one of our Kits. The Rafale puts together very easily so there is not much explanation
WRIGHT FLYER 1 INSTRUCTIONS FOR THE D10LC KIT
 WRIGHT FLYER 1 INSTRUCTIONS FOR THE D10LC KIT Manufactured in the USA by Easy Built Models PO Box 681744, Prattville, AL 36068-1744 Visit us at www.easybuiltmodels.com Easy Built Models GLUE METHODS Always
Extra 330LT CC. 2 Colour schemes H-G120001A ORACOVER FERRARI RED # ORACOVER WITH # ORACOVER BLACK # ORACOVER SILVER #
 Extra 330LT 85-125CC Item No:A-G120001 Specs: WING SPAN: LENGTH: WING AREA: FLYING WEIGHT: ENGINE: RADIO: Description Covering Material Carbon Fibre: 111 (2833mm) 100" (2530mm) 2139sq in (138sq dm) 25.3-28lbs
SE5a Wing Panels rev 1.0
 SE5a Wing Panels rev 1.0 The top and bottom wings are different. They might look the same but the bottom wing has one less rib and some rib spacing difference. This is due to where the wooden interplane
AT channel 6 servos
 Wing Span: Wing Area: Fuselage Length: Flying weight: Power system: Radio: 60.7in/1540mm 561 sq in/36.3 sq dm 44.1in/1120mm 6.9 Ibs/ 3100g 46(2C0/71(4C) 5 channel 6 servos AT6-46 INSTALLING AILERONS Begin
uin RC FPRC ZERO Specificationss Empty Weight
 Flying Pengu uin RC FPRC ZERO Specificationss Wing Span 42.75 (1085 mm) Fuselage length 30.5 ( 775 mm) Empty Weight 9.5 10 oz. (150 160g) Estimated Flying Weight 20 255 oz. (320 400g) Wing Area: 151 sq.
Messerschmitt Bf 109F-2 Version January 2005
 Assembly Manual for Messerschmitt Bf 109F-2 Version 1.2 29 January 2005 Designed by Terry Majewski Copyright 2005 Thomas A. Jacoby and WarbirdKits.com 1 Materials Kit Contents This kit includes the following
1/6 PA-25 PAWNEE. *Specifications are subject to change without notice.*
 1/6 PA-25 PAWNEE INSTRUCTION MANUAL [ A335 Kit ] Wing Span : 72 in / 1830 mm Wing Area : 736 sq in / 47.5 sq dm Flying Weight : 6.6 lbs / 3000 g Fuselage Length : 48 in / 1220 mm Requires : "Glow Power"
Building Instructions P-51 BF109
 Building Instructions P-51 BF109 Sport model for.015 engines. Legal for SSC Warbird Lanier R/C Inc. P. O. Box 458 Oakwood, Ga. 30566 Copyright 2004 Lanier R/C Inc. Important information: Please inspect
FORWARD FUSELAGE SIDES & REAR TOP SKINS
 FORWARD FUSELAGE SIDES & REAR TOP SKINS WORK REPORT Step No. Check Parts / Tools Qty Preparations. 1 [ ] 6F5-3 Upper Front Longerons 2 2 [ ] 6F5-5 Heel Support 1 3 [ ] 6F5-2 Front Floor Skin 1 3 [ ] Firewall
Plastic Trainer-19. I have tried to only use materials available from the big box building centers like Home Depot, Rona (Canada) and Lowe s.
 and Lowe s.") Plastic Trainer-19 I have tried to only use materials available from the big box building centers like Home Depot, Rona (Canada) and Lowe s. The picture above shows the prototypes with an original Cox
Plastic Trainer-19 I have tried to only use materials available from the big box building centers like Home Depot, Rona (Canada) and Lowe s. The picture above shows the prototypes with an original Cox
DRAFT COPY BUILDING INSTRUCTIONS FOR BLACKBURN BUCCANEER S2 VERSION 1 (BETA BUILD) BY MARK DOUGLAS
 BY MARK DOUGLAS") BUILDING INSTRUCTIONS FOR BLACKBURN BUCCANEER S2 VERSION 1 (BETA BUILD) BY MARK DOUGLAS COPYRIGHT MARK DOUGLAS 2011 THIS IS A "SHORT" KIT FOR EXPERIENCED BUILDERS AND FLYERS ONLY, DESIGNED BY A SHED DWELLING
BUILDING INSTRUCTIONS FOR BLACKBURN BUCCANEER S2 VERSION 1 (BETA BUILD) BY MARK DOUGLAS COPYRIGHT MARK DOUGLAS 2011 THIS IS A "SHORT" KIT FOR EXPERIENCED BUILDERS AND FLYERS ONLY, DESIGNED BY A SHED DWELLING
MercurE Mini Old Timer Electric Model
 MercurE Mini Old Timer Electric Model MercurE Specifications Wingspan: 31.6 in. Length: 20.6 in. Wing Area: 153 sq. in. Weight (Ready to Fly): 4.9 to 5.4 oz. Wing Loading: 4.6 5.1 oz. / sq. ft. Version
Warbird Series Zero - 32 Assembly Manual
 Warbird Series Zero - 32 Assembly Manual Specifications Wing Span: 32 inches Wing Area: 210 in 2 Fuselage Length: 26 inches Weight (ready to fly): 11 to 13 oz. Wing Loading: 7.5 to 8.9 oz/ft 2 Designed
High performance 90mm fiberglass jet
 High performance 90mm fiberglass jet Assembly manual For intermediate and advanced fliers only! Specs Wingspan: 1255mm Fuselage length: 1250mm Flying weight: 2600-3000g Wing area: 22.6 dm² Wing loading:
Switchback Sport Builder s Manual
 Switchback Sport Builder s Manual Thank you for purchasing the Switchback Sport. The Switchback Sport has been designed for the novice to intermediate pilot who wants a plane with good performance that
Zeon PDF Driver Trial
 Opus retro-fit tray assembly kit Features: CNC machined G10/FR4 fiberglass tray assembly. CNC machined G10/FR4 fiberglass replacement control horns. Milled aluminum servo mount system Servo mount is pre-drilled
Print template tiles and put together with clear tape to complete template.
 Print template tiles and put together with clear tape to complete template. Cut each pattern out with scissors or use a razor and strait edge ruler. Use the ruler as a guide for the razor to get nice strait
Zlín Z-37A Čmelák ("Bumblebee ) 850 mm. Assembly Instructions and recommended equipment of the RC model
 850 mm. Assembly Instructions and recommended equipment of the RC model") Zlín Z-37A Čmelák ("Bumblebee ) 850 mm Assembly Instructions and recommended equipment of the RC model 1 Technical information: Wingspan: Overall Length: Flying weight: RC Functions: 850 mm 610 mm ~380
Zlín Z-37A Čmelák ("Bumblebee ) 850 mm Assembly Instructions and recommended equipment of the RC model 1 Technical information: Wingspan: Overall Length: Flying weight: RC Functions: 850 mm 610 mm ~380
Introducing The Cloud Models Westland Whirlwind
 Produced by Cloud Models,Deopham Road,Morley,Wymondham, Norfolk,NR18 9AA E-mail sales@cloudmodels.com web site cloudmodels.com Introducing The Cloud Models Westland Whirlwind By Tricks Thank you for purchasing
Experience Level. Options. What Is Needed To Start. About Adhesives
 Introduction The DV8R is PCM Model s follow up to our popular AV8R sport trainer jet but is a completely new model designed from the ground up to be a superior all around performance jet, hence the name
1/2a Control Line Trainer Engine: Cox Black Window.049
 Designed by Bill Osborne & Peter Justin Drawn by Heman Lee 1/2a Control Line Trainer Engine: Cox Black Window.049 This model airplane is made from foam-board that can be purchased at any art-supply store
INCLUDED IN THIS KIT: SPECIFICATION: NEEDED BUILDING TOOLS: REQUIRED EQUIPMENT:
 Please review this entire manual before beginning assembly. By doing so it will help you better understand each step as you progress in the actual building of your kit, and you will do a better job in
TAUBE 40. Assembly Manual
 TAUBE 40 Assembly Manual Read through the instruction manual first to familiarize yourself with the type of construction used in this model. The manual also contains important warnings and instructions
Ÿ Battery Strap Ÿ Paper Knife Ÿ Elevon Throw Gauge Ÿ Instructional Manual. Building Tools:
 Congratulations on your purchase of the TuffBirds Spec Racer Flying Wing. We Hope these build instructions will help you complete the build easily. Though the build itself doesn't take much time, just
SwitchBack Senior. SwitchBack Senior Specifications
 SwitchBack Senior SwitchBack Senior Specifications Wingspan: 55.4 in. Length: 41 in. Wing Area: 597 sq. in. Weight (Ready to Fly): 34 to 37 oz. Wing Loading: 8.2 to 8.9 oz. / sq. ft. Version 1.05, March
Required Tools: Hobby Knife (# M917) Philips #1 Screwdriver Sanding Block (150grit) Pliers/Wire Cutters
 Philips #1 Screwdriver Sanding Block (150grit) Pliers/Wire Cutters") Thanks for choosing the Combat Wings - XE2 as your next or first model airplane. The XE2 s wings are made from 100% EPP (expanded polypropylene) foam which is extremely durable. For this reason, the XE2
Thanks for choosing the Combat Wings - XE2 as your next or first model airplane. The XE2 s wings are made from 100% EPP (expanded polypropylene) foam which is extremely durable. For this reason, the XE2
Wing. Gently bend the top of the wing over. With the paper removed, it should produce a nice curve.
 Fuselage Remove the paper in the four areas shown. Basically, from the trailing edge of the canard forward in the three nose segments and on the rear bottom of the fuse. Normal B fold for the sides but
Stream NXT - assembly instructions
 Stream NXT - assembly instructions Recommended settings CG (measured from root leading edge): Speed/launch camber (+down, near the wing root): Cruise camber (+down, near the wing root): Thermal camber
A large prop insures high performance. Cleverly designed to give a realistic appearance
 Cleverly designed to give a realistic appearance A large prop insures high performance A Vought Fighter That Flies Complete Data from Which You Can Build an Excellent Performing Flying Scale Model of the
Fokker D8 Master Instructions
 Fokker D8 Master Instructions Rev 1 Congratulations on your new project. The Fokker D8 is a marvellous subject that highlights the success of a monoplane design. The construction of the plane is similar
Contents. pages 20-24: Installing Edge sinks into. custom laminate countertops page 8: Installing Edge sinks into postform laminate countertops
 Contents pages 2-8: Installing Edge sinks into custom laminate countertops page 8: Installing Edge sinks into postform laminate countertops pages 9-14: Installing Acrylic sinks into custom laminate countertops