Instructions for Turning Laminated Bracelets
|
|
|
- Eric Quentin Fox
- 6 years ago
- Views:
Transcription
 measurements and Outside Diameter (OD) dimensions and make a final paper template.")
1 Instructions for Turning Laminated Bracelets 1. Start with Design 1. Make a paper template circle for the bracelet. Use this to check the fit on the person you are making the bracelet for. After checking that the bracelet will fit over the hand and fits the wrist, then take inside Diameter (ID) measurements and Outside Diameter (OD) dimensions and make a final paper template. ID for most women is 2 3/8" to 2 5/8", OD is approximately 1" larger or less. Make two templates on 4" to 5" squares of paper or cardboard (manila folders work well), coat them with clear wrapping tape on both sides to keep glue from sticking to them, and cut one of them out so you just have a ring. 2. This is where you determine the color features of the final bracelet. Glue up selected colorful hard wood strips as shown. (Use standard yellow glue.) Pen blanks are a good source of colored wood. a. Each strip may vary in width (typically 1/8 to 3/8 ). A good length is that of standard pen blanks (approximately 5 ½ ) as that will yield enough for three bracelets. (Material thickness is 3/4 inch.) b. This is a messy gluing step. It can be done in one step if you don t delay. Make sure that glue spreads completely between strips with no blank spots. (This assembly will be cut into ¾ arches, so the joints must be strong all the way along the strips.) c. Use cauls along the entire length of the assembly to clamp it together. In addition, clamp it between two flat boards to get the assembly as flat as possible. Cover the assembly with plastic or apply clear wrapping tape to the cauls and clamping boards to prevent glue from sticking to them. d. After the glue dries, use your paper template and trace both top & bottom arch outlines. Page 1 of 10


2 The Glue up 3. Rough cut both arches as shown on a band saw or scroll saw. Cut approximately 1/16 outside lines to leave wood to turn off. 4. Select two pieces of contrasting wood to complete the sides of the bracelet. Note the pencil marks that locate the positions of the arches. Page 2 of 10


3 Note: both arches are glued to long sides to complete the circle. 5. To make the pencil marks, center your paper template over the arches and sides. Mark the locations of the arches on each side piece so there is a reference point for positioning the pieces when you glue them. Laminate the two side pieces for each side first, and then glue the laminated side pieces and the arches. Make sure to get good glue coverage between the arches and the side pieces. Clamp the assembly GENTLY so as not to break the arches. Page 3 of 10


4 6. Once the assembly is dry, trace the paper template on it and cut the excess wood off of the sides. The bracelet blank should be as shown above, with enough room for your paper template to fit the blank dimensions, both I.D and O.D. Make a jig to hold the round blank during re-sawing The arches in the bracelet are the weak point and need strengthening. Two methods to do so involve re-sawing the blank. There is a lot of down pressure during the re-sawing process. Trying to re-saw the circular blank without a jig will result in, at best, a sloppy cut and, at worst, a broken blank, flying pieces, and a ruined saw blade. Use a 1/2" 4TPI blade and adjust the band saw fence so you are cutting down the center line. Assure that the band saw re-saws without drifting. Page 4 of 10
 Note: There is an alternate method to resaw the bracelet blank that works well.")

5 7. With a jig as shown above insert the bracelet blank and re-saw against band saw fence, producing two halves. The jig should be hardwood and at least half the thickness of the bracelet blank. (After using it once, it will be half the thickness of the blank.) Note: There is an alternate method to resaw the bracelet blank that works well. To do so, leave at least one side of the blank as long as the diameter of the bracelet (as shown in steps 5 and 6 above). Then place that long side on the bandsaw table and resaw the blank like a normal piece of wood. Having the long side of the blank on the table gives a stable base and prevents the blank from being caught by the blade. Turning Bracelets The photo shows the two halves of the bracelet after re-sawing. Note: If you get a rough cut off the band saw, use a full sheet of 120 Grit sandpaper on a flat surface to remove saw marks. Page 5 of 10

6 8. If the bracelet halves are to be aligned as they were before they were cut, use yellow glue to attach a veneer layer between the two re-sawn rings with the veneer grain direction 90 degrees to the seams in the arches for maximum strength, as shown in above photo. Another approach is to glue the two halves together at 90 degrees to each other, but without veneer between them, as the crossed grains strengthens the assembly. 9. After glue has dried use a knife or sharp chisel to trim off the outer veneer. This is required before mounting bracelet blank on lathe. 2. Shaping the bracelet 2.a. Mount the bracelet blank on the lathe using a form of jam chuck. The blank is held by pressure only between two flat surfaces, one is the end of a piece of round stock mounted in a standard check with a diameter a least as large as the bracelet blank, and the other can be any flat piece of scrap wood of the same diameter or larger held in position by the tail stock. Turn the outside of the bracelet to the desired shape, leaving the edges unrounded that is done in the next step. Sand the outside of the bracelet to at least 600 grit. Assure that there are no defects in the surface. A finish can be applied to the outside at this point or later. Note: Make sure the bracelet is lying flat and centered on the center line of the lathe. (Start the lathe at a slow speed to check for out of balance issues.) Page 6 of 10


7 2 b. Next, tape the bracelet to wood cylinder using three wraps of standard masking tape. Then remove the tail stock and shape the edge and inside half of the bracelet. As you turn the inside, verify the I.D. with your template. Then sand the expose surfaces of the bracelet to 600 grit and apply a finish to it. 2.c. Remove and save the masking tape. Reverse the bracelet blank and re-mount it using the tail stock to hold it in place. Center the blank very carefully in the jam chuck and then reuse the tape to re-tape it in place. Remove the tail stock and shape, sand, and finish the second side of the bracelet. 2.d. Re-apply pressure on the bracelet using the tail stock, then remove the masking tape and touch up and finish the outside of the bracelet. 2.e. Remove the completed bracelet. Page 7 of 10

 Page 8")
8 Examples of bracelets (Examples courtesy of John DePiazza, Nor-Cal Woodturners) Example 1 (showing nine examples) Page 8 of 10


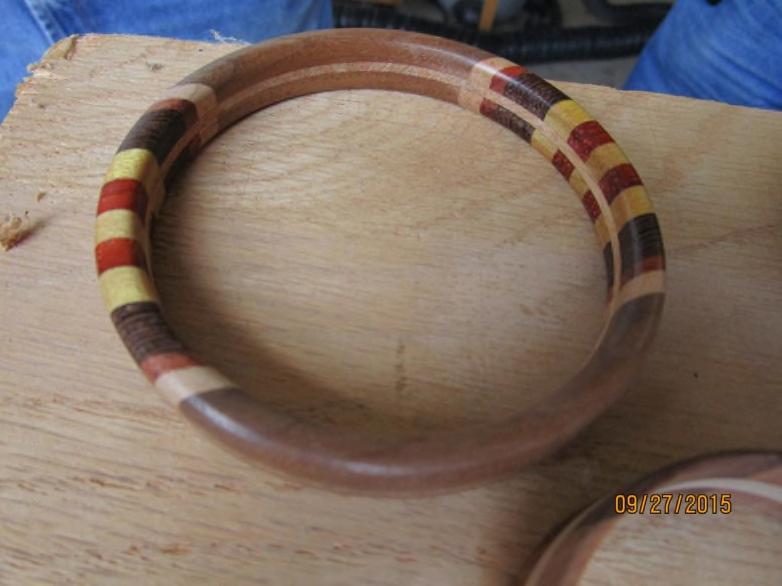
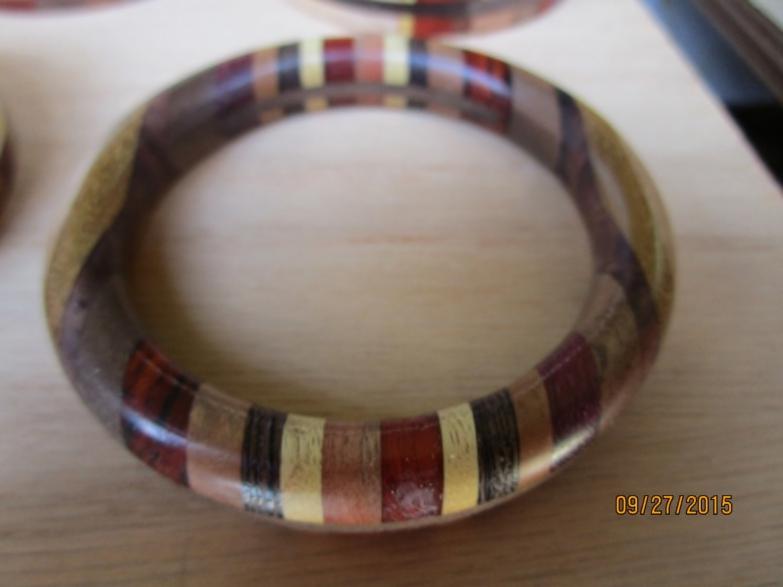
9 Example 2 Example 3 Example 4 Example 5 Example 6 Example 7 Page 9 of 10


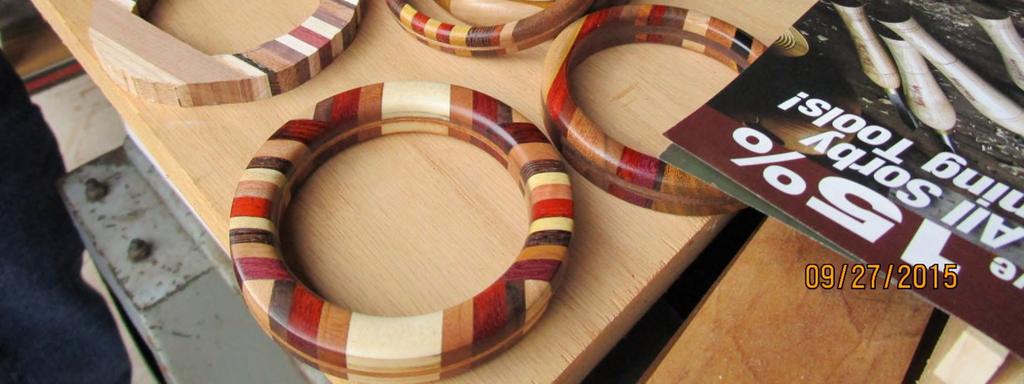
10 Example 8 Example 9...End of document Page 10 of 10
Instructables Butcher Block Top
 Instructables Butcher Block Top Project Overview: This project requires basic woodworking skills and access to woodworking machines. Woodworking machines have sharp cutting edges and are NOT forgiving.
GENERAL NOTES: Page 1 of 9
 Laminating A Zia Into A Turning Blank by W. H. Kloepping, Jan. 2009 This describes how a zia (the New Mexico state symbol) can be laminated into a turning blank. Materials needed: Square Turning Block
Demilune 4. Apron Joinery. Curved Apron Tenon. Bridle Joint Legs. Bridle Joint Front Apron
 Demilune Email 4 Apron Joinery There are two types of joints used in connecting the aprons and legs. The rear legs use conventional mortise and tenon joints, while the front legs use the less conventional
How to Construct the 8-Point Star by Jay S. Helland
 How to Construct the 8-Point Star by Jay S. Helland 1-5-2013 The photos in these instructions were not taken in consequential order but provide the reader the general idea of the processed used. The process
ALAN CARTER STUDIO 5332 RIVERVIEW DR., LISLE, IL
 ALAN CARTER STUDIO 5332 RIVERVIEW DR., LISLE, IL 60532 630-971-0690 apcarter@sbcglobal.net www.alancarterstudio.com SPLITTING THE DIFFERENCE This is for all you slackers out there. Sometimes half measures
Serving Tray. When some good friends got married recently, An exercise in template-making yields a great gift project that s easy to duplicate
 Serving Tray An exercise in template-making yields a great gift project that s easy to duplicate END Create from 3 8 2 8" piece. By Geoff Noden When some good friends got married recently, I decided to
Denise M. DeRose Handled Clamshell Handbag
 Denise M. DeRose Handled Clamshell Handbag Materials: Wood 2 discs between 6 and 9 in diameter -- 4/4, 6/4 or 8/4 1 piece of thin hardwood ¼ inch thick and 4 x 10 Wood for waste blocks Supplies Small piece
Fig2: The Sliding Glue Block from the back.
 Ornament Stand Introduction It was one of those forehead smacking moments. I was taking the #2 jaws off my Stronghold chuck, to put on my homemade wooden two jaw chuck set-up. For some reason instead of
Christmas Bell Ornament
 Christmas Bell Ornament This is an easy Christmas ornament idea I cabbaged from a friend and skilled turner, Curt Fuller, from Utah. I kind of adapted it to my style but I still got the idea from him.
Legacy Classic Twist Pencil Kit
 Legacy Pencil Kit Description: The pencil is great kit and has features to make it a step-up pen. It is slightly more difficult to make, but still very easy if you follow these instructions carefully.
SEGMENTED TURNING. Segmenting 101
 SEGMENTED TURNING Segmenting 101 The greatest difference between segmented turning and traditional turning is the turner must decide what final form the turning will take even before the first cut is made.
Curved Metal Segmenting
 Curved Metal Segmenting A Tutorial by: David Washburn A.K.A djwood1 This tutorial was downloaded from The International Association of Penturners Introduction As I continue to learn about pen turning,
Perhaps the best thing about. Three bowls slightly rearranged Twisted Possibilities
 Three bowls slightly rearranged Twisted Possibilities By Malcolm Tibbetts Lacewood Ribbon, 13 7½" Perhaps the best thing about segmented turning is the total lack of restrictions; there is no end to the
Wooden bus kids toy plan
 Project: Wooden Bus Page 1 of 9 Wooden bus kids toy plan Toys on wheels are among the first types of toys that children start actively to play with. In their early age children love to push toys on wheels
FLAT TO FABULOUS Make a Bowl from a Single Flat Board - Or How to Eat Salad off of Scrap Wood
 FLAT TO FABULOUS Make a Bowl from a Single Flat Board - Or How to Eat Salad off of Scrap Wood Let s face it: Woodworkers are frugal people. In fact, if you are anything like me, you have a hard time throwing
About.com :
 http://woodworking.about.com/gi/dynamic/offsite.htm?sit...//www.popularwoodworking.com/features/fea.asp%3fid=1088 (1 of 8)1/28/2004 12:05:01 AM Modern Storage Tower The last thing I want to do when starting
A Shaker Sewing Stand
 America s leading woodworking authority Step by Step construction instruction. A Shaker Sewing Stand A complete bill of materials. Exploded view and elevation drawings. How-to photos with instructive captions.
Stand & Bowls. optional. Online Extra
 Online Extra optional Stand & Bowls Once you make a bowl using the jig and technique from Woodsmith No. 229, it s only natural to see what else you can do with it. The starting point is to make copies
3Insert the second rod no. 4
 Yamato: Step-by-step 37 The stern block and searchlight control towers a b c d e f Recommended tools and materials Wood glue Sandpaper (no. 800 grain) Metal file Putty Craft knife For metal: Super Glue
PROJECT PLAN TRAVEL CRIBBAGE BOARD
 BUILD IT WITH ROCKLER PROJECT PLAN TRAVEL CRIBBAGE BOARD BUILD Stock # Item Stock # Item 59160 Small Cribbage Board Template, 2-Player, Straight Track 90638 3/4" Dia. Straight Router Bit (1/2" shank) 21026
Curved Pieces are a Common Woodworking Challenge
 Curved Pieces are a Common Woodworking Challenge I recently created a set of four dining chairs that required three curved back rest pieces each. On the top piece of each chair I wanted to inlay a marquetry
Grade 11 Woods Lift Lid Coffee Table. Based on Under the big Top from Popular Mechanics Website
 Grade 11 Woods Lift Lid Coffee Table Based on Under the big Top from Popular Mechanics Website TABLE TOP 1. Select enough lumber to construct a top that is between 22 ½ and 24 wide after jointing. Ensure
How to Make a Hat Bending Jig
 How to Make a Hat Bending Jig MATERIALS One 2" x 8" x 11" long (Base Block) exact measurements are 7 ½" x 1 ½" x 11" (Pine is OK to use, I have used scrap Walnut for my benders) Four pieces of Oak 1" x
6 Segment Knot Pen. A Tutorial by: Larry Wirt A.K.A ribanett. This tutorial was downloaded from. The International Association of Penturners
 Segment Knot Pen A Tutorial by: Larry Wirt A.K.A ribanett This tutorial was downloaded from. The International Association of Penturners How I Make A Six-Segment Knot By: Larry Wirt (aka ribanett) This
e) Attach the faceplate/backing plate assembly to the spindle. PROCESS
 Attach the faceplate/backing plate assembly to the spindle. PROCESS") BOARD TURNING This is an exercise in turning which can open up new vistas and potentials for any turner. A form of segmented turning best described as "STACK LAMINATE TURNING", this is unique in that it
BOARD TURNING This is an exercise in turning which can open up new vistas and potentials for any turner. A form of segmented turning best described as "STACK LAMINATE TURNING", this is unique in that it
Odd Wobbler Instructions By: Don Geiger
 Odd Wobbler Instructions By: Don Geiger Stock Size Calculations and Reference Table When preparing stock material for turning an Odd Wobbler, you will need two pieces of dry wood that is about one inch
Contents. pages 20-24: Installing Edge sinks into. custom laminate countertops page 8: Installing Edge sinks into postform laminate countertops
 Contents pages 2-8: Installing Edge sinks into custom laminate countertops page 8: Installing Edge sinks into postform laminate countertops pages 9-14: Installing Acrylic sinks into custom laminate countertops
OFFSET TURNINGS. By using an eccentric chuck, SHOPMADE CHUCK BUILD A FOR. David Mueller FEATURE. Build the chuck body
 FEATURE BUILD A SHOPMADE CHUCK FOR OFFSET TURNINGS David Mueller By using an eccentric chuck, you can add interest to turnings such as pendants and box lids. The workpiece is mounted out of alignment with
A Unique Cutting Board
 A Unique Cutting Board When I was asked to make a cutting board as a special gift, I wanted to do something new and eye-catching. Tired of squares and straight lines, I envisioned curving accents not shallow
Wooden Faceplates. Tapping on the Lathe
 Wooden Faceplates There are lots of turning jobs where spending some time on set-up makes the turning go quicker and easier. Making Wooden Faceplates is one way to make set-ups and jigs for turning. As
PITTS S2S CONSTRUCTION
 PITTS S2S CONSTRUCTION FUSELAGE CONSTRUCTION 1) Place the right fuselage side over the plan and mark the former positions. Place the left side over the right side and mark the former positions. Glue F1
A candle stick addresses transferring and reproducing dimensions from a plan and breaking the project into steps.
 Activities Discussion These projects allow more skill development including making items to match a drawing, sizing projects to specific dimensions, and just trying fun stuff for the first time! A candle
TURNED BIRD HOUSES Shelter from half-inch-thick stock
 TURNED BIRD HOUSES Shelter from half-inch-thick stock SUSAN SCHAUER LOCALS CALL ME THE BIRDHOUSE Lady. I take it as a compliment. My turning career began making lathe-turned birdhouses, and I continue
Homemade Sanding Tools David Hoehns
 Homemade Sanding Tools David Hoehns allskewedup@gmail.com 806 789 5108 My demonstration will focus on two types of homemade sanding devices, a foam ball sander that may be used for power sanding concave
BUILDING A STORM DOOR
 BUILDING A STORM DOOR BY NEAL BARRETT Illustrations by George Retseck If you're in the market for a storm door, you probably know that there are many styles and models available. However, most of them
Silverware Chest Plan
 Silverware Chest Plan 05L14.01 Introduction 1. Measure the space required for your cutlery before beginning this project to be sure that it will fit in the drawers and top compartment. The best way to
Project 17884EZ: Shaker End Table
 Project 17884EZ: Shaker End Table With its clean, simple lines, this piece is unmistakably Shaker style. Ours is made from cherry, a wood commonly used by Shaker craftsman, but we ve also seen this piece
Sky Eagle. User Guide. Cautionary and Warning Statements
 Sky Eagle User Guide 60089 V0613 Cautionary and Warning Statements This kit is designed and intended for educational purposes only. Use only under the direct supervision of an adult who has read and understood
 America s leading woodworking authority To download these plans, you will need Adobe Reader installed on your computer. If you want to get a free copy, visit: http://adobe.com/ reader. Having trouble downloading
Building Tips This model can be built using the following types of adhesives:
 Page 1 Building Tips This model can be built using the following types of adhesives: Epoxy (with or without microballons) Odorless cyanoacrylate (CA) with accelerator UHU Creativ for Styrofoam (or UHU
The following is the process of preparing the making the wedge ornament
 Wedge Christmas Ornament The following is the process of preparing the making the wedge ornament Setting up your saw to cut true 11.25 degree angles for a 16 piece to make a circle that will form the globe
Bangle Bracelet Instructions
 Bangle Bracelet Instructions (Using Penn State Bangle Bracelets) Tools & Equipment: Lathe, turning tools of choice, Band saw or scroll saw, Drill Press or 4 jaw lathe chuck with standard #2 jaws, mini
Notes for Making Wood Rings With Stainless Steel Insert Centers
 Notes for Making Wood Rings With Stainless Steel Insert Centers Background These notes describe how to make a ring with a stainless steel (SS) insert and a wood exterior band. They also include information
Make your own zero clearance throat plate.
 Make your own zero clearance throat plate. A picture tutorial By Wayne Breshears One of the more important table saw accessories you can have is a zero clearance insert or throat plate. The close tolerance
ALAN CARTER STUDIO 7 Cane Creek Circle, Fairview, NC
 ALAN CARTER STUDIO 7 Cane Creek Circle, Fairview, NC 28730 630-390-8821 apcarter@sbcglobal.net www.alancarterstudio.com TURNING SMALL GOBLETS As a follow up to my thin stem article, here s a how-to on
How to Make a 400 BC Greek Oenochoe Style Wine Pourer
 How to Make a 400 BC Greek Oenochoe Style Wine Pourer The purpose of the demonstration is to show how to make a hollow form wine pourer in the style of ancient Greek pottery. Live demonstration on the
O nament. Birdhouse. Birdhouse Christmas ornaments have become very
 Birdhouse O nament Photo by Al Parrish Dale Nish, one of the principal architects of the turning revival, shares some turning techniques. Birdhouse Christmas ornaments have become very popular the last
ARTS AND CRAFTS CHAIR
 ARTS AND CRAFTS CHAIR 491 MATERIALS LIST--DINING CHAIR Key No. Size and description (use) A 2 1-3/4 x 1-3/4 x 16-1/4'' oak (front leg) B 2 1-3/4 x 3-3/4 x 40-1/2'' oak (rear leg) C 1 1-3/4 x 3-3/16 x 15''
Ahead of the curve 2 Part
 F&C PROJECT Ahead of the curve 2 Part In the second part of this series, Chris Tribe constructs the table for his stylised cabinet which we looked at last month in F&C Accuracy in turning the legs for
A Pictorial of David Dawes AA400 HFT Thumbhole Stock in the Making
 A Pictorial of David Dawes AA400 HFT Thumbhole Stock in the Making From This This To Part 1 By James Mitchell (a.k.a. mitchejc) Note: Building rifle stocks is super fun and the idea with this pictorial
Ways to get the most out of your
 5 Ways to get the most out of your router table When you mount a router on a table, you expand your shop s potential. To help you take advantage of this potential, we assembled five router table techniques
Build the Spitfire: Step-By-step. Pack 7 Stages 61-71
 Pack 7 Stages 61-71 1 Stage Contents Page Number 61 212-215 62 216-218 63 219-221 64 222-224 65 225-228 66 229-231 67 232-235 68 236-238 69 239-241 70 242-245 71 246-249 Editorial and design by Continuo
TURNING A PEN ORIGINAL BY MIKE RUDE REVISED BY GORDON PATNUDE - AUGUST 2015, OCTOBER 2016 EQUIPMENT AND SUPPLIES NEEDED
 TURNING A PEN ORIGINAL BY MIKE RUDE SEPT 2006 REVISED BY GORDON PATNUDE - AUGUST 2015, OCTOBER 2016 PHOTOGRAPHY BY JIM GOTT AUGUST 2015 EQUIPMENT AND SUPPLIES NEEDED A PEN TURNING TUTORIAL [this document]
A Pictorial of David Dawes AA400 HFT Thumbhole Stock in the Making
 DRAFT Version A Pictorial of David Dawes AA400 HFT Thumbhole Stock in the Making Part 1 and finally Part 2 as well Updated: February 2008 By James Mitchell (a.k.a. mitchejc) Note: Building rifle stocks
The finished ornaments.
 Introduction I like to make different Christmas Ornaments every year to give to my relatives. This article describes the rnaments that I m making this year. The ornaments use a split turning of either
Domed Cove Box. Materials: Dry stable hardwood, straight grained with pronounced end grain, about 3+ square and 3+ long Sandpaper Finish of choice
 Domed Cove Box Michael G. Stafford I don t know who first turned a box where the sides were curved in to form a waist or as we like to say in woodturning, coved. I started gradually turning boxes with
Slanted Brick Pattern Pen Blanks
 Slanted Brick Pattern Pen Blanks Contributed by: Joseph Schneider & Kevin Kronewitter A.K.A wood128 & kronewi This tutorial was downloaded from http://www.penturners.org The International Association of
1Smooth pieces 4, 5 and 6, using
 Yamato: Step-by-step 109 Machine-guns, anti-aircraft guns and decking h e f a b c g d e f a Anti-aircraft gun base x 2 b Anti-aircraft gun (bottom) x 2 c Anti-aircraft gun (top) x 2 d Machine-gun base
Max Launch Abort System Prod. No *Kevlar is a registered trademark of Dupont
 Flying Model Parts List Max Launch Abort System Prod. No. 3014 A 11820 - Body Tube 3.5 Diam x 5.5" Long B 11824 - Orange Capsule Base Shoulder Ring C 16032 - Laser-cut Ring motor mount rear D 16033 - Laser-cut
Two-Piece Hollow Form Turning Hollowing Without the Hassle
 Two-Piece Hollow Form Turning Hollowing Without the Hassle Finger Lakes Woodturners January 17, 2013 1 Hollow Turning Usually turning a closed or semi-closed form through a small opening Can be done using
Display Case (for J&S)
") Display Case (for J&S) This is constructed of maple plywood with solid maple (soft maple) edge banding. It was made to fit between a door and a kitchen cabinet, and has an elegant circular taper between
Display Case (for J&S) This is constructed of maple plywood with solid maple (soft maple) edge banding. It was made to fit between a door and a kitchen cabinet, and has an elegant circular taper between
136 PLYWOOD DESK 522
 136 PLYWOOD DESK 522 Simple in design and inexpensive, this plywood desk is made from a single 4- x 8-foot panel. Plywood is available with many hardwood veneers; it can also be covered with plastic laminate,
Making Advanced Design Laminations by Bill Kloepping Aug. 2008
 Making Advanced Design Laminations by Bill Kloepping Aug. 2008 The following provides tips and techniques for planning laminations and negative space cuts in a blank to achieve predictable effects in the
Legacy Magnet Pen Kit
 Description: The Magnet pen model is a variation of the Slimline pen and considered one of the most basic pen kits and is a great starter kit for those new to pen turning. Sometimes called the Refrigerator
Crafting a Dizzy Bowl
 Crafting a Dizzy Bowl Visit Youtube.com Visit Youtube.com In the search section type dizzy bowl and you will find dozens of videos about turning dizzy bowls. Visit Youtube.com In the search section type
Introduction. Recess. Making the Recess
 Introduction A few weeks after last Christmas I got an idea for an ornament. That may seem to be backwards timing as before Christmas would have advantages. But Christmas is when I think about ornaments
Installation Guide. Pionite Decorative Surfaces One Pionite Road, Auburn, Maine PIONITE ( )
") Installation Guide A Subsidiary of Panolam Surface Systems SMPBRO00-012 6/14 Pionite decorative laminates are designed for finished interior surfaces which require high impact, wear and stain resistance
Installation Guide A Subsidiary of Panolam Surface Systems SMPBRO00-012 6/14 Pionite decorative laminates are designed for finished interior surfaces which require high impact, wear and stain resistance
THE SWALLOW. An interesting, simple, all-balsa speedster of crashproof design. by MALCOLM J. ABZUG
 THE SWALLOW An interesting, simple, all-balsa speedster of crashproof design. by MALCOLM J. ABZUG DESIGNED primarily for the purpose of testing a new type of monocoque fuselage design, the Swallow proved
From "American Woodturner" the Journal of the American Association of Woodturners, April 2015, vol 30, no 2 - CUSTOM - TOOL HANDLES
 From "American Woodturner" the Journal of the American Association of Woodturners, April 2015, vol 30, no 2 - CUSTOM - TOOL HANDLES Carl Ford I have found most commercially available tool handles uncomfortable
ribbon handle box 2010 August Home Publishing Co.
 ribbon handle box 00 ugust Home Publishing Co. eature Project Ribbon Handle ox This imaginative design not only makes a wonderful gift, it s also a great way to build your woodworking skills. Ithink of
Legacy Hex Pencil Kit
 Description: The Hex pencil is a step-up kit, with similar features to a Slimline Pro Pencil. It has a click mechanism instead of a twist. It uses an 3/8 tube and 2MM pencil lead. It has a heavier feel
Building the Cathedral
 Building the Cathedral Please note that the cathedral is a fairly difficult and time consuming project. I strongly suggest building one or two easier models before tackling this one! Four molds are needed
How to Assemble the Vacuum Formed Plastic 7/8 Scale Lewis Gun
 How to Assemble the Vacuum Formed Plastic 7/8 Scale Lewis Gun 1. Read ALL the instructions before starting assembly. 2. Begin assembly by thoroughly washing the inside and outside surfaces of the vacuum
The Simple Birdhouse Ornament
 The Simple Birdhouse Ornament There are a number of techniques for constructing birdhouse Christmas ornaments and the resulting ornaments vary from simple to very ornate and complicated. It has been my
Chili Pepper Routed Bowl
 Chili Pepper Routed Bowl MLCS Items Needed: Chili Pepper Bowl and Tray Template #9189 Top Mounted Bearing Dish Cutter Router Bit #7817 1/2 Router Collet Extension and Wrenches #9465 3/16 Radius Round Over
Tools: Scissors, hand held single-hole punch, metal ruler or other good straight-edge, sharp knife or Exacto-knife.
 Instructions for Building a Kepler Paper Model Version 30 Mar 3, 2010 You need the following files: File Sheet # Printer Paper Color Kepler_model_instructionspdf plain b/w Photometerpdf 1 Photo stock color
Arched. Building an. Passageway. Although my company specializes in high-end jobs
 Building an Arched Passageway All photos by Brian Striegler This straightforward approach combines basic shop methods with simple site joinery to create an elegant frame-and-panel archway by Gary Striegler
Kentucky 4H Wood Science Plans Notebook. Plans Level 1
 Kentucky 4H Wood Science Plans Notebook Plans Level 1 MATERIALS NEEDED: 1 piece wood 3/4" x 2 x 2 1 piece wood 3/4" x 3 x 3 1/2" 1 wooden spring-type clothespin 2-1 1/2" nails 1-1/2 woodscrew Wood Glue
INSTALLATION GUIDE VERSION 11/14
 INSTALLATION GUIDE VERSION 11/14 In this guide we will demonstrate effective techniques and methods for installing EDGE stainless steel sinks seamlessly in both laminate and solid surface. These techniques
The Lansdowne One Car Garage Assembly Instruction by Laser Dollhouse Designs
 The Lansdowne One Car Garage Assembly Instruction by Laser Dollhouse Designs NOTE 1: Please do a dry assembly using only tape to hold house together. This will get you familiar with parts, location, and
Legacy Slimline Pencil Kit
 Description: The model is considered one of the most basic pen kits and is a great starter kit for those new to pen turning. Many experienced pen turners use the kit to make elaborate and unusual pens
Sweetheart Clock. About this project. Project Sponsor: INCRA Precision Tools. Woodturner PRO, LLC. Lloyd Johnson, artist
 Woodturner PRO, LLC Sweetheart Clock Lloyd Johnson, artist Special points of interest: - Cutting thin strips safely AND with consistent results - Design considerations to improve results - Registration
This is a solid wood cabinet. The only plywood used is for the back and drawer bottoms.
 Sideboard Sideboard Overview: This project requires basic woodworking skills and access to woodworking machines. Woodworking machines have sharp cutting edges and are NOT forgiving. You should be properly
BONDO PROCESS. Installation Guide.
 BONDO PROCESS Installation Guide www.karran.com BONDO PROCESS This Installation Guide demonstrates simple methods and proven techniques for seamlessly installing Karran undermount sinks in laminate countertops.
Legacy Slimline Touch Pen Kit
 Description: The model is considered one of the most basic pen kits and is a great starter kit for those new to pen turning. Many experienced pen turners use the kit to make elaborate and unusual pens
MLCS Instructions for Bowl and Tray Template Kit #9176/#9179
 MLCS Instructions for Bowl and Tray Template Kit #9176/#9179 Tools Needed: Router 1-1/2 h.p. Minimum recommended with a 1/2 collet Forstner bit 3/4-2 recommended depending on template used Drill Press
Fretboard Wednesday, January 16, :36 PM
 ASL Breakdown Page 1 Fretboard Wednesday, January 16, 2013 9:36 PM - - To prepare the fretboard for cutting fret slots: True one edge of the fretboard blank on the jointer. True one of the other edges
1. Mount between centers round cut tenons on both ends (same diameter).
.") LONG NECK HOLLOWFORM Jim Terry Piedmont Triad Woodturners Association Turning this hollow form presents some interesting challenges in mounting and holding a turning. Both top and bottom are completely
LONG NECK HOLLOWFORM Jim Terry Piedmont Triad Woodturners Association Turning this hollow form presents some interesting challenges in mounting and holding a turning. Both top and bottom are completely
THE APOGEE A 100-INCH AMA DURATION SAILPLANE FROM DYNAFLITE
 THE APOGEE A 100-INCH AMA DURATION SAILPLANE FROM DYNAFLITE Apogee is the intermediate sailplane designed to be competitive in AMA duration contests. Effective spoilers, rudder and full flying stabilizer
Two Jaw Chuck. Introduction
 Two Jaw Chuck Introduction Multi-center or Eccentric Woodturning can open up a whole new world of woodturning design for you to explore. There are several special purpose (and rather expensive)
Three Legged Stool. Randy Cordle / 2016
 Three Legged Stool Randy Cordle / 2016 This stool could easily qualify as fine furniture, being equally at home in the living room or featured at the local arts and crafts fair. A few unique construction
COMPLIMENTARY WOODWORKING PLAN
 COMPLIMENTARY WOODWORKING PLAN COFFEE TABLE PLAN This downloadable plan is copyrighted. Please do not share or redistribute this plan in any way. It has been paid for on your behalf by JET Tools, a division
Windsor Chair Online. Assembly Instructions
 Windsor Chair Online Assembly Instructions Date: 1/4/2007 Other Chairs Offered Philadelphia Arm Chair New England Comb Back Sackback d Arm Chair Bow Back Side Chair Fan Back Side Chair Page 1 Table of
29mm Priority Cinco. Glue all along seam. Tape
 29mm Priority Cinco The 29mm Priority Cinco is a companion to the 29mm Priority Stealth which is made from a used, U.S. Postal Service Priority Mail cardboard box. A clean pizza box would work just as
3Position the hull of the ship as
 Yamato: Step-by-step 25 The hull and stern deck c b d a b d c e e f a Rear frame b Stern deck x 2 c Stern deck x 2 d Side wall x 2 Wood glue Sandpaper (no. 400 grain) Craft knife Pliers d Side wall x 2
Wall Panel Installation
 Wall Panel Installation Special care must be taken in handling of panels with grout lines, especially in cold weather. The indented grout lines are by necessity a little thinner than other areas of the
Greene & Greene. Mailbox. by Seth Keller. Signature details create an elegant box. 2 AmericanWoodworker.com
 Greene & Greene Mailbox by Seth Keller Signature details create an elegant box. 2 AmericanWoodworker.com We needed a new mailbox, but I couldn t find an off-the-shelf version that I liked. So I decided
Turning a Fast Joint dovetailed vase on a lathe
 Turning a Fast Joint dovetailed vase on a lathe Contributed by customer Brian H from Knoxville TN The MLCS Fast Joint precision joinery system offers a broad range of dovetail patterns that can be created
COPYRIGHT 2011 by The Taunton Press, Inc. Copying and distribution of this article is not permitted.
 30 FINE woodworking Shaker Side Table 1 2 in. Build a delicate version of this iconic round stand Subtop, 3 4 in. thick by 7 in. dia. Top, 1 2 in. thick by 16 1 8 in. dia. top edge Profile 3 4 in. BY CHRISTIAN
COMPLIMENTARY WOODWORKING PLAN
 COMPLIMENTARY WOODWORKING PLAN Bookcase This downloadable plan is copyrighted. Please do not share or redistribute this plan in any way. It has been created for Wilton Tools, a division of WMH Tool Group.