A Pictorial of David Dawes AA400 HFT Thumbhole Stock in the Making
|
|
|
- Andra Casey
- 6 years ago
- Views:
Transcription
1 DRAFT Version A Pictorial of David Dawes AA400 HFT Thumbhole Stock in the Making Part 1 and finally Part 2 as well Updated: February 2008 By James Mitchell (a.k.a. mitchejc) Note: Building rifle stocks is super fun and the idea with this pictorial is to spur a bit of interest in this great hobby. I m not a writer nor a photographer but you might find some of this photos interesting if you are planning to make a new stock for your air rifle. This is not a how-to article as such but I will try and augment some of the pictures with a few words to make it a bit more informative. There are many ways to skin a cat and these pictures show one way of doing it. If you have smarter or better ways of accomplishing some of the stock building tasks please take a few minutes and drop me an so I can share this info on my web site. Any submissions regarding how-to s or tips&tricks will be greatly appreciated! Web Site: mitchejc@vodamail.co.za
 Draw the design on a nice solid piece of wood. Fine tipped permanent marker pens works great for this. The photo shows the design partially cut out with a band saw.")
 This stock will have an adjustable cheek piece. Tip: Cut this out first as it will make some of the following steps a bit easier.")
2 Lets start. I have skipped the design and wood selection process in this pictorial and will post little articles on these topics sometime in the future on my web site. 1) Draw the design on a nice solid piece of wood. Fine tipped permanent marker pens works great for this. The photo shows the design partially cut out with a band saw. Tip: Leave a bit of extra wood at the bottom of the fore-end if your blank is large enough, to give you some extra space to work when clamped in a vice. This one has much more than is required to show the idea. 2) This stock will have an adjustable cheek piece. Tip: Cut this out first as it will make some of the following steps a bit easier. Be very careful with the cutting at a mistake here will ruin your work piece.

 Next step is to make the components for the fore-end tip.")
3 3) Plane the top of the stock flat. This step would not have been possible with the cheek piece in place. 4) Make sure the top is flat and square. 5) Next step is to make the components for the fore-end tip. This picture shows a very thin piece of wood being planed to about 3 or 4 mm in thickness.

 Test fit the tip and")
4 6) Cut the wood for the tip and sand/grind the surface that will be glued 100% flat to ensure a good fit to the stock 7) Test fit the tip and the stock


5 8) Glue the tip to the blank using water proof wood glue or epoxy. Make sure there is no oil or wax from the planner left on the wood. Tip: Always a good idea to wipe the surface with thinners and let dry before gluing.

 You probably have time to kill while the glue on the tip is drying, so")
6 9) Tip glued in place. Inspect carefully. If its not perfect, cut it off and repeat the steps to grind, fit and glue the tip. 10) You probably have time to kill while the glue on the tip is drying, so use it to shape the top and bottom of the cheek piece. 11) Sand the area where the cheek piece will mount.
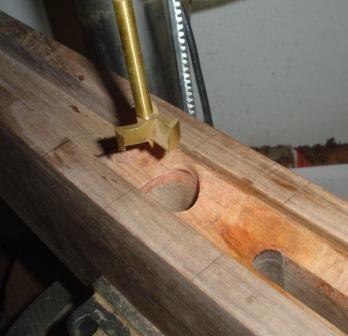
 Drill out the trigger hole.")

7 12) Check cheek piece for fit and repeat steps 10 and 11 until it looks neat. 13) Drill out the trigger hole. Good quality forstner bits helps a lot when drilling these large holes and will save a lot of sanding in this awkward spot later.


8 14) Drill the thumb hole and top of pistol grip.


9 15) Sand the trigger hole to the correct shape. 16) Mark the inletting on the top side of your blank.


10 17) Route the cylinder channel. I use a half inch router bit for this. Don t cut it out to the front and leave a little bit of wood there. 18) Shape the inside of the fore-end to a half round. Use a piece of pipe that is the same diameter as your rifle s cylinder to check the shape.

11 19) Ignore the piece of plastic and pipe and notice the little piece of wood, in the center of the picture, that was left in when band sawing the stock profile. This disposable flat surface is handy for router alignment as can be seen on this photo and will be cut out later after all inletting is complete. 20) A wooden insert is made by clamping to pieces of wood together and then drilling a 32mm hole with a BIG auger bit right through the middle where the two pieces meet. If the drilling was straight you should end up with two blocks, each having a half-round inlet along the length. Trim the sides of one of the piece to fit into the slot you ve routed in the stock. Glue the wooden insert to which the rifles action will bolt into place. Some pictures later on will show the insert in a bit more detail. I use piece of pipe wrapped in plastic to clamp it down with. The plastic is just to ensure you don accidentally glue the

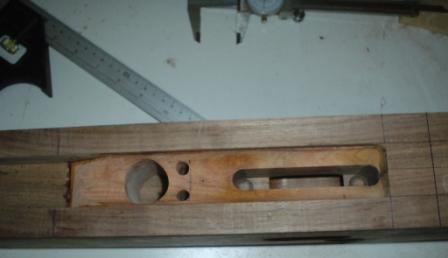
 Drill the hole for the pressure gauge and complete the")
12 pipe to the stock. 21) Route the trigger slot. Notice the wooden insert made from Rose Wood as mentioned in previous step. 22) Drill the hole for the pressure gauge and complete the rest if the inletting. Make sure its in the right place!
13
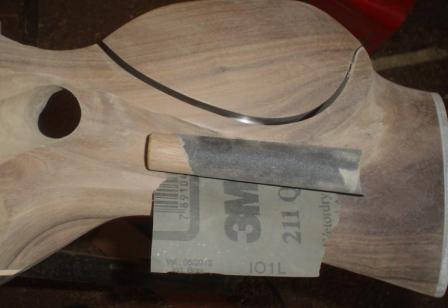
 Tip: Oops!")
 from damage by")
14 23) Test fit the rifle and make adjustments to the inletting. Probably the topic for whole mini article on its own 24) Tip: Oops! Forgot to mention this earlier but it s a good idea to protect the sharp edge at the rear of the cheek piece (depending on your design) from damage by wrapping a few layers of tape over it.

 The hole cannot cut deep enough to go thru the wood and I use a band saw to")
15 25) You probably wonder what on earth is he going here This bit of wood will be used to create the insert at the bottom of the stock where the pressure protrudes. I just cut a circle with a standard hole saw. 26) The hole cannot cut deep enough to go thru the wood and I use a band saw to free the piece of the larger block.


16 27) The hole saw I had was a little too large so I used this technique to make the part smaller. At first I thought its not going to work but I got it to a tolerance of 0.05mm out of round which is more than good enough. 28) Glue the into position with epoxy. Unfortunately I did not take a picture but after the glue dried I drilled out the center of the Blackwood inlay with a Forstner bit to leave just about 3mm on the sides.
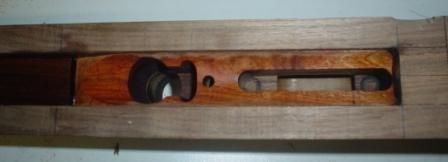
 Here the drilled out insert can be seen")
 Nothing constructive really happening in this step")

17 29) Cut the bottom section of the fore-end out on the band saw 30) Here the drilled out insert can be seen at the bottom of the fore-end. 31) Nothing constructive really happening in this step but I could not resist to sand a small portion of the tip and add a bit of oil just to take a peek at what the outcome is going to be.

 Use a band saw to cut the side profile on")
18 32) Mark the profile of the fore-end. I used a piece of scrap wood band sawed to the desired profile to transfer it to the stock. 33) Use a band saw to cut the side profile on the fore-end


19 34) Shape the fore-end. I used an angle grinder with a flap-disk pad and orbital sander to do this.
 Time to fit the adjustable cheek piece before I can continue to shape the rear.")

20 35) Here you can see some basic shaping happening on the rear-end. 36) Time to fit the adjustable cheek piece before I can continue to shape the rear. In this step I drill the hole in which the adjuster will fit. Obvious Tip: Great care must be taken here as an error could result in throwing away many hours of work and start over. 37) Drill the adjuster hole in the bottom section


21 37) Measure and drill the hole for the adjuster bolt 38) Shown here is how it fits together. Unfortunately I think I did not take a picture of exactly what goes where but if you look at the shiny bit in the second photo you ll figure it out otherwise just drop me a . The basic idea is that there is a little piston that goes into the shiny bit. The bolt in the picture above screws into the piston and this is


22 what secures the whole thing. Tip: Good idea to sand the top section now as this is much more difficult to do when the adjuster is glued in. 39) Cut the back plate. I did not really cut it with a hand hack saw and just took this picture for fun to pull Dave s leg a bit. I used an angle grinder to cut out the rough shape.
 After a bit hand sanding and drilling")

23 40) Shape the back with an angle grinder. 41) After a bit hand sanding and drilling the holes this is what you should end up with. Quite a bit of hand sanding in fact


24 42) Ah! This picture should give you a much better idea of how the check piece adjuster works. The piston I referred to in an earlier step is the little black thing inside the adjuster hole. The adjuster is glued into the top of the cheek piece. 43) Draw a center line where the butt plate will go. 44) Use a drill bit to mark the holes for the adjuster and drill the 2 holes
 I use a drum sander in my")


25 45) Screw butt plate to stock. 46) I use a drum sander in my drill press to sand the bottom of the rear end of the stock. 47) Cut the area where the grip cap will be glued to on the band saw.


26 48) Glue the grip cap with waterproof wood glue or epoxy 49) This pic shows the grip cap glued into place ready for shaping 50) Cut the excess off the grip cap with the band saw

 The REALLY fun part.")

27 51) This picture shows my 110mm angle grinder which is the primary tool I use for shaping the stock. The blue flap-disk I referred to earlier can clearly be seen. 51) The REALLY fun part. Shaping of the rear end of the stock. The pictures shows some progress and tools. Spot my lovely Dalmatian. Sorry Lilo, no pun intended


28 52) Basic shaping around the grip in progress 53) More shaping on the other side of the stock in progress.


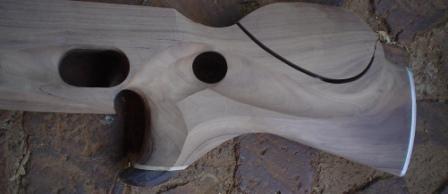
29 54) This pic shows how the area where the thumb-over recess will be cut is marked. 55) More shaping in progress.


30 56) Better pic of Lilo, my workshop companion You can also see the profile on the rear end of the stock taking shape. 57) Pic showing basic shaping completed 58) The following pics shows the stock is various stages of the sanding in progress. Most is done by hand and some of the flatter areas can be done with an orbital sander. Not really sure what to say about these sanding steps but I know the more effort you put in here the better the final outcome is.

31 A


32 59) Ah! Finally a sanding pic that s worth saying something about. This picture shows wet sanding in progress. This is done with very fine sandpaper after each of the first few layers of oil in order to seal the end grain.

 The following")

33 60) This pic shows the stock after about the second or third layer of oil. 61) The following pictures shows the stock in various stages during the oiling process

34

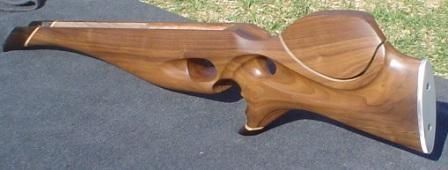
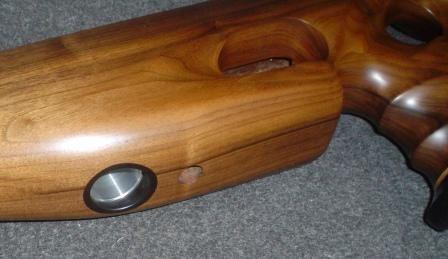
 And the")

35 62) This is a picture of the trigger guard replacement I made and the bolt that holds the rifle to the stock 63) Final product from below 64) And the rear. Dave did fit his own adjustable pad to the aluninium plate afterwards.


36 65) Finally done, boxed and ready to be shipped. I really hope you find this info useful. If you read this far changes are pretty good you have the patience it takes to build your own rifle stock. Now get your bum away from the PC and into the workshop Please feel free to me if you have any questions on the above. I only know a little bit but I m more than willing to share. Regards James Mitchell mitchejc@vodamail.co.za February 2008 Important Notice: You are more than welcome to use and distribute this document for non-commercial purposes, as long as you keep it in its original and complete form. Although this document is distributed for free, I retain all legal rights to the content. Please keep in mind that incorrect use of power tools could be lethal. Always use safe workshop practice and read the instruction manuals that came with your tools. Always wear eye, ear and respiratory protection when working power tools and wood.
A Pictorial of David Dawes AA400 HFT Thumbhole Stock in the Making
 A Pictorial of David Dawes AA400 HFT Thumbhole Stock in the Making From This This To Part 1 By James Mitchell (a.k.a. mitchejc) Note: Building rifle stocks is super fun and the idea with this pictorial
Slicing Jig For Pen Inlays
 Slicing Jig For Pen Inlays By Randall Smith (randyrls) May 2008 This article has been downloaded from the library of the International Association of Penturners. www.penturners.org You are welcome to reproduce
Jigsaw Puzzle Tray. Premium Plan. In this plan you ll find: America s leading woodworking authority
 America s leading woodworking authority Premium Plan In this plan you ll find: Step-by-step construction instruction. A complete bill of materials. Construction drawings and related photos. Tips to help
Invisible Clip Tutorial
 Invisible Clip Tutorial I first saw what I call the Invisible Clip in Russ Fairfield s PMG gallery and fell in love with it. I could not figure out how he made them so I sent him an e-mail and he was kind
Three Legged Stool. Randy Cordle / 2016
 Three Legged Stool Randy Cordle / 2016 This stool could easily qualify as fine furniture, being equally at home in the living room or featured at the local arts and crafts fair. A few unique construction
WOOD TOY NEWS SANDING DRUMS & JIGS ISSUE
 WOOD TOY NEWS SANDING DRUMS & JIGS ISSUE toymakingplans.com June 11, 2014 Wednesday How to Make a Sanding Drum Jig for Smarter Toymaking. By Imants Udris Udie Our discussion begins based on the 5 piece
Curved Metal Segmenting
 Curved Metal Segmenting A Tutorial by: David Washburn A.K.A djwood1 This tutorial was downloaded from The International Association of Penturners Introduction As I continue to learn about pen turning,
Instructions for Turning Laminated Bracelets
 Instructions for Turning Laminated Bracelets 1. Start with Design 1. Make a paper template circle for the bracelet. Use this to check the fit on the person you are making the bracelet for. After checking
MLCS Instructions for Bowl and Tray Template Kit #9176/#9179
 MLCS Instructions for Bowl and Tray Template Kit #9176/#9179 Tools Needed: Router 1-1/2 h.p. Minimum recommended with a 1/2 collet Forstner bit 3/4-2 recommended depending on template used Drill Press
A candle stick addresses transferring and reproducing dimensions from a plan and breaking the project into steps.
 Activities Discussion These projects allow more skill development including making items to match a drawing, sizing projects to specific dimensions, and just trying fun stuff for the first time! A candle
Shoulder Plane. dovetailed. fine tools. Make an heirloom tool and learn the secret to creating double dovetails in metal it s easier than you think.
 fine tools dovetailed Shoulder Plane Make an heirloom tool and learn the secret to creating double dovetails in metal it s easier than you think. I ve always been fascinated by old, metal hand planes.
How to Assemble the Vacuum Formed Plastic 7/8 Scale Lewis Gun
 How to Assemble the Vacuum Formed Plastic 7/8 Scale Lewis Gun 1. Read ALL the instructions before starting assembly. 2. Begin assembly by thoroughly washing the inside and outside surfaces of the vacuum
Kitchen Step Stool. Premium Plan. In this plan you ll find: America s leading woodworking authority
 America s leading woodworking authority Premium Plan In this plan you ll find: Step-by-step construction instruction. A complete bill of materials. Construction drawings and related photos. Tips to help
Lock on! Chris Tribe shows you how to cut a lock into the back of a door and fit an escutcheon
 Technique Lock on! Chris Tribe shows you how to cut a lock into the back of a door and fit an escutcheon Pic.1 Chris fitted this oak display cabinet with a cut lock and covered his precise work with a
Piper Cherokee /3 scale. Construction Manual
 Piper Cherokee 140 1/3 scale Construction Manual STAB CONSTRUCTION 1. Remove foam cores from cradle and place on flat surface. Inspect pieces before you epoxy halves together making sure leading and trailing
Serving Tray. When some good friends got married recently, An exercise in template-making yields a great gift project that s easy to duplicate
 Serving Tray An exercise in template-making yields a great gift project that s easy to duplicate END Create from 3 8 2 8" piece. By Geoff Noden When some good friends got married recently, I decided to
Christmas Bell Ornament
 Christmas Bell Ornament This is an easy Christmas ornament idea I cabbaged from a friend and skilled turner, Curt Fuller, from Utah. I kind of adapted it to my style but I still got the idea from him.
WESTERN PISTOL.22 CALIBER SINGLE SHOT. Entire pamphlet Copyrighted by JACO Designs 1972
 WESTERN PISTOL.22 CALIBER SINGLE SHOT Entire pamphlet Copyrighted by JACO Designs 1972 This pamphlet contains the plans and instructions necessary to construct the Western pistol. This pistol breaks open
Ways to get the most out of your
 5 Ways to get the most out of your router table When you mount a router on a table, you expand your shop s potential. To help you take advantage of this potential, we assembled five router table techniques
Copyright 1998 KDE Technologies
 Modular Computer Corner Desk Unit Copyright 1998 KDE Technologies http://members.tripod.com/~kdetech/ 1. Introduction 2. Plans Sheet one - Isometric Sheet two - Top Detail / Corner Unit Sheet three - Leg
RESolution V2 Manual
 RESolution V2 Manual Note for the German Manual: Yellow Bottle thick CA Pink Bottle Med CA Blue tube 5 minute Epoxy Green tube 90 Minute Epoxy Construction of the Fuselage Step 1: Cover the plan with a
Wooden Faceplates. Tapping on the Lathe
 Wooden Faceplates There are lots of turning jobs where spending some time on set-up makes the turning go quicker and easier. Making Wooden Faceplates is one way to make set-ups and jigs for turning. As
Project 13586EZ: Writing Desk. Writing Desk Materials List
 Project 13586EZ: Writing Desk This writing desk will make a handsome addition to just about any room in the house. The one shown is made of cherry, a logical choice for a piece like this, but mahogany
3Insert the second rod no. 4
 Yamato: Step-by-step 37 The stern block and searchlight control towers a b c d e f Recommended tools and materials Wood glue Sandpaper (no. 800 grain) Metal file Putty Craft knife For metal: Super Glue
Silverware Chest Plan
 Silverware Chest Plan 05L14.01 Introduction 1. Measure the space required for your cutlery before beginning this project to be sure that it will fit in the drawers and top compartment. The best way to
Project 17884EZ: Shaker End Table
 Project 17884EZ: Shaker End Table With its clean, simple lines, this piece is unmistakably Shaker style. Ours is made from cherry, a wood commonly used by Shaker craftsman, but we ve also seen this piece
After the canopy hinge is square with the firewall and the nut plates are installed you can set up the hinge mounts. Start by clamping a 1/16 tongue
 Written by: Sean Cole September 19, 2008 When fitting the stiffener use 3/32 clecos to hold it in place, it makes a smaller hole and is easier to work with. Only use the amount needed to hold the stiffener
THE PODIUM MUSIC STAND
 THE PODIUM MUSIC STAND 1 Set Assembly Instructions Wooden Parts: a. 1 Column b. 2 Long Slide Pieces c. 2 Slide Spacers (1 long & 1 short) d. 4 Feet e. 2 Fork Pieces f. 1 Fork Spacer g. 2 Long Desk Frame
968 Side Cladding Rubber Beading Replacement
 968 Side Cladding Rubber Beading Replacement A common and simple wear-oriented project for the 968 is the replacement of the rubber seals or beading on the lower side body cladding. These seals become
Chapter # 002 : Creating Threaded Metal Anchoring Points in Fiberglass Foam Structures
 Chapter # 002 : Creating Threaded Metal Anchoring Points in Fiberglass Foam Structures The following is a method of creating permanent, threaded, metal anchor point in a foam & fiberglass structure. The
Hinge Mortising Jig. One of the make it or break it parts of building a. 6 ShopNotes No. 74
 Hinge Mortising Jig A Mortise for a Hinge. Quick, clean, and accurate that s the only way to describe the mortise you get with a trim router and this hinge mortising jig. One of the make it or break it
How to install backchecks
 How to install backchecks Note: All pictures can be enlarged for better clarification. Revision 7 8/2009 Backchecks wear out in a piano much like brake pads in an automobile. While wear is a valid reason
Air rifle Stock Building by howie1a Part 1
 Air rifle Stock Building by howie1a Part 1 January 23, 2012, 10:38:23 AM I thought I would put some info on stock building since some of you have asked how to go about it. I know this is in the china gate
ENJOY THIS SELECTION FROM. Woodworking 101. Includes Step-by-Step Instructions for 8 Projects. Woodworking
 W ENJOY THIS SELECTION FROM Woodworking 101 Includes Step-by-Step Instructions for 8 Projects Woodworking 101 Aimé Fraser, Matthew Teague, and Joe Hurst-Wajszczuk To purchase your copy of Woodworking 101,
Grade 11 Woods Lift Lid Coffee Table. Based on Under the big Top from Popular Mechanics Website
 Grade 11 Woods Lift Lid Coffee Table Based on Under the big Top from Popular Mechanics Website TABLE TOP 1. Select enough lumber to construct a top that is between 22 ½ and 24 wide after jointing. Ensure
TURNING A PEN ORIGINAL BY MIKE RUDE REVISED BY GORDON PATNUDE - AUGUST 2015, OCTOBER 2016 EQUIPMENT AND SUPPLIES NEEDED
 TURNING A PEN ORIGINAL BY MIKE RUDE SEPT 2006 REVISED BY GORDON PATNUDE - AUGUST 2015, OCTOBER 2016 PHOTOGRAPHY BY JIM GOTT AUGUST 2015 EQUIPMENT AND SUPPLIES NEEDED A PEN TURNING TUTORIAL [this document]
EXTRA 330SC 60CC. Item No:H G Specifications cc gas DA50,DA60, DLE55, DLE60(twin), 3W55. Description
, 3W55. Description") EXTRA 330SC 60CC Item No:H G060011 Specifications Wing Span Length Wing Area Flying Weight Gasoline Radio Description Carbon Fibre : 92" (2347mm) 84 1/2 " (2060mm) 1526.8 sq in(98.5sq dm) 16 17lbs(7300
EXTRA 330SC 60CC Item No:H G060011 Specifications Wing Span Length Wing Area Flying Weight Gasoline Radio Description Carbon Fibre : 92" (2347mm) 84 1/2 " (2060mm) 1526.8 sq in(98.5sq dm) 16 17lbs(7300
PROJECT PLAN TRAVEL CRIBBAGE BOARD
 BUILD IT WITH ROCKLER PROJECT PLAN TRAVEL CRIBBAGE BOARD BUILD Stock # Item Stock # Item 59160 Small Cribbage Board Template, 2-Player, Straight Track 90638 3/4" Dia. Straight Router Bit (1/2" shank) 21026
ALAN CARTER STUDIO 7 Cane Creek Circle, Fairview, NC
 ALAN CARTER STUDIO 7 Cane Creek Circle, Fairview, NC 28730 630-390-8821 apcarter@sbcglobal.net www.alancarterstudio.com TURNING SMALL GOBLETS As a follow up to my thin stem article, here s a how-to on
Corvus Racer CC
 Corvus Racer 540 35CC Item No:L-G035008 Specifications Wing Span Length Wing Area Flying Weight Glow Gasoline Electric Radio mm mm 1200sq in (77.4sqdm) 9.9-12lbs(4.5-5.5kg) 91-1.20(2C) 1.10-1.40(4C) 20-40cc
COMPLIMENTARY WOODWORKING PLAN
 COMPLIMENTARY WOODWORKING PLAN COFFEE TABLE PLAN This downloadable plan is copyrighted. Please do not share or redistribute this plan in any way. It has been paid for on your behalf by JET Tools, a division
PITTS S2S CONSTRUCTION
 PITTS S2S CONSTRUCTION FUSELAGE CONSTRUCTION 1) Place the right fuselage side over the plan and mark the former positions. Place the left side over the right side and mark the former positions. Glue F1
SE5a Instrument Board part 2 - rev 1.1
 SE5a Instrument Board part 2 - rev 1.1 Fuel (Petrol) Valve This valve uses two circular name plates, eight brass screws, one black plastic base, copper wire and two black plastic risers. You can pick any
Regulator installation guide Air Arms S4xx/S5xx
 Welcome to Huma-Air. We design and manufacture brand- and model specific precision regulators for PCP air rifles. By using only the highest quality materials such as aircraft grade aluminum, aluminumbronze,
PM-01 Bolter 9mm Luger Carbine
 PM-01 Bolter 9mm Luger Carbine Disgned by Petr Malik For Educational Purposes Only! I m not responsible, in any shape or form, for the acts of others. For those who do not know, the PM-01 (Petr Malik-gun
Chili Pepper Routed Bowl
 Chili Pepper Routed Bowl MLCS Items Needed: Chili Pepper Bowl and Tray Template #9189 Top Mounted Bearing Dish Cutter Router Bit #7817 1/2 Router Collet Extension and Wrenches #9465 3/16 Radius Round Over
For Barrel Tapers. Installation and Operating Instructions for use with table saws and large disk sanders
 Tim s Taper Tool For Barrel Tapers Installation and Operating Instructions for use with table saws and large disk sanders Your taper tool is capable of making barrel tapered shafts. The term barrel is
Making a Corian Desktop Pen Holder
 Making a Corian Desktop Pen Holder Contributed by: Pete Ripaldi A.K.A pete00 This tutorial was downloaded from http://www.penturners.org The International Association of Penturners - 2016 Making a Corian
SE5a Wing Panels rev 1.0
 SE5a Wing Panels rev 1.0 The top and bottom wings are different. They might look the same but the bottom wing has one less rib and some rib spacing difference. This is due to where the wooden interplane
Building Bigger Things. Woodworking Tools and Machinery. Marking Gauge. Thumb Screw. Stop Screw. Shoe. Beam. Pin. Head. Face Plate
 Woodworking Tools and Machinery Pin Shoe Face Plate Thumb Screw Head Stop Screw Beam Marking Gauge A marking gauge is used to mark a uniform width on a board. The steel combination square discussed in
Making a Windsor Stool
 Brian Clifford A Windsor Stool - page 1 Making a Windsor Stool The Windsor style The Windsor style is the name of a particular type of traditional English chair. Within this style there are a variety of
 America s leading woodworking authority To download these plans, you will need Adobe Reader installed on your computer. If you want to get a free copy, visit: http://adobe.com/ reader. Having trouble downloading
Coil Winder Instructions.
 Page Coil Winder Instructions. Before we can build our wind turbine there are a few tools we need to make. We ll need to make moulds for the magnet rotors and the stator, and we need to make a coil winder.
Instructables Butcher Block Top
 Instructables Butcher Block Top Project Overview: This project requires basic woodworking skills and access to woodworking machines. Woodworking machines have sharp cutting edges and are NOT forgiving.
Cactus Routed Bowl. MLCS Items Needed:
 Cactus Routed Bowl MLCS Items Needed: Cactus Bowl and Tray Template #9188 Top Mounted Bearing Dish Cutter Router Bit #7817 1/2 Router Collet Extension and Wrenches #9465 45* Degree Chamfer Bit #7676 1-3/8
Hornsby Woodworking Men s Shed. Guide to the Shed s Woodworking Machines
 Guide to the Shed s Woodworking Machines SP00 Purpose The primary purpose of this document is to assist the induction of new members of the Hornsby Woodworking Men s Shed in the identification and understanding
WOOD TOY NEWS. July 23, 2013 Tuesday
 WOOD TOY NEWS Make your own perfect turntable for spray painting toys with these useful tips. And it s fast, fun and easy to build! by Imants Udris Watch the video on our website at : http://www.toymakingplans.com/website/how-to/
Copyright WilkerDos.com Dining Table. Project Designed By April Wilkerson - Plan Created By Jay Bates (jayscustomcreations.
 Copyright WilkerDos.com 2017 Project Designed By April Wilkerson - Plan Created By Jay Bates (jayscustomcreations.com) Layout & Shopping List Page 2 of 12 Layout & Shopping List Item Quantity Description
Making a Greenland Paddle - New Zealand style
 Making a Greenland Paddle - New Zealand style ~by Sandy Ferguson The following describes how to make a paddle reasonably easily and with as little wastage as possible. This could be your first Greenland
Traditional Undermount: S Method (Undermount):
:") TOOLS REQUIRED 15.1 TOOLS REQUIRED The installation of Corian shape product must be a precise and exacting process to ensure that a good fit is always created. Using the correct tools is essential. In
TOOLS REQUIRED 15.1 TOOLS REQUIRED The installation of Corian shape product must be a precise and exacting process to ensure that a good fit is always created. Using the correct tools is essential. In
Fancy Keepsake Box. Premium Plan. In this plan you ll find: America s leading woodworking authority
 America s leading woodworking authority Premium Plan In this plan you ll find: Step-by-step construction instruction. A complete bill of materials. Construction drawings and related photos. Tips to help
BUILDING A STORM DOOR
 BUILDING A STORM DOOR BY NEAL BARRETT Illustrations by George Retseck If you're in the market for a storm door, you probably know that there are many styles and models available. However, most of them
SCULL HANDLES AND GRIPS INSTRUCTION BOOKLET
 SCULL HANDLES AND GRIPS INSTRUCTION BOOKLET Contents Section I: Scull Grip Replacement: Fixed Handle or 10 cm Length Adjustment System Refer to this section if you need to replace the grips on your fixed
Option 1: False Frame Bent
 Black Bear Construction Co. www.blackbearcc.com Standard and Narrow Gauge railroads are often used in industrial or short line operations. These areas often require drainage that can be provided by trestles.
T3500 #131 Sole Repair & Re-setting. Adding Access to the Hidden Bilge
 Purpose: 1. To repair a damaged portion of the holly/teak veneered plywood sole by the mast base and provide ventilation and drainage between the sole and the fiberglass sub sole. 2. To install a new hatch
Coffee table with recessed tray
 Coffee table with recessed tray Dinner is served Coffee table with recessed tray This coffee table has it all: it contains a recessed tray, so that you can treat your guests to various delicacies. 1 Introduction
By Larry Brown & Charles Webb
 By Larry Brown & Charles Webb Page 1 of 16 SAFETY: Wood turning can be Hazardous so you should take precautions to minimize the risk of an accident. I always wear safety glasses when turning. On large
Make your own zero clearance throat plate.
 Make your own zero clearance throat plate. A picture tutorial By Wayne Breshears One of the more important table saw accessories you can have is a zero clearance insert or throat plate. The close tolerance
Colori. Part I Geometry
 Colori Part I Geometry 1 2 Determine the size of your cane. TOOLS & MATERIALS FOR BUILDING A CANE: - photocopy paper - ruler - pen or a black marker - color markers (optional) - pasta machine - clay of
COFFEE TABLE WITH RECESSED TRAY
 COFFEE TABLE WITH RECESSED TRAY Why not treat your guests to a tray laid with delicacies and then remove it from sight in your new coffee table. There's no easier way to show that you are a thoughtful
Rose Inspired Corner Shelf
 Photo 1: The side pieces are sized so you can hot melt glue them together outside of the pattern. Scoring a shallow v-groove with a utility knife holds the glue at bay. Rose Inspired Corner Shelf The best
Butterfly Leaf Dining Table Plans
 Butterfly Leaf Dining Table Plans Part 1 An attractive dining table with a secret: the leaf folds and stores inside the table. Season 1, Episode 7 P a g e 2 I first saw a butterfly leaf table in a back
Edge 540 V3 35CC. Scheme A. Item No:L G Specifications. Flying Weight
 Edge 540 V3 35CC Item No:L G035016 Specifications Wing Span Length Wing Area Flying Weight Glow Gasoline Electric Radio Description 76 (1930mm) 74 (1879mm) 1200sq in(77.4sqdm) 9.9 12lbs(4.5 5.5kg) 91 1.20(2C)
How to Mitre Mouldings
 How to Mitre Mouldings About Window and Door Mouldings Mitre cuts are a basic operation in most moulding installation. Mitre cuts are typically 45 degree angles, however many installations require minor
A Shaker Sewing Stand
 America s leading woodworking authority Step by Step construction instruction. A Shaker Sewing Stand A complete bill of materials. Exploded view and elevation drawings. How-to photos with instructive captions.
WOODWORKING GUIDE: BASIC JOINERY
 WOODWORKING GUIDE: BASIC JOINERY Close isn't really good enough. A perfect fit is what counts. When building furniture, there are many ways to construct joints. The simplest are those that use mechanical
Simple Dresser. Premium Plan. In this plan you ll find: America s leading woodworking authority
 America s leading woodworking authority Premium Plan In this plan you ll find: Simple Dresser Step-by-step construction instruction. A complete bill of materials. Construction drawings and related photos.
Introduction: The instructions to complete the vases begin on page 47.
 Introduction: Hello, my name is Steve Good. I am the author of the Scrollsaw Workshop Blog. Seven years ago I started the blog and today it is read by thousands of scroll saw enthusiasts all over the world.
30 FINE woodworking. Photo, this page: Michael Pekovich
 30 FINE woodworking Photo, this page: Michael Pekovich Arts & Crafts Bed White-oak bed is loaded with Stickley style and topped off with traditional inlay by Kevin Rodel This bed design is a close copy
135 ROLLTOP DESK 515
 135 ROLLTOP DESK 515 For the person who hates to clear off a desk, who wants to leave everything where it is overnight yet still have the clutter hidden, a rolltop desk is a godsend. The tambour hides
Quantum 2 SQUARE 0605
 Installation Instructions #CH-S-0605-KIT #CH-S-0605-2FT #CH-S-0605-4FT #CH-S-0605-6FT #CH-S-0605-8FT Custom #CH-S-0605 Sections: Pg. 2 Fixture Kit Channel Preparation Pg. 6 Cut Length Chart Pg. 7 Recessed
Safety First! Use eye protection, always! Use ear protection with loud power tools. Stay with children while they work!
 TM TM ART TABLE Safety First! Use eye protection, always! Use ear protection with loud power tools Stay with children while they work! Follow tool manufacturers safety guidelines Page 1 ART TABLE Page
Chapter Six. Getting started inboard. Installing the false deck
 A close look at the thinning down of the bulkhead extensions. They are just 1/16 thick after fairing them. Chapter Six Getting started inboard This next step is one of the last remaining messy tasks to
Arched. Building an. Passageway. Although my company specializes in high-end jobs
 Building an Arched Passageway All photos by Brian Striegler This straightforward approach combines basic shop methods with simple site joinery to create an elegant frame-and-panel archway by Gary Striegler
Procedure for Longworth Chuck construction
 Procedure for Longworth Chuck construction Overall construction The Longworth chuck is composed of three major components. Connected to the lathe spindle is some device that fastens to the first of two
The following pages replace pages 7 thru 14 in the current printing of BUILDING THE PT ELEVEN. (As of December 2012.)This is a modified method for
This is a modified method for") The following pages replace pages 7 thru 14 in the current printing of BUILDING THE PT ELEVEN. (As of December 2012.)This is a modified method for gluing puzzle joints that we believe is simpler than the
The following pages replace pages 7 thru 14 in the current printing of BUILDING THE PT ELEVEN. (As of December 2012.)This is a modified method for gluing puzzle joints that we believe is simpler than the
PRAZI USA. Model PR-3900 Owners Manual. Please read this manual in its entirety before using the PRAZI ChestMate.
 PRAZI USA Model PR-3900 Owners Manual Please read this manual in its entirety before using the PRAZI ChestMate. PRAZI USA 214 Rear South Meadow Rd (800)-262-0211 Plymouth MA, 02360 www.praziusa.com ChestMate
Foam Core Construction
 Tools Tips and Tricks X-Acto knife and blades Your most important tool for working with foam core will be an X-Acto knife with plenty of sharp blades. When choosing a knife, get one with replaceable blades
Note - the nose ribs and are thinner than the main ribs. These nose ribs will use a thinner rib cap than the ribs. This is per design.
 Stabilizer rev 1.2 The SE5a stabilizer is the heartbeat of the tail and is recreated like the full scale version. All tail pieces depend on the stabilizer. It uses the steel fittings, pulleys, inspection
Cowper From Steve Wolverton on the T&TTT forum, Feb 2005 For Reference Only Do not use to build a trailer. Check on Teardrop and Tiny Travel Trailers
 Cowper From Steve Wolverton on the T&TTT forum, Feb 2005 For Reference Only Do not use to build a trailer. Check on Teardrop and Tiny Travel Trailers for up to date building information; http://www.mikenchell.com/forums
Woodline USA Woodline Spacer Fence System
 Woodline USA Woodline Spacer Fence System MADE IN THE USA Includes: (1) ¼ Spacer Fence (1) 3/8 Spacer Fence (1) ½ Spacer Fence (1) Hardware Package (1) 3 Piece Brass bar set (2) Setup Blocks Visit Us Online
Shaker Lap Desk. The classic Shaker lap desk, designed two centuries ago to. Celebrate pen and ink with this quintessential case
 Shaker Lap Desk Celebrate pen and ink with this quintessential case BY CHRISTIAN BECKSVOORT The classic Shaker lap desk, designed two centuries ago to function as a miniature traveling office, was the
Plastic Trainer-19. I have tried to only use materials available from the big box building centers like Home Depot, Rona (Canada) and Lowe s.
 and Lowe s.") Plastic Trainer-19 I have tried to only use materials available from the big box building centers like Home Depot, Rona (Canada) and Lowe s. The picture above shows the prototypes with an original Cox
Plastic Trainer-19 I have tried to only use materials available from the big box building centers like Home Depot, Rona (Canada) and Lowe s. The picture above shows the prototypes with an original Cox
ribbon handle box 2010 August Home Publishing Co.
 ribbon handle box 00 ugust Home Publishing Co. eature Project Ribbon Handle ox This imaginative design not only makes a wonderful gift, it s also a great way to build your woodworking skills. Ithink of
Join Neck and Body Wednesday, January 16, :08 PM
 ASL Breakdown Page 1 Join Neck and Body Wednesday, January 16, 2013 10:08 PM 1. 2. 3. 4. Charles did the following steps to speed things up: Lightly sanded the top of the lower bout with an orbital sander.
Zestful Turnings. America s leading woodworking authority. Step by Step construction instruction. A complete bill of materials.
 America s leading woodworking authority Zestful Turnings Step by Step construction instruction. A complete bill of materials. Exploded view and elevation drawings. How-to photos with instructive captions.
Hey, check out this tutorial on Window Casing Pens!
 Hey, check out this tutorial on Window Casing Pens! My good buddy Mr. Natural assumes that you already know the basics for making a casing pen so things like drilling and seating bullets won't be covered.
Robert Bosch GmbH. Lounge light fixture
 Lounge light fixture Nice and relaxing Lounge light fixture Light has an important effect on mood. This cool light fixture is perfect for creating a cosy lounge atmosphere. 1 Introduction This cool light
Contrivance. sample. a modular mechanism machine. design by Derek Hugger. Important:
 sample Important: McMaster Carr, a supplier whose part numbers are referenced throughout this document, can only ship within the United States. Builders outside of the U.S. must find an alternate supplier