Curved Pieces are a Common Woodworking Challenge
|
|
|
- Elfreda Williams
- 5 years ago
- Views:
Transcription


1 Curved Pieces are a Common Woodworking Challenge I recently created a set of four dining chairs that required three curved back rest pieces each. On the top piece of each chair I wanted to inlay a marquetry picture of acorns and oak leaves. Each back rest piece was about7/8 inch thick by three inches by 15 inches. Here you see the extent of the curve a bit better: I could have found solid stock that was thick enough to allow me to use my bandsaw to cut the curves on both sides. This approach, however, has several problems. First, it is not easy to find oak thick enough to create a piece like this. Oak this thick would be very expensive and a lot of it would have been wasted. Second, I'm familiar with a technique called double bevel marquetry that requires thin stock (1/8 inch or thinner). By laminating seven 1/8 inch thick pieces of oak over a bending form, I was able to create a picture in one of the laminations resulting in a final effect that is difficult for most people to guess at how it was done. Regardless of if you are trying your hand at inlay or marquetry as I did, many furniture projects require wide stock bent to a pleasing curve. Steam bending is another bending technique commonly used in furniture construction. Because of the inlay, however, steam bending was not a good choice for this project. For this project, bentwood lamination was the natural choice. 1

2 Everything Begins with a Master Template I'm a big believer in taking the trouble to create an accurate pattern or template for any curved part of almost any project. I almost always make my patterns out of ½ in MDF. I find that MDF is an easy material to work with (particularly when fairing curves), is stable, and can be stored indefinitely in case you ever need to use it again. This master pattern or master template will only be used occasionally as all working patterns, templates, or forms are made from the master. Illustration 1: Master Template Illustration 1 shows an example of the master template I created to build the forms for the laminations for this project. I started out with a piece of ½ MDF ripped to exactly 15 inches and about 5 inches wide. I drew the curve in pencil and roughed out the curve on the bandsaw leaving the line and about 1/8 inch of material. I then used a disc sander, rasp, and flexible sanding block to smooth and fair the curve. I also like to use a permanent marker to write the name of the template and the project name so it will be easy to identify should I ever need it again in the future. Types of Forms There are basically two different ways you can build a form to use for bentwood lamination: open and closed. An open form is one where a single form is created and a series of holes are used to clamp the strips to the form. 2

 to be sure you are applying even clamping pressure.")
3 Illustration 2: Open Form Example By starting with a clamp in the center and working toward the edges, it is possible to tightly clamp the laminations to the form. This technique works well if you are creating a complex shape with a couple of curves as you might if you were gluing up laminations to form the rockers for a rocking chair. The width of the material you can work with in a form of this type is another factor to consider. The open form works well for relatively narrow stock. For wider stock, you will need two clamps in each hole (top and bottom) to be sure you are applying even clamping pressure. For the chairs I was making, I was gluing up laminations that were three inches wide so I opted instead to make a closed form. With a closed form, the laminations are clamped between two forms made as a mirror of each other but designed to compensate for the thickness of the material being clamped. Making the Forms The forms are straightforward to make if you have a router table with a pattern bit and some double sided tape. The master template can be used to layout both curves but we must be careful to take the thickness of the material being laminated into account. These two curves will be slightly different because they represent, in effect, a short segment from two different circles each with a slightly different diameter. It helps to imagine an inner circle representing the convex curve and an outer circle representing the concave curve. The difference between the radius of the two circles represents the thickness of the laminations. To create both forms start by placing the master template on a piece of ¾ 3


4 in MDF cut to same width as the template and long enough to make both forms plus the thickness of the material. Use a pencil to draw both arcs, one using the master template as a guide and a second arc using a small block the thickness of the material being laminated to offset the second arc the correct distance. Using a bandsaw, cut both pieces leaving the line. The master template can be used along with a router table and a pattern bit to create the first part of the convex form. You now have two pieces of ¾ inch MDF that can be used as templates to create the actual form. Double stick tape the master template and use a router table with a pattern bit to create the first part of 4
5 the form: You have now created the first component of the form. Simply repeat the process but instead of using double stick tape, now glue and nail each subsequent component until you reach the desired thickness of the finished form. It is important to cover the inside surfaces of both forms with clear packing tape. I take the time to completely cover both forms in packing tape to prevent any glue from sticking to the forms. If you wish, you can also cover the inside surface of one of the forms with thin cork before you cover the cork with packing tape. The cork will smooth out any minor imperfections in the forms and may help achieve a more uniform glue up. One of the problems with a closed form is keeping the laminations properly centered in the forms and keeping both forms properly aligned as you apply clamping pressure. Some kind of capture system must be devised to keep both forms aligned as you bring them together with the laminations in the middle. If not, it will be difficult and perhaps impossible to get both forms to properly align. For the forms I made for this particular glue up, I used a scrap piece of melamine and a couple of hardwood strips to create a simple alignment system. 5

6 Preparing the Laminations I needed seven 1/8 inch thick by 3 by about 17 inch long pieces of oak for each curved back rest. In theory, it is possible to rip stock this thin on the table saw, but I have never found a way to do this that I felt was even remotely safe. Other woodworks would certainly disagree and I'm sure that many woodworkers use the table saw routinely for this type of task. I happen to have a large bandsaw in the shop that I've dedicated to resawing stock. Since I do a lot of resawing for various reasons including making my own veneer, I naturally turned to my dedicated bandsaw to rip these pieces. I believe it is important when resawing on the bandsaw to have the face against the fence planed smooth. I keep a small jointer near the bandsaw and use the jointer to smooth the face each time I cut a lamination. I cut the laminations thicker than 1/8 by at least 1/16 inch. I will then place the smooth side of the lamination down and run the piece through my drum sander to get the stock to 1/8 inch thick and smooth on both sides. Laminating Requires a Rigid Glue Bending a hardwood like oak in a form and having the resulting glued up lamination retain the shape of the form requires a glue that is absolutely rigid. The yellow or white glues commonly used in woodworking do not form an absolutely rigid glue line. This means that a tiny amount of slip will occur as the forms are released resulting in the lamination springing back some amount. The amount of 6

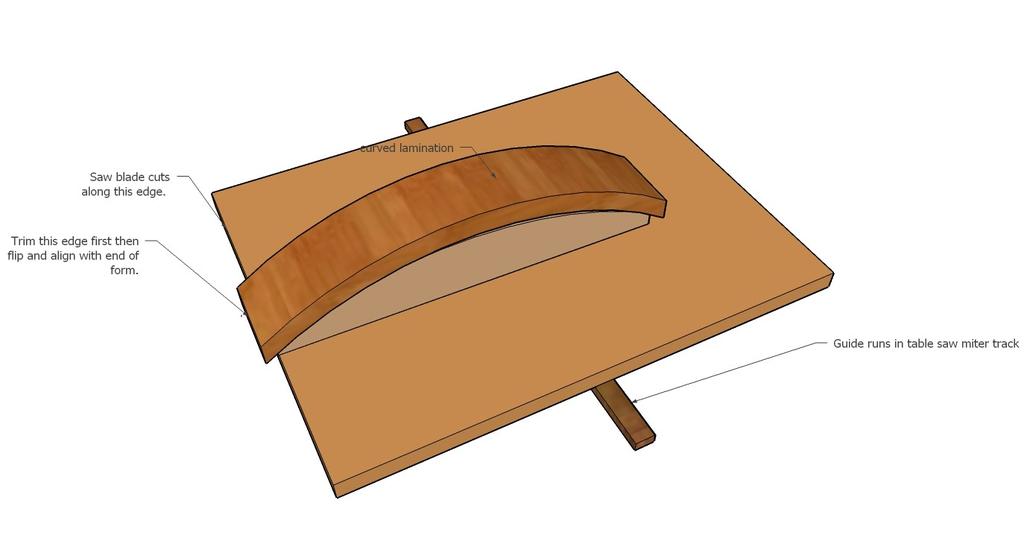
7 spring back is difficult to predict and worse still may be inconsistent from lamination to lamination. A second problem to contend with when creating glued up laminations is that many woodworking glues setup so fast that it will be difficult for you to get glue on all the surfaces before the glue starts to setup. This can be a real problem if you are making long laminations that involve compound curves where the time it takes to draw the forms together with clamps adds to the time it takes to get the glue on in the first place. Using a glue with a short setup time can add a great deal of stress to the entire process and could result in outright failure of the glue joint. I have found that Unibond 800 urea resin formaldehyde glue is the perfect glue for this type of application. It forms an extremely rigid glue line that greatly minimizes spring back and depending upon room temperature, has an open assembly time of from 10 to 30 minutes. This glue is a two part glue where one part is a translucent liquid resin and the other part is a powdered catalyst. It must be mixed just prior to use and once mixed immediately begins to catalyze. You can increase the open time by making minor adjustments in the amount of catalyst you add to the liquid resin. This glue is not commonly available and I've only found it over the Internet. One final bit of advise is that this glue is extremely difficult to remove and should be handled only while you are wearing latex gloves. I strongly suggest you protect any wood surfaces in your glue up that will eventually be visible with tape. I have found that clear packing tape works perfectly and for the curved back rests I applied this tape to these surfaces: Cleaning up and Trimming the Curved After the glue has cured and the lamination removed from the form, the glue squeeze out must be removed and the piece cut to final width. The first step is to use a paint scraper to remove most of the glue squeeze out from one edge, then run that edge on the jointer to smooth it out. You can easily run a curved piece of stock over the jointer as long as you are careful to keep the piece tightly against the fence as you move it through the jointer. After one edge is jointed smooth, you can cut the piece to final width using the bandsaw, again by keeping the jointed edge against the bandsaw fence as you move the piece through the sawblade keeping as much of the curved piece on the table as you can. This harder to describe than it is to actually do. For the curved backrests to fit properly in the chair back, both ends must be trimmed square on the 7
8 table saw. This is impossible to do without creating a fixture to hold the piece securely as it is passed through the sawblade. I again turned to my master template, this time to create a sled for the table saw to hold the curved work perpendicular to the blade. I created the master template to be the exact width I wanted the finished curved pieces to be. When cut the oak to make the laminations, I cut them longer than this final width intending to trim and square the ends later. The first step is to use the master template to create what amounts to another half of the closed form and use the bandsaw to then rip the form as shown below: The curved piece is then used to create a trimming sled as shown below: 8

9 The trimming sled will be used to trim each curved lamination. Since I used the master template to create the form on which the lamination will rest, it is possible to use the form itself to be sure that the curve is cut to the exact width (15 inches) and that the edges of the lamination will be in the correct plane. 9
10 10
A Unique Cutting Board
 A Unique Cutting Board When I was asked to make a cutting board as a special gift, I wanted to do something new and eye-catching. Tired of squares and straight lines, I envisioned curving accents not shallow
Instructables Butcher Block Top
 Instructables Butcher Block Top Project Overview: This project requires basic woodworking skills and access to woodworking machines. Woodworking machines have sharp cutting edges and are NOT forgiving.
WOODStore.net. Thank You! Adobe Acrobat Reader Troubleshooting Guide. WOOD Store. Browse more than 800 plans, projects, books, techniques, & more
 WOODStore.net Browse more than 800 plans, projects, books, techniques, & more Thank You! WOOD Store Customer Favorites Shop Tools & Accessories Thank you for ordering a WOOD magazine download. We hope
craftsman rocker Classic style meets comfort in this sturdy oak rocking chair BY MICHAEL PEKOVICH 34 FiNE woodworking
 craftsman rocker Classic style meets comfort in this sturdy oak rocking chair BY MICHAEL PEKOVICH 34 FiNE woodworking photo, this page: Michael pekovich shape the rear legs designing a chair can be a tough
Display Case (for J&S)
") Display Case (for J&S) This is constructed of maple plywood with solid maple (soft maple) edge banding. It was made to fit between a door and a kitchen cabinet, and has an elegant circular taper between
Display Case (for J&S) This is constructed of maple plywood with solid maple (soft maple) edge banding. It was made to fit between a door and a kitchen cabinet, and has an elegant circular taper between
Bandsawn curves, Precise and repeatable
 Bandsawn curves, Precise and repeatable Template-guided techniques from a master of the machine BY BRIAN BOGGS In 35 years working wood I ve gradually acquired many machines, but the bandsaw remains at
Arched. Building an. Passageway. Although my company specializes in high-end jobs
 Building an Arched Passageway All photos by Brian Striegler This straightforward approach combines basic shop methods with simple site joinery to create an elegant frame-and-panel archway by Gary Striegler
Butterfly Leaf Dining Table Plans
 Butterfly Leaf Dining Table Plans Part 1 An attractive dining table with a secret: the leaf folds and stores inside the table. Season 1, Episode 7 P a g e 2 I first saw a butterfly leaf table in a back
Instructions for Turning Laminated Bracelets
 Instructions for Turning Laminated Bracelets 1. Start with Design 1. Make a paper template circle for the bracelet. Use this to check the fit on the person you are making the bracelet for. After checking
 America s leading woodworking authority To download these plans, you will need Adobe Reader installed on your computer. If you want to get a free copy, visit: http://adobe.com/ reader. Having trouble downloading
Laminated Furniture Components
 Laminated Furniture Components Dec 2010 Woodworkers Simple Round Cherry Table Fritz Smith Cherry - 2008 Woodworkers 2 Snowboard Bench Fritz Smith White Oak Snowboard - 2009 Woodworkers 3 Fritz Smith Shell
Mid-Century Credenza Thoughtful details and modern joinery merge in this sleek design
 Mid-Century Credenza Thoughtful details and modern joinery merge in this sleek design BY LIBBY SCHRUM Mid-Century Modern furniture has not been wildly popular since, well, the mid-century. But fashion
How to Construct the 8-Point Star by Jay S. Helland
 How to Construct the 8-Point Star by Jay S. Helland 1-5-2013 The photos in these instructions were not taken in consequential order but provide the reader the general idea of the processed used. The process
The WoodWorker s Edge
 The WoodWorker s Edge Draw-leaf Game Table 1. 2. Layout the area for the tenons. The tenons are 3/8 thick x 4-1/2 long x 1-1/4 deep and offset to the inside. Create the tenons using the step method to
Copyright WilkerDos.com Dining Table. Project Designed By April Wilkerson - Plan Created By Jay Bates (jayscustomcreations.
 Copyright WilkerDos.com 2017 Project Designed By April Wilkerson - Plan Created By Jay Bates (jayscustomcreations.com) Layout & Shopping List Page 2 of 12 Layout & Shopping List Item Quantity Description
Demilune 4. Apron Joinery. Curved Apron Tenon. Bridle Joint Legs. Bridle Joint Front Apron
 Demilune Email 4 Apron Joinery There are two types of joints used in connecting the aprons and legs. The rear legs use conventional mortise and tenon joints, while the front legs use the less conventional
135 ROLLTOP DESK 515
 135 ROLLTOP DESK 515 For the person who hates to clear off a desk, who wants to leave everything where it is overnight yet still have the clutter hidden, a rolltop desk is a godsend. The tambour hides
MLCS Instructions for Bowl and Tray Template Kit #9176/#9179
 MLCS Instructions for Bowl and Tray Template Kit #9176/#9179 Tools Needed: Router 1-1/2 h.p. Minimum recommended with a 1/2 collet Forstner bit 3/4-2 recommended depending on template used Drill Press
The cabriole leg is one of the iconic motifs of 18th century furniture. It comes in
 Chapter 1 Cabriole Leg The cabriole leg is one of the iconic motifs of 18th century furniture. It comes in many sizes from a 6-inch version on a bombé chest, a 30-inch one on a pier table, or a robust
COMPLIMENTARY WOODWORKING PLAN
 COMPLIMENTARY WOODWORKING PLAN COFFEE TABLE PLAN This downloadable plan is copyrighted. Please do not share or redistribute this plan in any way. It has been paid for on your behalf by JET Tools, a division
Perhaps the best thing about. Three bowls slightly rearranged Twisted Possibilities
 Three bowls slightly rearranged Twisted Possibilities By Malcolm Tibbetts Lacewood Ribbon, 13 7½" Perhaps the best thing about segmented turning is the total lack of restrictions; there is no end to the
Stand & Bowls. optional. Online Extra
 Online Extra optional Stand & Bowls Once you make a bowl using the jig and technique from Woodsmith No. 229, it s only natural to see what else you can do with it. The starting point is to make copies
Guild of Oregon Woodworkers Shop Safety Test
 Guild of Oregon Woodworkers Shop Safety Test You must pass the Test with an 80% or better and self-correct it to 100% Make sure you put the answers under the correct portion of the answer sheet for the
This is a solid wood cabinet. The only plywood used is for the back and drawer bottoms.
 Sideboard Sideboard Overview: This project requires basic woodworking skills and access to woodworking machines. Woodworking machines have sharp cutting edges and are NOT forgiving. You should be properly
Make your own zero clearance throat plate.
 Make your own zero clearance throat plate. A picture tutorial By Wayne Breshears One of the more important table saw accessories you can have is a zero clearance insert or throat plate. The close tolerance
ribbon handle box 2010 August Home Publishing Co.
 ribbon handle box 00 ugust Home Publishing Co. eature Project Ribbon Handle ox This imaginative design not only makes a wonderful gift, it s also a great way to build your woodworking skills. Ithink of
Kitchen Step Stool. Premium Plan. In this plan you ll find: America s leading woodworking authority
 America s leading woodworking authority Premium Plan In this plan you ll find: Step-by-step construction instruction. A complete bill of materials. Construction drawings and related photos. Tips to help
GENERAL NOTES: Page 1 of 9
 Laminating A Zia Into A Turning Blank by W. H. Kloepping, Jan. 2009 This describes how a zia (the New Mexico state symbol) can be laminated into a turning blank. Materials needed: Square Turning Block
Perfect Tapers. on the Tablesaw. Make tapered legs of all types, quickly and safely
 Perfect Tapers on the Tablesaw Make tapered legs of all types, quickly and safely B Y S T E V E L A T T A 30 F I N e W o o D W o r K I N G COPYRIGHT 2012 by The Taunton Press, Inc. Copying and distribution
Curved Metal Segmenting
 Curved Metal Segmenting A Tutorial by: David Washburn A.K.A djwood1 This tutorial was downloaded from The International Association of Penturners Introduction As I continue to learn about pen turning,
Timberflex & Flexboard Technical Guide
 Timberflex & Flexboard Technical Guide A bendable substrate material that can be formed first and laminated last Patent #5,618,601; #5,232,762; #5,824,382 Doors Larger radius and small doors are easily
ALAN CARTER STUDIO 5332 RIVERVIEW DR., LISLE, IL
 ALAN CARTER STUDIO 5332 RIVERVIEW DR., LISLE, IL 60532 630-971-0690 apcarter@sbcglobal.net www.alancarterstudio.com SPLITTING THE DIFFERENCE This is for all you slackers out there. Sometimes half measures
Copyright 2014 Curtis B. Vevang Page Number 1
 As described on the Woodcraft Website: This is a 9 hour class consisting of 3, 3 hour sessions. The purpose of this class is to introduce woodworking from the ground up. The student will build a tool/garden
Nojo Design: Large Step Cabinet: February 2012
 Nojo Design: Large Step Cabinet: February 2012 The largest single piece of furniture I ve ever made is this stepped cabinet. Finished piece is 8! tall and over 10 long. This project has been great, although
Slicing Jig For Pen Inlays
 Slicing Jig For Pen Inlays By Randall Smith (randyrls) May 2008 This article has been downloaded from the library of the International Association of Penturners. www.penturners.org You are welcome to reproduce
BUILDING A SELMER MACCAFERRI GUITAR
 BUILDING A SELMER MACCAFERRI GUITAR A step-by-step guide to building a laminated body Selmer-Maccaferri guitar Michael Collins The Heel The heel should now be prepared to be glued to the neck shaft. Using
Serving Tray. When some good friends got married recently, An exercise in template-making yields a great gift project that s easy to duplicate
 Serving Tray An exercise in template-making yields a great gift project that s easy to duplicate END Create from 3 8 2 8" piece. By Geoff Noden When some good friends got married recently, I decided to
Grade 11 Woods Lift Lid Coffee Table. Based on Under the big Top from Popular Mechanics Website
 Grade 11 Woods Lift Lid Coffee Table Based on Under the big Top from Popular Mechanics Website TABLE TOP 1. Select enough lumber to construct a top that is between 22 ½ and 24 wide after jointing. Ensure
Odd Wobbler Instructions By: Don Geiger
 Odd Wobbler Instructions By: Don Geiger Stock Size Calculations and Reference Table When preparing stock material for turning an Odd Wobbler, you will need two pieces of dry wood that is about one inch
HANDCRAFTED LIDDED CHEST IN CHERRY With Red Cedar Lining
 HANDCRAFTED LIDDED CHEST IN CHERRY With Red Cedar Lining Design A chest was desired as a gift to family. The Shaker style of furniture was identified as a pleasing style. After viewing a number of pictures
Durable Outdoor Table
 54 F I N E W O O D W O R K I N G Durable Outdoor Table Ipé table will seat six and weather many seasons B Y D A V I D B E D R O S I A N Last summer brought a new pool to our backyard. With it came more
Pivot-Door Downdraft Cabinet Plans
 Pivot-Door Downdraft Cabinet Plans Finished Cabinet Closed Open Exploded View Introduction This simple downdraft-style dust collection cabinet is a great way to keep your shop cleaner and keep your router
Router Table. In a recent article, I wrote about the router table I built for the Center. 5 Essential Jigs for the
 5 Essential Jigs for the Router Table Great fixtures and fences offer better control and new possibilities BY PETER SCHLEBECKER In a recent article, I wrote about the router table I built for the Center
Shop-Made Miter Clamps
 *Editor s note: In the photos showing the table saw, the blade guard has been removed for clarity. I try to be as self-sufficient as possible, so I like to manufacture my own tools whenever I can. I designed
The Universal Table Saw Sled
 The Universal Table Saw Sled Do Precision Work Even with Inexpensive Table Saws! Table saw blades always tend to move the wood while the cut is being made. This is why it's so difficult to get accurate
Copyright 1998 KDE Technologies
 Modular Computer Corner Desk Unit Copyright 1998 KDE Technologies http://members.tripod.com/~kdetech/ 1. Introduction 2. Plans Sheet one - Isometric Sheet two - Top Detail / Corner Unit Sheet three - Leg
Ways to get the most out of your
 5 Ways to get the most out of your router table When you mount a router on a table, you expand your shop s potential. To help you take advantage of this potential, we assembled five router table techniques
e) Attach the faceplate/backing plate assembly to the spindle. PROCESS
 Attach the faceplate/backing plate assembly to the spindle. PROCESS") BOARD TURNING This is an exercise in turning which can open up new vistas and potentials for any turner. A form of segmented turning best described as "STACK LAMINATE TURNING", this is unique in that it
BOARD TURNING This is an exercise in turning which can open up new vistas and potentials for any turner. A form of segmented turning best described as "STACK LAMINATE TURNING", this is unique in that it
indicates a diagram detailing the dimensions of a project part and/or the placement for pocket holes, screws, nails, etc.
 f a r m h o u s e d i ni ng c h a i r What You'll Need lumber Beginner 1-1 x2x4 1-1 x2x8 3-2x3x8 1-2x4x8 1-3/4 x 2 x 4 sheet of plywood (availability will vary) Intermediate Intermediate Beginner About
Sleek and Shapely Coffee Table
 Sleek and Shapely Coffee Table Hand-shaping brings out the beauty in this elemental piece BY MICHAEL CULLEN At the time I first made this table, in 1995, I had been building a lot of complex furniture
Hornsby Woodworking Men s Shed. Guide to the Shed s Woodworking Machines
 Guide to the Shed s Woodworking Machines SP00 Purpose The primary purpose of this document is to assist the induction of new members of the Hornsby Woodworking Men s Shed in the identification and understanding
Classic Kitchen Island
 America s leading woodworking authority Step by Step construction instruction. A complete bill of materials. Classic Kitchen Island Exploded view and elevation drawings. How-to photos with instructive
Crafting a Dizzy Bowl
 Crafting a Dizzy Bowl Visit Youtube.com Visit Youtube.com In the search section type dizzy bowl and you will find dozens of videos about turning dizzy bowls. Visit Youtube.com In the search section type
REINFORCING THE CORNERS OF FLAT FRAMES
 REINFORCING THE CORNERS OF FLAT FRAMES There are a number of different methods that may be used to join flat frame sides together. As most Woodworkers know, end grain glue joints are not nearly as strong
Essential BOX JOINT JIG
 Essential BOX JOINT JIG Home in on precise finger joints with this table saw sled. By Ken Burton The box (or finger) joint is a remarkably strong, interlocking corner joint that can be quickly made on
Ahead of the curve 2 Part
 F&C PROJECT Ahead of the curve 2 Part In the second part of this series, Chris Tribe constructs the table for his stylised cabinet which we looked at last month in F&C Accuracy in turning the legs for
Mortisting Stand. Premium Plan. In this plan you ll find: America s leading woodworking authority
 America s leading woodworking authority Premium Plan In this plan you ll find: Mortisting Stand Step-by-step construction instruction. A complete bill of materials. Construction drawings and related photos.
Keeping Plank Doors Flat
 Keeping Plank Doors Flat Five solutions, from standard to stylish BY CHRISTIAN BECKSVOORT Working strictly with solid wood, I take frame-andpanel doors almost for granted. To me it's a no-brainer: Isolate
hanging mirror Two-piece desk set Handmade Gifts Photo: John Tetreault
 hanging mirror Two-piece desk set Handmade Gifts 44 FINE woodworking Photo: John Tetreault Flatware carrier Tea light candle holder 4 Tasteful projects made quickly from scraps BY CHRISTIAN BECKSVOORT
15 Dovetail Jig. Instruction Manual. Part # 3452
 15 Dovetail Jig Instruction Manual Part # 3452 CAUTION: Please read, understand, and follow all manufacturers instructions, guidelines and owners manuals that come with your power tools. Peachtree Woodworking
Adjustable Box Joint Jig. Richard Hicks on 8/24/2015. Box or Finger Joints
 Adjustable Box Joint Jig Richard Hicks on 8/24/2015 Box or Finger Joints Adjustable Box Joint Jig Richard Hicks on 8/24/2015 Box Joints are also called Finger Joints Because they have interlocking fingers
Agricultural Mechanics and Technology Power Tool Safety Rules
 Agricultural Mechanics and Technology Power Tool Safety Rules Name: BAND SAW Use: Cutting curves, circles and irregular shapes. 1. Use clean SHARP blades. 2. The teeth should always point DOWN. 3. Adjust
Floating-Top Table. Creative joinery adds spark to this versatile piece
 Floating-Top Table Creative joinery adds spark to this versatile piece By Michael Pekovich 28 FINE woodworking This is one of those projects that almost wasn t. Rachel, my wife, had asked for a small,
Fretboard Wednesday, January 16, :36 PM
 ASL Breakdown Page 1 Fretboard Wednesday, January 16, 2013 9:36 PM - - To prepare the fretboard for cutting fret slots: True one edge of the fretboard blank on the jointer. True one of the other edges
A candle stick addresses transferring and reproducing dimensions from a plan and breaking the project into steps.
 Activities Discussion These projects allow more skill development including making items to match a drawing, sizing projects to specific dimensions, and just trying fun stuff for the first time! A candle
Christmas Bell Ornament
 Christmas Bell Ornament This is an easy Christmas ornament idea I cabbaged from a friend and skilled turner, Curt Fuller, from Utah. I kind of adapted it to my style but I still got the idea from him.
ARTS AND CRAFTS CHAIR
 ARTS AND CRAFTS CHAIR 491 MATERIALS LIST--DINING CHAIR Key No. Size and description (use) A 2 1-3/4 x 1-3/4 x 16-1/4'' oak (front leg) B 2 1-3/4 x 3-3/4 x 40-1/2'' oak (rear leg) C 1 1-3/4 x 3-3/16 x 15''
Chapter Four, Fitting out the Shell
 Chapter Four Fitting out the Shell This chapter outlines the process for fitting the parts that go into a round or stave back shell. Square back sound boxes usually have the cap and base of the sound box
Apartment Dining Table
 Jeff Branch WOODWORKING You Can Build an Apartment Dining Table By JEFF BRANCH H ave you ever found yourself wanting a new piece of furniture, but everything you see in stores is too big? Big furniture
Sweetheart Clock. About this project. Project Sponsor: INCRA Precision Tools. Woodturner PRO, LLC. Lloyd Johnson, artist
 Woodturner PRO, LLC Sweetheart Clock Lloyd Johnson, artist Special points of interest: - Cutting thin strips safely AND with consistent results - Design considerations to improve results - Registration
Jeff Branch WOODWORKING YOU CAN BUILD A. By adding subtle design elements, a traditional furniture style becomes decidedly modern.
 Jeff Branch WOODWORKING YOU CAN BUILD A By adding subtle design elements, a traditional furniture style becomes decidedly modern. Jeff Branch WOODWORKING Publisher: Jeff Branch Editor: Jeff Branch Art
under the bottom shelf and along the top shelf should do the trick.
 w Bookshelves in a Day BY ST E V E L A T T A Iget the most pure enjoyment from reproducing 18th-century furniture, but every now and then it s nice to break out of that mode and dive into a project that
Shaker Classic Change the legs to change the look
 Shaker Classic Change the legs to change the look 2 Ways B Y C H R I S T I A N BECKSVOORT not long ago, a couple ordered a set of cherry side tables from me, one for each side of their pencil-post bed.
Hinge Mortising Jig. One of the make it or break it parts of building a. 6 ShopNotes No. 74
 Hinge Mortising Jig A Mortise for a Hinge. Quick, clean, and accurate that s the only way to describe the mortise you get with a trim router and this hinge mortising jig. One of the make it or break it
COMPLIMENTARY WOODWORKING PLAN
 COMPLIMENTARY WOODWORKING PLAN Bookcase This downloadable plan is copyrighted. Please do not share or redistribute this plan in any way. It has been created for Wilton Tools, a division of WMH Tool Group.
Coining it. Whether you are a numismatist, MAKE A COIN COLLECTING CABINET. Stu s shed. By Stuart Lees
 Stu s shed PHOTOGRAPHS: STUART LEES The finished coin cabinet the perfect excuse to expand your collection. Coining it MAKE A COIN COLLECTING CABINET. By Stuart Lees Whether you are a numismatist, a notaphilist
Complete Dovetail Jig Instructions
 Complete Dovetail Jig Instructions 15 18 4 3 1 12 13 8 19 17 16 6 14 5 9 11 10 2 9 PARTS LIST - Complete Dovetail Jig Introduction Your new dovetail jig will cut Full Through Dovetails and three varieties
ining Table Materials *Notes on Materials
 D ining Table We looked around for the perfect table for the dining room. Some were too big, some too small, and most were just too expensive. So we built this one, and we are happy with the result. It
Installation Guide. Pionite Decorative Surfaces One Pionite Road, Auburn, Maine PIONITE ( )
") Installation Guide A Subsidiary of Panolam Surface Systems SMPBRO00-012 6/14 Pionite decorative laminates are designed for finished interior surfaces which require high impact, wear and stain resistance
Installation Guide A Subsidiary of Panolam Surface Systems SMPBRO00-012 6/14 Pionite decorative laminates are designed for finished interior surfaces which require high impact, wear and stain resistance
Corner Cupboard. This space-saving piece enhances any room 46 FINE WOODWORKING
 Corner Cupboard This space-saving piece enhances any room BY G A R R E T T H A C K On every trip to the Shelburne Museum near Burlington, Vt., I visit a favorite object a small hanging corner cabinet.
How to Mitre Mouldings
 How to Mitre Mouldings About Window and Door Mouldings Mitre cuts are a basic operation in most moulding installation. Mitre cuts are typically 45 degree angles, however many installations require minor
A Classic Case. Floating-tenon joinery and curly cherry update a traditional Arts and Crafts design
 A Classic Case Floating-tenon joinery and curly cherry update a traditional Arts and Crafts design B Y G R E G O R Y P A O L I N I Anyone familiar with American furniture would immediately identify this
Knockdown Bookcase. This slant-sided bookcase was a popular mail-order item in the early 1900s.
 Knockdown Bookcase This slant-sided bookcase was a popular mail-order item in the early 1900s. The Arts & Crafts movement was part of an interesting social change in America the advent of mail-order purchases.
An Inner Hive Cover. In the Beekeeper s Work Shop. Building a Bee Hive: The Inner Hive Cover. by Stephen E. Tilmann
 An Inner Hive Cover In the Beekeeper s Work Shop The project for this article is an inner hive cover. The inner cover sits on top of the topmost hive body (super) and underneath the telescoping top cover
Preparation of Wood: From Rough to Smooth, Straight and Square. Paul Roberts
 Preparation of Wood: From Rough to Smooth, Straight and Square Paul Roberts Accurate machining fundamental to quality of woodworking Rough timber-defects flat, square & straight Rough timber cut/planed
How to Make a 400 BC Greek Oenochoe Style Wine Pourer
 How to Make a 400 BC Greek Oenochoe Style Wine Pourer The purpose of the demonstration is to show how to make a hollow form wine pourer in the style of ancient Greek pottery. Live demonstration on the
Extendable Large Dovetail Jig
 Extendable Large Dovetail Jig Instruction Manual Part # 3458 CAUTION: Please read, understand, and follow all manufacturers instructions, guidelines and owners manuals that come with your power tools.
Tongue & Groove Cabinet Doors Copyright 2014 JaysCustomCreations.com
 Tongue & Groove Cabinet Doors Copyright 2014 JaysCustomCreations.com A tongue and groove cabinet door is made up of at least 5 pieces. Two horizontal rails (blue), two vertical styles (green), and one
Plywood and Wood Bending. Jesse - Kalob - Evan
 Plywood and Wood Bending Jesse - Kalob - Evan Content Plywood and Wood bending History Concepts Techniques - Laminated - steam 2-sided forms (industrial process) vs 1-sided forms (vacuum forming) History
to convert to multiply by
 Band Saw Tool School Read This Important Safety Notice To prevent accidents, keep safety in mind while you work. Use the safety guards installed on power equipment; they are for your protection. When working
Dining Table with Two-Way Drawers
 Dining Table with Two-Way Drawers DOUBLE-FRONTED DRAWERS MAKE THIS PIECE UNIQUE With two drawer fronts, a center beam, plywood bottoms, and custom pulls, these drawers are both distinctive and durable.
Build a Rolling Tool Tote
 The rolling tool tote design calls for readily available materials: a cheap hand truck (it could be an axle and two wheels), 3/4 and 1/2 thick plywood, 1/4 thick MDF (you could use plywood or hardboard)
Chili Pepper Routed Bowl
 Chili Pepper Routed Bowl MLCS Items Needed: Chili Pepper Bowl and Tray Template #9189 Top Mounted Bearing Dish Cutter Router Bit #7817 1/2 Router Collet Extension and Wrenches #9465 3/16 Radius Round Over
Bluenose II Part 2. Planking the Hull
 Planking the Hull Planking is time consuming and requires care, but it can be very satisfying to watch your creation take shape. It is also the point at which many would-be ship modelers throw up their
Router Table. Construction
 Router Table A router table is an invaluable tool. The problem, however, is that ready-built router tables are usually relatively expensive and too narrow for many projects. This router table provides
Carcase Construction. Choosing and making the right joints. by Tage Frid
 Carcase Construction Choosing and making the right joints by Tage Frid Furniture construction is broken down into two main categories: frame and carcase. In frame construction, relatively narrow boards
TOOLS 2 ½ hole saw (a good sharp one. You re going to make 36 holes.) Sharp pencil Yard stick Compass Protractor Sandpaper Rasp Drill Motor Jig Saw
 Sharp pencil Yard stick Compass Protractor Sandpaper Rasp Drill Motor Jig Saw") My version of this upright rifle rack does not have a turntable or lazy Suzan on it. I need to be able to move my rifles around so I opted to put casters on the bottom of the rack. With four casters, it
My version of this upright rifle rack does not have a turntable or lazy Suzan on it. I need to be able to move my rifles around so I opted to put casters on the bottom of the rack. With four casters, it
custom Window Makeover Before After From Workbench magazine August Home Publishing Company All rights reserved
 custom Window Makeover efore After page of 10 Windows should be something more than just an interruption in the wall. They should be part of the wall: an architectural component and an integral part of
Step-by-Step Instructions for Making the Wall-hung Bookcase
 Step-by-Step Instructions for Making the Wall-hung Bookcase When a piece of furniture has an air and look of simplicity, you can be sure that it deftly conceals the complexity of its making. I wanted this
Heirloom music box August Home Publishing Co.
 eirloom music box 2013 August ome Publishing o. Weekend Project heirloom Music Box } One chamber inside the box is reserved for the musical works. t s not often that you can build an heirloom project in