ALAN CARTER STUDIO 5332 RIVERVIEW DR., LISLE, IL
|
|
|
- Allyson Briggs
- 6 years ago
- Views:
Transcription

1 ALAN CARTER STUDIO 5332 RIVERVIEW DR., LISLE, IL SPLITTING THE DIFFERENCE This is for all you slackers out there. Sometimes half measures work just as well as fully rounded efforts. I ll show you how to cut your work in 2 and double your creativity. Split bowl turnings are an interesting and creative alternative to regular bowl turning. By cutting a traditional turning in two and joining the 2 halves together, you can create a unique distinctive work that will stand apart. The first step is to mount a round blank on the lathe. Remember that the finished work will be ½ the size of a conventional bowl so plan your design accordingly. One of the advantages of this kind of work is that you can use flat boards from the local lumberyard or hardwood dealer. You don t have to necessarily use specialty turning blanks. If the board is too narrow for you, you can cut the board crosswise and join the 2 sections to double the diameter of the piece. Since each half is visible from just one side, you don t have to worry too much about matching grain patterns. You do want to make sure the board has the same coloring across its width. If there is a pronounced variation in color from one side of the board to the other, or if the sapwood is on one side and heartwood on the other, the difference will be apparent at the seams of the piece. The following is a step by step process of how I make these split bowl turnings. The blank has been mounted to the lathe. In this case, I m using a solid piece of wood rather than gluing together 2 separate pieces. I ve used double sided turners tape to attach the blank to a waste block. This allows me to use the entire thickness of the blank, in this case about 7/8. Normally I use a waste


2 block around 1/3 diameter of the blank itself. It s important to use double sided tape made for turning. Carpet tape will only work on small pieces where there s not much chance of the blank flying off the lathe. If in doubt, err on the side of caution. Be aware, though, that this stuff holds really, really well and sometimes it takes a lot of patience to release the turning from the waste block, especially if it s a little thin. Experience will show you how much tape to use. This is a side view of the blank mounted on the lathe. It s important to note that the side of the blank facing the headstock will become the outside of the vessel, the opposite of the way you normally turn a bowl. I ve drawn up the tailstock live center to secure the blank. Since the blank is held in place with just the double sided tape, I don t want to take any chances that it will fly off the lathe. Now I ll turn the blank round and start working on the general outside shape.


3 Here I ve roughed out the outside of the vessel, up the point where it reaches the mounting block. Most of the inside of the vessel has been turned away. Note also that I ve kept the tailstock engaged for safety reasons. I don t want to take a chance of the turning coming loose from pressure placed on the outer edges of the bowl where there s no backing support.


4 The inside of the vessel has been turned with a wall thickness of around 3/16. The thickness isn t critical. It should be thin enough to resist cracking and give the finished piece a light feel but you don t have to try to impress anyone with how thin you can make the walls. Since it ll be covered completely when assembled, there s no need to do any sanding. Note that the rim is fairly wide to provide an adequate gluing surface. I ve now reversed the blank and mounted it to a set of Coles jaws. This will allow me to finish turn the outer face without having to use an elaborate vacuum chucking system and I can leave the tailstock out of the way. You could also make a large jam chuck, but the Coles jaws are much simpler to set up.


5 The outside of the vessel has been turned to its final shape. The goal is to maintain an even curve around the bowl since it ll be visible once the top is glued on. I ve added a set of grooves and lines. The grooves are an incised detail and the lines mark the area that ll be textured. I use a parting tool ground down on the sides to make it very thin, around 1/32, where it enters the wood. You can use a skew instead, but there s less chance of the tool catching and skating along the surface with the thin parting tool.

6 Now comes the tricky part. The vessel is ready to be cut in half. You want the cut edges to be as straight as possible. The best way to insure this is to make a carrier plate that will support the vessel as you cut it. The carrier plate is exactly the same width as the vessel. To accomplish this, I set the vessel on the table saw against the fence and adjust the fence until the teeth of the blade just brush the edge of the vessel. Because some table saw fences have a small gap at base, I place the vessel on a ¼ or so scrap piece of MDF so the edge will ride against the fence and not slip underneath it. Once I have the fence at the right distance and locked in place, I cut the carrier plate from a piece of 1/8 or ¼ MDF or hardboard. I make it a little longer than the diameter of the vessel so it ll ride against the fence securely. Now you have a carrier plate that s exactly as wide as the diameter of the vessel.


7 I then measure the width of the carrier plate, divide that number in half, and put a pencil mark at the halfway point. I find it easier to use a center zero ruler to find the center point than having to figure half of, say 7 5/32 for example. No math is necessary. The vessel has been secured to the carrier with masking tape and is ready to go. This is a one-time operation so the masking tape will be more than sufficient to secure the vessel. Note that I ve taped the area where the blade will cut. This will help control any chipout, especially at the back edge. Grain orientation is important here, and generally it s better to have the grain running the same direction as the saw cut.


8 I then line it up with the saw blade so that the pencil mark visually splits the gullet of the blade in half. With just a 1/8 blade width, it s pretty easy to center the line. In places where a table saw can t be used, a bandsaw will work just as well. The thin kerf of the bandsaw blade makes it easy to align the pencil mark. Since a bandsaw won t give as smooth a cut as a tablesaw, some sanding may be necessary after the 2 halves of the vessel are glued together. The vessel has now been cut in half. It s important to feed the carrier through the saw a steady rate to insure that the cut edges will be perfectly straight. If you change feed rates or stop partway through, you can get a slight dip in the cut edge. Or worse, you could get a nasty kickback. There s no danger of kickback with a bandsaw, but it s important to properly tune the saw to avoid blade drift. You want the cuts to be as centered and straight as possible.


9 This is a piece of black dyed veneer I cut to act as a detail strip where the 2 halves are joined. This strip also helps conceal the differences in grain pattern from one side to the other. On larger pieces, I ll use either multiple layers of veneer or solid wood cut to 1/16 or so thickness. Once the vessel is cut in half, I proceed with whatever detailing I want, in this case a design made of pierced little squiggles. Once the detailing is done, I glue together the 2 halves with the divider strip in between. After I apply the glue, I hold the halves together, pressing down vertically on a flat surface to make sure the edges line up and then clamp the halves together until the glue sets. Lightly sand the edges on a piece of sandpaper mounted on a flat surface to insure that the edges and seams are perfectly aligned. Don t use too much pressure during sanding as this may slightly cup the edges. It isn t necessary to do any smoothing or finishing on the


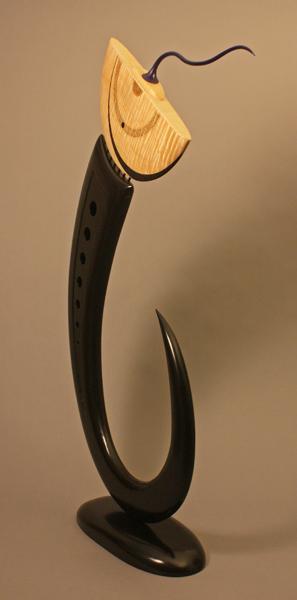
10 inside since you can t really see it once the top is on. I often paint the inside black so nothing shows, giving the interior a bit of mystery. The outline of the top has been traced on the blank, here a 1/8 piece of wenge. I ve drawn a line through the center, using marks I made where the center spline is located. I divided the line in half and marked where the center of the hole will be. The hole for the top finial has been drilled. The measurements I took earlier will insure that the hole will be in the center of the finished top. Don t make the hole wider than the distance between the 2 sides of the vessel at its center point. The top has been glued to the vessel and the edges sanded smooth. It s important to not sand too aggressively and sand away any details.


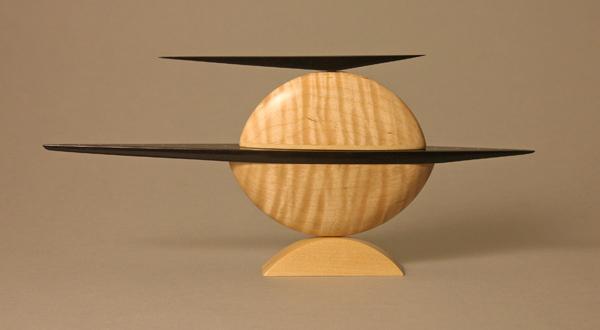
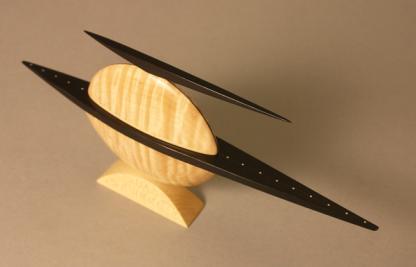
11 This is the completed vessel from the front, with the base and top completed. This is an angle view showing the unique shape the split bowl technique offers.


12 I like to add little surprises, so I put a small finial on the underneath side of the top. The design possibilities are endless with this kind of vessel. You can make quarter round pieces or even narrower ones. They can be oriented in different directions and different size turnings can be combined to make unusual sculptural pieces. These are example of pieces I ve made using this process.


13
ALAN CARTER STUDIO 7 Cane Creek Circle, Fairview, NC
 ALAN CARTER STUDIO 7 Cane Creek Circle, Fairview, NC 28730 630-390-8821 apcarter@sbcglobal.net www.alancarterstudio.com TURNING SMALL GOBLETS As a follow up to my thin stem article, here s a how-to on
Perhaps the best thing about. Three bowls slightly rearranged Twisted Possibilities
 Three bowls slightly rearranged Twisted Possibilities By Malcolm Tibbetts Lacewood Ribbon, 13 7½" Perhaps the best thing about segmented turning is the total lack of restrictions; there is no end to the
Instructions for Turning Laminated Bracelets
 Instructions for Turning Laminated Bracelets 1. Start with Design 1. Make a paper template circle for the bracelet. Use this to check the fit on the person you are making the bracelet for. After checking
Hinge Mortising Jig. One of the make it or break it parts of building a. 6 ShopNotes No. 74
 Hinge Mortising Jig A Mortise for a Hinge. Quick, clean, and accurate that s the only way to describe the mortise you get with a trim router and this hinge mortising jig. One of the make it or break it
Fig2: The Sliding Glue Block from the back.
 Ornament Stand Introduction It was one of those forehead smacking moments. I was taking the #2 jaws off my Stronghold chuck, to put on my homemade wooden two jaw chuck set-up. For some reason instead of
FLAT TO FABULOUS Make a Bowl from a Single Flat Board - Or How to Eat Salad off of Scrap Wood
 FLAT TO FABULOUS Make a Bowl from a Single Flat Board - Or How to Eat Salad off of Scrap Wood Let s face it: Woodworkers are frugal people. In fact, if you are anything like me, you have a hard time throwing
Stand & Bowls. optional. Online Extra
 Online Extra optional Stand & Bowls Once you make a bowl using the jig and technique from Woodsmith No. 229, it s only natural to see what else you can do with it. The starting point is to make copies
Two-Piece Hollow Form Turning Hollowing Without the Hassle
 Two-Piece Hollow Form Turning Hollowing Without the Hassle Finger Lakes Woodturners January 17, 2013 1 Hollow Turning Usually turning a closed or semi-closed form through a small opening Can be done using
GENERAL NOTES: Page 1 of 9
 Laminating A Zia Into A Turning Blank by W. H. Kloepping, Jan. 2009 This describes how a zia (the New Mexico state symbol) can be laminated into a turning blank. Materials needed: Square Turning Block
Step by-step three piece lid and finial
 Step by-step three piece lid and finial Hi all. Just thought I would share my way of creating a three piece finial. This really adds interest to vessels and boxes by providing a visual highlight and enabling
e) Attach the faceplate/backing plate assembly to the spindle. PROCESS
 Attach the faceplate/backing plate assembly to the spindle. PROCESS") BOARD TURNING This is an exercise in turning which can open up new vistas and potentials for any turner. A form of segmented turning best described as "STACK LAMINATE TURNING", this is unique in that it
BOARD TURNING This is an exercise in turning which can open up new vistas and potentials for any turner. A form of segmented turning best described as "STACK LAMINATE TURNING", this is unique in that it
Denise M. DeRose Handled Clamshell Handbag
 Denise M. DeRose Handled Clamshell Handbag Materials: Wood 2 discs between 6 and 9 in diameter -- 4/4, 6/4 or 8/4 1 piece of thin hardwood ¼ inch thick and 4 x 10 Wood for waste blocks Supplies Small piece
A Unique Cutting Board
 A Unique Cutting Board When I was asked to make a cutting board as a special gift, I wanted to do something new and eye-catching. Tired of squares and straight lines, I envisioned curving accents not shallow
Router Table. In a recent article, I wrote about the router table I built for the Center. 5 Essential Jigs for the
 5 Essential Jigs for the Router Table Great fixtures and fences offer better control and new possibilities BY PETER SCHLEBECKER In a recent article, I wrote about the router table I built for the Center
Making a snap lid box By Jeffrey A Lavine
 Making a snap lid box By Jeffrey A Lavine Some call them boxes, some call them lidded bowls, others call them vessels or containers but whatever you call them they are both enjoyable and a challenge to
A candle stick addresses transferring and reproducing dimensions from a plan and breaking the project into steps.
 Activities Discussion These projects allow more skill development including making items to match a drawing, sizing projects to specific dimensions, and just trying fun stuff for the first time! A candle
Bandsawn curves, Precise and repeatable
 Bandsawn curves, Precise and repeatable Template-guided techniques from a master of the machine BY BRIAN BOGGS In 35 years working wood I ve gradually acquired many machines, but the bandsaw remains at
1. Mount between centers round cut tenons on both ends (same diameter).
.") LONG NECK HOLLOWFORM Jim Terry Piedmont Triad Woodturners Association Turning this hollow form presents some interesting challenges in mounting and holding a turning. Both top and bottom are completely
LONG NECK HOLLOWFORM Jim Terry Piedmont Triad Woodturners Association Turning this hollow form presents some interesting challenges in mounting and holding a turning. Both top and bottom are completely
Turning a Five Sided Bowl
 Turning a Five Sided Bowl Cut and prepare the blank. This must be square and parallel to each side. The blank must also be small enough to fit the swing of your lathe, when turning off centre. First find
Greene & Greene. Mailbox. by Seth Keller. Signature details create an elegant box. 2 AmericanWoodworker.com
 Greene & Greene Mailbox by Seth Keller Signature details create an elegant box. 2 AmericanWoodworker.com We needed a new mailbox, but I couldn t find an off-the-shelf version that I liked. So I decided
Ways to get the most out of your
 5 Ways to get the most out of your router table When you mount a router on a table, you expand your shop s potential. To help you take advantage of this potential, we assembled five router table techniques
MATERIALS & TOOLS REQUIRED INTRODUCTION. Before you start turning, read and understand this entire procedure.
 INTRODUCTION This set of instructions shows one method to turn mills.there are many other possible variations and techniques. NOTE: These instructions are specific to 'Chef Specialties' mechanism. For
SEGMENTED TURNING. Segmenting 101
 SEGMENTED TURNING Segmenting 101 The greatest difference between segmented turning and traditional turning is the turner must decide what final form the turning will take even before the first cut is made.
Bangle Bracelet Instructions
 Bangle Bracelet Instructions (Using Penn State Bangle Bracelets) Tools & Equipment: Lathe, turning tools of choice, Band saw or scroll saw, Drill Press or 4 jaw lathe chuck with standard #2 jaws, mini
ribbon handle box 2010 August Home Publishing Co.
 ribbon handle box 00 ugust Home Publishing Co. eature Project Ribbon Handle ox This imaginative design not only makes a wonderful gift, it s also a great way to build your woodworking skills. Ithink of
Domed Cove Box. Materials: Dry stable hardwood, straight grained with pronounced end grain, about 3+ square and 3+ long Sandpaper Finish of choice
 Domed Cove Box Michael G. Stafford I don t know who first turned a box where the sides were curved in to form a waist or as we like to say in woodturning, coved. I started gradually turning boxes with
Crafting a Dizzy Bowl
 Crafting a Dizzy Bowl Visit Youtube.com Visit Youtube.com In the search section type dizzy bowl and you will find dozens of videos about turning dizzy bowls. Visit Youtube.com In the search section type
TURNED BIRD HOUSES Shelter from half-inch-thick stock
 TURNED BIRD HOUSES Shelter from half-inch-thick stock SUSAN SCHAUER LOCALS CALL ME THE BIRDHOUSE Lady. I take it as a compliment. My turning career began making lathe-turned birdhouses, and I continue
Christmas Bell Ornament
 Christmas Bell Ornament This is an easy Christmas ornament idea I cabbaged from a friend and skilled turner, Curt Fuller, from Utah. I kind of adapted it to my style but I still got the idea from him.
While one of the most
 Plans NOW www.plansnow.com TOOLS & TECHNIQUES SERIES While one of the most useful tools for cutting joints is a dado blade, selecting which type to buy can be a little bit confusing. To simplify it, all
Serving Tray. When some good friends got married recently, An exercise in template-making yields a great gift project that s easy to duplicate
 Serving Tray An exercise in template-making yields a great gift project that s easy to duplicate END Create from 3 8 2 8" piece. By Geoff Noden When some good friends got married recently, I decided to
Curved Pieces are a Common Woodworking Challenge
 Curved Pieces are a Common Woodworking Challenge I recently created a set of four dining chairs that required three curved back rest pieces each. On the top piece of each chair I wanted to inlay a marquetry
Curved Metal Segmenting
 Curved Metal Segmenting A Tutorial by: David Washburn A.K.A djwood1 This tutorial was downloaded from The International Association of Penturners Introduction As I continue to learn about pen turning,
This is an excerpt from the book. Turning Bowls. by Richard Raffan. Copyright 2001 by The Taunton Press
 This is an excerpt from the book Turning Bowls by Richard Raffan Copyright 2001 by The Taunton Press www.taunton.com 4 ROUGH-TURNING CHAPTER THE PROFILE Ialways rough out bowls in two stages. First I turn
Face Once you've tapped the hole, cut the circles out on your band saw.
 Introduction An earlier article in More Woodturning on turning wine stoppers got me thinking about collet chucks. I wondered if I could make one entirely out of wood. I thought this would be just an exercise
Turning a Christmas Angel
 Turning a Christmas Angel Introduction I was at work one day and a co-worker asked if I had ever turned an angel. I said no. She said I picked one up at craft fair while on vacation. Would you like to
Woodturning Fundamentals American Association of Woodturners, January 2013
 Woodturning Fundamentals American Association of Woodturners, January 2013 Methods and Jigs for Reverse Turning Bowls By John Lucas There are many ways to hold bowls and hollow vessels so that you can
Shoulder Plane. dovetailed. fine tools. Make an heirloom tool and learn the secret to creating double dovetails in metal it s easier than you think.
 fine tools dovetailed Shoulder Plane Make an heirloom tool and learn the secret to creating double dovetails in metal it s easier than you think. I ve always been fascinated by old, metal hand planes.
Slicing Jig For Pen Inlays
 Slicing Jig For Pen Inlays By Randall Smith (randyrls) May 2008 This article has been downloaded from the library of the International Association of Penturners. www.penturners.org You are welcome to reproduce
Grade 11 Woods Lift Lid Coffee Table. Based on Under the big Top from Popular Mechanics Website
 Grade 11 Woods Lift Lid Coffee Table Based on Under the big Top from Popular Mechanics Website TABLE TOP 1. Select enough lumber to construct a top that is between 22 ½ and 24 wide after jointing. Ensure
Using the Richard Joyner Off-Center Jig By Arnold Ward
 The Richard Joyner Off-Center Jig is a faceplate tool that provides a crea ve way to make small mul -axis turnings. The jig has 8 centers and 24 index posi ons. It is especially useful when precision between
1Use the metal file to smooth
 Yamato: Step-by-step 85 Parts of the bridge and the hull a b c d e f a Part of the bridge b Part of the bridge c Part of the bridge d Radar x 2 e Part of the bridge x 2 f Wire Recommended tools and materials
3Insert the second rod no. 4
 Yamato: Step-by-step 37 The stern block and searchlight control towers a b c d e f Recommended tools and materials Wood glue Sandpaper (no. 800 grain) Metal file Putty Craft knife For metal: Super Glue
Hand Dovetails. They're really not that hard to do. by Alphonse Mattia
 Hand Dovetails They're really not that hard to do by Alphonse Mattia Dovetailing is one of the strongest and most attractive methods of joining the ends of boards together. Traditionally, handcut dovetails
Procedure for Longworth Chuck construction
 Procedure for Longworth Chuck construction Overall construction The Longworth chuck is composed of three major components. Connected to the lathe spindle is some device that fastens to the first of two
Jimmy s 2 nd demonstration was what he called an African Drum style box made from Iroko with a cocobolo insert in the lid with inlaid sterling silver.
 Jimmy s 2 nd demonstration was what he called an African Drum style box made from Iroko with a cocobolo insert in the lid with inlaid sterling silver. He started by roughing out the block with a roughing
Working with Wood & Tools. Marking and Measuring. Tools you will need:
 Marking and Measuring English Measure If you want to make pieces of a certain size, you will have to measure and mark them before you do any cutting. Examine a rule and find an inch mark. The mark (")
Tongue & Groove Cabinet Doors Copyright 2014 JaysCustomCreations.com
 Tongue & Groove Cabinet Doors Copyright 2014 JaysCustomCreations.com A tongue and groove cabinet door is made up of at least 5 pieces. Two horizontal rails (blue), two vertical styles (green), and one
Instructables Butcher Block Top
 Instructables Butcher Block Top Project Overview: This project requires basic woodworking skills and access to woodworking machines. Woodworking machines have sharp cutting edges and are NOT forgiving.
COMPLIMENTARY WOODWORKING PLAN
 COMPLIMENTARY WOODWORKING PLAN COFFEE TABLE PLAN This downloadable plan is copyrighted. Please do not share or redistribute this plan in any way. It has been paid for on your behalf by JET Tools, a division
Floating-Top Table. Creative joinery adds spark to this versatile piece
 Floating-Top Table Creative joinery adds spark to this versatile piece By Michael Pekovich 28 FINE woodworking This is one of those projects that almost wasn t. Rachel, my wife, had asked for a small,
OFFSET TURNINGS. By using an eccentric chuck, SHOPMADE CHUCK BUILD A FOR. David Mueller FEATURE. Build the chuck body
 FEATURE BUILD A SHOPMADE CHUCK FOR OFFSET TURNINGS David Mueller By using an eccentric chuck, you can add interest to turnings such as pendants and box lids. The workpiece is mounted out of alignment with
Turning Pendants with the Richard Joyner Eccentric Backer Plate
 Turning Pendants with the Richard Joyner Eccentric Backer Plate Vaughn McMillan August 2010 As the result of a great tool sharing effort by my friend Jonathan Shively at http://familywoodworking.org, I
REINFORCING THE CORNERS OF FLAT FRAMES
 REINFORCING THE CORNERS OF FLAT FRAMES There are a number of different methods that may be used to join flat frame sides together. As most Woodworkers know, end grain glue joints are not nearly as strong
Fig01: A spindle with the intended extents of a spiral marked with V-cuts.
 Spiral Layouts Three Ways Introduction The traditional way to lay out spirals leaves me cold for a simple spiral on small work with 5 full turns you would need 4 longitudinal lines, dealing with parallax
TURNING A NATURAL EDGE BOWL
 TURNING A NATURAL EDGE BOWL by Jim Burrowes Make sure your lathe is at the lowest speed setting.first, mount your blank between centers. Use the tool rest as a reference to align the top (bark side) so
Notes for Making Wood Rings With Stainless Steel Insert Centers
 Notes for Making Wood Rings With Stainless Steel Insert Centers Background These notes describe how to make a ring with a stainless steel (SS) insert and a wood exterior band. They also include information
hanging mirror Two-piece desk set Handmade Gifts Photo: John Tetreault
 hanging mirror Two-piece desk set Handmade Gifts 44 FINE woodworking Photo: John Tetreault Flatware carrier Tea light candle holder 4 Tasteful projects made quickly from scraps BY CHRISTIAN BECKSVOORT
15 Dovetail Jig. Instruction Manual. Part # 3452
 15 Dovetail Jig Instruction Manual Part # 3452 CAUTION: Please read, understand, and follow all manufacturers instructions, guidelines and owners manuals that come with your power tools. Peachtree Woodworking
A Day House. A View of One Way to Finish the Exterior of The Day House. Read these instructions all the way through before beginning this project.
 A Day House A View of One Way to Finish the Exterior of The Day House Read these instructions all the way through before beginning this project. General Comments For the purposes of this project, the standard
Shop Projects. Plans NOW. Each Built from One Sheet of Plywood!
 Plans NOW www.plansnow.com 5 Shop Projects Each Built from One Sheet of Plywood! Tool Tote - Sawhorse - Workbench - Wood Bin - Wall Cabinet PLUS: 7 SHOP SECRETS Working with Plywood Dread the thought of
136 PLYWOOD DESK 522
 136 PLYWOOD DESK 522 Simple in design and inexpensive, this plywood desk is made from a single 4- x 8-foot panel. Plywood is available with many hardwood veneers; it can also be covered with plastic laminate,
Extendable Large Dovetail Jig
 Extendable Large Dovetail Jig Instruction Manual Part # 3458 CAUTION: Please read, understand, and follow all manufacturers instructions, guidelines and owners manuals that come with your power tools.
Learning Objectives To be able to state the different safety precautions associated with the lathe. To be able to identify and state the function of t
 Learning Objectives To be able to state the different safety precautions associated with the lathe. To be able to identify and state the function of the different parts of the lathe. To be able to identify
Perfect Tapers. on the Tablesaw. Make tapered legs of all types, quickly and safely
 Perfect Tapers on the Tablesaw Make tapered legs of all types, quickly and safely B Y S T E V E L A T T A 30 F I N e W o o D W o r K I N G COPYRIGHT 2012 by The Taunton Press, Inc. Copying and distribution
Building the Gothic Church
 Building the Gothic Church Mold #54 does not contain all of the blocks to build this church. You will need extra regular blocks (1/2" x 1/2" x 1") and square blocks (1/2" x 1/2" x 1/2"). These blocks can
Mid-Century Credenza Thoughtful details and modern joinery merge in this sleek design
 Mid-Century Credenza Thoughtful details and modern joinery merge in this sleek design BY LIBBY SCHRUM Mid-Century Modern furniture has not been wildly popular since, well, the mid-century. But fashion
Class Descriptions for DWR2016
 John Beaver Class Descriptions for DWR2016 Wave Bowls I will demonstrate the basic techniques to make my signature Wave bowls. First project will begin with a solid block of wood and free hand cut on a
Demilune 4. Apron Joinery. Curved Apron Tenon. Bridle Joint Legs. Bridle Joint Front Apron
 Demilune Email 4 Apron Joinery There are two types of joints used in connecting the aprons and legs. The rear legs use conventional mortise and tenon joints, while the front legs use the less conventional
JUNIOR CERTIFICATE 2005 MATERIALS TECHNOLOGY (WOOD) MARKING SCHEME ORDINARY LEVEL SECTION A
 MARKING SCHEME ORDINARY LEVEL SECTION A") JUNIOR CERTIFICATE 2005 MATERIALS TECHNOLOGY (WOOD) MARKING SCHEME ORDINARY LEVEL SECTION A NOTE Please ensure that totals for each question are divided by two before entering marks on marking sheets.
JUNIOR CERTIFICATE 2005 MATERIALS TECHNOLOGY (WOOD) MARKING SCHEME ORDINARY LEVEL SECTION A NOTE Please ensure that totals for each question are divided by two before entering marks on marking sheets.
Odd Wobbler Instructions By: Don Geiger
 Odd Wobbler Instructions By: Don Geiger Stock Size Calculations and Reference Table When preparing stock material for turning an Odd Wobbler, you will need two pieces of dry wood that is about one inch
From "American Woodturner" the Journal of the American Association of Woodturners, April 2015, vol 30, no 2 - CUSTOM - TOOL HANDLES
 From "American Woodturner" the Journal of the American Association of Woodturners, April 2015, vol 30, no 2 - CUSTOM - TOOL HANDLES Carl Ford I have found most commercially available tool handles uncomfortable
Making a Windsor Stool
 Brian Clifford A Windsor Stool - page 1 Making a Windsor Stool The Windsor style The Windsor style is the name of a particular type of traditional English chair. Within this style there are a variety of
Building and installing dividing walls, by Tobias Sternberg
 Building and installing dividing walls, by Tobias Sternberg This instruction sets out to show one way to build and install simple dividing walls for studio spaces. I have written it as clearly as possible.
Introduction. Recess. Making the Recess
 Introduction A few weeks after last Christmas I got an idea for an ornament. That may seem to be backwards timing as before Christmas would have advantages. But Christmas is when I think about ornaments
The Kruger Eccentric
 The Kruger Eccentric Instructions for Use of the Dual Taper Reel Seat Filler and Eccentric Reel Seat Recess Turning Mandrels Rick Kruger 503-860-6346 krugerr@easystreet.net The Dual Taper Reel Seat Filler
Turning Penguin and Chick Ornaments
 Turning Penguin and Chick Ornaments INTRODUCTION I was looking for a way to use turning, power carving and painting to make a Christmas Ornament. Penguins have become popularized by television, movies
Turning an End Grain Lidded Box
 Turning an End Grain Lidded Box by Michael Stafford Copyright 2006 All Rights Reserved 1 Turning an End Grain Lidded Box Turning an end grain lidded box differs from face grain bowl turning primarily in
Chapter Six. Getting started inboard. Installing the false deck
 A close look at the thinning down of the bulkhead extensions. They are just 1/16 thick after fairing them. Chapter Six Getting started inboard This next step is one of the last remaining messy tasks to
Malcolm Zander malcolmzander.com Ottawa, Ontario Canada
 Malcolm Zander mzander@magma.ca malcolmzander.com 613-226-5041 Ottawa, Ontario Canada I began turning in 2000. Obviously I have a lace fetish. This I blame on Binh Pho, whose seminar in Albany I attended
How To Make A Longworth Chuck OCTOBER 17, 2010
 How To Make A Longworth Chuck OCTOBER 17, 2010 Ravenview 27 Comments In The Shop In The Shop, tutorials Need an easy way to finish the bottom of your woodturnings? Tired of continually screwing in and
WOODWORKING GUIDE: BASIC JOINERY
 WOODWORKING GUIDE: BASIC JOINERY Close isn't really good enough. A perfect fit is what counts. When building furniture, there are many ways to construct joints. The simplest are those that use mechanical
Wooden Faceplates. Tapping on the Lathe
 Wooden Faceplates There are lots of turning jobs where spending some time on set-up makes the turning go quicker and easier. Making Wooden Faceplates is one way to make set-ups and jigs for turning. As
O nament. Birdhouse. Birdhouse Christmas ornaments have become very
 Birdhouse O nament Photo by Al Parrish Dale Nish, one of the principal architects of the turning revival, shares some turning techniques. Birdhouse Christmas ornaments have become very popular the last
Making a Veneer Sand Shaded Fan
 P. Michael Henderson January 24, 2007 There are many decorative elements for furniture that you can make using veneer in fact, the possibilities are limited only by the imagination of the veneer worker.
Basic Box Making by Alan Hewitt
 Whilst it is possible to make boxes in many different ways I will introduce you to my method of box making. I am indebted to many of the top wood-turners for their demonstrations of box making, and the
Essential BOX JOINT JIG
 Essential BOX JOINT JIG Home in on precise finger joints with this table saw sled. By Ken Burton The box (or finger) joint is a remarkably strong, interlocking corner joint that can be quickly made on
Tilt-Top Table Elegant project builds hand-tool and machine skills
 Tilt-Top Table Elegant project builds hand-tool and machine skills BY M A R I O R O D R I G U E Z As a woodworking instructor, I m always looking for interesting and challenging projects to present in
How to Make a 400 BC Greek Oenochoe Style Wine Pourer
 How to Make a 400 BC Greek Oenochoe Style Wine Pourer The purpose of the demonstration is to show how to make a hollow form wine pourer in the style of ancient Greek pottery. Live demonstration on the
AC50 Enclosure - Thin Edge
 AC50 Enclosure - Thin Edge 2 3/16??? 4 PL 11/16 1 7/8 Piping Groove 2 7/8 Top thickness = 18mm 6 7/16 All other pieces thick Corner Radii and joints =?? Bracing blocks for back = 5/8 square, 2 ea. Back
3Position the hull of the ship as
 Yamato: Step-by-step 25 The hull and stern deck c b d a b d c e e f a Rear frame b Stern deck x 2 c Stern deck x 2 d Side wall x 2 Wood glue Sandpaper (no. 400 grain) Craft knife Pliers d Side wall x 2
Nojo Design: Large Step Cabinet: February 2012
 Nojo Design: Large Step Cabinet: February 2012 The largest single piece of furniture I ve ever made is this stepped cabinet. Finished piece is 8! tall and over 10 long. This project has been great, although
Charles Neil Dovetail Jig Instructions
 Charles Neil Dovetail Jig Instructions Thank you for purchasing the Charles Neil (CN) Dovetail Jig. This is an easy to use and flexible jig for cutting through dovetails. These instructions complement
custom Window Makeover Before After From Workbench magazine August Home Publishing Company All rights reserved
 custom Window Makeover efore After page of 10 Windows should be something more than just an interruption in the wall. They should be part of the wall: an architectural component and an integral part of
Coimisiún na Scrúduithe Stáit State Examinations Commission JUNIOR CERTIFICATE 2010 MARKING SCHEME MATERIALS TECHNOLOGY WOOD ORDINARY LEVEL
 Coimisiún na Scrúduithe Stáit State Examinations Commission JUNIOR CERTIFICATE 2010 MARKING SCHEME MATERIALS TECHNOLOGY WOOD ORDINARY LEVEL JUNIOR CERTIFICATE 2010 MATERIALS TECHNOLOGY (WOOD) MARKING
Make your own zero clearance throat plate.
 Make your own zero clearance throat plate. A picture tutorial By Wayne Breshears One of the more important table saw accessories you can have is a zero clearance insert or throat plate. The close tolerance
Handle Hardware Kit for Router Plane 05P38.10
 Handle Hardware Kit for Router Plane 05P38.10 Introduction With this kit, you can make a set of replacement handles for the Veritas Router Plane. The following instructions describe how to make one handle
The finished ornaments.
 Introduction I like to make different Christmas Ornaments every year to give to my relatives. This article describes the rnaments that I m making this year. The ornaments use a split turning of either
Jack Tar Spar Leather Kit. Thank you for choosing our premium spar leather kit.
 OARSMAN MARINE PRODUCTS Swanson Boat Company Rodger C. Swanson, Proprietor 420 Broad Street Windsor, CT 06095 Phone: (860)299-6502 E-Mail: rodgerswanson412@comcast.net Website: www.oarsmanmarinetallow.com
Durable Outdoor Table
 54 F I N E W O O D W O R K I N G Durable Outdoor Table Ipé table will seat six and weather many seasons B Y D A V I D B E D R O S I A N Last summer brought a new pool to our backyard. With it came more