COPYRIGHT 2011 by The Taunton Press, Inc. Copying and distribution of this article is not permitted.
|
|
|
- Jordan Flowers
- 5 years ago
- Views:
Transcription
1 30 FINE woodworking


 Post, 1 15 16 in. dia. at base Grain direction 5 8 in. 5 8 in. 2 in.")

 is ideal, but because that kind of plank is rarely available, I usually cut")

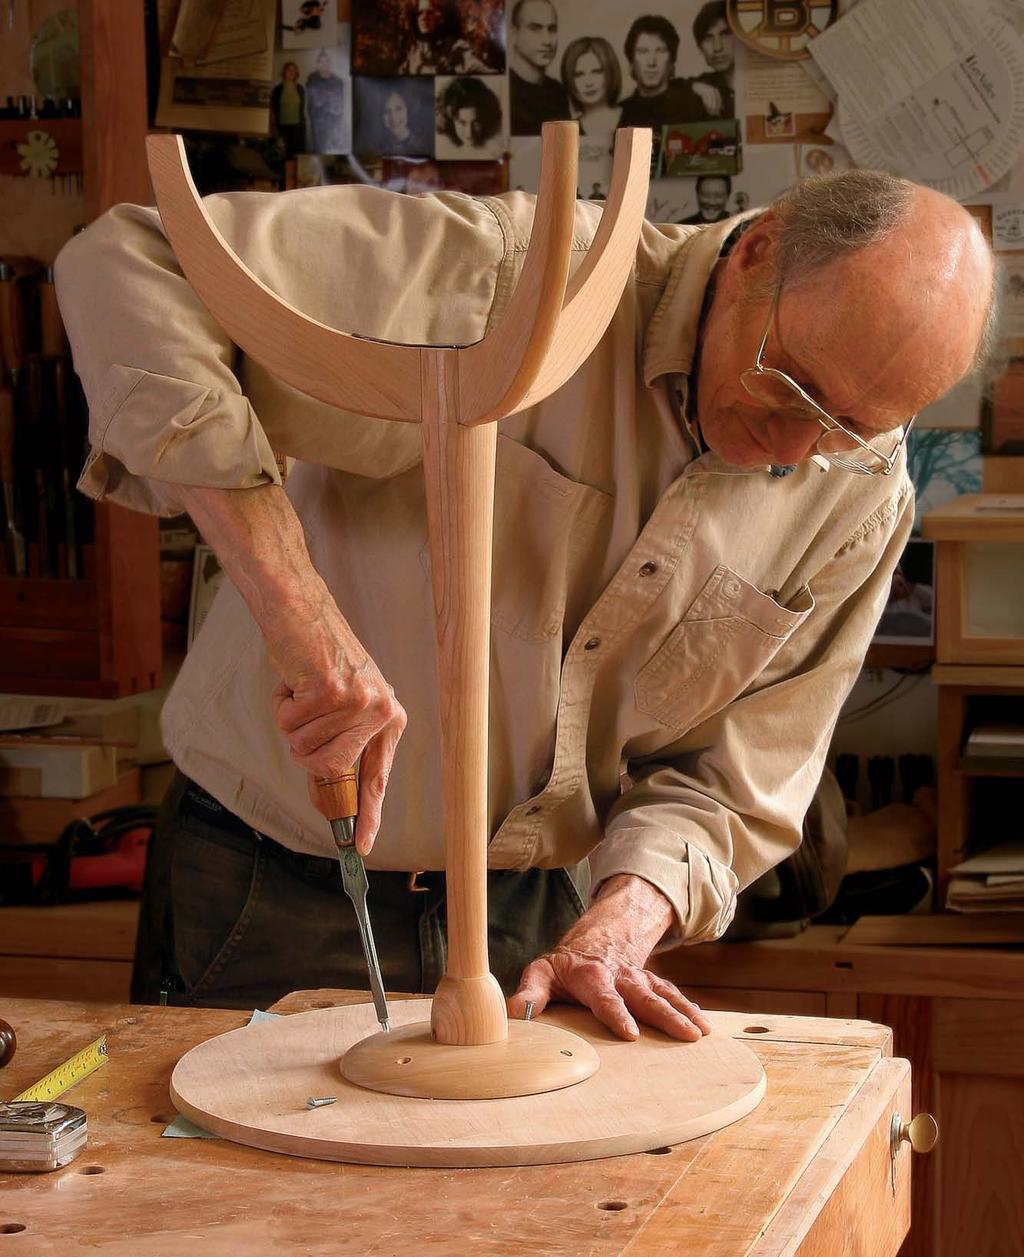
2 Shaker Side Table 1 2 in. Build a delicate version of this iconic round stand Subtop, 3 4 in. thick by 7 in. dia. Top, 1 2 in. thick by in. dia. top edge Profile 3 4 in. BY CHRISTIAN BECKSVOORT The first time I saw a photo of this small table, I was thrilled, but also taken aback. It looked to me like something designed in denmark in 1960, not in a Shaker village in the early 1800s. The Shakers designed a variety of beautiful round stands, and I ve written about other versions and built more than 100 of them but this one in my opinion is the ultimate. With its slightly concave tapering post, thin top, and light, halfcrescent legs, the piece sums up the power and simplicity of Shaker design. It also happens to be the rarest of round stands; only one original in this form is known to exist. I ve since built several reproductions, in a variety of woods, and refined the parts until they are as near to the original as possible. To purchase expanded plans and a complete cutlist for this table and other projects, go to FineWoodworking.com/PlanStore. Leg, 5 8 in. thick Table spider reinforces joint (hortonbrasses.com). Post, in. long (see profile, p. 32) Post, in. dia. at base Grain direction 5 8 in. 5 8 in. 2 in. subtop edge Profile leg-to-post DoVetAils Cross section of leg 9 16 in. 2 in in. Start with the top My first move when I make this stand is to glue up a blank for the in.-dia. cherry top and put it aside. a singleboard top (like the original) is ideal, but because that kind of plank is rarely available, I usually cut two pieces from a 9-in. or 10-in. board and edge-glue them. I look for a flatsawn or riftsawn board and disguise the glueline by putting two riftto-quartersawn edges together. Turn the post Start the post by selecting stock with grain as straight as possible, and turn in in. 7 8 in in. leg Profile WHERE TO FIND THE RAREST ROUND STAND The lone original example of this table, made at the Mt. Lebanon, N.Y., Shaker village in 1820, is in the collection of the American Museum in Bath, England. John Kassay measured and drew the table for his classic book, The Book of Shaker Furniture (1980, The University of Massachusetts Press), which is still in print. MarCh/aPrIL


3 Turn a slender post 1 in. dia in. 8 in. dia in. dia in. dia in in. dia in. dia in. dia in. dia in. dia in. dia in. dia in in. dia in. dia in. dia in. dia in. dia in. dia. 2 in. dia in. dia. Post profile 2 in. 2 Marked and measured. After turning the cylinder, use a pencil to transfer diameter marks from a story stick (1). Then turn the tenon (2) and the bulb at the top of the post (3). 3 a 2-in. cylinder. Using a story stick, make pencil marks on it at each of the dimensions. On the top end, turn a tenon 1 in. dia. by 3 4 in. long. Just below the tenon is a flared bulb. Its curve is not an arc, but rather a section of a parabola. Turn the diameter below the bulb first, using a parting tool. Then use a small gouge and a spear-point scraper to turn the bulb itself. The long part of the post is not a straight taper, but a concave flared curve, and reproducing that subtle shape requires precise turning. I use a parting tool fitted with a gate jig to make a series of cuts that will control the shape of the curve. If you prefer, you can use calipers instead of the gate jig. The last section of the post where the legs will dovetail in must be perfectly cylindrical, and the small shoulder should be crisp. Make a series of depth cuts with a parting tool, clean them up with a spear-point scraper, and follow with sandpaper on a block. With the bottom cylinder complete, move on to the main section of the post, cleaning out the waste between the parting-tool cuts with a sharp gouge and then fairing the curve with a thumbnail gouge. When the turning is finished, leave the lathe running and sand the whole post to at least 400 grit, followed by a rubdown with 0000 steel wool. Shape and dovetail the legs Make a pattern for the legs and trace it three times onto 5 8-in.- thick stock, orienting the pattern so the wood s grain runs more or less straight between the two farthest points of the leg. Cut out the legs on the bandsaw and sand the curves fair. Then, at the router table, use a roundover bit to cut a shallow arced profile into the curved edges of the legs. Next, create the dovetail keys on the legs at the router table, using a 14 dovetail 32 FINE woodworking Photos: Jonathan Binzen; drawings: Bob La Pointe
 or a pair of calipers to control the depth")


4 1 2 3 Dial in the diameters. Use a gate jig (1) or a pair of calipers to control the depth of cut. Establish the critical diameters of the post with a parting tool (2). Then remove the waste between the grooves with a heavy, shallow gouge (3), before fine-tuning the surface with a fingernail gouge. TUrN THE SUBTOP WHILE YOU re AT THE LATHE Sandpaper cleanup. Smooth the taper and the bulb with sandpaper, going through the grits from 150 to 400, and finishing with steel wool. For the cylinder at the base, back up the paper with a sanding block to be sure the surface stays flat. Shaping the subtop. After bandsawing out a disk, turn it perfectly round. Then shape the curved profile on the bottom edge with a roundnosed scraper. MarCh/aPrIL

. Strapped in for sanding.")
.")
 with a")


5 Shape the legs Leg layout. Trace the shape using a cardboard template, orienting the grain so it runs straight from tip to tip (see leg profile, p. 31). Strapped in for sanding. After cutting the legs, tape them in a stack and smooth the ends and the outside curve at the disk sander (left). Sand right through the tape. Re-tape the stack, then fair the inside curve (right) with a drum sander. DOVETAIL THE LEGS TO THE POST Standing dovetail. Cut the sliding dovetail keys at the router table, using a dovetail bit and a tall fence. Fence Leg, 5 8 in. thick 9 16 in. Socket layout. With the post inverted in the vise, scribe around the dovetail key. Pine cushion blocks hold the post steady. Shape the hollows in the cushion blocks with a gouge. Taper them to match the taper of the post. 14 dovetail bit Rubber bands hold blocks on round post. 34 FINE WOOdWOrkINg


6 bit. Then finish-sand the legs to 400 grit and rub them with 0000 steel wool. Mark and cut the dovetail sockets To properly locate the dovetail sockets, clamp the post upside down in the vise and divide the bottom into three 120 sections. You can do this with a protractor or a compass, but I do it with paper. Wrap a strip of paper around the end of the post, marking and cutting it to the exact circumference. Flatten the paper on the bench and divide its length into exact thirds. Then wrap the paper around the post again and transfer the marks to the end grain. Now position one of the leg dovetails on the post s end grain so that it sits flat and the tips of the shoulders just touch the rim of the post. Put it just to one side of one of the third marks. Then scribe around the dovetail with a knife. Repeat the process for all three legs, and be sure to number the legs and their mating sockets. If the knife marks are faint, I highlight them with a chisel. Use a small square and a pencil to bring the lines down the face of the post to the shoulder. To cut the sockets, position the leg in the vise at about a 30 angle. Using a rip dovetail saw, cut on the inside of the pencil lines, following the knife marks. Since you have to stop shy of the shoulder, this angled cut will create a bit less than half of the cheek of each dovetail. The rest of the work is done with a chisel, using the sawn plane as a guide. Carefully define the end of the socket by chopping downward right at the shoulder line, then begin chiseling out the bulk of the waste between the sawcuts. Once most of the waste is removed, place the chisel into the knife cuts and pare down the slot. If the grain runs perfectly straight, this works fine. Unfortunately, it often runs to the left or right, in which case one side pares very well, while the other side tears into the post. When that happens, instead of paring along the grain from the end of the socket, pare across the grain from the outside of the post. Fit and glue up the dovetails Once the socket is well-defined, begin fitting. Mark the three leading edges of the dovetail key with a pencil, and push the leg in as far as it will go with moderate hand pressure. The graphite Saw the socket. With a rip dovetail saw, cut a kerf just inside the pencil lines and as deep as you can without hitting the shoulder. Extend the layout lines. Use a small square and a pencil to carry the scribed lines down to the shoulder. It s chisel work from here. Establish the shoulder of the socket with several mallet hits (far left), then remove long chips of waste, working from the end with the chisel horizontal. Extend the cheeks beyond the sawkerfs with vertical (left) and horizontal chops. March/April


7 Put it all together ATTACH THE LEGS Post Curved recess matches edge profile of leg. Sliding dovetail socket Flats mate with shoulders of the dovetail key. Flat tops. Cut flats on each side of the socket (left) to seat the shoulders of the dovetail keys. Use a shallow gouge (right) to cut a crescent-shaped recess to accept the rounded edge of the leg. Leg 5 8 in. Mark and fit. To fit the joint, rub the leading edge of the dovetail key with a pencil, insert the key, and pare darkened wood from the socket. When all the joints fit, apply glue and pull them home with hand pressure (right). 36 FINE WOOdWOrkINg


8 BrACE THE BOTTOM AND ADD THE TOP Joint cleanup. After the glue cures, smooth the bottom of the post with a drum sander. transfers to the edges of the socket and shows where the dovetail is binding. Pare this away from the socket, and repeat the process five, 10, even 15 times until the leg slides all the way to the end. It should seat with no wobble. Too loose a fit means a weak joint. But you shouldn t have to pound a leg in, either; if it s too tight it could split the leg. When all three legs are fitted, glue them in. If they fit right, there s no need to clamp them. Subtop and true top Bandsaw out the subtop, mount it on a faceplate, and shape its edge profile on the lathe. After turning, drill a 1-in. hole in the center of the subtop to mate with the tenon at the top of the post. The original table has a small metal plate, or spider, at the bottom of the post to reinforce the joints. You can cut your own spider out of 1 8-in. sheet metal, or order one from Horton Brasses. Finally, bandsaw the top to a 16-in.-dia. circle and fair it on the disk sander. Then create the edge profile with a balloon sander. Alternatively, it could be done with a rasp, file, spokeshave, or router. Finish-sand the top to 400 grit and attach it with four wood screws up through the subtop. I use a straight linseed-oil finish of three or four coats. Since it has no UV filters, linseed oil allows the cherry to darken faster than any other finish. Christian Becksvoort is a contributing editor. Bottom needs support. Screwing in a metal brace, or spider, reinforces the sliding dovetails. Becksvoort bought his spider and modified it, cutting several inches off each of its legs. Crosswise wedge. To avoid splitting the subtop, orient the wedge perpendicular to the grain. After the glue cures, saw off the wedge and chisel the tenon flush. Then attach the top with screws through the subtop. March/April
Shaker Classic Change the legs to change the look
 Shaker Classic Change the legs to change the look 2 Ways B Y C H R I S T I A N BECKSVOORT not long ago, a couple ordered a set of cherry side tables from me, one for each side of their pencil-post bed.
A Shaker Sewing Stand
 America s leading woodworking authority Step by Step construction instruction. A Shaker Sewing Stand A complete bill of materials. Exploded view and elevation drawings. How-to photos with instructive captions.
craftsman rocker Classic style meets comfort in this sturdy oak rocking chair BY MICHAEL PEKOVICH 34 FiNE woodworking
 craftsman rocker Classic style meets comfort in this sturdy oak rocking chair BY MICHAEL PEKOVICH 34 FiNE woodworking photo, this page: Michael pekovich shape the rear legs designing a chair can be a tough
Tilt-Top Table Elegant project builds hand-tool and machine skills
 Tilt-Top Table Elegant project builds hand-tool and machine skills BY M A R I O R O D R I G U E Z As a woodworking instructor, I m always looking for interesting and challenging projects to present in
Shaker Lap Desk. The classic Shaker lap desk, designed two centuries ago to. Celebrate pen and ink with this quintessential case
 Shaker Lap Desk Celebrate pen and ink with this quintessential case BY CHRISTIAN BECKSVOORT The classic Shaker lap desk, designed two centuries ago to function as a miniature traveling office, was the
Floating-Top Table. Creative joinery adds spark to this versatile piece
 Floating-Top Table Creative joinery adds spark to this versatile piece By Michael Pekovich 28 FINE woodworking This is one of those projects that almost wasn t. Rachel, my wife, had asked for a small,
hanging mirror Two-piece desk set Handmade Gifts Photo: John Tetreault
 hanging mirror Two-piece desk set Handmade Gifts 44 FINE woodworking Photo: John Tetreault Flatware carrier Tea light candle holder 4 Tasteful projects made quickly from scraps BY CHRISTIAN BECKSVOORT
Tilt-Top Table. Clean lines and a clever pivot highlight this attractive and useful table
 Tilt-Top Table READY FOR DINNER swing the top down and you have a beautiful table ready for a cozy meal. 60 SMALL FOOTPRINT with the top swung up, the table fits neatly against a wall, freeing up floor
A candle stick addresses transferring and reproducing dimensions from a plan and breaking the project into steps.
 Activities Discussion These projects allow more skill development including making items to match a drawing, sizing projects to specific dimensions, and just trying fun stuff for the first time! A candle
ARTS AND CRAFTS CHAIR
 ARTS AND CRAFTS CHAIR 491 MATERIALS LIST--DINING CHAIR Key No. Size and description (use) A 2 1-3/4 x 1-3/4 x 16-1/4'' oak (front leg) B 2 1-3/4 x 3-3/4 x 40-1/2'' oak (rear leg) C 1 1-3/4 x 3-3/16 x 15''
A Unique Cutting Board
 A Unique Cutting Board When I was asked to make a cutting board as a special gift, I wanted to do something new and eye-catching. Tired of squares and straight lines, I envisioned curving accents not shallow
Demilune 4. Apron Joinery. Curved Apron Tenon. Bridle Joint Legs. Bridle Joint Front Apron
 Demilune Email 4 Apron Joinery There are two types of joints used in connecting the aprons and legs. The rear legs use conventional mortise and tenon joints, while the front legs use the less conventional
HANDCRAFTED LIDDED CHEST IN CHERRY With Red Cedar Lining
 HANDCRAFTED LIDDED CHEST IN CHERRY With Red Cedar Lining Design A chest was desired as a gift to family. The Shaker style of furniture was identified as a pleasing style. After viewing a number of pictures
Sleek and Shapely Coffee Table
 Sleek and Shapely Coffee Table Hand-shaping brings out the beauty in this elemental piece BY MICHAEL CULLEN At the time I first made this table, in 1995, I had been building a lot of complex furniture
Framework joints FABRICATION - WOOD JOINTS. Corner joints. Tee joints. Worksheet 15a. Cable Educational Ltd
 FABRICATION - WOOD JOINTS The word: fabricate means to join together. Most wooden products are held together with adhesive. Adhesive works very well when the edge of a piece of wood is being glued to the
Corner Cupboard. This space-saving piece enhances any room 46 FINE WOODWORKING
 Corner Cupboard This space-saving piece enhances any room BY G A R R E T T H A C K On every trip to the Shelburne Museum near Burlington, Vt., I visit a favorite object a small hanging corner cabinet.
Dovetail Saw Guides. Figure 1: Dovetail saw guide, exploded view. Guide Block. UHMW Friction Pad. Sliding Clamp. Rare-Earth Magnet
 Dovetail Saw Guides U.S. Pat. No. 6,607,016 Dovetail joints have traditionally been the hallmark of a cabinetmaker who had acquired an expert level of skill. They are also a mark of quality and attention
Dining Table with Two-Way Drawers
 Dining Table with Two-Way Drawers DOUBLE-FRONTED DRAWERS MAKE THIS PIECE UNIQUE With two drawer fronts, a center beam, plywood bottoms, and custom pulls, these drawers are both distinctive and durable.
Half-Blind Dovetails in Half the Time
 Half-Blind Dovetails in Half the Time Get the hand-cut look with the speed and consistency of machines B Y S T E P H E N H A M M E R Bandsawn tails Zip, zip. A simple jig delivers accurate and uniform
The WoodWorker s Edge
 The WoodWorker s Edge Draw-leaf Game Table 1. 2. Layout the area for the tenons. The tenons are 3/8 thick x 4-1/2 long x 1-1/4 deep and offset to the inside. Create the tenons using the step method to
WOODWORKING GUIDE: BASIC JOINERY
 WOODWORKING GUIDE: BASIC JOINERY Close isn't really good enough. A perfect fit is what counts. When building furniture, there are many ways to construct joints. The simplest are those that use mechanical
pad foot slipper foot
 48 W270BR.indd 48 pad foot slipper foot The most familiar foot of the three, the pad foot has plenty of variations. In the simplest and most common version the rim of the foot is 3 4 in. to 1 in. off the
15 Dovetail Jig. Instruction Manual. Part # 3452
 15 Dovetail Jig Instruction Manual Part # 3452 CAUTION: Please read, understand, and follow all manufacturers instructions, guidelines and owners manuals that come with your power tools. Peachtree Woodworking
Trestle Table and Benches Materials List
 Project 18444EZ: Trestle Table and Benches In the early days of our country, trestle tables were popular because they could easily be disassembled and moved out of the way when not in use no small advantage
This is a solid wood cabinet. The only plywood used is for the back and drawer bottoms.
 Sideboard Sideboard Overview: This project requires basic woodworking skills and access to woodworking machines. Woodworking machines have sharp cutting edges and are NOT forgiving. You should be properly
Turning an End Grain Lidded Box
 Turning an End Grain Lidded Box by Michael Stafford Copyright 2006 All Rights Reserved 1 Turning an End Grain Lidded Box Turning an end grain lidded box differs from face grain bowl turning primarily in
Arts & Crafts with an English Accent
 Arts & Crafts with an English Accent Desk and wall cabinet make an elegant matched set B y N a n c y H i l l e r For several years around the turn of the 20th century, an English manufacturing firm, Harris
Traditional glass-pane and wood-muntin doors highlight this free-standing piece.
 Bookcase Traditional glass-pane and wood-muntin doors highlight this free-standing piece. As the saying goes, there's nothing like good books. But they can present some storage problems--especially if
30 FINE woodworking. Photo, this page: Michael Pekovich
 30 FINE woodworking Photo, this page: Michael Pekovich Arts & Crafts Bed White-oak bed is loaded with Stickley style and topped off with traditional inlay by Kevin Rodel This bed design is a close copy
BUILDING A STORM DOOR
 BUILDING A STORM DOOR BY NEAL BARRETT Illustrations by George Retseck If you're in the market for a storm door, you probably know that there are many styles and models available. However, most of them
Project 17884EZ: Shaker End Table
 Project 17884EZ: Shaker End Table With its clean, simple lines, this piece is unmistakably Shaker style. Ours is made from cherry, a wood commonly used by Shaker craftsman, but we ve also seen this piece
Wooden Plane. Hardware Kit. 05P Blade packaged separately.
 Wooden Plane Hardware Kit Veritas Tools Inc. Ottawa ON K2H 1C2 Canada Ogdensburg NY 13669-2205 United States www.veritastools.com 05P40.45 W22356p@AEBHe Blade packaged separately. Introduction The following
Copyright WilkerDos.com Dining Table. Project Designed By April Wilkerson - Plan Created By Jay Bates (jayscustomcreations.
 Copyright WilkerDos.com 2017 Project Designed By April Wilkerson - Plan Created By Jay Bates (jayscustomcreations.com) Layout & Shopping List Page 2 of 12 Layout & Shopping List Item Quantity Description
Mid-Century Credenza Thoughtful details and modern joinery merge in this sleek design
 Mid-Century Credenza Thoughtful details and modern joinery merge in this sleek design BY LIBBY SCHRUM Mid-Century Modern furniture has not been wildly popular since, well, the mid-century. But fashion
Learning Objectives To be able to state the different safety precautions associated with the lathe. To be able to identify and state the function of t
 Learning Objectives To be able to state the different safety precautions associated with the lathe. To be able to identify and state the function of the different parts of the lathe. To be able to identify
Making a snap lid box By Jeffrey A Lavine
 Making a snap lid box By Jeffrey A Lavine Some call them boxes, some call them lidded bowls, others call them vessels or containers but whatever you call them they are both enjoyable and a challenge to
Bandsawn curves, Precise and repeatable
 Bandsawn curves, Precise and repeatable Template-guided techniques from a master of the machine BY BRIAN BOGGS In 35 years working wood I ve gradually acquired many machines, but the bandsaw remains at
Denise M. DeRose Handled Clamshell Handbag
 Denise M. DeRose Handled Clamshell Handbag Materials: Wood 2 discs between 6 and 9 in diameter -- 4/4, 6/4 or 8/4 1 piece of thin hardwood ¼ inch thick and 4 x 10 Wood for waste blocks Supplies Small piece
Project 13586EZ: Writing Desk. Writing Desk Materials List
 Project 13586EZ: Writing Desk This writing desk will make a handsome addition to just about any room in the house. The one shown is made of cherry, a logical choice for a piece like this, but mahogany
Jimmy s 2 nd demonstration was what he called an African Drum style box made from Iroko with a cocobolo insert in the lid with inlaid sterling silver.
 Jimmy s 2 nd demonstration was what he called an African Drum style box made from Iroko with a cocobolo insert in the lid with inlaid sterling silver. He started by roughing out the block with a roughing
Step-by-Step Instructions for Making the Wall-hung Bookcase
 Step-by-Step Instructions for Making the Wall-hung Bookcase When a piece of furniture has an air and look of simplicity, you can be sure that it deftly conceals the complexity of its making. I wanted this
Instructables Butcher Block Top
 Instructables Butcher Block Top Project Overview: This project requires basic woodworking skills and access to woodworking machines. Woodworking machines have sharp cutting edges and are NOT forgiving.
Silverware Chest Plan
 Silverware Chest Plan 05L14.01 Introduction 1. Measure the space required for your cutlery before beginning this project to be sure that it will fit in the drawers and top compartment. The best way to
JUNIOR CERTIFICATE 2005 MATERIALS TECHNOLOGY (WOOD) MARKING SCHEME ORDINARY LEVEL SECTION A
 MARKING SCHEME ORDINARY LEVEL SECTION A") JUNIOR CERTIFICATE 2005 MATERIALS TECHNOLOGY (WOOD) MARKING SCHEME ORDINARY LEVEL SECTION A NOTE Please ensure that totals for each question are divided by two before entering marks on marking sheets.
JUNIOR CERTIFICATE 2005 MATERIALS TECHNOLOGY (WOOD) MARKING SCHEME ORDINARY LEVEL SECTION A NOTE Please ensure that totals for each question are divided by two before entering marks on marking sheets.
Shaker Shop Stool. By Glen D. Huey
 Shaker Shop Stool By Glen D. Huey By the turn of the decade following Mother Ann Lee s visit in 1783, the Massachusetts Shaker community known as Hancock began its existence. From a small gathering of
Extendable Large Dovetail Jig
 Extendable Large Dovetail Jig Instruction Manual Part # 3458 CAUTION: Please read, understand, and follow all manufacturers instructions, guidelines and owners manuals that come with your power tools.
DOCUMENT CHEST. Curly Maple, White Pine
 25 DOCUMENT CHEST Curly Maple, White Pine 100 MAKING THE DOCUMENT CHEST After the stock has been thicknessed, ripped to width, and cut to length, plough a 1/4" X 3 /8" groove on the inside faces of the
Moravian. Stool. By christopher schwarz. This traditional, lightweight stool is an excellent first step toward chairmaking.
 Moravian Stool By christopher schwarz This traditional, lightweight stool is an excellent first step toward chairmaking. 36 popular woodworking magazine December 2012 One highlight of a visit to historic
Greene & Greene. Mailbox. by Seth Keller. Signature details create an elegant box. 2 AmericanWoodworker.com
 Greene & Greene Mailbox by Seth Keller Signature details create an elegant box. 2 AmericanWoodworker.com We needed a new mailbox, but I couldn t find an off-the-shelf version that I liked. So I decided
Classic Project. Contemporary Table. In this plan you ll find: Step-by-step construction instruction. A complete bill of materials.
 America s leading woodworking authority Classic Project In this plan you ll find: Step-by-step construction instruction. Contemporary Table A complete bill of materials. Construction drawings and related
Make your own zero clearance throat plate.
 Make your own zero clearance throat plate. A picture tutorial By Wayne Breshears One of the more important table saw accessories you can have is a zero clearance insert or throat plate. The close tolerance
FLAT TO FABULOUS Make a Bowl from a Single Flat Board - Or How to Eat Salad off of Scrap Wood
 FLAT TO FABULOUS Make a Bowl from a Single Flat Board - Or How to Eat Salad off of Scrap Wood Let s face it: Woodworkers are frugal people. In fact, if you are anything like me, you have a hard time throwing
Chess board. The true origins of chess are. from old wood scraps Michael T Collins makes a chessboard and a box to store the pieces
 What you will need: Combination plane with 3mm, 6mm and 13mm cutters Rip and cross cut saw Block and jack plane Marking gauge and knife Card scraper optional and try square Chess board from old wood scraps
Grade 11 Woods Lift Lid Coffee Table. Based on Under the big Top from Popular Mechanics Website
 Grade 11 Woods Lift Lid Coffee Table Based on Under the big Top from Popular Mechanics Website TABLE TOP 1. Select enough lumber to construct a top that is between 22 ½ and 24 wide after jointing. Ensure
Build a Pencil-Post Bed
 Build a Pencil-Post Bed Figured wood, subtle details, and a rich finish bring charm and elegance to this traditional design B Y L O N N I E B I R D The pencil-post bed remains popular several centuries
Butterfly Leaf Dining Table Plans
 Butterfly Leaf Dining Table Plans Part 1 An attractive dining table with a secret: the leaf folds and stores inside the table. Season 1, Episode 7 P a g e 2 I first saw a butterfly leaf table in a back
Hinge Mortising Jig. One of the make it or break it parts of building a. 6 ShopNotes No. 74
 Hinge Mortising Jig A Mortise for a Hinge. Quick, clean, and accurate that s the only way to describe the mortise you get with a trim router and this hinge mortising jig. One of the make it or break it
Ten Essential. These bits will conquer the majority of woodworking tasks. b y G a r y R o g o w s k i. Operating: handheld vs.
 Ten Essential Router Bits These bits will conquer the majority of woodworking tasks b y G a r y R o g o w s k i You ve bought a new router, unpacked it, and even found the switch on it. But that s only
Notes for Making Wood Rings With Stainless Steel Insert Centers
 Notes for Making Wood Rings With Stainless Steel Insert Centers Background These notes describe how to make a ring with a stainless steel (SS) insert and a wood exterior band. They also include information
Hand Tools. 1. Marking Out Tools
 Hand Tools 1. Marking Out Tools Steel Rule Used for measuring Measure twice, cut once, golden rule of woodwork Rule should begin from the edge of the metal Millimetres are used, nothing else will do 10mm
Keeping Plank Doors Flat
 Keeping Plank Doors Flat Five solutions, from standard to stylish BY CHRISTIAN BECKSVOORT Working strictly with solid wood, I take frame-andpanel doors almost for granted. To me it's a no-brainer: Isolate
Instructions for Turning Laminated Bracelets
 Instructions for Turning Laminated Bracelets 1. Start with Design 1. Make a paper template circle for the bracelet. Use this to check the fit on the person you are making the bracelet for. After checking
Odd Wobbler Instructions By: Don Geiger
 Odd Wobbler Instructions By: Don Geiger Stock Size Calculations and Reference Table When preparing stock material for turning an Odd Wobbler, you will need two pieces of dry wood that is about one inch
Cherry Chest of Drawers. Dovetail joinery decorates this Shaker-inspired case piece
 Cherry Chest of Drawers Dovetail joinery decorates this Shaker-inspired case piece BY M I C H A E L P E K O V I C H DRESSER CONSTRUCTION Case top Rabbet, 9 6 in. deep 4 in. 0 7 8 in. 9 2 in. 4 in. Top
Project 13519EZ: Shaker Sewing Desk
 Project 13519EZ: Shaker Sewing Desk This fine example of a Shaker sewing desk was measured and photographed at Hancock Shaker Village in Hancock, Massachusetts. On the original, the legs and various frame
Mortisting Stand. Premium Plan. In this plan you ll find: America s leading woodworking authority
 America s leading woodworking authority Premium Plan In this plan you ll find: Mortisting Stand Step-by-step construction instruction. A complete bill of materials. Construction drawings and related photos.
Christmas Bell Ornament
 Christmas Bell Ornament This is an easy Christmas ornament idea I cabbaged from a friend and skilled turner, Curt Fuller, from Utah. I kind of adapted it to my style but I still got the idea from him.
Ahead of the curve 2 Part
 F&C PROJECT Ahead of the curve 2 Part In the second part of this series, Chris Tribe constructs the table for his stylised cabinet which we looked at last month in F&C Accuracy in turning the legs for
Alaska Bird Observatory Shelves Christopher Swingley
 Introduction Alaska ird Observatory Shelves Christopher Swingley These are the bookshelves I built for the Alaska ird Observatory s new building at Wedgewood Resort in Fairbanks. My version was built from
Display Case (for J&S)
") Display Case (for J&S) This is constructed of maple plywood with solid maple (soft maple) edge banding. It was made to fit between a door and a kitchen cabinet, and has an elegant circular taper between
Display Case (for J&S) This is constructed of maple plywood with solid maple (soft maple) edge banding. It was made to fit between a door and a kitchen cabinet, and has an elegant circular taper between
Chili Pepper Routed Bowl
 Chili Pepper Routed Bowl MLCS Items Needed: Chili Pepper Bowl and Tray Template #9189 Top Mounted Bearing Dish Cutter Router Bit #7817 1/2 Router Collet Extension and Wrenches #9465 3/16 Radius Round Over
129 KITCHEN BASE CABINET 480
 129 KITCHEN BASE CABINET 480 There are two sorts of kitchen cabinets: base cabinets, which sit on the floor, and wall cabinets. Base cabinets provide both storage space and work surfaces. They often house
Chapter 26 CHISELS HOW TO CHOOSE AND USE THEM TM 9-243
 Chapter 26 CHISELS HOW TO CHOOSE AND USE THEM The Types and Uses section provides you with a list of some of the types of chisels. These pages should help you select the right chisel to do the job. The
GENERAL NOTES: Page 1 of 9
 Laminating A Zia Into A Turning Blank by W. H. Kloepping, Jan. 2009 This describes how a zia (the New Mexico state symbol) can be laminated into a turning blank. Materials needed: Square Turning Block
Carcase Construction. Choosing and making the right joints. by Tage Frid
 Carcase Construction Choosing and making the right joints by Tage Frid Furniture construction is broken down into two main categories: frame and carcase. In frame construction, relatively narrow boards
Iearn my living by making cabinetry not cookie-cutter
 Supporting Shelves Five methods for installing by Stephen Winchester Iearn my living by making cabinetry not cookie-cutter kitchens, but one-of-a-kind pieces and custom built-ins. Every cabinet I build
Knockdown Bookcase. This slant-sided bookcase was a popular mail-order item in the early 1900s.
 Knockdown Bookcase This slant-sided bookcase was a popular mail-order item in the early 1900s. The Arts & Crafts movement was part of an interesting social change in America the advent of mail-order purchases.
Lidded box double axis
 Lidded box double axis The Wood: Avoid the pith or take a chance. Select an interesting grain pattern or decorate the plain grain. Turn a cylinder with grain parallel to the axis. See the graphic below
woodworkersjournal.com MATERIAL LIST
 MATERIAL LIST T x W x L 1 Legs (2) 1 1 2" x 3 1 2" x 36 7 16" 2 End Uprights (2) 1 1 2" x 3 1 2" x 32 1 2" 3 Stringers (4) 1 1 2" x 3 1 2" x 42" 4 Top Cladding, Long (2) 3/4" x 7 1 4" x 65 3 4" 5 Side
MATERIALS & TOOLS REQUIRED INTRODUCTION. Before you start turning, read and understand this entire procedure.
 INTRODUCTION This set of instructions shows one method to turn mills.there are many other possible variations and techniques. NOTE: These instructions are specific to 'Chef Specialties' mechanism. For
Shoulder Plane. dovetailed. fine tools. Make an heirloom tool and learn the secret to creating double dovetails in metal it s easier than you think.
 fine tools dovetailed Shoulder Plane Make an heirloom tool and learn the secret to creating double dovetails in metal it s easier than you think. I ve always been fascinated by old, metal hand planes.
Kitchen Step Stool. Premium Plan. In this plan you ll find: America s leading woodworking authority
 America s leading woodworking authority Premium Plan In this plan you ll find: Step-by-step construction instruction. A complete bill of materials. Construction drawings and related photos. Tips to help
Build a Stout Workbench
 Build a Stout Workbench Tail vise is at the heart of this versatile bench by chris gochnour I ve done a fair amount of handplaning during my 32 years as a professional furniture maker, and I ve found that
Join Neck and Body Wednesday, January 16, :08 PM
 ASL Breakdown Page 1 Join Neck and Body Wednesday, January 16, 2013 10:08 PM 1. 2. 3. 4. Charles did the following steps to speed things up: Lightly sanded the top of the lower bout with an orbital sander.
Hone Your Hand-Tool Skills
 Hone Your Hand-Tool Skills A handful of exercises develops competence and confidence with chisels, planes, and saws B Y M I C H A E L P E K O V I C H Hand tools intimidated me for a long time. I knew I
Mail Truck Bank Plan. Rockler Mail Truck Bank Plan
 Mail Truck Bank Plan Build this nostalgic Mail Truck Bank and capture the imagination of a child! This easy-to-build plan uses our Solid Brass Mailbox Door (#55358) to commemorate the stalwart little truck
How to Make a 400 BC Greek Oenochoe Style Wine Pourer
 How to Make a 400 BC Greek Oenochoe Style Wine Pourer The purpose of the demonstration is to show how to make a hollow form wine pourer in the style of ancient Greek pottery. Live demonstration on the
Heirloom Tool Chest. This classic chest offers a lesson in efficient woodworking
 Heirloom Tool Chest This classic chest offers a lesson in efficient woodworking BY CH R I S G O C H N O U R A COMFORTABLE HOME FOR TOOLS Made of cherry and constructed entirely with hand tools, the tool
Shaker Wall Clock Version 1
 Shaker Wall Clock Version 1 The construction of both the original and this version is as simple as the spare design. I will offer several options -- in construction techniques, dimensional changes and
Reasons to Own a Shoulder Plane
 9 Reasons to Own a Shoulder Plane Fine-tune your joinery with these tips and techniques B y C h r i s G o c h n o u r It s easy to dismiss the shoulder plane as a specialty plane, another way of saying
Router Table. In a recent article, I wrote about the router table I built for the Center. 5 Essential Jigs for the
 5 Essential Jigs for the Router Table Great fixtures and fences offer better control and new possibilities BY PETER SCHLEBECKER In a recent article, I wrote about the router table I built for the Center
Building a Sawbench. Precision Sawing at The Woodwright's School August 2010
 Building a Sawbench Precision Sawing at The Woodwright's School August 2010 Introduction: Though I work with both machinery and hand tools, I consider a pair of traditional old-school sawbenches to be
Serving Tray. When some good friends got married recently, An exercise in template-making yields a great gift project that s easy to duplicate
 Serving Tray An exercise in template-making yields a great gift project that s easy to duplicate END Create from 3 8 2 8" piece. By Geoff Noden When some good friends got married recently, I decided to
Kentucky 4H Wood Science Plans Notebook. Plans Level 3
 Kentucky 4H Wood Science Plans Notebook Plans Level 3 MATERIALS: 2 pieces wood 3/4 x 10 x 4 1 piece wood 3/4 x 12 x 4 2 pieces wood 3/4 x 3 x 2 5 1/2" 2 pieces wood 3/4 x 3 x 1 8 1 piece wood 2 x 4 x
1. Mount between centers round cut tenons on both ends (same diameter).
.") LONG NECK HOLLOWFORM Jim Terry Piedmont Triad Woodturners Association Turning this hollow form presents some interesting challenges in mounting and holding a turning. Both top and bottom are completely
LONG NECK HOLLOWFORM Jim Terry Piedmont Triad Woodturners Association Turning this hollow form presents some interesting challenges in mounting and holding a turning. Both top and bottom are completely
Fig01: The mounting plan drawn on the Backup Plate.
 Wine Rack Introduction Turning of eccentric rectangular objects with a Backup Plate is limited to largely two dimensional designs. But that doesn t mean the project has to stay that way. In this article
This tailor s cabinet was brought to my attention by a customer
 So what if you don t sew? This authentic Shaker case piece is drop-dead gorgeous in any room. This tailor s cabinet was brought to my attention by a customer who wanted one just like it. She had seen the
Plan #1 Wooden hinge, single action
 Plan #1 Wooden hinge, single action There are two types of wooden hinges, a single action hinge (that is in effect a finger joint with a pin through it) and a double action hinge which has two pins. The
Windsor Chair Online. Assembly Instructions
 Windsor Chair Online Assembly Instructions Date: 1/4/2007 Other Chairs Offered Philadelphia Arm Chair New England Comb Back Sackback d Arm Chair Bow Back Side Chair Fan Back Side Chair Page 1 Table of
Classic Project. Cherry Drop-leaf Dining Table. In this plan you ll find: Step-by-step construction instruction. A complete bill of materials.
 America s leading woodworking authority Classic Project n this plan you ll find: Step-by-step construction instruction. A complete bill of materials. Construction drawings and related photos. Cherry Drop-leaf