Project 13519EZ: Shaker Sewing Desk
|
|
|
- Juniper Horton
- 6 years ago
- Views:
Transcription

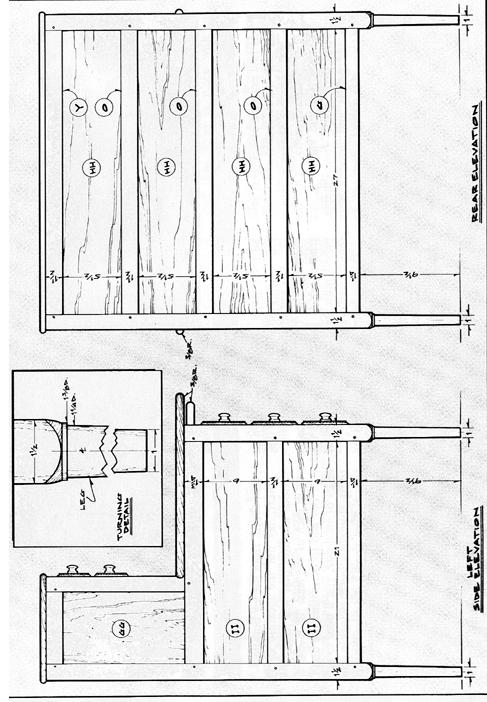
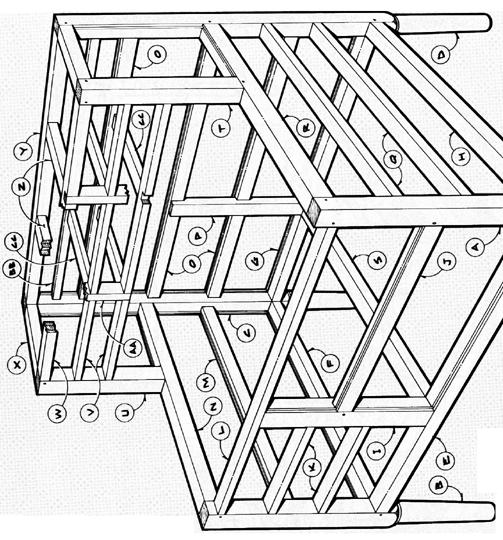
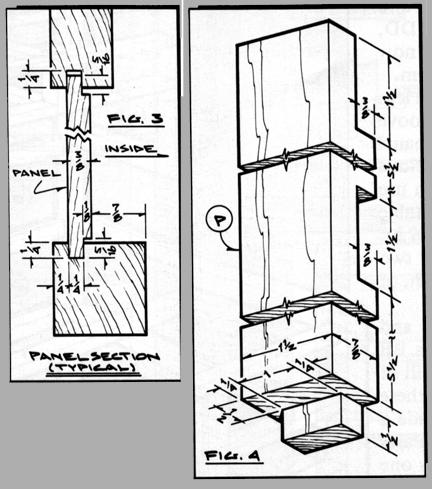
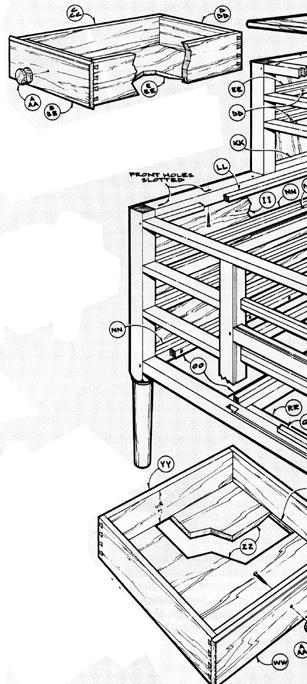
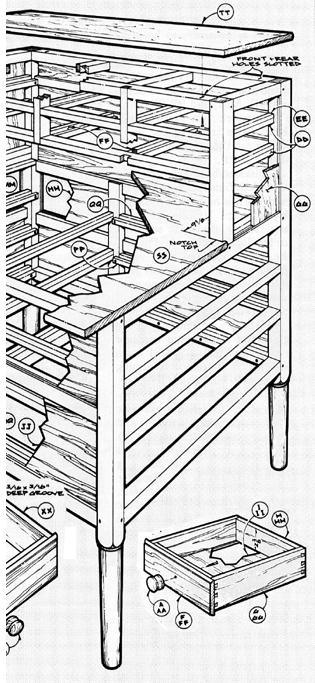
1 Project 13519EZ: Shaker Sewing Desk This fine example of a Shaker sewing desk was measured and photographed at Hancock Shaker Village in Hancock, Massachusetts. On the original, the legs and various frame members were made from maple, while the panels and drawers were made from pine stained a deep red. As a final finish, the Shakers used a clear varnish on the entire piece. We included Figure 1 in the artwork to show the basic framework of the piece. In order to show it with a minimum of confusion, we did not include the various panels, drawers, runners, guides, etc. The basic framework with all these parts added on is shown in Figure 8. The point to keep in mind is that Figure 1 is not intended as an assembly drawing; in fact, when the basic framework is glued-up later on, the panels must be assembled as part of that framework.

2 Shaker Sewing Desk Complete Schematic
3
4
5
6
7
8
9
10
11
12
13 Shaker Sewing Desk Materials List A 1-1/2" x 1-1/2" x 26" 1 B 1-1/2" x 1-1/2" x 26" 1 C 1-1/2" x 1-1/2" x 39" 1 D 1-1/2" x 1-1/2" x 39" 1 E 1-1/4" x 1-1/2" x 28"* 1 F 1-1/4" x 1-1/2" x 22"* 1 G 1-1/4" x 1-1/2" x 28"* 1 H 1-1/4" x 1-1/2" x 22"* 1 I 1-1/2" x 1-1/2" x 14-1/2"* 1 J 1" x 1-1/2" x 17-1/2" 1 K 3/4" x 1-1/2" x 10"* 2 L 3/4" x 1-1/2" x 28"* 1 M 1" x 1-1/2" x 22"* 1 N 1-1/2" x 1-3/4" x 22"* 1 O 1" x 1-1/2" x 28"* 3 P 7/8" x 1-1/2" x 14-1/2"* 1 Q 3/4" x 1-1/2" x 22"* 2 R 1-1/2" x 1-3/4" x 22"* 1 S 1-1/4" 1-1/2" x 22"* 1 T 1-1/2" x 1-1/2" x 13-1/4"* 1 U 1-1/2" x 1-1/2" x 13-1/4"* 1 V 3/4" x 1-1/2" x 28"* 2 W 1-1/4" x 1-1/2" x 28"* 1 X 1-1/2" x 1-1/2" x 7-3/4"* 2 Y 1-1/2" x 1-1/2" x 28"* 1 Z 1-1/4" x 1-1/2" x 7-3/4"* 2 AA 3/4" x 1-1/2" x 8-1/4" 2 BB 3/8" x 1-1/2" x 28"* 1 CC 3/4" x 1-3/4" x 8"* 4 DD 3/4" x 1" x 7-3/4" 4 EE 1/2" x 1/2" x 6-3/4" 4 FF 1/2" x 3/4" x 7-1/4" 4 GG 3/8" x 7-1/4" 11-3/4" 2 HH 3/8" x 6" X 27-1/2" 4 II 3/8" x 6-1/2" x 21-1/2" 2 JJ 3/8" x 6-1/2" x 17" 2 KK 3/4" x 7/8" x 6-3/4" 2 LL 3/4" x 1/2" x 21" 2 MM 3/4" x 1" x 22" 4 NN 1/2" x 1/2" x 21" 6 OO 3/4" x 1/2" x 21" 2 PP 3/4" x 1" x 17-1/2" 4 QQ 1/2" x 1/2" x 16-1/2" 6 RR 3/4" x 1/2" x 16-1/2" 2 SS 3/4" x 26-3/8" x 31" 1 TT 1/2" x 10-1/4" x 30-1/2" 1 UU 3/4" x 26-3/8" x 31" 1 VV 3/4" x 1" x 24-5/8" 2 WW 5/8" x 4-1/2" x 21-1/2" 3 XX 3/8" x 4" x 18-1/4" 6 YY 3/8" x 3-5/8" x 21" 3 ZZ 5/16" x 18-1/8" x 20-5/8" 3 AAA See detail. 12 BBB 5/8" x 4-1/2" x 9-1/2" 3 CCC 3/8" x 4" x 22-1/2" 6 DDD 3/8" x 3-5/8" x 9" 3 EEE 5/16" x 8-5/8" x 22-3/8" 3 FFF 5/8" x 3-1/4" X 9" 6 GGG 3/8" x 2-3/4" X 8" 12 HHH 3/8" x 2-3/8" X 8-1/2" 6 III 5/16" x 7-7/8" x 8-1/8" 6 * Includes Tenons
14 12
15
16 16 17
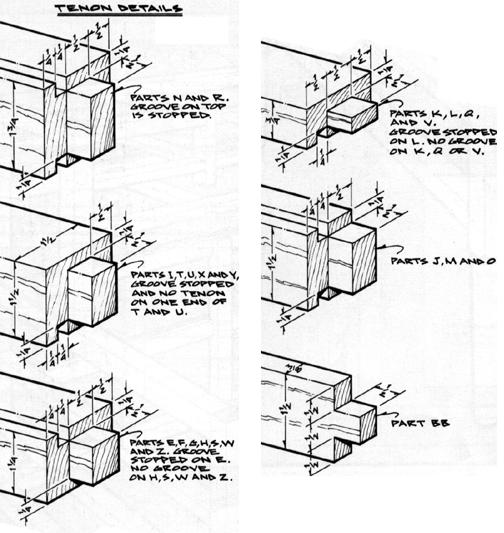
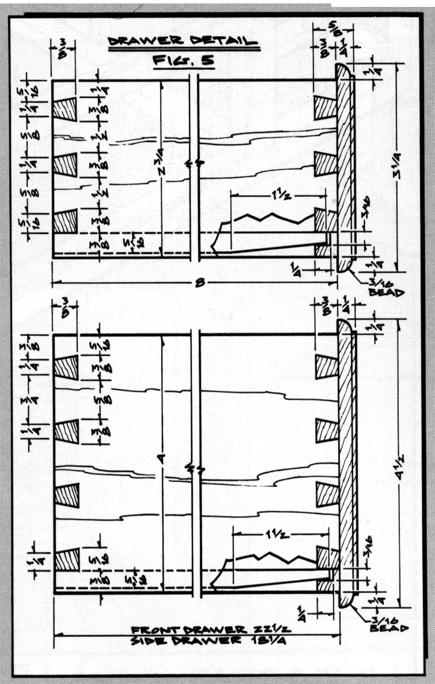
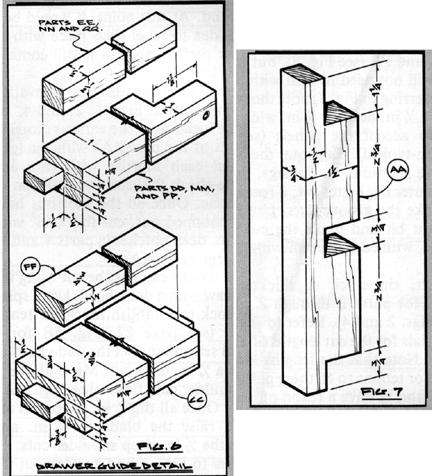
17 Shaker Sewing Desk Step-by-Step Instructions 1. Rip stock to 1-1/2" square before to begin making the two front legs (A and B) and the two back legs (C and D). 2. Cut each leg to the length shown in the materials list. 3. Use the lathe to turn the bottom end of each leg to the dimensions specified in the turning detail. NOTE: As indicated in the front elevation, the turning starts at a point 8-1/4" from the leg bottom. 4. Refer to the four elevation drawings as well as Figures 1 and 2 to carefully lay out the location of the various mortises that will need to be cut in each of the legs. 5. Check the size and location of each mortise again as one miscalculation can ruin all the previous work that went into the leg. 6. Use a sharp chisel to chop out each mortise. 7. Refer to Figure 1 and note that the legs have a 1/4" deep by 1/4" wide groove cut to accept the panels (see panel section-typical). 8. Lay out the various groove locations on the legs. 9. Use a router table equipped with a 1/4" straight bit to make the groove cuts in two passes, with each cut removing 1/8" of stock. 10. Rip stock to thickness and width for parts E through Z plus BB (see Figures 2 and 4). 11. Cut all these parts to the lengths provided in the materials list. NOTE: The lengths include a tenon or tenons to all these parts. Parts P, T, and U have a tenon on only one end, while all others have a tenon on each end. 12. Label each piece with its proper part number. 13. Refer to the elevation drawings and to Figures 1, 2, and 4 to carefully lay out the location of the various mortises in each of the parts. 14. Reheck the size and location of each mortise. 15. Chop out all the mortises. 16. Cut the 3/4" wide x 1/2" deep notches in parts V and W to accept parts AA. 17. Equip the table saw with a dado head to begin cutting the tenons. 18. Establish the 1/2" tenon length with a spacing block (See Figure 5B for a typical set-up). 19. Set the dado head to make a 1/4" deep cut. 20. Make all the 1/4" shoulder cuts first using Figure 2 as a guide. 21. Raise the blade to 1/2" and make the 1/2" deep shoulder cuts. 22. Refer to Figures 1 and 2 to lay out the location of the various 1/4" deep by 1/4" wide grooves.
18 23. Cut these grooves in the same manner used to cut the grooves on the legs. 24. Make parts AA (Figure 7) and the four parts CC (Figure 6). 25. Use the dado head to cut the notches in parts AA and the tenons on each end of parts CC. 26. Reduce thicker stock to 3/8" to make the panels (parts GG, HH, II, and JJ). 27. Cut the panels to the overall length and width shown materials list. 28. Use the table saw and dado head to cut the 1/8" deep x 5/16" wide rabbet (see Figure 3) all around. NOTE: The panel length and width dimensions given in the materials list do not allow any clearance inside the grooves. When the framework is dry assembled, you may find it necessary to lightly hand plane the panel edges to provide room for them to expand and contract with seasonal changes in humidity. 29. Begin the dry assembly by putting together the front sub-assembly (parts A, B, E, K, L, I, J, and JJ). 30. Place clamps between the legs to hold everything together. 31. Join the back as a separate sub-assembly (parts C, D, G, O, P, BB, Y, and HH), again using clamps between the legs. 32. Join the upper drawer front face (part N, R, T, U, V, W, and AA) as a third separate subassembly. 33. Join the front to the back by adding the upper drawer front face plus all the remaining front to back stretchers (parts F, H, M, Q, S, X, Z, CC, GG, and II). 34. Add clamps as necessary to keep the assembly together. 35. Check for general fit-up and squareness. 36. Lay out and mark the mortises to be cut for parts DD, MM, and PP (see Figure 6). 37. Disassemble the framework. 38. Use a chisel to cut out the mortises for parts DD, MM, and PP (see Figure 8). 39. Final sand all parts, finishing with 220-grit sandpaper. 40. Obtain plastic resin glue, which dries slower than regular glue. 41. Glue and clamp the front sub-assembly with side panels to begin final assembly. 42. Check for squareness and set aside to dry. 43. Repeat this process for the back and the upper drawer front face sub-assemblies, again checking for squareness and setting aside to dry. 44. Complete the assembly by joining the front, back, upper drawer front face, and the remaining front to back stretchers and panels. 45. Square everything up and allow to dry thoroughly.
19 46. Lay out and bore holes for the 3/16" diameter x 1-1/4" long tenon dowel pins (See Figure 1 and elevation views). 47. Cut the pins slightly long. 48. Glue them in place and sand flush. 49. Refer to Figure 8 to lay out and bore the various holes in parts N, R, W, X and Y that will be used later on to attach parts SS and TT. NOTE: Some of these holes are slotted to allow parts SS and TT to expand and contract with changes in humidity. 50. Make slotted holes by boring a 1/4" diameter hole and elongating it with a rattail file. 51. Take actual measurements for parts DD, EE, FF, MM, NN, PP, and QQ from the assembled framework, as minor construction variancies may change the actual dimensions slightly. 52. Refer to Figure 6 and the bill of materials to cut the drawer guides DD, EE, FF, MM, NN, PP, and QQ to thickness, width, and length. 53. NOTE that on parts DD, MM, and PP there is a tenon cut on one end while a notch is cut on the other. 54. Use the materials list as a guide to cut parts KK, LL, OO, and RR to size. 55. Study the assembly for the various drawer guides in Figure NOTE that the 1-1/8" long notch on the back end of parts DD, MM, and PP allows the tenon to be inserted in the mortise without interference. 57. Glue and screw the notch into place. 58. Cut part UU to overall length and width from 3/4" thic stock. 59. Use the table saw and dado head to cut the tenons on each end. 60. Cut parts VV to size. 61. Use a router table with a 1/4" diameter straight bit to cut the 1/2" deep mortise, making four pass with each pass removing 1/8" of stock. NOTE: To accommodate seasonal movement, the mortise is cut longer than the tenon is wide. 62. Dry assemble parts UU to parts VV. 63. Use pipe clamps to hold the pieces together. 64. Bore the three 3/16" diameter dowel pin holes. 65. Remove the pipe clamps and separate the parts. 66. Use a rattail file to elongate the two end holes in each tenon as shown. 67. Reassemble the parts. 68. Apply glue to the 3/16" dowel pins and drive them in place. NOTE: Only the pins are glued, not the mortse and tenon joints. 69. Final sand parts UU and VV. 70. Cut a 3/4" x 3/4" x 12" long cleat.
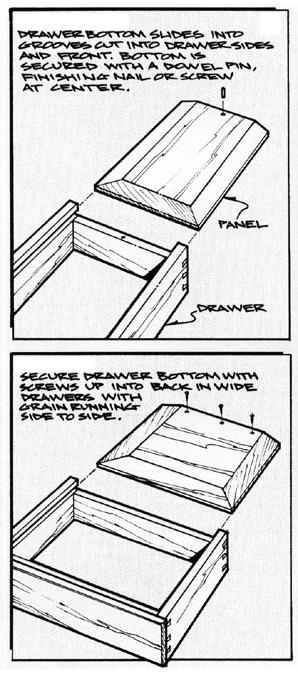
20 71. Screw the cleat to the underside of part UU, flush with the back edge. When part UU is installed, the cleat will act as a stop to keep the desk surface from sliding out. 72. Glue up stock for parts SS and TT. 73. Cut both parts to final length and width. 74. Lay out the location of the cutout and notch on each back corner of part SS (see elevation views and Figure 8). 75. Make the cutout so that the back of part SS fits between parts T and U and extends all the way back to panel HH. 76. Final sand parts SS and TT. 77. Apply two coats of a penetrating oil as a final finish. 78. Finish parts UU and VV in the same manner. 79. Use wood screws driven up through the slotted holes in parts W, X, and Y to install part TT. 80. Place parts UU and VV in position on the frame. 81. Add part SS by driving screws up through parts N and R. 82. Cut and fit parts KK, which server as filler blocks. 83. Make the drawers as shown in Figures 5 and Edge-join sufficient stock to obtain the width required for the drawer bottoms (see Figure 9), paying attention to the direction the grain runs for maximum strength given the length and width of the drawer, as shown in Figure Rip and cross-cut the drawer panels to their final sizes as given in the materials list. 86. Start hand-planing the stock to its final 5/16" thickness by clamping it with bench dogs and a vise as shown in Figure 11). 87. Set the plane iron for a maximum cut. 88. Quickly remove the material to reach approximate final thickness. 89. Reset the plane iron for a shallow cut. 90. Plane the rest of the material with the grain (Figure 12) to final smooth the surface. 91. Cut the panel to final length and width (See Figure 13). 92. Lay out bevel lines according to the dimensions shown in Figure 14, and taking seasonal moisture changes into account. 93. NOTE that the drawer bottom bevel tapers to about 1/32" less than the groove width. This is necessary to allow the beveled edge to fit into the groove. 94. Clamp the drawer bottom panel in place with a backup board (Figure 14) to establish the end-grain bevel.
21 95. Cut the end-grain bevel. 96. Clamp a guide board to the stock to help establish an even long-grain bevel. 97. Hold the plane at the approximate bevel angle. 98. Start planning at the edge and work down to the desired final point (see Figure 15). 99. Apply glue to the groove cut for the bottom Slide the bottom in from the back to begin assembly Use several screws or brads to reinforce the back edge, as illustrated Lathe-turn the knobs (AAA) to the dimensions shown in the knob detail Drive a flathead wood screw through the inside of the drawer front to hold the knob in place Add a brass lock on the upper right side drawer if you desire Cut the diamond shaped escutcheon from.32" thick brass stock to 3/4" across the points and 1" top to bottom Bore the keyhole and file the slot Use two small brads to secure the keyhole to the front Apply two coats of penetrating oil All the oil to dry Buff with a soft cloth for a warm satin finish Complete the project by pplying a thin coat of beeswax on the drawer guides to make the slide easily. These plans were originally published in Volume 11, Issue 2 of The Woodworker s Journal (Mar./Apr. 1987, pages 27-32).
Trestle Table and Benches Materials List
 Project 18444EZ: Trestle Table and Benches In the early days of our country, trestle tables were popular because they could easily be disassembled and moved out of the way when not in use no small advantage
Project 13586EZ: Writing Desk. Writing Desk Materials List
 Project 13586EZ: Writing Desk This writing desk will make a handsome addition to just about any room in the house. The one shown is made of cherry, a logical choice for a piece like this, but mahogany
Project 17884EZ: Shaker End Table
 Project 17884EZ: Shaker End Table With its clean, simple lines, this piece is unmistakably Shaker style. Ours is made from cherry, a wood commonly used by Shaker craftsman, but we ve also seen this piece
Shaker Classic Change the legs to change the look
 Shaker Classic Change the legs to change the look 2 Ways B Y C H R I S T I A N BECKSVOORT not long ago, a couple ordered a set of cherry side tables from me, one for each side of their pencil-post bed.
Project 11010EZ: Gun/Bookcase/Curio Cabinet
 Project 11010EZ: Gun/Bookcase/Curio Cabinet No man can be all things to all people, but this cabinet comes as close to fitting multiple uses as any inanimate object can. We ve pictured it as a gun cabinet
Kitchen Island. By Rob Joseph Leg Dimensions. Drawer Exploded View. Leg Glue-Up
 Kitchen Island y Rob Joseph eg imensions Step 1 - ut the legs () slightly longer than the dimensions given in the material list. or the thickness we need, the legs are cut from a piece of 11 2"-thick stock,
135 ROLLTOP DESK 515
 135 ROLLTOP DESK 515 For the person who hates to clear off a desk, who wants to leave everything where it is overnight yet still have the clutter hidden, a rolltop desk is a godsend. The tambour hides
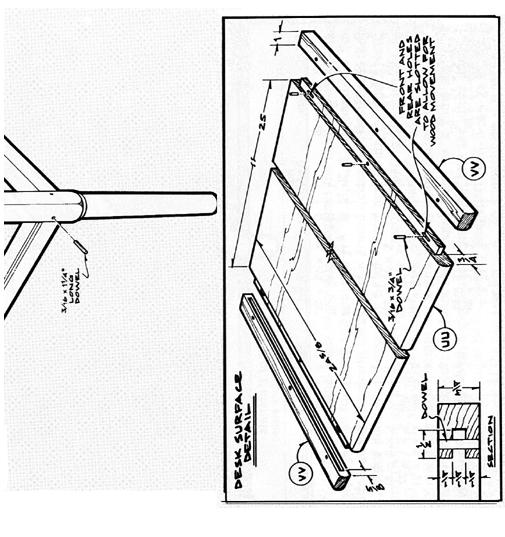
Kentucky 4H Wood Science Plans Notebook. Plans Level 3
 Kentucky 4H Wood Science Plans Notebook Plans Level 3 MATERIALS: 2 pieces wood 3/4 x 10 x 4 1 piece wood 3/4 x 12 x 4 2 pieces wood 3/4 x 3 x 2 5 1/2" 2 pieces wood 3/4 x 3 x 1 8 1 piece wood 2 x 4 x
BUILDING A STORM DOOR
 BUILDING A STORM DOOR BY NEAL BARRETT Illustrations by George Retseck If you're in the market for a storm door, you probably know that there are many styles and models available. However, most of them
Cherry Chest of Drawers. Dovetail joinery decorates this Shaker-inspired case piece
 Cherry Chest of Drawers Dovetail joinery decorates this Shaker-inspired case piece BY M I C H A E L P E K O V I C H DRESSER CONSTRUCTION Case top Rabbet, 9 6 in. deep 4 in. 0 7 8 in. 9 2 in. 4 in. Top
The WoodWorker s Edge
 The WoodWorker s Edge Draw-leaf Game Table 1. 2. Layout the area for the tenons. The tenons are 3/8 thick x 4-1/2 long x 1-1/4 deep and offset to the inside. Create the tenons using the step method to
rmoire Materials Hardware
 A rmoire No house ever has enough storage space, and I built this armoire to satisfy a couple of needs. Inside the armoire is a shelf large enough for the television. Under the shelf are six drawers that
I then moved on to the legs assemblies. The legs are simply three pieces of 1 ½ in x 4 ¼ in stock glued up, planed and jointed to 4 in x 4in.
 Nicholson Workbench Another workbench? Does this guy have nothing better to do than build one workbench after another? First off, this one is not for me. I recently received a commission to build a Nicholson
Project 11355EZ: Wall Cabinet with Louvered Doors and Shelf
 Project 11355EZ: Wall Cabinet with Louvered Doors and Shelf This Early American style cabinet will look good in any room, although it seems particularly well suited for the kitchen or bathroom. To make
Project 12231EZ: Country Curio Clock
 Project 12231EZ: Country Curio Clock This good-looking clock not only reminds you of the time, it also provides a couple of shelves to display favorite curios. No fancy joinery is needed here, just butt
A Shaker Sewing Stand
 America s leading woodworking authority Step by Step construction instruction. A Shaker Sewing Stand A complete bill of materials. Exploded view and elevation drawings. How-to photos with instructive captions.
- 1 - P/N REV E 9/15
 INSTRUCTIONS HIGH TECH II DELUXE FLUSH UNIT ASSEMBLY The following instruction is a guideline, illustrating suggested methods, assembly sequence, and tool selection. Actual assembly may vary by each situation.
DOCUMENT CHEST. Curly Maple, White Pine
 25 DOCUMENT CHEST Curly Maple, White Pine 100 MAKING THE DOCUMENT CHEST After the stock has been thicknessed, ripped to width, and cut to length, plough a 1/4" X 3 /8" groove on the inside faces of the
Classic Project. Contemporary Table. In this plan you ll find: Step-by-step construction instruction. A complete bill of materials.
 America s leading woodworking authority Classic Project In this plan you ll find: Step-by-step construction instruction. Contemporary Table A complete bill of materials. Construction drawings and related
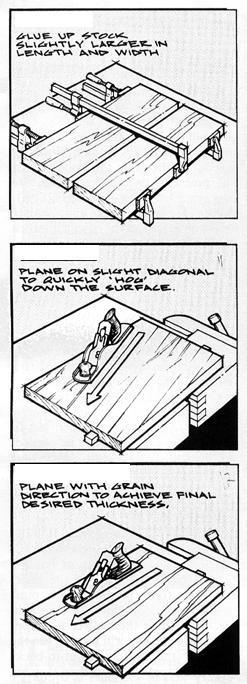
ARTS AND CRAFTS CHAIR
 ARTS AND CRAFTS CHAIR 491 MATERIALS LIST--DINING CHAIR Key No. Size and description (use) A 2 1-3/4 x 1-3/4 x 16-1/4'' oak (front leg) B 2 1-3/4 x 3-3/4 x 40-1/2'' oak (rear leg) C 1 1-3/4 x 3-3/16 x 15''
World. Old. Dining Table YOU CAN BUILD AN
 YOU CAN BUILD AN Old World Dining Table This design combines heavy oak timbers with period specific elements. The result brings an old world look to a modern sized dining table. Publisher: Jeff Branch
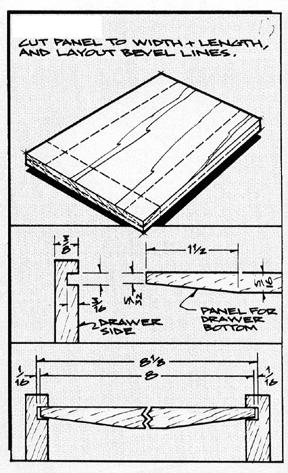
Silverware Chest Plan
 Silverware Chest Plan 05L14.01 Introduction 1. Measure the space required for your cutlery before beginning this project to be sure that it will fit in the drawers and top compartment. The best way to
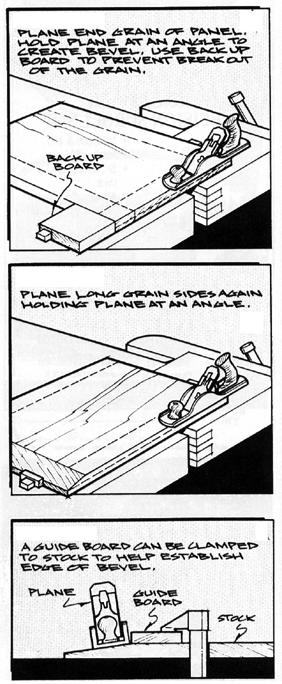
This tailor s cabinet was brought to my attention by a customer
 So what if you don t sew? This authentic Shaker case piece is drop-dead gorgeous in any room. This tailor s cabinet was brought to my attention by a customer who wanted one just like it. She had seen the
Shaker Lap Desk. The classic Shaker lap desk, designed two centuries ago to. Celebrate pen and ink with this quintessential case
 Shaker Lap Desk Celebrate pen and ink with this quintessential case BY CHRISTIAN BECKSVOORT The classic Shaker lap desk, designed two centuries ago to function as a miniature traveling office, was the
World. Old. Dining Table YOU CAN BUILD AN
 YOU CAN BUILD AN Old World Dining Table This design combines heavy oak timbers with period specific elements. The result brings an old world look to a modern sized dining table. Publisher: Jeff Branch
Demilune 4. Apron Joinery. Curved Apron Tenon. Bridle Joint Legs. Bridle Joint Front Apron
 Demilune Email 4 Apron Joinery There are two types of joints used in connecting the aprons and legs. The rear legs use conventional mortise and tenon joints, while the front legs use the less conventional
129 KITCHEN BASE CABINET 480
 129 KITCHEN BASE CABINET 480 There are two sorts of kitchen cabinets: base cabinets, which sit on the floor, and wall cabinets. Base cabinets provide both storage space and work surfaces. They often house
Classic Project. Two-drawer Platform Bed. In this plan you ll find: Step-by-step construction instruction. A complete bill of materials.
 America s leading woodworking authority Classic Project In this plan you ll find: Step-by-step construction instruction. Two-drawer Platform Bed A complete bill of materials. Construction drawings and
Dress up your dining room with this Southern delicacy. that was used to serve drinks after a hunt. Breeches and jodhpurs are optional.
 Dress up your dining room with this Southern delicacy that was used to serve drinks after a hunt. Breeches and jodhpurs are optional. Huntboard Classic Six-Legged My dad has been making this six-legged
You Can Build a Bedside Table
 You Can Build a Bedside Table Jeff Branch WOODWORKING If you like making panels, you ll love this project. By JEFF BRANCH M y current home is a modest one. But it is a big improvement over our small starter
END TABLE EXPLODED VIEW
 28" E 2 M E N S O N S : 2 W 28" 26 3 4" H pproximate materials cost: $100 if you turn the legs. Or $150 if you purchase the legs. 45/8" H C igure-8 fastener 5/8" counterbore 1/8" deep B EN TBE EXPOE VEW
Dining Table with Two-Way Drawers
 Dining Table with Two-Way Drawers DOUBLE-FRONTED DRAWERS MAKE THIS PIECE UNIQUE With two drawer fronts, a center beam, plywood bottoms, and custom pulls, these drawers are both distinctive and durable.
Ratcheting and Angled Leg Vises. Ratcheting Parallel Guide
 Ratcheting and Angled Leg Vises Ratcheting Parallel Guide In Scott Landis s The Work Bench Book there is a drawing of a ratchet mechanism for a parallel guide. It was one of those little tidbits I tend
x16 GAZEBO ASSEMBLY INSTRUCTIONS
 36 1 x16 GAZEBO ASSEMBLY INSTRUCTIONS Assembly with more than one person recommended 0 L:\WP51\Instructions\SOLARIUMS INSTRUCTION BOOKS\36\ZZZ-05.36.0810-1.GP.EN.doc Step 1: Assemble beams A and B using
x12 GAZEBO ASSEMBLY INSTRUCTIONS
 30 10 x1 GAZEBO ASSEMBLY INSTRUCTIONS Assembly with more than one person recommended 0 L:\WP51\Instructions\SOLARIUMS INSTRUCTION BOOKS\30\ZZZ-0.30.0807-1.GP.EN.doc Step 1: Assemble beams A and B using
Copyright WilkerDos.com Dining Table. Project Designed By April Wilkerson - Plan Created By Jay Bates (jayscustomcreations.
 Copyright WilkerDos.com 2017 Project Designed By April Wilkerson - Plan Created By Jay Bates (jayscustomcreations.com) Layout & Shopping List Page 2 of 12 Layout & Shopping List Item Quantity Description
Project 19496EZ: Rocking Horse. Rocking Horse Materials List
 Project 19496EZ: Rocking Horse A delightful must gift for preschoolers, our rocking horse is made from sturdy stock like maple or birch. Easy to build with optional detailing: if you don t want to paint
Celebrate 100 years of PM with the fourth in our furniture series.
 Anniversary Desk Celebrate 100 years of PM with the fourth in our furniture series. With all the business involved in running a home, it's no wonder most of us run out of space to handle the paperwork.
Durable Outdoor Table
 54 F I N E W O O D W O R K I N G Durable Outdoor Table Ipé table will seat six and weather many seasons B Y D A V I D B E D R O S I A N Last summer brought a new pool to our backyard. With it came more
Corner Cupboard. This space-saving piece enhances any room 46 FINE WOODWORKING
 Corner Cupboard This space-saving piece enhances any room BY G A R R E T T H A C K On every trip to the Shelburne Museum near Burlington, Vt., I visit a favorite object a small hanging corner cabinet.
Butterfly Leaf Dining Table Plans
 Butterfly Leaf Dining Table Plans Part 1 An attractive dining table with a secret: the leaf folds and stores inside the table. Season 1, Episode 7 P a g e 2 I first saw a butterfly leaf table in a back
HANDCRAFTED LIDDED CHEST IN CHERRY With Red Cedar Lining
 HANDCRAFTED LIDDED CHEST IN CHERRY With Red Cedar Lining Design A chest was desired as a gift to family. The Shaker style of furniture was identified as a pleasing style. After viewing a number of pictures
 America s leading woodworking authority To download these plans, you will need Adobe Reader installed on your computer. If you want to get a free copy, visit: http://adobe.com/ reader. Having trouble downloading
Grade 11 Woods Lift Lid Coffee Table. Based on Under the big Top from Popular Mechanics Website
 Grade 11 Woods Lift Lid Coffee Table Based on Under the big Top from Popular Mechanics Website TABLE TOP 1. Select enough lumber to construct a top that is between 22 ½ and 24 wide after jointing. Ensure
Traditional glass-pane and wood-muntin doors highlight this free-standing piece.
 Bookcase Traditional glass-pane and wood-muntin doors highlight this free-standing piece. As the saying goes, there's nothing like good books. But they can present some storage problems--especially if
Display Case (for J&S)
") Display Case (for J&S) This is constructed of maple plywood with solid maple (soft maple) edge banding. It was made to fit between a door and a kitchen cabinet, and has an elegant circular taper between
Display Case (for J&S) This is constructed of maple plywood with solid maple (soft maple) edge banding. It was made to fit between a door and a kitchen cabinet, and has an elegant circular taper between
CROTCH-GRAINED CHESS TABLE. Walnut, Poplar
 3 CROTCH-GRAINED CHESS TABLE Walnut, Poplar 11 MAKING THE CHESS TABLE This piece is designed around a set of angles taken from the playing pieces, angles echoed in the fat dovetails holding the stretchers
SEWING MACH E CABINET
 SEWING MACH E CABINET OWNER'S Model Number MANUAL 272.98200..49! Oak 272.98201.491 White ASSEMBLY PARTS LIST IMPORTANT: Read instructions before assembling. 98200-FC 98201-FC Notice to Customer: Before
MODERN BED FRAME ROCKLER BUILD IT WITH BUILD SIMPLIFY CUSTOMIZE. Plan Value $14.99
 BUILD Stock # Item 63446 Baltic Birch Plywood /2" x 24" x 30" (2 qty) Stick veneer - Maple 24" x 96" 3/8" Dowels - Birch Bed Connector Hardware I-Semble Platform Bed Frame - Queen 3/8" Beadlock Basic Starter
SHAKER COUNTER. Build a Classic. This shallow chest of drawers is a catalog of traditional joinery details. By Chris Hedges
 Build a Classic SHAKER COUNTER This shallow chest of drawers is a catalog of traditional joinery details. By Chris Hedges O f the many reasons I am drawn to Shaker furniture, the one that stands strongest
ARCHED AURORA NIGHTSTAND BY DARRELL PEART
 ARCHED AURORA NIGHTSTAND BY DARRELL PEART If my furniture making business were a corporation, the shareholders would have thrown me out a long time ago. My approach is impractical, because I d rather tinker
Kentucky 4H Wood Science Plans Notebook. Plans Level 4
 Kentucky 4H Wood Science Plans Notebook Plans Level 4 MATERIALS NEEDED: Note: 1" wood may be 3/4" thick and 2" x 2" may be 1 1/2" x 1 1/2" 2 pieces wood 1 x 3 x 17 1 piece wood 1 x 3 x 14 3/4" 2 pieces
WOODWORKING GUIDE: BASIC JOINERY
 WOODWORKING GUIDE: BASIC JOINERY Close isn't really good enough. A perfect fit is what counts. When building furniture, there are many ways to construct joints. The simplest are those that use mechanical
Serving Tray. When some good friends got married recently, An exercise in template-making yields a great gift project that s easy to duplicate
 Serving Tray An exercise in template-making yields a great gift project that s easy to duplicate END Create from 3 8 2 8" piece. By Geoff Noden When some good friends got married recently, I decided to
x12 GAZEBO ASSEMBLY INSTRUCTIONS
 adlonco@hotmail.com 30 10 x1 GAZEBO ASSEMBLY INSTRUCTIONS Assembly with more than one person recommended 0 ZZZ-0.30.100-1.GP.EN.HER.doc Before you assemble the Gazebo It is important that this gazebo be
Section # /2" x 1 1/2" x 20" /4" x 15 3/4" x 82 1/2" /4" x 1 5/8" x 82 1/2"
 Hardware & Miscellaneous Items: A 2 3 1/2" chest handles B 7 3" T-hinges and screws C 4 1/4" T nuts D 4 1/4" x 2 1/2" Carage bolts E 2 1/4" x 2" Barrel Bolts F 2 1" x 5' Straps G 8 1/4" 3 1/2" Carage Bolts
W1209 1/2 10 X 12 SOLARIUM ASSEMBLY INSTRUCTIONS
 W09 / 0 X SOLARIUM ASSEMBLY INSTRUCTIONS Assembly by more than one person is suggested. Base Dimensions x 8, Largest Dimensions x (see pg.3) L:\WP5\Instructions\SOLARIUMS INSTRUCTION BOOKS\W09\ZZZ-09.W09.GP.EN.doc
Jeff Branch WOODWORKING YOU CAN BUILD A. By adding subtle design elements, a traditional furniture style becomes decidedly modern.
 Jeff Branch WOODWORKING YOU CAN BUILD A By adding subtle design elements, a traditional furniture style becomes decidedly modern. Jeff Branch WOODWORKING Publisher: Jeff Branch Editor: Jeff Branch Art
Mid-Century Credenza Thoughtful details and modern joinery merge in this sleek design
 Mid-Century Credenza Thoughtful details and modern joinery merge in this sleek design BY LIBBY SCHRUM Mid-Century Modern furniture has not been wildly popular since, well, the mid-century. But fashion
W1610 1/2 10 X 16 SOLARIUM ASSEMBLY INSTRUCTIONS Assembly by more than one person is suggested.
 adlonco@hotmail.com W60 / 0 X 6 SOLARIUM ASSEMBLY INSTRUCTIONS Assembly by more than one person is suggested. Requires 96 clearance at the wall Base Dimensions 90 x 8, Largest Dimensions 90 x (see pg.3)
Precision Measurement
 Precision Measurement Engineering Principles Student Journal Published by ENERGY CONCEPTS, INC. 27201J I COPYRIGHT 2009 BY ENERGY CONCEPTS, INC. All rights reserved. No part of this publication may be
x16 GAZEBO ASSEMBLY INSTRUCTIONS
 adlonco@hotmail.com 36-3 1 x16 GAZEBO ASSEMBLY INSTRUCTIONS Two or more adults required for assembly 0 ZZZ-05.36-3.117-15.GP.EN.HER.doc Before you assemble the Gazebo It is important that this gazebo be
Kitchen Base Cabinet: Multiple Drawers Cabinets from Scratch
 Kitchen Base Cabinet: Multiple Drawers by Cabinets from Scratch Our Home from Scratch LLC Page 1 Disclaimer Our Home from Scratch LLC and its legal owners cannot be held responsible for any loss, damage,
leaf table Leaves dropped, this traditional oak table makes an ideal kitchen island. Leaves extended, it s a small breakfast table
 leaf table Leaves dropped, this traditional oak table makes an ideal kitchen island. Leaves extended, it s a small breakfast table The drop-leaf table is a traditional favourite, but the one I ve designed
12 X 18 SOLARIUM ASSEMBLY INSTRUCTIONS
 1218 12 X 18 SOLARIUM ASSEMBLY INSTRUCTIONS Assembly by more than one person is recommended. Base Dimensions 12 ½ x18 11, Largest Dimensions 13 6 x20 ½ (see pg.1) L:\WP51\Instructions\SOLARIUMS INSTRUCTION
Classic Mitered Jewelry Box
 America s leading woodworking authority Premium Plan In this plan you ll find: Step-by-step construction instruction. A complete bill of materials. Construction drawings and related photos. Tips to help
Mortisting Stand. Premium Plan. In this plan you ll find: America s leading woodworking authority
 America s leading woodworking authority Premium Plan In this plan you ll find: Mortisting Stand Step-by-step construction instruction. A complete bill of materials. Construction drawings and related photos.
DIY Full-Size Captain s Bed with Storage. Addicted2DIY.com
 DIY Full-Size Captain s Bed with Storage Addicted2DIY.com Before beginning this project Please read through all of the plans as well as the blog post associated with this project. Always use safety precautions
hanging mirror Two-piece desk set Handmade Gifts Photo: John Tetreault
 hanging mirror Two-piece desk set Handmade Gifts 44 FINE woodworking Photo: John Tetreault Flatware carrier Tea light candle holder 4 Tasteful projects made quickly from scraps BY CHRISTIAN BECKSVOORT
Greene & Greene. Mailbox. by Seth Keller. Signature details create an elegant box. 2 AmericanWoodworker.com
 Greene & Greene Mailbox by Seth Keller Signature details create an elegant box. 2 AmericanWoodworker.com We needed a new mailbox, but I couldn t find an off-the-shelf version that I liked. So I decided
12 X 18 SOLARIUM ASSEMBLY INSTRUCTIONS
 adlonco@hotmail.com 1218 12 X 18 SOLARIUM ASSEMBLY INSTRUCTIONS Assembly by more than one person is recommended. Base Dimensions 12 ½ x18 11, Largest Dimensions 13 6 x20 ½ (see pg.1) ZZZ-18.1218.0530-1.GP.EN.HER.doc
Serving Tray. America s leading woodworking authority. Step by Step construction instruction. A complete bill of materials.
 America s leading woodworking authority Serving Tray Step by Step construction instruction. A complete bill of materials. Exploded view and elevation drawings. How-to photos with instructive captions.
The Q Frame PROJECT. a picture frame with secrets created exclusively for the Router Forum
 The Q Frame PROJECT a picture frame with secrets created exclusively for the Router Forum 007 OR RELEASE FPLANS APPROVED The Q Frame: Project Overview LIST OF MATERIALS Frame Sides & Face 3/4 x 5 1/2 x
Shoulder Plane. dovetailed. fine tools. Make an heirloom tool and learn the secret to creating double dovetails in metal it s easier than you think.
 fine tools dovetailed Shoulder Plane Make an heirloom tool and learn the secret to creating double dovetails in metal it s easier than you think. I ve always been fascinated by old, metal hand planes.
Floating-Top Table. Creative joinery adds spark to this versatile piece
 Floating-Top Table Creative joinery adds spark to this versatile piece By Michael Pekovich 28 FINE woodworking This is one of those projects that almost wasn t. Rachel, my wife, had asked for a small,
Materials. Special Tools and Techniques Chisel Long pipe clamps Miters Router with 1/2" rabbet cutter Rabbets Dadoes. Hardware
 D esk Our executive desk was built with specific needs in mind. We wanted a large desktop, large drawers, and a cubbyhole to house a rollaway hanging file cabinet. We are thrilled with our finished project.
A PIANO BENCH Piano Bench in Black Walnut
 A PIANO BENCH Piano Bench in Black Walnut The piano bench shown in the accompanying picture was made of black walnut and was finished natural. The finish was applied in the following manner: First, all
Designed by Valori Wells
 Just THE SOUKS Kisses Designed by Valori Wells www.valoriwells.com Featuring Finished quilt measures: 60 x 78 For questions about this pattern, please email Patterns@RobertKaufman.com. Fabric and Supplies
Reasons to Own a Shoulder Plane
 9 Reasons to Own a Shoulder Plane Fine-tune your joinery with these tips and techniques B y C h r i s G o c h n o u r It s easy to dismiss the shoulder plane as a specialty plane, another way of saying
W X 12 SOLARIUM ASSEMBLY INSTRUCTIONS Two or more adults required for assembly
 adlonco@hotmail.com W07-3 8 X SOLARIUM ASSEMBLY INSTRUCTIONS Two or more adults required for assembly Requires 96 clearance at the wall Base Dimensions x 9 /, Largest Dimensions x98 / (see pg.) ZZZ-87.W07-3.7-5.GP.EN.HER.doc
PROJECT PLANS EXPANDABLE CRAFT CENTER
 R PROJECT PLANS EXPANDABLE CRAFT CENTER Whether you re working on craft projects, sewing, or pursuing another hobby, this craft center offers a great place to work. It features a large work surface that
Nineteenth-Century Dough Box
 Nineteenth-Century Dough Box T he dough box was a functional piece found in many a country kitchen. The idea was that the cook would make a large batch of bread dough, knead it on the large work surface
Kentucky 4H Wood Science Plans Notebook. Plans Level 2
 Kentucky 4H Wood Science Plans Notebook Plans Level 2 MATERIALS NEEDED: JEWELRY BOX WS201 1 piece wood 1/4" x 4 x 4 1/2" (bottom) 1 piece wood 1/4" x 4 1/2" x 5 (top) 2 pieces wood 1/4" x 2 x 5 (front
Kitchen Base Cabinet: Single Drawer with Double Doors Cabinets from Scratch
 Kitchen Base Cabinet: Single Drawer with Double Doors by Cabinets from Scratch Our Home from Scratch LLC Page 1 Disclaimer Our Home from Scratch LLC and its legal owners cannot be held responsible for
W1610 1/ X 16 SOLARIUM ASSEMBLY INSTRUCTIONS Two or more adults required for assembly
 adlonco@hotmail.com W60 /-3 0 X 6 SOLARIUM ASSEMBLY INSTRUCTIONS Two or more adults required for assembly Requires 96 clearance at the wall Base Dimensions 90 x 8, Largest Dimensions 90 x (see pg.4) ZZZ-0.W60-3.4-5.GP.EN.HER.doc
I I. . i1 AD JUSTABLE SHELVES
 ADJUSTABLE SHELVES HAD BEEN TRYNG TO WORK out a really simple (read "fast") way to make an elegant wooden version of the old standby, metal standards and brackets. Although have seen many commercial versions
DOWNLOADABLE PROJECT PLANS FROM THE EDITORS OF WOOD MAGAZINE Whether it s
 DWNDBE JEC NS F HE EDIS F WD GZINE http://www.woodmagazine.com Whether it s butterflies or baseball cards, Irish lace or South merican stamps, this ten-drawer beauty has got your collection covered. Not
Build a Bed Designed for Readers
 America s leading woodworking authority Step by Step construction instruction. Build a Bed Designed for Readers A complete bill of materials. Exploded view and elevation drawings. How-to photos with instructive
Build A Cedar Chair And Ottoman
 Build A Cedar Chair And Ottoman If you've ever dreamed of extending the comfort of your living room to your deck, patio or yard, our porch chair-and-ottoman combination is a great place to start making
Classic Kitchen Island
 America s leading woodworking authority Step by Step construction instruction. A complete bill of materials. Classic Kitchen Island Exploded view and elevation drawings. How-to photos with instructive
Plans. Easy-to-Build Pencil Box. For more plans, tools and hardware visit rockler.com
 Easy-to-Build Pencil Box Rare-earth magnets keep the lid and the drawer from flying open unexpectedly Plans For more plans, tools and hardware visit rockler.com What you ll find inside: Elevation drawings
Hardware Cabinet. Part 3
 Hardware Cabinet Part 3 The vertical dividers are the next task on the cabinet and a bit of a trick to get right. The horizontal dividers are only ½ thick pine spanning the 31 width of the cabinet and
ENJOY THIS SELECTION FROM. Woodworking 101. Includes Step-by-Step Instructions for 8 Projects. Woodworking
 W ENJOY THIS SELECTION FROM Woodworking 101 Includes Step-by-Step Instructions for 8 Projects Woodworking 101 Aimé Fraser, Matthew Teague, and Joe Hurst-Wajszczuk To purchase your copy of Woodworking 101,
BUTCHER BLOCK MICROWAVE OVEN STAND
 BUTCHER BLOCK MICROWAVE OVEN STAND 828 The butcher block has fallen out of favor in recent years, replaced by the countertop cutting board in an attempt to save space. This design, however, makes the butcher
WOOD MANUFACTURING 30
 WOOD MANUFACTURING 30 Description This course is designed to introduce to the student the processes and techniques of leg and rail construction. Student skills will be developed through tool and machine
This is a solid wood cabinet. The only plywood used is for the back and drawer bottoms.
 Sideboard Sideboard Overview: This project requires basic woodworking skills and access to woodworking machines. Woodworking machines have sharp cutting edges and are NOT forgiving. You should be properly
10 Easy-to-Build. Plywood Projects
 10 Easy-to-Build Plywood Projects Ten shop projects ten sheets of plywood. These rock-solid essentials take just a couple hours to build and will help you make the most of the space in your shop. All content
Classic Project. Cherry Drop-leaf Dining Table. In this plan you ll find: Step-by-step construction instruction. A complete bill of materials.
 America s leading woodworking authority Classic Project n this plan you ll find: Step-by-step construction instruction. A complete bill of materials. Construction drawings and related photos. Cherry Drop-leaf
How to Build a Recessed Medicine Cabinet
 How to Build a Recessed Medicine Cabinet See post for install info http://www.hertoolbelt.com/recessed-medicine-cabinet/ Materials 6 Inset Cabinet Door Hinges 3 Latches 1 sheet Beadboard or 1/4 plywood
12 X 15 SOLARIUM ASSEMBLY INSTRUCTIONS
 115 1 X 15 SOLARIUM ASSEMBLY INSTRUCTIONS Assembly by more than one person is recommended. Base Dimensions 1 ½ x15 6, Largest Dimensions 13 6 x16 11 (see pg.13) L:\WP51\Instructions\SOLARIUMS INSTRUCTION