Hardware Cabinet. Part 3
|
|
|
- Roger Hunter
- 5 years ago
- Views:
Transcription

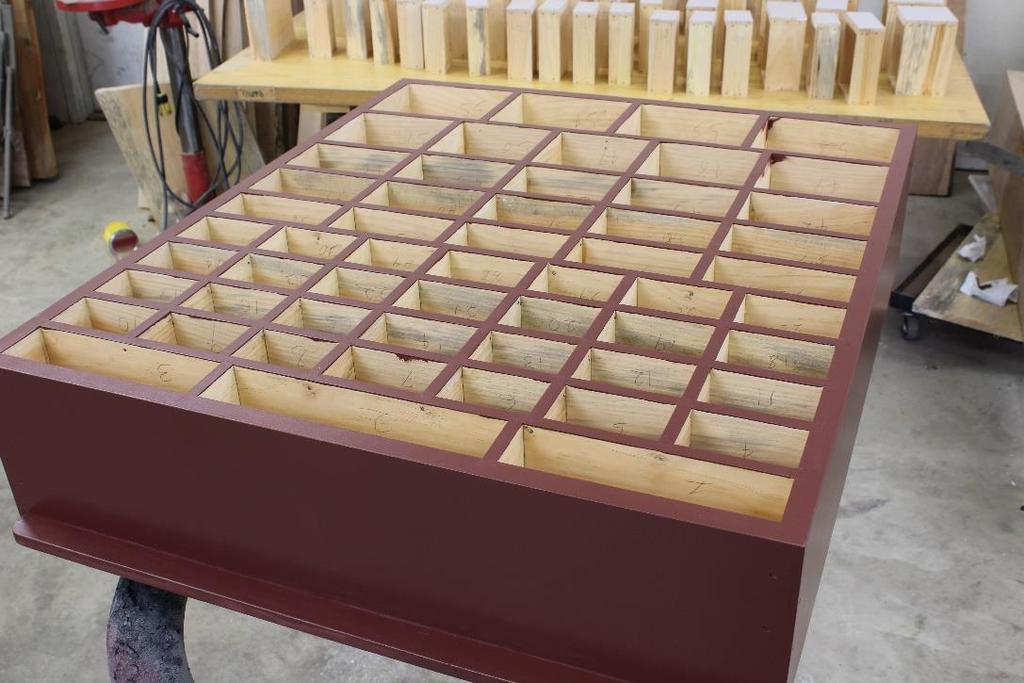
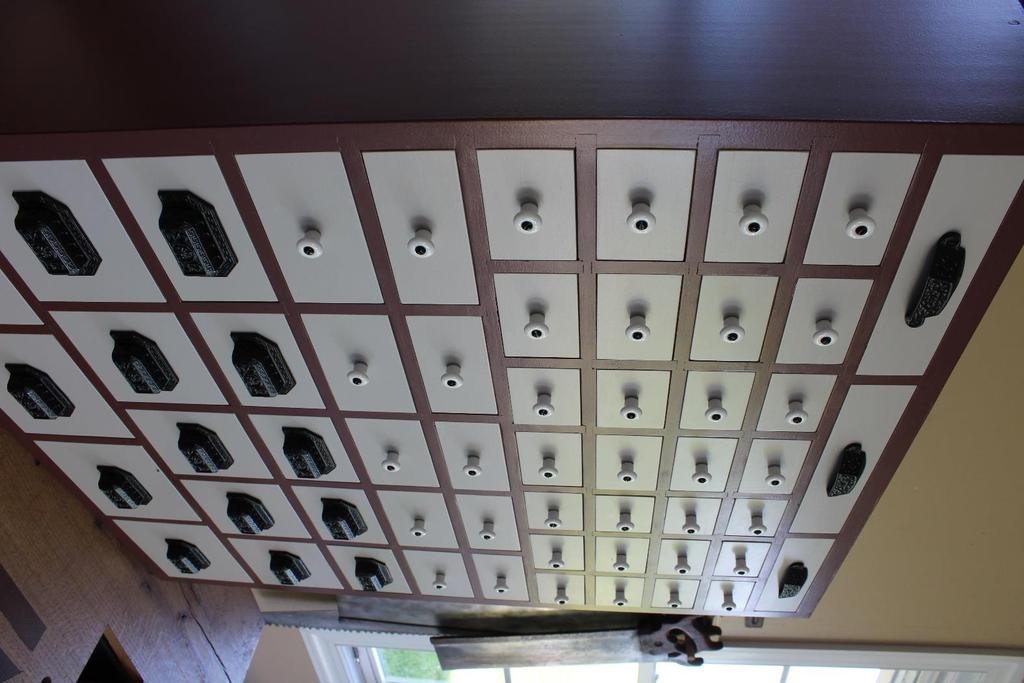
1 Hardware Cabinet Part 3 The vertical dividers are the next task on the cabinet and a bit of a trick to get right. The horizontal dividers are only ½ thick pine spanning the 31 width of the cabinet and quiet flimsy until the verticals are installed. If you remember in the beginning of part 2 when I planed the dados in the case side I had a 2 wide piece in-between the case sides that was dadoed as well.


2 The reason for that piece was to help support and hold the horizontal dividers in alignment while installing the vertical dividers. The support piece is simply placed in the center of the case and pressed onto the dividers. The vertical dividers are ½ stock cut slightly narrower than the horizontals so they won t quiet contact the backboard when it is installed. The length of the verticals needs to be very accurate, even with the center support it would not take much to push the horizontals out of alignment. One row of the verticals

3 that is too long or too short could make a mess of everything. I transferred the length of the first divider in the first row directly to the stock, then used a hand miter box and cut it to length. Before cutting anymore for that row I installed it in the cabinet and made sure it was the right length. If it s good, clamp a stop to the miter box and cut the remaining dividers the same length for that row. As you complete each row of verticals, eyeball down the horizontal divider to double check that it is not bowed one way or the other. After completing a row, I glued and nailed the dividers front and back with small finish nails. Repeat the same process for each row. After all of the vertical dividers are in the, back boards can be installed. I pre-bored the back then glued and nailed it in place with 1 ½ cut nails.

4

5 The drawers on the original cabinet are made with different thickness parts, thinner stock on the smaller upper drawers and progressively heavier stock on the larger lower drawers. All of the drawers are simply nailed together with a floating bottom set in a grove plowed in the front and sides. To attempt to dovetail 55 little drawers would be the definition of insanity. Nailing these is entirely adequate; most of the drawers in this cabinet could not hold more than a pound or two of nails or screws if completely full anyway. You can really make a dent in your scrap pile building the drawers. There are dozens of small pieces that can be made from crappy wood. To try to utilize what I had, when milling out the drawer stock I milled the pieces out as long as possible with knots and defects included. As I cut individual drawer parts to

6 length I would dodge the defects. This way I did not have to try and plane or saw a bunch of small parts and the drawers in this cabinet ended up being pretty much all clear material. For my cabinet I made all of the drawers from the same dimension stock throughout to simplify the milling process. The drawer fronts are all ¾ thick, sides 3/8 and the bottoms from 3/16 material. I started with the drawer fronts. Mill out enough stock for an entire row of drawers the proper height to fit the openings. Before cutting then to length I plowed the 3/16 grove to accept the drawer bottom. To get an accurate fit I transferred the lengths from each individual drawer opening to the stock and cut to length on the miter box. Test each drawer face to the openings and check the fit, tune up with a block plane if needed. After they are fit be sure to number each opening to each drawer face to avoid confusion. Each drawer face has two rabbets to accept the drawer sides. These drawer faces are narrow and a bit difficult to try to rabbet individually. The best way I found to do them was a whole row of fronts at once.

7 Using my tail vise, I aligned one side of a row of fronts with a straight edge, clamped, and then cut the rabbit with a moving fillister plane. To be sure they were all to a perfectly equal depth I used a router plane to make the last pass. I re-sawed with a band saw the 5/4 stock I had to make the 3/8 thickness needed for the drawer sides. Here again, the height changes between rows and you have to mill out the sides accordingly. The length of the side pieces are the same for all the drawers. The sides also get a 3/16 groove for the bottom board to fit into. This is best done before the sides are cut to length.

8 You will also need to cut the backs for each drawer. The best way to size these is to use the back of the drawer face between the rabbets for the length and for the height the length from the top of the grove to the top of the drawer front. The bottom boards are milled to 3/16 thick and are the same width throughout all of the drawers. The grain of the bottoms run side to side in the drawers. Being that the drawers are nailed together, assembly moves along pretty quickly. I used 1 ¼ wire nails same as had been used on the original cabinet.


9 To begin, I started the nails in the side boards that would go into the front board rabbet, spread a little glue in the rabbet and nail on one side, flip it over and glue the opposing rabbet and nail on the second side.

10 Next, spread some glue on both ends of the drawer back and nail it in from either side being sure it is even with the tops of the groves plowed into the drawer sides. For the bottom, I used the drawer itself to transfer the width to the bottom board and cut it to length.


11 No glue is added to the drawer bottom so it can float in the groves, just a nail into the back board is all that you need to secure it. Last, check the drawer for square then insert it in its respective location and check the fit. If the drawers needed any tuning I did it as I assembled them, that way I did not end up with a lot of tweaking when they were all together.


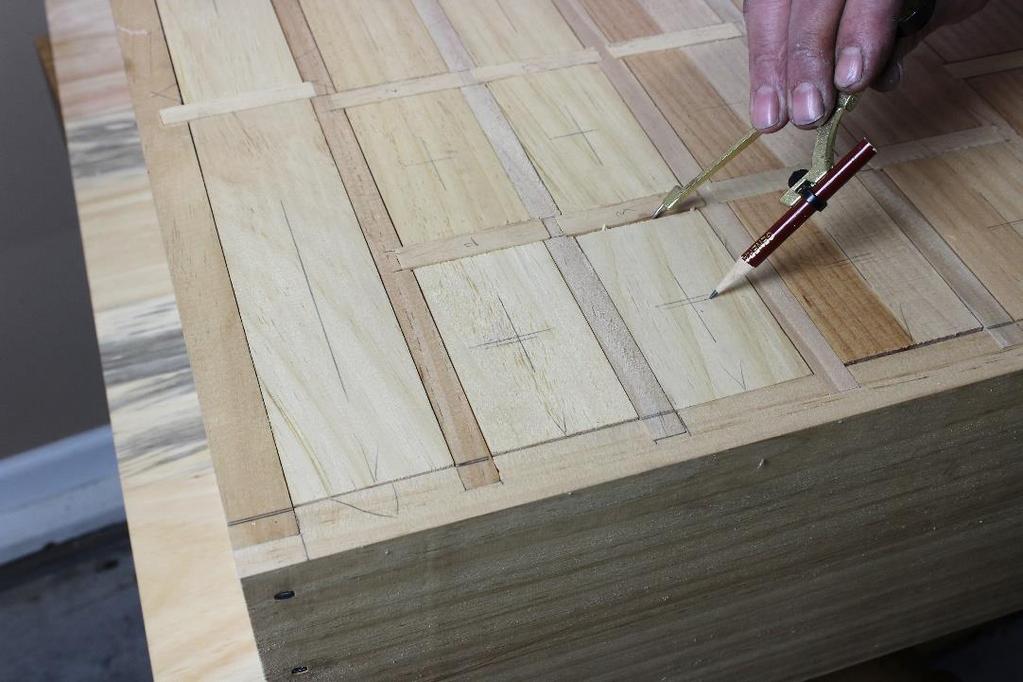
12 As for the hardware, I was fortunate enough to find some reproduction bin pulls and knobs that were almost identical to the originals on the old cabinet. At this point I went ahead and laid out and pre-bored the drawer fronts for the mounting screws. I did this with the cabinet laid on its back, found the center of each row, and then used a long straight edge to mark the horizontal center of each drawer. The drawers with bin pulls I used the pull itself located on the horizontal line, eyeballed the center side to side and bored the holes for the mounting screws. The drawers with knobs I used a pair of dividers making a mark from either side of the drawer to find the center, then bored the screw holes for them as well.
13

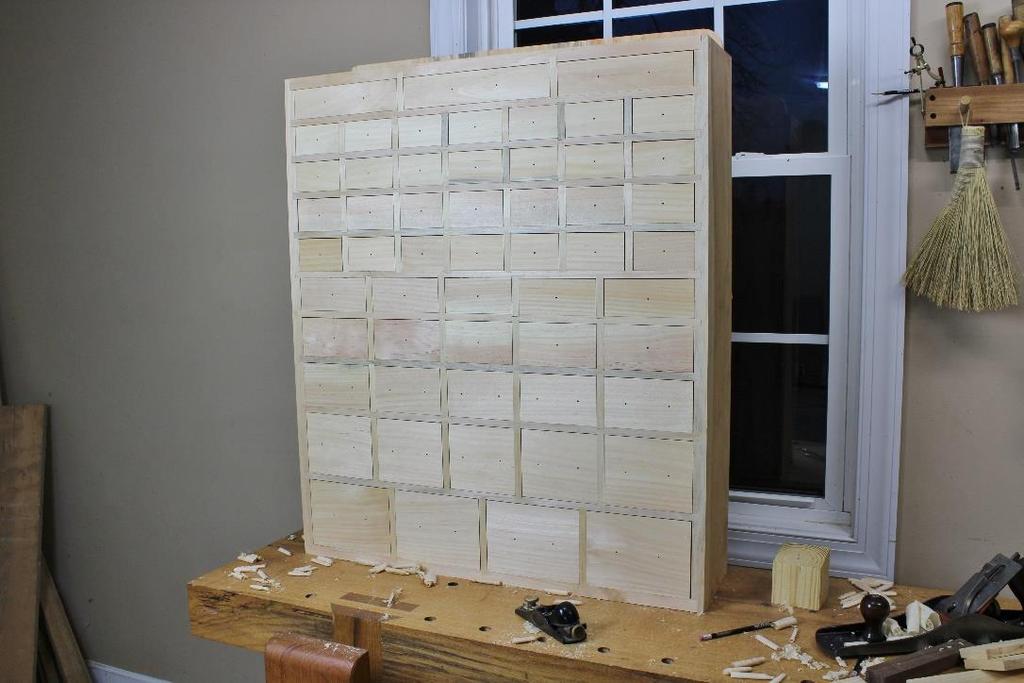
14 Once all the drawers were made I removed all of them, then using a block plane smoothed and evened up the front edges of the cabinet, horizontal and vertical dividers.

15 With the face of the cabinet finished, I checked each drawer s fit again and planed the faces smooth.

16 I also went over the sides, top and bottom of the cabinet with a plane to remove any remaining roughness and layout marks. The original cabinet was pained two different colors. A light gray on the drawer fronts and dark barn red on the cabinet itself. I decided to go with the same on this one.
17


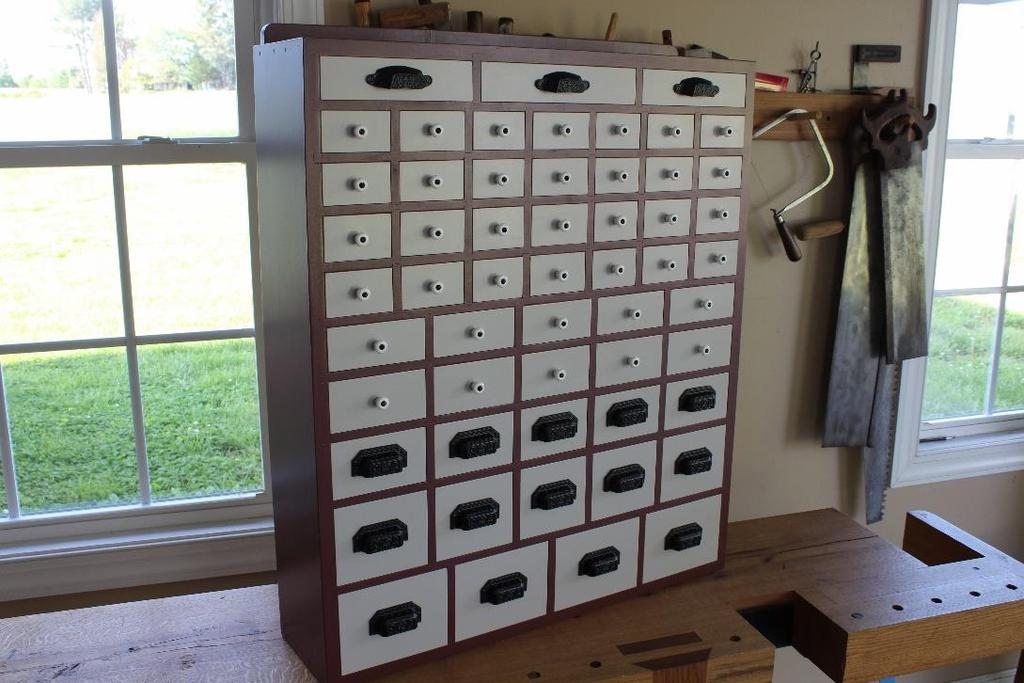
18 Being that the cabinet is made from pine, I used an oil based primer first. I followed with two color coats of Benjamin-Moore Advance. A small 4 foam roller really worked well for the application. After the paint was dry I installed the hardware. I have not decided yet whether I will add a couple of French cleats to the back and hang the cabinet on a wall or possibly build a lower storage cabinet for it to set on.
19
20

21 One other detail I have not decided on is how I am going to label the drawers. Painted lettering like the original would be the coolest option but it is not easily changeable if you need to add or remove hardware down the road. Label holders that hold paper labels is an option but I don t really like the way they look. One thing if for sure, I will have to do something, with this may drawers you could lose stuff in the cabinet instead of organize it! Thanks for following along! Will Myers May 2017 Questions, comments? sbhemi@yahoo.com
hanging mirror Two-piece desk set Handmade Gifts Photo: John Tetreault
 hanging mirror Two-piece desk set Handmade Gifts 44 FINE woodworking Photo: John Tetreault Flatware carrier Tea light candle holder 4 Tasteful projects made quickly from scraps BY CHRISTIAN BECKSVOORT
Tongue & Groove Cabinet Doors Copyright 2014 JaysCustomCreations.com
 Tongue & Groove Cabinet Doors Copyright 2014 JaysCustomCreations.com A tongue and groove cabinet door is made up of at least 5 pieces. Two horizontal rails (blue), two vertical styles (green), and one
Project 17884EZ: Shaker End Table
 Project 17884EZ: Shaker End Table With its clean, simple lines, this piece is unmistakably Shaker style. Ours is made from cherry, a wood commonly used by Shaker craftsman, but we ve also seen this piece
BUILDING A STORM DOOR
 BUILDING A STORM DOOR BY NEAL BARRETT Illustrations by George Retseck If you're in the market for a storm door, you probably know that there are many styles and models available. However, most of them
Nojo Design: Large Step Cabinet: February 2012
 Nojo Design: Large Step Cabinet: February 2012 The largest single piece of furniture I ve ever made is this stepped cabinet. Finished piece is 8! tall and over 10 long. This project has been great, although
Project 13586EZ: Writing Desk. Writing Desk Materials List
 Project 13586EZ: Writing Desk This writing desk will make a handsome addition to just about any room in the house. The one shown is made of cherry, a logical choice for a piece like this, but mahogany
The frame sections of the china hutch are assembled with the aid of glue and spiral dowels. Dowel centers are recommended to
 60 CHINA HUNT 282 ARE YOU LOOKING for a showpiece china hutch to display your elegant chinaware, antique vase, or collectibles? Here's the perfect cabinet for you, with lots of transparent glass to show
About.com :
 http://woodworking.about.com/gi/dynamic/offsite.htm?sit...//www.popularwoodworking.com/features/fea.asp%3fid=1088 (1 of 8)1/28/2004 12:05:01 AM Modern Storage Tower The last thing I want to do when starting
This photo more clearly shows how locating pins are used to transfer the dowel holes from the edge to front of frame. Use bar clamps till glue dries.
 CHINA HUTCH 266 The frame sections of the china hutch are assembled with the aid of glue and spiral dowels. Dowel centers are recommended to ease matching of dowel holes. gant chinaware, antique vase,
DOCUMENT CHEST. Curly Maple, White Pine
 25 DOCUMENT CHEST Curly Maple, White Pine 100 MAKING THE DOCUMENT CHEST After the stock has been thicknessed, ripped to width, and cut to length, plough a 1/4" X 3 /8" groove on the inside faces of the
Chest of Drawers Plans
 Chest of Drawers Plans www.andrewharriswoodwork.com Page 1 of 15 Introduction This plan makes a chest of drawers that is 50 inches at the widest point, 19 inches deep and 40.75 inches high. I have tried
ENJOY THIS SELECTION FROM. Woodworking 101. Includes Step-by-Step Instructions for 8 Projects. Woodworking
 W ENJOY THIS SELECTION FROM Woodworking 101 Includes Step-by-Step Instructions for 8 Projects Woodworking 101 Aimé Fraser, Matthew Teague, and Joe Hurst-Wajszczuk To purchase your copy of Woodworking 101,
Build a Rolling Tool Tote
 The rolling tool tote design calls for readily available materials: a cheap hand truck (it could be an axle and two wheels), 3/4 and 1/2 thick plywood, 1/4 thick MDF (you could use plywood or hardboard)
Dress up your dining room with this Southern delicacy. that was used to serve drinks after a hunt. Breeches and jodhpurs are optional.
 Dress up your dining room with this Southern delicacy that was used to serve drinks after a hunt. Breeches and jodhpurs are optional. Huntboard Classic Six-Legged My dad has been making this six-legged
Jeff Branch WOODWORKING YOU CAN BUILD A. By adding subtle design elements, a traditional furniture style becomes decidedly modern.
 Jeff Branch WOODWORKING YOU CAN BUILD A By adding subtle design elements, a traditional furniture style becomes decidedly modern. Jeff Branch WOODWORKING Publisher: Jeff Branch Editor: Jeff Branch Art
Complete Dovetail Jig Instructions
 Complete Dovetail Jig Instructions 15 18 4 3 1 12 13 8 19 17 16 6 14 5 9 11 10 2 9 PARTS LIST - Complete Dovetail Jig Introduction Your new dovetail jig will cut Full Through Dovetails and three varieties
Copyright 2007 MLCS 1
 Copyright 2007 MLCS 1 REFERENCE GUIDE and SPECIFICATIONS: Edge Guides: This 12 Dovetail Template comes complete with 2 Edge Guide Sets one set for Half Blind and one set for Rabbeted Half Blind Dovetails.
The Hive Bodies. Hive Body (Super) Hive Bodies
 Hive Bodies") The Hive Bodies The hive body is the heart of a managed bee hive colony (Figure 1). It is where the queen lays her eggs, the house bees raise the brood and the workers store the pollen and nectar (converted
The Hive Bodies The hive body is the heart of a managed bee hive colony (Figure 1). It is where the queen lays her eggs, the house bees raise the brood and the workers store the pollen and nectar (converted
Pivot-Door Downdraft Cabinet Plans
 Pivot-Door Downdraft Cabinet Plans Finished Cabinet Closed Open Exploded View Introduction This simple downdraft-style dust collection cabinet is a great way to keep your shop cleaner and keep your router
Shaker Lap Desk. The classic Shaker lap desk, designed two centuries ago to. Celebrate pen and ink with this quintessential case
 Shaker Lap Desk Celebrate pen and ink with this quintessential case BY CHRISTIAN BECKSVOORT The classic Shaker lap desk, designed two centuries ago to function as a miniature traveling office, was the
Kitchen Upper Cabinet: Double Doors Cabinets from Scratch
 Kitchen Upper Cabinet: Double Doors by Cabinets from Scratch Our Home from Scratch LLC Page 1 Disclaimer Our Home from Scratch LLC and its legal owners cannot be held responsible for any loss, damage,
Half-Blind Isoloc Joint Procedures
 ISOLOC - CHAPTER 6 Half-Blind Isoloc Joint Procedures 6- Always use scrap boards to practice and test for fit. Rip the boards to width to suit the chosen template. The pin boards should not be less than
Project 13519EZ: Shaker Sewing Desk
 Project 13519EZ: Shaker Sewing Desk This fine example of a Shaker sewing desk was measured and photographed at Hancock Shaker Village in Hancock, Massachusetts. On the original, the legs and various frame
Classic Kitchen Island
 America s leading woodworking authority Step by Step construction instruction. A complete bill of materials. Classic Kitchen Island Exploded view and elevation drawings. How-to photos with instructive
Slicing Jig For Pen Inlays
 Slicing Jig For Pen Inlays By Randall Smith (randyrls) May 2008 This article has been downloaded from the library of the International Association of Penturners. www.penturners.org You are welcome to reproduce
MITER SAW SUPPORT WINGS PLAN
 MITER SAW SUPPORT WINGS PLAN Version 1.0 How to build support wings for your miter saw With easy to follow step-by-step instructions, you will be able to cut, assemble, and finish your very own support
Modern Farmhouse Printer Cabinet. Addicted2DIY.com
 Modern Farmhouse Printer Cabinet Addicted2DIY.com Before beginning this project please read through all of the plans as well as the blog post associated with this project. Always use safety precautions
Computer Desk. Project designed by April Wilkerson
 Project designed by April Wilkerson Copyright WilkerDos.com 2018 Project plan Desk Page 2 of 16 Page 3 of 16 File cabinet Page 4 of 16 Metal base Page 5 of 16 Glue up Get started by gluing up boards for
ULTIMATE ROUTER TABLE PLANS. By Dan Phalen
 ULTIMATE ROUTER TABLE PLANS By Dan Phalen January 2017 Ultimate Router Table Plans. Copyright 2012-2017 by Daniel Phalen. Published by Creston Hall Publishing Company. All rights reserved. No part of this
Kitchen Upper Cabinet: Single Door Cabinets from Scratch
 Kitchen Upper Cabinet: Single Door by Cabinets from Scratch Our Home from Scratch LLC Page 1 Disclaimer Our Home from Scratch LLC and its legal owners cannot be held responsible for any loss, damage, disappointment,
WOOD MANUFACTURING 30
 WOOD MANUFACTURING 30 Description This course is designed to introduce to the student the processes and techniques of leg and rail construction. Student skills will be developed through tool and machine
I then moved on to the legs assemblies. The legs are simply three pieces of 1 ½ in x 4 ¼ in stock glued up, planed and jointed to 4 in x 4in.
 Nicholson Workbench Another workbench? Does this guy have nothing better to do than build one workbench after another? First off, this one is not for me. I recently received a commission to build a Nicholson
This is a solid wood cabinet. The only plywood used is for the back and drawer bottoms.
 Sideboard Sideboard Overview: This project requires basic woodworking skills and access to woodworking machines. Woodworking machines have sharp cutting edges and are NOT forgiving. You should be properly
Arched. Building an. Passageway. Although my company specializes in high-end jobs
 Building an Arched Passageway All photos by Brian Striegler This straightforward approach combines basic shop methods with simple site joinery to create an elegant frame-and-panel archway by Gary Striegler
Corner Cabinet. American. There is something about corner cabinets that spooks
 American Corner Cabinet The triangular shape of this project puts off most woodworkers. Here s a secret: It s actually quite easy to build. There is something about corner cabinets that spooks most woodworkers.
Shaker Classic Change the legs to change the look
 Shaker Classic Change the legs to change the look 2 Ways B Y C H R I S T I A N BECKSVOORT not long ago, a couple ordered a set of cherry side tables from me, one for each side of their pencil-post bed.
Hand Dovetails. They're really not that hard to do. by Alphonse Mattia
 Hand Dovetails They're really not that hard to do by Alphonse Mattia Dovetailing is one of the strongest and most attractive methods of joining the ends of boards together. Traditionally, handcut dovetails
Kitchen Base Cabinet: Multiple Drawers Cabinets from Scratch
 Kitchen Base Cabinet: Multiple Drawers by Cabinets from Scratch Our Home from Scratch LLC Page 1 Disclaimer Our Home from Scratch LLC and its legal owners cannot be held responsible for any loss, damage,
Shoulder Plane. dovetailed. fine tools. Make an heirloom tool and learn the secret to creating double dovetails in metal it s easier than you think.
 fine tools dovetailed Shoulder Plane Make an heirloom tool and learn the secret to creating double dovetails in metal it s easier than you think. I ve always been fascinated by old, metal hand planes.
The WoodWorker s Edge
 The WoodWorker s Edge Draw-leaf Game Table 1. 2. Layout the area for the tenons. The tenons are 3/8 thick x 4-1/2 long x 1-1/4 deep and offset to the inside. Create the tenons using the step method to
MODERN BED FRAME ROCKLER BUILD IT WITH BUILD SIMPLIFY CUSTOMIZE. Plan Value $14.99
 BUILD Stock # Item 63446 Baltic Birch Plywood /2" x 24" x 30" (2 qty) Stick veneer - Maple 24" x 96" 3/8" Dowels - Birch Bed Connector Hardware I-Semble Platform Bed Frame - Queen 3/8" Beadlock Basic Starter
Mid-Century Credenza Thoughtful details and modern joinery merge in this sleek design
 Mid-Century Credenza Thoughtful details and modern joinery merge in this sleek design BY LIBBY SCHRUM Mid-Century Modern furniture has not been wildly popular since, well, the mid-century. But fashion
The first step is to cut all wood to proper size. Refer to the cutting schedule and Details 1 and 2 for further instructions.
 CHILD S ARMOIRE 275 THIS CHILD'S ARMOIRE will make it easy for kids to keep their rooms neat and orderly. Its six drawers and two shelves provide enough storage space to house a substantial wardrobe. By
Hinge Mortising Jig. One of the make it or break it parts of building a. 6 ShopNotes No. 74
 Hinge Mortising Jig A Mortise for a Hinge. Quick, clean, and accurate that s the only way to describe the mortise you get with a trim router and this hinge mortising jig. One of the make it or break it
DIY Rustic Dresser Addicted2DIY.com
 DIY Rustic Dresser Addicted2DIY.com *Before beginning this project, please read through all of the plans as well as the blog post associated with this project. Always use safety precautions whenever using
Adjustable Box Joint Jig. Richard Hicks on 8/24/2015. Box or Finger Joints
 Adjustable Box Joint Jig Richard Hicks on 8/24/2015 Box or Finger Joints Adjustable Box Joint Jig Richard Hicks on 8/24/2015 Box Joints are also called Finger Joints Because they have interlocking fingers
Project 11355EZ: Wall Cabinet with Louvered Doors and Shelf
 Project 11355EZ: Wall Cabinet with Louvered Doors and Shelf This Early American style cabinet will look good in any room, although it seems particularly well suited for the kitchen or bathroom. To make
FINISH CARPENTRY. Installing Arched Casing How to make three different arched trim details look like they grew there
 FINISH CARPENTRY 1 2 3 Installing Arched Casing How to make three different arched trim details look like they grew there Photos by Gary Striegler BY GARY STRIEGLER I love the challenge of trimming arched
Bathroom Storage Unit. Wilkerdos.com
 Bathroom Storage Unit Wilkerdos.com Copyright 2015 Material List Quantity Item Notes 1 4 x 8 x 3/4 plywood Construction grade 1 2 x 4 x 1/2 plywood Construction grade 11" 7-1/2" Page 1 Some 1 1/4" brad
Butterfly Leaf Dining Table Plans
 Butterfly Leaf Dining Table Plans Part 1 An attractive dining table with a secret: the leaf folds and stores inside the table. Season 1, Episode 7 P a g e 2 I first saw a butterfly leaf table in a back
Hudson Dresser [1] Hudson Dresser Published on Ana White ( Submitted by dan-k [2] on Fri, :43 [1]
![Hudson Dresser [1] Hudson Dresser Published on Ana White ( Submitted by dan-k [2] on Fri, :43 [1]](/thumbs/90/102626096.jpg "Hudson Dresser [1] Hudson Dresser Published on Ana White ( Submitted by dan-k [2] on Fri, :43 [1]") [1] Submitted by dan-k [2] on Fri, 2011-03-11 11:43 [1] If you plan on staining this piece, it is recommended that you stain all of the drawer face materials before assembly for a more professional look.
[1] Submitted by dan-k [2] on Fri, 2011-03-11 11:43 [1] If you plan on staining this piece, it is recommended that you stain all of the drawer face materials before assembly for a more professional look.
You Can Build a Bedside Table
 You Can Build a Bedside Table Jeff Branch WOODWORKING If you like making panels, you ll love this project. By JEFF BRANCH M y current home is a modest one. But it is a big improvement over our small starter
15 Dovetail Jig. Instruction Manual. Part # 3452
 15 Dovetail Jig Instruction Manual Part # 3452 CAUTION: Please read, understand, and follow all manufacturers instructions, guidelines and owners manuals that come with your power tools. Peachtree Woodworking
Copyright WilkerDos.com Dining Table. Project Designed By April Wilkerson - Plan Created By Jay Bates (jayscustomcreations.
 Copyright WilkerDos.com 2017 Project Designed By April Wilkerson - Plan Created By Jay Bates (jayscustomcreations.com) Layout & Shopping List Page 2 of 12 Layout & Shopping List Item Quantity Description
Display Case (for J&S)
") Display Case (for J&S) This is constructed of maple plywood with solid maple (soft maple) edge banding. It was made to fit between a door and a kitchen cabinet, and has an elegant circular taper between
Display Case (for J&S) This is constructed of maple plywood with solid maple (soft maple) edge banding. It was made to fit between a door and a kitchen cabinet, and has an elegant circular taper between
Kitchen Base Cabinet: Single Drawer with Double Doors Cabinets from Scratch
 Kitchen Base Cabinet: Single Drawer with Double Doors by Cabinets from Scratch Our Home from Scratch LLC Page 1 Disclaimer Our Home from Scratch LLC and its legal owners cannot be held responsible for
PROJECT PLAN OUTFEED TABLE
 BUILD IT WITH ROCKLER PROJECT PLAN OUTFEED TABLE BUILD Stock # Item 00 ' Universal T-Track () 0 T-Track Intersection Kit 70 JIG IT Universal Drawer Slide Jig 0 " Drawer Slides () 77 Auto-Adjust Jig Clamp
Demilune 4. Apron Joinery. Curved Apron Tenon. Bridle Joint Legs. Bridle Joint Front Apron
 Demilune Email 4 Apron Joinery There are two types of joints used in connecting the aprons and legs. The rear legs use conventional mortise and tenon joints, while the front legs use the less conventional
Iearn my living by making cabinetry not cookie-cutter
 Supporting Shelves Five methods for installing by Stephen Winchester Iearn my living by making cabinetry not cookie-cutter kitchens, but one-of-a-kind pieces and custom built-ins. Every cabinet I build
DIY Full-Size Captain s Bed with Storage. Addicted2DIY.com
 DIY Full-Size Captain s Bed with Storage Addicted2DIY.com Before beginning this project Please read through all of the plans as well as the blog post associated with this project. Always use safety precautions
10 Easy-to-Build. Plywood Projects
 10 Easy-to-Build Plywood Projects Ten shop projects ten sheets of plywood. These rock-solid essentials take just a couple hours to build and will help you make the most of the space in your shop. All content
Build a Stout Workbench
 Build a Stout Workbench Tail vise is at the heart of this versatile bench by chris gochnour I ve done a fair amount of handplaning during my 32 years as a professional furniture maker, and I ve found that
Chess board. The true origins of chess are. from old wood scraps Michael T Collins makes a chessboard and a box to store the pieces
 What you will need: Combination plane with 3mm, 6mm and 13mm cutters Rip and cross cut saw Block and jack plane Marking gauge and knife Card scraper optional and try square Chess board from old wood scraps
Silverware Chest Plan
 Silverware Chest Plan 05L14.01 Introduction 1. Measure the space required for your cutlery before beginning this project to be sure that it will fit in the drawers and top compartment. The best way to
Plans. Easy-to-Build Full-size Deluxe Murphy Bed Plan. For more plans, tools and hardware visit rockler.com
 Easy-to-Build Full-size Deluxe Murphy Bed Plan Build a full-size Deluxe Murphy Bed complete with decorative molding and matching side cabinets! Plans For more plans, tools and hardware visit rockler.com
HANDCRAFTED LIDDED CHEST IN CHERRY With Red Cedar Lining
 HANDCRAFTED LIDDED CHEST IN CHERRY With Red Cedar Lining Design A chest was desired as a gift to family. The Shaker style of furniture was identified as a pleasing style. After viewing a number of pictures
Bellwood-Antis School District Curriculum Revised on 8/23/2011
 Course: H.S. Ind. Arts/Tech. Ed. III - 907 Grade Level(s): 11 Bellwood-Antis School District Curriculum Revised on 8/23/2011 Month Duration PA Stards/ Anchors Aug/Sept. Oct. 2 ws 1 w Content Assessment
 America s leading woodworking authority To download these plans, you will need Adobe Reader installed on your computer. If you want to get a free copy, visit: http://adobe.com/ reader. Having trouble downloading
Extendable Large Dovetail Jig
 Extendable Large Dovetail Jig Instruction Manual Part # 3458 CAUTION: Please read, understand, and follow all manufacturers instructions, guidelines and owners manuals that come with your power tools.
Woodline USA Woodline Spacer Fence System
 Woodline USA Woodline Spacer Fence System MADE IN THE USA Includes: (1) ¼ Spacer Fence (1) 3/8 Spacer Fence (1) ½ Spacer Fence (1) Hardware Package (1) 3 Piece Brass bar set (2) Setup Blocks Visit Us Online
Jigsaw Puzzle Tray. Premium Plan. In this plan you ll find: America s leading woodworking authority
 America s leading woodworking authority Premium Plan In this plan you ll find: Step-by-step construction instruction. A complete bill of materials. Construction drawings and related photos. Tips to help
Making a Massive Bookcase Step-by-Step
 Making a Massive Bookcase Step-by-Step Jeff Branch WOODWORKING The only thing challenging about this project is its huge size. By JFF BRANCH A t right is a rendering of my first woodworking project completed
Materials. Special Tools and Techniques Chisel Long pipe clamps Miters Router with 1/2" rabbet cutter Rabbets Dadoes. Hardware
 D esk Our executive desk was built with specific needs in mind. We wanted a large desktop, large drawers, and a cubbyhole to house a rollaway hanging file cabinet. We are thrilled with our finished project.
ARTS AND CRAFTS CHAIR
 ARTS AND CRAFTS CHAIR 491 MATERIALS LIST--DINING CHAIR Key No. Size and description (use) A 2 1-3/4 x 1-3/4 x 16-1/4'' oak (front leg) B 2 1-3/4 x 3-3/4 x 40-1/2'' oak (rear leg) C 1 1-3/4 x 3-3/16 x 15''
Cedar 2-Drawer Desktop Storage Cube
 Cedar 2-Drawer Desktop Storage Cube 5 ½ Dimensions 5 ½ 5 ½ 2 2 1 7/8 4 ¼ 4 ½ Author s Notes: Build a Cedar 2-Drawer Desktop Storage Cube from just 1 cedar fence picket. No angles, special cuts or rips
Kitchen Island. By Rob Joseph Leg Dimensions. Drawer Exploded View. Leg Glue-Up
 Kitchen Island y Rob Joseph eg imensions Step 1 - ut the legs () slightly longer than the dimensions given in the material list. or the thickness we need, the legs are cut from a piece of 11 2"-thick stock,
Classic Project. Two-drawer Platform Bed. In this plan you ll find: Step-by-step construction instruction. A complete bill of materials.
 America s leading woodworking authority Classic Project In this plan you ll find: Step-by-step construction instruction. Two-drawer Platform Bed A complete bill of materials. Construction drawings and
I I. . i1 AD JUSTABLE SHELVES
 ADJUSTABLE SHELVES HAD BEEN TRYNG TO WORK out a really simple (read "fast") way to make an elegant wooden version of the old standby, metal standards and brackets. Although have seen many commercial versions
Cherry Chest of Drawers. Dovetail joinery decorates this Shaker-inspired case piece
 Cherry Chest of Drawers Dovetail joinery decorates this Shaker-inspired case piece BY M I C H A E L P E K O V I C H DRESSER CONSTRUCTION Case top Rabbet, 9 6 in. deep 4 in. 0 7 8 in. 9 2 in. 4 in. Top
Floating-Top Table. Creative joinery adds spark to this versatile piece
 Floating-Top Table Creative joinery adds spark to this versatile piece By Michael Pekovich 28 FINE woodworking This is one of those projects that almost wasn t. Rachel, my wife, had asked for a small,
DVD Cabinet. rabbeting with a moving filletster plane At this point, the insides of the case, and the shelves 5-JAN-2005
 INTRODUCTION DVD Cabinet CHRISTOPHER SWINGLEY 5-JAN-2005 These plans are derived from Michael Dunbar s Colonial Cupboard hand tool project in Fine Woodworking, Number 151, October 2001, pages 64-71. The
PLANS BY TOM BURY MURPHY WORKTABLE TOTAL DIMENSIONS: FOLDED UP 30 X 48 X 0 FOLDED DOWN 30 X 58 X 84
 MURPHY WORKTABLE TOTAL DIMENSIONS: FOLDED UP 30 X 48 X 0 FOLDED DOWN 30 X 58 X 84 MATERIALS LIST: (2) 2 x8 x8 (3) 2 x4 x8 (1) 1 x2 x8 (1) 48 x96 3/4 plywood (2) 1-1/2 x30 continuous hinge (1) Left-side
Corner Cupboard. This space-saving piece enhances any room 46 FINE WOODWORKING
 Corner Cupboard This space-saving piece enhances any room BY G A R R E T T H A C K On every trip to the Shelburne Museum near Burlington, Vt., I visit a favorite object a small hanging corner cabinet.
A Deluxe Chisel Cabinet
 After I finished my wall-mounted tool chest (8 x 21 x 36 ) a few years ago, a wise friend warned me [I]t s one that holds disappointment in its heart. The day will certainly come when there is no more
Design Update /29/2006
 Design Update 3 -- 8/29/2006 Since our first design we ve made many minor changes to key areas of the prayer bench, especially the folding hinge geometry. The general design remains the same, though the
An Inner Hive Cover. In the Beekeeper s Work Shop. Building a Bee Hive: The Inner Hive Cover. by Stephen E. Tilmann
 An Inner Hive Cover In the Beekeeper s Work Shop The project for this article is an inner hive cover. The inner cover sits on top of the topmost hive body (super) and underneath the telescoping top cover
Here are the tools and materials we used for the project:
 When we began our kitchen remodel, we knew we were going to have to do something about the trash can-- our old one was stained and dented and just had to go. While we would have loved to have had room
woodworkersjournal.com MATERIAL LIST
 MATERIAL LIST T x W x L 1 Legs (2) 1 1 2" x 3 1 2" x 36 7 16" 2 End Uprights (2) 1 1 2" x 3 1 2" x 32 1 2" 3 Stringers (4) 1 1 2" x 3 1 2" x 42" 4 Top Cladding, Long (2) 3/4" x 7 1 4" x 65 3 4" 5 Side
Heirloom Tool Chest. This classic chest offers a lesson in efficient woodworking
 Heirloom Tool Chest This classic chest offers a lesson in efficient woodworking BY CH R I S G O C H N O U R A COMFORTABLE HOME FOR TOOLS Made of cherry and constructed entirely with hand tools, the tool
Empire Dresser Plans
 1 Empire Dresser Plans Materials 1 sheet 3/4" plywood (cabinet grade 4' x 8') 1 sheet 5 mm (3/16") underlayment plywood 4'x 8', buy another 1/2 sheet if you want to put a back on the dresser. 1-2" x 4"
Reasons to Own a Shoulder Plane
 9 Reasons to Own a Shoulder Plane Fine-tune your joinery with these tips and techniques B y C h r i s G o c h n o u r It s easy to dismiss the shoulder plane as a specialty plane, another way of saying
Drum Trigger Project Part 2: Electric Bongo Case
 Drum Trigger Project Part 2: Electric Bongo Case When I started this project, it seemed that the best implementation of Ray Wilson s drum trigger circuit would be as a sort of hand drum. Since I ve got
Single Pass Half-Blind Dovetails
 9 DR Pro - CHAPTER Single Pass Half-Blind Dovetails Why rout single pass dovetails on a variable spaced Leigh jig? Well, you just may need to reproduce or restore a late 9th or early 0th century drawer
86N80.10 Economy Dovetail Jig
 86N80.10 Economy Dovetail Jig IMPORTANT: Before using your dovetail jig, it should be securely fastened to a workbench. For a temporary setup, attach the jig to a piece of ¾ thick plywood or MDF long and
Dining Table with Two-Way Drawers
 Dining Table with Two-Way Drawers DOUBLE-FRONTED DRAWERS MAKE THIS PIECE UNIQUE With two drawer fronts, a center beam, plywood bottoms, and custom pulls, these drawers are both distinctive and durable.
Classic Mitered Jewelry Box
 America s leading woodworking authority Premium Plan In this plan you ll find: Step-by-step construction instruction. A complete bill of materials. Construction drawings and related photos. Tips to help
Can-Do Can Crusher. America s leading woodworking authority. Step by Step construction instruction. A complete bill of materials.
 America s leading woodworking authority Can-Do Can Crusher Step by Step construction instruction. A complete bill of materials. Exploded view and elevation drawings. How-to photos with instructive captions.
Wood Planter Box. Description: Materials: Procedure: Name: Date:
 Wood Planter Box Name: Date: Description: Students will complete a wood working project by building a wood planter box. The planter box will be big enough to hold 4 4 square pots or can be filled with
Harriet Chair with Modifications
 Harriet Chair with Modifications This modification of the Harriet chair includes a slat back, padded seat, and is 2 inches wider than the original plan. The overall dimensions of the finished chair: 38
ADULT. Adirondack / Muskoka Chair Plans
 ADULT Adirondack / Muskoka Chair Plans Materials List 3/4" x 9 1/2" (1.9cm x 24.1cm) redwood, cedar or pine boards. Six, 8' (2.44m) boards should make one chair depending on knots and layout. You can also