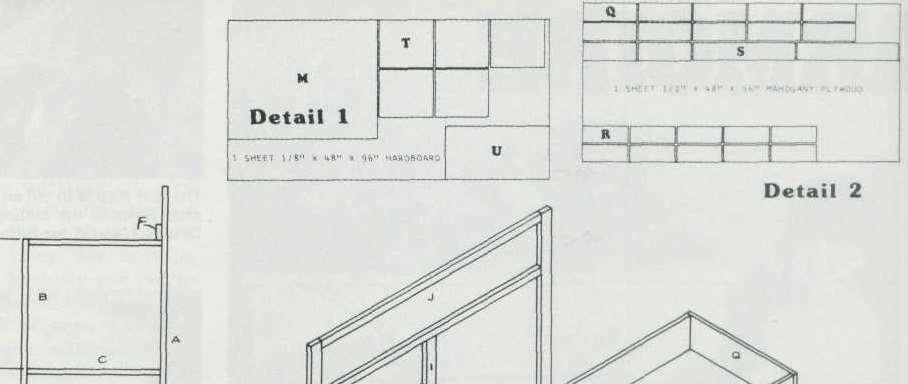
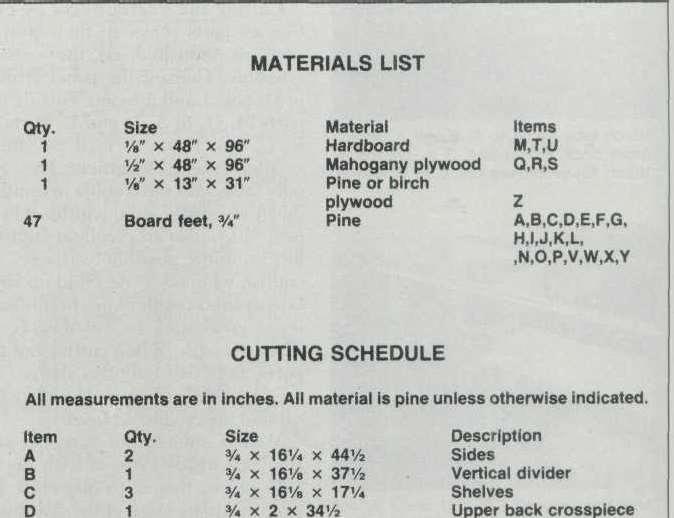
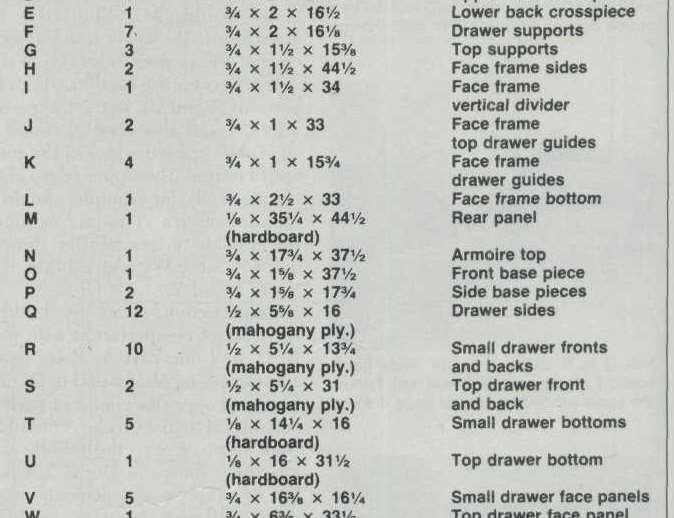
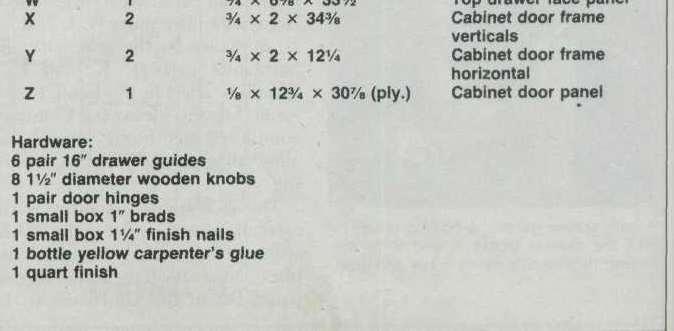
The first step is to cut all wood to proper size. Refer to the cutting schedule and Details 1 and 2 for further instructions.
|
|
|
- Brendan Martin
- 6 years ago
- Views:
Transcription

1 CHILD S ARMOIRE 275


. Procuring the hardware should not be much of a problem.")
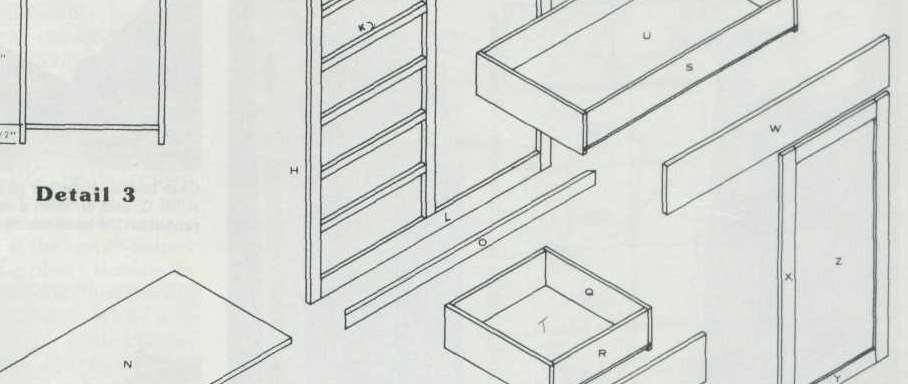
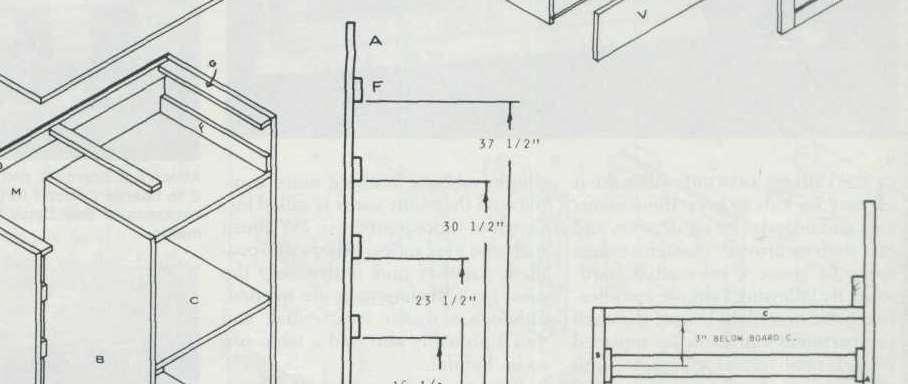
2 THIS CHILD'S ARMOIRE will make it easy for kids to keep their rooms neat and orderly. Its six drawers and two shelves provide enough storage space to house a substantial wardrobe. By following a simple modification to be described below, the shelf compartment can even be replaced with a small closet complete with clothes pole for hanging dresses, suits, or coats. Best of all, the ar-moire is designed especially with the pint-sized set in mind. No more standing on tippy toes just to reach a clean pair of socks! Before starting on the project, carefully study all photos, diagrams, lists, and building instructions. One attractive feature worth noting at the outset is that no fancy joinery is required. With the exception of a few simple rabbets, nothing more complicated than butt joints is called for. On all of these joints, use 1 1/4" finish nails and glue unless otherwise specified. Another plus is that only the most basic of shop tools are needed, although a router is essential, and you 11 probably also find a table saw to be helpful. Because of the variety of dimensions encountered in the plan, we've simply indicated the total amount of 3/4" pine required, which is 47 board feet. This figure allows approximately 15% for scrap. When shopping at the lumberyard, bear in mind that the largest single width of pine called for in the plan is 6 3/8" (parts V and W). Procuring the hardware should not be much of a problem. If you do have difficulty, though, a complete The first step is to cut all wood to proper size. Refer to the cutting schedule and Details 1 and 2 for further instructions. Glue boards together to make up boards A, B, C, and N. With a router, cut a thin rabbet on the back inside edge of board A. Attach A to boards B, and C. Attach board B to boards C. Don't forget to check for squareness. See Detail 3 for measurements Glue face frame H, I, J, K, and L together. Note that parts J, K, and L are each 6" apart. Refer to drawing on the next page. 276
3 277


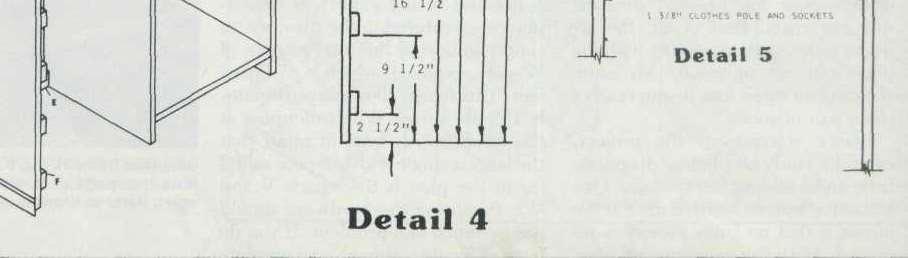
4 Attach face frame to A, B.and C. Attach upper back crosspiece D to boards A. Attach lower crosspiece E to A and B. Attach two boards G to A, D, and J. Attach one board G to the center of D and J. Then attach drawer supports F to both boards A. Nail Q to R using 1" brads. Slide hard-board T into groove in Q and nail. Follow the same procedure for the large drawer. Attach drawer guides to boards Q and F. Nail the drawer fronts R and S to the drawer face panels using brads and glue. set of hardware, replete with mounting instructions and all necessary screws, can he ordered through the mail. Write to the address found at the end of this article for more information. Cutting the Parts. Begin by cutting all parts down to their proper sizes as indicated on the cutting schedule. Consult the panel layouts in Details 1 and 2 before cutting out parts M, Q, R, S, T, and U. Farts A, B, C, and N are formed by gluing smaller hoards together. This not only saves you the trouble of hunting down unusually large widths of lumber, but is also an excellent strategy for avoiding possible warpage. Of course, whenever you build up large boards from smaller ones in this way, it's a good idea to use dowels for extra strength. When cutting out the parts, note that only two shelves (C) are needed if you intend to make the cabinet space into a closet. With a router, cut a rabbet into the back inside edge of each part A side piece; this is to allow for the eventual placement of the rear hard-board panel (M). Similarly, cut grooves into the lower inside edge of each of the drawer sides (Q) to provide access for the hardboard drawer bottoms (T and U). In the interests of safety, you'll also want to round off all of the exposed edges of the piece with a router. The upper edges of the top piece (N), for example, should be rounded off to a 1/4" radius, as should the outside edges of the drawers (parts V and W) and cabinet door (parts X and Y). Construction. Start by building the cabinet compartment with parts B, C, and one part A. Refer to the accompanying photos and to Detail 3 for the proper placement of parts. If you intend to make a closet out of the shelf space, ignore the middle shelf board (C) shown in Detail 3. Check for squareness and accurate alignment of all parts. Next, assemble the face frame from parts II, I, J, K, glue here, and drive the nails through part II (on the drawer side of the face frame) into the front edge of the side panel. To secure the construction, attach the upper back crosspiece (D) between the two parts A, following the placement indicated on the schematic. This crosspiece must be aligned with the rabbets on the two parts A in order to accommodate the rear hardboard panel (M). The lower back crosspiece (E), spanning from part B to the drawer-side part A, is similarly aligned with the rabbet on A. On each side of the unit now, attach a top support (G) between the face frame and the upper rear cross-piece (D), as shown in the schematic and Detail 3. Then take the remaining part G top support and fasten it to parts D and J in the center of the unit. The drawer supports (F) are added next. Detail 3 shows how one part F is to be situated on the cabinet-side part A. The remaining six drawer supports are arranged on the drawer-side part A according to the measurements given on Detail 4. Once all the drawer supports are in place, carefully center the armoire top (N) and fasten it to parts D, G, and J. Set the unit aside now, and allow all glue to dry. Drawers. Each of the five small drawers consists of two sides (Q), a front and back (both parts R), a hard-board bottom (T), and a face panel (V). Start by attaching the front and back to the sides with 1" brads and glue. As seen in the schematic, the tops of the two parts R are flush with the tops of the drawer sides. Next, slide the hardboard bottom (T) into the grooves of parts Q, and secure it with a nail or two. Repeat this procedure in assembling the large drawer from parts S, U, and the remaining parts Q. Following the manufacturer's instructions, attach the 16" drawer guides now to the drawer supports (F) within the armoire unit and to the sides (Q) of each drawer. Assembly of the drawers is completed then with the addition of the face panels (parts V for the- small drawers; W for the large drawer). Use glue here, and drive 1" brads through the drawer fronts (R or S) into the face panels. Again using 1" brads, fasten the hardboard rear panel (M) to the back of the armoire, driving the brads through M into parts A, 278

5 Use 1" brads to attach M to A, D, and E. Miter front ends of boards P and attach to A. Miter both ends of O and attach to L. and L, as shown in the schematic. The horizontal parts J, K, and L are spaced 6" apart in the frame to make room for the drawers. Clamp the completed face frame securely, and allow all glue to dry before continuing. The face frame assembly is then carefully positioned on the cabinet compartment and fastened into place. Now attach the remaining side panel (A) to the construction. Use B, D, and E. The front and side base pieces are attached next. First, miter both ends of the front base piece (O) at a 45 angle, and miter the matching end of each of the two side base pieces (P). Parts P are then glued and nailed to parts A, while O is fastened to the face frame bottom (L). Cabinet. The cabinet door comprises parts X, Y, and Z. Start by routing out a 1/8"'-wide x 3/8"-deep channel centered along the inside edges of parts X and Y. The cabinet door panel (Z) is nestled within these channels and secured in place with glue. The excess channel space on both ends of each part X may be concealed with a wood filler. Otherwise, cut four 1/8" x 3/8" x 1 1/2" splines from scrap and glue into place. Hang the door with hinges mounted 4" in from each end. Attach wooden knobs to the drawers and cabinet door, sand the entire unit and finish as desired. Assuming you've left out the middle shelf (C), it's an easy matter to make the cabinet compartment into a closet for hanging clothes. All that's needed is a pair of 1 3/8" diameter clothes pole sockets and a 17" length of l 3/8" dowel. Just locate the sockets 3" below the cabinet ceiling (C), and centered on parts A and B. Detail 5 shows the arrangement found in the closet option. 279
6 280


7 Want To Get More Tips, Designs & Plans Like This? You ll LOVE The Full Package At TedsWoodworking Want to get the FULL complete plan to this project? You ll get: All-Inclusive Blueprints & Plans Step-By-Step Photos Detailing Every Step Along The Way Illustrated Drawings and Sketches Metric and Imperial Measurements Complete Easy-To-Follow Instructions Insider tips, tricks, tactics and techniques that professionals use so you can cut corners, and get the job done faster 16,000 More Woodworking Plans! Order TedsWoodworking today and get full access to all the details of this plan PLUS 16,000 step-by-step woodworking plans. This package will blow your mind because it s filled with everything you need to complete any woodworking project you could ever imagine! Get Full Access To 16,000 Plans Now!
The frame sections of the china hutch are assembled with the aid of glue and spiral dowels. Dowel centers are recommended to
 60 CHINA HUNT 282 ARE YOU LOOKING for a showpiece china hutch to display your elegant chinaware, antique vase, or collectibles? Here's the perfect cabinet for you, with lots of transparent glass to show
This photo more clearly shows how locating pins are used to transfer the dowel holes from the edge to front of frame. Use bar clamps till glue dries.
 CHINA HUTCH 266 The frame sections of the china hutch are assembled with the aid of glue and spiral dowels. Dowel centers are recommended to ease matching of dowel holes. gant chinaware, antique vase,
Colonial Washstand Circa 1760
 Colonial Washstand Circa 1760 I found the original of this piece while on vacation on Jekyll Island in Georgia. It was one of a pair in a conference room at the Jekyll Island Club Hotel, part of the island's
rmoire This attractive and practical two-door armoire takes up very little floor space in a bedroom but provides lots of storage. Because it is only
 A rmoire This attractive and practical two-door armoire takes up very little floor space in a bedroom but provides lots of storage. Because it is only a little over 1 foot deep, it s easy to incorporate
Project 11355EZ: Wall Cabinet with Louvered Doors and Shelf
 Project 11355EZ: Wall Cabinet with Louvered Doors and Shelf This Early American style cabinet will look good in any room, although it seems particularly well suited for the kitchen or bathroom. To make
Dress up your dining room with this Southern delicacy. that was used to serve drinks after a hunt. Breeches and jodhpurs are optional.
 Dress up your dining room with this Southern delicacy that was used to serve drinks after a hunt. Breeches and jodhpurs are optional. Huntboard Classic Six-Legged My dad has been making this six-legged
Project 11010EZ: Gun/Bookcase/Curio Cabinet
 Project 11010EZ: Gun/Bookcase/Curio Cabinet No man can be all things to all people, but this cabinet comes as close to fitting multiple uses as any inanimate object can. We ve pictured it as a gun cabinet
Project 12231EZ: Country Curio Clock
 Project 12231EZ: Country Curio Clock This good-looking clock not only reminds you of the time, it also provides a couple of shelves to display favorite curios. No fancy joinery is needed here, just butt
Modern Farmhouse Printer Cabinet. Addicted2DIY.com
 Modern Farmhouse Printer Cabinet Addicted2DIY.com Before beginning this project please read through all of the plans as well as the blog post associated with this project. Always use safety precautions
rmoire Materials Hardware
 A rmoire No house ever has enough storage space, and I built this armoire to satisfy a couple of needs. Inside the armoire is a shelf large enough for the television. Under the shelf are six drawers that
Computer Desk. Project designed by April Wilkerson
 Project designed by April Wilkerson Copyright WilkerDos.com 2018 Project plan Desk Page 2 of 16 Page 3 of 16 File cabinet Page 4 of 16 Metal base Page 5 of 16 Glue up Get started by gluing up boards for
Nineteenth-Century Dough Box
 Nineteenth-Century Dough Box T he dough box was a functional piece found in many a country kitchen. The idea was that the cook would make a large batch of bread dough, knead it on the large work surface
under the bottom shelf and along the top shelf should do the trick.
 w Bookshelves in a Day BY ST E V E L A T T A Iget the most pure enjoyment from reproducing 18th-century furniture, but every now and then it s nice to break out of that mode and dive into a project that
Materials and Tools: Printer s Triple Console Cabinet. Free Plans to build a Triple Console Cabinet
 Materials and Tools: Materials: 3 sets euro style bottom corner mount drawer slides, 16 length 3 sets inset hinges 24 cup style handles 8 2x2 @ 8 feet long 6 1x3 @ 8 feet long 6 1x2 @ 8 feet long 1 sheet
MAKING THE TV RISER CUTTING A STOPPED GROOVE ON THE TABLE SAW
 TV RISER Cherry 19 MAKING THE TV RISER First, the material that will make up the riser is glued together. Then, dress down the glued-up panel to a flat surface and a consistent thickness. In a shop with
Birdhouse Plan Combo Pack
 Birdhouse Plan Combo Pack Two Quick and Creative Projects for Your Yard PROJECT 17 Old Plane Birdhouse BY CHRISTOPHER SCHWARZ Every woodworker should spruce up the yard (or the shop) with this simple birdhouse.
PLANS BY TOM BURY MURPHY WORKTABLE TOTAL DIMENSIONS: FOLDED UP 30 X 48 X 0 FOLDED DOWN 30 X 58 X 84
 MURPHY WORKTABLE TOTAL DIMENSIONS: FOLDED UP 30 X 48 X 0 FOLDED DOWN 30 X 58 X 84 MATERIALS LIST: (2) 2 x8 x8 (3) 2 x4 x8 (1) 1 x2 x8 (1) 48 x96 3/4 plywood (2) 1-1/2 x30 continuous hinge (1) Left-side
DOCUMENT CHEST. Curly Maple, White Pine
 25 DOCUMENT CHEST Curly Maple, White Pine 100 MAKING THE DOCUMENT CHEST After the stock has been thicknessed, ripped to width, and cut to length, plough a 1/4" X 3 /8" groove on the inside faces of the
Project Skill Level: INTERMEDIATE Plywood Used: CANPLY EXTERIOR Good Two Sides (G2S) or precision sanded Aspen
 or precision sanded Aspen") Project Skill Level: INTERMEDIATE Plywood Used: CANPLY EXTERIOR Good Two Sides (G2S) or precision sanded Aspen MATERIALS LIST: (1) ¾" x 4 ft x 8 ft plywood panel (20) #8 x 2" Robertson or Phillips wood
Project Skill Level: INTERMEDIATE Plywood Used: CANPLY EXTERIOR Good Two Sides (G2S) or precision sanded Aspen MATERIALS LIST: (1) ¾" x 4 ft x 8 ft plywood panel (20) #8 x 2" Robertson or Phillips wood
How to Build a Recessed Medicine Cabinet
 How to Build a Recessed Medicine Cabinet See post for install info http://www.hertoolbelt.com/recessed-medicine-cabinet/ Materials 6 Inset Cabinet Door Hinges 3 Latches 1 sheet Beadboard or 1/4 plywood
DIY Full-Size Captain s Bed with Storage. Addicted2DIY.com
 DIY Full-Size Captain s Bed with Storage Addicted2DIY.com Before beginning this project Please read through all of the plans as well as the blog post associated with this project. Always use safety precautions
Shop Projects. Plans NOW. Each Built from One Sheet of Plywood!
 Plans NOW www.plansnow.com 5 Shop Projects Each Built from One Sheet of Plywood! Tool Tote - Sawhorse - Workbench - Wood Bin - Wall Cabinet PLUS: 7 SHOP SECRETS Working with Plywood Dread the thought of
Materials. Special Tools and Techniques Chisel Long pipe clamps Miters Router with 1/2" rabbet cutter Rabbets Dadoes. Hardware
 D esk Our executive desk was built with specific needs in mind. We wanted a large desktop, large drawers, and a cubbyhole to house a rollaway hanging file cabinet. We are thrilled with our finished project.
BUILDING A STORM DOOR
 BUILDING A STORM DOOR BY NEAL BARRETT Illustrations by George Retseck If you're in the market for a storm door, you probably know that there are many styles and models available. However, most of them
Iearn my living by making cabinetry not cookie-cutter
 Supporting Shelves Five methods for installing by Stephen Winchester Iearn my living by making cabinetry not cookie-cutter kitchens, but one-of-a-kind pieces and custom built-ins. Every cabinet I build
GARDEN SCREEN FENCE 232
 GARDEN SCREEN FENCE 232 233 Materials List--Privacy Screen Key No. Size and description (use) A 16 3/4 x 1 x 53" cedar (horizontal slat) B 14 3/4 x 1 x 72" cedar (vertical slat) C 4 3/4 x 2-1/2 x 53" cedar
 America s leading woodworking authority To download these plans, you will need Adobe Reader installed on your computer. If you want to get a free copy, visit: http://adobe.com/ reader. Having trouble downloading
About.com :
 http://woodworking.about.com/gi/dynamic/offsite.htm?sit...//www.popularwoodworking.com/features/fea.asp%3fid=1088 (1 of 8)1/28/2004 12:05:01 AM Modern Storage Tower The last thing I want to do when starting
Pivot-Door Downdraft Cabinet Plans
 Pivot-Door Downdraft Cabinet Plans Finished Cabinet Closed Open Exploded View Introduction This simple downdraft-style dust collection cabinet is a great way to keep your shop cleaner and keep your router
ENJOY THIS SELECTION FROM. Woodworking 101. Includes Step-by-Step Instructions for 8 Projects. Woodworking
 W ENJOY THIS SELECTION FROM Woodworking 101 Includes Step-by-Step Instructions for 8 Projects Woodworking 101 Aimé Fraser, Matthew Teague, and Joe Hurst-Wajszczuk To purchase your copy of Woodworking 101,
PROJECT PLANS EXPANDABLE CRAFT CENTER
 R PROJECT PLANS EXPANDABLE CRAFT CENTER Whether you re working on craft projects, sewing, or pursuing another hobby, this craft center offers a great place to work. It features a large work surface that
Display Case (for J&S)
") Display Case (for J&S) This is constructed of maple plywood with solid maple (soft maple) edge banding. It was made to fit between a door and a kitchen cabinet, and has an elegant circular taper between
Display Case (for J&S) This is constructed of maple plywood with solid maple (soft maple) edge banding. It was made to fit between a door and a kitchen cabinet, and has an elegant circular taper between
Classic Kitchen Island
 America s leading woodworking authority Step by Step construction instruction. A complete bill of materials. Classic Kitchen Island Exploded view and elevation drawings. How-to photos with instructive
DIY Rustic Dresser Addicted2DIY.com
 DIY Rustic Dresser Addicted2DIY.com *Before beginning this project, please read through all of the plans as well as the blog post associated with this project. Always use safety precautions whenever using
You Can Build a Bedside Table
 You Can Build a Bedside Table Jeff Branch WOODWORKING If you like making panels, you ll love this project. By JEFF BRANCH M y current home is a modest one. But it is a big improvement over our small starter
Project 13586EZ: Writing Desk. Writing Desk Materials List
 Project 13586EZ: Writing Desk This writing desk will make a handsome addition to just about any room in the house. The one shown is made of cherry, a logical choice for a piece like this, but mahogany
Total Test Questions: 74 Levels: Grades Units of Credit:.50. Identify career opportunities in the furniture and cabinetmaking industries.
 DESCRIPTION Furniture Design and Manufacturing (522) is the second instructional course in a sequence that prepares students to apply technical knowledge and skills to prepare and execute furniture design
NEXUS SERIES CABINETS
 NEXUS SERIES CABINETS STANDARD BASE ASSEMBLY INSTRUCTIONS Also applies to: Galaxy Series, Nexus Series, Ridgeline Series, Statesman Series, and Waterford Series FOR YOUR INFORMATION: These assembly instructions
Drill Press Storage Cart
 Drill Press Storage Cart Richard Hicks on July 22, 2013 Drill Press Storage Cart Drill Press Storage Cart My Inspiration ShopNotes Issue 128 Changes Used casters instead of wheels Didn t build the drill
10 Easy-to-Build. Plywood Projects
 10 Easy-to-Build Plywood Projects Ten shop projects ten sheets of plywood. These rock-solid essentials take just a couple hours to build and will help you make the most of the space in your shop. All content
Performance Rating Scale: Limited Skills... Moderate Skills..High Skills
 PERFORMANCE STANDARD EVALUATION CHECKLIST Student Name Instructor s Name School District Performance Rating Scale: 1 2 3 4 5 6 7 8 9 10 Limited Skills..... Moderate Skills..High Skills Performance assessments
Industrial Cart. Materials. With High Style Restyle
 1 Industrial Cart With High Style Restyle Materials 1 sheet 3/4" plywood 1-1" x 2" x 8' board 2-1" x 3" x 8' board 1-2" x 8" x 10' board 1-2" x 6" x 8' board 3-1/4" x 2 1/2" x 4' poplar hobby boards, or
Classic Project. Two-drawer Platform Bed. In this plan you ll find: Step-by-step construction instruction. A complete bill of materials.
 America s leading woodworking authority Classic Project In this plan you ll find: Step-by-step construction instruction. Two-drawer Platform Bed A complete bill of materials. Construction drawings and
Burning For It. The world's easiest table doubles as a workbench, a laundry counter, a project table and, in a pinch, a spare bunk bed.
 Burning For It The world's easiest table doubles as a workbench, a laundry counter, a project table and, in a pinch, a spare bunk bed. If you're like me, you need more surface area. And I'm not talking
Making a Massive Bookcase Step-by-Step
 Making a Massive Bookcase Step-by-Step Jeff Branch WOODWORKING The only thing challenging about this project is its huge size. By JFF BRANCH A t right is a rendering of my first woodworking project completed
This tailor s cabinet was brought to my attention by a customer
 So what if you don t sew? This authentic Shaker case piece is drop-dead gorgeous in any room. This tailor s cabinet was brought to my attention by a customer who wanted one just like it. She had seen the
Kentucky 4H Wood Science Plans Notebook. Plans Level 3
 Kentucky 4H Wood Science Plans Notebook Plans Level 3 MATERIALS: 2 pieces wood 3/4 x 10 x 4 1 piece wood 3/4 x 12 x 4 2 pieces wood 3/4 x 3 x 2 5 1/2" 2 pieces wood 3/4 x 3 x 1 8 1 piece wood 2 x 4 x
SkillsUSA Wisconsin CABINETMAKING
 SkillsUSA Wisconsin CABINETMAKING The following rules are for the Wisconsin state contest only. Students/Teams that qualify for the national contest need to adhere to the rules and guidelines for that
Code Description Qty. Material Dimensions A Long Inner 4 2 x 4 pine 34-1/2 long
 B utler s Chest Because it s designed to suit a variety of purposes, this butler s chest is a piece of furniture that absolutely anyone can appreciate. Used by itself, it can serve as an end table or can
Total Test Questions: 74 Levels: Grades Units of Credit:.50
 DESCRIPTION The third in a sequence of assessments, Cabinetmaking prepares students to apply technical knowledge and skills to set up and operate industrial woodworking machinery and to use such machinery
CABINETRY Assembly Instructions
 www.hdicabinetry.com Assembly Instructions TABLE OF CONTENTS Category Page(s) Section 1: Framed Series Base Cabinet Instructions Wall Cabinet Instructions Easy Reach Cabinet Instructions 1.01-1.04 1.05-1.06
Corner Cabinet. American. There is something about corner cabinets that spooks
 American Corner Cabinet The triangular shape of this project puts off most woodworkers. Here s a secret: It s actually quite easy to build. There is something about corner cabinets that spooks most woodworkers.
BUTCHER BLOCK MICROWAVE OVEN STAND
 BUTCHER BLOCK MICROWAVE OVEN STAND 828 The butcher block has fallen out of favor in recent years, replaced by the countertop cutting board in an attempt to save space. This design, however, makes the butcher
135 ROLLTOP DESK 515
 135 ROLLTOP DESK 515 For the person who hates to clear off a desk, who wants to leave everything where it is overnight yet still have the clutter hidden, a rolltop desk is a godsend. The tambour hides
antebellum home in Eutaw, Alabama, built in 1860 (Google it for photos).
.") You Can Build the Kirkwood Bookcase By Jeff Branch A vid readers will tell you they often need a new way to store all of their books. I ve seen some pretty creative ways to stockpile books - in some instances
You Can Build the Kirkwood Bookcase By Jeff Branch A vid readers will tell you they often need a new way to store all of their books. I ve seen some pretty creative ways to stockpile books - in some instances
WOODWORKING GUIDE: BASIC JOINERY
 WOODWORKING GUIDE: BASIC JOINERY Close isn't really good enough. A perfect fit is what counts. When building furniture, there are many ways to construct joints. The simplest are those that use mechanical
It can be either a 2½ seater bench seat (2 adult and a kid), or a 5 seater picnic table.
, or a 5 seater picnic table.") Page 1 Folding picnic table in both bench-seat and picnic table mode Introduction Description A single bench seat that can be changed into a picnic table with ease. This 'Bench come Picnic Table' is ideal
Page 1 Folding picnic table in both bench-seat and picnic table mode Introduction Description A single bench seat that can be changed into a picnic table with ease. This 'Bench come Picnic Table' is ideal
Router Table-Mate. Everything you'd want in a router table for just $50.
 Router Table-Mate Everything you'd want in a router table for just $50. Commercially made router tables are everywhere these days. Some of them come with more gizmos and gadgets than a 59 Edsel. By the
The Ultimate Storage Cart Tutorial
 The Ultimate Storage Cart Tutorial TOOLS Table saw (or circular saw and straight edge) (alternatively, a good hardware store could make these cuts for you) Router with 1/2 bit Straight edge Clamps Screwdriver
ULTIMATE ROUTER TABLE PLANS. By Dan Phalen
 ULTIMATE ROUTER TABLE PLANS By Dan Phalen January 2017 Ultimate Router Table Plans. Copyright 2012-2017 by Daniel Phalen. Published by Creston Hall Publishing Company. All rights reserved. No part of this
The Q Frame PROJECT. a picture frame with secrets created exclusively for the Router Forum
 The Q Frame PROJECT a picture frame with secrets created exclusively for the Router Forum 007 OR RELEASE FPLANS APPROVED The Q Frame: Project Overview LIST OF MATERIALS Frame Sides & Face 3/4 x 5 1/2 x
CABINETMAKING. ELIGIBILITY Open to active SkillsUSA members enrolled in programs with cabinetmaking or millwork as the occupational objective.
 The following rules are for the state contest only. Students/Teams that qualify for the national contest need to adhere to the rules and guidelines for that national contest. The rules can be found in
You Can Build an Architectural Bookcase
 Jeff Branch WOODWORKING You Can Build an Architectural Bookcase Heavy moldings bring this project to life. By JEFF BRANCH I am drawn to architecture. In particular, I like the orderly nature of Palladian
A Classic Case. Floating-tenon joinery and curly cherry update a traditional Arts and Crafts design
 A Classic Case Floating-tenon joinery and curly cherry update a traditional Arts and Crafts design B Y G R E G O R Y P A O L I N I Anyone familiar with American furniture would immediately identify this
CABINETMAKING. ELIGIBILITY Open to active SkillsUSA members enrolled in programs with cabinetmaking or millwork as the occupational objective.
 CABINETMAKING PURPOSE To evaluate each contestant s preparation for employment and to recognize outstanding students for excellence and professionalism in the field of cabinetmaking and millwork. GENERAL
Shutter At The Thought
 Shutter At The Thought Dive into the dump and come up a winner. Building projects using reclaimed materials is good for the soul. Materials: Old shutters Lazy Susan hardware Tools Drill/driver Drill bits
Kitchen Upper Cabinet: Single Door Cabinets from Scratch
 Kitchen Upper Cabinet: Single Door by Cabinets from Scratch Our Home from Scratch LLC Page 1 Disclaimer Our Home from Scratch LLC and its legal owners cannot be held responsible for any loss, damage, disappointment,
Plans. Easy-to-Build Full-size Deluxe Murphy Bed Plan. For more plans, tools and hardware visit rockler.com
 Easy-to-Build Full-size Deluxe Murphy Bed Plan Build a full-size Deluxe Murphy Bed complete with decorative molding and matching side cabinets! Plans For more plans, tools and hardware visit rockler.com
Kitchen Upper Cabinet: Double Doors Cabinets from Scratch
 Kitchen Upper Cabinet: Double Doors by Cabinets from Scratch Our Home from Scratch LLC Page 1 Disclaimer Our Home from Scratch LLC and its legal owners cannot be held responsible for any loss, damage,
D. Product Certificates: Signed by manufacturers of casework certifying that products furnished comply with requirements.
 SECTION 12356 - CASEWORK PART 1 - GENERAL 1.1 RELATED DOCUMENTS A. Drawings and general provisions of the Contract, including General and Supplementary Conditions and Division 1 Specification Sections,
Hudson Dresser [1] Hudson Dresser Published on Ana White ( Submitted by dan-k [2] on Fri, :43 [1]
![Hudson Dresser [1] Hudson Dresser Published on Ana White ( Submitted by dan-k [2] on Fri, :43 [1]](/thumbs/90/102626096.jpg "Hudson Dresser [1] Hudson Dresser Published on Ana White ( Submitted by dan-k [2] on Fri, :43 [1]") [1] Submitted by dan-k [2] on Fri, 2011-03-11 11:43 [1] If you plan on staining this piece, it is recommended that you stain all of the drawer face materials before assembly for a more professional look.
[1] Submitted by dan-k [2] on Fri, 2011-03-11 11:43 [1] If you plan on staining this piece, it is recommended that you stain all of the drawer face materials before assembly for a more professional look.
Apartment Dining Table
 Jeff Branch WOODWORKING You Can Build an Apartment Dining Table By JEFF BRANCH H ave you ever found yourself wanting a new piece of furniture, but everything you see in stores is too big? Big furniture
Cabinetmaking & Millwork CIP Task Grid
 1 Secondary Task List 100 DEMONSTRATE PERSONAL SAFETY. 101 Demonstrate knowledge of general safety rules for working in the cabinetmaking lab. 102 Identify cabinetmaking lab tools and equipment. 103 State
CMT Enlock Jig Owner s Manual
 Thank you for purchasing the CMT Enlock Jig. This jig will simplify joinery in your shop, and on the job site. Please read the instructions thoroughly before using the Enlock Jig. Router requirements A
Jeff Branch WOODWORKING YOU CAN BUILD A. By adding subtle design elements, a traditional furniture style becomes decidedly modern.
 Jeff Branch WOODWORKING YOU CAN BUILD A By adding subtle design elements, a traditional furniture style becomes decidedly modern. Jeff Branch WOODWORKING Publisher: Jeff Branch Editor: Jeff Branch Art
Kitchen Base Cabinet: Single Drawer with Double Doors Cabinets from Scratch
 Kitchen Base Cabinet: Single Drawer with Double Doors by Cabinets from Scratch Our Home from Scratch LLC Page 1 Disclaimer Our Home from Scratch LLC and its legal owners cannot be held responsible for
Silverware Chest Plan
 Silverware Chest Plan 05L14.01 Introduction 1. Measure the space required for your cutlery before beginning this project to be sure that it will fit in the drawers and top compartment. The best way to
ARTS AND CRAFTS CHAIR
 ARTS AND CRAFTS CHAIR 491 MATERIALS LIST--DINING CHAIR Key No. Size and description (use) A 2 1-3/4 x 1-3/4 x 16-1/4'' oak (front leg) B 2 1-3/4 x 3-3/4 x 40-1/2'' oak (rear leg) C 1 1-3/4 x 3-3/16 x 15''
Cabinetmaking & Millwork CIP Task Grid
 1 Secondary Task List 100 FOLLOW RULES FOR WORKING IN THE CABINETMAKING LAB. 101 Review and discuss school rules. 102 Review and demonstrate knowledge of cabinetmaking lab rules. 103 Complete all theory
Arched. Building an. Passageway. Although my company specializes in high-end jobs
 Building an Arched Passageway All photos by Brian Striegler This straightforward approach combines basic shop methods with simple site joinery to create an elegant frame-and-panel archway by Gary Striegler
PROJECT PLAN TOOL CHEST
 BUILD IT WITH ROCKLER PROJECT PLAN TOOL CHEST FEATURING ROCKLER S BUILD QUESTIONS? Go to www.rockler.com or call 800-279-4441 Stock # Item 63420 1/4" x 24" x 30" Baltic Birch Plywood 63446 1/2" x 24" x
Copyrighted Material Page 1
 Compare to: Pottery Barn Teen Storage Bed System Skill Level: Beginner Working with the rest of the components in the Storage Bed Collection, the Small Hutch fits on top of the Storage Headboard and will
Entrance Cabinet Plans
 Entrance Cabinet Plans www.andrewharriswoodwork.com Page 1 of 19 Introduction I have tried to ensure all steps are covered in these plans but if you find any errors in the plans or have a question then
Hardware Cabinet. Part 3
 Hardware Cabinet Part 3 The vertical dividers are the next task on the cabinet and a bit of a trick to get right. The horizontal dividers are only ½ thick pine spanning the 31 width of the cabinet and
irdhouse Table Special Tools and Techniques Materials and Supplies Hardware
 B irdhouse Table This whimsical table is one of our favorite projects, because it never fails to produce a smile on the faces of our backyard guests. Not only is it cheerful to behold but the glass top
YOU CAN BUILD THE JACKSON DRESSER. Combining traditional styling with rustic materials leads to a classic, yet casual look.
 YOU CAN BUILD THE JACKSON DRESSER Combining traditional styling with rustic materials leads to a classic, yet casual look. Jeff Branch CONTENTS Jeff Branch Publisher: Jeff Branch Editor-in-Chief: Jeff
Redwood 3. Install the chair back Finishing A d i r o n d a c k C h a i r Grades Materials For Adirondack Chair Quantity Size Length 4.
 Adirondack Chair Adirondack Chair BUILD THE CHAIR FRAME The rounded wooden slats, oversized armrests and inviting slant-back design identify the classic Adirondack chair. Born a century ago in upstate
Corner Cupboard. This space-saving piece enhances any room 46 FINE WOODWORKING
 Corner Cupboard This space-saving piece enhances any room BY G A R R E T T H A C K On every trip to the Shelburne Museum near Burlington, Vt., I visit a favorite object a small hanging corner cabinet.
A Deluxe Chisel Cabinet
 After I finished my wall-mounted tool chest (8 x 21 x 36 ) a few years ago, a wise friend warned me [I]t s one that holds disappointment in its heart. The day will certainly come when there is no more
WOOD MANUFACTURING 30
 WOOD MANUFACTURING 30 Description This course is designed to introduce to the student the processes and techniques of leg and rail construction. Student skills will be developed through tool and machine
Office Towers 83 ¼ 35 ½ 18 ¼
 Copyright 2015 Shanty-2-Chic.com T Office Towers his towering hutch will be admired for years to come. Inspired by rustic, high end furniture found in boutique showrooms it will impress all who see it...especially
PROJECT PLAN OUTFEED TABLE
 BUILD IT WITH ROCKLER PROJECT PLAN OUTFEED TABLE BUILD Stock # Item 00 ' Universal T-Track () 0 T-Track Intersection Kit 70 JIG IT Universal Drawer Slide Jig 0 " Drawer Slides () 77 Auto-Adjust Jig Clamp
Copyright 1998 KDE Technologies
 Modular Computer Corner Desk Unit Copyright 1998 KDE Technologies http://members.tripod.com/~kdetech/ 1. Introduction 2. Plans Sheet one - Isometric Sheet two - Top Detail / Corner Unit Sheet three - Leg
Project 13519EZ: Shaker Sewing Desk
 Project 13519EZ: Shaker Sewing Desk This fine example of a Shaker sewing desk was measured and photographed at Hancock Shaker Village in Hancock, Massachusetts. On the original, the legs and various frame
Hinge Mortising Jig. One of the make it or break it parts of building a. 6 ShopNotes No. 74
 Hinge Mortising Jig A Mortise for a Hinge. Quick, clean, and accurate that s the only way to describe the mortise you get with a trim router and this hinge mortising jig. One of the make it or break it
Flamingo. That s what I looked
 Plans N O W w w w. P l a n s N O W. c o m flip-seat Storage Bench Flamingo. That s what I looked like as I stood in the doorway perched on one leg, with my other foot raised so that I could untie the laces
Entryway Locker 17 ½ 25 ½
 Copyright 2015 Shanty-2-Chic.com T Entryway Locker his old world entryway locker is loaded with possibilities. Two adjustable shelves allow you to customize the storage to fit your needs. Even better,
DIY Farmhouse Cabinet
 DIY Farmhouse Cabinet Addicted2DIY.com *Before beginning this project, please read through all of the plans as well as the blog post associated with this project. Always use safety precautions whenever
AC50 Enclosure - Thin Edge
 AC50 Enclosure - Thin Edge 2 3/16??? 4 PL 11/16 1 7/8 Piping Groove 2 7/8 Top thickness = 18mm 6 7/16 All other pieces thick Corner Radii and joints =?? Bracing blocks for back = 5/8 square, 2 ea. Back
Multiple Category Scope and Sequence: Scope and Sequence Report For Course Standards and Objectives, Content, Skills, Vocabulary
 Multiple Category Scope and Sequence: Scope and Sequence Report For Course Standards and Objectives, Content, Skills, Vocabulary Wednesday, August 20, 2014, 1:32PM Unit Course Standards and Objectives