Extendable Large Dovetail Jig
|
|
|
- Georgiana Bruce
- 6 years ago
- Views:
Transcription


1 Extendable Large Dovetail Jig Instruction Manual Part # 3458 CAUTION: Please read, understand, and follow all manufacturers instructions, guidelines and owners manuals that come with your power tools. Peachtree Woodworking Inc. and its subsidiaries assume no liability for accidents or injuries caused by improper use of this product. B Copyright Peachtree Woodworking Inc All images, copy, and graphics are copyrighted by law and may not be copied, or reproduced without our express written consent.


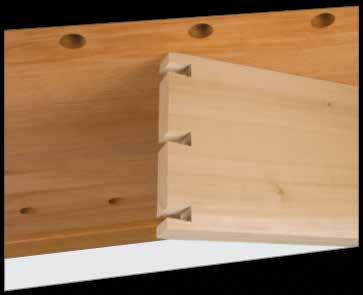
2 Peachtree Extendable Dovetail System Instructions Introduction The Peachtree Extendable Dovetail system takes a simple approach to making beautiful thru-dovetail s, a hallmark of fine craftsmanship. The hardest part about cutting dovetails is marking and cutting the matching angles to one another. That s what makes this system so easy. We have done the math for you and milled the exact cuts that need to be made in this heavy duty and easy to use jig. The Peachtree Extendable Dovetail system works in conjunction with bearing guides on the shank of router bits instead of using those hard to center brass bushing guides. Because the bearing is already centered on the bit it makes setting up to cut the joint fast and easy. We have milled the template to match the bearing size so that the bit is perfectly centered and there is no slop, wear or no waste. Unlike other templates you have seen, our jig will work with two different thickness stock as well as two different widths. We have also added extension tabs to the jig, so you can make dovetail cuts as long as you need by attaching two Peachtree Dovetail Jigs together. This means the type of projects you can create are endless. Lets get started making some joints.. But first - let s talk about safety. Read and follow all safety instructions Caution: Please read, understand and follow all manufacturers instructions, guidelines and owners manuals that come with your power tools. Peachtree Woodworking Supply Inc. and its subsidiaries assume no liability for accidents or injuries caused by improper use of this product. Safety Tips Creating dovetails that look like they have been hand cut will add curb appeal or distinction to any of your projects. To get the best performance and results out of your dovetail jig, we recommend the following tips: 1. Always wear safety glasses, hearing protection and dress properly. No loose clothing, hair, draw strings or jewelry that might get caught in moving parts. 2. Keep work area clean. Messy work areas invite injuries. 3. Make deeper or larger cuts in multiple passes and NEVER use dull cutters. Forcing a deep cut in one 4. pass or using a dull cutter can result in injury. Inspect bits for loose parts, damage or chips in carbide. 5. Make sure router bit is properly installed in router and do not exceed the recommended rpm 6. Keep all safety guards in place. 7. Always unplug your tools before changing cutters 8. Secure you work. Always use at least two clamps to hold your stock to the jig. Make sure the clamps do not interfere with the cutters on the under side of the jig. 9. Make sure the jig is clean with no build up or debris for smooth operation. 10. Make sure the bearing on the cutter is spinning freely. If not spinning freely it may damage the jig. Keep bearing clean and well lubed with bearing lubrication. 11. Follow all manufacturer safety guidelines provided with you router. 12. Support longer stock properly so that it does not shift or change the position of the jig 1 15 Dovetail Package Contents: Aluminum Dovetail Jig 2. Straight Edge Bit 3. 7 Dovetail Bit 4. 3/8 Sleeve adaptor 2 3 4


3 Mounting The Dovetail Jig Prepare the mounting block (Not Included): The 15 Dovetail Jig is mounted to a piece of stock (mounting block) that acts as a clamping surface for the work-piece. This will also prevent tear-out on the back side of your stock when you cut your joints. It it essential that the mounting block is accurately machined so it is 90 to the dovetail jig. It can be made from a solid block or laminated. The block needs to be 2-1/4 thick x 3-1/2 high x 18 long for use with standard router bits. For different size dovetails we recommend you change your mounting block to provide solid, continuous support when your bit passes through the back of your stock. Mount the Jig to Mounting Block: The first thing you need to do to start using your Peachtree Dovetail jig is mount the jig to the mounting block. The 15 Dovetail Jig has four elongated holes to attach the jig to the mounting block. There is a scribed line that runs across the underside and the top side of the dovetail jig on the pin side of the jig itself (Fig. 1). The line is used to line up the mounting block to the dovetail jig. Match this line to the top edge of the mounting block, it is important that the scribed line on the template jig and the stock are parallel. Drill through the four holes and insert the screws into the middle of the elongated holes. Tighten securely. The 15 Dovetail Jig can be used either in an upright position locked in a vise or inverted onto a router table when working with shorter stock. Fig.1 Pin Side Top Scribe Line Tail Side CAUTION Before using the peachtree dovetail jig system, be sure that the 3/8 sleeve is against the bearing guide before installing either bit into the router. Failing to do so could result in damaging the dovetail jig, router bit or may cause personal injury. Cut a Sample Joint Before making a live cut on your project you will need to make a sample cut to test the accuracy of the fit. Follow instructions in the next section on how to make the tail cut and pin cut for your sample joint. When cutting a sample joint, it is important that the stock thickness is the same thickness as your project stock. The standard bit set that came with your jig is capable of cutting 3/4 to 1 stock. There is also an accessory bit set available for your dovetail jig. This bit set will do 1/2 to 3/4 stock. Cutting The Tails Making the Tail Cut: Always start your projects by cutting the tail side first. The reason for this is, the tail cut side of the joint is not able to be adjusted. This makes the joint very accurate because we are working off of the angles of the dovetail router bit. It is the pin side of the joint that can be adjusted to fit the tail cut of the joint. 1. Secure stock to Jig A. Prepare the stock to be dovetailed by joining all four edges followed by cutting the ends square. With the Peachtree Dovetail Jig you can use one thickness stock for the tail cut and a different thickness stock for you pin cut. B. Clamp your stock to be dovetailed vertically into you workbench vise. Fig 2 Fig.2 3/8 SLEEVE AGAINST BEARING GUIDE Bottom Scribe Line


4 C. Place the mounted dovetail jig (tail side) on the end of stock. Position the jig, so that there are equal distances on either side of the jig. Make sure dovetail jig rest s flat on the tail stock and secure in place with F-clamps or C-clamps. To achieve an exact centered joint, mark the center of your stock, See Fig. 3, then measure 7/16 to one side of the center mark and scribe a second line with a pencil. Position the inside edge of one of the tail side openings exactly with the second scribed line See Fig. 4. Secure in place with F-clamps or C-clamps. This method will give equal spacing of your tails on either side of your stock. Fig.3 Fig.5 E. Place the dovetail router bit with bearing guide into your router and secure router bit collet tightly. Adjust the base of your router for depth of cut by adding the thickness of the pin stock piece plus 1/2 for the thickness of the dove tail jig. If desired, add an additional 1/32 or more for sanding the edge perfectly flush after assembly of joint. Another way of setting your bit height is to place your pin side stock on top of the jig. Place the router with bit on top of stock, with bit hanging over edge between the fingers of the jig. Now lower Fig. the 6 router bit until it touches the top of the tail stock and then secure router bit in place. See Fig. 6 Fig.6 Fig.4 Pin Stock Dovetail Jig Tail Stock Align Bit Flush Caution: Make sure when clamping your stock to the jig your clamp heads are not in the path of the router bit. See Fig.5 Caution: Make sure bearing contacts dovetail jig by at least 1/8 or more before starting cut. If bearing does not contact jig properly it may result in injury or damaging the dovetail jig. See Fig.7. In order cut dovetails into thinner stock, you must use optional router bits which are sold separately.


 and cause damage to the jig or cause injury.")
5 Fig.7 F. (Always wear eye protection) Cut your stock standing behind mounting block. See Fig. 8a. This will allow you to pull the router towards you while making the cut, giving you a smoother, more controllable cut. This also will keep the wood chips directed away from you. Place your router flat on top of the dovetail jig surface with the bit in between one of the openings. Be sure the cutter is not contacting the wood surface before turning your router on. Holding the router firmly, turn it on, and guide the bearing and router bit through each of the tail side openings, pulling the router all the way back to each of the tail slots, See Fig. 8a. Do not force the router bit, or cut to fast, as this may result in tear-out, splintering of the stock or even loss of control. Moving the router to slow could result in burning of your stock. Feed the router bit into the stock with a smooth and controllable rate. Caution: To prevent damaging your dovetail jig while router is turned on - Do not tip the router, always keep the router flat on jig. Do not use the last opening on either end of the Dovetail Jig during the cutting process, doing so may tip the router (Fig. 8b) and cause damage to the jig or cause injury. Do not lift the router up between the fingers while router is on. Always be sure the router base is supported while making your cuts on the dovetail jig. When routering of joint is complete, turn router off and wait for bit to come to a complete stop before removing router off of the dovetail jig. Fig.8b Completed Tail Cut: Your completed tail cut stock should look like the photograph shown below in Fig. 9 Fig.9 DO NOT USE THE LAST OPENING ON EITHER END OF THE DOVETAIL JIG Fig.8a When Stock is Wider Than Dovetail Jig: When the stock is wider than the jig, cut all of your tails, then scribe the outline of the last tail opening on the right side of the jig before un-clamping. Once scribed, un-clamp jig, slide the jig to the right, aligning the last tail opening on the left side of the jig with the scribed lines. Repeat this process for the entire width of you stock.

 on the end of stock.")

6 Cutting The Pins Making the Pin Cut: Pin cuts are always made after cutting the tails. The reason for this is, you will use the tail to cuts to lay out the positioning of the pins of your joint. 1. Secure stock to Jig A. Prepare the stock to be dovetailed by joining all four edges followed by cutting the ends square. With the Peachtree Dovetail Jig you can use one thickness stock for the pin cut and a different thickness stock for you tail cut. B. Clamp your stock to be dovetailed vertically into you workbench vise. Fig 10 D. Place the mounted dovetail jig (pin side) on the end of stock. Position the jig, so that the two edges of one of the pins line up with the two scribed lines. Note: the angles that you marked with your scribing tool for your dovetail opening will match both side edges of one pin on your dovetail jig. See Fig.12. Make sure dove tail jig rest s flat on the pin stock and secure in place with F-clamps or C-clamps. You will be removing the stock that is exposed between the pin openings of the dovetail jig using the straight router bit. Fig.12 Fig.10 Caution: Make sure when clamping your stock to the jig your clamp heads are not in the path of the router bit. See Fig.13 C. To mark the location of the pins you will use the tail stock piece you just cut as marking guide. Position the tail stock on top of the pin board in the correct right angle position See Fig. 11. Make sure all three edges line up flush with the pin board (piece to be cut). Using a utility knife, scribing knife or a fine tipped pencil mark the location of one dovetail opening on the end grain of the pin board. Fig.11 Fig.13 E. Place the straight router bit with bearing guide into your router and secure router bit collet tightly. Adjust the base of your router for depth of cut by adding the thickness of the tail stock piece plus 1/2 for the thickness of the dovetail jig. If desired, add an additional 1/32 or more for sanding the edge perfectly flush after assembly of joint. Another way of setting your bit height is to place your tail side stock on top of the jig. Place the router with bit on top of stock, with bit hanging over edge between the fingers of the jig. Now lower the router bit until it touches the top of the pin stock and then secure router bit in place. See Fig. 14


7 Fig.14 Fig.16 Tail Stock Dovetail Jig Pin Stock Align Bit Flush Caution: Make sure bearing contacts dovetail jig by at least 1/8 or more before starting cut. If bearing does not contact jig properly it may result in injury or damaging the dovetail jig. See Fig.15. In order cut dovetails into thinner stock, you must use optional router bits which are sold separately. Fig.15 F. (Always wear eye protection) Cut your stock standing behind mounting block. See Fig. 16. This will allow you to pull the router towards you while making the cut, giving you a smooth er, more controllable cut. This also will keep the wood chips directed away from you. Place your router flat on top of the dovetail jig surface with the bit in between one of the openings. Be sure the cutter is not contacting the wood surface before turning your router on. Holding the router firmly, turn it on, start by taking very light pass across the face of your pin stock. This step pre vents chipping or tear-out of the stock. Proceed to guide the bearing and router bit along the edge of each of the pin side openings of the dove tail jig. Pulling the router all the way back to each of the pin slots removing the stock down to the scribed lines, See Fig.16 On wood that tends to easily chip, a thin light pass from the face of the stock to the back of the dovetail jig will ` help eliminate tear-out. Caution: To prevent damaging your dovetail jig while router is turned on - Do not tip the router, always keep the router flat on jig. Do not lift the router up between the fingers while router is on. When routering of joint is complete, turn router off and wait for bit to come to a complete stop before removing router off of the dovetail jig. Do not force the router bit, or cut to fast, as this may result in tear-out, splintering of the stock or even loss of control. Moving the router to slow could result in burning of your stock. Feed the router bit into the stock with a smooth and controllable rate. Completed Pin Cut: Your completed pin cut stock should look like the photograph shown below in Fig. 17 Fig.17 When Stock is Wider Than Dovetail Jig: When the stock is wider than the jig, cut all of your pins, then scribe the outline of the last pin opening on the right side of the jig before un-clamping. Once scribed, un-clamp jig, slide the jig to the right, aligning the last pin opening on the left side of the jig with the scribed lines. Repeat this process for the entire width of you stock.


8 Assemble the Dovetail Joints: Assemble the pin-board and the tail-board. The Joint should have a snug - sliding fit as shown in Fig. 18. If you have to force the joint together with a mallet, it may result in splitting the dovetailed sockets, as well as forcing the glue out of the joint. To loose of a fit, may produce wobbling and a week dovetail joint. If you have added the extra 1/32 or more to your joint, it can now be cleaned up by sanding the joint flush after gluing. If satisfied with the fit of your dovetail joint - glue, clamp and finish your project. If the dovetails are in need of adjustment, this is done on the pin side of the dovetail jig (follow steps below). The tail side or of the joint remains the same. Fig.18 If Joints Are To Loose: You will need to make the joint tighter, by making the pins larger, lightly loosen the 4 screws that hold the dovetail jig to the mounting block, just enough to be able to tap the jig forward with a wooden mallet or scrap block of wood (do not use a metal hammer directly on jig as it may damage the dovetail jig). Tap the dovetail jig forward on the mounting block. The distance of this adjustment usually is made in.001 depending upon how loose the joint is. Start out by tapping the dovetail jig forward on the block.002 See Fig. 19. This means that each pin size is increased by.004 wider (.002 on each side of the pin =.004 ). Make sure your adjustment remains parallel across the dovetail jig to the mounting block. Once adjusted, tighten the four screws - repeat cutting process with different piece of stock until you obtain the desired fit. Fig.19 When making test cuts it is important that your test stock is exactly the same size thickness as your project stock. Each time you change the thickness of your stock, you must adjust the dovetail jig accordingly. If joints are to tight: You will need to make the joint looser by making the pins smaller, slightly loosen the 4 screws that hold the dovetail jig to the mounting block, just enough to be able to tap the jig backward with a wooden mallet or scrap block of wood (do not use a metal hammer directly on jig as it may damage the dovetail jig). Tap the dovetail jig backward on the mounting block. The distance of this adjustment usually is made in.001 depending upon how tight the joint is. Start out by tapping the dovetail jig backward on the block.002. See Fig. 20. This means that each pin size is decreased by.004 smaller (.002 on each side of the pin =.004 ). Make sure your adjustment remains parallel across the dovetail jig to the mounting block. Once adjustment is made, tighten four screws and repeat cutting process with different piece of stock until you obtain desired fit. Fig.20 Tap jig Tap jig When making test cuts it is important that your test stock is exactly the same size thickness as your project stock. Each time you change the thickness of your stock, you must adjust the dovetail jig accordingly.


 to the opposing stock thickness. Fig.")


9 Using your dovetail jig on a router table: To use your Peachtree dovetail jig on a router table, you will follow the exact same directions as detailed in this instruction manual, with an exception. You do not clamp your stock into your work bench vise. Once the stock is clamped into your jig you will then flip the jig with stock up-side down to be run on your router table. (See Fig. 21) Fig.21 Various Dovetail Jig Uses Cutting stock two different thicknesses: Your dovetail jig is capable of cutting different thickness stock within the same joint. We used the standard dovetail bit set that came with the dovetail jig to cut this joint. The only adjustment that needs to be made is for the height of the router bit for thickness stock we are cutting. The example below shows the tail cut in 3/4 stock and the pin cut made in 1 stock (See Fig. 23). Keep in mind, when setting up for this type of cut, you would set the bit up for the opposing stock thickness. Which means the height of the router bit to make the tail cut would be 1-1/2 and the pin cut router bit height would be 1-1/4. We achieved this setting by adding 1/2 (for the dovetail jig thickness) to the opposing stock thickness. Fig.23 Thinner stock using standard bits: You are able to do thinner stock using the bits that came with your set, leaving a larger amount of cut-off waste. Since the bearing of the bit must ride in the template by 1/8 or more, the standard bits will leave larger waste to be removed once the joint is complete. See (Fig. 22) 1 thick pin cut 3/4 thick tail cut Fig.22 This joint shows 3/4 thick stock for the tails and 1 stock for the pins. When cutting with the optional router bits, follow the all the instructions previously outlined in this manual. Make necessary adjustment for thinner stock pieces. Caution: Make sure bearing contacts dovetail jig by at least 1/8 or more before starting cut. If bearing does not contact jig properly it may result in injury or damaging the dovetail jig. See Fig.15. In order cut dovetails into thinner stock, you must use optional router bits which are sold separately. Cutting stock thickness; 1/2 to 3/4 : We have designed two optional smaller router bits for your dovetail jig. These router bits are used for cutting 1/2 to 3/4 stock. In order to use these bits, you must either attach a spacer fence on you current mounting block or make a wider mounting block. Item # 3461
 to the face of your mounting block (Fig. 24) not included.")


10 Prepare The Mounting Block Thinner Stock: In order to use the small router bit set for stock 1/2 to 3/4, you must make the pins smaller. This is achieved by adding a spacer (made out of MDF or solid wood) to the face of your mounting block (Fig. 24) not included. It it essential that the mounting block is accurately machined so it is 90 to the dovetail jig. It can be made from a solid block or laminated. For different size dovetails we recommend you change your mounting block to provide solid, continuous support when your bit passes through the back of your stock. To determine the thickness of your spacer, you will need to subtract the thickness of the stock from 1-1/4, see example s below. When cutting with the optional router bits, follow the all the instructions for cutting pins and tails previously outlined in this manual. To the adjust the tightness of the joint with the small router bit set follow previously outlined in figure 19 or 20 of this manual. Fig.24 Subtract Stock Thickness Equals Spacer Thickness 11/4-1/2 = 3/4 11/4-5/8 = 5/8 11/4-3/4 = 1/2 Creating Angled Dovetails Angled Dovetails: Cutting angled dovetails is done the same way you would do 90 dovetails. In this example we have a cut 22½ angle on our tail cut. Follow the instructions previously outlined in this manual to center the stock, then clamp your jig to the stock and make the cut. Make sure you position the jig to have at least 1/4 of stock on the outer tail. See (Fig. 26) Fig.26 Scribe Line 3/4 spacer The example above shows the correct spacer attached to the original mounting block for cutting 1/2 stock using the small router bit set. 1/4 minimum stock


11 Completed Angled Tail Cut: Your completed tail cut stock should look like the one shown below. See (Fig. 27) Fig.27 Assemble the Angled Dovetail Joints: Assemble the pin-board and the tail-board. The Joint should have a snug - sliding fit as shown in Fig. 30. If you have to force the joint together with a mallet, it may result in splitting the dovetailed sockets, as well as forcing the glue out of the joint. To loose of a fit, may produce wobbling and a week dovetail joint. If you have added the extra 1/32 or more to your joint, it can now be cleaned up by sanding the joint flush after gluing. If satisfied with the fit of your dovetail joint - glue, clamp and finish your project. If the dovetails are in need of adjustment, this is done on the pin side of the dovetail jig (refer previous instruction for joint adjustment). Fig.30 Making the Pin Cut: Follow the instructions previously outlined in this manual to align the stock to the jig, then clamp your jig to the stock and make the cut. See (Fig. 28) Fig.28 Completed Angled Pin Cut: Your completed tail cut stock should look like the one shown below. See (Fig. 29) Fig.29 You can use angled spacing blocks between your stock and the jig to cut virtually any type of angle from acute to obtuse. If you can clamp it to the jig you can dovetail it. Creating Skip Spacing Joints Skip Spacing Dovetail Joints: One of the unique features of this system is, you can skip spaces between the tail cut and pin cut to vary the size of the joint. You can also make and endless amount of different widths by making one, cut an then sliding the jig to one side and make a second cut to vary the width of the joints. This following example will show you the skip spacing method. Please Note: When using this method you will mark the location of all the pins on the opposing stock.
 Fig.29 Fig.")
.")
 Fig.")
12 Cutting The Tail: We will be cutting every other tail cut on the jig. Follow the instructions previously outlined in this manual to center the stock, then clamp your jig to the stock and make every other tail cut. See (Fig. 31) Fig.29 Fig.31 Making Pin Cut Locations: To mark the location of the pins you will use the tail stock piece you just cut as marking guide. Position the tail stock on top of the pin board in the correct right angle position See Fig. 33. Make sure all three edges line up flush with the pin board (piece to be cut). Using a utility knife, scribing knife or a fine tipped pencil mark the location of ALL dovetail openings on the end grain of the pin board. Fig.33 Completed Skip Spacing Of Tail Cut: Your completed tail cut stock should look like the one shown below. See (Fig. 32) Fig.32 Marking Stock to be Removed: Once you have marked the locations of your pins, use a magic marker or pencil to mark the stock to be removed between the pins. See (Fig. 34) Fig.34 Making The Pin Cut: Pin cuts are always made after cutting the tails. The reason for this is, you will use the tail cuts to layout the positioning of the pins of your joint. You will follow the instructions previously outlined in this manual to align the stock to the jig with one exception; you must mark all of the pin locations on the stock to be cut.


. Note, there will be a small piece of the pin left that needs to be removed. Fig.")
, then clamp your jig to the stock.")

13 Stock removal of pin cuts: Follow the instructions previously outlined in this manual to align the stock to the jig for the pin cut, then clamp your jig to the stock, set your bit height and make the cut. The first pass you will remove the stock in every pin cut opening. Your completed pin cut should look like Fig. 35. Take note, the pins that still have the magic marker on them need to be removed. You can use your band saw or a hand saw to remove them, or follow instructions below on how to use your dovetail jig to remove the excess pin material. Make The Cut: When making the cut, be sure to only remove the stock that has been marked. See (Fig. 37) Fig.37 Fig.35 Stock to be removed After making the cut, remove the jig - and your stock should look like this, See (Fig. 38). Note, there will be a small piece of the pin left that needs to be removed. Fig.38 Removing Excess Pins: Slide the jig to the Left and align the jig so that the back edge of the fingers rest on part of the pins See (Fig. 36), then clamp your jig to the stock. Note that we will be removing the stock that still has the markings on it. Fig.36 Removing Excess Pins: Slide the jig to the Right and align the jig so the back edge of the fingers rest on part of the pins See (Fig. 39), then clamp your jig to the stock. Note that we will be removing the stock that still has the markings on it. Stock to be removed Fig.39 The Dovetail jig must rest flat on part of the pins to maintain the correct depth of cut, which will provide a stable work surface. Stock to be removed


.")
14 Make The Cut: When making the cut, be sure to only remove the stock that has been marked. See (Fig. 40) Fig.40 Assemble the Skip Spacing Joint: Assemble the pin-board and the tail-board. The Joint should have a snug - sliding fit as shown in Fig. 42. If you have to force the joint together with a mallet, it may result in splitting the dovetailed sockets, as well as forcing the glue out of the joint. To loose of a fit, may produce wobbling and a week dovetail joint. If you have added the extra 1/32 or more to your joint, it can now be cleaned up by sanding the joint flush after gluing. If satisfied with the fit of your dovetail joint - glue, clamp and finish your project. If the dovetails are in need of adjustment, this is done on the pin side of the dovetail jig (refer previous instruction for joint adjustment). Stock to be removed The Dovetail jig must rest flat on part of the pins to maintain the correct depth of cut, which will provide a stable work surface. Fig. 42 Completed Skip Spacing of Pin Cut: Your completed tail cut stock should look like the one shown below. See (Fig. 41) Fig.41 This method of skip spacing has an endless amount of possibilities when making your projects. It is up to you as to which socket to skip. You can cut one, skip one, cut one, skip one, or cut two, skip one, cut two - simply mix it up. You will also use this same basic principal to slide the jig one side to make wider pins and tails. When using either method of skip spacing or slide spacing, the jig must rest flat on part of the pins to maintain the correct depth, which will provide a stable work surface.
. Install the two machine screws, but do not completely tighten.")
. Fig.43 Extending Your Dovetail Jig Fig.")


 fit neatly on to the tabs of the dovetail jig tabs with two machine screws.")
.")
15 Overlapping the Tabs The Peachtree Dovetail Jig has tabs on both ends of the jig. The tabs allow you to secure two or more Peachtree Dovetail Jigs together. Take 2 Peachtree Extendable Dovetail Jigs and overlap the tabs (Fig. 43). Install the two machine screws, but do not completely tighten. Next, Place the extended jig assembly up against a straight edge or ruler and make sure the jig is sitting flush up against it. Check for any gaps between the jig and the straight edge / ruler. Once the jig is flat up against, tighten the two machine screws firmly (Fig. 44). Fig.43 Extending Your Dovetail Jig Fig.44 Slide the Micro-adjust assemblies under the tabs and align with the pre-drilled holes. Secure the assemblies with the machine screws. Next, align the dovetail jig and the mounting block to the inner scribe line on the jig. Secure the L bracket on the Micro-adjust to the mounting block with 2 wood screws. Make sure there is enough space between the L bracket and the edge of the mounting block to prevent any splitting of the wood (Fig. 46). Once the Micro-adjust assemblies are secured to the jig and mounting block, tighten the screws that hold the dovetail jig to the mounting block before making your first test cut. Fig.46 attach Micro-adjuster with machine screws Mounting The Extended Jig Mounting the extended jig works the same way as mounting a single jig. The only difference is the length of the block. When making the block, follow the instructions detailed in the beginning of this instruction booklet on page 3 (Prepare the Mounting Block / Mount the Jig to the Mounting Block, Fig. 1), but make the length of the block at least 2½ longer than the jig on each end. Micro-adjust Your Jig Installing the Micro-adjust Assemblies The Micro-adjust assemblies (sold separately - part #3444) fit neatly on to the tabs of the dovetail jig tabs with two machine screws. Before the Micro-adjust assemblies can be installed, you must first have your dovetail jig mounted to the mounting block. When mounting the jig, follow the instructions on page 3 (Mount the Jig to the Mounting Block, Fig. 1). Make sure the screws that secure the dovetail jig to the mounting block are only partially tightened (Fig. 45) to allow for the installation of the Microadjuster. Using the Micro-adjust To make adjustments with the Micro-adjust assemblies, slightly loosen the screws that hold the dovetail jig to the mounting block. Next, turn the knob(s) on the Micro-adjust assemblies clockwise /counter clockwise to move the jig in and out until you find your mark (Fig. 47). Refer back to page 7 (figures 19 and 20) for details on properly making adjustments to the fit of your dovetail joint. Once the jig is correctly adjusted, be sure to tighten the screws that hold the dovetail jig to the mounting block before making another test cut. Fig.47 secure L bracket with wood screws Fig.45 partially tighten screws Note: For proper fit of the Micro-adjust assemblies, the mounting block must extend at least 2½ longer than jig on each end. rotate knob(s) until you find your mark


16 Peachtree Dovetail Jig The Peachtree Dovetail Jig is one of the most versatile jigs available. In this manual we have outlined several different types of joints as well as thickness stock that can be made. The possibilities that can be applied are virtually endless. Thank you for your purchase and we hope you enjoy your brand new Peachtree Dovetail Jig!
15 Dovetail Jig. Instruction Manual. Part # 3452
 15 Dovetail Jig Instruction Manual Part # 3452 CAUTION: Please read, understand, and follow all manufacturers instructions, guidelines and owners manuals that come with your power tools. Peachtree Woodworking
Complete Dovetail Jig Instructions
 Complete Dovetail Jig Instructions 15 18 4 3 1 12 13 8 19 17 16 6 14 5 9 11 10 2 9 PARTS LIST - Complete Dovetail Jig Introduction Your new dovetail jig will cut Full Through Dovetails and three varieties
Copyright 2007 MLCS 1
 Copyright 2007 MLCS 1 REFERENCE GUIDE and SPECIFICATIONS: Edge Guides: This 12 Dovetail Template comes complete with 2 Edge Guide Sets one set for Half Blind and one set for Rabbeted Half Blind Dovetails.
Woodline USA Woodline Spacer Fence System
 Woodline USA Woodline Spacer Fence System MADE IN THE USA Includes: (1) ¼ Spacer Fence (1) 3/8 Spacer Fence (1) ½ Spacer Fence (1) Hardware Package (1) 3 Piece Brass bar set (2) Setup Blocks Visit Us Online
86N80.10 Economy Dovetail Jig
 86N80.10 Economy Dovetail Jig IMPORTANT: Before using your dovetail jig, it should be securely fastened to a workbench. For a temporary setup, attach the jig to a piece of ¾ thick plywood or MDF long and
Copyright MLCS 1
 Copyright 2007. MLCS 1 WORKING WITH BOX JOINTS Box joints (AKA "Finger Joints") provide a simple, yet equally effective, alternative to dovetail joinery. In particular, they serve well for applications
CHAPTER 10. Half-Blind Dovetail Procedures
 CHAPTER 0 Half-Blind Dovetail Procedures 6 Chapter 0 D User Guide HALF-BLIND DOVETAIL PROCEDURES Chapter Foreword In these instructions for using the Leigh Dovetail Jig, we have recommended using certain
Half-Blind Isoloc Joint Procedures
 ISOLOC - CHAPTER 6 Half-Blind Isoloc Joint Procedures 6- Always use scrap boards to practice and test for fit. Rip the boards to width to suit the chosen template. The pin boards should not be less than
Table Saw Small Parts Sled Instructions
 Table Saw Small Parts Sled Instructions Effective May 2018 Review full manual instructions prior to use for important safety information. Always check Rockler.com to confirm that you are using the most
Hinge Mortising Jig. One of the make it or break it parts of building a. 6 ShopNotes No. 74
 Hinge Mortising Jig A Mortise for a Hinge. Quick, clean, and accurate that s the only way to describe the mortise you get with a trim router and this hinge mortising jig. One of the make it or break it
Quick Set Dovetail Jig
 Quick Set Dovetail Jig FOR HELP OR ADVISE ON THIS PRODUCT PLEASE CALL OUR CUSTOMER SERVICE HELP LINE : 01509 500359 THE MANUFACTURER RESERVES THE RIGHT TO ALTER THE DESIGN OR SPECIFICATION TO THIS PRODUCT
CHAPTER 8. Through Dovetail Procedures
 CHAPTER Through Dovetail Procedures 52 Chapter D4 User Guide THROUGH DOVETAIL PROCEDURES Chapter Foreword In these instructions for using the Leigh Dovetail Jig, we have recommended using certain cutters
Plan #1 Wooden hinge, single action
 Plan #1 Wooden hinge, single action There are two types of wooden hinges, a single action hinge (that is in effect a finger joint with a pin through it) and a double action hinge which has two pins. The
End-On-End Dovetails D4R - CHAPTER 12
 D4R - CHAPTER End-On-End Dovetails 4 While you have the router set up for half-blind dovetails, it is a good time to try end-on-end dovetails. If you have not yet routed half-blind dovetails or read through
Wagon Vise Retrofit Installation Instructions. American Craft Woodworks. Wagon Vise
 Wagon Vise Retrofit Installation Instructions American Craft Woodworks Wagon Vise Wagon Vise Retrofit Installation Instructions 2 Retrofit Installation Instructions Before you get started, please read
OPERATOR'S MANUAL RULES FOR SAFE OPERATION
 OPERATOR'S MANUAL #4950300 ROUTER AND JIG SAW MOUNTING KIT (FOR USE WITH THE BT3000 TABLE SAW) CONGRATULATIONS AND THANK YOU FOR BUYING THIS RYOBI ROUTER AND JIG SAW MOUNTING KIT. Your new #4950300 Router
Single MJ Splitter Installation Manual - 1Si
 SP1 Single MJ Splitter Installation Manual - 1Si Micro Jig, Inc. PO Box 195607 Winter Springs, FL 32719, USA. Tel: 1-407-696-6695 Web site: www.microjig.com Email: sales@microjig.com Copyright 2004 Micro
Ways to get the most out of your
 5 Ways to get the most out of your router table When you mount a router on a table, you expand your shop s potential. To help you take advantage of this potential, we assembled five router table techniques
Single Pass Half-Blind Dovetails
 9 DR Pro - CHAPTER Single Pass Half-Blind Dovetails Why rout single pass dovetails on a variable spaced Leigh jig? Well, you just may need to reproduce or restore a late 9th or early 0th century drawer
MINI-LATHE QUICK CHANGE TOOL POST
 MINI-LATHE QUICK CHANGE TOOL POST Cutting and assembly details Machinists should familiarize themselves with the contents of this section before jumping in to the drawings. Many details are described here
ALWAYS disconnect the power source before using the Betterley UNA-GAUGE with any power tool or machine!
 Betterley UNA-GAUGE Thank you for purchasing the Betterley UNA-GAUGE. You will find the UNA-GAUGE provides quick adjustments and alignment of most tools and machinery with extreme accuracy. The versatile
Charles Neil Dovetail Jig Instructions
 Charles Neil Dovetail Jig Instructions Thank you for purchasing the Charles Neil (CN) Dovetail Jig. This is an easy to use and flexible jig for cutting through dovetails. These instructions complement
Dovetail Saw Guides. Figure 1: Dovetail saw guide, exploded view. Guide Block. UHMW Friction Pad. Sliding Clamp. Rare-Earth Magnet
 Dovetail Saw Guides U.S. Pat. No. 6,607,016 Dovetail joints have traditionally been the hallmark of a cabinetmaker who had acquired an expert level of skill. They are also a mark of quality and attention
Adjustable Box Joint Jig. Richard Hicks on 8/24/2015. Box or Finger Joints
 Adjustable Box Joint Jig Richard Hicks on 8/24/2015 Box or Finger Joints Adjustable Box Joint Jig Richard Hicks on 8/24/2015 Box Joints are also called Finger Joints Because they have interlocking fingers
PRAZI USA. Model PR-3900 Owners Manual. Please read this manual in its entirety before using the PRAZI ChestMate.
 PRAZI USA Model PR-3900 Owners Manual Please read this manual in its entirety before using the PRAZI ChestMate. PRAZI USA 214 Rear South Meadow Rd (800)-262-0211 Plymouth MA, 02360 www.praziusa.com ChestMate
OPERATOR'S MANUAL ROUTER MOUNTING KIT
 OPERATOR'S MANUAL MOUNTING KIT 4950301 (FOR USE WITH BT3000 AND BT3100 TABLE SAWS) Your new router mounting kit has been engineered and manufactured to Ryobi's high standard for dependability, ease of
Corner Key Doweling Jig Instructions Effective July 2018
 Corner Key Doweling Jig Instructions Effective July 2018 Review full manual instructions prior to use for important safety information. Always check Rockler.com to confirm that you are using the most recent
MODEL W1.0X305A(12 ) MODEL W1.0X610A(24 ) HAND BENDING BRAKE ASSEMBLY&OPERATING INSTRUCTION
 MODEL W1.0X610A(24 ) HAND BENDING BRAKE ASSEMBLY&OPERATING INSTRUCTION") MODEL W1.0X305A(12 ) MODEL W1.0X610A(24 ) HAND BENDING BRAKE ASSEMBLY&OPERATING INSTRUCTION 1 SAVE THIS MANUAL You will need the manual for the safety warning and precautions, assembly instructions, operating
MODEL W1.0X305A(12 ) MODEL W1.0X610A(24 ) HAND BENDING BRAKE ASSEMBLY&OPERATING INSTRUCTION 1 SAVE THIS MANUAL You will need the manual for the safety warning and precautions, assembly instructions, operating
User Guide: Setting Up and Using Rail & Stile Sets
 User Guide: Setting Up and Using Rail & Stile Sets Table of Contents Important Safety Information... 3 Prepare the Project Wood and Size Work Pieces... 4 Make Test Cuts and Setup Blocks before Cutting
MODEL SETUP & OPERATION MANUAL DOVETAIL JIG FEATURES SPECIFICATIONS
 SETUP & OPERATION MANUAL FEATURES Male and female dovetail joints are cut simultaneously, to ensure perfectly matched dovetail joints. Side stops provided, allow repeated precise dovetail joint cutting
WARNING: Read these instructions before using the machine DOVETAIL JIG MODEL NO: CDTJ12 / CDTJ24 PART NO: ,
 WARNING: Read these instructions before using the machine DOVETAIL JIG MODEL NO: CDTJ12 / CDTJ24 PART NO: 6462170, 6462175 OPERATION & MAINTENANCE INSTRUCTIONS LS0111 INTRODUCTION Thank you for purchasing
Essential BOX JOINT JIG
 Essential BOX JOINT JIG Home in on precise finger joints with this table saw sled. By Ken Burton The box (or finger) joint is a remarkably strong, interlocking corner joint that can be quickly made on
HIT-30 ALUMINUM DOOR SERIES OWNERS MANUAL
 HIT-30 ALUMINUM DOOR SERIES OWNERS MANUAL INSTALL LOCKS LATCHES LEVERS / PADDLES INDICATORS STRIKES Every Installation Is A Self-Portrait Of The Person Who Did It! Autograph Your Work With Excellence!
Grizzly Drill Press SOP
 Grizzly Drill Press SOP Drill Press is wired to run on 0V. Drill Press has a built in light with a ON/OFF switch. Never hold a workpiece by hand while drilling. Clamp it down or hold it in a vice. Never
WOODWORKING GUIDE: BASIC JOINERY
 WOODWORKING GUIDE: BASIC JOINERY Close isn't really good enough. A perfect fit is what counts. When building furniture, there are many ways to construct joints. The simplest are those that use mechanical
Agricultural Mechanics and Technology Power Tool Safety Rules
 Agricultural Mechanics and Technology Power Tool Safety Rules Name: BAND SAW Use: Cutting curves, circles and irregular shapes. 1. Use clean SHARP blades. 2. The teeth should always point DOWN. 3. Adjust
CMT Enlock Jig Owner s Manual
 Thank you for purchasing the CMT Enlock Jig. This jig will simplify joinery in your shop, and on the job site. Please read the instructions thoroughly before using the Enlock Jig. Router requirements A
EZ SQUARE BANDSAW FENCE Instructions
 EZ SQUARE BANDSAW FENCE Instructions Peachtree Woodworking Supply Inc. 6684 Jimmy Carter Blvd. Norcross GA 30071 The EZ SQUARE BAND SAW FENCE Table of Contents TABLE OF CONTENTS SAFETY GUIDELINES PARTS
User Manual. CMT650 Kitchen Worktop Jig CMT Part no:
 User Manual CMT650 Kitchen Worktop Jig www.cmtuk.com Part no:200650 www.axminster.co.uk CMT650 Index of Contents... Page No. Index of Contents...02 What s in the Box.........03 What else you will need...
7902 Dado Jig. Owners Manual Please Read Carefully! Hardware List: 7902 Parts List:
 7902 Dado Jig Owners Manual Please Read Carefully! 7902 Dado Jig Hardware List: Identify and verify that you have all of the hardware shown below prior to assembly. Please read the instructions at least
Please read this owner s manual before use and keep it at hand for reference.
 From the makers of INCRA JIG! Split fence design Micro adjustable Universal dust collection port Adjustable fence gap Compatible with all INCRA joint-making accessories CONTENTS CONTENTS Assembly........................
REINFORCING THE CORNERS OF FLAT FRAMES
 REINFORCING THE CORNERS OF FLAT FRAMES There are a number of different methods that may be used to join flat frame sides together. As most Woodworkers know, end grain glue joints are not nearly as strong
ABM International, Inc.
 ABM International, Inc. Lightning Stitch required 1 1.0: Parts List head and motor assembly (Qty. 1) Reel stand (Qty. 1) Needle bar frame clamp (Qty. 1) Motor drive (Qty. 1) 2 Cable harness with bracket
Disc Sander Angle Jig Instructions
 Disc Sander Angle Jig Instructions Congratulations on the purchase of your new Disc Sander Angle Jig! It allows you to sand precise angles on the end of your workpiece and to sand perfectly round circles.
Mortise & Tenon Routing Procedures
 See Appendix I for complete joint specifications and guide and bit selection FMT PRO CHAPTER 4 Mortise & Tenon Routing Procedures Single Mortise & Tenon, Test Production Procedures Production Procedures
Pivot-Door Downdraft Cabinet Plans
 Pivot-Door Downdraft Cabinet Plans Finished Cabinet Closed Open Exploded View Introduction This simple downdraft-style dust collection cabinet is a great way to keep your shop cleaner and keep your router
Grade 11 Woods Lift Lid Coffee Table. Based on Under the big Top from Popular Mechanics Website
 Grade 11 Woods Lift Lid Coffee Table Based on Under the big Top from Popular Mechanics Website TABLE TOP 1. Select enough lumber to construct a top that is between 22 ½ and 24 wide after jointing. Ensure
How To Create An Entertainment Unit
 How To Create An Entertainment Unit Materials required: 2 x Pine Panels - 1800mm x 450mm x 18mm 4 x Pine Panels - 310mm x 450mm x 18mm 1 x Pine Panels - 650mm x 450mm x 18mm 6 x Bun feet (your choice of
Silverware Chest Plan
 Silverware Chest Plan 05L14.01 Introduction 1. Measure the space required for your cutlery before beginning this project to be sure that it will fit in the drawers and top compartment. The best way to
CV1B Sliding Table Installation and Setup Guide
 CV1B Sliding Table Installation and Setup Guide Tech Mark, Inc 7901 Industry Drive North Little Rock, AR 72117 tel (501) 945-9393 fax (501) 945-0312 www.tech-mark.com email: info@tech-mark.com The CV1B
PVC Composite Railing & Stair Kit
 FREEDOM-WEB PVC Composite Railing & Stair Kit INSTALLATION INSTRUCTIONS Read all instructions prior to installing product. Refer to manufacturers safety instructions when operating any tools. To register
OWNER S MANUAL CONTENTS. The only table saw fence with Automatic Positioning Control TM
 The only table saw fence with Automatic Positioning Control TM OWNER S MANUAL Please read this owner s manual before use and keep it at hand for reference. Note: The INCRA TS II system consists of three
Crafter. Hinge INCRA. Any Hinge, Any Size, Any Project! OWNER S MANUAL SAFETY. Please read this owner s manual and keep it at hand for reference.
 INCRA Hinge Crafter OWNER S MANUAL Any Hinge, Any Size, Any Project! SAFETY Important safety instructions for using the INCRA HingeCrafter Please read this owner s manual and keep it at hand for reference.
Chain Drive Vise. Installation Instructions. (revised 05/04/2016)
") Chain Drive Vise Installation Instructions (revised 05/04/2016) Lie-Nielsen Chain Drive Vise Instructions Table of Contents page About Your Chain Drive Vise 3 Parts List 4 Exploded Parts Diagram 5 step
Chain Drive Vise Installation Instructions (revised 05/04/2016) Lie-Nielsen Chain Drive Vise Instructions Table of Contents page About Your Chain Drive Vise 3 Parts List 4 Exploded Parts Diagram 5 step
SMALL GAUGE NIBBLER ASSEMBLY & OPERATING INSTRUCTIONS Mission Oaks Blvd., Camarillo, CA Visit our Web Site at
 SMALL GAUGE NIBBLER 91739 ASSEMBLY & OPERATING INSTRUCTIONS 3491 Mission Oaks Blvd., Camarillo, CA 93011 Visit our Web Site at www.harborfreight.com Copyright 2004 by Harbor Freight Tools. All rights reserved.
BUILDING A STORM DOOR
 BUILDING A STORM DOOR BY NEAL BARRETT Illustrations by George Retseck If you're in the market for a storm door, you probably know that there are many styles and models available. However, most of them
HAND HELD SAW W MILL
 HAND HELD SAW W MILL 92247 ASSEMBLY AND OPERATING INSTRUCTIONS 3491 Mission Oaks Blvd., Camarillo, CA 93011 Visit our Web site at http://www.harborfreight.com Copyright 2004 by Harbor Freight Tools. All
Pro-Doweling Kit USER S MANUAL #840. Visit us at
 Pro-Doweling Kit USER S MANUAL #840 99 Washington Street Melrose, MA 02176 Phone 781-665-1400 Toll Free 1-800-517-8431 Visit us at www.testequipmentdepot.com Please read this manual carefully and thoroughly
General Wood Shop Notes
 General Wood Shop Notes Restricted Materials No METAL or BONE of any kind on any machine or in the room o See additional restrictions individual machine All reclaimed and other than new lumber must be
Guild of Oregon Woodworkers Shop Safety Test
 Guild of Oregon Woodworkers Shop Safety Test You must pass the Test with an 80% or better and self-correct it to 100% Make sure you put the answers under the correct portion of the answer sheet for the
CHAPTER 11 3/4" Box (Finger) Joints
 Joints") 53 RTJ400 OPERTION CHPTER 11 3/4" ox (Finger) Joints IMPORTNT SFETY NOTE efore using your Leigh RTJ400 you must have completed the preparatory steps listed in the previous pages, including reading the
53 RTJ400 OPERTION CHPTER 11 3/4" ox (Finger) Joints IMPORTNT SFETY NOTE efore using your Leigh RTJ400 you must have completed the preparatory steps listed in the previous pages, including reading the
Instructions for use: 650mm, 700mm & 1000mm Versions.
 Instructions for use: 650mm, 700mm & 1000mm Versions. These New Compact Multifunction jigs offer all the cuts & facilities as the larger traditional worktop jigs. The compact design make them very light
Router Table. Construction
 Router Table A router table is an invaluable tool. The problem, however, is that ready-built router tables are usually relatively expensive and too narrow for many projects. This router table provides
Chain Drive Vise. Installation Instructions. (revised 11/29/2018)
") Chain Drive Vise Installation Instructions (revised 11/29/2018) Lie-Nielsen Chain Drive Vise Instructions Table of Contents page About Your Chain Drive Vise 3 Parts List 4 Exploded Parts Diagram 5 step
Chain Drive Vise Installation Instructions (revised 11/29/2018) Lie-Nielsen Chain Drive Vise Instructions Table of Contents page About Your Chain Drive Vise 3 Parts List 4 Exploded Parts Diagram 5 step
Specifications: Hole Sizes: Selector Pin Hole: 3/8 (0.375 ) Trigger Pin Hole: 5/32 (0.156 ) Hammer Pin Holes: 5/32 (0.156 )
 Trigger Pin Hole: 5/32 (0.156 ) Hammer Pin Holes: 5/32 (0.156 )") 80% Arms AR-15 Jig manual Thank you for purchasing our AR- 15 jig. This precision self- aligning jig will allow you to finish your 80% Arms and other 80% lowers using only a drill press and a few common
80% Arms AR-15 Jig manual Thank you for purchasing our AR- 15 jig. This precision self- aligning jig will allow you to finish your 80% Arms and other 80% lowers using only a drill press and a few common
MODEL H " BYRD SHELIX CUTTERHEAD INSTRUCTIONS
 MODEL H9291 12" BYRD SHELIX CUTTERHEAD INSTRUCTIONS The Model H9291 12" Byrd Shelix cutterhead is designed to replace the straight-knife cutterhead on the Grizzly jointer Model G0609. The total procedure
Lassco Spinnit EBM-S Paper Drill
 Lassco Spinnit EBM-S Paper Drill User's Manual Provided By http://www.mybinding.com http://www.mybindingblog.com Before operating this equipment, please read these instructions completely and keep these
Pro Lift Instructions
 Pro Lift Instructions Effective January 2018 Review full manual instructions prior to use for important safety information. Always check Rockler.com to confirm that you are using the most recent manual
The Universal Table Saw Sled
 The Universal Table Saw Sled Do Precision Work Even with Inexpensive Table Saws! Table saw blades always tend to move the wood while the cut is being made. This is why it's so difficult to get accurate
Installation Instructions for. Before You Begin TOOLS REQUIRED
 Composite Railing System STEP-BY-STEP Installation Instructions for Spectrum Composite Railing Virtually maintenance free 20-year warranty EverNew Spectrum Railing system is designed to work with a number
Floating-Top Table. Creative joinery adds spark to this versatile piece
 Floating-Top Table Creative joinery adds spark to this versatile piece By Michael Pekovich 28 FINE woodworking This is one of those projects that almost wasn t. Rachel, my wife, had asked for a small,
Model Assembly & Operating Instructions
 30 SHEAR BRAKE ROLL Model 05907 Assembly & Operating Instructions Diagrams within this manual may not be drawn proportionally. Due to continuing improvements, actual product may differ slightly from the
3400 to 3440 Scarfing Sled Owners Manual Please Read Carefully!
 3400 to 3440 Scarfing Sled Owners Manual Please Read Carefully! Parts List: Please identify and verify that you have all of the hardware shown. Please refer to photos in the instructions for the parts
Introduction to Carpentry Power Tools
 Youth Explore Trades Skills Introduction to Carpentry Power Tools Description s use power tools every day, and the ability to use these tools correctly and safely is paramount. In this Activity Plan, students
Front Vise 70G G08.02
 Front Vise 70G08.01 70G08.02 The following instructions guide you through the installation of either the Regular Front Vise (70G08.01) or the Large Front Vise (70G08.02). The first step is to determine
HEAVY DUTY GASKET CUTTER
 HEAVY DUTY GASKET CUTTER GUIDE TO PERFECT GASKETS CUTTING GASKETS 1 TO 13 IN DIAMETER: 1. Lay out gasket outer diameter (OD), inner diameter (ID) and bolt holes on template or gasket material. See section
Wooden Hinge Plans by Roger Gifkins
 Single Action Hinge Wooden Hinge Plans by Roger Gifkins Double Action Hinge Single Action Hinge Over the past 7 years I have produced two types of wooden hinges, a single action hinge (that is in effect
Frameless Inline Door With Return QCI5263
 INSTALLATION INSTRUCTIONS Frameless Inline Door With Return QCI5263 WALL MOUNT HINGES FRAMELESS DOOR / PANEL / RETURN PANEL QCI5263 REV. 0 Page 1 Certified 06/17/2016 Parts List with wall mount hinges
Installation and Assembly: Flat Video Wall Mount For 40" to 65" Flat Panel Displays
 Installation and Assembly: Flat Video Wall Mount For 40" to 65" Flat Panel Displays Model: DS-VW665 Maximum Load Capacity: 125 lb (57 kg) 1 of 11 ISSUED: 03-22-12 SHEET #: 125-9288-4 06-25-13 NOTE: Read
7th/8th Grade Industrial Tech General Safety. Give your undivided attention to the machine in which you are using.
 7th/8th Grade Industrial Tech General Safety Wood Lab Safety General Safety Always wear safety glasses. Report all injuries to the instructor. No baggy clothing or open toed shoes. Give your undivided
Mid-Century Credenza Thoughtful details and modern joinery merge in this sleek design
 Mid-Century Credenza Thoughtful details and modern joinery merge in this sleek design BY LIBBY SCHRUM Mid-Century Modern furniture has not been wildly popular since, well, the mid-century. But fashion
TORONTO TOOL MANUFACTURING INC. BTS-50, BTS-36. User Manual
 TORONTO TOOL MANUFACTURING INC. BTS-50, BTS-36 User Manual BTS-50, BTS-36 Clamp, Saw and Router Guide USER GUIDE: Thank you for purchasing the BT series Clamp, Saw and Router Guide. For Your Own Safety
Instructables Butcher Block Top
 Instructables Butcher Block Top Project Overview: This project requires basic woodworking skills and access to woodworking machines. Woodworking machines have sharp cutting edges and are NOT forgiving.
Carcase Construction. Choosing and making the right joints. by Tage Frid
 Carcase Construction Choosing and making the right joints by Tage Frid Furniture construction is broken down into two main categories: frame and carcase. In frame construction, relatively narrow boards
Hand Dovetails. They're really not that hard to do. by Alphonse Mattia
 Hand Dovetails They're really not that hard to do by Alphonse Mattia Dovetailing is one of the strongest and most attractive methods of joining the ends of boards together. Traditionally, handcut dovetails
MODEL SETUP & OPERATION MANUAL DOVETAIL JIG FEATURES
 SETUP & OPERATION MANUAL FEATURES New clamping system for greater accuracy. Lockable template height for a stable platform for the router. Cuts precision matching dovetails with the same accuracy found
TOOL LIST FOR TAILGATE HIDDEN LATCH & LINK ASSY FOR FORD FLARESIDE TRUCKS
 TOOL LIST FOR TAILGATE HIDDEN LATCH & LINK ASSY FOR 53-87 FORD FLARESIDE TRUCKS Vise Grip Clamps C-clamps Sharpie Marker Ball Peen Hammer Center Punch 3/8 or 1/2 Drill 5/32, 7/32, 9/32, and 3/8 Drill Bits
SYSTEM OWNER S MANUAL
 From the makers of INCRA JIG SYSTEM OWNER S MANUAL W hat does an INCRA tool do better than any other? Just ask that question to any of the thousands of satisfied INCRA router table or table saw fence owners
OWNER S MANUAL. But that s just half the story. The fence INCRA Miter Gauge really does work
 From the makers of the INCRA JIG! Please read this owner s manual before use and keep it at hand for reference. Your new INCRA Miter Gauge at long last solves that frustrating problem all too familiar
Lassco Spinnit EBM-2.1 Paper Drill
 Lassco Spinnit EBM-2.1 Paper Drill User's Manual Provided By http://www.mybinding.com http://www.mybindingblog.com Serial Number: Date of Purchase: Dealer: Address: Before operating this equipment, please
How to install backchecks
 How to install backchecks Note: All pictures can be enlarged for better clarification. Revision 7 8/2009 Backchecks wear out in a piano much like brake pads in an automobile. While wear is a valid reason
SUPPLEMENTARY INSTRUCTION MANUAL DOVETAIL JIG MODELS 4210 & 4212
 SUPPLEMENTARY INSTRUCTION MANUAL DOVETAIL JIG MODELS 4210 & 4212 To learn more about Porter-Cable visit our website at: http://www.porter-cable.com IMPORTANT Please make certain that the person who is
Rail Coping Sled Instructions
 Rail Coping Sled Instructions GENERAL SAFETY WARNINGS This tool is designed for specific applications as defined in the instructions and should not be modified and/or used for any other applications. Before
PRAZI USA. Model PR-3900 Owners Manual. Please read this manual in its entirety before using the PRAZI ChestMate.
 PRAZI USA Model PR-3900 Owners Manual Please read this manual in its entirety before using the PRAZI ChestMate. PRAZI USA 214 Rear South Meadow Rd (800)-262-0211 Plymouth MA, 02360 www.praziusa.com ChestMate
FINGER JOINT TEMPLATES LEIGH DEDICATED CUSTOMER SUPPORT Using the F3, F18 and F24 Finger Joint Templates on Leigh D-Series & SuperJigs
 LEIGH FINGER JOINT TEMPLATES Using the F, F and F Finger Joint Templates on Leigh D-Series & SuperJigs DEDICATED CUSTOMER SUPPORT -00-- ii Introduction F, F & F FINGER JOINT TEMPLATES USERGUIDE FOREWORD
Model D1700/D1701 Moulding Head Instruction Sheet
 Model D1700/D1701 Moulding Head Instruction Sheet Phone #: (360) 734-3482 Online Tech Support: tech-support@shopfox.biz Web: www.shopfox.biz To reduce risk of serious personal injury when using moulding
S A F T E Y W A R N I N G
 BINDING CUTTING BASE This tool is designed to fit on a Porter Cable Model 310 and 3701 trim router, this combination will provide you with an easy way to accurately cut a binding rabbet on you instrument.
Right-Angle Sled. Owner s Manual 05J U.S. Patent No. 5,890,524
 Right-Angle Sled Owner s Manual 05J24.01 U.S. Patent No. 5,890,524 Introduction The Veritas Right-Angle Sled straddles the Veritas Router Fence, giving rock solid support to the right-angle arm. As with
FREUD. Operating Instructions. JS104K Biscuit Joiner Kit
 FREUD Operating Instructions JS104K Biscuit Joiner Kit Contents Safety General Safety Rules Additional Safety Rules for Biscuit Joiners Functional Description and Specifications Symbols Parts and Feature
INSTRUCTIONS FOR HIT LOCK MORTISER
 1825 VIA BURTON ANAHEIM CA 92806 714-772-5202 / FAX 714-772-2302 EMAIL: MAIL@MAJORMFG.COM WEB: WWW.MAJORMFG.COM INSTRUCTIONS FOR HIT-66-200 LOCK MORTISER WHEN USING POWER TOOLS ALWAYS WEAR EYE AND EAR