I I. . i1 AD JUSTABLE SHELVES
|
|
|
- Lawrence Harrell
- 6 years ago
- Views:
Transcription
1
.")
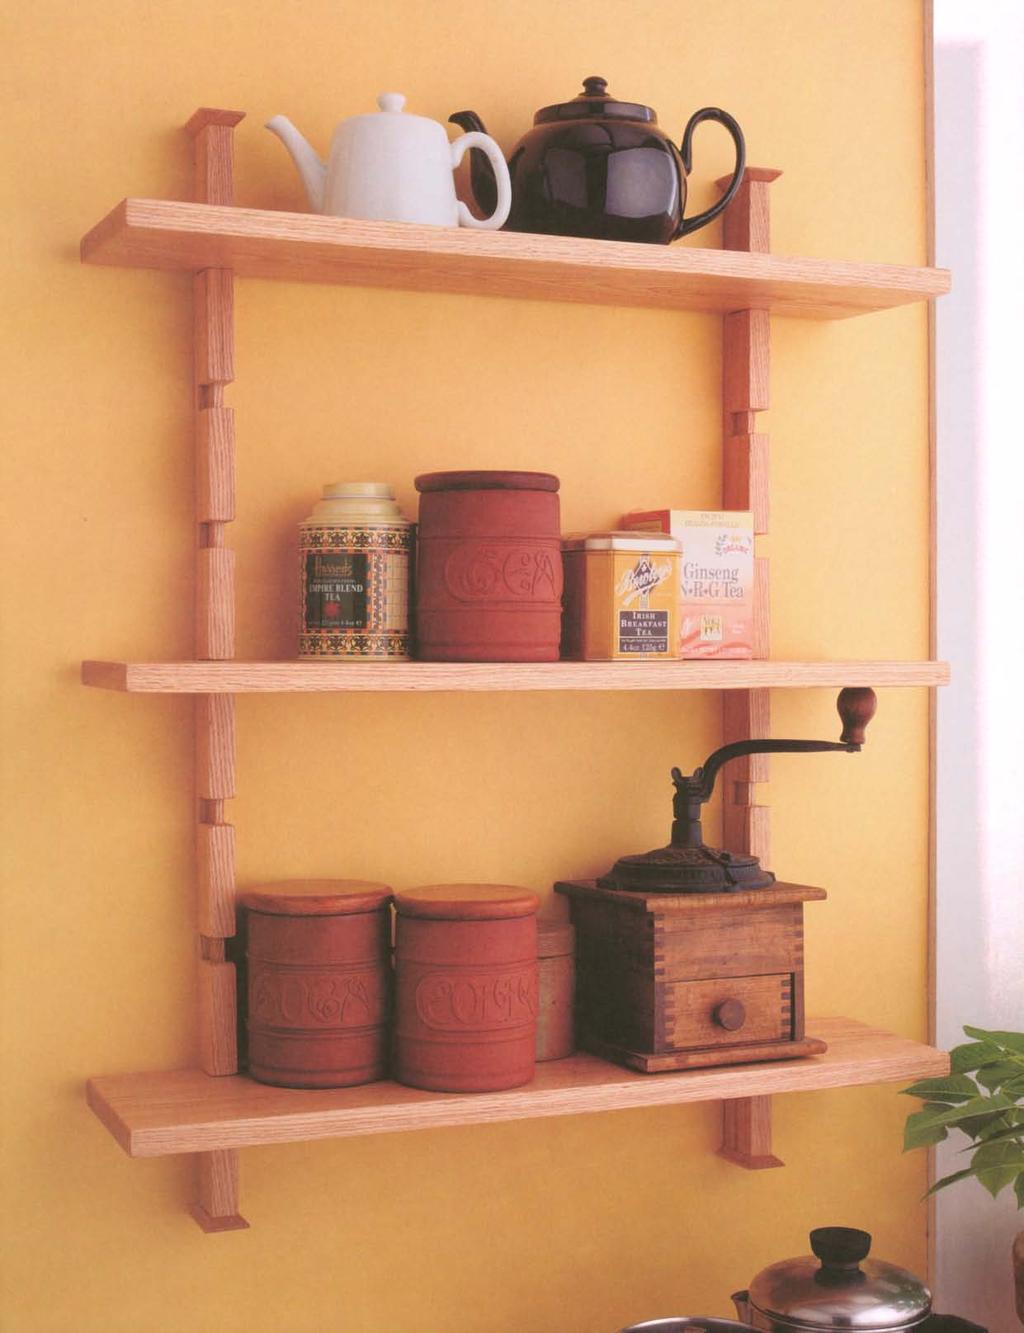
2 ADJUSTABLE SHELVES HAD BEEN TRYNG TO WORK out a really simple (read "fast") way to make an elegant wooden version of the old standby, metal standards and brackets. Although have seen many commercial versions of wall-hung shelving systems built of wood, wanted something cleverly uncomplicated (if you know what mean). The problem was always the shelf support brackets. What needed was a way to hold up the shelves that didn't rely on brackets. Luckily, got this flash of insight. Why not just make couple of uprights with matching notches in them and stick the shelves into the notches? As long as the shelves fit the notches just right and weren't too deep or heavily loaded, it should be fine. The physics of it seem to work: The notches support the shelves and hold quite a lot of weight. The first time made it, however, installing it on the wall proved somewhat difficult. Once you cut notches in the uprights, they become more flexible. When you screw these flexible pieces of wood to a not-so-flat wall, the notches either spread open or pinch closed just enough to make the shelves either too loose or too tight in their slots. And, when open, the shelves slide easily from side to side. n keeping with the original spirit of this project, the solution to these issues turned out to be simple. A spline inserted into the back of each upright stiffens them so they do not bend, and matching notches in the backs of the shelves keep them from moving side to side. The arrangement also has the added benefit of being rigid enough that the whole unit can be hung from just two points at the tops of the uprights. So, with several refinements, present you with amazingly simple adjustable shelves! 31
3 AD JUSTABLE SHELVES The shelves fit into notches in the uprights and are cantilevered. There are no brackets or other hardware to hold the shelves in place. v, 32 A D J US TAB L E 5 H E LV E 5. i1

4 29 " '\= L 4 11.f;; v--x" Front and Side Views FRONT 24" ">== trr trr ] 1%" f-3w --1 '--- 1X" %" % 11 -'> A;;+--- 6" %" SDE 2" +--3,4" %" 1 X" Stock Preparation ALL THE PARTS SHOULD BE first milled to size, and then shaped accordingly. find it's more efficient to do the bulk of the jointing, planing, ripping, and crosscutting work at the same time. Mill the uprights to their finished size. Cut the shelves to width and length, but leave them a little thicker than % in. for now. Mill the spline material, again leaving each piece a little thick, wide, and long. CUT LST FOR ADJUSTABLE SHELVES 2 Uprights 1%" x 29W' x %" 3 Shelves 6" x 24" x %" y." 4 Caps 1" x 2" x %" 2 Splines 1 x 29W' x X" Other materials 2 Keyhole hangers and screws 8 #8 x %" brass screws (to attach caps) A D J US TA B L E 5 H E LV solid oak solid oak solid oak solid oak E 5 33

5 Notch Layout in Uprig hts k %" %" 3W' 6%" The notches are laid out symmetrically from the center notch, always an equal distance from the ends. Center notch PHOTO A: Cut the shelf 4. notches in the uprights with a dado blade on the table saw. Ys Make one long piece 1 in. wide and in. thick for the caps. Make enough stock to cut four caps plus a couple of extras. The Uprights To cut %-in.-wide by l -in.-deep notches for the shelves in the uprights, use a dado blade on your table saw and a miter gauge (see "Notch Layout in Uprights"). L 34 A D JUS TAB E SHE LV E S 1 X" deep 2. Clamp the uprights together to cut notches in them simultaneously. This will ensure that the joints line up with each other and the shelves are parallel. Cut the notches an equal distance from either end of the uprights. This makes it possible to cut a notch in each end of the 3. uprights for each setup. used a flip stop on my miter gauge to register each series of cuts, but you can also use the table-saw fence for registration (see photo A). Cut the last notch in the center of the uprights. Splines 2. nstall a -in.-wide dado blade in your table saw; set it to the same l -in. height as in the previous setup Position the fence to make a cut down the center of the back edge of the uprights. Cut the groove for the splines in each upright. Plane the spline material until it's easily pressed by hand into this groove. Don't make the spline too thick because the glue will swell it slightly and it will grab as you insert the spline.

6 PHOTO B: Gently tap overlong splines into the uprights. Clamp the uprights across their faces so they don't bulge while the glue sets nsert the dry splines about halfway into the grooves. Spread glue on both sides of the part of each spline that remains exposed. t is important to apply the glue in this manner. The splines do not need much to keep them in place; if you put too much glue into these joints it will only end up squeezing out in the dadoes and around the visible portions of the splines, which will be extremely difficult to clean up! 7. Tap the spline in the rest of the way until it bottoms out in the cut (see photo B). You may have to put it in a vise or use some 8. clamps to get it in all the way. Once the splines are fully seated, place some clamps along the joint to make sure it 9. remains tight until the glue dries. Once the glue is dry, trim the excess off the splines. A sharp handsaw for the ends and a block plane for the back will make short work of this. Shelves Shim the Y.-in. dado blade so it will make a cut just a little wider than the slot the spline fits into. This will allow the notches you Y. will cut in the shelves to fit easily over the splines. 3 Lower the blade to cut in. deep, and set the table-saw fence in. from the blade. 4. Using a miter gauge with a tall auxiliary face attached to support the shelves, cut a 36). notch in each end of the back of all the shelves (see photo C on p. Take these still slightly thick shelves and plane them down until they fit easily into the notches of the uprights. They should slide in easily but not be too loose. Remember that these shelves still need to be sanded and that it doesn't take much for 36). these shelves to be too loose (see "Shelf Connection Detail" on p. A D J US TAB L E SHE LV E S 35

7 PHOTO C: With a X-in. dado blade, notch the backs of shelves to fit over the splines. Use the rip fence to ensure the notches are an equal distance from the ends of all the shelves. x 3y';" A 1,; " %" slot, which is from the end of the shelf, fits over the spline in the upright. Shelf Connection Detail Upright Shelf 36 A D J US TA B L E SHE LV E S

8 D: PHOTO nstall hanger hardware flush with the back side of the uprights. Hangers The next step is to install some metal hangers in the top back of each upright. There are several types of hangers available from woodworking suppliers, and the exact installation method will depend on the type you choose. You will need to choose a flush hanger, however, to allow the shelves to hang flat against the wall. A typical installation requires you to mortise the hanger into the workpiece. 2. With a sharp marking knife, trace the outline of the hanger onto the top back of each upright. Using a sharp chisel, remove enough material to allow the hangers to be installed flush Drill a hole inside each mortise deep and large enough to allow each hanger to fit over a screw head. Screw the hangers in place (see photo D). Decorative Caps /{6 Bevel both long edges of the cap stock on your table saw with the blade tilted 45 degrees. This bevel should leave the narrow side 2. of the stock in. wide (just slightly wider than the uprights). t should also leave a right angle flat along each long edge Ys in. wide. With the blade still tilted, transfer the workpiece to your miter gauge set at 38). 90 degrees, and cut a matching bevel on each end (see "Making the Caps" on p. A D J US TA B L E 5 H E LV E 5 37

9 ill" Draw a line around the blank from the top. Making the Caps VEW SDE VEW FRONT 'r-----i ::::1-% " (, 2" aste _ { Crosscut pieces from each end. Rip edges at 45 degrees. Bevel the ends at 45 degrees. 7' '" 1 t::".'" 1 1=1==========1 e Ll 1 7' Repeat the process. PHOTO E: nstall the top and bottom end caps with two brass screws. 38 A D J US TAB L E SHE LV E S

10 DESGN OPTON : LARGE OR SMALL? The shelves in this chapter are relatively small, but have built several different sizes of this kind of shelving, including some quite large (see the photo). Yo u can certainly make a unit as tall as your ceiling height will allow, but shelves deeper than 9 in. should be avoided. Yo u could possibly make them a little deeper, by making the 1 uprights larger and deeper (the ones in the photo are 2Yz in. deep and Yz in. wide), but think the scale would look wrong. A shelf length of 48 in. is the maximum for a unit with two uprights-as long as you keep 30 in. between upright centers and 9 in. on each side. f you want a wider unit, you will have to use more uprights. All of this is assuming %-in.-thick shelves. You can use thicker shelves, but you really gain very little since the thicker shelves are heavier. also think the lighter look of %-in. shelves is more in keeping with the simple, open spirit of the piece. A much larger version of the adjustable-shelf project, used to hold this antique-radio collection. t isn't a good idea to make this type of shelf much larger than this. 3. Crosscut a 2-in. piece off of each end, and repeat the process until you have enough caps for the project and a couple of 4. extras. recommend cutting extra because it only takes a few moments to do, and these little pieces can sometimes split when you drill holes for the attachment screws. Drill two countersunk holes for some small brass screws and some mating pilot holes into the ends of the uprights, and attach the caps (see photo E). Sanding and Finishing Sand all the parts to at least 150 grit. You might find it easier to temporarily remove the caps for sanding and even finishing, and you should definitely remove the hangers for finishing. finished my shelves with a satin spray lacquer, but as with many of the projects in this book, a good-quality oil finish or even a carefully applied brush-on water-based polyurethane would also work well. A D J US TA B L E SHE LV E S 39
Project 17884EZ: Shaker End Table
 Project 17884EZ: Shaker End Table With its clean, simple lines, this piece is unmistakably Shaker style. Ours is made from cherry, a wood commonly used by Shaker craftsman, but we ve also seen this piece
WOODWORKING GUIDE: BASIC JOINERY
 WOODWORKING GUIDE: BASIC JOINERY Close isn't really good enough. A perfect fit is what counts. When building furniture, there are many ways to construct joints. The simplest are those that use mechanical
Grade 11 Woods Lift Lid Coffee Table. Based on Under the big Top from Popular Mechanics Website
 Grade 11 Woods Lift Lid Coffee Table Based on Under the big Top from Popular Mechanics Website TABLE TOP 1. Select enough lumber to construct a top that is between 22 ½ and 24 wide after jointing. Ensure
ARTS AND CRAFTS CHAIR
 ARTS AND CRAFTS CHAIR 491 MATERIALS LIST--DINING CHAIR Key No. Size and description (use) A 2 1-3/4 x 1-3/4 x 16-1/4'' oak (front leg) B 2 1-3/4 x 3-3/4 x 40-1/2'' oak (rear leg) C 1 1-3/4 x 3-3/16 x 15''
 America s leading woodworking authority To download these plans, you will need Adobe Reader installed on your computer. If you want to get a free copy, visit: http://adobe.com/ reader. Having trouble downloading
Classic Project. Two-drawer Platform Bed. In this plan you ll find: Step-by-step construction instruction. A complete bill of materials.
 America s leading woodworking authority Classic Project In this plan you ll find: Step-by-step construction instruction. Two-drawer Platform Bed A complete bill of materials. Construction drawings and
The WoodWorker s Edge
 The WoodWorker s Edge Draw-leaf Game Table 1. 2. Layout the area for the tenons. The tenons are 3/8 thick x 4-1/2 long x 1-1/4 deep and offset to the inside. Create the tenons using the step method to
Demilune 4. Apron Joinery. Curved Apron Tenon. Bridle Joint Legs. Bridle Joint Front Apron
 Demilune Email 4 Apron Joinery There are two types of joints used in connecting the aprons and legs. The rear legs use conventional mortise and tenon joints, while the front legs use the less conventional
Greene & Greene. Mailbox. by Seth Keller. Signature details create an elegant box. 2 AmericanWoodworker.com
 Greene & Greene Mailbox by Seth Keller Signature details create an elegant box. 2 AmericanWoodworker.com We needed a new mailbox, but I couldn t find an off-the-shelf version that I liked. So I decided
Project 13586EZ: Writing Desk. Writing Desk Materials List
 Project 13586EZ: Writing Desk This writing desk will make a handsome addition to just about any room in the house. The one shown is made of cherry, a logical choice for a piece like this, but mahogany
BUILDING A STORM DOOR
 BUILDING A STORM DOOR BY NEAL BARRETT Illustrations by George Retseck If you're in the market for a storm door, you probably know that there are many styles and models available. However, most of them
Classic Mitered Jewelry Box
 America s leading woodworking authority Premium Plan In this plan you ll find: Step-by-step construction instruction. A complete bill of materials. Construction drawings and related photos. Tips to help
Knockdown Bookcase. This slant-sided bookcase was a popular mail-order item in the early 1900s.
 Knockdown Bookcase This slant-sided bookcase was a popular mail-order item in the early 1900s. The Arts & Crafts movement was part of an interesting social change in America the advent of mail-order purchases.
Adjustable Box Joint Jig. Richard Hicks on 8/24/2015. Box or Finger Joints
 Adjustable Box Joint Jig Richard Hicks on 8/24/2015 Box or Finger Joints Adjustable Box Joint Jig Richard Hicks on 8/24/2015 Box Joints are also called Finger Joints Because they have interlocking fingers
Serving Tray. When some good friends got married recently, An exercise in template-making yields a great gift project that s easy to duplicate
 Serving Tray An exercise in template-making yields a great gift project that s easy to duplicate END Create from 3 8 2 8" piece. By Geoff Noden When some good friends got married recently, I decided to
Trestle Table and Benches Materials List
 Project 18444EZ: Trestle Table and Benches In the early days of our country, trestle tables were popular because they could easily be disassembled and moved out of the way when not in use no small advantage
Traditional glass-pane and wood-muntin doors highlight this free-standing piece.
 Bookcase Traditional glass-pane and wood-muntin doors highlight this free-standing piece. As the saying goes, there's nothing like good books. But they can present some storage problems--especially if
Jigsaw Puzzle Tray. Premium Plan. In this plan you ll find: America s leading woodworking authority
 America s leading woodworking authority Premium Plan In this plan you ll find: Step-by-step construction instruction. A complete bill of materials. Construction drawings and related photos. Tips to help
Butterfly Leaf Dining Table Plans
 Butterfly Leaf Dining Table Plans Part 1 An attractive dining table with a secret: the leaf folds and stores inside the table. Season 1, Episode 7 P a g e 2 I first saw a butterfly leaf table in a back
Shaker Classic Change the legs to change the look
 Shaker Classic Change the legs to change the look 2 Ways B Y C H R I S T I A N BECKSVOORT not long ago, a couple ordered a set of cherry side tables from me, one for each side of their pencil-post bed.
Classic Kitchen Island
 America s leading woodworking authority Step by Step construction instruction. A complete bill of materials. Classic Kitchen Island Exploded view and elevation drawings. How-to photos with instructive
Essential BOX JOINT JIG
 Essential BOX JOINT JIG Home in on precise finger joints with this table saw sled. By Ken Burton The box (or finger) joint is a remarkably strong, interlocking corner joint that can be quickly made on
Dress up your dining room with this Southern delicacy. that was used to serve drinks after a hunt. Breeches and jodhpurs are optional.
 Dress up your dining room with this Southern delicacy that was used to serve drinks after a hunt. Breeches and jodhpurs are optional. Huntboard Classic Six-Legged My dad has been making this six-legged
Build a Stout Workbench
 Build a Stout Workbench Tail vise is at the heart of this versatile bench by chris gochnour I ve done a fair amount of handplaning during my 32 years as a professional furniture maker, and I ve found that
About.com :
 http://woodworking.about.com/gi/dynamic/offsite.htm?sit...//www.popularwoodworking.com/features/fea.asp%3fid=1088 (1 of 8)1/28/2004 12:05:01 AM Modern Storage Tower The last thing I want to do when starting
Corner Cupboard. This space-saving piece enhances any room 46 FINE WOODWORKING
 Corner Cupboard This space-saving piece enhances any room BY G A R R E T T H A C K On every trip to the Shelburne Museum near Burlington, Vt., I visit a favorite object a small hanging corner cabinet.
Woodline USA Woodline Spacer Fence System
 Woodline USA Woodline Spacer Fence System MADE IN THE USA Includes: (1) ¼ Spacer Fence (1) 3/8 Spacer Fence (1) ½ Spacer Fence (1) Hardware Package (1) 3 Piece Brass bar set (2) Setup Blocks Visit Us Online
Project 11010EZ: Gun/Bookcase/Curio Cabinet
 Project 11010EZ: Gun/Bookcase/Curio Cabinet No man can be all things to all people, but this cabinet comes as close to fitting multiple uses as any inanimate object can. We ve pictured it as a gun cabinet
Build A Cedar Chair And Ottoman
 Build A Cedar Chair And Ottoman If you've ever dreamed of extending the comfort of your living room to your deck, patio or yard, our porch chair-and-ottoman combination is a great place to start making
Kitchen Island. By Rob Joseph Leg Dimensions. Drawer Exploded View. Leg Glue-Up
 Kitchen Island y Rob Joseph eg imensions Step 1 - ut the legs () slightly longer than the dimensions given in the material list. or the thickness we need, the legs are cut from a piece of 11 2"-thick stock,
While creating a two-wall
 Ready-To-Assemble Cabinets Outfit your shop in a weekend or less. By Gary Lombard with Jim Harrold 32 woodcraftmagazine.com Aug/Sept 2013 While creating a two-wall or larger shop (or a kitchen, for that
Silverware Chest Plan
 Silverware Chest Plan 05L14.01 Introduction 1. Measure the space required for your cutlery before beginning this project to be sure that it will fit in the drawers and top compartment. The best way to
Kentucky 4H Wood Science Plans Notebook. Plans Level 3
 Kentucky 4H Wood Science Plans Notebook Plans Level 3 MATERIALS: 2 pieces wood 3/4 x 10 x 4 1 piece wood 3/4 x 12 x 4 2 pieces wood 3/4 x 3 x 2 5 1/2" 2 pieces wood 3/4 x 3 x 1 8 1 piece wood 2 x 4 x
Mid-Century Credenza Thoughtful details and modern joinery merge in this sleek design
 Mid-Century Credenza Thoughtful details and modern joinery merge in this sleek design BY LIBBY SCHRUM Mid-Century Modern furniture has not been wildly popular since, well, the mid-century. But fashion
Jeff Branch WOODWORKING YOU CAN BUILD A. By adding subtle design elements, a traditional furniture style becomes decidedly modern.
 Jeff Branch WOODWORKING YOU CAN BUILD A By adding subtle design elements, a traditional furniture style becomes decidedly modern. Jeff Branch WOODWORKING Publisher: Jeff Branch Editor: Jeff Branch Art
Rose Inspired Corner Shelf
 Photo 1: The side pieces are sized so you can hot melt glue them together outside of the pattern. Scoring a shallow v-groove with a utility knife holds the glue at bay. Rose Inspired Corner Shelf The best
ZeroPlay Guide Bar Jig Plans (V2.0) Micro Jig, Inc. PO Box Winter Springs, FL USA
 Micro Jig, Inc. PO Box Winter Springs, FL USA") Z2 ZeroPlay Guide Bar Jig Plans (V2.0) 0409 Micro Jig, Inc. PO Box 195607 Winter Springs, FL 32719 USA Tel: 1-407-696-6695 Web site: www.microjig.com Email: sales@microjig.com Copyright 2009 Micro Jig,
Z2 ZeroPlay Guide Bar Jig Plans (V2.0) 0409 Micro Jig, Inc. PO Box 195607 Winter Springs, FL 32719 USA Tel: 1-407-696-6695 Web site: www.microjig.com Email: sales@microjig.com Copyright 2009 Micro Jig,
Reasons to Own a Shoulder Plane
 9 Reasons to Own a Shoulder Plane Fine-tune your joinery with these tips and techniques B y C h r i s G o c h n o u r It s easy to dismiss the shoulder plane as a specialty plane, another way of saying
hanging mirror Two-piece desk set Handmade Gifts Photo: John Tetreault
 hanging mirror Two-piece desk set Handmade Gifts 44 FINE woodworking Photo: John Tetreault Flatware carrier Tea light candle holder 4 Tasteful projects made quickly from scraps BY CHRISTIAN BECKSVOORT
Router Table-Mate. Everything you'd want in a router table for just $50.
 Router Table-Mate Everything you'd want in a router table for just $50. Commercially made router tables are everywhere these days. Some of them come with more gizmos and gadgets than a 59 Edsel. By the
Carcase Construction. Choosing and making the right joints. by Tage Frid
 Carcase Construction Choosing and making the right joints by Tage Frid Furniture construction is broken down into two main categories: frame and carcase. In frame construction, relatively narrow boards
Bathroom Storage Unit. Wilkerdos.com
 Bathroom Storage Unit Wilkerdos.com Copyright 2015 Material List Quantity Item Notes 1 4 x 8 x 3/4 plywood Construction grade 1 2 x 4 x 1/2 plywood Construction grade 11" 7-1/2" Page 1 Some 1 1/4" brad
Copyright WilkerDos.com Dining Table. Project Designed By April Wilkerson - Plan Created By Jay Bates (jayscustomcreations.
 Copyright WilkerDos.com 2017 Project Designed By April Wilkerson - Plan Created By Jay Bates (jayscustomcreations.com) Layout & Shopping List Page 2 of 12 Layout & Shopping List Item Quantity Description
Mortisting Stand. Premium Plan. In this plan you ll find: America s leading woodworking authority
 America s leading woodworking authority Premium Plan In this plan you ll find: Mortisting Stand Step-by-step construction instruction. A complete bill of materials. Construction drawings and related photos.
woodworkersjournal.com MATERIAL LIST
 MATERIAL LIST T x W x L 1 Legs (2) 1 1 2" x 3 1 2" x 36 7 16" 2 End Uprights (2) 1 1 2" x 3 1 2" x 32 1 2" 3 Stringers (4) 1 1 2" x 3 1 2" x 42" 4 Top Cladding, Long (2) 3/4" x 7 1 4" x 65 3 4" 5 Side
Router bit cabinet August Home Publishing Co.
 Router bit cabinet 2011 ugust Home Publishing Co. Feature Project Router Bit Cabinet Dovetail keys at the corners reinforce the joints to make a stronger cabinet. Plus, a clear, plastic door panel lets
DOCUMENT CHEST. Curly Maple, White Pine
 25 DOCUMENT CHEST Curly Maple, White Pine 100 MAKING THE DOCUMENT CHEST After the stock has been thicknessed, ripped to width, and cut to length, plough a 1/4" X 3 /8" groove on the inside faces of the
GARDEN SCREEN FENCE 232
 GARDEN SCREEN FENCE 232 233 Materials List--Privacy Screen Key No. Size and description (use) A 16 3/4 x 1 x 53" cedar (horizontal slat) B 14 3/4 x 1 x 72" cedar (vertical slat) C 4 3/4 x 2-1/2 x 53" cedar
Kitchen Base Cabinet: Multiple Drawers Cabinets from Scratch
 Kitchen Base Cabinet: Multiple Drawers by Cabinets from Scratch Our Home from Scratch LLC Page 1 Disclaimer Our Home from Scratch LLC and its legal owners cannot be held responsible for any loss, damage,
Hinge Mortising Jig. One of the make it or break it parts of building a. 6 ShopNotes No. 74
 Hinge Mortising Jig A Mortise for a Hinge. Quick, clean, and accurate that s the only way to describe the mortise you get with a trim router and this hinge mortising jig. One of the make it or break it
Pivot-Door Downdraft Cabinet Plans
 Pivot-Door Downdraft Cabinet Plans Finished Cabinet Closed Open Exploded View Introduction This simple downdraft-style dust collection cabinet is a great way to keep your shop cleaner and keep your router
Table to Go. Build a foldable, portable, storable table for four WORKSHOP
 WORKSHOP Table to Go Build a foldable, portable, storable table for four by Dan Cary This table is designed to handle the rigors of outdoor use and travel, but it is equally at home indoors. If you ve
Floating-Top Table. Creative joinery adds spark to this versatile piece
 Floating-Top Table Creative joinery adds spark to this versatile piece By Michael Pekovich 28 FINE woodworking This is one of those projects that almost wasn t. Rachel, my wife, had asked for a small,
PROJECT PLAN MODERN COFFEE TABLE
 BUILD IT WITH ROCKLER PROJECT PLAN MODERN COFFEE TABLE With its clean lines and striking geometry, this coffee table will lend iconic midcentury modern style to any living space. And you can build it yourself
Kitchen Upper Cabinet: Single Door Cabinets from Scratch
 Kitchen Upper Cabinet: Single Door by Cabinets from Scratch Our Home from Scratch LLC Page 1 Disclaimer Our Home from Scratch LLC and its legal owners cannot be held responsible for any loss, damage, disappointment,
Tools: Drill/Driver Kreg Jig Miter Saw Jigsaw Circular Saw Adjustable Square Tape Measure Veneer Trimmer Sandpaper and Sander
 R PROJECT PLANS DROP-FRONT DESK Create a workspace almost anywhere with this drop-front desk. Mounted to a wall, it doesn t take up any floor space, which means you can hang it wherever you need to work.
curved-lid treasure box
 curved-lid treasure box 20 ugust Home Publishing o. Feature Project urved-lid Treasure Box The curved lid and ebonized sides of this attractive box show off the highly figured wood and your woodworking
Kitchen Upper Cabinet: Double Doors Cabinets from Scratch
 Kitchen Upper Cabinet: Double Doors by Cabinets from Scratch Our Home from Scratch LLC Page 1 Disclaimer Our Home from Scratch LLC and its legal owners cannot be held responsible for any loss, damage,
Heirloom music box August Home Publishing Co.
 eirloom music box 2013 August ome Publishing o. Weekend Project heirloom Music Box } One chamber inside the box is reserved for the musical works. t s not often that you can build an heirloom project in
Nojo Design: Large Step Cabinet: February 2012
 Nojo Design: Large Step Cabinet: February 2012 The largest single piece of furniture I ve ever made is this stepped cabinet. Finished piece is 8! tall and over 10 long. This project has been great, although
DOWNLOADABLE PROJECT PLANS FROM THE EDITORS OF WOOD MAGAZINE Whether it s
 DWNDBE JEC NS F HE EDIS F WD GZINE http://www.woodmagazine.com Whether it s butterflies or baseball cards, Irish lace or South merican stamps, this ten-drawer beauty has got your collection covered. Not
Mail Truck Bank Plan. Rockler Mail Truck Bank Plan
 Mail Truck Bank Plan Build this nostalgic Mail Truck Bank and capture the imagination of a child! This easy-to-build plan uses our Solid Brass Mailbox Door (#55358) to commemorate the stalwart little truck
Iearn my living by making cabinetry not cookie-cutter
 Supporting Shelves Five methods for installing by Stephen Winchester Iearn my living by making cabinetry not cookie-cutter kitchens, but one-of-a-kind pieces and custom built-ins. Every cabinet I build
Hand Dovetails. They're really not that hard to do. by Alphonse Mattia
 Hand Dovetails They're really not that hard to do by Alphonse Mattia Dovetailing is one of the strongest and most attractive methods of joining the ends of boards together. Traditionally, handcut dovetails
This is a solid wood cabinet. The only plywood used is for the back and drawer bottoms.
 Sideboard Sideboard Overview: This project requires basic woodworking skills and access to woodworking machines. Woodworking machines have sharp cutting edges and are NOT forgiving. You should be properly
Build a Rolling Tool Tote
 The rolling tool tote design calls for readily available materials: a cheap hand truck (it could be an axle and two wheels), 3/4 and 1/2 thick plywood, 1/4 thick MDF (you could use plywood or hardboard)
Kitchen Step Stool. Premium Plan. In this plan you ll find: America s leading woodworking authority
 America s leading woodworking authority Premium Plan In this plan you ll find: Step-by-step construction instruction. A complete bill of materials. Construction drawings and related photos. Tips to help
Copyright 2007 MLCS 1
 Copyright 2007 MLCS 1 REFERENCE GUIDE and SPECIFICATIONS: Edge Guides: This 12 Dovetail Template comes complete with 2 Edge Guide Sets one set for Half Blind and one set for Rabbeted Half Blind Dovetails.
Kitchen Base Cabinet: Single Drawer with Double Doors Cabinets from Scratch
 Kitchen Base Cabinet: Single Drawer with Double Doors by Cabinets from Scratch Our Home from Scratch LLC Page 1 Disclaimer Our Home from Scratch LLC and its legal owners cannot be held responsible for
It s a Keeper
 DOWNLODBLE ONLINE WOODWORKING PLNS http://www.woodonline.com It s a Keeper Neat, orderly storage for your WOOD magazines Do you keep back issues of WOOD magazine for reference? nd, if you haven t noticed,
15 Dovetail Jig. Instruction Manual. Part # 3452
 15 Dovetail Jig Instruction Manual Part # 3452 CAUTION: Please read, understand, and follow all manufacturers instructions, guidelines and owners manuals that come with your power tools. Peachtree Woodworking
ribbon handle box 2010 August Home Publishing Co.
 ribbon handle box 00 ugust Home Publishing Co. eature Project Ribbon Handle ox This imaginative design not only makes a wonderful gift, it s also a great way to build your woodworking skills. Ithink of
Shoulder Plane. dovetailed. fine tools. Make an heirloom tool and learn the secret to creating double dovetails in metal it s easier than you think.
 fine tools dovetailed Shoulder Plane Make an heirloom tool and learn the secret to creating double dovetails in metal it s easier than you think. I ve always been fascinated by old, metal hand planes.
Step-by-Step Instructions for Making the Wall-hung Bookcase
 Step-by-Step Instructions for Making the Wall-hung Bookcase When a piece of furniture has an air and look of simplicity, you can be sure that it deftly conceals the complexity of its making. I wanted this
Keeping Plank Doors Flat
 Keeping Plank Doors Flat Five solutions, from standard to stylish BY CHRISTIAN BECKSVOORT Working strictly with solid wood, I take frame-andpanel doors almost for granted. To me it's a no-brainer: Isolate
Assembly Instructions
 Selling Station Assembly Instructions View from above without top A B C D Rounded finished corners on A & D Square unfinished 3-sides on B & C Selling Station Components (2) 2' x 6' Side s Have a channel
Build a Michigan Sloyd. Spoon Mule
 Build a Michigan Sloyd Spoon Mule Contents Materials Choosing and milling wood.... 3 Base Legs.... 4 Rails.... 5 Seat Assembly and shaping...10 Fin options....10 Riser Assembly....11 Wedge....12 Head Laminations....13
A Deluxe Chisel Cabinet
 After I finished my wall-mounted tool chest (8 x 21 x 36 ) a few years ago, a wise friend warned me [I]t s one that holds disappointment in its heart. The day will certainly come when there is no more
craftsman rocker Classic style meets comfort in this sturdy oak rocking chair BY MICHAEL PEKOVICH 34 FiNE woodworking
 craftsman rocker Classic style meets comfort in this sturdy oak rocking chair BY MICHAEL PEKOVICH 34 FiNE woodworking photo, this page: Michael pekovich shape the rear legs designing a chair can be a tough
Ways to get the most out of your
 5 Ways to get the most out of your router table When you mount a router on a table, you expand your shop s potential. To help you take advantage of this potential, we assembled five router table techniques
Trimming Windows. Get the jambs flush with the drywall, and the miters come easily THE PARTS AND PIECES OF WINDOW TRIM BY JIM BLODGETT
 Trimming Windows Get the jambs flush with the drywall, and the miters come easily BY JIM BLODGETT THE PARTS AND PIECES OF WINDOW TRIM Traditional window trim includes a stool, which most people think of
ENJOY THIS SELECTION FROM. Woodworking 101. Includes Step-by-Step Instructions for 8 Projects. Woodworking
 W ENJOY THIS SELECTION FROM Woodworking 101 Includes Step-by-Step Instructions for 8 Projects Woodworking 101 Aimé Fraser, Matthew Teague, and Joe Hurst-Wajszczuk To purchase your copy of Woodworking 101,
Wall-hung Jewelry Cabinet
 America s leading woodworking authority Premium Plan In this plan you ll find: Step-by-step construction instruction. A complete bill of materials. Construction drawings and related photos. Tips to help
Flamingo. That s what I looked
 Plans N O W w w w. P l a n s N O W. c o m flip-seat Storage Bench Flamingo. That s what I looked like as I stood in the doorway perched on one leg, with my other foot raised so that I could untie the laces
A Table for Four... with a View
 America s leading woodworking authority Step by Step construction instruction. A Table for Four... with a View A complete bill of materials. Exploded view and elevation drawings. How-to photos with instructive
Dining Table with Two-Way Drawers
 Dining Table with Two-Way Drawers DOUBLE-FRONTED DRAWERS MAKE THIS PIECE UNIQUE With two drawer fronts, a center beam, plywood bottoms, and custom pulls, these drawers are both distinctive and durable.
Project 13519EZ: Shaker Sewing Desk
 Project 13519EZ: Shaker Sewing Desk This fine example of a Shaker sewing desk was measured and photographed at Hancock Shaker Village in Hancock, Massachusetts. On the original, the legs and various frame
Instructables Butcher Block Top
 Instructables Butcher Block Top Project Overview: This project requires basic woodworking skills and access to woodworking machines. Woodworking machines have sharp cutting edges and are NOT forgiving.
Build a comfortable outdoor seat in time for spring
 asy lider Build a comfortable outdoor seat in time for spring by Vern rassel Our glider features metal swing arms that are easy to install and provide a smooth gliding motion. W hen you re choosing a spot
Router Table. In a recent article, I wrote about the router table I built for the Center. 5 Essential Jigs for the
 5 Essential Jigs for the Router Table Great fixtures and fences offer better control and new possibilities BY PETER SCHLEBECKER In a recent article, I wrote about the router table I built for the Center
Herringbone Serving Tray
 Overall dimensions 3"h 11"w 171/2"l Fun-and-Fanciful Herringbone Serving Tray Designer/Builder: Craig Godsey Writer: Jim Harrold Note: Before beginning this project, take a few minutes to install your
Tongue & Groove Cabinet Doors Copyright 2014 JaysCustomCreations.com
 Tongue & Groove Cabinet Doors Copyright 2014 JaysCustomCreations.com A tongue and groove cabinet door is made up of at least 5 pieces. Two horizontal rails (blue), two vertical styles (green), and one
Kentucky 4H Wood Science Plans Notebook. Plans Level 2
 Kentucky 4H Wood Science Plans Notebook Plans Level 2 MATERIALS NEEDED: JEWELRY BOX WS201 1 piece wood 1/4" x 4 x 4 1/2" (bottom) 1 piece wood 1/4" x 4 1/2" x 5 (top) 2 pieces wood 1/4" x 2 x 5 (front
under the bottom shelf and along the top shelf should do the trick.
 w Bookshelves in a Day BY ST E V E L A T T A Iget the most pure enjoyment from reproducing 18th-century furniture, but every now and then it s nice to break out of that mode and dive into a project that
ARCHED AURORA NIGHTSTAND BY DARRELL PEART
 ARCHED AURORA NIGHTSTAND BY DARRELL PEART If my furniture making business were a corporation, the shareholders would have thrown me out a long time ago. My approach is impractical, because I d rather tinker
Arched. Building an. Passageway. Although my company specializes in high-end jobs
 Building an Arched Passageway All photos by Brian Striegler This straightforward approach combines basic shop methods with simple site joinery to create an elegant frame-and-panel archway by Gary Striegler
PROJECT PLANS WOODEN GIFT BOX
 PROJECT PLANS WOODEN GIFT BOX Make the gifts you give even more special by presenting them in this one-of-a-kind gift box. In fact, the box may be valued more than whatever it contains. The box is sized
Replacing Hammer Butt Springs in the Upright Action
 Schaff Piano Supply Company Presents: Replacing Hammer Butt Springs in the Upright Action Basic Procedures By Chuck Behm Replacing Hammer Butt Springs -Rationale- In the restoration of an upright, the
Project 12231EZ: Country Curio Clock
 Project 12231EZ: Country Curio Clock This good-looking clock not only reminds you of the time, it also provides a couple of shelves to display favorite curios. No fancy joinery is needed here, just butt
Dovetail Saw Guides. Figure 1: Dovetail saw guide, exploded view. Guide Block. UHMW Friction Pad. Sliding Clamp. Rare-Earth Magnet
 Dovetail Saw Guides U.S. Pat. No. 6,607,016 Dovetail joints have traditionally been the hallmark of a cabinetmaker who had acquired an expert level of skill. They are also a mark of quality and attention