x12 GAZEBO ASSEMBLY INSTRUCTIONS
|
|
|
- Alaina Blair
- 6 years ago
- Views:
Transcription


1 30 10 x1 GAZEBO ASSEMBLY INSTRUCTIONS Assembly with more than one person recommended 0 L:\WP51\Instructions\SOLARIUMS INSTRUCTION BOOKS\30\ZZZ GP.EN.doc
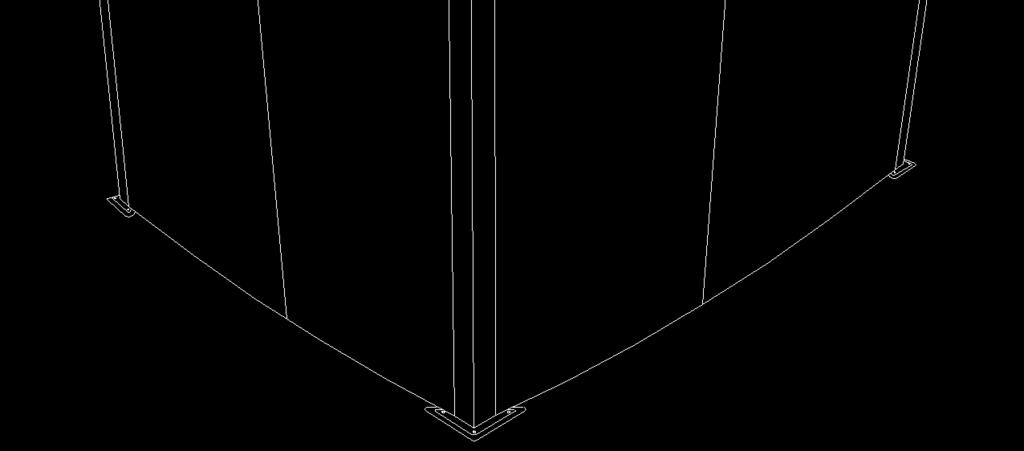
2 Step 1: Assemble beams A and B using center plate F, securing tightly with 8 bolts Oo. Repeat with beams C and D, also using center plate F. Lay out the assembled beams in a rectangle and join at each corner with a corner plate E, again securing tightly with 8 bolts Oo. Step : For each leg G, attach foot plate H using 3 bolts Pp. L:\WP51\Instructions\SOLARIUMS INSTRUCTION BOOKS\30\ZZZ GP.EN.doc 1
3 Step 3: Have someone lift the beam assembly and attach each leg G into a corner, securing each using bolts Pp. Repeat until all four legs are in place. NOTE: Remove bolts to put leg in position, and then replace those bolts onto the leg. Step : Install middle joint cover J at each of the beam junctions, using screws Qq each. Install corner cover I at each of the corners, using screws Qq each. L:\WP51\Instructions\SOLARIUMS INSTRUCTION BOOKS\30\ZZZ GP.EN.doc
4 Step 5: Attach mounting brackets O and P to rafters M and N respectively. Use threaded hole about 8 from end of rafter. Lift central hub L to a height of about 110 (.79m) at the center of the gazebo. (Caution: this part may be heavy, use support as needed) Attach one end of rafter M to the hub using 1 bolt Oo. Attach other end with mounting bracket to the corner of the beam assembly with bolts Pp. Use the set of holes closest to the inside. Repeat with remaining M rafters. Similarly, attach one end of rafter N to the hub using 1 bolt Oo. Attach other end with mounting bracket to the beam assembly with screws Qq. Use the set of holes closes to the inside. Repeat with remaining N rafters. Step 6: Once all rafters are in place, install top cap K over central hub L. Use flat washers and acorn nuts Vv to secure tightly. L:\WP51\Instructions\SOLARIUMS INSTRUCTION BOOKS\30\ZZZ GP.EN.doc 3
5 Step 7: Install the flashings Q, R, and S onto the beam assembly, using screws Qq on the inside. The notched end of a flashing will always go in a corner of the gazebo. Step 8: Install the curtain rails T and U on the inside of the beam assembly using bolts Oo. L:\WP51\Instructions\SOLARIUMS INSTRUCTION BOOKS\30\ZZZ GP.EN.doc
6 Step 9: Slide the indicated polycarbonate panels into the spaces between the rafters, using the top groove of each rafter. Ensure the side meant to face the sun is on the outside. Use a rubber hammer to carefully tap each panel into the grooves. Step 10: Insert the middle roof joints in between the rafters and slide them up under the polycarbonate panels. Tap lightly to ensure the panel is fully in the slot. Seen from above, most of the joint as well as the drain holes should be beneath the roof panels. L:\WP51\Instructions\SOLARIUMS INSTRUCTION BOOKS\30\ZZZ GP.EN.doc 5
7 Step 11: Slide the remaining polycarbonate roof panels in the lower groove of the rafters and into the lower slot of the roof joints. Tap to make sure panels fit securely and do not extend past the ends of the rafters. Step 1: Starting from any end, install all edgings, with end caps Gg or Hh at each junction or corner respectively. Use bolts Pp to secure. L:\WP51\Instructions\SOLARIUMS INSTRUCTION BOOKS\30\ZZZ GP.EN.doc 6
8 Step 13: Install the upper crossbars on the interior of the roof using bolts Oo, following the shaped ends and letters. Do not tighten bolts immediately; install loose and tighten once all crossbars are in place. Repeat this step with the lower crossbars. Step 1: Secure each foot plate into the ground. Use lag shields if needed for harder surfaces. 7 L:\WP51\Instructions\SOLARIUMS INSTRUCTION BOOKS\30\ZZZ GP.EN.doc
9 Step 15: Install the screen curtains Ww in the interior groove of the curtain rails, using the provided hooks. Install the privacy curtains Xx in the exterior groove of the rails. Once the hooks are in, use curtain rail caps Uu to close ends of curtain rails. IMPORTANT NOTES: Make sure all screws and bolts are tight. If conditions are windy, you may have to add cable guides at the corners. 8 L:\WP51\Instructions\SOLARIUMS INSTRUCTION BOOKS\30\ZZZ GP.EN.doc
10 PART QTY DIAGRAM PART QTY DIAGRAM (11-637) 60 3/8 ROOF RAFTER 6 N (11-6) 5 ¾ TOP LEFT BEAM A (11-65) 5 ¾ TOP RIGHT BEAM B (11-66) 65 ½ TOP LEFT BEAM C (11-67) 65 ½ TOP RIGHT BEAM D (11-68) CORNER PLATE E (11-69) CENTER PLATE F (11-630) 81 ½ LEG G (11-631) FOOT PLATE H (11-63) CORNER COVER I (11-633) MIDDLE COVER J (11-63) 37 ¼ TOP CAP K (11-635) 3 ¼ CENTRAL HUB L (11-636) 83 ROOF RAFTER M 1 1 RAFTER M MOUNTING BRACKET O RAFTER N MOUNTING BRACKET P (11-638) 55 ¼ RIGHT FLASHING Q (11-639) 55 ¼ LEFT FLASHING R (11-60) 5 3/8 CENTER FLASHING S (11-61) 60 ½ CURTAIN RAIL, 1 SIDE T (11-6) 7 ¾ CURTAIN RAIL, 10 SIDE U (11-63) 30 x30 LEFT UPPER ROOF PANEL V (11-6) 5 ½ x9 ½ MIDDLE UPPER ROOF PANEL W (11-65) 30 x30 RIGHT UPPER ROOF PANEL X (11-66) 30 ¾ LEFT MIDDLE ROOF JOINT Y (11-67) 5 ½ CENTER MIDDLE ROOF JOINT Z 6 9 L:\WP51\Instructions\SOLARIUMS INSTRUCTION BOOKS\30\ZZZ GP.EN.doc
11 PART QTY DIAGRAM PART QTY DIAGRAM (11-661) 17 ½ RIGHT UPPER CROSSBAR Nn (11-68) 30 ¾ RIGHT MIDDLE ROOF JOINT Aa (11-69) 58 1/8 x33 LEFT LOWER ROOF PANEL Bb (11-650) 58 1/8 x33 RIGHT LOWER ROOF PANEL Cc (11-651) 58 7/8 LEFT EDGING Dd (11-65) 6 ¾ CENTER EDGING Ee (11-653) 58 7/8 RIGHT EDGING Ff (11-65) RAFTER CAP Gg (11-655) CORNER END BRACKET Hh (11-656) LEFT LOWER CROSSBAR Ii (11-657) 6 ¾ MIDDLE LOWER CROSSBAR Jj (11-658) RIGHT LOWER CROSSBAR Kk (11-659) 17 ½ LEFT UPPER CROSSBAR Ll (11-660) 6 ¾ MIDDLE UPPER CROSSBAR Mm 6 (08-168) BOLT Oo (08-158) BOLT Pp (08-156) SCREW Qq (08-167) SCREW Rr (08-193) PLASTIC PLUG Ss (08-187) WASHER Tt (11-697) CURTAIN RAIL CAP Uu (08-189) ACORN NUT Vv (11-695) SCREEN CURTAIN Ww (11-696) PRIVACY CURTAIN Xx (11-706) 5 ½ x33 MIDDLE LOWER ROOF PANEL Yy mm KEY (M6x1mm) (M6x16mm) (Mx16mm) (M6x100mm) (M6) 10 L:\WP51\Instructions\SOLARIUMS INSTRUCTION BOOKS\30\ZZZ GP.EN.doc
12 L:\WP51\Instructions\SOLARIUMS INSTRUCTION BOOKS\30\ZZZ GP.EN.doc 11
13 MAINTENANCE NOTES 1. In case of a defective or damaged part, or for any other questions concerning the product, please contact the manufacturer directly.. Please have the parts list and part numbers on hand when ordering or requesting replacement parts. 3. While the product is designed for seasons use, it is strongly recommended to clear snow from the roof on a regular basis. ONE YEAR LIMITED WARRANTY This product has been designed and manufactured to meet the highest standards of quality and durability. Subject to the Conditions for Exercising the Warranty and the Limitations on the Warranty set forth below, it is warranted to be free of material and manufacturing defects for a period of one year from the date of purchase. Should the product become damaged, or the warranty period has expired, please contact Gazebo Penguin Customer Service Department for a complete schedule of replacement parts and prices. CONDITIONS FOR EXERCISING THE WARRANTY In order to properly exercise your warranty, please comply with the following: Carefully inspect the contents of the carton for missing or damaged components. Should you discover damaged or missing parts, do not return the product to the place of purchase, but contact Gazebo Penguin Customer Service Department at the numbers listed below: Montreal: (51) Elsewhere: LIMITATIONS ON THE WARRANTY 1. The product is not warranted against damages due to vandalism, abuse, or falling or thrown objects.. The product is not warranted against damages due to extreme weather conditions, such as thunderstorms, hail, strong wind or snow storms, or any other acts of God. 3. The product is only warranted in the event it is installed in accordance with the Gazebo Penguin s written instructions enclosed with the product.. The product is not warranted in the event it has been improperly anchored. L:\WP51\Instructions\SOLARIUMS INSTRUCTION BOOKS\30\ZZZ GP.EN.doc 1
x16 GAZEBO ASSEMBLY INSTRUCTIONS
 36 1 x16 GAZEBO ASSEMBLY INSTRUCTIONS Assembly with more than one person recommended 0 L:\WP51\Instructions\SOLARIUMS INSTRUCTION BOOKS\36\ZZZ-05.36.0810-1.GP.EN.doc Step 1: Assemble beams A and B using
x12 GAZEBO ASSEMBLY INSTRUCTIONS
 adlonco@hotmail.com 30 10 x1 GAZEBO ASSEMBLY INSTRUCTIONS Assembly with more than one person recommended 0 ZZZ-0.30.100-1.GP.EN.HER.doc Before you assemble the Gazebo It is important that this gazebo be
x16 GAZEBO ASSEMBLY INSTRUCTIONS
 adlonco@hotmail.com 36-3 1 x16 GAZEBO ASSEMBLY INSTRUCTIONS Two or more adults required for assembly 0 ZZZ-05.36-3.117-15.GP.EN.HER.doc Before you assemble the Gazebo It is important that this gazebo be
12 X 15 SOLARIUM ASSEMBLY INSTRUCTIONS
 115 1 X 15 SOLARIUM ASSEMBLY INSTRUCTIONS Assembly by more than one person is recommended. Base Dimensions 1 ½ x15 6, Largest Dimensions 13 6 x16 11 (see pg.13) L:\WP51\Instructions\SOLARIUMS INSTRUCTION
12 X 18 SOLARIUM ASSEMBLY INSTRUCTIONS
 1218 12 X 18 SOLARIUM ASSEMBLY INSTRUCTIONS Assembly by more than one person is recommended. Base Dimensions 12 ½ x18 11, Largest Dimensions 13 6 x20 ½ (see pg.1) L:\WP51\Instructions\SOLARIUMS INSTRUCTION
12 X 18 SOLARIUM ASSEMBLY INSTRUCTIONS
 adlonco@hotmail.com 1218 12 X 18 SOLARIUM ASSEMBLY INSTRUCTIONS Assembly by more than one person is recommended. Base Dimensions 12 ½ x18 11, Largest Dimensions 13 6 x20 ½ (see pg.1) ZZZ-18.1218.0530-1.GP.EN.HER.doc
W1209 1/2 10 X 12 SOLARIUM ASSEMBLY INSTRUCTIONS
 W09 / 0 X SOLARIUM ASSEMBLY INSTRUCTIONS Assembly by more than one person is suggested. Base Dimensions x 8, Largest Dimensions x (see pg.3) L:\WP5\Instructions\SOLARIUMS INSTRUCTION BOOKS\W09\ZZZ-09.W09.GP.EN.doc
W1610 1/2 10 X 16 SOLARIUM ASSEMBLY INSTRUCTIONS Assembly by more than one person is suggested.
 adlonco@hotmail.com W60 / 0 X 6 SOLARIUM ASSEMBLY INSTRUCTIONS Assembly by more than one person is suggested. Requires 96 clearance at the wall Base Dimensions 90 x 8, Largest Dimensions 90 x (see pg.3)
X 12 SOLARIUM ASSEMBLY INSTRUCTIONS Two or more adults required for assembly
 adlonco@hotmail.com 1212-12 12 X 12 SOLARIUM ASSEMBLY INSTRUCTIONS Two or more adults required for assembly Base Dimensions 12 ½ x12 ½, Largest Dimensions 13 6 x13 6 (see pg.1) Overall Height 110 ZZZ-182.1212-12.1030-15.GP.EN.HER
W X 12 SOLARIUM ASSEMBLY INSTRUCTIONS Two or more adults required for assembly
 adlonco@hotmail.com W07-3 8 X SOLARIUM ASSEMBLY INSTRUCTIONS Two or more adults required for assembly Requires 96 clearance at the wall Base Dimensions x 9 /, Largest Dimensions x98 / (see pg.) ZZZ-87.W07-3.7-5.GP.EN.HER.doc
W1610 1/ X 16 SOLARIUM ASSEMBLY INSTRUCTIONS Two or more adults required for assembly
 adlonco@hotmail.com W60 /-3 0 X 6 SOLARIUM ASSEMBLY INSTRUCTIONS Two or more adults required for assembly Requires 96 clearance at the wall Base Dimensions 90 x 8, Largest Dimensions 90 x (see pg.4) ZZZ-0.W60-3.4-5.GP.EN.HER.doc
Grandview 4 seat Glider. Product Code: D71 M KSN Code: UPC Code: Date of purchase: / /
 Grandview 4 seat Glider Product Code: D7 M3738 KSN Code: 04733850-4 UPC Code: 74943364 Date of purchase: / / SAFETY INFORMATION Please read and understand this entire manual before attempting to assemble,
ASSEMBLY INSTRUCTIONS 10 X14 HIGGINS HARDTOP GAZEBO ITEM# L-GZ212PST-4
 3811110 ASSEMBLY INSTRUCTIONS 10 X14 HIGGINS HARDTOP GAZEBO ITEM# L-GZ212PST-4 Parts List Square pole A 4 Round pole B 4 Short arch bar C 4 Long arch bar D 6 Long beam 1 E1 2 Long beam 2 E2 2 Long beam
**MOUNTING YOUR MONITOR
 FPP72V200 72 FREE STANDING DISPLAY CART Assembly Instructions Hardware List Ref. Qty. Part No. Description AA 4 030-1128 1/4-20 UNC, 1 3/4 Socket Hd Screws BB 1 030-1129 5/8-11 UNC 1 3/4 Socket Hd Screw
- 1 - P/N REV E 9/15
 INSTRUCTIONS HIGH TECH II DELUXE FLUSH UNIT ASSEMBLY The following instruction is a guideline, illustrating suggested methods, assembly sequence, and tool selection. Actual assembly may vary by each situation.
Sonoma Hardtop Gazebo 10 X 12. Owner s Manual
 Sonoma Hardtop Gazebo 10 X 12 Owner s Manual Congratulations on your purchase of our Sonoma Hardtop Gazebo. Our clear, easy to follow, step-by-step instructions will guide you through the assembly process
Installation and Assembly: 32" - 60" Flat Panel TV Cart
 nstallation and Assembly: 32" - 60" Flat Panel TV Cart Models: SR1M, SR560M R This product is UL Listed. t must be installed by a qualified professional installer. Max UL Load Capacity: 150 lb (68 kg)
Assembly Instructions. Item# L-GZ704PST
 Assembly Instructions Item# L-GZ704PST GAZEBO ASSEMBLY INSTRUCTIONS Our clear, easy-to-follow, step-by-step instructions will guide you through the project from start to finish. The final product will
RUN-IN SHED INSTRUCTIONS
 RUN-IN SHED INSTRUCTIONS 14321 5th Line Nassagaweya, Rockwood, ON, N0B 2K0 Phone 519-856-9959 ~ Fax 519-856-4141 Toll Free 1-800-461-3362 ~ Email sales@systemhorse.com Website www.systemfence.com RUN-IN
Frameless Inline Door QCI5288
 Frameless Inline Door QCI5288 QCI5288 Rev. 0 Page 1 Date Certified: 06/21/2016 Tools: To install your New Shower Enclosure, you may need the following: Pencil Drill Hack Saw Low Tack Tape 1/8 & 3/16 Drill
YUKON PATIO COVER INSTALLATION INSTRUCTIONS
 YUKON PATIO COVER INSTALLATION INSTRUCTIONS Before You Begin: Consult your local building department for any required permits You may be required to obtain a building permit for this structure. Contact
ASSEMBLY IINSTRUCTIONS D-DN1508SAL Table
 ASSEMBLY IINSTRUCTIONS D-DN1508SAL Table Warning Some parts may contain sharp edges. When assembling and using this product, basic safety precautions should always be followed to reduce the risk of personal
tile redi redi DOOR Redi Swing SERIES: CONFIGURATION: MOUNTING PACKAGE:
 redi DOOR INSTALLATION INSTRUCTIONS tile redi Redi Swing g TM TM...Opening Doors to Stunning Showers! TM TM SERIES: CONFIGURATION: MOUNTING PACKAGE: 2900V Door-Panel No header, offset pivot hinges, u-channel
THIS PRODUCT IS NOT INTENDED FOR INSTITUTIONAL OR COMMERCIAL USE. COLOR
 BENTLEY 6 DRAWER DRESSER READ ALL INSTRUCTIONS BEFORE ASSEMBLY AND USE. KEEP INSTRUCTIONS FOR FUTURE USE. ADULT ASSEMBLY REQUIRED DUE TO THE PRESENCE OF SMALL PARTS DURING ASSEMBLY, KEEP OUT OF REACH OF
ASSEMBLY INSTRUCTIONS
 SKU # 693964 Model #WSFP46ECHD-8 ASSEMBLY INSTRUCTIONS Grafton 46 inch Media Console Infrared Electric Fireplace in Medium Brown Finish Questions, problems, missing parts? Before returning to the store,
ALUMA-VENT AWNING REGULAR END STYLE INSTALLATION INSTRUCTIONS
 ALUMA-VENT AWNING REGULAR END STYLE INSTALLATION INSTRUCTIONS Contact us at: 1-888-442-2928 or www.americana.com Options in your kit: A. Splice Pg 16 B. Column Pg 17 C. C-Channel Brace Pg 19 D. Runner
Assembly Instructions L-DN1629SAL-A 3-Seat Sofa
 Assembly Instructions L-DN629SAL-A 3-Seat Sofa Warning Some parts may contain sharp edges. When assembling and using this product, basic safety precautions should always be followed to reduce the risk
USE AND CARE GUIDE BRAMFORD GAZEBO
 Item #1000 683 163 Model #L-GZ669PST-I USE AND CARE GUIDE BRAMFORD GAZEBO Questions, problems, missing parts? Before returning to the store, call Hampton Bay Customer Service 8 a.m. - 6 p.m., EST, Monday-Friday
(Toll Free); 7am-7pm Pacific Time, Monday-Saturday. Assembly instructions for: SUN GAZEBO WITH SLIDING DOORS
; 7am-7pm Pacific Time, Monday-Saturday. Assembly instructions for: SUN GAZEBO WITH SLIDING DOORS") 866.332.2403 (Toll Free); 7am-7pm Pacific Time, Monday-Saturday Assembly instructions for: SUN GAZEBO WITH SLIDING DOORS CONTENT OF BOXES QUANTITY DESCRIPTION DRAWING Quantity will vary Window wall panels
866.332.2403 (Toll Free); 7am-7pm Pacific Time, Monday-Saturday Assembly instructions for: SUN GAZEBO WITH SLIDING DOORS CONTENT OF BOXES QUANTITY DESCRIPTION DRAWING Quantity will vary Window wall panels
IMPORTANT WARRANTY & INSTALLATION INSTRUCTIONS ATTACHED
 IMPORTANT WARRANTY & INSTALLATION INSTRUCTIONS ATTACHED Please Forward All Attached Information to Consumer Warranty Not Valid Unless Returned to Volant Performance Please be sure to review the enclosed
Horizontal Cable Systems
 ALUMINUM RAILING INSTALLATION INSTRUCTIONS Horizontal Cable Systems 1) Check Contents Of Packages: Verify that all parts have arrived and that they match the packing list. 1A) Coastal applications: Confirm
HARDWOOD CLOSET SYSTEM
 ITEM #0020720 HARDWOOD CLOSET SYSTEM MODEL #WSCO-72C-AR ATTACH YOUR RECEIPT HERE Serial Number Purchase Date Questions, problems, missing parts? Before returning to your retailer, call our customer service
Essex Gazebo. Assembly Instructions. Model No
 Essex Gazebo Model No. 088-1336-8 Instructions Toll-free: 1-877-483-6759 IMPORTANT: Please read this manual carefully before beginning assembly of this product. Keep this manual for future reference. Made
Assembly Instructions
 Assembly Instructions Item# L-DN37SCO-B (Table) Congratulations on your purchase of our SUNJOY products. Our clear, easy to follow, step-by-step instructions will guide you through the assembly process
400A 40113V, 401A 40120V, & 401AL 40120VL ALUMINUM VERTICAL 4000 LB LIFT INCLUDES SCREW LEG ASSEMBLY INSTRUCTIONS
 12/11/07 PAGE 1 OF 12 400A 40113V, 401A 40120V, & 401AL 40120VL ALUMINUM VERTICAL 4000 LB LIFT INCLUDES SCREW LEG ASSEMBLY INSTRUCTIONS Thank you for purchasing our product! *Please read these instructions
OUTDOOR GAZEBO ITM./ART MODEL#L-GZ682PCO-I ASSEMBLY INSTRUCTIONS
 OUTDOOR GAZEBO ITM./ART. 966731 MODEL#L-GZ62PCO-I ASSEMBLY INSTRUCTIONS IMPORTANT: RETAIN FOR FUTURE REFERENCE. READ CAREFULLY. Please check with your local governing authority / local municipal codes
FLAT PANEL CART WITH OR WITHOUT A PULL OUT SHELF
 FP42UL FP60UL FP42MUL FP60MUL FLAT PANEL CART WITH OR WITHOUT A PULL OUT SHELF WARNING: FP42 carts are intended to hold monitors up to 75 lbs and FP60 carts are intended to hold monitors up to 100 lbs.
Project 13519EZ: Shaker Sewing Desk
 Project 13519EZ: Shaker Sewing Desk This fine example of a Shaker sewing desk was measured and photographed at Hancock Shaker Village in Hancock, Massachusetts. On the original, the legs and various frame
Precision Measurement
 Precision Measurement Engineering Principles Student Journal Published by ENERGY CONCEPTS, INC. 27201J I COPYRIGHT 2009 BY ENERGY CONCEPTS, INC. All rights reserved. No part of this publication may be
DASHLEY COLLECTION GAZEBO
 DASHLEY COLLECTION GAZEBO MODEL NO. 088-1760-6 INSTRUCTIONS Toll-free: 1-888-670-6684 IMPORTANT: Please read this manual carefully before beginning assembly of this product. Keep this manual for future
Wood Finish and Glass 3-in-1 TV Stand
 USER GUIDE Wood Finish and Glass 3-in-1 TV Stand f TVs up to 52 /135 lbs. NS-3IN1MT50C/NS-3IN1MT50C-C SAFETY INFORMATION AND SPECIFICATIONS.2 PACKAGE CONTENTS: PARTS...4 PACKAGE CONTENTS: HARDWARE...5
TREX REVEAL RAILING Installation Instructions
 TREX REVEAL RAILING BRACKET HARDWARE STAIR APPLICATIONS (INCLUDING STAIR SWIVEL BRACKETS, STAIR CROSSOVER BRACKET, AND COMPOUND SWIVEL BRACKETS) FIXED BRACKET Stair HARDWARE AA. Bottom Stair Bracket and
Installation and Assembly: 32" - 60" Flat Panel TV Cart
 Installation and Assembly: 32" - 60" Flat Panel TV Cart Models: SR1G, SR560G R This product is U isted. It must be installed by a qualified professional installer. Max U oad Capacity: 150 lb (68 kg) screen
Owner s Manual Pompano 10 ft. x 12 ft. Mural Sun Shelter. Sojag code: UPC code: Date of purchase: / /
 Owner s Manual ompano 0 ft. x 2 ft. Mural Sun Shelter Sojag code: 999-350759 UC code: 77283050759 Date of purchase: / / Table of Contents Safety Information...2 Warranty...3 What is Covered...3 What is
USE AND CARE GUIDE 1
 USE AND CARE GUIDE 1 Thank you for your purchase! We are pleased that you have chosen Sears for your outdoor gazebo purchase. We hope that you enjoy the unmatched quality, comfort, and style of your new
Assembly Instructions GARDENA GAZEBO
 Assembly Instructions GARDENA GAZEBO Item# L-GZ136PST-9C SKU# 7143514 WARNING In order to reduce the risk of personal injury and damage to equipment, basic safety precaution should always be followed when
Gardman Lean-to Greenhouse Assembly Instructions
 Page 1 Gardman Lean-to Greenhouse Assembly Instructions Our Help Line provides support and advice to customers of Summer Garden Buildings after ordering. For advice before you buy you can phone us free
LAWN AND GARDEN GREENHOUSE
 MODELS# OG0AL8-BKE OGAL-8 OGrow Walk-in ' x 8' LAWN AND GARDEN GREENHOUSE With Heavy Duty Aluminium Frame MANUAL VERSION # Grow r! e h t e g To Let's Thank you for purchasing the OGROW greenhouse Follow
ASSEMBLY INSTRUCTIONS D-DN1507SAL 3-Seat Sofa
 ASSEMBLY INSTRUCTIONS D-DN1507SAL 3-Seat Sofa Warning Some parts may contain sharp edges. When assembling and using this product, basic safety precautions should always be followed to reduce the risk of
Depending on the size you ordered you will have either 5 Foot sections which will build the 10 Foot frame or 6 Foot sections which will build the 12
 XL Quilting Frame 1 Depending on the size you ordered you will have either 5 Foot sections which will build the 10 Foot frame or 6 Foot sections which will build the 12 Foot frame Printed 2 June 2014 Updated
OWNER S BAY WINDOW GAZEBO
 OWNER S MANUAL BAY WINDOW GAZEBO Caution: Carefully Read Instcrtuions and Proucedures for Safe Operation Product Code: D7 M809 KSN: 780-083636- UPC code: 868000503 Date of purchase: / / Warning:. When
Gazebo GZ3584 Aluminum Composite Roof Panels
 Gazebo GZ8 Aluminum Composite Roof Panels Assembly Instructions 7 9 2 9 8 0 2 2 Systems Trading Corporation Customer service: (877)782 82 Email: easygrow@stcaustin.com of Introduction Thank you for purchasing
PART #MSP-DCCST Flat Panel Tilt Mount
 INSTALLATION INSTRUCTIONS PART # Flat Panel Tilt Mount The Flat Panel Tilt Mount is a quick disconnect mounting solution for flat panel displays. The mount features adjustability between 0 and 15 degrees
SEWING MACH E CABINET
 SEWING MACH E CABINET OWNER'S Model Number MANUAL 272.98200..49! Oak 272.98201.491 White ASSEMBLY PARTS LIST IMPORTANT: Read instructions before assembling. 98200-FC 98201-FC Notice to Customer: Before
ASSEMBLY ASSEMBLY. Step 3 Requires D, E
 φ Model No. 088-1328-8 Model No. 088-1328-8 Note: When using bolts and nuts to assemble the product, always use a flat washer between the frames and the bolt and/or nut. This will protect the parts from
ShorePort PWC Lift Instructions " x 138" Sandstone ShorePort " x 138" White ShorePort " x 138" Tan ShorePort
 ShorePort PWC Lift Instructions 00-8" x 8" Sandstone ShorePort 009-8" x 8" White ShorePort 090-8" x 8" Tan ShorePort....... - PUT SAFETY FIRST To avoid the risk of personal injury or death, study and fully
Assembly Instructions
 Assembly Instructions 10'x12' Aluminum Gazebo Item: L-GZ399PAL-B Our clear, easy-to-follow, step-by-step instructions will guide you through the project from start to finish. The final product will be
391 SERIES STIKSTALL TM SHOWER ENCLOSURE
 INSTALLATION INSTRUCTIONS 391 SERIES STIKSTALL TM SHOWER ENCLOSURE Copyright Alumax Bath Enclosures 1997. All rights reserved. LIMITED WARRANTY AND REMEDY ALUMAX BATH ENCLOSURES warrants to its dealers,
LAWN AND GARDEN GREENHOUSE
 MODEL# OGAL-66 OGrow Walk-in 6' x ' LAWN AND GARDEN GREENHOUSE With Heavy Duty Aluminium Frame Let'sGrow Together! Thank you for purchasing the OGROW greenhouse Follow the assembly and safety instructions
Dunkirk Grill Gazebo
 Dunkirk Grill Gazebo Item#: L-GZ326PST-2B Congratulations on your purchase of our SUNJOY Dunkirk Grill Gazebo. Our clear, easy to follow, step-by-step instructions will guide you through the assembly process
Leveling Foot RB210. Leg Extender RLT66
 Landing for Right & Left Turn R342 ITEMS # 0254049, 0254061, 0254072, 0254076, 0016567, 0254099, 0254110, 0054116, 0254117, 0254126, 0254140, 0254150, 0254156 CUSTOM ACCESS RAMP SYSTEM MODELS # R100, R242,
Models: PLAV70-UNL, PLAV70-UNLP. Installation and Assembly - Universal Articulating Swivel Double-Arm for 42" - 95" Plasma Screens
 Installation and Assembly - Universal Articulating Swivel Double-Arm for 42" - 95" Plasma Screens Models: PLAV70-UNL, PLAV70-UNLP Max UL Load Capacity: 200 lb (91 kg) 2300 White Oak Circle Aurora, Il 60502
Model: SS660-PT-R Stainless Steel Poly-Top Floor Scale Series. Installation, Set-Up and Operation Manual
 SCALE WORKS, INC. Model: SS660-PT-R Stainless Steel Poly-Top Floor Scale Series (Remote Junction Box) Installation, Set-Up and Operation Manual Cambridge Scale Works, Inc. P.O. Box 670 Honey Brook, PA.
Assembly Instructions
 Assembly Instructions ITEM#:L-GZ076PST-1A-4 Vineyard Gazebo IMPORTANT: Please read and follow all safety statements, warnings, assembly instructions, use & care directions, before attempting to assemble
Octagon Vinyl Gazebo Assembly Instructions
 Octagon Vinyl Gazebo Assembly Instructions For 10 & 12 Models Toll Free: 866.768.8465 Hours: 9-5 Monday-Friday EST www.homeplacestructures.com Package ships as shown revised 04/29/09 Vinyl Gazebo Assembly
PA1012 Pergola OWNER'S MANUAL. Please follow instructions. Suncast is not responsible for replacing parts damaged due to incorrect assembly.
 OWNER'S MANUAL PA1012 Pergola WARNING Repair or replace broken parts immediately. Suncast is not responsible for damage caused by weather or misuse. Avoid excess heat from any auxiliary source. This assembly
L.L.Bean. Wooden Slat Bed
 L.L.Bean Wooden Slat Bed Thank you for purchasing our Slat Bed. Assembly of this product requires A Phillips head screwdriver. We have found it helpful to have a second person present in at least one step
Hip Roof Canopy Instructions
 Hip Roof Canopy Instructions - PUT SAFETY FIRST. NOT COMPLYING WITH THE PROCEDURES AND PRECAUTIONS OUTLINED IN THIS MANUAL MAY RESULT IN PERSONAL INJURY AND WILL INVALIDATE THE WARRANTY.. Before attempting
6 Drawer Dresser. Style #: Lot: Date:
 Read all instructions before assembly and use. KEEP INSTRUCTIONS FOR FUTURE USE. ADULT ASSEMBLY REQUIRED Due to the presence of small parts during assembly, keep out of reach of children until assembly
200A FLB VERTICAL 22113V LIFT W/CHAIN DRIVE WINCH
 PG. 1 OF 11 PORTA-DOCK, INC. 200A FLB VERTICAL 22113V LIFT W/CHAIN DRIVE WINCH STEP 1. Separate and group like parts and fasteners together. Locate the winch side member with the longer upright tube and
Dorian Triple and Quad Instructions Installation Instructions
 Installation Instructions www.ergomart.com 888 40 00 STEP UNPACKING... Page STEP COLUMN... Page 7 STEP MOUNTS Free Standing Base... Page 4 Clamp Mount... Page 5 Thru Mount... Page 6 STEP 4 WORK SURFACE...
8' x 22' Cash Hut INSTALLATION INSTRUCTIONS
 PARTS IST J I G A A J I C F D E B B K H A A K H G A Posts w/ Feet (4pcs) J eft End Panels (Front & Back) [4'3"x7'8"] (2pcs) B 22' Peak Trusses (2pcs) K Right End Panels (Front & Back) C 8' Centre Truss
TREX REVEAL RAILING Installation Instructions
 TREX REVEAL RAILING NoteS:» Reveal railings are designed to be attached with posts installed at a clear span of 6' (.8 m) or 8' (.44 m).» If installing at exact span lengths of 6' (.8 m) or 8' (.44 m),
All Restoration Hardware bunk beds are designed to meet the highest safety standards and comply with all U.S. and Canadian Bunk Bed regulations.
 All Restoration Hardware bunk beds are designed to meet the highest safety standards and comply with all U.S. and Canadian Bunk Bed regulations. Page 1 of 13 Assembly Instructions Callum Storage Twin Bunk
394 SERIES STIKSTALL TM SHOWER ENCLOSURE
 INSTALLATION INSTRUCTIONS 394 SERIES STIKSTALL TM SHOWER ENCLOSURE Copyright Alumax Bath Enclosures 1997. All rights reserved. LIMITED WARRANTY AND REMEDY ALUMAX BATH ENCLOSURES warrants to its dealers,
SPACESAVER ITEM # , MODEL #9819WWMV, 9820CHMV Français p. 13 Español p. 25. ATTACH YOUR RECEIPT HERE Serial Number.
 ITEM #0290970, 0298971 SPACESAVER Style Selections is a registered trademark of L, LLC. All rights reserved. MODEL #9819WWMV, 9820CHMV rançais p. 13 Español p. 25 ATTACH YOUR RECEIPT HERE Serial Number
43107 Rhino Jerry Can Holder Rhino Jerry Can Holder - Horizontal
 Important: Please read these instructions carefully prior to installation. Check the contents of kit before commencing fitment and report any discrepancies. Clean the alloy tray prior to installation.
Folding Wood Adirondack Chair. Assembly Instructions. Item# S-DN096-C1
 Folding Wood Adirondack Chair Assembly Instructions Item# S-DN096-C1 ASSEMBLY INSTRUCTIONS Our clear, easy-to-follow, step-by-step instructions will guide you through the project from start to finish.
10' ROUND OFFSET WITH X BASE
 10' ROUND OFFSET WITH X BASE 08807249-1 8-48681-066-1 Thank you for your purchase Thank you for your purchase! We are pleased that you have chosen Sears for your outdoor furniture purchase. We hope that
C L A S S I C. Deluxe. Snow Thrower Cab. Assembly and Care Instructions
 C L A S S I C Deluxe Snow Thrower Cab Assembly and Care Instructions Deluxe Snow Thrower Cab Assembly and Care Instructions Before you begin please unpack the carton and check that you have all your parts.
GREENHOUSE 6'x8' ASSEMBLY INSTRUCTIONS. (Internal Dimensions) Overall Dimensions (Approx.) L 193 W 200 H cms 97.5" L 76" W 78.
 Overall Dimensions (Approx.) L 193 W 200 H cms 97.5 L 76 W 78.") ASSEMBLY INSTRUCTIONS GREENHOUSE 'x8' (Internal Dimensions) Overall Dimensions (Approx.) 7. L 9 W 00 H cms 97." L 7" W 78.8" H 0 IMPORTANT You must read these instructions carefully before you start to
ASSEMBLY INSTRUCTIONS GREENHOUSE 'x8' (Internal Dimensions) Overall Dimensions (Approx.) 7. L 9 W 00 H cms 97." L 7" W 78.8" H 0 IMPORTANT You must read these instructions carefully before you start to
STOP. 48" GT DOZER BLADE For Garden Tractors with 23" Tires. Operator's Manual. Model No Safety Assembly Operation Maintenance Parts
 Operator's Manual STOP 48" GT DOZER BLADE For Garden Tractors with 23" Tires DO NOT RETURN TO STORE For Missing Parts or Assembly Questions Call 1-866-76-8388 Model No. 486.24414 CAUTION: Before using
ARROW LINE DUAL SEWING CENTER
 ARROW LINE DUAL SEWING CENTER (Desk Only) Model Number: 272.98400A90 (Oak) 272,98401.490 (White) Assembly Instructions and Parts List IMPORTANT: Please read these instructions before assembling desk. Assemble
Models 2030 and 2040
 Models 2030 and 2040 Overview... 2 Tools Needed... 2 Hardware... 2 Assembly... 3-8 Installation... 9 Operation... 9 Maintenance... 10 Accessories... 10 Limited Warranty... 10 Document # 101290 0607 Printed
PFW 6851 Display Wall Mount, Turn & Tilt 80 kg INSTALLATION INSTRUCTIONS
 Display Wall Mount, Turn & Tilt 80 kg INSTALLATION INSTRUCTIONS 9531-007-Z00-01 Table of Contents Warning Statements 2 Parts List 3 Installation Tools 3 Wood Stud Installation 5 Concrete Surface Installation
Thank you for purchasing out product! *Please read these instructions and follow them step by step. *
 Page 1 of 7 AD17 AA DS 4 X 16 T12 Thank you for purchasing out product! *Please read these instructions and follow them step by step. * STEP 1. Slide two support posts (REF. # 24) into the two outside
STORM OUTDOOR TELEVISION MOUNT
 Model: TW-1 INSTRUCTION MANUAL STORM OUTDOOR TELEVISION MOUNT Tilting Wall Mount www.seura.com Thank you for selecting Séura s Outdoor Tilting Wall Mount for Storm. This product has been inspected and
rmoire Materials Hardware
 A rmoire No house ever has enough storage space, and I built this armoire to satisfy a couple of needs. Inside the armoire is a shelf large enough for the television. Under the shelf are six drawers that
Pergola PR100N1. Assembly Instructions. Systems Trading Corporation Customer service: (877)
") FABRIC Pergola PR00N Assembly Instructions Systems Trading Corporation Customer service: (8)82 82 of 20 Introduction Thank you for purchasing the Pergola PR00N. When properly assembled and maintained,
FABRIC Pergola PR00N Assembly Instructions Systems Trading Corporation Customer service: (8)82 82 of 20 Introduction Thank you for purchasing the Pergola PR00N. When properly assembled and maintained,
Installation Manual XRL Solar Rail System
 Installation Manual XRL Solar Rail System Solar Mounting Solutions June 2009 www.ironridge.com 2009 IronRidge, Inc. All Rights Reserved Version 1.0 2 XRL Solar Rail System Installation Guide Introduction
17MAY18 U.S. RACK, Inc Falcon Drive, Madera, CA
 17MAY18 U.S. RACK, Inc. - 2850 Falcon Drive, Madera, CA 93637-559-661-3050 INSTRUCTIONS for FIFTH WHEEL RACK Model 2010-4AD WARNING: Do NOT attempt to install or use this rack without following all instructions.
FOR PROFESSIONAL GARAGE DOOR INSTALLERS
 Composite Garage Doors Installation Instructions FOR PROFESSIONAL GARAGE DOOR INSTALLERS Tools required Screwdriver Claw Hammer Locking Pliers Power Drill Level with a 3/32" Drill Bit Utility Knife 9/16",
IMPORTANT!!! ASSEMBLY ASSEMBLY INSTRUCTIONS. (Internal Dimensions)
") ASSEMBLY ASSEMBLY INSTRUCTIONS (Internal Dimensions) Ent Spec Edition Ltr v-0- Overall dimensions including base: 7. L x 9 W x 0 H cms 97.5" L x 7" W x 8.7" H IMPORTANT!!! Please read these instructions
ASSEMBLY ASSEMBLY INSTRUCTIONS (Internal Dimensions) Ent Spec Edition Ltr v-0- Overall dimensions including base: 7. L x 9 W x 0 H cms 97.5" L x 7" W x 8.7" H IMPORTANT!!! Please read these instructions
3,500/4,500lb. Vertical Cable Feighner Lift
 3,500/4,500lb. Vertical Cable Feighner Lift CAUTION - PUT SAFETY FIRST 1. Before attempting to install or operate this lift, study and fully understand the proper operating procedures and safety precautions
ASSEMBLY INSTRUCTIONS for : Version 4
 ASSEMBLY INSTRUCTIONS for : Version 4 Hardware Pack 80080 Hardware List Hardware Pack Cont' (a) (j) Qty 4 - Qty 32-1/2" x 2-1/4" Button Head Bolt 5/16" Nylock Nut (b) (k) Qty 4 - Qty 4-1/2" Nylock Jam
Assembly Instructions 10 X 10 Aluminum Roof Support
 Assembly Instructions 10 X 10 Aluminum Roof Support Aluminum Roof Support Bolt Package 16-5/16 X 2 ¼ SS Bolt 24-5/16 X 1 SS Bolt 40-5/16 SS Nylon Lock Nuts 16-5/16 SS Flat Washers 28-4 ½ Wood Screws 36-1
Owner s Manual Capecod 10 x 12 Mural Hardtop Gazebo. Vendor Code: Product Code: D71 M18996 UPC Code: Date of purchase: / /
 Owner s Manual Capecod 0 x 2 Mural Hardtop Gazebo endor Code: 999-345052 roduct Code: D7 M8996 UC Code: 77283045052 Date of purchase: / / Table of Contents Safety Information...2 Warranty...3 What is Covered...3
8MAY15 U.S. Rack Inc Falcon Drive, Madera, CA
 8MAY15 U.S. Rack Inc. 2850 Falcon Drive, Madera, CA 93637 1-888-877-2257 INSTRUCTION for GALLEON OVERHEAD STAKE POCKET RACK WARNING: Do NOT attempt to install or use this rack without following all instructions.
Titan Series Awning Assembly and Installation Instructions
 Titan Series Awning Assembly and Installation Instructions Be sure to use safety glasses when assembling and installing the awning. Some metal parts may have sharp edges. Use work gloves to handle them.
Models 2230 and 2240
 Models 2230 and 2240 Overview... 2 Tools Needed... 2 Hardware...3 Assembly... 4-13 Installation... 14 Drawer Removal... 15 Operation... 15 Maintenance... 15 Accessories... 16 Limited Warranty... 16 Perform