Join Neck and Body Wednesday, January 16, :08 PM
|
|
|
- Justin Bell
- 6 years ago
- Views:
Transcription

1 ASL Breakdown Page 1 Join Neck and Body Wednesday, January 16, :08 PM Charles did the following steps to speed things up: Lightly sanded the top of the lower bout with an orbital sander. I wrote "mark side of top with pencil line just inside the top edge" - I assume that means to avoid sanding close to the edge. Sanded the front of the body to conform to the correct angle where the neck will join (see 1st picture). This angle is critical - the "Bermuda Triangle of lutherie." The correct angle is obtained when a straightedge sits on the fretboard and just hits the top of the bridge. The fretboard is 1/4" off the body and the bridge is 3/8". This is a 1/8" difference, so at the 12th fret, there should be 1/16" clearance. Said differently, the clearance from the front of the body (without the neck on) to the bridge is 1/8". The top, in front, has to be angled for more than 1/8" by a bit in order to accommodate the frets and the inevitable pulling on the lower bout by the bridge. The first picture shows the jig used to flatten the upper part of the body that will be under the fretboard and set it to the correct angle. Sealed the top with sealer (shellac, etc). This helps provide a crisp edge when routing for the bindings. It also makes it easier to remove tape without ripping fibers when the tape used to hold the bindings during gluing is removed. Covered the sound holes to keep shellac out of the guitar. Fiberboard cut from center to edge to make a cone and held up with foam rubber (or whatever) will work - be creative!


2 Note: all of our guitars came out with too little height at the bridge. So the 3/32 clearance may be too much by a tad. ASL Breakdown Page 2
 relative to")


3 ASL Breakdown Page 3 Jig for sanding upper part of the guitar to the angle needed for the neck. This angle accounts for the height of the fretboard (with frets installed) relative to the height of the bridge (without saddle). After sanding, the upper bout above the sound hole will have the proper angle for installing the neck along the plane defined by the sanded part of the top. Another view showing this relationship. Prepare the neck angle on the body. Using the jig, sand the area where the fret board will overhang the body. Place the back of the jig approximately where the bridge will be. Sand vigorously, using the pencil test to make sure the entire area is in the plane described by the jig. Upper bout sanding jig Test for correct angle. When correct, the straightedge will be flush with the area sanded (above) and will be 1/8" above the top in the bridge area. Check the sanded area to see that all lies in the same plane.


4 ASL Breakdown Page 4 Determining the angle to be sanded into the heel block. The block must join the body in a way that continues the angle set on the top with the sanding jig down the entire length of the neck. NOTE: Charles is working on a simpler way to set the heel block angle and its joint with the body as we speak. The method may not be the same tomorrow!! Using the angle gauge to register the angle between the sides and neck (as given by the angle set into the top). Heel block angle sander Jig for sanding the heel block to the proper angle. It consists of two boards joined by a piano hinge, a 1/4" wood strip to locate the neck using the truss rod channel, and a bolt and wing nuts to set and hold and angle between the two boards. Setting the angle of the jig based on the angle gauge.


5 ASL Breakdown Page 5 Sanding the heel block to the proper angle. Make sure you check at least once that the gauge has not shifted between the time the angle is first determined and this step. Routing out the end of the heel block. To make further sanding and joining of the block easier, remove most of the material in the middle. Leave two rails, one on either side of the block about 1/2" to 9/16" wide. These will be easy to shape and sufficient to support the neck against the body. Routing is done by hand, as none of the dimensions is critical other than the obvious: the rails should be about 5/8" wide, and their faces must not be cut at all. The tool is a Dremel with an 1/8" bit. Remember, the neck is not glued to the body - it's bolted on. A tight fit makes this or breaks it. Checking the routed heel block against the body.


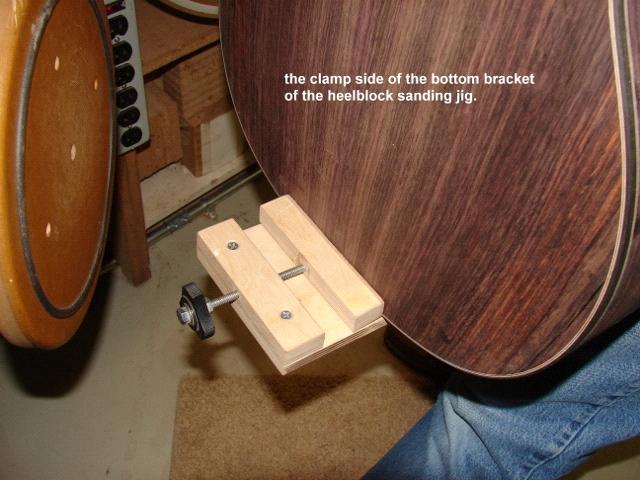
6 ASL Breakdown Page 6 Part of jig for sanding the heel block to fit along the curve of the body where the neck joins. This means sanding the faces of the two channels just formed with the router so that they conform to the contour of the body at the neck juncture. Body/heel block joint sander Next part of sanding jig: a sound hole cover with a tenon that fits into a slot on the upright part of the jig used for the actual sanding. Note the Plexiglas extension from this board that fits into the slot in the jig that was attached to the butt of the guitar in the previous photo. Don't round off the rim of the sound hole until the neck is fitted. As you see, this jig uses the sound hole to position the jig, so it shouldn't be contoured yet. The side of the jig facing the back of the guitar includes two 1/4" registration pins to keep the neck aligned.


7 ASL Breakdown Page 7 Completed heel block sanding setup with neck clamped to the upright part of the jig. Guitar is held to the side of the workbench with suction. Sandpaper is placed between the body of the guitar and the heel block. Sanding action: the paper is pulled down and to the right while the jig is allowed to rest on the guitar body. The left hand holds the jig in place in the vertical plane so that it follows the line set by the earlier sanding of the guitar top. The upright portion of the jig is then lifted with the left hand, allowing the right hand to feed the sand paper back under the jig to prepare for another pass. This process is a bit slow and tedious, but it allows the precise contour of the guitar body at the neck juncture to be transferred to the underside of the heel block. Note that the sand paper must be pulled out and down as it comes across the body. If the sandpaper will to be pulled in an upward direction, it would bevel the edge of the heel block away from its joint with the body. This would be very bad.


8 ASL Breakdown Page 8

9 ASL Breakdown Page 9


10 ASL Breakdown Page 10 Checking the heel block/body joint for tightness on both sides. Neck Install Installing the neck: begin by cutting a small channel in the top and binding/purflings so as to reveal the truss rod slot in the internal head block. The top material in this area will later be removed entirely, so the cut is not critical. Do be sure to reveal the entire truss rod slot, as the truss rod end exposed from the neck will be used to locate the points where the neck and body a re joined. NOTE: by this point, any sanding on the top or back should be done with a soft block and #120 grit. Tools at this step: knife, Japanese saw, 1/4" chisel.


11 ASL Breakdown Page 11 Completed slot. Neck symmetry checker With the neck loosely joined by the truss rod end inserted into the head block slot, check for symmetry. This measuring stick locates the center of the neck (cauls tighten against the sides of the neck). The bottom of the stick contains a center mark. The center line of the guitar at the butt end should be no more than 1/8" from the mark on the measuring stick. Now, locate the positions on the inside of the heel block where it will be bolted to the body. The two small steel rods have pointy ends. (Could perhaps use appropriate brad-point drill bits if you have them.)

12 ASL Breakdown Page 12


13 ASL Breakdown Page 13 The trick to working on the inside of a guitar is to stand it on its side. With the pointy rods inserted from the inside and with the neck located as before and held firmly, tap the pointy rods to pri ck two points on the inside of the heel block.


14 ASL Breakdown Page 14 The two points located above will be the centers of two threaded inserts that will receive the bolts that hold the neck on. These inserts must be placed perpendicular to the plane described by the rails on either side of the heel block. The dial device is a level, allowing the placement of these rails in a precise perpendicular position relative to mother Earth. Be sure to level to the side of the heel block, not the bottom of the fretboard. Threaded inserts. These are meant to screw into any grain except end grain. Unfortunately, here we will screw them into end grain. These inserts come with a hex tool that allows them to be screwed in easily. The neck bolts that will screw into these measure 5/16". Drilling the holes for the threaded inserts. The drill has a level indicator on it so that the hole can be placed relatively precisely. Here, blue tape is used in lieu of a depth stop.


15 ASL Breakdown Page 15 Thick super glue holds the inserts in place. After inserting a reasonable dab of glue, swirl it around in the hole with a Q -tip to make sure the sides of the hole are coated. Insert the inserts with the special hex tool. Finish off the inserts with a few squirts of thin super glue around the edges. This helps keep end grain fibers from being fu rther torn up.


16 ASL Breakdown Page 16 It may be necessary to use a tap and die set to ream out the inserts and check the bolts so that they match. I suspect the ne ed for this arises if too much glue gets in and fouls the thread of the inserts. The inserts are short, so a standard tap has to be ground off at the tip. Special tool made by Charles from a cheap socket driver that can be found at Sears near the hardware checkout counter. It allows easy handling of a hex shaft inside the guitar body to screw in and unscrew the neck. When tightening the neck bolts, first press the fretboard against the top of the guitar and maintain pressure while tightening the bolts. Drilling the recess channels for the tuning pegs. The fixture should look familiar. Be sure to support the peghead as much as possible and don't let the neck ride up on the support fixture. Insert the fretboard extension shim and mask the bottom of the fretboard around it. Be sure the truss rod will still turn.


17 ASL Breakdown Page 17 Spread thick super glue over the exposed fretboard underside. Fretboard extension routing Fixture for routing out the top with a plunge router. Attach the body to the suction jig. Make sure the fixture is aligned on the center of the body.


18 ASL Breakdown Page 18 Clamp the routing fixture to the body. Keep the clamp out of the way of the area to be routed. Clamp at the edges where there's lining to support the top. Plunge router. Note stops on lower left, set to take out material in 3 steps. The ultimate routing depth is not critical. It just has to be deep enough to ensure that the neck extension block is not proud of the top of the guitar. Hole guide for fretboard extension Guide for drilling holes for the neck extension block. When installing the neck, it may be necessary to use a circular file to make the hole a bit larger in one direction or another so that the bolts have some wiggle room to line up with the fretboard extension shim.

19 ASL Breakdown Page 19 Creating a heel cap. Determine center line. Project the back plane out to the front of the heel using a flexible ruler. Mark the point at the tip of the heel and draw a line to it from the bottom of the binding, just where it meets the purfling. Cut just proud of this line with the Japanese saw.


20 ASL Breakdown Page 20 As with the heel block joint with the body, draw a rail around the heel cap and chisel out the interior. As before, sand the heel cap rails level, checking frequently against the body until the heel cap is in position, meeting the body at the edge of the back purflings and projecting the back plane forward through the tip of the heel cap. Construct a heel cap cover out of ebony. Sand the back edge so it butts tightly up against the body. (Not shown )
21 Me and my guitar, now with neck bolted on. ASL Breakdown Page 21
Finish Neck and Fretboard Wednesday, January 16, :36 PM
 ASL Breakdown Page 1 Finish Neck and Fretboard Wednesday, January 16, 2013 9:36 PM Layer on the fret board, making sure registration pins are in place and everything lays flat. The 3/16" aluminum nutsurrogate
Fretboard Wednesday, January 16, :36 PM
 ASL Breakdown Page 1 Fretboard Wednesday, January 16, 2013 9:36 PM - - To prepare the fretboard for cutting fret slots: True one edge of the fretboard blank on the jointer. True one of the other edges
Rim Wednesday, January 16, :35 PM
 ASL Breakdown Page 1 Rim Wednesday, January 16, 2013 9:35 PM Similar to the plates, begin with the side blanks, determining the "show face" and taper angle. Then make the taper cut. The diagram shows these
BUILDING MARTIN-STYLE ACOUSTIC GUITAR KITS 41
 Braces To Be Tucked Into Lining The braces in the photo at right with circles at the ends are those that will be notched into the lining of the guitar. In this procedure, the end of the brace is trimmed
Build Table of Contents. 1. Introduction
 Build Table of Contents 1. Introduction... 1-2 2. A Brief Review of Assembly Systems... 2-2 2.1. Free Assembly Methods... 2-3 2.2. Constrained Assembly Methods... 2-4 3. Our Approach to Building... 3-2
Traditional Undermount: S Method (Undermount):
:") TOOLS REQUIRED 15.1 TOOLS REQUIRED The installation of Corian shape product must be a precise and exacting process to ensure that a good fit is always created. Using the correct tools is essential. In
TOOLS REQUIRED 15.1 TOOLS REQUIRED The installation of Corian shape product must be a precise and exacting process to ensure that a good fit is always created. Using the correct tools is essential. In
BUILDING A STORM DOOR
 BUILDING A STORM DOOR BY NEAL BARRETT Illustrations by George Retseck If you're in the market for a storm door, you probably know that there are many styles and models available. However, most of them
Owner s Manual. Bass-Guitar Kit J-Style
 Owner s Manual Bass-Guitar Kit J-Style Contents Introduction... 3 Body finish... 4 Neck finish... 4 Assembling of tuners... 5 Neck... 6 Wiring... 6 Bridge assembly... 8 Strap buttons... 8 Setting up...
Assembly Manual - Flamenco Guitar Kit
 Assembly Manual - Flamenco Guitar Kit Index Contents (pg. 3) Soundboard assembly (pg. 4) Neck to top assembly (pg. 5) Preparation of the sides (pg. 6) Preparation of the back (pg. 7) Body assembly (pg.
Solo AD Style DIY Acoustic Guitar Kit
 Solo AD Style DIY Acoustic Guitar Kit Assembly Manual ADK-1 V 2.0 Copyright 2017 Solo Music Gear. All rights reserved Show Off Your Custom Built Guitar! When you have your guitar finished, please take
U-bass Kit Assembly Instructions
 U-bass Kit Assembly Instructions Compiled by playubass.com This guide is built from the instructions found here: http://kalabrand.com/ubass-kit/index.html Tools Needed 5/8 (16 mm) Wrench 7/16 (~11 mm)
Adjustable Box Joint Jig. Richard Hicks on 8/24/2015. Box or Finger Joints
 Adjustable Box Joint Jig Richard Hicks on 8/24/2015 Box or Finger Joints Adjustable Box Joint Jig Richard Hicks on 8/24/2015 Box Joints are also called Finger Joints Because they have interlocking fingers
WOODWORKING GUIDE: BASIC JOINERY
 WOODWORKING GUIDE: BASIC JOINERY Close isn't really good enough. A perfect fit is what counts. When building furniture, there are many ways to construct joints. The simplest are those that use mechanical
About.com :
 http://woodworking.about.com/gi/dynamic/offsite.htm?sit...//www.popularwoodworking.com/features/fea.asp%3fid=1088 (1 of 8)1/28/2004 12:05:01 AM Modern Storage Tower The last thing I want to do when starting
CAL-K1 Self-build guitar kit UK Version 1.0
 CAL-K1 Self-build guitar kit 174.460UK Version 1.0 Thank you for buying the CAL-K1 kit. All the wood, hardware and electrical components of a Chord CAL93 guitar are contained in this package. Please read
Woodline USA Woodline Spacer Fence System
 Woodline USA Woodline Spacer Fence System MADE IN THE USA Includes: (1) ¼ Spacer Fence (1) 3/8 Spacer Fence (1) ½ Spacer Fence (1) Hardware Package (1) 3 Piece Brass bar set (2) Setup Blocks Visit Us Online
router table sled 2012 August Home Publishing Co.
 router table sled 2012 August Home Publishing Co. best-built jigs & fixtures router Table Sled Packed with features, this sled makes it easy to rout perfect-fitting joints. A router table is a great tool
Metroboard Pulley Replacement Procedure
 Metroboard Pulley Replacement Procedure 1) Remove the two transmission cover screws (1/8 allen driver). Then remove the transmission cover. Note there is a split lock washer and flat washer as well, so
Silverware Chest Plan
 Silverware Chest Plan 05L14.01 Introduction 1. Measure the space required for your cutlery before beginning this project to be sure that it will fit in the drawers and top compartment. The best way to
Dovetail Saw Guides. Figure 1: Dovetail saw guide, exploded view. Guide Block. UHMW Friction Pad. Sliding Clamp. Rare-Earth Magnet
 Dovetail Saw Guides U.S. Pat. No. 6,607,016 Dovetail joints have traditionally been the hallmark of a cabinetmaker who had acquired an expert level of skill. They are also a mark of quality and attention
Essential BOX JOINT JIG
 Essential BOX JOINT JIG Home in on precise finger joints with this table saw sled. By Ken Burton The box (or finger) joint is a remarkably strong, interlocking corner joint that can be quickly made on
Copyright 2007 MLCS 1
 Copyright 2007 MLCS 1 REFERENCE GUIDE and SPECIFICATIONS: Edge Guides: This 12 Dovetail Template comes complete with 2 Edge Guide Sets one set for Half Blind and one set for Rabbeted Half Blind Dovetails.
Dresser. Materials & Tools FEATURING FORMALDEHYDE-FREE TECHNOLOGY. Free Plans to build a Dresser
 Free Plans to build a Dresser Materials & Tools Materials: 1-1/4 pocket hole screws 1-1/4 brad nails 3 sets of 18 drawer slides Drawer pulls Edge banding, optional Wood glue Sandpaper (100, 150, 220 grits)
The Q Frame PROJECT. a picture frame with secrets created exclusively for the Router Forum
 The Q Frame PROJECT a picture frame with secrets created exclusively for the Router Forum 007 OR RELEASE FPLANS APPROVED The Q Frame: Project Overview LIST OF MATERIALS Frame Sides & Face 3/4 x 5 1/2 x
This is a solid wood cabinet. The only plywood used is for the back and drawer bottoms.
 Sideboard Sideboard Overview: This project requires basic woodworking skills and access to woodworking machines. Woodworking machines have sharp cutting edges and are NOT forgiving. You should be properly
Instructables Butcher Block Top
 Instructables Butcher Block Top Project Overview: This project requires basic woodworking skills and access to woodworking machines. Woodworking machines have sharp cutting edges and are NOT forgiving.
Agricultural Mechanics and Technology Power Tool Safety Rules
 Agricultural Mechanics and Technology Power Tool Safety Rules Name: BAND SAW Use: Cutting curves, circles and irregular shapes. 1. Use clean SHARP blades. 2. The teeth should always point DOWN. 3. Adjust
CUSTOM SHUTTERS IN-A-BOX
 CUSTOM SHUTTERS IN-A-BOX SHUTTER ASSEMBLE INSTRUCTIONS & INSTALLATION INSTRUCTIONS 1. Inspect the contents of your package. Do not discard the shutter packaging box until you have started painting your
Build your own Drawer unit. D3 / D4
 Page1 Build your own Drawer unit. D3 / D4 1: Introduction. This guide will give you the plans, materials and how to information to build your own drawer unit. The dimensions given will fit a D3 or D4,
Section # /2" x 1 1/2" x 20" /4" x 15 3/4" x 82 1/2" /4" x 1 5/8" x 82 1/2"
 Hardware & Miscellaneous Items: A 2 3 1/2" chest handles B 7 3" T-hinges and screws C 4 1/4" T nuts D 4 1/4" x 2 1/2" Carage bolts E 2 1/4" x 2" Barrel Bolts F 2 1" x 5' Straps G 8 1/4" 3 1/2" Carage Bolts
Klamp Trak. Instructions (39052)
") Klamp Trak TM Instructions (39052) ITEM# KKS1020 - Klamp Trak TM Getting Started There are three main methods for installing Klamp Trak in your workshop. In all three methods, your goal will be to construct
Klamp Trak TM Instructions (39052) ITEM# KKS1020 - Klamp Trak TM Getting Started There are three main methods for installing Klamp Trak in your workshop. In all three methods, your goal will be to construct
15 Dovetail Jig. Instruction Manual. Part # 3452
 15 Dovetail Jig Instruction Manual Part # 3452 CAUTION: Please read, understand, and follow all manufacturers instructions, guidelines and owners manuals that come with your power tools. Peachtree Woodworking
Piper Cherokee /3 scale. Construction Manual
 Piper Cherokee 140 1/3 scale Construction Manual STAB CONSTRUCTION 1. Remove foam cores from cradle and place on flat surface. Inspect pieces before you epoxy halves together making sure leading and trailing
Project 11355EZ: Wall Cabinet with Louvered Doors and Shelf
 Project 11355EZ: Wall Cabinet with Louvered Doors and Shelf This Early American style cabinet will look good in any room, although it seems particularly well suited for the kitchen or bathroom. To make
Grade 11 Woods Lift Lid Coffee Table. Based on Under the big Top from Popular Mechanics Website
 Grade 11 Woods Lift Lid Coffee Table Based on Under the big Top from Popular Mechanics Website TABLE TOP 1. Select enough lumber to construct a top that is between 22 ½ and 24 wide after jointing. Ensure
129 KITCHEN BASE CABINET 480
 129 KITCHEN BASE CABINET 480 There are two sorts of kitchen cabinets: base cabinets, which sit on the floor, and wall cabinets. Base cabinets provide both storage space and work surfaces. They often house
Masterpiece Module Kits N T-trak Module Kit Assembly Instructions
 Masterpiece Module Kits N T-trak Module Kit Assembly Instructions For tips, watch Instructional Video at http://www.youtube.com/watch?v=fklebffclau Tools Required flat, sturdy work surface Quality grade
Soprano Ukulele Kit #5347 Assembly Instructions
 Soprano Ukulele Kit #5347 Assembly Instructions Soprano Ukulele Kit Assembly Instructions Table of contents Welcome to ukulele building! Getting started.................................... 1 Kit parts
Electric Ukulele. Plans
 Electric Ukulele Plans Build a tenor electric ukulele! Daniel Hulbert 2014 CircuitsAndStrings.wordpress.com 2 Parts and Supplies: Two 3/4 by 5 by 12 inch (19 mm x 127 mm x 305 mm) pieces of wood for the
SINKS AND LAVATORIES. Steps to completion: These items are essential for installing all sinks:
 DUPONT CORIAN SOLID SURFACE FABRICATION/INSTALLATION FUNDAMENTALS NA/ENGLISH SINKS AND LAVATORIES INTRODUCTION This bulletin discusses installing DuPont Corian solid surface sinks and lavatories. OVERVIEW
F-F-Fiddle Assembly Instructions
 F-F-Fiddle Assembly Instructions Bout Bridge Neck Machine Heads/Tuners Truss Rod Strings An open-source FFF 3d-printable electric violin. 1. Assemble materials 5 3 8 1 9,10, 11 7 4 2 6 PARTS 1. Bout part
Electric Guitar Kit DC Style electric guitar kit
 Electric Guitar Kit DC Style electric guitar kit user manual Musikhaus Thomann Thomann GmbH Hans-Thomann-Straße 1 96138 Burgebrach Germany Telephone: +49 (0) 9546 9223-0 E-mail: info@thomann.de Internet:
Build a Stout Workbench
 Build a Stout Workbench Tail vise is at the heart of this versatile bench by chris gochnour I ve done a fair amount of handplaning during my 32 years as a professional furniture maker, and I ve found that
Corner Cupboard. This space-saving piece enhances any room 46 FINE WOODWORKING
 Corner Cupboard This space-saving piece enhances any room BY G A R R E T T H A C K On every trip to the Shelburne Museum near Burlington, Vt., I visit a favorite object a small hanging corner cabinet.
BUILDING A SELMER MACCAFERRI GUITAR
 BUILDING A SELMER MACCAFERRI GUITAR A step-by-step guide to building a laminated body Selmer-Maccaferri guitar Michael Collins The Heel The heel should now be prepared to be glued to the neck shaft. Using
Traditional glass-pane and wood-muntin doors highlight this free-standing piece.
 Bookcase Traditional glass-pane and wood-muntin doors highlight this free-standing piece. As the saying goes, there's nothing like good books. But they can present some storage problems--especially if
Router Table-Mate. Everything you'd want in a router table for just $50.
 Router Table-Mate Everything you'd want in a router table for just $50. Commercially made router tables are everywhere these days. Some of them come with more gizmos and gadgets than a 59 Edsel. By the
How to install backchecks
 How to install backchecks Note: All pictures can be enlarged for better clarification. Revision 7 8/2009 Backchecks wear out in a piano much like brake pads in an automobile. While wear is a valid reason
Owner s Manual e-guitar Kit sg-style Harley Benton E-Guitar Kit SG-Style
 Owner s Manual E-Guitar Kit SG-Style Contents Introduction... 3 Body finish... 4 Neck finish... 4 Assembling of tuners... 5 Neck... 6 Wiring... 7 Bridge assembly... 10 Strap buttons... 11 Setting up...
ARTS AND CRAFTS CHAIR
 ARTS AND CRAFTS CHAIR 491 MATERIALS LIST--DINING CHAIR Key No. Size and description (use) A 2 1-3/4 x 1-3/4 x 16-1/4'' oak (front leg) B 2 1-3/4 x 3-3/4 x 40-1/2'' oak (rear leg) C 1 1-3/4 x 3-3/16 x 15''
Hinge Mortising Jig. One of the make it or break it parts of building a. 6 ShopNotes No. 74
 Hinge Mortising Jig A Mortise for a Hinge. Quick, clean, and accurate that s the only way to describe the mortise you get with a trim router and this hinge mortising jig. One of the make it or break it
Installation for Full Size Polaris Ranger Crew Doors
 Installation for Full Size Polaris Ranger Crew Doors Order of Installation: Heater Doors Wiper on to Windshield Windshield Top & Back Panel Note: Most of the steps in these instructions need to be repeated
Assembly instructions for Classic Cantabile DIY Ukulele
 Assembly instructions for Classic Cantabile DIY Ukulele ArtNr.: 00036326 Sopranukulele / 00036327 Konzertukulele Musikhaus Kirstein GmbH Bernbeurener Strasse 11 D-86956 Schongau / Germany Tel.: 0049-8861-909494-0
Triple-O Acoustic Guitar Kit #5297 Assembly Instructions
 Triple-O Acoustic Guitar Kit #5297 Assembly Instructions www. Table of contents Getting started Welcome to guitar building!... 2 Recommended tools and supplies... 2 Kit parts list... 3 Side Assembly Assembling
Extendable Large Dovetail Jig
 Extendable Large Dovetail Jig Instruction Manual Part # 3458 CAUTION: Please read, understand, and follow all manufacturers instructions, guidelines and owners manuals that come with your power tools.
TOOLS You will need some tools. Mostly, they re tools you probably have around the house, anyway.
 INTRODUCTION Congratulations on your purchase of your RAS Kit. While it can be a great challenge for an inexperienced builder, with care and attention to details, it can produce an excellent instrument
Design Update /29/2006
 Design Update 3 -- 8/29/2006 Since our first design we ve made many minor changes to key areas of the prayer bench, especially the folding hinge geometry. The general design remains the same, though the
Dreadnought Acoustic Guitar Kit #5295 Assembly Instructions stewmac.com
 Dreadnought Acoustic Guitar Kit #5295 Assembly Instructions Table of contents Getting started Welcome to guitar building!... 2 Recommended tools and supplies... 2 Kit parts list... 3 Side Assembly Assembling
Demilune 4. Apron Joinery. Curved Apron Tenon. Bridle Joint Legs. Bridle Joint Front Apron
 Demilune Email 4 Apron Joinery There are two types of joints used in connecting the aprons and legs. The rear legs use conventional mortise and tenon joints, while the front legs use the less conventional
ALWAYS disconnect the power source before using the Betterley UNA-GAUGE with any power tool or machine!
 Betterley UNA-GAUGE Thank you for purchasing the Betterley UNA-GAUGE. You will find the UNA-GAUGE provides quick adjustments and alignment of most tools and machinery with extreme accuracy. The versatile
786 Kurka Jig Owners Manual
 7 Kurka Jig Owners Manual Please Read Carefully! 7 Parts List Parts listed in this box are shown in photos in the instructions. Part Description Quantity 7B Jig Plate Set, pieces..................... Six
3/8-16 x 3/4 cap screw. 3/8-16 hex nut for above screws. 1/4-20 x 3/4 socket cap screw. 3/16 short arm hex key (not to scale)
") Super Slab Roller 24, 30 and 36 models Worktable Assembly Directions P.O. Box 89 Cheney, WA 99004 USA 509.235.9200/800.23.7896 Fax: 509.235.9203 www.northstarequipment.com Revised September, 2006. All
Super Slab Roller 24, 30 and 36 models Worktable Assembly Directions P.O. Box 89 Cheney, WA 99004 USA 509.235.9200/800.23.7896 Fax: 509.235.9203 www.northstarequipment.com Revised September, 2006. All
StewMac. Sheet #i-5351 Updated 11/17 UKULELE KIT. Assembly Instructions
 StewMac Sheet #i-5351 Updated 11/17 UKULELE KIT Assembly Instructions Table of contents Tools and supplies... 2 Parts list... 3 Brace the top and back.... 4 Make the body mold... 6 Assemble the body...
Slicing Jig For Pen Inlays
 Slicing Jig For Pen Inlays By Randall Smith (randyrls) May 2008 This article has been downloaded from the library of the International Association of Penturners. www.penturners.org You are welcome to reproduce
Flush Trimmer Jig By Santanu Lahiri
 Flush Trimmer Jig By Santanu Lahiri I found this jig in a book published by the Fine Woodworking people: Ingenious Jigs And Shop Accessories, publisher Taunton Press, ISBN# 1-56158-296-4. The Author is
Router bit cabinet August Home Publishing Co.
 Router bit cabinet 2011 ugust Home Publishing Co. Feature Project Router Bit Cabinet Dovetail keys at the corners reinforce the joints to make a stronger cabinet. Plus, a clear, plastic door panel lets
More Storage Space Under Yacht Bed
 More Storage Space Under Yacht Bed Open up storage space under your bed! Convert your bed deck to a Lifting Hatch with Gas Spring assist! Many bed decks on boats and RV s have two or three pieces of plywood
Copyright 2010 Springbok Publishing All Rights Reserved- Page 1
 Copyright 2010 Springbok Publishing All Rights Reserved- www.woodensaddlerackplans.com Page 1 Legal Information All contents copyright 2010 by Springbok Publishing. All rights reserved. No part of this
Making Simple Bookbinding Equipment
 Tony Firman 20 1 2 19 Notes Tony Firman Tony Firman Bookbinding 18 3 : 2012 Tony Firman Bookbinding P.O. Box 507 Haslet, TX 76052 www.tonyfirmanbookbinding.com 4. When all the tapes have been pinned in
WOOD COUNTERTOP INSTALLATION INSTRUCTIONS
 1209 Logan Circle, Atlanta, Georgia 30318 www.craft-art.com (404)352-5625 WOOD COUNTERTOP INSTALLATION INSTRUCTIONS Required Tools and Supplies Cordless Drill Belt Sander with 60 and 80 grit belts. Shur-form
How-to-Install. Laminate Countertops and Sheet Laminate. FREE brochure Reverso en español
 FREE brochure Reverso en español How-to-Install Laminate Countertops and Easy to install instructions provided inside Multiple colors available for unique design options Durable and easy to care for Accessory
Framework joints FABRICATION - WOOD JOINTS. Corner joints. Tee joints. Worksheet 15a. Cable Educational Ltd
 FABRICATION - WOOD JOINTS The word: fabricate means to join together. Most wooden products are held together with adhesive. Adhesive works very well when the edge of a piece of wood is being glued to the
Flamingo. That s what I looked
 Plans N O W w w w. P l a n s N O W. c o m flip-seat Storage Bench Flamingo. That s what I looked like as I stood in the doorway perched on one leg, with my other foot raised so that I could untie the laces
Chain Drive Vise. Installation Instructions. (revised 05/04/2016)
") Chain Drive Vise Installation Instructions (revised 05/04/2016) Lie-Nielsen Chain Drive Vise Instructions Table of Contents page About Your Chain Drive Vise 3 Parts List 4 Exploded Parts Diagram 5 step
Chain Drive Vise Installation Instructions (revised 05/04/2016) Lie-Nielsen Chain Drive Vise Instructions Table of Contents page About Your Chain Drive Vise 3 Parts List 4 Exploded Parts Diagram 5 step
Wagon Vise Retrofit Installation Instructions. American Craft Woodworks. Wagon Vise
 Wagon Vise Retrofit Installation Instructions American Craft Woodworks Wagon Vise Wagon Vise Retrofit Installation Instructions 2 Retrofit Installation Instructions Before you get started, please read
Quick-Release Sliding Tail Vise 05G30.01
 Quick-Release Sliding Tail Vise 05G30.01 U.S. Des. Pat. No. D671,812 U.S. Pat. No. 9,050,710 Introduction The Veritas Quick-Release Sliding Tail Vise is a reworked version of the well-known tail vise that
Installing your new Bevella Top. L Shaped Countertop with Joints No Finished Ends (Fits Between Four Walls)
") Installing your new Bevella Top L Shaped Countertop with Joints No Finished Ends (Fits Between Four Walls) Bevella RTI Countertops are engineered and manufactured to the highest quality standards, built
Installing your new Bevella Top L Shaped Countertop with Joints No Finished Ends (Fits Between Four Walls) Bevella RTI Countertops are engineered and manufactured to the highest quality standards, built
Step-by-Step Instructions for Making the Wall-hung Bookcase
 Step-by-Step Instructions for Making the Wall-hung Bookcase When a piece of furniture has an air and look of simplicity, you can be sure that it deftly conceals the complexity of its making. I wanted this
EXPRESS ASSEMBLY MANUAL SECTION 3 F5-RG/FT WING ASSEMBLY. Procedure 3.155A WING CLOSE-OUT PROCEDURES
 Procedure 3.155A WING CLOSE-OUT PROCEDURES In this procedure The lower wing skin will be bonded to the upper wing For this procedure, the following parts will be required: Part Number Description Qty 111-11-060-01
Installation Guide. Pionite Decorative Surfaces One Pionite Road, Auburn, Maine PIONITE ( )
") Installation Guide A Subsidiary of Panolam Surface Systems SMPBRO00-012 6/14 Pionite decorative laminates are designed for finished interior surfaces which require high impact, wear and stain resistance
Installation Guide A Subsidiary of Panolam Surface Systems SMPBRO00-012 6/14 Pionite decorative laminates are designed for finished interior surfaces which require high impact, wear and stain resistance
3Insert the second rod no. 4
 Yamato: Step-by-step 37 The stern block and searchlight control towers a b c d e f Recommended tools and materials Wood glue Sandpaper (no. 800 grain) Metal file Putty Craft knife For metal: Super Glue
DIY Wine Storage Cabinet
 DIY Wine Storage Cabinet ADDICTED2DIY.COM *Before beginning this project, please read through all of the plans and the blog post. When building this project, be sure to measure your wood and cut to fit.
D. Drill Bolt Holes Through Topper Shell and Bed Rails
 A. Check Mounting Kit Check to make sure that all of the following items are included in the mounting kit. Call 515-272-4372 if you need to obtain a part from BrandFX. Double-stick tape (1 roll) White
This manual will aid in the assembly of the FireBall V90 and FireBall X90. The assembly of both machines will be identical, unless specified.
 This manual will aid in the assembly of the FireBall V90 and FireBall X90. The assembly of both machines will be identical, unless specified. Step #1 Lay all parts out to verify quantities. (2) 2 x 25-1/4
Assembly Instructions 10 X 10 Aluminum Frame Building
 Assembly Instructions 10 X 10 Aluminum Frame Building 27 97 9 8 47 36 74 52 10 10 X 10 Square Building W/ Dome Includes: The Steel Entry Door with a Dead Bolt Lock assembly and Aluminum Door Frame. Metal
Plan #1 Wooden hinge, single action
 Plan #1 Wooden hinge, single action There are two types of wooden hinges, a single action hinge (that is in effect a finger joint with a pin through it) and a double action hinge which has two pins. The
SwingSafe Swing-Away Mailbox Support Diagram
 SwingSafe Swing-Away Mailbox Support Diagram Wood Mounting Plates Top Arm (B) Muffler Clamps (A) Carriage Bolts and Nuts Bottom Arm 4-Foot U-Channel Post USPS Recommended 42-44 Height Ground Slope Hex
DIY ALIGNMENT GAGES. Next cut the aluminum to length. o Cut 2 pieces of the 1 in sq. tube: One pc 19 inches long One pc 12 inches long
 DIY ALIGNMENT GAGES If you thrash your Corvette around the track like I do, then frequent alignments are the norm for you. Costs vary, but $130 or more is what you usually face. This DIY article will show
Making a snap lid box By Jeffrey A Lavine
 Making a snap lid box By Jeffrey A Lavine Some call them boxes, some call them lidded bowls, others call them vessels or containers but whatever you call them they are both enjoyable and a challenge to
DAKOTA OCTAVE MANDOLIN KIT and MANDOCELLO KIT
 DAKOTA OCTAVE MANDOLIN KIT and MANDOCELLO KIT MUSICMAKER S KITS, INC PO Box 2117 Stillwater, MN 55082 651-439-9120 harpkit.com WOOD PARTS: DAKOTA OCTAVE MANDOLIN KIT A - Neck B - Fretboard C - Heel Block
StewMac. Sheet #i-5371 Updated 11/18 PREMIUM SOLID-WOOD UKULELE KIT. Assembly Instructions
 StewMac Sheet #i-5371 Updated 11/18 PREMIUM SOLID-WOOD UKULELE KIT Assembly Instructions Table of contents Tools and supplies... 2 Parts list... 3 Installing the rosette... 4 Brace the top and back....
Floating-Top Table. Creative joinery adds spark to this versatile piece
 Floating-Top Table Creative joinery adds spark to this versatile piece By Michael Pekovich 28 FINE woodworking This is one of those projects that almost wasn t. Rachel, my wife, had asked for a small,
Chapter Four, Fitting out the Shell
 Chapter Four Fitting out the Shell This chapter outlines the process for fitting the parts that go into a round or stave back shell. Square back sound boxes usually have the cap and base of the sound box
Making a Windsor Stool
 Brian Clifford A Windsor Stool - page 1 Making a Windsor Stool The Windsor style The Windsor style is the name of a particular type of traditional English chair. Within this style there are a variety of
Resonator Guitar Kit. Assembly Instructions.
 Resonator Guitar Kit Assembly Instructions www.stewmac.com Table of Contents Getting started................................................ 1 Installing the truss rod.........................................
Nojo Design: Large Step Cabinet: February 2012
 Nojo Design: Large Step Cabinet: February 2012 The largest single piece of furniture I ve ever made is this stepped cabinet. Finished piece is 8! tall and over 10 long. This project has been great, although
135 ROLLTOP DESK 515
 135 ROLLTOP DESK 515 For the person who hates to clear off a desk, who wants to leave everything where it is overnight yet still have the clutter hidden, a rolltop desk is a godsend. The tambour hides
Installation Instructions for. Before You Begin TOOLS REQUIRED
 Composite Railing System STEP-BY-STEP Installation Instructions for Spectrum Composite Railing Virtually maintenance free 20-year warranty EverNew Spectrum Railing system is designed to work with a number
Clearview Railing System Installation Instructions
 Clearview Railing System Installation Instructions Disclaimer: AGS Stainless, Inc. has its Clearview Railing Systems designed by a professional engineer to meet the requirements of the latest national
Contractors Rack Assembly and Installation Instructions
 Part # 18601 & 16601 Contractors Rack Assembly and Installation Instructions 4751 Littlejohn St. Unit A, Baldwin Park, CA 91706 Page 1 of 12 11/13/08 Thank you for purchasing the Paramount Restyling Contractors