Electric Ukulele. Plans
|
|
|
- Nicholas Thomas
- 5 years ago
- Views:
Transcription

1 Electric Ukulele Plans Build a tenor electric ukulele! Daniel Hulbert 2014 CircuitsAndStrings.wordpress.com
2 2 Parts and Supplies: Two 3/4 by 5 by 12 inch (19 mm x 127 mm x 305 mm) pieces of wood for the body 3/4 by 3 by 15 inch (19 mm x 76 mm x 381 mm) wood for the neck 1/4 by 3 by 10.5 inch (6.35 mm 76 mm x 267 mm) wood for the fretboard Four guitar or ukulele geared tuners (Two left and two right) One ukulele nut (1 1/16 inches (28 mm) from first to last string) One set of electric guitar strings 32 inches (813 mm) of fretwire One strap peg One endpin jack Two neck mounting ferrules Two neck mounting screws (1.5 inches (38 mm)) Four string ferrules One single coil magnetic pickup One mounting ring for the pickup One 4 string bridge (1 1/4 inches (32 mm) from first to last string) Tru- Oil and wax finish (or other finish) Wood glue (Titebond or similar) Solder Sandpaper Clear Tape Note: I have included templates and guides in 8.5 by 11, and A4 paper sizes. Make sure you know what paper you are using when printing. Set the printer to print at 100% size and confirm that the fret guide especially is printed correctly. The 12th fret should be 8 7/16 inches (214 mm) away from the zero fret. Daniel Hulbert 2014 CircuitsAndStrings.wordpress.com
3 3 Tools: Electric drill (A drill press works best) Various drill bits One drill bit at least 10 inches (254 mm) long Clamps A thin bladed saw (for the fret slots) Soldering iron Scroll or band saw Rasps, files, or spokeshave (to shape neck) Miter box Daniel Hulbert 2014 CircuitsAndStrings.wordpress.com
 is exactly on the edge of the wood. Keep the wood square at this point. Do not taper the edges of the fretboard yet. 2.")
4 4 Make the Fretboard: 1. Print the fret guide located at the back of these plans. Tape the fret guide to the 1/4 by 3 by 10.5 inch piece of wood. Make sure that the line on the left (the zero fret) is exactly on the edge of the wood. Keep the wood square at this point. Do not taper the edges of the fretboard yet. 2. Using a miter box and a thin bladed saw, cut shallow slots along the lines. The slots only need to be as deep as the tang of the fret wire. 3. Remove the tape and paper from the fretboard. Print another fret guide and tape it on the board where the first guide was. Cut along the outside edges of the fret guide to taper the fretboard. 4. Carefully tap fretwire into the slots. Use a file to make the edges of the frets comfortable for hands sliding up and down the neck. Daniel Hulbert 2014 CircuitsAndStrings.wordpress.com

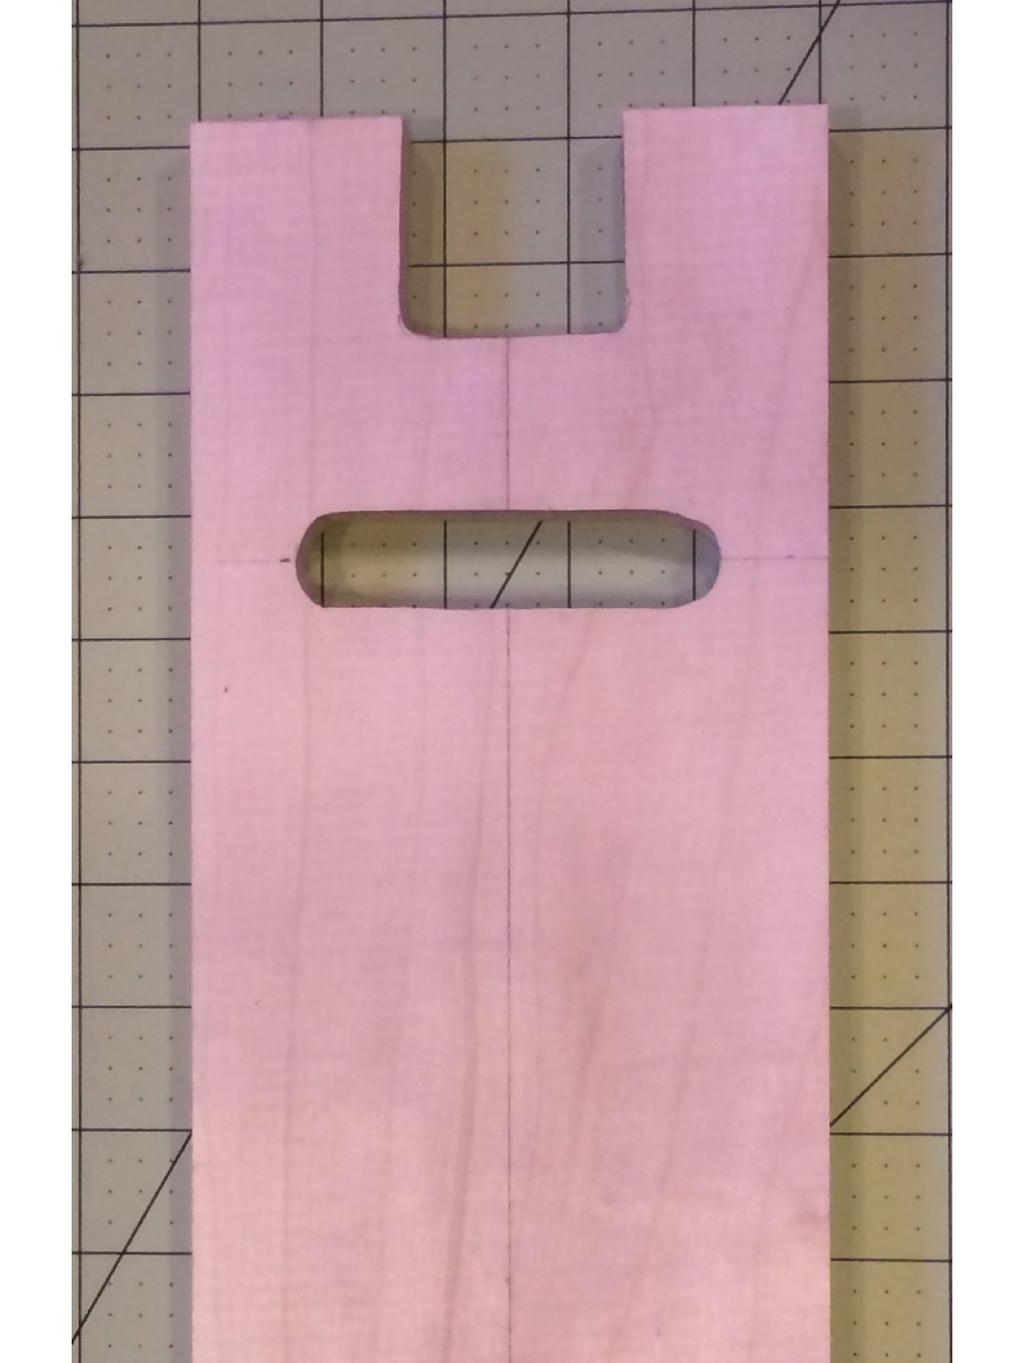
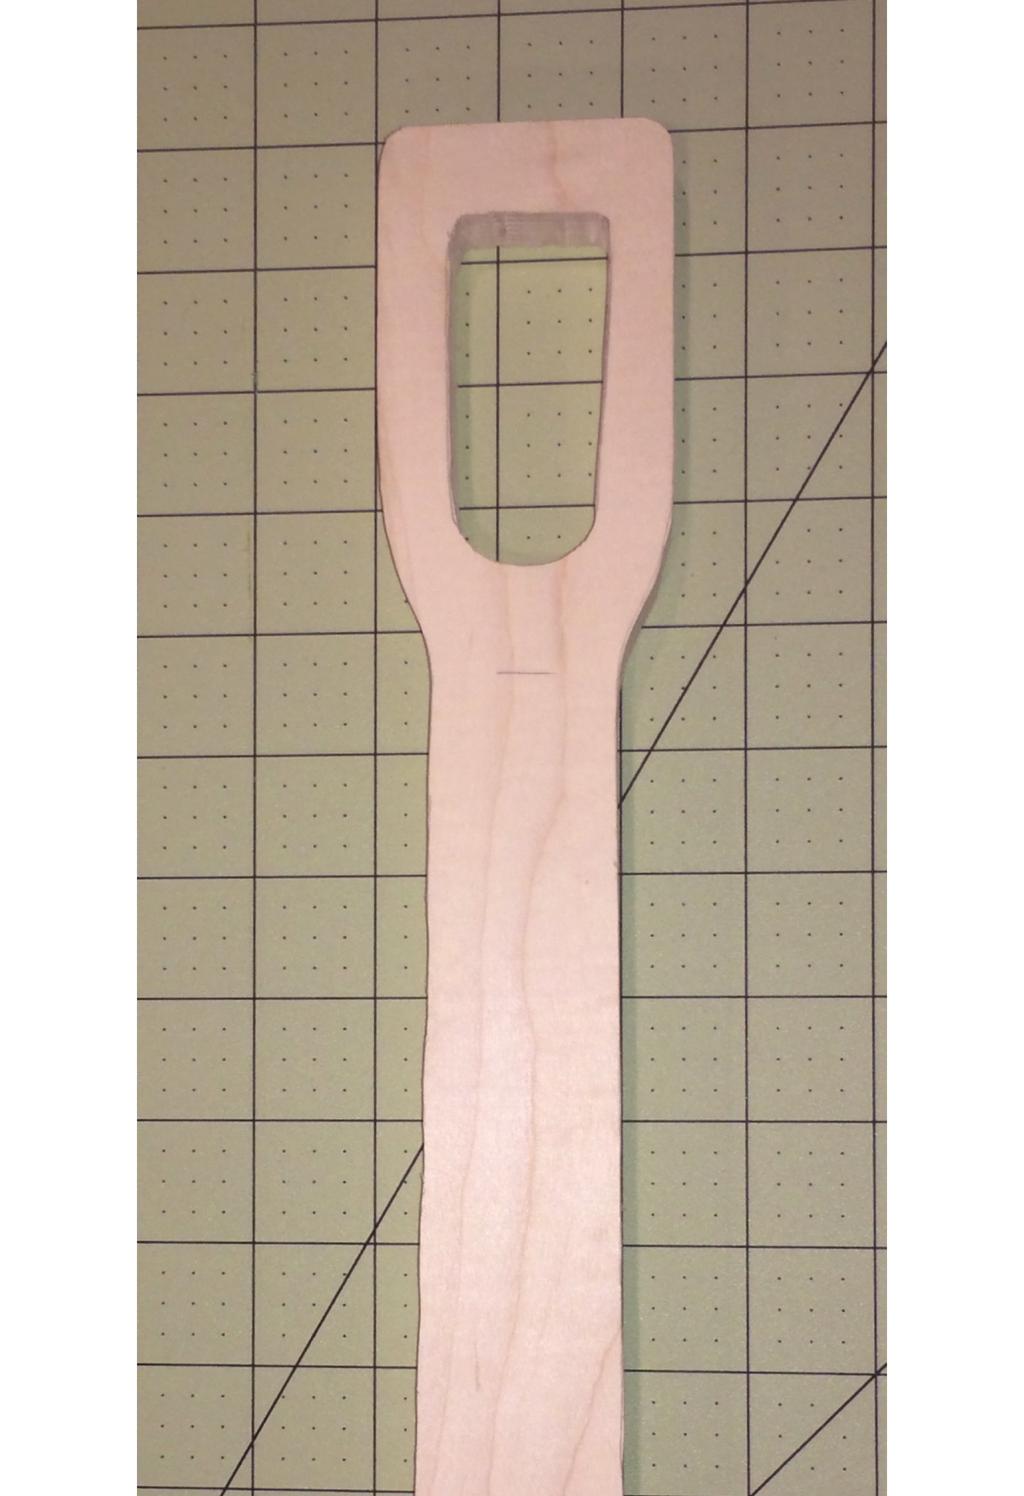
5 5 Make the Neck: 1. Print the neck template located at the back of these plans. Cut out the neck template and trace it on the 3/4 by 3 by 15 inch piece of wood. Cut out the neck. 2. Shape the neck with a file, router, rasp and/or a spokeshave. Make the neck so that it is comfortable in your hands. Remember that the neck will be 1/4 inch thicker when the fretboard is glued on. Keep the 2 inches that will mount to the body square. 3. Glue the fretboard on the neck so that the 16 th fret is right on the body side edge of the neck. 4. Mount the tuners to the side of the slotted headstock. Tuners come in all shapes and sizes. Make sure that you drill holes into the side of the headstock that will allow the tuner to turn freely. Daniel Hulbert 2014 CircuitsAndStrings.wordpress.com

6 6 Make the Body: 1. Print the body template located at the back of these plans. Cut out the body template and trace it on one of the 3/4 by 5 by 12 inch piece of wood. Cut out the neck pocket and pickup cavity. The pickup cavity may need to be adjusted to fit the specific pickup being used. The neck pocket can also be slightly adjusted to fit the individual neck. 2. Glue both of the 3/4 by 5 by 12 inch pieces of wood together. 3. After the glue has dried, round off the edges and corners with sandpaper. Daniel Hulbert 2014 CircuitsAndStrings.wordpress.com


7 7 Prepare the Body: 1. Drill a hole at the tail of the body large and deep enough to fit the endpin jack. 2. Using a long, narrow drill bit, drill a hole from the endpin hole to the pickup cavity. 3. Drill a hole on the side of the upper bout for the strap peg. 4. Drill holes for the pickup mounting ring. 5. Drill two holes for the neck mounting screws. They will be 1/2 and 1 1/4 inches away from the edge of the body. These holes into the neck pocket should just be large enough to allow the screws to pass without resistance. 6. Place the neck into the neck pocket, and mark the holes for the screws. These holes should be small enough to give the screws plenty of grip. Daniel Hulbert 2014 CircuitsAndStrings.wordpress.com

8 8 Bridge: 1. Place the bridge in the middle of the body, and make sure that the string saddles are exactly 17 inches away from the edge of the fretboard. Once the bridge is in the correct place, mark the holes for the bridge screws. 2. Drill 4 holes through the body for the string holes (The string saddles may need to be removed to better see the string through holes in the bridge). 3. Counter sink all four holes in the back of the body for the string ferrules. 4. Drill one hole from under the bridge to the endpin jack hole. This hole will be used for the ground wire. Daniel Hulbert 2014 CircuitsAndStrings.wordpress.com

9 9 Finish the body and neck: 1. Sand, sand, sand. Get the body and neck ready to finish. 2. Apply finish to the body, neck, and fretboard. Tru- Oil and gunstock wax work well. Electronics: 1. Feed the ground wire into the endpin jack hole. Make sure that the ground wire has a solid electrical connection to the bridge. 2. Push the pickup wire through the hole from the pickup cavity to the endpin jack hole. Screw the mounting ring to the body. 3. Solder both the pickup ground wire and the bridge ground to the sleeve lug of the endpin jack. 4. Solder the pickup signal wire to the tip lug of the endpin jack. Daniel Hulbert 2014 CircuitsAndStrings.wordpress.com
10 10 Assembly: 1. Attach the neck, tuners, strap peg, string ferrules, and bridge. 2. If using a premade nut, a thin shim may be needed under the nut. Without the shim, the nut may not be high enough. 3. Use the 4 thinnest strings from an electric guitar set on this ukulele. 4. Tune up the strings and rock! Make a YouTube video about your instrument and/or take pictures of it. Share the link or pictures to CircuitsAndStrings@gmail.com. Daniel Hulbert 2014 CircuitsAndStrings.wordpress.com
11 8.5 X 11
12 8.5 X 11
13 8.5 X 11
14 8.5 X 11
15 8.5 X 11
16
17 A4

18 A4
19 A4
20 A4
DIY Travel Ukulele Instructions
 DIY Travel Ukulele Instructions Foreword Thank you for requesting the instructions to make your very own DIY Travel Ukulele. Before starting the steps to make this instrument, it is recommended that you
U-bass Kit Assembly Instructions
 U-bass Kit Assembly Instructions Compiled by playubass.com This guide is built from the instructions found here: http://kalabrand.com/ubass-kit/index.html Tools Needed 5/8 (16 mm) Wrench 7/16 (~11 mm)
Assembly instructions for Classic Cantabile DIY Ukulele
 Assembly instructions for Classic Cantabile DIY Ukulele ArtNr.: 00036326 Sopranukulele / 00036327 Konzertukulele Musikhaus Kirstein GmbH Bernbeurener Strasse 11 D-86956 Schongau / Germany Tel.: 0049-8861-909494-0
Build Table of Contents. 1. Introduction
 Build Table of Contents 1. Introduction... 1-2 2. A Brief Review of Assembly Systems... 2-2 2.1. Free Assembly Methods... 2-3 2.2. Constrained Assembly Methods... 2-4 3. Our Approach to Building... 3-2
New Jersey Jr Electric Guitar DIY Kit
 New Jersey Jr Electric Guitar DIY Kit Thank you for purchasing this DIY Guitar Kit. The following instructions specify how to assemble your guitar. There are a variety of finishes that can be applied to
TOOLS You will need some tools. Mostly, they re tools you probably have around the house, anyway.
 INTRODUCTION Congratulations on your purchase of your RAS Kit. While it can be a great challenge for an inexperienced builder, with care and attention to details, it can produce an excellent instrument
ASSEMBLY INSTRUCTIONS
 WWW.NUKE.ROCKS ASSEMBLY INSTRUCTIONS 1 Let s begin our satisfying journey to 3D Printed music by downloading a copy of Nuke s 3D model from www.nuke.rocks. You will obtain a ZIP file which you must decompress,
Tools and materials, which are well needed for assembling the Tenayo Ukulele KITs Rasp, file and sandpapers with different granulations for the sandin
 Tenayo TK-UK-1, 2, 3 und 4 Ukulele: Facts, Manual & Introduction Text und photos by Michael Koch The Ukulele was invented and brought to Hawaii until the end of the 19. Century by a Portuguese named João
Guitar Repair Price List & Guide
 Guitar Repair Price List & Guide April 2017 Bench Rate Services or repairs which do not have a fixed rate will be billed at the bench rate of $72 per hour ($1.20 per minute) with a minimum charge of $15.
Solo JB Style DIY Electric Bass Guitar Kit
 Solo JB Style DIY Electric Bass Guitar Kit Assembly Manual JBK-1 V 1.02 Copyright 2011 Solo Music Gear. All rights reserved Materials List Press-fit peghead bushings String Retainer (1 mounting screw included)
Brooklyn DIY Guitar Kit
 Brooklyn DIY Guitar Kit Thank you for purchasing this DIY Guitar Kit. The following instructions specify how to assemble your guitar. There are a variety of finishes that can be applied to the guitar,
GUITAR ANATOMY GLOSSARY
 GUITAR ANATOMY GLOSSARY abalone: an iridescent lining found in the inner shell of the abalone mollusk that is often used alongside mother of pearl; commonly used as an inlay material. action: the distance
BUILDING A SELMER MACCAFERRI GUITAR
 BUILDING A SELMER MACCAFERRI GUITAR A step-by-step guide to building a laminated body Selmer-Maccaferri guitar Michael Collins The Heel The heel should now be prepared to be glued to the neck shaft. Using
New Jersey Electric Guitar DIY Kit
 New Jersey Electric Guitar DIY Kit Thank you for purchasing this DIY Guitar Kit. The following instructions specify how to assemble your guitar. There are a variety of finishes that can be applied to the
Installation Instructions TK-2/3 and TKS-2/3
 Installation Instructions TK-2/3 and TKS-2/3 The Trem King TKS-2 is designed to fit tele style guitars with a slanted bridge pickup mounted in the bridge plate. The TKS-2 has a Modern tele bridge footprint.
Solo ES Style DIY Hollow Body Electric Guitar Kit
 Solo ES Style DIY Hollow Body Electric Guitar Kit Assembly Manual ESK-35 V 1.02 Copyright 2011 Solo Music Gear. All rights reserved Show Off Your Custom Built Guitar! When you have your guitar finished,
Finish Neck and Fretboard Wednesday, January 16, :36 PM
 ASL Breakdown Page 1 Finish Neck and Fretboard Wednesday, January 16, 2013 9:36 PM Layer on the fret board, making sure registration pins are in place and everything lays flat. The 3/16" aluminum nutsurrogate
TOOLS You will need some tools. Mostly, they re tools you probably have around the house, anyway.
 INTRODUCTION Congratulations on your purchase of your RAS Kit. While it can be a great challenge for an inexperienced builder, with care and attention to details, it can produce an excellent instrument
Solo Guitar/Bass DIY Electric Double Neck Guitar Kit
 Solo Guitar/Bass DIY Electric Double Neck Guitar Kit Assembly Manual DJMBK-1 V 1.02 Copyright 2011 Solo Music Gear. All rights reserved Show Off Your Custom Built Guitar! When you have your guitar finished,
Assembly Manual - Flamenco Guitar Kit
 Assembly Manual - Flamenco Guitar Kit Index Contents (pg. 3) Soundboard assembly (pg. 4) Neck to top assembly (pg. 5) Preparation of the sides (pg. 6) Preparation of the back (pg. 7) Body assembly (pg.
GTS Music diy-guitar.com
 GTS Music diy-guitar.com IB Jem Style Kit GTS Music 313 Strachan St. Port Hope, Ontario L1A 0C2 Canada sales@diyguitarkits.net Please read these instructions carefully before beginning in order to have
The GITTYLELE Ukulele Kit
 The GITTYLELE Ukulele Kit Assembly Instructions & How-To Guide Product #: 36-011-01 View this guide in full color online: www.cbgitty.com/gittylelekit Copyright 2016 C. B. Gitty Crafter Supply 1 SAFETY
SINGLE-CUT JR GUITAR KIT
 Sheet #i-5203 Updated 10/18 StewMac SINGLE-CUT JR GUITAR KIT Assembly Instructions Welcome to guitar building! If you re a first-time builder, this kit is a great way to start. You ll have fun and learn
G-STYLE GUITAR KIT. StewMac. Assembly Instructions
 Sheet #i-5202 Updated 10/18 StewMac G-STYLE GUITAR KIT Assembly Instructions Welcome to guitar building! If you re a first-time builder, this kit is a great way to start. You ll have fun and learn a lot.
Fretboard Wednesday, January 16, :36 PM
 ASL Breakdown Page 1 Fretboard Wednesday, January 16, 2013 9:36 PM - - To prepare the fretboard for cutting fret slots: True one edge of the fretboard blank on the jointer. True one of the other edges
How to Build a Fretless, Acoustic Cigar Box Guitar
 How to Build a Fretless, Acoustic Cigar Box Guitar Introduction Welcome to the fun and world of building Cigar Box Guitars. It is unlikely that you will build only one - it is addictive. Regardless of
GTS Music diy-guitar.com
 GTS Music diy-guitar.com SG Style Kit GTS Music 313 Strachan St. Port Hope, Ontario L1A 0C2 Canada sales@diyguitarkits.net Please read these instructions carefully before beginning to build your guitar
Evertune ET001F and ET001T Router Template Instructions
 Evertune ET001F and ET001T Router Template Instructions 2011-05-05 All Templates: Every template has scribe lines for the guitar centerline and the scale length. Every template should be positioned so
GTS Music diy-guitar.com
 GTS Music diy-guitar.com Tele Style Kit GTS Music 313 Strachan St. Port Hope, Ontario L1A 0C2 Canada sales@diyguitarkits.net Please read these instructions carefully before beginning to build your guitar
EASY BREAD/ CUTTING BOARDS
 PLANS BY DEEPLY SOUTHERN HOME EASY BREAD/ CUTTING BOARDS DIFFICULTY LEVEL: EASY TOOLS REQUIRED 18V ONE+ RANDOM ORBIT SANDER 18V ONE+ CORNER CAT FINISH SANDER 18V ONE+ LITHIUM-ION DRILL KIT 18V ONE+ ORBITAL
B-BENDER Do It Yourself Installation Instructions
 (Parsons/Green) B-BENDER Do It Yourself The Hipshot (Parsons/Green) B-Bender is designed and manufactured to provide decades of trouble free service when it is properly adjusted and installed. These installation
Join Neck and Body Wednesday, January 16, :08 PM
 ASL Breakdown Page 1 Join Neck and Body Wednesday, January 16, 2013 10:08 PM 1. 2. 3. 4. Charles did the following steps to speed things up: Lightly sanded the top of the lower bout with an orbital sander.
Soprano Ukulele Kit #5347 Assembly Instructions
 Soprano Ukulele Kit #5347 Assembly Instructions Soprano Ukulele Kit Assembly Instructions Table of contents Welcome to ukulele building! Getting started.................................... 1 Kit parts
How To Guide: Installing the C.B. Gitty Foundry Tone Pre Wired 4 String Single Coil Pickup Harness with Volume and Tone
 How To Guide: Installing the C.B. Gitty Foundry Tone Pre Wired 4 String Single Coil Pickup Harness with Volume and Tone This is a guide to help you install a C.B. Gitty Foundry Tone Pre Wired 4 String
Owner s Manual. Bass-Guitar Kit J-Style
 Owner s Manual Bass-Guitar Kit J-Style Contents Introduction... 3 Body finish... 4 Neck finish... 4 Assembling of tuners... 5 Neck... 6 Wiring... 6 Bridge assembly... 8 Strap buttons... 8 Setting up...
StewMac. Sheet #i-5351 Updated 11/17 UKULELE KIT. Assembly Instructions
 StewMac Sheet #i-5351 Updated 11/17 UKULELE KIT Assembly Instructions Table of contents Tools and supplies... 2 Parts list... 3 Brace the top and back.... 4 Make the body mold... 6 Assemble the body...
F-F-Fiddle Assembly Instructions
 F-F-Fiddle Assembly Instructions Bout Bridge Neck Machine Heads/Tuners Truss Rod Strings An open-source FFF 3d-printable electric violin. 1. Assemble materials 5 3 8 1 9,10, 11 7 4 2 6 PARTS 1. Bout part
Solo AD Style DIY Acoustic Guitar Kit
 Solo AD Style DIY Acoustic Guitar Kit Assembly Manual ADK-1 V 2.0 Copyright 2017 Solo Music Gear. All rights reserved Show Off Your Custom Built Guitar! When you have your guitar finished, please take
Trem King Style-1 Retro Fit Installation Instructions
 Trem King Style-1 Retro Fit Installation Instructions The Trem King Model TKS/TK- 1 is designed to fit into guitars previously fit with vintage 6- screw or two- post type vibrato systems. The following
Telecaster Wiring Kits Please Read All Instructions Before Beginning. Tools you will need: Soldering tips: Removing Current Wiring: Step 1. Step 2.
 Telecaster Wiring Kits Please Read All Instructions Before Beginning. Tools you will need: Soldering Iron (35 watt preferably) Solder Wet Sponge Wire Clippers Wire Strippers 3/8 Drill Bit 5/32 Drill Bit
CAL-K1 Self-build guitar kit UK Version 1.0
 CAL-K1 Self-build guitar kit 174.460UK Version 1.0 Thank you for buying the CAL-K1 kit. All the wood, hardware and electrical components of a Chord CAL93 guitar are contained in this package. Please read
Trem King Style-1 Retro Fit Installation Instructions
 Trem King Style-1 Retro Fit Installation Instructions The Trem King Model TKS/TK-1 is designed to fit into guitars previously fit with vintage 6- screw or two-post type vibrato systems. The following instructions
SPR 01 FLEMING DIY GUITAR KIT Assembly Instructions
 DIY GUITAR KIT SPR 01 Joint: Bolt-on Body: Basswood with Flamed Maple Top Neck: Maple Fingerboard: Rosewood Tuning Machines: Chrome Die-cast Scale Length: 628mm/24.75" Fret: 22 Control: 1V, 1T, 3-Way Toggle
StewMac 335 SEMIHOLLOW GUITAR KIT. Assembly Instructions
 Sheet #i-5201 Updated 10/18 StewMac 335 SEMIHOLLOW GUITAR KIT Assembly Instructions Welcome to guitar building! If you re a first-time builder, this kit is a great way to start. You ll have fun and learn
Riverboat Banjo Musicmaker's Kits Inc. (One block north of Hwy 36 & behind Joseph s Restaurant)
") Riverboat Banjo Musicmaker's Kits Inc. (One block north of Hwy 36 & behind Joseph s Restaurant) P.O. Box 2117 Stillwater, MN 55082 (651) 439-9120 info@harpkit.com RIVERBOAT BANJO Wooden Parts List: A --
Riverboat Banjo Musicmaker's Kits Inc. (One block north of Hwy 36 & behind Joseph s Restaurant) P.O. Box 2117 Stillwater, MN 55082 (651) 439-9120 info@harpkit.com RIVERBOAT BANJO Wooden Parts List: A --
LAYOUT & ROUTING TEMPLATES Electric Guitars
 1/8 Clear Acrylic Templates Violin Makers Template Set 1 All of the essential templates for bridge shape, 55.00 fingerboard radius & string spacing for nut and bridge. 11 JAZZ BASS ½ BASS 1/4 BASS CELLO
GTS Music diy-guitar.com
 GTS Music diy-guitar.com Strat Style Kit GTS Music 313 Strachan St. Port Hope, Ontario L1A 0C2 Canada sales@diyguitarkits.net Please read these instructions carefully before beginning in order to have
WARNING! ETCHED PARTS CONTAINED IN THIS KIT HAVE SHARP POINTS, EDGES AND CORNERS.
 MPD18 chassis build instructions K A (see below for details) J I G H L C D F E B M Parts list: Ident Quantity A Etched Nickel/Silver fret 1 B Wheel sets 2 C Worms 2 D Worm gears 2 E Shaft adapters 2 F
Tools and Materials which will be needed to assemble the Tenayo electric-guitar kit A rasp, different files and sandpapers with variably granulation f
 Tenayo TK-EG-TC1 E-Guitar KIT Tele -like: Facts & Manual Text und photos by Michael Koch At all: Electric guitars were built to play loud and hard!!! And finally acoustic guitars were much too faint to
NYC-Guitars.com Guitar Setup Checklist
 NYC-Guitars.com Guitar Setup Checklist Customer Name: Address: Email: Phone: Guitar Make and Model, Year: Serial / Reference Number: Technician Name: Received Metrics Height of strings at 3rd fret when
Solo ST Style DIY Electric Guitar Kit
 Solo ST Style DIY Electric Guitar Kit Assembly Manual V 2.0 Copyright 2017 Solo Music Gear. All rights reserved Wiring Diagram for your DIY Guitar Kit All our wiring diagrams are posted on our website
PROJECT PLAN TRAVEL CRIBBAGE BOARD
 BUILD IT WITH ROCKLER PROJECT PLAN TRAVEL CRIBBAGE BOARD BUILD Stock # Item Stock # Item 59160 Small Cribbage Board Template, 2-Player, Straight Track 90638 3/4" Dia. Straight Router Bit (1/2" shank) 21026
Cigar Box Guitar Instructors Guide
 Building the Cigar Box Guitar Instructors Guide Developed by Building to Teach 1-18-17 Building the Cigar Box Guitar -(c) Building To Teach 2014 Introduction This project really engages students and helps
Digital Patterns. If you would like to donate click here. No Paypal account needed. Designed by Steve Good
 Digital Patterns Designed by Steve Good Hundreds of free Patterns Stencil Printer Jigsaw Puzzle Templates DVD s Key Chain Pattern Printer Video Tutorials Reviews Community Forum and more. If you would
ALWAYS disconnect the power source before using the Betterley UNA-GAUGE with any power tool or machine!
 Betterley UNA-GAUGE Thank you for purchasing the Betterley UNA-GAUGE. You will find the UNA-GAUGE provides quick adjustments and alignment of most tools and machinery with extreme accuracy. The versatile
DAKOTA OCTAVE MANDOLIN KIT and MANDOCELLO KIT
 DAKOTA OCTAVE MANDOLIN KIT and MANDOCELLO KIT MUSICMAKER S KITS, INC PO Box 2117 Stillwater, MN 55082 651-439-9120 harpkit.com WOOD PARTS: DAKOTA OCTAVE MANDOLIN KIT A - Neck B - Fretboard C - Heel Block
 WWW.CHAOSGUITARS.COM Bench Rate All services not associated with a fixed rate will be billed at a bench rate of $50 per hour with a minimum charge of $18. Fixed Rate Most of the common repairs and modifications
Tools and Materials which will be needed to assemble the Tenayo electric-guitar kit A rasp, different files and sandpapers with variably granulation f
 Tenayo TK-EG-HM1 E-Guitar KIT BCR -like: Facts & Manual Text and photos: Michael Koch At all: Electric guitars were built to play loud and hard!!! And finally acoustic guitars were much too faint to get
Al & Gary's Illusionist Heart
 Al & Gary's Illusionist Heart Plans and Instructions by: Albert Herwig and Gary A. Emerich Al & Gary's Illusionist Heart As Al Would Say: It's a pendant Now it's a heart Our pictures are in there My children'
A candle stick addresses transferring and reproducing dimensions from a plan and breaking the project into steps.
 Activities Discussion These projects allow more skill development including making items to match a drawing, sizing projects to specific dimensions, and just trying fun stuff for the first time! A candle
135 ROLLTOP DESK 515
 135 ROLLTOP DESK 515 For the person who hates to clear off a desk, who wants to leave everything where it is overnight yet still have the clutter hidden, a rolltop desk is a godsend. The tambour hides
Introduction to Machining: Lathe Operation
 Introduction to Machining: Lathe Operation Lathe Operation Lathe The purpose of a lathe is to rotate a part against a tool whose position it controls. It is useful for fabricating parts and/or features
Owner s Manual e-guitar Kit sg-style Harley Benton E-Guitar Kit SG-Style
 Owner s Manual E-Guitar Kit SG-Style Contents Introduction... 3 Body finish... 4 Neck finish... 4 Assembling of tuners... 5 Neck... 6 Wiring... 7 Bridge assembly... 10 Strap buttons... 11 Setting up...
Tools and Materials which will be needed to assemble the Tenayo electric-guitar kit A rasp, different files and sandpapers with variably granulation f
 Tenayo TK-EG-ST1 E-Guitar KIT Strat -like: Facts & Manual Text und Fotos von Michael Koch At all: Electric guitars were built to play loud and hard!!! And finally acoustic guitars were much too faint to
Jigsaw Puzzle Tray. Premium Plan. In this plan you ll find: America s leading woodworking authority
 America s leading woodworking authority Premium Plan In this plan you ll find: Step-by-step construction instruction. A complete bill of materials. Construction drawings and related photos. Tips to help
How to Mitre Mouldings
 How to Mitre Mouldings About Window and Door Mouldings Mitre cuts are a basic operation in most moulding installation. Mitre cuts are typically 45 degree angles, however many installations require minor
Making a Massive Bookcase Step-by-Step
 Making a Massive Bookcase Step-by-Step Jeff Branch WOODWORKING The only thing challenging about this project is its huge size. By JFF BRANCH A t right is a rendering of my first woodworking project completed
Project 17884EZ: Shaker End Table
 Project 17884EZ: Shaker End Table With its clean, simple lines, this piece is unmistakably Shaker style. Ours is made from cherry, a wood commonly used by Shaker craftsman, but we ve also seen this piece
ELECTRIC GUITAR KIT S-TYPE BODY WITH 3 SINGLE-COIL PICKUPS. StewMac SOLIDBODY. Assembly Instructions
 StewMac SOLIDBODY Assembly Instructions Sheet #i-5280 Updated 12/16 ELECTRIC GUITAR KIT S-TYPE BODY WITH 3 SINGLE-COIL PICKUPS Welcome to guitar building! If you re a first-time builder, this kit is a
Shaker Classic Change the legs to change the look
 Shaker Classic Change the legs to change the look 2 Ways B Y C H R I S T I A N BECKSVOORT not long ago, a couple ordered a set of cherry side tables from me, one for each side of their pencil-post bed.
Chief s Shop: Simple Woodworking Bench
 Chief s Shop: Simple Woodworking Bench Be sure to read the instructions and review the illustrations and accompanying video for this project BEFORE you start. Follow ALL SAFETY GUIDELINES AND RECOMMENDATIONS
Bass Guitar Kit P-Style bass electric guitar kit
 Bass Guitar Kit P-Style bass electric guitar kit user manual Musikhaus Thomann Thomann GmbH Hans-Thomann-Strasse 1 96138 Burgebrach Germany Telephone: +49 (0) 9546 9223-0 E-mail: info@thomann.de Internet:
Bass Guitar Kit J-Style bass electric guitar kit
 Bass Guitar Kit J-Style bass electric guitar kit user manual Musikhaus Thomann Thomann GmbH Hans-Thomann-Strasse 1 96138 Burgebrach Germany Telephone: +49 (0) 9546 9223-0 E-mail: info@thomann.de Internet:
Glue the ends onto the rafters following the instructions on the container of glue supplied with the kit.
 29 Glue the ends onto the rafters following the instructions on the container of glue supplied with the kit. 30 Raise and position rafters using a measuring tape to center each rafter on the beams. Secure
Empire Dresser Plans
 1 Empire Dresser Plans Materials 1 sheet 3/4" plywood (cabinet grade 4' x 8') 1 sheet 5 mm (3/16") underlayment plywood 4'x 8', buy another 1/2 sheet if you want to put a back on the dresser. 1-2" x 4"
Copyright 2010 Springbok Publishing All Rights Reserved- Page 1
 Copyright 2010 Springbok Publishing All Rights Reserved- www.woodensaddlerackplans.com Page 1 Legal Information All contents copyright 2010 by Springbok Publishing. All rights reserved. No part of this
BMG Special Upgrade Installation Revised: May 23, 2017
 BMG Special Upgrade Installation Revised: May 23, 2017 Before you start, read these instructions first to understand how to install and use this product. Assumptions This Pickup Switch Upgrade TM product
Cactus Routed Bowl. MLCS Items Needed:
 Cactus Routed Bowl MLCS Items Needed: Cactus Bowl and Tray Template #9188 Top Mounted Bearing Dish Cutter Router Bit #7817 1/2 Router Collet Extension and Wrenches #9465 45* Degree Chamfer Bit #7676 1-3/8
MODEL H8067 FLAT IRON STYLE MANDOLIN KIT OWNER'S MANUAL
 MODEL H8067 FLAT IRON STYLE MANDOLIN KIT OWNER'S MANUAL COPYRIGHT NOVEMBER, 2006 BY GRIZZLY INDUSTRIAL, INC. WARNING: NO PORTION OF THIS MANUAL MAY BE REPRODUCED IN ANY SHAPE OR FORM WITHOUT THE WRITTEN
Resonator Guitar Kit. Assembly Instructions.
 Resonator Guitar Kit Assembly Instructions www.stewmac.com Table of Contents Getting started................................................ 1 Installing the truss rod.........................................
Wooden Faceplates. Tapping on the Lathe
 Wooden Faceplates There are lots of turning jobs where spending some time on set-up makes the turning go quicker and easier. Making Wooden Faceplates is one way to make set-ups and jigs for turning. As
Klamp Trak. Instructions (39052)
") Klamp Trak TM Instructions (39052) ITEM# KKS1020 - Klamp Trak TM Getting Started There are three main methods for installing Klamp Trak in your workshop. In all three methods, your goal will be to construct
Klamp Trak TM Instructions (39052) ITEM# KKS1020 - Klamp Trak TM Getting Started There are three main methods for installing Klamp Trak in your workshop. In all three methods, your goal will be to construct
LP-STYLE GUITAR KIT. StewMac. Assembly Instructions
 Sheet #i-5827 Updated 8/18 StewMac LP-STYLE GUITAR KIT Assembly Instructions Welcome to guitar building! If you re a first-time builder, this kit is a great way to start. You ll have fun and learn a lot.
Read Me First! PICKUP INSTALLATION MATRIX INFINITY VT MATRIX INFINITY MIC BLEND INSTALLATION GUIDE. *Minimum 20⁰ string break angle
 MATRIX INFINITY VT MATRIX INFINITY MIC BLEND INSTALLATION GUIDE Read Me First! We recommend having this system installed by an experienced repair technician *Minimum 20⁰ string break angle PICKUP INSTALLATION
Eo Classical - Specification and Features
 Eo Classical - Specification and Features Folded dimensions 420mm long x 100mm high x 130mm wide. Weight 1.5 kg. Unfolded, overall 820 mm x 360 mm with contour wings in place. String scale length: 650
Pneumatic Robot arm/digger
 1 0 6. 1 8 6 Pneumatic Robot arm/digger Please Note The OPITEC range of projects is not primarily intended as toys for young children. It is for teaching, designing and making to ensure that pupils experience
Building an Unfeathered Paddle with a Wood Shaft and Carbon Fiber Blades
 Building an Unfeathered Paddle with a Wood Shaft and Carbon Fiber Blades by Duane Strosaker Choosing the Wood Two 3/4" pieces of Sitka spruce laminated with epoxy for an unfeathered one-piece paddle. For
Explorer Guitar Kit Assembly Instructions
 Explorer Guitar Kit Assembly Instructions WWW.www.byoguitar.com Introduction WARNING Some dust created by power sanding, sawing, grinding, drilling, and other construction activities contains chemicals
Installation Guide. Pionite Decorative Surfaces One Pionite Road, Auburn, Maine PIONITE ( )
") Installation Guide A Subsidiary of Panolam Surface Systems SMPBRO00-012 6/14 Pionite decorative laminates are designed for finished interior surfaces which require high impact, wear and stain resistance
Installation Guide A Subsidiary of Panolam Surface Systems SMPBRO00-012 6/14 Pionite decorative laminates are designed for finished interior surfaces which require high impact, wear and stain resistance
PTM Jazz Bass Control Plate Installation Revised: March 2, 2011
 PTM Jazz Bass Control Plate Installation Revised: March 2, 2011 Before you start, read these instructions first to understand what you need to do to install this product. Assumptions This patented Pickup
Seascape Bungalow Assembly instructions. Laser Dollhouse Designs
 Seascape Bungalow Assembly instructions Laser Dollhouse Designs NOTE: Please do a dry assembly using only tape to hold house together. This will get you familiar with parts, location, and fit. This also
Build the Spitfire: Step-By-step. Pack 7 Stages 61-71
 Pack 7 Stages 61-71 1 Stage Contents Page Number 61 212-215 62 216-218 63 219-221 64 222-224 65 225-228 66 229-231 67 232-235 68 236-238 69 239-241 70 242-245 71 246-249 Editorial and design by Continuo
How to Make a 400 BC Greek Oenochoe Style Wine Pourer
 How to Make a 400 BC Greek Oenochoe Style Wine Pourer The purpose of the demonstration is to show how to make a hollow form wine pourer in the style of ancient Greek pottery. Live demonstration on the
It s easy to Build Your Own Lap Steel Guitar
 It s easy to Build Your Own Lap Steel Guitar by Martin Koch Copyright 2004 by Martin Koch All rights reserved ISBN 3-901314-09-1 Published by Martin Koch, Gleisdorf, Austria Copy editor: Franz Luttenberger
the wire, less is better. And make sure the bends on each truss wire are in line with the other. See the next photo.
 The following information and photographs are what I did to build the kit. Your methods and needs may differ from this which is fine. There is no right or wrong way if you are used to scratch building.
Tele Guitar Kit Assembly
 Tele Guitar Kit Assembly WWW.byoguitar.com California requires the following notice: WARNING Some dust created by power sanding, sawing, grinding, drilling, and other construction activities contains chemicals
EXTRA 330SC 60CC. Item No:H G Specifications cc gas DA50,DA60, DLE55, DLE60(twin), 3W55. Description
, 3W55. Description") EXTRA 330SC 60CC Item No:H G060011 Specifications Wing Span Length Wing Area Flying Weight Gasoline Radio Description Carbon Fibre : 92" (2347mm) 84 1/2 " (2060mm) 1526.8 sq in(98.5sq dm) 16 17lbs(7300
EXTRA 330SC 60CC Item No:H G060011 Specifications Wing Span Length Wing Area Flying Weight Gasoline Radio Description Carbon Fibre : 92" (2347mm) 84 1/2 " (2060mm) 1526.8 sq in(98.5sq dm) 16 17lbs(7300
Electric Guitar Kit DC Style electric guitar kit
 Electric Guitar Kit DC Style electric guitar kit user manual Musikhaus Thomann Thomann GmbH Hans-Thomann-Straße 1 96138 Burgebrach Germany Telephone: +49 (0) 9546 9223-0 E-mail: info@thomann.de Internet:
SG Guitar Kit Assembly Instructions.
 SG Guitar Kit Assembly Instructions WWW.byoguitar.com Introduction California requires the following notice: WARNING Some dust created by power sanding, sawing, grinding, drilling, and other construction