DIY Travel Ukulele Instructions
|
|
|
- Aldous Parks
- 6 years ago
- Views:
Transcription

1 DIY Travel Ukulele Instructions
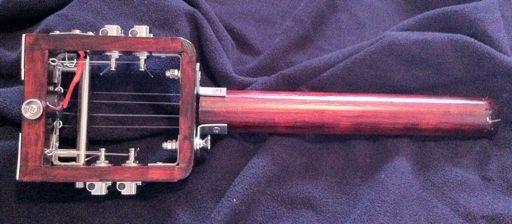
2 Foreword Thank you for requesting the instructions to make your very own DIY Travel Ukulele. Before starting the steps to make this instrument, it is recommended that you read through all of the steps. That way, you will have a high level view of the process and will know the destination before you start. The parts for this project can be obtained at a home improvement store (Home Depot, Lowe's, etc.), Radio Shack, and a music supply store (Stewart-Macdonald, Grizzly, C.B. Gitty, etc.). Throughout this project, if any questions or comments arise, feel free to CircuitsAndStrings@gmail.com. Safety Always wear safety glasses or goggles when operating equipment. Everyday glasses or reading glasses are not safety glasses. Be certain the safety glasses you wear meet the appropriate standards of the American National Standards Institute (ANSI). Because there are various ways to cut and join wood, you can make substitutions for the methods stated in this plan. We try to suggest the easiest methods possible. However, only you know your skills with each piece of machinery. Never compromise your safety by using a cutting method with which you are not comfortable. Instead, find an alternative approach that will yield the same result. These instructions assume that you are intimately familiar with the safe operation and use of woodworking machinery and woodworking tools, and understand the techniques used to repro- duce this project. If you do not qualify for both of these criteria, STOP building this project for your own safety. Read and understand the owner s manual for the machinery you intend to use, take a woodworking class or visit your local library for more information. Woodworking machinery and tools are inherently dangerous, because they use sharp edges that can and will cause serious personal injury including amputation and death. Do not underestimate the ability of these tools and machinery to cause injury. Never operate any tool without all guards in place and always wear approved safety glasses. For your own safety, please heed this warning. In short, be careful while doing this project. By using these instructions, you assume all risks associated with this project.
3 Needed Parts: (measurements are in inches, unless otherwise noted).25 X 1.5 oak board.75 X.75 oak or poplar square molding.5 X 1.5 oak board.5 quarter round oak or other wood molding.75 quarter round oak molding Fretwire (about 30 inches) 4 guitar style tuners.5 X.75 angled aluminum (about 4 inches) 1 straight cabinet handle Assorted screws and bolts 6 corner braces 2 flat corner braces 8 small eye screws Set of nylon ukulele strings Optional Parts:.25 X 6 oak board (for back of ukulele) 1 piezo buzzer (for amplification) 1 square jack plate (for amplification) 1 mono audio jack (for amplification) 2 strap pegs Fret inlays Needed Supplies: Gorilla Glue Polyshade stain (or other stain/clear coat combination) Stainable wood putty Sand paper Needed Tools: Drill Assorted drill bits Metal File Miter box Saw for miter box Thin bladed saw Optional Tools: Soldering Iron


4 INSTRUCTIONS: 1. Cut.5 X 1.5 board into two 5 inch lengths. 2. Cut.5 X 1.5 board into one 3.75 inch length. 3. Cut.5 quarter molding into two 1.5 inch lengths. 4. Cut.75 X.75 square molding into two 3.75 inch lengths. 5. Glue the seven pieces together with Gorilla Glue to form a box. 6. Mark and drill pilot holes for the metal corner braces. The two on the back of the box will be flush with the top. The two on the front of the box will be halfway between the top and the bottom. The holes on the front of the box will go all of the way through the wood. Small bolts will be used to secure this side of the braces to the wood. Use short (.25 inch) screws to secure the metal to the wood so that they don't poke through the wood. 7. Mark and drill pilot holes for the metal flat corner braces on the bottom. 8. Cut the angled aluminum into a 3.75 inch length.
 side of the angled aluminum. Drill two holes about.")


5 9. Drill holes for the cabinet handle on the narrower (.5 inch) side of the angled aluminum. Drill two holes about.75 inches closer to middle on the wider side of the aluminum. If desired, round off the edges of the aluminum with a file. This piece, and the cabinet handle will serve as the bridge. Drill holes on the back top of the box for the screws that will attach the aluminum to the box. 10. Drill four holes for the desired guitar style tuners. Mount the tuners as close to the front of the box as possible. 11. If amplification is desired, drill out a hole for the mono audio jack and square jack plate.


6 12. Use eight small eye screws to guide the strings off of the cabinet handle to the tuners. The four eye screws in the middle should be spaced to the desired string spacing. The eye screws on the sides should be placed so that they are in line with the guitar tuners. If amplification is being used, place the two eye screws on the side of the jack plate so they miss the audio jack. 13. On the top of the box, two metal corner braces will be mounted with the small bolts through the wood to the metal braces on the inside of the box. The braces on the top of the box will form a channel to mount the neck. If desired, have one of the bolts longer so that a strap peg can be mounted on top of the bracket. The other strap peg will be in the middle of the wood on the back bottom of the box. 14. If more resonance is desired, take a.25 X 6 board and trim it to fit the bottom of the box. Then Gorilla Glue it to the bottom of the box. 15. Take two lengths of.75 quarter round molding and glue them together to form a half round. The half round will be the neck. The length of these two pieces will depend on the desired scale length and the desired length behind the nut. For a 13-7/8" scale, cut the two.75 quarter round pieces of molding into 12 inch lengths and Gorilla Glue them together.


7 16. Take a.25 X 1.5 board and cut a fret slot using a thin bladed saw and a precision miter box about an inch from one edge. This slot will eventually have fretwire hammered into it and serve as the zero fret. The picture below gives an example of a zero fret. The zero fret is the nut for our instrument. 17. Now the board is ready for the fret slots. The fret slots should be cut in reference to the zero fret slot. The prototype DIY Travel Ukulele fret slots were cut using a mandolin fingerboard as a guide. Carefully mark the where the slots should be using a fret guide, another short scale instrument, or using a fret position calculator. (I have included a 13 7/8 inch scale and a 15 inch scale guide at the end of these instructions.) This is a critical step. The fret slots need to be very accurate, or the intonation of the instrument will be wrong. Once the fret slots are marked, cut the fret slots using a thin bladed saw and a precision miter box.

8 18. Place the slotted fretboard on top of the half round neck. Place the neck and fingerboard in place on the box. Now the neck will need to be trimmed. The 12 th fret needs to be exactly half the distance between the nut and the cabinet handle bridge. The cabinet handle bridge can be adjusted a little, but make it close. Trim the extra part off of the neck. Trim the fingerboard so that it overlaps the end of the neck by about.5 to.75 inches. The nut side of the fingerboard and the neck should be flush. The body side of the fingerboard should overlap the neck. Gorilla Glue the fingerboard and the neck together. 19. Round off the nut end of the neck. This adds elegance to the end product. 20. Drill four holes though the fingerboard and the neck behind the nut. The holes should be small. These holes are for the nylon ukulele strings, so they need to be spaced to the desired string spacing and just large enough for the thickest string. 21. On the underside of the neck, shallowly auger out the string holes so that the string knots can rest in the holes. 22. Position the neck in place with the two metal brackets forming the channel. Drill holes for the screws that will attach the neck to the brackets. Make sure that the neck is able to be attached to the body straight and level. 23. At this point, all of the hardware (except for the frets and strings), should be in place. Making sure the hardware and wood fits together is a nice thing to do before the wood is sanded and stained. 24. Take off all of the hardware and set aside. Fill and level the wood with stainable wood putty. Sand the wood and putty until everything is as smooth as desired. 25. The frets can be put on now or later. For the prototype, the neck and fingerboard were stained and then the frets were put on. Then the frets were filed down and and shaped. The filing process scuffed the stain, so these parts needed to be touched up.
9 26. Stain the box and neck to desired color. Polyshade (by Minwax) is a combination of stain and polyurethane and worked well for the prototype. 27. Put the frets on now if that wasn't done earlier. Touch up the stain as needed. 28. If desired, put fret inlays on fingerboard. 29. Reattach all of the hardware. Make sure the neck is square and level. Use washers as shims under the braces on the outside of the box to straighten out, if needed. 30. If amplification is desired, solder a piezo buzzer to the mono audio jack. (Red wire to the tip lug and black wire to the shaft lug). Attach the piezo buzzer to the wood. 31. Tie knots to the end of the strings and thread them through the holes in the neck. Thread them through the eye screws and to the tuners. 32. Adjust the cabinet handle bridge to adjust the intonation, as needed. 33. Tune up the strings and rock! Make a YouTube video about your instrument and/or take pictures of it. Share the link or pictures to CircuitsAndStrings@gmail.com. 1
10 15 inch scale fretting guide
11 13 7/8 inch scale fretting guide
Electric Ukulele. Plans
 Electric Ukulele Plans Build a tenor electric ukulele! Daniel Hulbert 2014 CircuitsAndStrings.wordpress.com 2 Parts and Supplies: Two 3/4 by 5 by 12 inch (19 mm x 127 mm x 305 mm) pieces of wood for the
ASSEMBLY INSTRUCTIONS
 WWW.NUKE.ROCKS ASSEMBLY INSTRUCTIONS 1 Let s begin our satisfying journey to 3D Printed music by downloading a copy of Nuke s 3D model from www.nuke.rocks. You will obtain a ZIP file which you must decompress,
How to Build a Fretless, Acoustic Cigar Box Guitar
 How to Build a Fretless, Acoustic Cigar Box Guitar Introduction Welcome to the fun and world of building Cigar Box Guitars. It is unlikely that you will build only one - it is addictive. Regardless of
Owner s Manual. Bass-Guitar Kit J-Style
 Owner s Manual Bass-Guitar Kit J-Style Contents Introduction... 3 Body finish... 4 Neck finish... 4 Assembling of tuners... 5 Neck... 6 Wiring... 6 Bridge assembly... 8 Strap buttons... 8 Setting up...
TOOLS You will need some tools. Mostly, they re tools you probably have around the house, anyway.
 INTRODUCTION Congratulations on your purchase of your RAS Kit. While it can be a great challenge for an inexperienced builder, with care and attention to details, it can produce an excellent instrument
CAL-K1 Self-build guitar kit UK Version 1.0
 CAL-K1 Self-build guitar kit 174.460UK Version 1.0 Thank you for buying the CAL-K1 kit. All the wood, hardware and electrical components of a Chord CAL93 guitar are contained in this package. Please read
Owner s Manual e-guitar Kit sg-style Harley Benton E-Guitar Kit SG-Style
 Owner s Manual E-Guitar Kit SG-Style Contents Introduction... 3 Body finish... 4 Neck finish... 4 Assembling of tuners... 5 Neck... 6 Wiring... 7 Bridge assembly... 10 Strap buttons... 11 Setting up...
U-bass Kit Assembly Instructions
 U-bass Kit Assembly Instructions Compiled by playubass.com This guide is built from the instructions found here: http://kalabrand.com/ubass-kit/index.html Tools Needed 5/8 (16 mm) Wrench 7/16 (~11 mm)
Solo JB Style DIY Electric Bass Guitar Kit
 Solo JB Style DIY Electric Bass Guitar Kit Assembly Manual JBK-1 V 1.02 Copyright 2011 Solo Music Gear. All rights reserved Materials List Press-fit peghead bushings String Retainer (1 mounting screw included)
Case Building Instructions For Derbywizard Freedom Aluminum Tracks
 Case Building Instructions For Derbywizard Freedom Aluminum Tracks You can easily build a hard storage case for your new track by following these simple instructions. Materials Case Width (W): 2 ln = 8.75",
TOOLS You will need some tools. Mostly, they re tools you probably have around the house, anyway.
 INTRODUCTION Congratulations on your purchase of your RAS Kit. While it can be a great challenge for an inexperienced builder, with care and attention to details, it can produce an excellent instrument
MyOutdoorPlans.com. By Julian King [2X4 GARDEN BENCH]
![MyOutdoorPlans.com. By Julian King [2X4 GARDEN BENCH]](/thumbs/75/72876801.jpg "MyOutdoorPlans.com. By Julian King [2X4 GARDEN BENCH]") MyOutdoorPlans.com By Julian King [2X4 GARDEN BENCH] CUT LIST A 2 pieces of 2 4 lumber 24 long, 2 pieces 32 1/2 long LEGS B 2 pieces of 2 4 lumber 45 long, 2 pieces 15 1/2 long, 1 piece 12 1/2 long SEAT
MyOutdoorPlans.com By Julian King [2X4 GARDEN BENCH] CUT LIST A 2 pieces of 2 4 lumber 24 long, 2 pieces 32 1/2 long LEGS B 2 pieces of 2 4 lumber 45 long, 2 pieces 15 1/2 long, 1 piece 12 1/2 long SEAT
F-F-Fiddle Assembly Instructions
 F-F-Fiddle Assembly Instructions Bout Bridge Neck Machine Heads/Tuners Truss Rod Strings An open-source FFF 3d-printable electric violin. 1. Assemble materials 5 3 8 1 9,10, 11 7 4 2 6 PARTS 1. Bout part
Why are we giving this guidebook as a FREE download?
 Construction Guide Queen, Double & Twin Vertical 1 Note: This guide covers the construction steps for all 3 sizes of the vertical wall mount Easy DIY Murphy beds, Queen, Double and Twin. The construction
CONTINUED. TABLE TOPS: 1. Sort one 2x6x8 piece from your lumber. 2. Measure and mark two 48 pieces from each, then cut.
 # Materials: Quantity Each: Total Quantity: x4x8 7 x6x8 1 TIPS FOR SUCCESSFUL PREP WORK: Before starting, carefully read through the entire instruction sheet. Refer to the material list to the left and
Tools and materials, which are well needed for assembling the Tenayo Ukulele KITs Rasp, file and sandpapers with different granulations for the sandin
 Tenayo TK-UK-1, 2, 3 und 4 Ukulele: Facts, Manual & Introduction Text und photos by Michael Koch The Ukulele was invented and brought to Hawaii until the end of the 19. Century by a Portuguese named João
MODEL H8067 FLAT IRON STYLE MANDOLIN KIT OWNER'S MANUAL
 MODEL H8067 FLAT IRON STYLE MANDOLIN KIT OWNER'S MANUAL COPYRIGHT NOVEMBER, 2006 BY GRIZZLY INDUSTRIAL, INC. WARNING: NO PORTION OF THIS MANUAL MAY BE REPRODUCED IN ANY SHAPE OR FORM WITHOUT THE WRITTEN
BUILDING A SELMER MACCAFERRI GUITAR
 BUILDING A SELMER MACCAFERRI GUITAR A step-by-step guide to building a laminated body Selmer-Maccaferri guitar Michael Collins The Heel The heel should now be prepared to be glued to the neck shaft. Using
Assembly instructions for Classic Cantabile DIY Ukulele
 Assembly instructions for Classic Cantabile DIY Ukulele ArtNr.: 00036326 Sopranukulele / 00036327 Konzertukulele Musikhaus Kirstein GmbH Bernbeurener Strasse 11 D-86956 Schongau / Germany Tel.: 0049-8861-909494-0
Twin-Wall Double Swinging Door Kit
 105105 Twin-Wall Double Swinging Kit YOU MUST READ THIS DOCUMENT BEFORE YOU BEGIN TO ASSEMBLE THE DOOR KIT. Thank you for purchasing this GrowSpan door kit. When properly assembled and maintained, this
Salter Industries Spiral Stair
 Salter Industries Spiral Stair The Leader in Spiral Staircases Continuous Sleeve Stair Installation Instructions TOOLS NEEDED: 1. Electric drill with hex chuck and Phillips bit 2. Drill bits 1/8", 1/4",
Solo AD Style DIY Acoustic Guitar Kit
 Solo AD Style DIY Acoustic Guitar Kit Assembly Manual ADK-1 V 2.0 Copyright 2017 Solo Music Gear. All rights reserved Show Off Your Custom Built Guitar! When you have your guitar finished, please take
Twin-Wall Double Swinging Door Kit
 115021 Twin-Wall Double Swinging Kit READ THIS DOCUMENT BEFORE YOU BEGIN Thank you for purchasing this GrowSpan door kit. When properly assembled and maintained, this product will provide years of reliable
How To Guide: Installing the C.B. Gitty Foundry Tone Pre Wired 4 String Single Coil Pickup Harness with Volume and Tone
 How To Guide: Installing the C.B. Gitty Foundry Tone Pre Wired 4 String Single Coil Pickup Harness with Volume and Tone This is a guide to help you install a C.B. Gitty Foundry Tone Pre Wired 4 String
Pivot-Door Downdraft Cabinet Plans
 Pivot-Door Downdraft Cabinet Plans Finished Cabinet Closed Open Exploded View Introduction This simple downdraft-style dust collection cabinet is a great way to keep your shop cleaner and keep your router
Installation Manual MODEL ANE-42
 Installation Manual MODEL ANE-42 GET TO KNOW YOUR UNIT 1 2 1. CROSS BRACES 2. SIDE BRACKETS - Stud Finder - 12-14 Level - Tape Measure - Small Flathead Screwdriver Tools Needed: - Electric Drill (with
GUITAR ANATOMY GLOSSARY
 GUITAR ANATOMY GLOSSARY abalone: an iridescent lining found in the inner shell of the abalone mollusk that is often used alongside mother of pearl; commonly used as an inlay material. action: the distance
WARNING! ETCHED PARTS CONTAINED IN THIS KIT HAVE SHARP POINTS, EDGES AND CORNERS.
 MPD18 chassis build instructions K A (see below for details) J I G H L C D F E B M Parts list: Ident Quantity A Etched Nickel/Silver fret 1 B Wheel sets 2 C Worms 2 D Worm gears 2 E Shaft adapters 2 F
Slicing Jig For Pen Inlays
 Slicing Jig For Pen Inlays By Randall Smith (randyrls) May 2008 This article has been downloaded from the library of the International Association of Penturners. www.penturners.org You are welcome to reproduce
antebellum home in Eutaw, Alabama, built in 1860 (Google it for photos).
.") You Can Build the Kirkwood Bookcase By Jeff Branch A vid readers will tell you they often need a new way to store all of their books. I ve seen some pretty creative ways to stockpile books - in some instances
You Can Build the Kirkwood Bookcase By Jeff Branch A vid readers will tell you they often need a new way to store all of their books. I ve seen some pretty creative ways to stockpile books - in some instances
GTS Music diy-guitar.com
 GTS Music diy-guitar.com IB Jem Style Kit GTS Music 313 Strachan St. Port Hope, Ontario L1A 0C2 Canada sales@diyguitarkits.net Please read these instructions carefully before beginning in order to have
Chief s Shop: Simple Woodworking Bench
 Chief s Shop: Simple Woodworking Bench Be sure to read the instructions and review the illustrations and accompanying video for this project BEFORE you start. Follow ALL SAFETY GUIDELINES AND RECOMMENDATIONS
Tele Guitar Kit Assembly
 Tele Guitar Kit Assembly WWW.byoguitar.com California requires the following notice: WARNING Some dust created by power sanding, sawing, grinding, drilling, and other construction activities contains chemicals
Assembly instructions
 Nerdy Gurdy Assembly instructions This manual describes how to assemble a Nerdy Gurdy. Go to http://www.nerdygurdy.nl for more info about these instruments. Jaap Brand The Netherlands January 2018 General
Assembly Manual - Flamenco Guitar Kit
 Assembly Manual - Flamenco Guitar Kit Index Contents (pg. 3) Soundboard assembly (pg. 4) Neck to top assembly (pg. 5) Preparation of the sides (pg. 6) Preparation of the back (pg. 7) Body assembly (pg.
GTS Music diy-guitar.com
 GTS Music diy-guitar.com SG Style Kit GTS Music 313 Strachan St. Port Hope, Ontario L1A 0C2 Canada sales@diyguitarkits.net Please read these instructions carefully before beginning to build your guitar
Important Note: Why this guidebook is FREE?
 Easy DIY Murphy Bed Construction Guide 1 Important Note: This guide is a FREE SAMPLE of our Complete Construction Guidebook. With the help of this guide you will get familiar with the construction steps
3400 to 3440 Scarfing Sled Owners Manual Please Read Carefully!
 3400 to 3440 Scarfing Sled Owners Manual Please Read Carefully! Parts List: Please identify and verify that you have all of the hardware shown. Please refer to photos in the instructions for the parts
Installation Manual MODEL NE-42
 Installation Manual MODEL NE-42 GET TO KNOW YOUR UNIT 1 1. CROSS BRACES - Stud Finder - 12-14 Level - Tape Measure - Small Flathead Screwdriver Tools Needed: - Electric Drill (with 1/4 & 1/8 drill bit)
Thank you for purchasing these easel plans. I think you will find this to be a fun, easy to build project that will serve you for years to come.
 Construction Plans for The Basic Wooden Easel Updated August, 2002 Thank you for purchasing these easel plans. I think you will find this to be a fun, easy to build project that will serve you for years
INSTALLATION INSTRUCTIONS John Deere 600C Corn Head Auger Trough Liner
 www.polyskid.com P.O. Drawer 349, Monticello, GA 31064 Phone: 800.542.7659 Fax: 706.468.2881 e-mail: polytech@polyskid.com INSTALLATION INSTRUCTIONS John Deere 600C Corn Head Auger Trough Liner IT IS VERY
For Barrel Tapers. Installation and Operating Instructions for use with table saws and large disk sanders
 Tim s Taper Tool For Barrel Tapers Installation and Operating Instructions for use with table saws and large disk sanders Your taper tool is capable of making barrel tapered shafts. The term barrel is
Guitar Repair Price List & Guide
 Guitar Repair Price List & Guide April 2017 Bench Rate Services or repairs which do not have a fixed rate will be billed at the bench rate of $72 per hour ($1.20 per minute) with a minimum charge of $15.
GTS Music diy-guitar.com
 GTS Music diy-guitar.com Tele Style Kit GTS Music 313 Strachan St. Port Hope, Ontario L1A 0C2 Canada sales@diyguitarkits.net Please read these instructions carefully before beginning to build your guitar
Hatchback Wing Riser Kit
 Hatchback Wing Riser Kit 2015-06-11 Thank you for purchasing this PERRIN product for your car! Installation of this product should only be performed by persons experienced with installation of aftermarket
Table Saw Small Parts Sled Instructions
 Table Saw Small Parts Sled Instructions Effective May 2018 Review full manual instructions prior to use for important safety information. Always check Rockler.com to confirm that you are using the most
Outdoor Cooler Cart. Outdoor Cooler Cart Construction Instructions
 Outdoor Cooler Cart Outdoor Cooler Cart Construction Instructions Make the Legs and Side Panels. Cut the eight long and short leg pieces to length. See Material List on next page.. Apply a bead of glue
Riverboat Banjo Musicmaker's Kits Inc. (One block north of Hwy 36 & behind Joseph s Restaurant)
") Riverboat Banjo Musicmaker's Kits Inc. (One block north of Hwy 36 & behind Joseph s Restaurant) P.O. Box 2117 Stillwater, MN 55082 (651) 439-9120 info@harpkit.com RIVERBOAT BANJO Wooden Parts List: A --
Riverboat Banjo Musicmaker's Kits Inc. (One block north of Hwy 36 & behind Joseph s Restaurant) P.O. Box 2117 Stillwater, MN 55082 (651) 439-9120 info@harpkit.com RIVERBOAT BANJO Wooden Parts List: A --
Please read BOTH these Installation Instructions and the General Towing Instructions before attempting to install or operate this equipment.
 Serial Number Please read BOTH these and the General Towing Instructions before attempting to install or operate this equipment. 1. Blue Ox towing products and accessories are intended to be installed
RLP Flat Track Hardware sliding door hardware/ barn door track
 Page 1 of 9 Installation Suggestions for: RLP Flat Track Hardware sliding door hardware/ barn door track Read these instructions to end before starting installation or ordering hardware. Reclaimed Lumber
Solo ES Style DIY Hollow Body Electric Guitar Kit
 Solo ES Style DIY Hollow Body Electric Guitar Kit Assembly Manual ESK-35 V 1.02 Copyright 2011 Solo Music Gear. All rights reserved Show Off Your Custom Built Guitar! When you have your guitar finished,
FW / FIG Partition Kit(s) Installation Instructions
 Installation Instructions") FW / FIG Partition Kit(s) Installation Instructions This instruction explains how to join 8 in. and 10 in. top piping partitions to FIG and FW merchandisers. Do not remove the shipping braces until the
FW / FIG Partition Kit(s) Installation Instructions This instruction explains how to join 8 in. and 10 in. top piping partitions to FIG and FW merchandisers. Do not remove the shipping braces until the
ining Table Materials *Notes on Materials
 D ining Table We looked around for the perfect table for the dining room. Some were too big, some too small, and most were just too expensive. So we built this one, and we are happy with the result. It
Copyright 1998 KDE Technologies
 Modular Computer Corner Desk Unit Copyright 1998 KDE Technologies http://members.tripod.com/~kdetech/ 1. Introduction 2. Plans Sheet one - Isometric Sheet two - Top Detail / Corner Unit Sheet three - Leg
INSTALLATION MANUAL WEEKENDER STEEL LADDER RACK
 TRUCK STORAGE SOLUTIONS SECURING YOUR REPUTATION INSTALLATION MANUAL WEEKENDER STEEL LADDER RACK STEEL & ALUMINUM SIDE BOX WITH PACK RAT DRAWER UNITS MODELS ATTENTION: PLEASE READ AND UNDERSTAND ALL INSTRUCTIONS
OPERATIONAL MANUAL V1.0. Removing/Replacing Blades
 OPERATIONAL MANUAL V1.0 BLUEROCK WS-212 Wire Stripper Removing/Replacing Blades CAUTION!! IMPORTANT!! DANGER!! WARNING!! DISCONNECT MACHINE FROM POWER BEFORE PROCEEDING!! Estimated Completion Time: 90
Customer Notice: Congratulations again on your SawStop purchase, and thank you! -SawStop Tualatin, OR
 Customer Notice: Congratulations on the purchase of this Sliding Crosscut Attachment. As the owner of a SawStop saw, you are familiar with our high standards for quality, fit and finish. Different from
INSTRUCTION MANUAL. Electric Guitar SKY SKY SKY SKY2246. Ver. 2
 Ver. 2 INSTRUCTION MANUAL Electric Guitar SKY1032 + SKY1033 + SKY2885 + SKY2246 PARTS A GUITAR B CARRYING CASE C STRAP D 10W AMP E TREMOLO BAR F EXTRA STRINGS G 8 GUITAR CABLE H GUITAR PICK Pg. 2 GUITAR
OWNER S MANUAL CONTENTS. The only table saw fence with Automatic Positioning Control TM
 The only table saw fence with Automatic Positioning Control TM OWNER S MANUAL Please read this owner s manual before use and keep it at hand for reference. Note: The INCRA TS II system consists of three
EZ SQUARE BANDSAW FENCE Instructions
 EZ SQUARE BANDSAW FENCE Instructions Peachtree Woodworking Supply Inc. 6684 Jimmy Carter Blvd. Norcross GA 30071 The EZ SQUARE BAND SAW FENCE Table of Contents TABLE OF CONTENTS SAFETY GUIDELINES PARTS
GTS Music diy-guitar.com
 GTS Music diy-guitar.com Strat Style Kit GTS Music 313 Strachan St. Port Hope, Ontario L1A 0C2 Canada sales@diyguitarkits.net Please read these instructions carefully before beginning in order to have
GrowSpan Single Swinging Door Black-Out Door Kit
 GrowSpan Single Swinging Door Black-Out Door Kit ATTENTION: Door kit includes materials for door only. All other components shown in the diagram above and diagrams throughout this guide are not included
Please read BOTH these Installation Instructions and the General Instructions prior to installing or operating this equipment.
 Serial Number BX3620 Please read BOTH these and the General Instructions prior to installing or operating this equipment. 1. Blue Ox towing products and accessories are intended to be installed by Blue
END FRAMES. End frames built using pressure treated 2x4 (1 1/2" x 3 1/2") 36" 34" 7/16" pilot hole. 5 1/2" x 1/2" lag bolt 8" wheel 23"
 36 34 7/16 pilot hole. 5 1/2 x 1/2 lag bolt 8 wheel 23") END FRAMES End frames built using pressure treated 2x4 (1 1/2" x 3 1/2") 23" 17 1/2" (B) (B) Measure from the bottom of your stone to 1" below the lip to get your measurement. 17 1/2"(B) 36" 34" 1/2" flat
END FRAMES End frames built using pressure treated 2x4 (1 1/2" x 3 1/2") 23" 17 1/2" (B) (B) Measure from the bottom of your stone to 1" below the lip to get your measurement. 17 1/2"(B) 36" 34" 1/2" flat
Solo Guitar/Bass DIY Electric Double Neck Guitar Kit
 Solo Guitar/Bass DIY Electric Double Neck Guitar Kit Assembly Manual DJMBK-1 V 1.02 Copyright 2011 Solo Music Gear. All rights reserved Show Off Your Custom Built Guitar! When you have your guitar finished,
Dura-Lock Roof System
 DLR-14 Dura-Lock Roof System Assembly and Installation Instructions Read the instructions before starting the job. They explain the steps required to produce a finished product that will meet factory specifications.
SawStop. Contractor Fence Assembly OWNER S MANUAL. Model CNS-SFA
 Contractor Fence Assembly OWNER S MANUAL Model CNS-SFA Warranty warrants to the original retail purchaser of the Contractor Fence Assembly accompanying this manual that the fence assembly will be free
SE5a Instrument Board part 2 - rev 1.1
 SE5a Instrument Board part 2 - rev 1.1 Fuel (Petrol) Valve This valve uses two circular name plates, eight brass screws, one black plastic base, copper wire and two black plastic risers. You can pick any
Installation Guide. Pionite Decorative Surfaces One Pionite Road, Auburn, Maine PIONITE ( )
") Installation Guide A Subsidiary of Panolam Surface Systems SMPBRO00-012 6/14 Pionite decorative laminates are designed for finished interior surfaces which require high impact, wear and stain resistance
Installation Guide A Subsidiary of Panolam Surface Systems SMPBRO00-012 6/14 Pionite decorative laminates are designed for finished interior surfaces which require high impact, wear and stain resistance
DIY RUSTIC HALL TREE
 DIY RUSTIC HALL TREE *Before beginning this project, please read through all of the plans as well as the blog post associated with this project. Always use safety precautions whenever using power tools
Miter Saw Super Stand
 Quality Power Tool Accessories OWNER S MANUAL Miter Saw Super Stand Models 2875/2875XL IMPORTANT Read and understand all safety guidelines and instructions carefully before operating. GENERAL INFORMATION
OWNER S MANUAL CONTENTS. The only table saw fence with Automatic Positioning Control TM
 The only table saw fence with Automatic Positioning Control TM OWNER S MANUAL Please read this owner s manual before use and keep it at hand for reference. Note: The INCRA TS III system consists of three
INSTALLATION INSTRUCTIONS
 INSTALLATION INSTRUCTIONS Trans4mer Mounting System Dodge Ram Kit No. 65220, 73132, 75525, 76253 (black) or 65221, 73133, 75530, 76254 (stainless) As you read these instructions, you will see NOTES, CAUTIONS
Electric Guitar Kit DC Style electric guitar kit
 Electric Guitar Kit DC Style electric guitar kit user manual Musikhaus Thomann Thomann GmbH Hans-Thomann-Straße 1 96138 Burgebrach Germany Telephone: +49 (0) 9546 9223-0 E-mail: info@thomann.de Internet:
WARNING. Bolt Torque Specifications Torque in Foot-Pounds for Inch Bolts Bolt Size Grade 5 Grade 8
 1. Blue Ox towing products and accessories are intended to be installed by Blue Ox Dealers who are familiar with our products and have the equipment and knowledge necessary to do fit work. If needed, Blue
How to Build A Porch Swing
 How to Build A Porch Swing SUPPLIES USED Tape measure Drill 2.5" Wood Screws 1.5" Wood Screws 2" Finishing nails Hammer (or nail gun if you're lucky) Sand paper/ Electric sander Exterior paint Safety glasses
(For models manufactured since 9/12)
") MODEL T24831 left-handed classic-style KIT INSTRUCTION Manual (For models manufactured since 9/12) Copyright OCtoBER, 2012 By Grizzly Industrial, Inc. REVISED OCtoBER, 2013 (BL) Warning: No portion of
MODEL T24831 left-handed classic-style KIT INSTRUCTION Manual (For models manufactured since 9/12) Copyright OCtoBER, 2012 By Grizzly Industrial, Inc. REVISED OCtoBER, 2013 (BL) Warning: No portion of
Entryway Locker 17 ½ 25 ½
 Copyright 2015 Shanty-2-Chic.com T Entryway Locker his old world entryway locker is loaded with possibilities. Two adjustable shelves allow you to customize the storage to fit your needs. Even better,
Solo ST Style DIY Electric Guitar Kit
 Solo ST Style DIY Electric Guitar Kit Assembly Manual V 2.0 Copyright 2017 Solo Music Gear. All rights reserved Wiring Diagram for your DIY Guitar Kit All our wiring diagrams are posted on our website
AFCO-Rail Post INSTALLATION INSTRUCTIONS AFCO-RAIL POST
 AFCO-Rail Post INSTALLATION INSTRUCTIONS TOOLS REQUIRED: Drill Bits (for the appropriate fastener) Drill (with adjustable clutch, recommended) Level String Line Tape Measure Tools to install fasteners
How to Mitre Mouldings
 How to Mitre Mouldings About Window and Door Mouldings Mitre cuts are a basic operation in most moulding installation. Mitre cuts are typically 45 degree angles, however many installations require minor
Dewalt Organizer Storage Cabinet Plans
 Dewalt Organizer Storage Cabinet Plans Version 1.0 How to build a system to perfectly organize you Dewalt storage organizers. With easy to follow step-by-step instructions, you will be able to cut, assemble,
Bulkhead Model Number and
 Bulkhead Model Number 96141-3-01 and 96142-3-01 Installing your ProMaster bulkhead is very clear cut following these instructions. Before cutting or drilling in the floor, verify the location of you gas
Sliding Door Kit
 YOU MUST READ THIS DOCUMENT BEFORE YOU BEGIN TO ASSEMBLE THE DOOR KIT. Thank you for purchasing this GrowSpan door kit. When properly assembled and maintained, this product will provide years of reliable
 WWW.CHAOSGUITARS.COM Bench Rate All services not associated with a fixed rate will be billed at a bench rate of $50 per hour with a minimum charge of $18. Fixed Rate Most of the common repairs and modifications
Please read BOTH these Installation Instructions and the General Towing Instructions before attempting to install or operate this equipment.
 Serial Number 2012 Hyundai Accent (No Foglights) Please read BOTH these and the General Towing Instructions before attempting to install or operate this equipment. 1. Blue Ox towing products and accessories
How to Build a DIY Extra Long Wood Bench
 How to Build a DIY Extra Long Wood Bench Free woodworking plans for building a large, extra-long wood bench. This bench measures 9 in length and is designed to match the DIY Large Outdoor Dining Table,
OPERATOR'S MANUAL RULES FOR SAFE OPERATION
 OPERATOR'S MANUAL #4950300 ROUTER AND JIG SAW MOUNTING KIT (FOR USE WITH THE BT3000 TABLE SAW) CONGRATULATIONS AND THANK YOU FOR BUYING THIS RYOBI ROUTER AND JIG SAW MOUNTING KIT. Your new #4950300 Router
Please read BOTH these Installation Instructions and the General Instructions prior to installing or operating this equipment.
 Attachment Tab Height: 13 Attachment Tab Width: 24 Please read BOTH these and the General Instructions prior to installing or operating this equipment. Serial Number 1. Blue Ox towing products and accessories
INSTALLATION INSTRUCTIONS
 INSTALLATION INSTRUCTIONS SPORTSMAN WINCH MOUNT GRILLE GUARD APPLICATION: 2016-2018 Toyota Tacoma PART NUMBER: 40-93885, 45-93880, 46-23885 ITEM QUANTITY DESCRIPTION TOOLS NEEDED 1 1 WINCH TRAY 15MM SOCKET
B-BENDER Do It Yourself Installation Instructions
 (Parsons/Green) B-BENDER Do It Yourself The Hipshot (Parsons/Green) B-Bender is designed and manufactured to provide decades of trouble free service when it is properly adjusted and installed. These installation
Kentucky 4H Wood Science Plans Notebook. Plans Level 3
 Kentucky 4H Wood Science Plans Notebook Plans Level 3 MATERIALS: 2 pieces wood 3/4 x 10 x 4 1 piece wood 3/4 x 12 x 4 2 pieces wood 3/4 x 3 x 2 5 1/2" 2 pieces wood 3/4 x 3 x 1 8 1 piece wood 2 x 4 x
Parts & Tools. O'Cello printing and assembly instructions. o-cello.com
 The O'Cello is a 3D-printable cello developed by Conor O'Kane, which is free to download and print for personal use. This document will show you how to print and assemble your own O'Cello. For the latest
WARNING BX1514. Serial Number Buick LaCrosse Installation Instructions
 Serial Number Please read BOTH these and the General Towing Instructions before attempting to install or operate this equipment. 1. Blue Ox towing products and accessories are intended to be installed
Patrol Box Plans by David J. Yarusso Troop 609
 Patrol Box Plans by David J. Yarusso Troop 609 Materials List: 1. One 4 x8 sheet of ½ thick cabinet grade (birch or oak) or AC plywood. If using AC grade, use the A grade surface on the outside for a clean
DIY Bedroom Entertainment Center
 DIY Bedroom Entertainment Center Free woodworking plans for building a bedroom entertainment center that also serves as a laundry sorter. Perfect for bedroom with limited wall space. Cost: ~$250 Difficulty:
User Instructions Multiline Otter Scoreboard Caddy Assembly
 List of parts: User Instructions Multiline Otter Scoreboard Caddy Assembly Single Caddy Double Caddy 1 1 Base assembly with attached wheels 2 4 1 1 2 4 4 8 10 20 12 Uprights (60 or 74 aluminum extrusion)
Assembly instructions
 Nerdy Gurdy Assembly instructions This manual describes how to assemble a Nerdy Gurdy kit. Go to http://www.nerdygurdy.nl for more info about these instruments. Jaap Brand The Netherlands January 2018
The GITTYLELE Ukulele Kit
 The GITTYLELE Ukulele Kit Assembly Instructions & How-To Guide Product #: 36-011-01 View this guide in full color online: www.cbgitty.com/gittylelekit Copyright 2016 C. B. Gitty Crafter Supply 1 SAFETY
Cigar Box Guitar Instructors Guide
 Building the Cigar Box Guitar Instructors Guide Developed by Building to Teach 1-18-17 Building the Cigar Box Guitar -(c) Building To Teach 2014 Introduction This project really engages students and helps