Crafting a Dizzy Bowl
|
|
|
- Hope Harmon
- 5 years ago
- Views:
Transcription

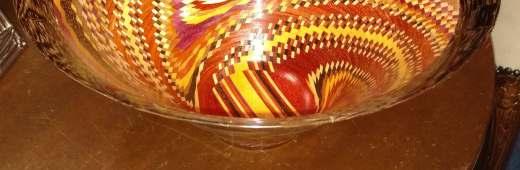
1 Crafting a Dizzy Bowl
2 Visit Youtube.com
3 Visit Youtube.com In the search section type dizzy bowl and you will find dozens of videos about turning dizzy bowls.
4 Visit Youtube.com In the search section type dizzy bowl and you will find dozens of videos about turning dizzy bowls. Watch some and familiarize yourself with the building process.
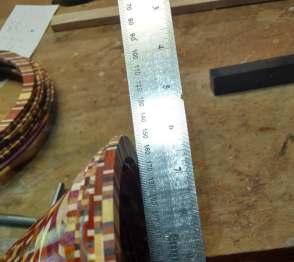
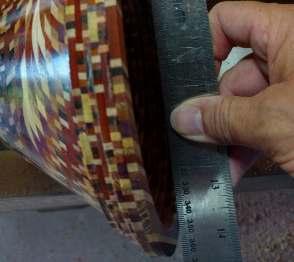
5 Before You Get Started Power tools that I used: Lathe Band saw Table saw Planer Jointer Drum sander Belt sander Disc sander Dust collector Hand tools that I used: Caliper 18 ruler Wood clamps Compass Self made jigs Wedge sled Sacrificial sanding plates Push block Ring press Centering jig
6 Things to consider Use only scrapers and scews because the majority of your bowl will consist of end-grains. Because the bowl will be end-grain if you do not have a multidirectional lathe you will not be able to sand the bowl completely smooth. The nap of the grain will cause the bowl to feel smooth from one direction and rough from the other. Do not attempt to turn down any part of the bowl until all the segments are added. If you turn each ring to thickness as you assemble the bowl, the thin base of the bowl may not sustain the weight of the unfinished section of the bowl. I speak from experience! By taking the time to glue the rings one at a time, and by using a centering jig, you will ensure all the rings are centered (the more rings you have the more important this is). I use Titebond I, or II aliphatic glue. I can glue a ring and in one hour return to the lathe, round, and flatten the ring and glue another ring onto the bowl.
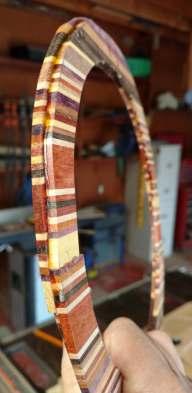
7 Designing your dizzy bowl Dizzy bowls are time consuming and tedious projects. Do not get in a hurry. Determine the diameter and depth of your bowl. Anticipate how many rings you will need to construct. Draw your bowl to scale including all the rings at correct dimensions. Select the different types of wood you will be using. The thinner your strips are the more spectacular your bowl will be.
8 Why draw your dizzy bowl to scale? You can visualize how large the bowl will be. You can determine the thickness of all your rings. You can determine how many rings you will need. You can label your rings on paper before you label your boards. You will have the measurements to all your rings. By drawing a line down the middle of your bowl you can use your drawing to set your compass. This saves a lot of time. You can determine the diameter of you rings in order to prevent wasted wood.


9 Drawing out your dizzy bowl


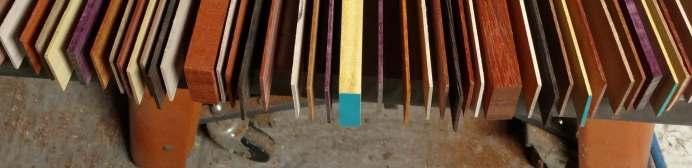
10 Selecting and rough cutting your wood For rough cut selections Cut all pieces to same length Cut all pieces to same thickness Preferably 2 thick or more. Width is not important at this point


11 Cutting your wood to desired thickness


12 Cutting your wood to desired thickness

13 Bi-symmetrical construction
14 Gluing your pieces


15 Gluing your pieces Use Caliper clamps to prevent wood strips from slipping out of place
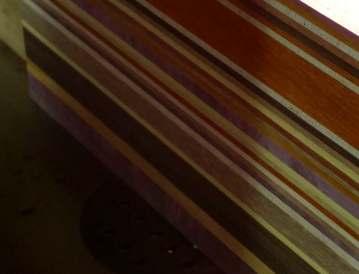
16 Glued and finished slabs

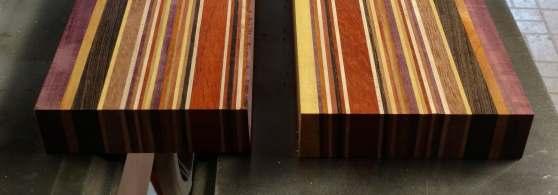
17 Glued and finished slabs


18 Re-sawing the slabs


19 Re-sawing the slabs I re-sawed the Slabs to 3/16 and drum sanded them down to 1/8


20 Re-sawing the slabs Slabs are smoothed and thickness set with my drum sander


21 Drawing your rings Twelve boards, Twenty-four halves. All are taped in the back. After the rings are drawn the halves are separated and cut on the band saw.


22 Marking your rings Only outer diameter of rings are drawn and cut. This allows for maximum width


23 Cut rings Because the rings Were 1 in width, I was able to cut two sets of rings and construct two Bowls instead of one.

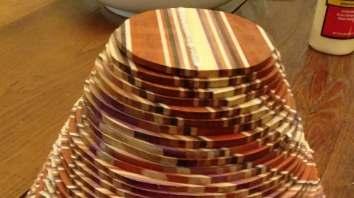
24 Dry stacking the rings

25 Making your pattern The dizzy pattern is created by turning each successive ring clockwise. Also every ring must be turned the same distance and in the same direction.
26 Ring Overlap After splitting the rings, each set of rings were now 7/16 in width. When the rings were stacked this allowed for a 5/16 overlap. Since I was stacking 36 rings, I had to make sure each ring was centered. From top to bottom, my combined margin for error was only 1/8.

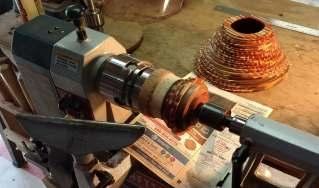

27 Assembly of bowl

28 Gluing the rings Each ring is only 1/8 thick and is comprised of dozens of narrow strips of wood. This makes them very fragile and flexible. So, if you drop one it will break. Also, they tend to warp when pressed together. For this reason. I first glue them in pairs. The staggered rings create a stronger and more rigid ring. This makes them less likely to break, or warp. This also allows you perform half your gluing at one time making for quicker assembly.


29 Using a Ring Press A ring press applies consistent pressure over entire ring. Use extreme caution when gluing more than two rings. They tend to slip! My Method: Glue two rings and press for five minutes. Start with widest rings. During this time glue two more ring, lift the press, lay paper between the two sets of pressed rings and press. Glue two more rings and continue process. Note: I glued the rings in pairs on the press. I took the pared rings and glued them in place on the lathe using my centering jig.


30 My high tech centering jig Centering the rings

31 Centering the rings Remove bowl from chuck and place upright. Dry fit the next ring and turn it to its proper location. Glue ring and press into place. Gently clamp bowl back into chuck. Center ring with centering jig. Make sure ring is still turned in proper place. Press the ring onto the bowl with centering jig. Wait at least one hour. Round out new ring with scraper. Make sure the flat surface of the ring is square and flat. Get next ring and repeat previous steps. Continue until all the rings are glued onto the bowl.


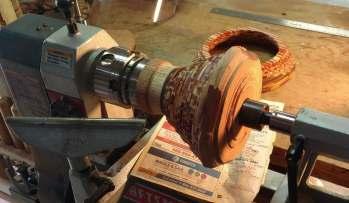
32 Flattening the face of the ring


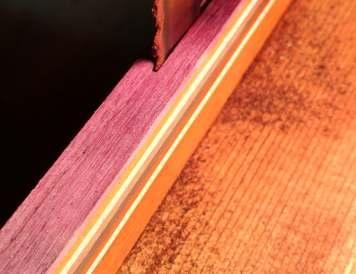
33 Adding the rim, or last ring Both the base and the rim were made with Wenge


34 1. Use scraper to smooth bowl. Final touches 2. Use caliper to gauge thickness. 3. Scrape bowl down to desired thickness. 4. Sand with 150, 240, 320, 400, and 600 grit. 5. Sand with 1500, 1800, 2400, 3200 grit micromesh. 6. Finish with a clear gloss. 7. Cut off of sacrificial block. 8. Enjoy your bowl.

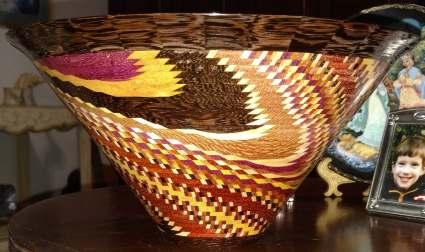

35 Finished Bowl
How to Construct the 8-Point Star by Jay S. Helland
 How to Construct the 8-Point Star by Jay S. Helland 1-5-2013 The photos in these instructions were not taken in consequential order but provide the reader the general idea of the processed used. The process
FLAT TO FABULOUS Make a Bowl from a Single Flat Board - Or How to Eat Salad off of Scrap Wood
 FLAT TO FABULOUS Make a Bowl from a Single Flat Board - Or How to Eat Salad off of Scrap Wood Let s face it: Woodworkers are frugal people. In fact, if you are anything like me, you have a hard time throwing
SEGMENTED TURNING. Segmenting 101
 SEGMENTED TURNING Segmenting 101 The greatest difference between segmented turning and traditional turning is the turner must decide what final form the turning will take even before the first cut is made.
Instructables Butcher Block Top
 Instructables Butcher Block Top Project Overview: This project requires basic woodworking skills and access to woodworking machines. Woodworking machines have sharp cutting edges and are NOT forgiving.
Presentation by Vic Buxton Valley Wood Turners Meeting April 10, 2012
 Presentation by Vic Buxton Valley Wood Turners Meeting April 10, 2012 1 Segmented wood turning is much more than gluing together pieces of wood. It is about creating exciting objects that challenge you
Odd Wobbler Instructions By: Don Geiger
 Odd Wobbler Instructions By: Don Geiger Stock Size Calculations and Reference Table When preparing stock material for turning an Odd Wobbler, you will need two pieces of dry wood that is about one inch
e) Attach the faceplate/backing plate assembly to the spindle. PROCESS
 Attach the faceplate/backing plate assembly to the spindle. PROCESS") BOARD TURNING This is an exercise in turning which can open up new vistas and potentials for any turner. A form of segmented turning best described as "STACK LAMINATE TURNING", this is unique in that it
BOARD TURNING This is an exercise in turning which can open up new vistas and potentials for any turner. A form of segmented turning best described as "STACK LAMINATE TURNING", this is unique in that it
COMPLIMENTARY WOODWORKING PLAN
 COMPLIMENTARY WOODWORKING PLAN COFFEE TABLE PLAN This downloadable plan is copyrighted. Please do not share or redistribute this plan in any way. It has been paid for on your behalf by JET Tools, a division
Perhaps the best thing about. Three bowls slightly rearranged Twisted Possibilities
 Three bowls slightly rearranged Twisted Possibilities By Malcolm Tibbetts Lacewood Ribbon, 13 7½" Perhaps the best thing about segmented turning is the total lack of restrictions; there is no end to the
Segmented Bowl Making Presentation (Polychromatic Stave-Type Bowl Making) by Jay Helland Lee s Summit, Missouri
 by Jay Helland Lee s Summit, Missouri") Segmented Bowl Making Presentation (Polychromatic Stave-Type Bowl Making) by Jay Helland Lee s Summit, Missouri In Remembrance of George Sonnie Sharrar Oct. 2, 1914-Dec. 25,2007 (Patternmaker, Master Bowl
Segmented Bowl Making Presentation (Polychromatic Stave-Type Bowl Making) by Jay Helland Lee s Summit, Missouri In Remembrance of George Sonnie Sharrar Oct. 2, 1914-Dec. 25,2007 (Patternmaker, Master Bowl
Christmas Bell Ornament
 Christmas Bell Ornament This is an easy Christmas ornament idea I cabbaged from a friend and skilled turner, Curt Fuller, from Utah. I kind of adapted it to my style but I still got the idea from him.
ALAN CARTER STUDIO 5332 RIVERVIEW DR., LISLE, IL
 ALAN CARTER STUDIO 5332 RIVERVIEW DR., LISLE, IL 60532 630-971-0690 apcarter@sbcglobal.net www.alancarterstudio.com SPLITTING THE DIFFERENCE This is for all you slackers out there. Sometimes half measures
Slicing Jig For Pen Inlays
 Slicing Jig For Pen Inlays By Randall Smith (randyrls) May 2008 This article has been downloaded from the library of the International Association of Penturners. www.penturners.org You are welcome to reproduce
Jimmy s 2 nd demonstration was what he called an African Drum style box made from Iroko with a cocobolo insert in the lid with inlaid sterling silver.
 Jimmy s 2 nd demonstration was what he called an African Drum style box made from Iroko with a cocobolo insert in the lid with inlaid sterling silver. He started by roughing out the block with a roughing
Instructions for Turning Laminated Bracelets
 Instructions for Turning Laminated Bracelets 1. Start with Design 1. Make a paper template circle for the bracelet. Use this to check the fit on the person you are making the bracelet for. After checking
Grade 11 Woods Lift Lid Coffee Table. Based on Under the big Top from Popular Mechanics Website
 Grade 11 Woods Lift Lid Coffee Table Based on Under the big Top from Popular Mechanics Website TABLE TOP 1. Select enough lumber to construct a top that is between 22 ½ and 24 wide after jointing. Ensure
Segmented Bowl Making Presentation (Polychromatic Stave-Type Bowl Making) by Jay Helland
 by Jay Helland") Segmented Bowl Making Presentation (Polychromatic Stave-Type Bowl Making) by Jay Helland More Woodworker than Wood Turner George Sonnie Sharrar About Your Safety Working with wood is inherently dangerous!
Segmented Bowl Making Presentation (Polychromatic Stave-Type Bowl Making) by Jay Helland More Woodworker than Wood Turner George Sonnie Sharrar About Your Safety Working with wood is inherently dangerous!
This computer software described in this document facilitates the calculation of the segment length of each ring.
 SEGMENTED TURNING What is it? Segmented turning is the creation of a bowl, vase or similar object by the assembly of small wooden segments. The segments are assembled into rings and the number of segments
GENERAL NOTES: Page 1 of 9
 Laminating A Zia Into A Turning Blank by W. H. Kloepping, Jan. 2009 This describes how a zia (the New Mexico state symbol) can be laminated into a turning blank. Materials needed: Square Turning Block
Nojo Design: Large Step Cabinet: February 2012
 Nojo Design: Large Step Cabinet: February 2012 The largest single piece of furniture I ve ever made is this stepped cabinet. Finished piece is 8! tall and over 10 long. This project has been great, although
Denise M. DeRose Handled Clamshell Handbag
 Denise M. DeRose Handled Clamshell Handbag Materials: Wood 2 discs between 6 and 9 in diameter -- 4/4, 6/4 or 8/4 1 piece of thin hardwood ¼ inch thick and 4 x 10 Wood for waste blocks Supplies Small piece
Curved Pieces are a Common Woodworking Challenge
 Curved Pieces are a Common Woodworking Challenge I recently created a set of four dining chairs that required three curved back rest pieces each. On the top piece of each chair I wanted to inlay a marquetry
Framework joints FABRICATION - WOOD JOINTS. Corner joints. Tee joints. Worksheet 15a. Cable Educational Ltd
 FABRICATION - WOOD JOINTS The word: fabricate means to join together. Most wooden products are held together with adhesive. Adhesive works very well when the edge of a piece of wood is being glued to the
Two-Piece Hollow Form Turning Hollowing Without the Hassle
 Two-Piece Hollow Form Turning Hollowing Without the Hassle Finger Lakes Woodturners January 17, 2013 1 Hollow Turning Usually turning a closed or semi-closed form through a small opening Can be done using
How to Make a 400 BC Greek Oenochoe Style Wine Pourer
 How to Make a 400 BC Greek Oenochoe Style Wine Pourer The purpose of the demonstration is to show how to make a hollow form wine pourer in the style of ancient Greek pottery. Live demonstration on the
Volvo 1800 Smiths Gauge Face Overlay Installation By Dave Barton
 Volvo 1800 Smiths Gauge Face Overlay Installation By Dave Barton These face overlays are the product of a lot of research. They are printed with a special printer using waterproof and UV resistant ink
3D END GRAIN CUTTING BOARD N3
 3D END GRAIN CUTTING BOARD N3 mtmwood 2014 This pattern shows a 3D optical illusion of the zigzag wall lit by the sun. I used hard maple, black walnut and black cherry for this project. You may use other
Shaker Shop Stool. By Glen D. Huey
 Shaker Shop Stool By Glen D. Huey By the turn of the decade following Mother Ann Lee s visit in 1783, the Massachusetts Shaker community known as Hancock began its existence. From a small gathering of
Turning an End Grain Lidded Box
 Turning an End Grain Lidded Box by Michael Stafford Copyright 2006 All Rights Reserved 1 Turning an End Grain Lidded Box Turning an end grain lidded box differs from face grain bowl turning primarily in
How to Edge Joint Boards
 How to Edge Joint Boards It s unusual to find solid boards much over 300mm wide, and anything over about 150mkm is likely to be unstable. So for wide solid pieces it is necessary to edge joint boards together
TURNING A NATURAL EDGE BOWL
 TURNING A NATURAL EDGE BOWL by Jim Burrowes Make sure your lathe is at the lowest speed setting.first, mount your blank between centers. Use the tool rest as a reference to align the top (bark side) so
BUILD THE. Soleil Royal. Pack 1. The flagship of King Louis XIV.
 BUILD THE Soleil Royal The flagship of King Louis XIV www.model-space.com Pack 1 Stage 1 Assembly Guide Hull frame, false keel and first deck half A 4 2 5 1 6 7 1A Smooth the surfaces of all the pieces
How to Make a Hat Bending Jig
 How to Make a Hat Bending Jig MATERIALS One 2" x 8" x 11" long (Base Block) exact measurements are 7 ½" x 1 ½" x 11" (Pine is OK to use, I have used scrap Walnut for my benders) Four pieces of Oak 1" x
Making a snap lid box By Jeffrey A Lavine
 Making a snap lid box By Jeffrey A Lavine Some call them boxes, some call them lidded bowls, others call them vessels or containers but whatever you call them they are both enjoyable and a challenge to
Cactus Routed Bowl. MLCS Items Needed:
 Cactus Routed Bowl MLCS Items Needed: Cactus Bowl and Tray Template #9188 Top Mounted Bearing Dish Cutter Router Bit #7817 1/2 Router Collet Extension and Wrenches #9465 45* Degree Chamfer Bit #7676 1-3/8
Notes for Making Wood Rings With Stainless Steel Insert Centers
 Notes for Making Wood Rings With Stainless Steel Insert Centers Background These notes describe how to make a ring with a stainless steel (SS) insert and a wood exterior band. They also include information
Chili Pepper Routed Bowl
 Chili Pepper Routed Bowl MLCS Items Needed: Chili Pepper Bowl and Tray Template #9189 Top Mounted Bearing Dish Cutter Router Bit #7817 1/2 Router Collet Extension and Wrenches #9465 3/16 Radius Round Over
Volvo 1800 Smiths Gauge Face Overlay Installation By Dave Barton
 Volvo 1800 Smiths Gauge Face Overlay Installation By Dave Barton These face overlays are the product of a lot of research. They are printed with a special printer using waterproof and UV resistant ink
Fig2: The Sliding Glue Block from the back.
 Ornament Stand Introduction It was one of those forehead smacking moments. I was taking the #2 jaws off my Stronghold chuck, to put on my homemade wooden two jaw chuck set-up. For some reason instead of
Kitchen Step Stool. Premium Plan. In this plan you ll find: America s leading woodworking authority
 America s leading woodworking authority Premium Plan In this plan you ll find: Step-by-step construction instruction. A complete bill of materials. Construction drawings and related photos. Tips to help
Al & Gary's Illusionist Heart
 Al & Gary's Illusionist Heart Plans and Instructions by: Albert Herwig and Gary A. Emerich Al & Gary's Illusionist Heart As Al Would Say: It's a pendant Now it's a heart Our pictures are in there My children'
3Position the hull of the ship as
 Yamato: Step-by-step 25 The hull and stern deck c b d a b d c e e f a Rear frame b Stern deck x 2 c Stern deck x 2 d Side wall x 2 Wood glue Sandpaper (no. 400 grain) Craft knife Pliers d Side wall x 2
Jimmy Clewes Masterclass - Cheam Woodturners 10th November 2013
 This demonstration was the first time in 6 years that Jimmy has demonstrated in the UK. He pointed out that the techniques he uses are his alone, that it is important to enjoy woodturning and do whatever
PITTS S2S CONSTRUCTION
 PITTS S2S CONSTRUCTION FUSELAGE CONSTRUCTION 1) Place the right fuselage side over the plan and mark the former positions. Place the left side over the right side and mark the former positions. Glue F1
The following is the process of preparing the making the wedge ornament
 Wedge Christmas Ornament The following is the process of preparing the making the wedge ornament Setting up your saw to cut true 11.25 degree angles for a 16 piece to make a circle that will form the globe
Hornsby Woodworking Men s Shed. Guide to the Shed s Woodworking Machines
 Guide to the Shed s Woodworking Machines SP00 Purpose The primary purpose of this document is to assist the induction of new members of the Hornsby Woodworking Men s Shed in the identification and understanding
ARTS AND CRAFTS CHAIR
 ARTS AND CRAFTS CHAIR 491 MATERIALS LIST--DINING CHAIR Key No. Size and description (use) A 2 1-3/4 x 1-3/4 x 16-1/4'' oak (front leg) B 2 1-3/4 x 3-3/4 x 40-1/2'' oak (rear leg) C 1 1-3/4 x 3-3/16 x 15''
Contents. pages 20-24: Installing Edge sinks into. custom laminate countertops page 8: Installing Edge sinks into postform laminate countertops
 Contents pages 2-8: Installing Edge sinks into custom laminate countertops page 8: Installing Edge sinks into postform laminate countertops pages 9-14: Installing Acrylic sinks into custom laminate countertops
Wooden Faceplates. Tapping on the Lathe
 Wooden Faceplates There are lots of turning jobs where spending some time on set-up makes the turning go quicker and easier. Making Wooden Faceplates is one way to make set-ups and jigs for turning. As
Durable Outdoor Table
 54 F I N E W O O D W O R K I N G Durable Outdoor Table Ipé table will seat six and weather many seasons B Y D A V I D B E D R O S I A N Last summer brought a new pool to our backyard. With it came more
O nament. Birdhouse. Birdhouse Christmas ornaments have become very
 Birdhouse O nament Photo by Al Parrish Dale Nish, one of the principal architects of the turning revival, shares some turning techniques. Birdhouse Christmas ornaments have become very popular the last
Build A Cedar Chair And Ottoman
 Build A Cedar Chair And Ottoman If you've ever dreamed of extending the comfort of your living room to your deck, patio or yard, our porch chair-and-ottoman combination is a great place to start making
Rosalina Accessories Tutorial Version March 2011 Martyn
 Rosalina Accessories Tutorial Version 1.0 - March 2011 Martyn Star Brooch Feel free to experiment with these dimensions, you should make a template you are happy with, the method still works. 1) Creating
MLCS Instructions for Bowl and Tray Template Kit #9176/#9179
 MLCS Instructions for Bowl and Tray Template Kit #9176/#9179 Tools Needed: Router 1-1/2 h.p. Minimum recommended with a 1/2 collet Forstner bit 3/4-2 recommended depending on template used Drill Press
LITTLE CRITTERS WITH CHARACTER
 LITTLE CRITTERS WITH CHARACTER Spindle Turning for FUN By Linda Ferber You will discover there are many design options that will give these critters personality. Make these in batches; I am sure you will
Cut two squares of 1/2 to 3/4 stock that are the exact size of your coaster blanks. Stacking Coasters
 Stacking Coasters Main: Maple and Corian nested stacking coasters. Introduction My wife asked for more coasters. We have a nice quartet of square glass ones I had gotten at the ACC Craft Fair years ago,
ALAN CARTER STUDIO 7 Cane Creek Circle, Fairview, NC
 ALAN CARTER STUDIO 7 Cane Creek Circle, Fairview, NC 28730 630-390-8821 apcarter@sbcglobal.net www.alancarterstudio.com TURNING SMALL GOBLETS As a follow up to my thin stem article, here s a how-to on
Hand Dovetails. They're really not that hard to do. by Alphonse Mattia
 Hand Dovetails They're really not that hard to do by Alphonse Mattia Dovetailing is one of the strongest and most attractive methods of joining the ends of boards together. Traditionally, handcut dovetails
Guild of Oregon Woodworkers Shop Safety Test
 Guild of Oregon Woodworkers Shop Safety Test You must pass the Test with an 80% or better and self-correct it to 100% Make sure you put the answers under the correct portion of the answer sheet for the
Turning a Christmas Angel
 Turning a Christmas Angel Introduction I was at work one day and a co-worker asked if I had ever turned an angel. I said no. She said I picked one up at craft fair while on vacation. Would you like to
The Simple Birdhouse Ornament
 The Simple Birdhouse Ornament There are a number of techniques for constructing birdhouse Christmas ornaments and the resulting ornaments vary from simple to very ornate and complicated. It has been my
REINFORCING THE CORNERS OF FLAT FRAMES
 REINFORCING THE CORNERS OF FLAT FRAMES There are a number of different methods that may be used to join flat frame sides together. As most Woodworkers know, end grain glue joints are not nearly as strong
Phase Two. The Skirt, Play Area and Sub Table ( continued )
") Dry fit the skirt in place and make sure all is tight. Drill a countersink screw hole on the back of the skirt down where you will connect it to the bull nose. Make three holes on each board (ends and
Dry fit the skirt in place and make sure all is tight. Drill a countersink screw hole on the back of the skirt down where you will connect it to the bull nose. Make three holes on each board (ends and
TURNED BIRD HOUSES Shelter from half-inch-thick stock
 TURNED BIRD HOUSES Shelter from half-inch-thick stock SUSAN SCHAUER LOCALS CALL ME THE BIRDHOUSE Lady. I take it as a compliment. My turning career began making lathe-turned birdhouses, and I continue
COPYRIGHT 2011 by The Taunton Press, Inc. Copying and distribution of this article is not permitted.
 30 FINE woodworking Shaker Side Table 1 2 in. Build a delicate version of this iconic round stand Subtop, 3 4 in. thick by 7 in. dia. Top, 1 2 in. thick by 16 1 8 in. dia. top edge Profile 3 4 in. BY CHRISTIAN
Turning Small Squarish Dished Platters Rev 2.1 5/5/2018
 Turning Small Squarish Dished Platters Rev 2.1 5/5/2018 John K Jordan jordanjk@gmail.com These are "small," perhaps about 7.5" to 10.5" across. They are "squarish," not quite square. I call them "dished
Step-by-Step Instructions for Making the Wall-hung Bookcase
 Step-by-Step Instructions for Making the Wall-hung Bookcase When a piece of furniture has an air and look of simplicity, you can be sure that it deftly conceals the complexity of its making. I wanted this
BUILDING A STORM DOOR
 BUILDING A STORM DOOR BY NEAL BARRETT Illustrations by George Retseck If you're in the market for a storm door, you probably know that there are many styles and models available. However, most of them
Agricultural Mechanics and Technology Power Tool Safety Rules
 Agricultural Mechanics and Technology Power Tool Safety Rules Name: BAND SAW Use: Cutting curves, circles and irregular shapes. 1. Use clean SHARP blades. 2. The teeth should always point DOWN. 3. Adjust
How I built my Breezy pieces
 How I built my Breezy pieces Segment Pro to start with I started with the Segment Pro software. My talent with this program is poor; I can t wait to get to the St Louis Symposium to get some better understanding
By Gail Cone. Disclaimer This is a presentation on how I created this project. It is not intended to be a definitive how to.
 By Gail Cone Disclaimer This is a presentation on how I created this project. It is not intended to be a definitive how to. 3/11/2014 The inspiration for this furniture project. This table was presented
Apartment Dining Table
 Jeff Branch WOODWORKING You Can Build an Apartment Dining Table By JEFF BRANCH H ave you ever found yourself wanting a new piece of furniture, but everything you see in stores is too big? Big furniture
Laminated Furniture Components
 Laminated Furniture Components Dec 2010 Woodworkers Simple Round Cherry Table Fritz Smith Cherry - 2008 Woodworkers 2 Snowboard Bench Fritz Smith White Oak Snowboard - 2009 Woodworkers 3 Fritz Smith Shell
1983 Jaguar XJS Interior Wood Trim Repair and Refinishing
 The following describes and shows one method of wood trim repair/restoration/refinishing for wood trim on Jaguar cars, specifically this 1983 Jaguar XJS, although the wood trim should be the same in all
Max Launch Abort System Prod. No *Kevlar is a registered trademark of Dupont
 Flying Model Parts List Max Launch Abort System Prod. No. 3014 A 11820 - Body Tube 3.5 Diam x 5.5" Long B 11824 - Orange Capsule Base Shoulder Ring C 16032 - Laser-cut Ring motor mount rear D 16033 - Laser-cut
Butcher Block Countertop
 A friend asked if I would be willing and able to construct a new countertop for an existing island in his kitchen. He had priced countertops of granite and many other materials, but his wife was partial
EZYSTONE WORKSURFACES
 EZYSTONE WORKSURFACES Installation & Maintenance Instructions 1. Tools Required Worktop Edge Finishing Kit Pack 1-100mm Velcro Backing Pad Pack 2-100mm Diamond Dry Cut Velcro Discs (100 Grit Yellow) (200
Curved Metal Segmenting
 Curved Metal Segmenting A Tutorial by: David Washburn A.K.A djwood1 This tutorial was downloaded from The International Association of Penturners Introduction As I continue to learn about pen turning,
BONDO PROCESS. Installation Guide.
 BONDO PROCESS Installation Guide www.karran.com BONDO PROCESS This Installation Guide demonstrates simple methods and proven techniques for seamlessly installing Karran undermount sinks in laminate countertops.
Working with Wood and Wood Materials
 Working with Wood and Wood Materials Excerpt from the Bosch Encyclopedia of Power Tools. Written & Published by ROBERT BOSCH GmbH and Robert Bosch Tool Corporation. The grain direction of the fibers determines
OFFSET TURNINGS. By using an eccentric chuck, SHOPMADE CHUCK BUILD A FOR. David Mueller FEATURE. Build the chuck body
 FEATURE BUILD A SHOPMADE CHUCK FOR OFFSET TURNINGS David Mueller By using an eccentric chuck, you can add interest to turnings such as pendants and box lids. The workpiece is mounted out of alignment with
SE5a Instrument Board part 2 - rev 1.1
 SE5a Instrument Board part 2 - rev 1.1 Fuel (Petrol) Valve This valve uses two circular name plates, eight brass screws, one black plastic base, copper wire and two black plastic risers. You can pick any
Making a Cement Upper Molding Surface for Compression Molding of Shape&Roll Prosthetic Foot Cores
 Making a Cement Upper Molding Surface for Compression Molding of Shape&Roll Prosthetic Foot Cores Andrew Hansen, PhD Steven Steer, MS Kerice Tucker Elizabeth Klodd Craig Heckathorne, MS Northwestern University
WOODWORKING GUIDE: BASIC JOINERY
 WOODWORKING GUIDE: BASIC JOINERY Close isn't really good enough. A perfect fit is what counts. When building furniture, there are many ways to construct joints. The simplest are those that use mechanical
Greene & Greene. Mailbox. by Seth Keller. Signature details create an elegant box. 2 AmericanWoodworker.com
 Greene & Greene Mailbox by Seth Keller Signature details create an elegant box. 2 AmericanWoodworker.com We needed a new mailbox, but I couldn t find an off-the-shelf version that I liked. So I decided
Powermatic Model 31A Combination Belt-Disk Sander
 OPERATING PROCEDURE FOR: Powermatic Model 31A Combination Belt-Disk Sander INTRODUCTION: The combination belt-disk sander is used to sand the edges of boards. It can be used to smooth the edge or to remove
Gently slide the roundnose chisel on the tool rest and into the grinding wheel. Like you practiced, pivot the chisel to grind the bevel.
 Set the roundnose chisel, bevel down on the tool rest. Slide the chisel forward until the center of the chisel touches the grinding wheel (Figure 24-21). With the machine "OFF" prac-tice pivoting the roundnose
Simple Segment Project
 Simple Segment Project Prompted by a Thread question by woodfarmer regarding cutting segments for bowls on UKWorkshop forum I jumped in with some images. I've taken the liberty of cribbing some of the
Bangle Bracelet Instructions
 Bangle Bracelet Instructions (Using Penn State Bangle Bracelets) Tools & Equipment: Lathe, turning tools of choice, Band saw or scroll saw, Drill Press or 4 jaw lathe chuck with standard #2 jaws, mini
Building Instructions
 Building Instructions Tools Required Tape measure Straight edge Pencil/pen Jigsaw Table Saw Circular Saw Electric drill 1 Hole saw bit Saw horses/table Protractor Staple gun Caulk gun Paint brush Wrenches
Sweetheart Clock. About this project. Project Sponsor: INCRA Precision Tools. Woodturner PRO, LLC. Lloyd Johnson, artist
 Woodturner PRO, LLC Sweetheart Clock Lloyd Johnson, artist Special points of interest: - Cutting thin strips safely AND with consistent results - Design considerations to improve results - Registration
Windsor Chair Online. Assembly Instructions
 Windsor Chair Online Assembly Instructions Date: 1/4/2007 Other Chairs Offered Philadelphia Arm Chair New England Comb Back Sackback d Arm Chair Bow Back Side Chair Fan Back Side Chair Page 1 Table of
This is a solid wood cabinet. The only plywood used is for the back and drawer bottoms.
 Sideboard Sideboard Overview: This project requires basic woodworking skills and access to woodworking machines. Woodworking machines have sharp cutting edges and are NOT forgiving. You should be properly
A Cross Drilling Tape, Version 1.2
 A Cross Drilling Tape, Version 1.2 By R. G. Sparber Copyleft protects this document. 1 Here is my cross drilling tape measure: When I need to cross drill a piece of pipe, there are two options. I can pull
Homemade Sanding Tools David Hoehns
 Homemade Sanding Tools David Hoehns allskewedup@gmail.com 806 789 5108 My demonstration will focus on two types of homemade sanding devices, a foam ball sander that may be used for power sanding concave
BENCH MORTICER. Woodworking Equipment Bench Morticer with Sliding Table. trade level
 BENCH MORTICER 01944 Bench Morticer with Sliding Table A compact bench mounted morticer giving high levels of accuracy, ease of use with industrial features at an affordable price. An important feature
TURNING A PEN ORIGINAL BY MIKE RUDE REVISED BY GORDON PATNUDE - AUGUST 2015, OCTOBER 2016 EQUIPMENT AND SUPPLIES NEEDED
 TURNING A PEN ORIGINAL BY MIKE RUDE SEPT 2006 REVISED BY GORDON PATNUDE - AUGUST 2015, OCTOBER 2016 PHOTOGRAPHY BY JIM GOTT AUGUST 2015 EQUIPMENT AND SUPPLIES NEEDED A PEN TURNING TUTORIAL [this document]
 America s leading woodworking authority To download these plans, you will need Adobe Reader installed on your computer. If you want to get a free copy, visit: http://adobe.com/ reader. Having trouble downloading
No lathe? No Problem!
 No lathe? No Problem! J. D. Michne I was in the Northeastern Woodworkers Association (NWA) Learning Center, teaching some members how to build a cedar stripped canoe. There were some other members working
Project Plans Kreg Tool Company/BuildSomething. All Rights Reserved.
 BY Project Plans ONE-OF-A-KIND CUTTING BOARD This solid-maple cutting board offers ample space for cutting and a comfortable handle, but the most-unique feature lies underneath. A cutout in the lower layer