Phase Two. The Skirt, Play Area and Sub Table ( continued )
|
|
|
- Britney Hodge
- 5 years ago
- Views:
Transcription
1
2
 and follow it with a pilot hole into the bull nose. Watch not to drill thru the bull nose.")
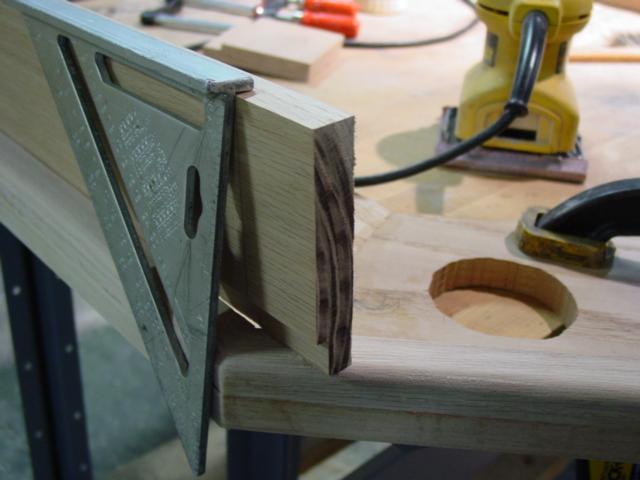
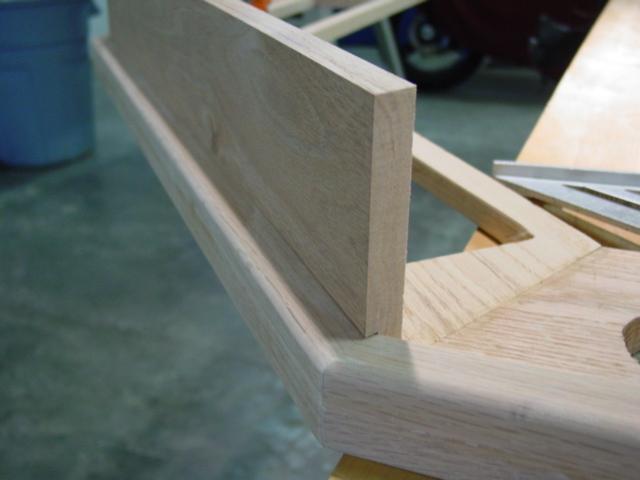
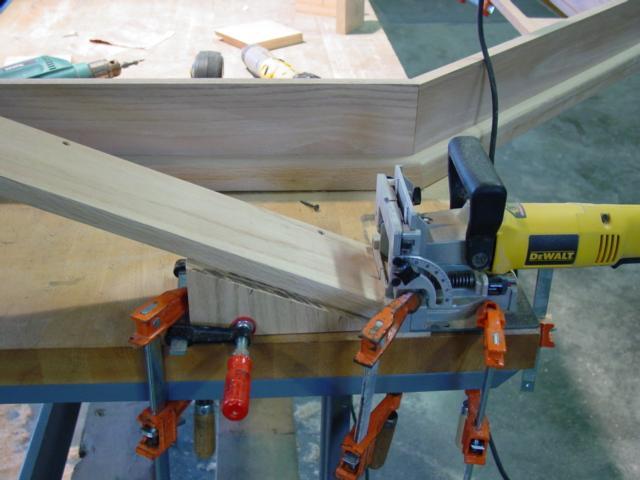
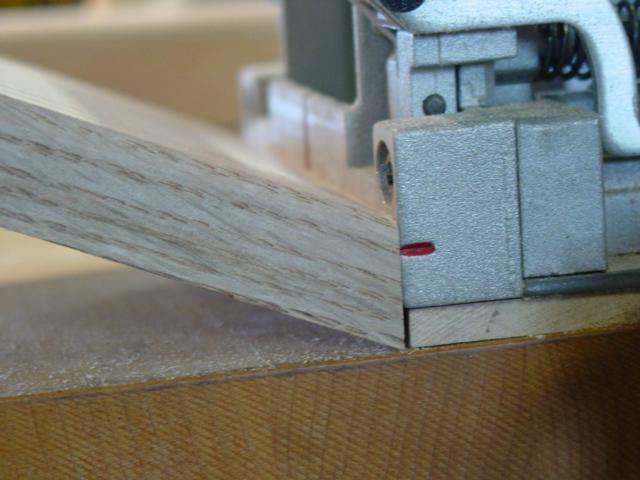
3 Dry fit the skirt in place and make sure all is tight. Drill a countersink screw hole on the back of the skirt down where you will connect it to the bull nose. Make three holes on each board (ends and middle) and follow it with a pilot hole into the bull nose. Watch not to drill thru the bull nose. Time to get your joiner back out and make your cuts on the skirt pieces. I setup a 22.5 angle jig for this. Make biscuit location and cut both side. You will only be using one biscuit per joint. Notice how I use a shim (1/4") to pickup the joiner. You can adjust the the plate but since this is the only time I would use this height I just use a shim. Lay out all the pieces and get ready to glue, screw and set.
4
5

6

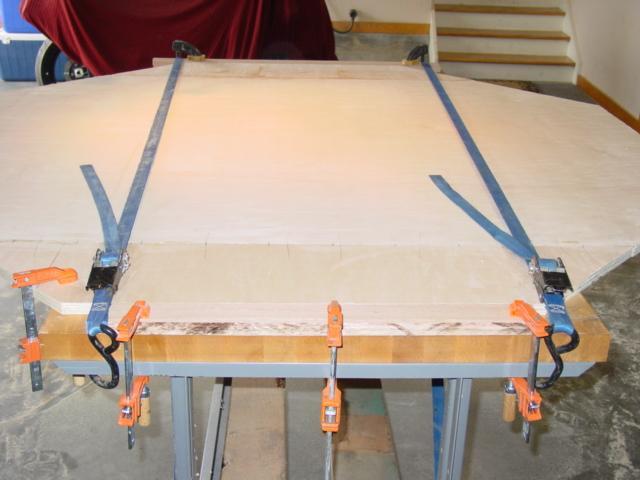
7 This part requires that you have a ratchet type tie down straps (18' minimum) and clamps. Work here will have to go fast so if you can find someone to help do it. Start with any end and apply glue. Jump right into the next piece and start connecting it with the biscuits on top of the octagon ring. Continue till you have all eight skirt pieces glue and sitting on top of ring. Apply glue to the back of the bull nose. Now push and force the skirt down into the ring behind the bull nose. Once down wrap the strap around the skirt and start to tighten up the strap. Use clamps to keep the skirt down on the ring. Notice the paper towels at the skirt joint. Clean up the glue as it comes out the joints. Screw in the bottom of the skirt and use clamps to keep the board down. Once screwed you can remove the clamps. Let sit and dry over night.

8 What I did while waiting for the glue to dry was flip the octagon over and did some palm sanding with 120 sandpaper. Your skirt should be nice and dry some remove the strap. Looks nice don't it. Flip it back over and get your router. Use a 3/8" quarter round bit and round off the bottom of the skirt. Careful to keep level and balance when working the router around the bottom of the skirt. After you router the bottom sand the skirt with 120.

9 That's it with the octagon and skirt. Let's move on to the table platform and play area.

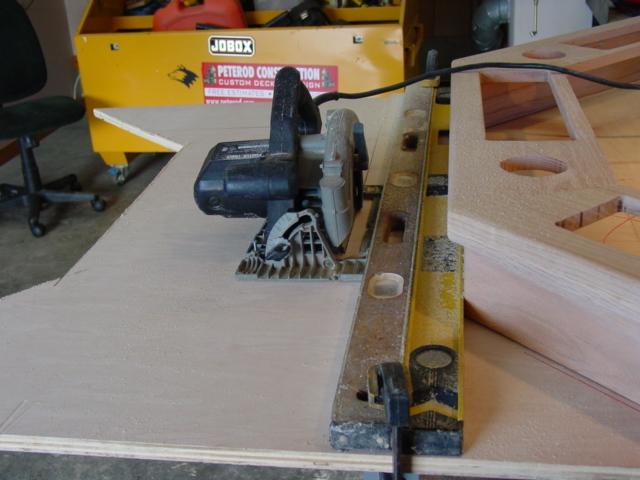
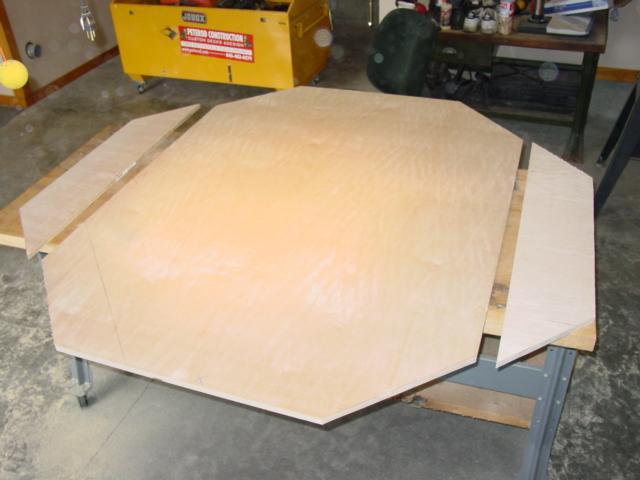
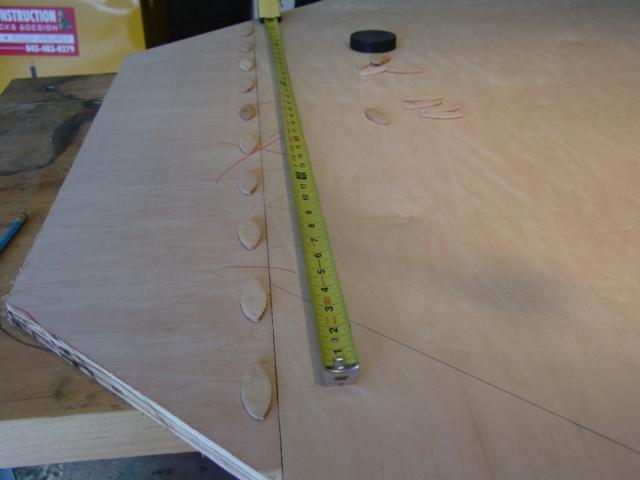
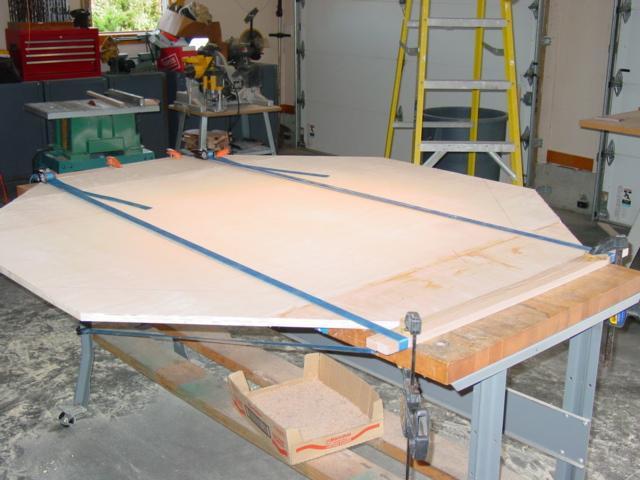
10 Your table platform and playing area are made from two pieces of Plywood. Check the sheet and make sure it is not warped. Lay one on your work bench or saw horse. Making the sub table platform can be done one of two ways. Let's go with the easy way guys. Get someone to help you with laying the octagon ring on the plywood sheet skirt facing down. We are going to trace the octagon onto the sheet. Position the ring center of the ply with all the waste to one end. Trace the ring out line and cut with your circular saw. Notice in the picture how the ply is not big enough to make the platform. We will add the waste to complete the shape. Take your ply cut off and position and trace. See how I set up a level to make a true straight cut for the other side. Remove the ring and ready to the joiner again. I used a biscuit every 4" so mark and cut your joint. Straps were used to press the joints together (see my setup) but you can also do the wedge system
11
12
13
14
15
16

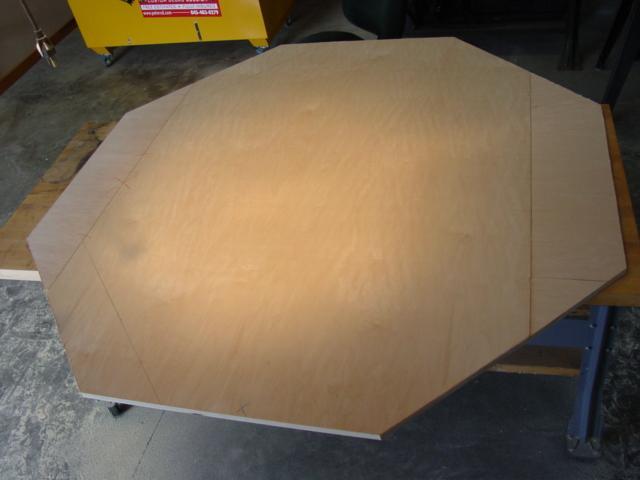
17 What is key in the above step is to keep the plywood down while it set's up. I used a wedge to do the play area so on to that. Using you other sheet of plywood lay it on your bench and place the octagon ring on top facing down. Trace the octagon outline onto the plywood and cut it up. Secure the piece on the bench with clamps. Using the blow picture as a guild lets add the rest of the play area with biscuits and use wedges to press the joint. Let dry overnight.

18 Remove all the clamps and the wedges and put the ring back on top of the plywood. Trace the rest of the octagon and trim with your circular saw. Later on we will sand it for fit within the ring.

19 That's it for the sub table and play area for now. In the next phase we get into the pedestal and table connection.

20 Phase Three The Pedestal And Table Connection So your Octagon Ring is done, the sub table and play slab are done. We move on here to the Pedestal and table connection. Truth be said it be easier to go out and buy some cheap folding legs or a prefabricate oak pedestal. But this is your oak table and all must be you. Take into account the size of the table. The bigger the table the wider your leg base needs to be. I have a 48" leg span for my 67" table. Keep that in mind when you do this. Let's find some 6/4"x6" finish oak stock. Using eight pieces by 24" means finding 16' of it. Check it for cracks. If you can see if you can find "HEART" lubber. Heart is the section near the middle of the core. No knocks in the wood please. You will be using 6/4"x4" for the legs also so get it while you are at it. You will need 8' for the legs. This pedestal will have a base cap and a box top. Bring out your 1x8x36" and 1x10x36" and using your joiner glue together and set aside.

21 Phase Three The Pedestal And Table Connection ( continued ) Pitch your table saw to 22.5 angle and the fence to 5-7/16". Rip the angle on the side and do it to all the pieces before we move the fence. Bring the fence in to 5-1/4". Rip the other side. Do this on the eight pieces.

22 Phase Three The Pedestal And Table Connection ( continued )

23 Phase Three The Pedestal And Table Connection ( continued )

24 Phase Three The Pedestal And Table Connection ( continued )

25 Phase Three The Pedestal And Table Connection ( continued ) Get all the pieces together and do a dry fit. Tape it or tie it together and check it for fit.

26 Phase Three The Pedestal And Table Connection ( continued )
. Start by wrapping two straps around the two ends.")
27 Phase Three The Pedestal And Table Connection ( continued ) Time again for the joiner. I used 5 biscuit per edge. Space evenly and on all side and ready the glue and straps. This will go together all at the same time so the rush is on with the glue. Mark your edge's so that all your biscuit cuts line up (see the picture). Start by wrapping two straps around the two ends. Use clamps to help get the pieces in and true to shape. Hammer comes in handy here also for banging in the joints. Wipe off all the glue from the outside of the pedestal. Use one last strap to wrap the middle of the pedestal. Let dry overnight.

28 Phase Three The Pedestal And Table Connection ( continued )

29 Phase Three The Pedestal And Table Connection ( continued )

30 Phase Three The Pedestal And Table Connection ( continued )

31 Phase Three The Pedestal And Table Connection ( continued ) Remove straps and clamps. Using your belt sander remove as much dry glue as you can. Care not to damage the piece and keep it even. Move on to the palm sander 120 paper and hit it. Ready for the base and box next. Show Desktop.scf
COMPLIMENTARY WOODWORKING PLAN
 COMPLIMENTARY WOODWORKING PLAN COFFEE TABLE PLAN This downloadable plan is copyrighted. Please do not share or redistribute this plan in any way. It has been paid for on your behalf by JET Tools, a division
ARTS AND CRAFTS CHAIR
 ARTS AND CRAFTS CHAIR 491 MATERIALS LIST--DINING CHAIR Key No. Size and description (use) A 2 1-3/4 x 1-3/4 x 16-1/4'' oak (front leg) B 2 1-3/4 x 3-3/4 x 40-1/2'' oak (rear leg) C 1 1-3/4 x 3-3/16 x 15''
Tools and Tips: ( 1 )
") Tools and Tips: As you build instructions will show in my many picture manual how to assemble. You can use your own methods as you desire, my results are very good. A smooth, flat work surface is very
Tools and Tips: As you build instructions will show in my many picture manual how to assemble. You can use your own methods as you desire, my results are very good. A smooth, flat work surface is very
The WoodWorker s Edge
 The WoodWorker s Edge Draw-leaf Game Table 1. 2. Layout the area for the tenons. The tenons are 3/8 thick x 4-1/2 long x 1-1/4 deep and offset to the inside. Create the tenons using the step method to
1 ¼-inch Pocket Screws Brad Nailer or Hammer 1 ¼-inch Brad Nails Clamps
 MATERIALS: TOOLS: (4) 2 x 6 x 8 Ft. Boards Tape Measure (2) 2 x 4 x 8 Ft. Boards Carpenter s Square (7) 1 x 4 x 8 Ft. Boards Pencil (2) 1 x 3 x 8 Ft. Boards Drill (1) Half Sheet of ¾-inch Thick Plywood
Empire Dresser Plans
 1 Empire Dresser Plans Materials 1 sheet 3/4" plywood (cabinet grade 4' x 8') 1 sheet 5 mm (3/16") underlayment plywood 4'x 8', buy another 1/2 sheet if you want to put a back on the dresser. 1-2" x 4"
Corner Entertainment Center Plans
 Table of Contents Introduction... 3 Let s discuss the tools needed... 3 Let s discuss the materials needed... 4 Let s build it... 4 Attaching the 2x2's... 7 Determine the shelf spacing... 9 Scribing the
 America s leading woodworking authority To download these plans, you will need Adobe Reader installed on your computer. If you want to get a free copy, visit: http://adobe.com/ reader. Having trouble downloading
Workstation. Multipurpose. Shop Project
 Shop Project Multipurpose Workstation Rock-solid, practical, and inexpensive it s tough to beat this versatile workstation that you can make from one sheet of plywood.. I don t think a woodworker can ever
About.com :
 http://woodworking.about.com/gi/dynamic/offsite.htm?sit...//www.popularwoodworking.com/features/fea.asp%3fid=1088 (1 of 8)1/28/2004 12:05:01 AM Modern Storage Tower The last thing I want to do when starting
Chief s Shop: Simple Woodworking Bench
 Chief s Shop: Simple Woodworking Bench Be sure to read the instructions and review the illustrations and accompanying video for this project BEFORE you start. Follow ALL SAFETY GUIDELINES AND RECOMMENDATIONS
Tools and Tips: ( 1 )
") Tools and Tips: As you build instructions will show in my many picture manual how to assemble. You can use your own methods as you desire, my results are very good. A smooth, flat work surface is very
Tools and Tips: As you build instructions will show in my many picture manual how to assemble. You can use your own methods as you desire, my results are very good. A smooth, flat work surface is very
Tools: Drill/Driver Kreg Jig Miter Saw Jigsaw Circular Saw Adjustable Square Tape Measure Veneer Trimmer Sandpaper and Sander
 R PROJECT PLANS DROP-FRONT DESK Create a workspace almost anywhere with this drop-front desk. Mounted to a wall, it doesn t take up any floor space, which means you can hang it wherever you need to work.
Silverware Chest Plan
 Silverware Chest Plan 05L14.01 Introduction 1. Measure the space required for your cutlery before beginning this project to be sure that it will fit in the drawers and top compartment. The best way to
Grade 11 Woods Lift Lid Coffee Table. Based on Under the big Top from Popular Mechanics Website
 Grade 11 Woods Lift Lid Coffee Table Based on Under the big Top from Popular Mechanics Website TABLE TOP 1. Select enough lumber to construct a top that is between 22 ½ and 24 wide after jointing. Ensure
Woodline USA Woodline Spacer Fence System
 Woodline USA Woodline Spacer Fence System MADE IN THE USA Includes: (1) ¼ Spacer Fence (1) 3/8 Spacer Fence (1) ½ Spacer Fence (1) Hardware Package (1) 3 Piece Brass bar set (2) Setup Blocks Visit Us Online
Motorcycle Lift Assembly Instructions
 Motorcycle Lift Assembly Instructions Copyright JCS 2009 Rev1M Page 1 Lift Table Assembly Instructions The following pages will assist you in the construction of your Motorcycle Lift Table. You will find
Making Simple Bookbinding Equipment
 Tony Firman 20 1 2 19 Notes Tony Firman Tony Firman Bookbinding 18 3 : 2012 Tony Firman Bookbinding P.O. Box 507 Haslet, TX 76052 www.tonyfirmanbookbinding.com 4. When all the tapes have been pinned in
Butterfly Leaf Dining Table Plans
 Butterfly Leaf Dining Table Plans Part 1 An attractive dining table with a secret: the leaf folds and stores inside the table. Season 1, Episode 7 P a g e 2 I first saw a butterfly leaf table in a back
ZeroPlay Guide Bar Jig Plans (V2.0) Micro Jig, Inc. PO Box Winter Springs, FL USA
 Micro Jig, Inc. PO Box Winter Springs, FL USA") Z2 ZeroPlay Guide Bar Jig Plans (V2.0) 0409 Micro Jig, Inc. PO Box 195607 Winter Springs, FL 32719 USA Tel: 1-407-696-6695 Web site: www.microjig.com Email: sales@microjig.com Copyright 2009 Micro Jig,
Z2 ZeroPlay Guide Bar Jig Plans (V2.0) 0409 Micro Jig, Inc. PO Box 195607 Winter Springs, FL 32719 USA Tel: 1-407-696-6695 Web site: www.microjig.com Email: sales@microjig.com Copyright 2009 Micro Jig,
Project 17884EZ: Shaker End Table
 Project 17884EZ: Shaker End Table With its clean, simple lines, this piece is unmistakably Shaker style. Ours is made from cherry, a wood commonly used by Shaker craftsman, but we ve also seen this piece
A Shaker Sewing Stand
 America s leading woodworking authority Step by Step construction instruction. A Shaker Sewing Stand A complete bill of materials. Exploded view and elevation drawings. How-to photos with instructive captions.
Shopsmith Mobile Storage Cabinet.
 http://wwwinstructablescom/id/shopsmith-mobile-storage-cabinet/ technology workshop living food play outside Shopsmith Mobile Storage Cabinet by Beave2012 on May 3, 2015 Table of Contents Shopsmith Mobile
A Table for Four... with a View
 America s leading woodworking authority Step by Step construction instruction. A Table for Four... with a View A complete bill of materials. Exploded view and elevation drawings. How-to photos with instructive
Project 13586EZ: Writing Desk. Writing Desk Materials List
 Project 13586EZ: Writing Desk This writing desk will make a handsome addition to just about any room in the house. The one shown is made of cherry, a logical choice for a piece like this, but mahogany
Ways to get the most out of your
 5 Ways to get the most out of your router table When you mount a router on a table, you expand your shop s potential. To help you take advantage of this potential, we assembled five router table techniques
Classic Kitchen Island
 America s leading woodworking authority Step by Step construction instruction. A complete bill of materials. Classic Kitchen Island Exploded view and elevation drawings. How-to photos with instructive
Laminated Furniture Components
 Laminated Furniture Components Dec 2010 Woodworkers Simple Round Cherry Table Fritz Smith Cherry - 2008 Woodworkers 2 Snowboard Bench Fritz Smith White Oak Snowboard - 2009 Woodworkers 3 Fritz Smith Shell
woodworkersjournal.com MATERIAL LIST
 MATERIAL LIST T x W x L 1 Legs (2) 1 1 2" x 3 1 2" x 36 7 16" 2 End Uprights (2) 1 1 2" x 3 1 2" x 32 1 2" 3 Stringers (4) 1 1 2" x 3 1 2" x 42" 4 Top Cladding, Long (2) 3/4" x 7 1 4" x 65 3 4" 5 Side
DIY Bedroom Entertainment Center
 DIY Bedroom Entertainment Center Free woodworking plans for building a bedroom entertainment center that also serves as a laundry sorter. Perfect for bedroom with limited wall space. Cost: ~$250 Difficulty:
Chapter Four, Fitting out the Shell
 Chapter Four Fitting out the Shell This chapter outlines the process for fitting the parts that go into a round or stave back shell. Square back sound boxes usually have the cap and base of the sound box
BUILDING A STORM DOOR
 BUILDING A STORM DOOR BY NEAL BARRETT Illustrations by George Retseck If you're in the market for a storm door, you probably know that there are many styles and models available. However, most of them
1. Position the legs on the plywood, mark the angle on the plywood, and also mark the cut at the top of the leg. Cut points "A" at a 10 degree angle u
 .com.com flyrods Construction of the "Niemiera" Planing Bench text and drawings by John Niemiera Copyright Q 2002 Niemiera H y Rods Inc. h ttp://www.niemierafiyrods.co john@niemieraflyrods 732 548-5656
Bird Feeder. Tool Requirements
 Bird Feeder Written and constructed by Craig Tilley This wooden bird feeder will be an attractive addition to your garden. Its wide trays allow plenty of room for birds to come and have a snack, and the
Make your own zero clearance throat plate.
 Make your own zero clearance throat plate. A picture tutorial By Wayne Breshears One of the more important table saw accessories you can have is a zero clearance insert or throat plate. The close tolerance
Somewhere along the way, we ve
 Precision 60 FINEHOMEBUILDING.com Window Trim A systematic approach ensures better joints and a faster installation By Anthony Vitale Somewhere along the way, we ve decided that it s the apprentice s job
Project Plans Kreg Tool Company / BuildSomething. All Rights Reserved.
 BY Project Plans HARDWARE ORGANIZER How easy is it top keep screws, hardware, and other small items organized instead of in the way? Just cut six identically sized pieces of plywood, add a 1x2 cleat, and
DIY Wine Storage Cabinet
 DIY Wine Storage Cabinet ADDICTED2DIY.COM *Before beginning this project, please read through all of the plans and the blog post. When building this project, be sure to measure your wood and cut to fit.
Cabonyx Installation Manual
 Cabonyx Installation Manual Content Deck-Nyx and Plan-Nyx Installation Page 1 Flooring Products Page 1 Accessories Page 1 Installation Tools Page 2 Preparing Sub-structure Page 2 Installation Page 4 Cautions
ENJOY THIS SELECTION FROM. Woodworking 101. Includes Step-by-Step Instructions for 8 Projects. Woodworking
 W ENJOY THIS SELECTION FROM Woodworking 101 Includes Step-by-Step Instructions for 8 Projects Woodworking 101 Aimé Fraser, Matthew Teague, and Joe Hurst-Wajszczuk To purchase your copy of Woodworking 101,
Hinge Mortising Jig. One of the make it or break it parts of building a. 6 ShopNotes No. 74
 Hinge Mortising Jig A Mortise for a Hinge. Quick, clean, and accurate that s the only way to describe the mortise you get with a trim router and this hinge mortising jig. One of the make it or break it
Materials and Tools: Printer s Triple Console Cabinet. Free Plans to build a Triple Console Cabinet
 Materials and Tools: Materials: 3 sets euro style bottom corner mount drawer slides, 16 length 3 sets inset hinges 24 cup style handles 8 2x2 @ 8 feet long 6 1x3 @ 8 feet long 6 1x2 @ 8 feet long 1 sheet
Copyright WilkerDos.com Dining Table. Project Designed By April Wilkerson - Plan Created By Jay Bates (jayscustomcreations.
 Copyright WilkerDos.com 2017 Project Designed By April Wilkerson - Plan Created By Jay Bates (jayscustomcreations.com) Layout & Shopping List Page 2 of 12 Layout & Shopping List Item Quantity Description
After the canopy hinge is square with the firewall and the nut plates are installed you can set up the hinge mounts. Start by clamping a 1/16 tongue
 Written by: Sean Cole September 19, 2008 When fitting the stiffener use 3/32 clecos to hold it in place, it makes a smaller hole and is easier to work with. Only use the amount needed to hold the stiffener
Adjustable Box Joint Jig. Richard Hicks on 8/24/2015. Box or Finger Joints
 Adjustable Box Joint Jig Richard Hicks on 8/24/2015 Box or Finger Joints Adjustable Box Joint Jig Richard Hicks on 8/24/2015 Box Joints are also called Finger Joints Because they have interlocking fingers
SE5a Instrument Board part 2 - rev 1.1
 SE5a Instrument Board part 2 - rev 1.1 Fuel (Petrol) Valve This valve uses two circular name plates, eight brass screws, one black plastic base, copper wire and two black plastic risers. You can pick any
PLANS BY KELLEY FARMHOUSE DESIGNS LOFTED DORM ROOM BED
 PLANS BY KELLEY FARMHOUSE DESIGNS LOFTED DORM ROOM BED DIMENSIONS: 82" X 70" X 45" DIFFICULTY LEVEL: INTERMEDIATE TOOLS REQUIRED ONE+ Circular Saw ONE+ AirStrike 16GA Finish Nailer ONE+ Impact Driver ONE+
Cowper From Steve Wolverton on the T&TTT forum, Feb 2005 For Reference Only Do not use to build a trailer. Check on Teardrop and Tiny Travel Trailers
 Cowper From Steve Wolverton on the T&TTT forum, Feb 2005 For Reference Only Do not use to build a trailer. Check on Teardrop and Tiny Travel Trailers for up to date building information; http://www.mikenchell.com/forums
788XL Dado Jig Owners Manual Please Read Carefully!
 788XL Dado Jig Owners Manual Please Read Carefully! 788XL Dado Jig Hardware List: Identify and verify that you have all of the hardware shown below prior to assembly. Tools needed for assembly: #2 & 3
Plans. Easy-to-Build Full-size Deluxe Murphy Bed Plan. For more plans, tools and hardware visit rockler.com
 Easy-to-Build Full-size Deluxe Murphy Bed Plan Build a full-size Deluxe Murphy Bed complete with decorative molding and matching side cabinets! Plans For more plans, tools and hardware visit rockler.com
Fan Back Adirondack Chair Assembly Instructions How To Assemble Your Chair in 12 Easy Steps Parts List 5 9
 Fan Back How To Assemble Your Chair in 12 Easy Steps Parts List 5 9 5 5 9 5 5 1 12 11 7 7 1 8 13 10 2 6 4 3 3 3 3 3 2 #1 (2) frame, left & right #2 (2) 20" legs, left & right #3 (6) 20" seat slats #4 (1)
This is a solid wood cabinet. The only plywood used is for the back and drawer bottoms.
 Sideboard Sideboard Overview: This project requires basic woodworking skills and access to woodworking machines. Woodworking machines have sharp cutting edges and are NOT forgiving. You should be properly
Dresser. Materials & Tools FEATURING FORMALDEHYDE-FREE TECHNOLOGY. Free Plans to build a Dresser
 Free Plans to build a Dresser Materials & Tools Materials: 1-1/4 pocket hole screws 1-1/4 brad nails 3 sets of 18 drawer slides Drawer pulls Edge banding, optional Wood glue Sandpaper (100, 150, 220 grits)
Simple Woodworking: Outdoor Pitch Chair
 Parts Lumber Front Front Leg Front Leg Drill three pocket holes on each end of the Front - one centered and two 3/4" from each side. Cut a 15-degree miter on one end of the Front Legs. It will be easier
Build your own Drawer unit. D3 / D4
 Page1 Build your own Drawer unit. D3 / D4 1: Introduction. This guide will give you the plans, materials and how to information to build your own drawer unit. The dimensions given will fit a D3 or D4,
Vinyl Gazebo Instructions
 P a g e 1 Vinyl Gazebo Instructions 10 Vinyl Gazebo Shown Thank you for the purchase of your New Gazebo. Depending on the size of your Gazebo, installation can usually be completed in 1 to 2 days. These
Australian Vintage Radio Society Inc.
 Australian Vintage Radio Society Inc. (Incorporated in Victoria A0050003S) P.O. Box 3099, Syndal L.P.O., Victoria, 3150, Australia. Cabinet assembly instructions for the AVRS 10 th Anniversary construction
Shop Projects. Plans NOW. Each Built from One Sheet of Plywood!
 Plans NOW www.plansnow.com 5 Shop Projects Each Built from One Sheet of Plywood! Tool Tote - Sawhorse - Workbench - Wood Bin - Wall Cabinet PLUS: 7 SHOP SECRETS Working with Plywood Dread the thought of
Flamingo. That s what I looked
 Plans N O W w w w. P l a n s N O W. c o m flip-seat Storage Bench Flamingo. That s what I looked like as I stood in the doorway perched on one leg, with my other foot raised so that I could untie the laces
An Inner Hive Cover. In the Beekeeper s Work Shop. Building a Bee Hive: The Inner Hive Cover. by Stephen E. Tilmann
 An Inner Hive Cover In the Beekeeper s Work Shop The project for this article is an inner hive cover. The inner cover sits on top of the topmost hive body (super) and underneath the telescoping top cover
A Magazine Rack with a Top
 A Magazine Rack with a Top Introduction: I have never come across a good free plan for a magazine rack. Yet almost all homes have one. So this is one of the few items I have made on my own, as I don t
Entryway Locker 17 ½ 25 ½
 Copyright 2015 Shanty-2-Chic.com T Entryway Locker his old world entryway locker is loaded with possibilities. Two adjustable shelves allow you to customize the storage to fit your needs. Even better,
NEWCASTLE WOODWORKING
 NEWCASTLE WOODWORKING Seaswift Investments LLC SLIDING BABY / PET GATE DESIGN AND CONSTRUCTION NOTES AND ENGINEERING DRAWINGS BABY GATE TA11031.DOCX Page 2 PORTABLE DOCUMENT FORMAT (PDF) FILE The file
I love the outdoors. And I m impressed with whatever forces in the universe have made it possible for me to purchase a collapsible canvasand-metal
 Limbert Chair 9 I love the outdoors. And I m impressed with whatever forces in the universe have made it possible for me to purchase a collapsible canvasand-metal camp chair for under $20. But when you
END FRAMES. End frames built using pressure treated 2x4 (1 1/2" x 3 1/2") 36" 34" 7/16" pilot hole. 5 1/2" x 1/2" lag bolt 8" wheel 23"
 36 34 7/16 pilot hole. 5 1/2 x 1/2 lag bolt 8 wheel 23") END FRAMES End frames built using pressure treated 2x4 (1 1/2" x 3 1/2") 23" 17 1/2" (B) (B) Measure from the bottom of your stone to 1" below the lip to get your measurement. 17 1/2"(B) 36" 34" 1/2" flat
END FRAMES End frames built using pressure treated 2x4 (1 1/2" x 3 1/2") 23" 17 1/2" (B) (B) Measure from the bottom of your stone to 1" below the lip to get your measurement. 17 1/2"(B) 36" 34" 1/2" flat
Piper Cherokee /3 scale. Construction Manual
 Piper Cherokee 140 1/3 scale Construction Manual STAB CONSTRUCTION 1. Remove foam cores from cradle and place on flat surface. Inspect pieces before you epoxy halves together making sure leading and trailing
JUNIOR CERTIFICATE 2007 MATERIALS TECHNOLOGY (WOOD) MARKING SCHEME ORDINARY LEVEL SECTION A
 MARKING SCHEME ORDINARY LEVEL SECTION A") JUNIOR CERTIFICATE 2007 MATERIALS TECHNOLOGY (WOOD) MARKING SCHEME ORDINARY LEVEL SECTION A NOTE Please ensure that totals for each question are divided by two before entering marks on marking sheets.
JUNIOR CERTIFICATE 2007 MATERIALS TECHNOLOGY (WOOD) MARKING SCHEME ORDINARY LEVEL SECTION A NOTE Please ensure that totals for each question are divided by two before entering marks on marking sheets.
This book, or portions of it, may not be duplicated, resold, or redistributed in any way, without the expressed written consent of Stay Tooned, Inc.
 Copyright 2006 - Stay Tooned, Inc. All rights reserved worldwide. This book, or portions of it, may not be duplicated, resold, or redistributed in any way, without the expressed written consent of Stay
Media Center Woodworking Plans Our Home from Scratch
 Media Center Woodworking Plans by Our Home from Scratch Our Home from Scratch LLC Page 1 Disclaimer Our Home from Scratch LLC and its legal owners cannot be held responsible for any loss, damage, injury
MLCS Instructions for Bowl and Tray Template Kit #9176/#9179
 MLCS Instructions for Bowl and Tray Template Kit #9176/#9179 Tools Needed: Router 1-1/2 h.p. Minimum recommended with a 1/2 collet Forstner bit 3/4-2 recommended depending on template used Drill Press
Greg s Right Size Big Band Risers
 Greg s Right Size Big Band Risers Based on a 32 inch square module 3/4 plywood lids with interlocking tabs on five gallon buckets February 25, 2012 Yes, it looks better with black paint and black buckets.
9. Weld a cross brace between the H frame and the A frame on each side. 10. Remove all the bracing and blocks, now you have I frame to work off.
 Foam target butts 1. Determine what butts you wish to install we used 4 different types not the best idea as we had to make 2 different size frames 2. Find the wheels you wish to use I prefer large wheels
Hudson Dresser [1] Hudson Dresser Published on Ana White ( Submitted by dan-k [2] on Fri, :43 [1]
![Hudson Dresser [1] Hudson Dresser Published on Ana White ( Submitted by dan-k [2] on Fri, :43 [1]](/thumbs/90/102626096.jpg "Hudson Dresser [1] Hudson Dresser Published on Ana White ( Submitted by dan-k [2] on Fri, :43 [1]") [1] Submitted by dan-k [2] on Fri, 2011-03-11 11:43 [1] If you plan on staining this piece, it is recommended that you stain all of the drawer face materials before assembly for a more professional look.
[1] Submitted by dan-k [2] on Fri, 2011-03-11 11:43 [1] If you plan on staining this piece, it is recommended that you stain all of the drawer face materials before assembly for a more professional look.
Weather Forecaster Materials List
 Project 14438EZ: Old World Weather Forecaster The weather house type of weather forecaster is a very old traditional type that was popular in Europe, especially Germany. Changes in the weather cause a
PROJECT PLAN MODERN COFFEE TABLE
 BUILD IT WITH ROCKLER PROJECT PLAN MODERN COFFEE TABLE With its clean lines and striking geometry, this coffee table will lend iconic midcentury modern style to any living space. And you can build it yourself
Building the ArcadeCab Trackball/Single-Player Controller
 Building the ArcadeCab Trackball/Single-Player Controller Introduction This help document details the construction of the original ArcadeCab Ultra- Trackball controller. It is based on my construction
CAUTION: Before opening the crate place it flat on its side (not up right as show in the photo) Hardware included for assembling your gazebo:
 Hardware included for assembling your gazebo:") Octagon Wood Gazebo Kit Contents Hardware included for assembling your gazebo: 5/16" Lag Bolts Use to fasten post to floor 2 1/2" screws Use to fasten joist together fasten posts to outside joist fasten
Octagon Wood Gazebo Kit Contents Hardware included for assembling your gazebo: 5/16" Lag Bolts Use to fasten post to floor 2 1/2" screws Use to fasten joist together fasten posts to outside joist fasten
A WORD ABOUT BRACING PART A - BUILDING A STRAIGHT, PILE BENT, OPEN DECK TRESTLE. Built in Place, Straight
 BUILDING LARGE SCALE TRESTLES You have many options when building a large scale trestle. The choices you make may be based on the prototype you are modeling; the era or industry you are modeling; or, simply
Jeff Branch WOODWORKING YOU CAN BUILD A. By adding subtle design elements, a traditional furniture style becomes decidedly modern.
 Jeff Branch WOODWORKING YOU CAN BUILD A By adding subtle design elements, a traditional furniture style becomes decidedly modern. Jeff Branch WOODWORKING Publisher: Jeff Branch Editor: Jeff Branch Art
Kreg Tool Co. All Rights Reserved.
 Version 1 p. 1 Materials: Lumber: Qty: Board 2 2x2s 3 ft. long 2 1x2s 8 ft. long 2 1x3s 8 ft. long 6 1x6s 10 ft. long INSTRUCTIONS: Supplies: 1 1 / 4" Kreg Screws (coarse thread for softwoods, fine thread
Nineteenth-Century Dough Box
 Nineteenth-Century Dough Box T he dough box was a functional piece found in many a country kitchen. The idea was that the cook would make a large batch of bread dough, knead it on the large work surface
Make a cupboard as a BCATS
 National Certificate in Building, Construction, and Allied Trades Skills (BCATS) Make a cupboard as a BCATS project Unit Standard 25921 Level 2, Credit 6 Name: Contents Reference Page What you need to
The Q Frame PROJECT. a picture frame with secrets created exclusively for the Router Forum
 The Q Frame PROJECT a picture frame with secrets created exclusively for the Router Forum 007 OR RELEASE FPLANS APPROVED The Q Frame: Project Overview LIST OF MATERIALS Frame Sides & Face 3/4 x 5 1/2 x
Seamed Undermount Bowls
 CUTOUT TEMPLATES MAKING CUTOUT TEMPLATES 7.1 CUTOUT TEMPLATES The use of an accurate template is one of the most essential elements to the successful completion of a cutout in Corian. For the completion
Copyright 2010 Springbok Publishing All Rights Reserved- Page 1
 Copyright 2010 Springbok Publishing All Rights Reserved- www.woodensaddlerackplans.com Page 1 Legal Information All contents copyright 2010 by Springbok Publishing. All rights reserved. No part of this
TURNING A PEN ORIGINAL BY MIKE RUDE REVISED BY GORDON PATNUDE - AUGUST 2015, OCTOBER 2016 EQUIPMENT AND SUPPLIES NEEDED
 TURNING A PEN ORIGINAL BY MIKE RUDE SEPT 2006 REVISED BY GORDON PATNUDE - AUGUST 2015, OCTOBER 2016 PHOTOGRAPHY BY JIM GOTT AUGUST 2015 EQUIPMENT AND SUPPLIES NEEDED A PEN TURNING TUTORIAL [this document]
Farmhouse Vanity 24-¼ 21-½
 opyright 2015 Shanty-2-hic.com I Farmhouse Vanity nspired by simpler days of the past, this vanity is built with sophisticated charm and character. ozy and freestanding, this base can be paired with any
790XL Dado Jig Owners Manual Please Read Carefully!
 790XL Dado Jig Owners Manual Please Read Carefully! 790XL Dado Jig Hardware List: Identify and verify that you have all of the hardware shown below prior to assembly. Tools needed for assembly: #2 & 3
Kitchen Island. By Rob Joseph Leg Dimensions. Drawer Exploded View. Leg Glue-Up
 Kitchen Island y Rob Joseph eg imensions Step 1 - ut the legs () slightly longer than the dimensions given in the material list. or the thickness we need, the legs are cut from a piece of 11 2"-thick stock,
Classic Project. Two-drawer Platform Bed. In this plan you ll find: Step-by-step construction instruction. A complete bill of materials.
 America s leading woodworking authority Classic Project In this plan you ll find: Step-by-step construction instruction. Two-drawer Platform Bed A complete bill of materials. Construction drawings and
Dining Table with Two-Way Drawers
 Dining Table with Two-Way Drawers DOUBLE-FRONTED DRAWERS MAKE THIS PIECE UNIQUE With two drawer fronts, a center beam, plywood bottoms, and custom pulls, these drawers are both distinctive and durable.
PROJECT PLAN TOOL CHEST
 BUILD IT WITH ROCKLER PROJECT PLAN TOOL CHEST FEATURING ROCKLER S BUILD QUESTIONS? Go to www.rockler.com or call 800-279-4441 Stock # Item 63420 1/4" x 24" x 30" Baltic Birch Plywood 63446 1/2" x 24" x
Clock 35 - Toyland. Construction instructions for Clock 35
 This clock has been designed for children, it is a stand-alone unit and can be positioned on a shelf or cabinet out of the reach of very young hands who may be tempted to touch. The clock is shown in two
Patio Table. Page 1 of 16
 Patio Table www.andrewharriswoodwork.com Page 1 of 16 Introduction This plan makes a table that is unit which is 95 ½ inches long and 49 inches wide. The distance from the underside of the top edging to
10. Wing prep and subassembly
 Date Section Objective: Construct and fabricate the sub-assemblies of the wing panel. Required Parts: Wing left 11gal PN104-300, Wing right 1gal PN104-400, Wing left 15 gal option PN104-322, Wing right
ADULT. Adirondack / Muskoka Chair Plans
 ADULT Adirondack / Muskoka Chair Plans Materials List 3/4" x 9 1/2" (1.9cm x 24.1cm) redwood, cedar or pine boards. Six, 8' (2.44m) boards should make one chair depending on knots and layout. You can also
indicates a diagram detailing the dimensions of a project part and/or the placement for pocket holes, screws, nails, etc.
 f a r m h o u s e d i ni ng c h a i r What You'll Need lumber Beginner 1-1 x2x4 1-1 x2x8 3-2x3x8 1-2x4x8 1-3/4 x 2 x 4 sheet of plywood (availability will vary) Intermediate Intermediate Beginner About
Installation Guide. Pionite Decorative Surfaces One Pionite Road, Auburn, Maine PIONITE ( )
") Installation Guide A Subsidiary of Panolam Surface Systems SMPBRO00-012 6/14 Pionite decorative laminates are designed for finished interior surfaces which require high impact, wear and stain resistance
Installation Guide A Subsidiary of Panolam Surface Systems SMPBRO00-012 6/14 Pionite decorative laminates are designed for finished interior surfaces which require high impact, wear and stain resistance
Chili Pepper Routed Bowl
 Chili Pepper Routed Bowl MLCS Items Needed: Chili Pepper Bowl and Tray Template #9189 Top Mounted Bearing Dish Cutter Router Bit #7817 1/2 Router Collet Extension and Wrenches #9465 3/16 Radius Round Over
CENTER WING SECTION (CWS) WORK REPORT
 WORK REPORT") CENTER WING SECTION (CWS) WORK REPORT No. Check Parts / Description Qty PHASE 1: Preparations 1 [ ] 6V1-3 Rear ribs 2R & 2L 1 [ ] L Angle 6 2 [ ] 6V2-1 Rear Ribs.032 2R & 2L 2 [ ] 6V5-1 Gear Rib Doubler
CENTER WING SECTION (CWS) WORK REPORT No. Check Parts / Description Qty PHASE 1: Preparations 1 [ ] 6V1-3 Rear ribs 2R & 2L 1 [ ] L Angle 6 2 [ ] 6V2-1 Rear Ribs.032 2R & 2L 2 [ ] 6V5-1 Gear Rib Doubler