G. Building the Cab, Cab Roof and Cab Boiler Extension Page 14 and Backhead.
|
|
|
- Monica Harvey
- 5 years ago
- Views:
Transcription


.")
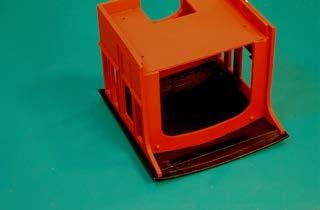
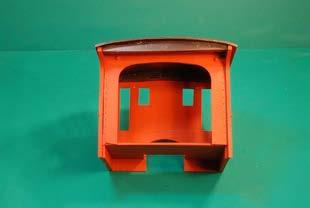
1 G. Building the Cab, Cab Roof and Cab Boiler Extension Page 14 and Backhead. Cab. In order to ensure that the cab and tender would actually look right, as what often appears on a drawing is not always reflected in the three dimensional end product, a card mock-up of the two units was constructed. The mock-up offered the opportunity to experiment with different window and door configurations and also the shape of the roof. The roof in particular offered several options; a simple curve, parabolic or a straight pitched form. In the end a parabolic curve was chosen which looked just fine and one of our dinner plates offered just the right profile! The parabolic roof was, in retrospect, a mistake. It proved difficult to obtain the correct curvature for the roof panel and if I were to build another cab I very much suspect I would opt for a straight pitched roof profile. Having decided on the form the cab would take the four sides were marked out on a sheet of styrene. An old 12 steel rule was used as a cutting guide with a fairly hefty blade in the craft knife in order to cut easily through the thick styrene. Once all the four pieces were cut out, including the window and door openings, each edge was given a gentle rub on the sanding board to ensure nice square cut edges. (The sanding board is a piece of scrap flat board to which are glued two sheets of medium grade aluminium sanding paper). Plate as a template Cab sections on styrene sheet & cut from sheet Cab held with tape for a test fit Having opted to model a cab and tender of steel construction it was thus necessary to simulate the rivet detail that would have held the panels together. 10mm long brass pins (Approx 0. 40), frequently used by model boat builders, were chosen to simulate the rivet heads. These pins have smaller heads than the normal domestic pins and better represent scale rivets. To avoid damage to the outer surface of each panel the marking off was completed on the reverse side of each panel. (A masking tape label to the inner side of each panel ensured that I didn t get confused as to which side was which!!!) The panels were marked out using a draughtsman clutch pencil to give a neat narrow pencil line, an engineers square and 45 degree set square to keep thing square, a ½ scale rule (The model was built to 1/24 th scale) and a plastic ellipse template which produces gentler and more aesthetic curves than a simple circular template.


2 Page 15 Rivet centres were marked off at 6 centres and placed 2 in from each panel edge and 4 below the window openings. The panel was then gripped onto a piece of soft flat wood with 2½ spring clamps with the reverse side of a steel rule uppermost to act as a guide for the centre punch tool to ensure nice straight lines of rivet centres. A gentle tap with a hammer on the centre punch at each marked location gave a set of positive centres for drilling the holes that would take the rivets. A #78 drill in a hand held mini drill produced holes that gave a nice firm grip to the pins a little experimenting with small diameter drills will ensure you get a drill that suits the pins you choose use. Once all the holes were drilled the panel was turned the over and given a gentle rub along the sanding board to remove the drill protrusions. The pencil lines were also removed from the inner surface of the panel with a little kitchen cleaner on a damp cloth. A packet of the brass pins were tipped into a plastic container lid in order that they could be lifted easily with a pair of self closing tweezers. The styrene panel was placed on a flat board and each pin was gently tapped through with the line of holes overhanging the board edge. After each row was complete a sealing coat of styrene liquid cement was run along the base of the protruding pins to ensure they remained firmly in place whilst a large diameter cutting disc in a mini drill being used to remove the surplus protruding stem of each pin. (Before proceeding further all the cut-off pin pieces were removed with my shop vacuum the pin cut-off s have a tendency to wander!!) A gentle rub with a 6 flat file ensured the pin stubs were flush with the inside of the panel. A final run of liquid along the inside of the pin rows (Now rivets!) ensured they remained firmly in place. Procedure for using pins to simulate rivet detail
3 Page 16 It was at this stage that I made a major mistake. I decided to glue acetate to the wall s before proceeding further and thus have the window frame butt against the glazing. Unfortunately the glazing became a little scratched and my first attempt at spraying the cab walls proved my masking was not perfect I had overspray on the glazing. It was back to the work bench and time to build a replacement cab with glazing that would be fixed with 14BA set screw and nuts after painting. With all the rivets in place it is now time to fit the window frames and doors. The window frames consist of x square styrene strips (Scale 1 x 3 in 1/24 th scale). These were cut in situ using a chisel X-acto knife blade to give a good square cut. Each piece was held in place with styrene liquid cement applied with a fine brush. This technique ensures each side of the frame fits snugly into place. The panels were held down flat on a board whilst the strips are glued in place. The door is constructed with the cab side panel held flat against a back board. A piece of styrene sheet was cut to fit the door opening and glued in place flush with the inner surface of the panel. A strip of scale 1 x 4 forms the top frame piece, 1 x 6 forming the bottom piece with 1 x 3 strips forming the sides and a final 1 x 4 strip forming the centre bar. The window opening was then cut out and 1 x 1 framing added. The cab grab handles were now formed from 1/16 brass bar being simply bent in a pair of pliers and the legs trimmed with a mini drill cutting disc. Once fitted masking tape labels were attached to each grab handle to indicate its location (Left side front etc) and the handles set aside. A length of x (2 x 3 ) styrene strip was added along the cab sides beneath the window openings as an elbow rest and to add some relief to the plain panels. The outer surface of the panel was then given a spray coat of automotive gray primer and set aside. An inner covering of styrene was now added to the front and side panel for several reasons: it gave a firm structure, provided a landing onto the original cab floor, provided a rest upon which to place the glazing and also provided a solid guide and location for the new cab floor. The glazing is clear acetate secured by five 14BA set screws and nuts to the front panel and four in each of the side panels. The hexagon heads are in no way obtrusive and blend in well once painted along with the cab walls. Strips of square styrene along the vertical edges of the cab ensured a solid location for the side walls. Two short lengths of (4 scale size) angle were fixed to each inner cab wall (the gap being for the cab door). These angle pieces provide an inner elbow rest but more importantly they form a gap into which the clear acetate glazing can be slipped. With all four cab sides now complete externally it was time to consider the assembly and interior finishing of the cab. Using a set of miniature sash clamps to hold the four cab panels together a test fit of the unit on the loco chassis showed no modifications were required. The assembly was removed from the


4 Page 17 chassis a floor plate was cut from styrene and then sides and floor were joined with liquid cement, the floor plate ensuring the corners remained square. Turning the cab upside down a gentle rub on the sanding board ensured the curve of the roof extended over the side walls to ensure a snug fit for the roof. The cab and floor were removed from the loco and side strips of ¼ x ¼ styrene were cemented in place along each inside wall to offer added strength to the wall / floor joint and a sound location for the set screws that would hold the cab to the chassis through the extension plate. The strips were also extended along the inner front panel for ½ from the cab side wall.. Cab sides with supports highlighted Cab wall and floor plates Side panel showing 14BA glazing set screws and wire grab handles Front panel with five 14BA glazing Cab grab handles referenced to Miniature sash clamps set screws and two estucheon pins ensure correct re-location. to secure roof in place. Walls held in place whilst floor is All ready for glueing. Completed unit slid into position.


5 Cab Roof. Page 18 Using the cab end panels as a marking guide six roof support beams were cut from styrene. Four of the beams were cemented together in pairs as these would rest inside the panels and accept two escutcheon pins each as the means of holding what would be a removable roof firmly in place. The support beams also ensure the roof maintains the correct curved form. Forming curve of cab roof using a barrel and heat gun. Roof with internal supports Completed cab with roof held in place with four estucheon pins. Cover plate, boiler and cab in place. Selection of spray cans used. Sprayed roof with four locating pins Weather tarp added to rear of cab roof. Cab Boiler Extension and Back-head. The cab boiler extension and back head are formed from a section of pipe as used for the boiler itself. Front and rear panels of styrene, cemented to the pipe section, are extended down ward to form vertical sides for the unit and filed to the circular form of the boiler top. A thin piece of styrene sheet wrapped around the pipe and the added panels needs to be well cemented into place before being cut off to give a flat seating for the boiler to the cab floor. Firebox door, valves, water gauges, piping, control and brake levers can now be added as you choose. I am not a steam expert but the fittings I chose give the cab firebox / boiler unit, at least to me, an original and unique appearance one has to stamp ones identity on a model somewhere!! The back-head unit was glued to a styrene base which enables the unit to be slipped into the cab, between the elbow rest angles, once the cab is in place. Two 6BA screws pass through the back head and cab floor and secure them to the original chassis and extension plate


6 Construction and detailing of cab back head and boiler extension. Page 19 Final assembly of cab Final assembly of cab
7 Page 20
Modular Locomotive System Instruction Manual for HBK22 Fowler Body Kit
 Modular Locomotive System Instruction Manual for HBK22 Fowler Body Kit Roundhouse Engineering Co. Ltd. Units 6-10 Churchill Business Park. Churchill Road, Wheatley. Doncaster. DN1 2TF. England. Tel. 01302
Taco Bell Restaurant kit in HO scale
 Taco Bell Restaurant kit in HO scale Parking lot base and cars not included This kit includes all building parts milled in white styrene plastic, clear window glazing, Plastruct tile roofing, and logo
The Rubley Building Instructions for Assembly of the N scale kit. v1.1
 The Rubley Building Instructions for Assembly of the N scale kit. v1.1 Kit Contents: 197 ea. laser cut 1/16" acrylic parts. 1ea. adhesive backed.020 styrene part. 10 ea..060 x 1" styrene alignment pins.
Shay Cab - Floor & Roof
 Shay Cab - Floor & Roof Nelson Riedel Nelson@NelsonsLocomotive.com Initial: 1/20/04 Last Revised: 06/06/2004 Cab Floor: A cab floor was made at the same time as the tender floor. I was unhappy with some
woodworkersjournal.com MATERIAL LIST
 MATERIAL LIST T x W x L 1 Legs (2) 1 1 2" x 3 1 2" x 36 7 16" 2 End Uprights (2) 1 1 2" x 3 1 2" x 32 1 2" 3 Stringers (4) 1 1 2" x 3 1 2" x 42" 4 Top Cladding, Long (2) 3/4" x 7 1 4" x 65 3 4" 5 Side
Peter Krause ABN
 Peter Krause ABN 25 736 637 163 T/as O-Aust Kits PO Box 743 ALBANY CREEK QLD 4035 AUSTRALIA Phone +61 (0)7 3298 6283 (7.00pm to 9.30pm ONLY) Facsimile +61 (0)7 3298 6287 (24 hours) Mobile 0419 680 584
Reversing Gear. Shay Reversing Gear
 Shay Nelson Riedel Nelson@NelsonsLocomotive.com Initial: 9/23/03 Last Revised: 06/05/2004 The reversing gear is another one of those pieces I've been putting off. The reason for the postponement was that
Instructions For Corrugated End Van
 Instructions For Corrugated End Van This kit contains the following items QTY ITEM QTY ITEM QTY ITEM 1 Floor 2 Van Ends 1 Roof 2 Van Sides 2 Sole Bars 4 Axle Boxes 4 Bearings 2 Coupling Hooks 2 Split Pins
Tools and Tips: ( 1 )
") Tools and Tips: As you build instructions will show in my many picture manual how to assemble. You can use your own methods as you desire, my results are very good. A smooth, flat work surface is very
Tools and Tips: As you build instructions will show in my many picture manual how to assemble. You can use your own methods as you desire, my results are very good. A smooth, flat work surface is very
Framework joints FABRICATION - WOOD JOINTS. Corner joints. Tee joints. Worksheet 15a. Cable Educational Ltd
 FABRICATION - WOOD JOINTS The word: fabricate means to join together. Most wooden products are held together with adhesive. Adhesive works very well when the edge of a piece of wood is being glued to the
Installation Instructions
 Installation Instructions Complete 19-piece carpet set for Porsche 911 77 through 86 Complete 16-piece carpet set for Porsche 911 69 through 73 2 B E FORE YOU BEGIN Installation of your carpet set takes
Tools and Tips: ( 1 )
") Tools and Tips: As you build instructions will show in my many picture manual how to assemble. You can use your own methods as you desire, my results are very good. A smooth, flat work surface is very
Tools and Tips: As you build instructions will show in my many picture manual how to assemble. You can use your own methods as you desire, my results are very good. A smooth, flat work surface is very
How To Create An Entertainment Unit
 How To Create An Entertainment Unit Materials required: 2 x Pine Panels - 1800mm x 450mm x 18mm 4 x Pine Panels - 310mm x 450mm x 18mm 1 x Pine Panels - 650mm x 450mm x 18mm 6 x Bun feet (your choice of
Rosalina Accessories Tutorial Version March 2011 Martyn
 Rosalina Accessories Tutorial Version 1.0 - March 2011 Martyn Star Brooch Feel free to experiment with these dimensions, you should make a template you are happy with, the method still works. 1) Creating
SE5a Instrument Board part 2 - rev 1.1
 SE5a Instrument Board part 2 - rev 1.1 Fuel (Petrol) Valve This valve uses two circular name plates, eight brass screws, one black plastic base, copper wire and two black plastic risers. You can pick any
Donaldson s Department Store
 Donaldson s Department Store Instructions for Assembly of Donaldson s Department Store Kit Contents: 80 each laser cut acrylic parts. 1 each sheet of canopy parts. 1 each sheet of AC roof unit parts. 1
Scratchbuild A Backwoods Water Tank Part V - Making the Frost Box and Hanging the Water Spout
 Scratchbuild A Backwoods Water Tank Part V - Making the Frost Box and Hanging the Water Spout By Dwight Ennis In this section, we're going to make the Frost Box, and we'll build the Spout Hanger Assembly
Cockpit Kit. Full Depth - Builds Quickly - Light Weight READ THROUGH THIS INSTRUCTION MANUAL FIRST. IT CONTAINS IM- laser cut wood kit
 The Savage Light Sukhoi Su- 27 Cockpit Kit contains everything you need to build a full depth semi scale Su-27 cockpit, yet adds less than an ounce to your finished model s weight (not including pilot).
-1- Coach Instructions.
 -1- Coach Instructions. Insert the bogie pivot pins through the bottom of the coach body ensuring the dimples fit into the recesses. Glue the.06 x.25 short strips each side of the pivot head, bridge the
Tudor Webasto Sun Roofs
 Tudor Webasto Sun Roofs The Tudor Webasto Sun Roof has been a market leader for more than 25 years. Originally developed in West Germany, it is now exclusively manufactured in Great Britain. With the demise
PS 5077 cu. ft. Boxcar with EOC device. 1:29 scale resin craftsman kit. by Burl Rice
 PS 5077 cu. ft. Boxcar with EOC device 1:29 scale resin craftsman kit by Burl Rice www.burlrice.com Bill of materials (not included): Thick/medium viscosity CA PL adhesive, or Gorilla Glue Heavy Duty Construction
Billy Body Kit HBK5 CHECKLIST. Modular Locomotive System Instruction Manual for HBK5 Billy Body Kit. Checked
 Billy Body Kit HBK5 CHECKLIST 1 Cab body panel (folded). 1 Cab floor. 1 Cab front panel. 1 Roof. 1 Body tank support. 2 Boiler bands with M2 Long Steel Screws & Nuts fitted. 1 Brass dome. 1 Cast brass
Nanton Grain Mill Assembly
 ( 1 ) Nanton Grain Mill Assembly Locate package for assembling storage building. These are cut from 1/8 masonite. Inspect and lightly sand edges where it will be bonded. Use white glue or CA glue to bond.
TOYOTA MOTOR EUROPE CA Products Division Tel : Fax :
 TOYOTA MOTOR EUROPE CA Products Division Tel : + 32 2 745 26 77 Fax : + 33 2 745 26 99 Ordering part numbers Comments Part Numbers Wooden floor one hatch PZ449-D3C42-11 one hatch with carpet PZ449-D3C42-01
Continue gluing the remaining top parts ensuring the angled piece is glued well. Set aside and let dry. See photo below
 Radiator rev 1.1 The SE5a s radiator is one of the most recognized radiators in WW1. It is one of the components that defines the SE5a. The original SE5a has seen multiple radiator designs used during
1. Underframe/Tank Bottom
 1. Underframe/Tank Bottom The construction process for the Class X tank cars is a little different as there is no true underframe. Instead we will use the tank bottom as part of the underframe, attaching
STEEL RULE. Stock TRY SQUARE
 FITTING INTRODUCTION Fitting consists of a handwork involved in fitting together components usually performed at a bench equipped with a vice and hand tools. The matting components have a close relation
Pump Assembly. Lloyd Matthews September 2013
 Pump Assembly Lloyd Matthews September 2013 Before proceeding with this part of the build, the author recommends that Pt. No 227 1 mm diameter Brass Wire Figure H1, is replaced with 0.8 mm straight brass
Dubnium 11 Installation Instructions & Parts List
 Dubnium 11 Installation Instructions & Parts List Illustration Dubnium, H1 Handle Right Hand: Open Out Page 1 of 25 IMPORTANT This shower screen / enclosure must be installed by suitably qualified individuals.
Lima XPT/HST Re-Powering Conversion
 Lima XPT/HST Re-Powering Conversion Please read through these instructions before beginning the conversion process. Non-Powered Bogie The front non-powered bogie is the starting point for this conversion.
Vivian Mansion Assembly Instruction By Laser Dollhouse Designs
 Vivian Mansion Assembly Instruction By Laser Dollhouse Designs NOTE 1: Please do a dry assembly using only tape to hold house together. This will get you familiar with parts, location, and fit. This also
129 KITCHEN BASE CABINET 480
 129 KITCHEN BASE CABINET 480 There are two sorts of kitchen cabinets: base cabinets, which sit on the floor, and wall cabinets. Base cabinets provide both storage space and work surfaces. They often house
The Saint Paul Building
 The Saint Paul Building Instructions for Assembly of The Saint Paul Building. Kit Contents: 65 each laser cut acrylic parts. 1 each sheet of AC roof unit parts. 1 each sidewalk. 3 each Window Glass Templates,
Cabinet is 90% assembled, all you need to do is to attach the legs, lay the glass top on the cabinet, connect the faucet, drains & ptrap.
 Things you might need for the installation: vessel sink, plumber's putty(home depot), liquid nails(home depot), Bucket silicone caulk(home depot), Putty knife Plumber's putty Pipe wrench Channel-lock pliers
Curium 19.4H Installation Instructions & Parts List
 Curium 19.4H Installation Instructions & Parts List Illustration Curium 19.4H Right Hand Page 1 of 21 30/06/2016 Revision 1.0 IMPORTANT This shower screen / enclosure must be installed by suitably qualified
Dura-Lock Roof System
 DLR-14 Dura-Lock Roof System Assembly and Installation Instructions Read the instructions before starting the job. They explain the steps required to produce a finished product that will meet factory specifications.
3Insert the second rod no. 4
 Yamato: Step-by-step 37 The stern block and searchlight control towers a b c d e f Recommended tools and materials Wood glue Sandpaper (no. 800 grain) Metal file Putty Craft knife For metal: Super Glue
Curium 19H Installation Instructions & Parts List
 Curium 19H Installation Instructions & Parts List Illustration Curium 19H Right Hand Page 1 of 15 01/07/2016 Revision 2.1 IMPORTANT This shower screen / enclosure must be installed by suitably qualified
Ziroli D-17 Beech Staggerwing
 Ziroli D-17 Beech Staggerwing Parts List Vacuform Parts: Miscellanous Pieces 1 Four Side Panels 1 3/16" Tube, 2" Long 2 Lower Dash - Back Dash 2 Felt, 12x24 3 Dash 3 Cordury 12x24 4 Dash Hood 4 Aluminum
CONVERTING CAMBRIAN MODELS FOX BOGIES TO 45MM GAUGE AND SIERRA VALLEY STEEL WHEELS WITH BALL BEARINGS
 CONVERTING CAMBRIAN MODELS FOX BOGIES TO 45MM GAUGE AND SIERRA VALLEY STEEL WHEELS WITH BALL BEARINGS Parts list (photograph 1) 1 pair Cambrian Models Fox Bogies 4 x Sierra Valley gauge 1, 25mm diameter
Installation Guide. Bi-fold Doors
 Installation Guide Bi-fold Doors Installation Guide Components box 1. 6. 2. 3. 7. 5. 4. 8. Contents 1. Fixing plugs 2. Wedge gasket 3. Bottom trolley 4. Top trolley 5. Magnetic keep (x 2 if door height
Cobra X Q Construction Tips Construction: Bel y pan
 Cobra X Q Construction Tips : The white plastic in this kit is high impact styrene. It can be painted with most types of coatings if light coats are applied this is necessary due to the thickness of the
FINNEY7 4500G May17 SR 4500G TENDER. Fig 1. Original Appearance. Side raves Sanding gear Front water fillers TIA Water treatment system
 Fig 1. Original Appearance Side raves Sanding gear Front water fillers TIA Water treatment system 4500G - 3 Fig 2. Rebuilt Condition Cut down side raves with fire iron tunnels# TIA removed and replaced
Hotel Belvedere Instructions for Assembly of the HO scale kit. v1.1
 Hotel Belvedere Instructions for Assembly of the HO scale kit. v1.1 Kit Contents: 319 ea. laser cut.090" acrylic parts. 132 ea. laser cut.060" acrylic parts. 8 ea. window glass templates 8 ea. window glazing
Radon 07 Installation Instructions & Parts List
 Radon 07 Installation Instructions & Parts List Illustration Radon 07, H1 Handle Right Hand: Open Out 14/06/2016 Revision 1.1 Page 1 of 21 IMPORTANT This shower screen / enclosure must be installed by
Practical Scrap Metal Small Arms Vol.10 By Professor Parabellum
 Practical Scrap Metal Small Arms Vol.10 By Professor Parabellum Introduction The 9mm submachine gun design described here is extremely basic and can be put together using very limited tools and materials.
Robert Bosch GmbH. Minimalist washstand
 Minimalist washstand Neat and tidy Minimalist washstand Minimalist design in the bathroom is in fashion. And rightly so, as this washstand proves: because less is more! 1 Introduction Here s an idea to
1Use the metal file to smooth
 Yamato: Step-by-step 85 Parts of the bridge and the hull a b c d e f a Part of the bridge b Part of the bridge c Part of the bridge d Radar x 2 e Part of the bridge x 2 f Wire Recommended tools and materials
Shay Tender Frame Fabrication
 Shay Tender Frame Fabrication Nelson Riedel Nelson@NelsonsLocomotive.com Initial:3/15/03 Last Revised: 06/05/2004 This page shows additional detail on the tender frame members and some of the processes
Converting a Bachmann Class 45 model to 45133
 Converting a Bachmann Class 45 model to 45133 Bachmann have yet to produce an accurate OO gauge model of a Class 45/1. The 45/1s that have been produced were let down by the presence of steam heat details
General Purpose Flat Wagon
 General Purpose Flat Wagon This is a freelance model of a flat wagon used by any number of railways for transporting large and awkward loads. The kit includes optional load securing rings and a pair of
Robert Bosch GmbH. Lounge light fixture
 Lounge light fixture Nice and relaxing Lounge light fixture Light has an important effect on mood. This cool light fixture is perfect for creating a cosy lounge atmosphere. 1 Introduction This cool light
EXTREME LOAD no. TWO
 1602 - EXTREME LOAD no. TWO Kit Features: 22' 4 " x 14' x 3'-6 Oversize Load 49mm (1.9") actual height Bolt Head Details Welded Load Mounting Fins Painting Handles Tools Required: Hobby Knife Tweezers
2. Sanding the Modules Sand the entire surface of each cyc module with 60-grit sandpaper. This will provide for better paint adhesion.
 ASSEMBLY INSTRUCTIONS SYSTEM 4 BI (Built-In) Congratulations on your decision to use the world s most advanced and user-friendly cyclorama system. We have taken a great deal of care to create and ship
Shed Assembly Instructions
 Shed Kit Contents The shed kit includes all the parts needed to assemble your shed except for tools and fasteners such as screws and nails. The various pieces are pre-cut and many are marked to indicate
Tool Wagon Assembly Instructions
 Tool Wagon Assembly Instructions Adhesives Wood to wood joints are best done with a PVA wood glue but a good quality, slow acting (beware of instant grab ) cyanoacrylate super glue can be used if preferred.
INFINITE RANGE - HINGE DOOR
 INFINITE RANGE - HINGE DOOR HINGE DOOR + 1 SIDE RETURN PANEL (CORNER) Please read these instructions before installing, as incorrect fitting will invalidate the guarantee-carry out each stage before moving
LocoGear. Technical Bulletin - 14 November 28, 2003 Copyright 2003 by LocoGear LIVE STEAM CASTINGS. Tech Bulletin - 14
 LIVE STEAM CASTINGS LocoGear Tech Bulletin - 14 John D.L. Johnson 3879 Woods Walk Blvd Lake Worth, FL 33467-2359 jjohnson@locogear.com www.locogear.com Technical Bulletin - 14 November 28, 2003 Copyright
Gallium 03 Installation Instructions & Parts List
 Gallium 03 Installation Instructions & Parts List Illustration Gallium 03, H1 Handle Left Hand: Open Out 04/05/2016 Revision 1.1 Page 1 of 19 IMPORTANT This shower screen / enclosure must be installed
GENERAL NOTES: Page 1 of 9
 Laminating A Zia Into A Turning Blank by W. H. Kloepping, Jan. 2009 This describes how a zia (the New Mexico state symbol) can be laminated into a turning blank. Materials needed: Square Turning Block
The Fyfe Building Instructions for Assembly of the N scale kit.
 The Fyfe Building Instructions for Assembly of the N scale kit. Kit Contents: 150 each laser cut 1/16" acrylic parts. 6 each 020 adhesive backed part 6 each column caps 2 each decorative canopy 1 each.125"
Ford Ranger / Bronco II Set Part # Rev B 5-04
 Ford Ranger / Bronco II Set Part # 21008 Rev B 5-04 Step 1: Prior to Installation: A) Fit: Verify the fit of the flares to vehicle. (Some filing, sanding, or cutting may be necessary to ensure proper fit).
The Festival Assembly Instructions
 The Festival Assembly Instructions Toll Free: 866.768.8465 Hours: 9-5 Monday-Friday EST www.homeplacestructures.com Package ships as shown CONTACT INFORMATION: HomePlace Structures 301 Commerce Drive New
The Switched Longwire Tuner SLT
 The Switched Longwire Tuner SLT Thank you for purchasing the SLT kit from Hendricks QRP Kits. This kit is a very high quality kit that you will find easy to build, yet when you finish, you will have a
Antique Trunks: Refinish, Repair, Restore, Revised and Expanded
 15. Patch any holes on the inside of the trunk: There will often be splits or holes on the inside of the trunk that may or may not be visible from the outside. Most often they are holes left by the removal
FITTING INTRODUCTION:
 FITTING INTRODUCTION: Machine tools are capable of producing work at a faster rate, but there are occasions when components are processed at the bench. Sometimes it becomes necessary to replace or repair
HDL(M)6 Nut/Screw Assembly
6 Nut/Screw Assembly") HDL(M)6 Nut/Screw Assembly Remove, repair, and reassemble the nut and screw assembly in your HDL series double lock vise. In these instructions when we refer to the front of the vise or nut/screw assembly,
HDL(M)6 Nut/Screw Assembly Remove, repair, and reassemble the nut and screw assembly in your HDL series double lock vise. In these instructions when we refer to the front of the vise or nut/screw assembly,
WESTERN PISTOL.22 CALIBER SINGLE SHOT. Entire pamphlet Copyrighted by JACO Designs 1972
 WESTERN PISTOL.22 CALIBER SINGLE SHOT Entire pamphlet Copyrighted by JACO Designs 1972 This pamphlet contains the plans and instructions necessary to construct the Western pistol. This pistol breaks open
The Reading Tug Schuylkill By: Barry Hensel
 The Reading Tug Schuylkill By: Barry Hensel My Reading Lines Central Division layout has needed a tug boat for the Port Richmond coal dock scene for some time. I finally found a Walthers Tug kit for a
Assembly Instructions for Summit Motel Kits # SMFS and SMBD
 Assembly Instructions for Summit Motel Kits # SMFS and SMBD Introduction Thank you for your purchase of the Summit Motel. This modern motel can be converted to almost any chain motel of your choice, depending
CVS Pharmacy kit in HO scale
 CVS Pharmacy kit in HO scale Parking lot base and cars not included This kit includes all building parts and wall-mounted signs milled in white styrene plastic, clear window glazing and pre-cut Plastruct
Xenon 05 Installation Instructions & Parts List
 Xenon 05 Installation Instructions & Parts List Illustration Xenon 05, H1 Handle Left Hand: Open Out 26/05/2016 Revision 2.1 Page 1 of 19 IMPORTANT This shower screen / enclosure must be installed by suitably
'Mutiny' Ozone Reactor Kit
 'Mutiny' Ozone Reactor Kit Skill Level: Beginner Tools Required: Scissors or razor blade Other Materials: Teflon tape Time to Build: Approximately 1 hour not including drying time Version: 2012 spray nozzle
Triplex Instructions for Packing and Unpacking
 2-8-8-2 Triplex Instructions for Packing and Unpacking It is recommended that you review all these instructions before removing the engine or tender from the poly foam container. www.mthtrains.com Table
The Park Hotel Instructions for Assembly
 The Park Hotel Instructions for Assembly Kit Contents: 280 ea. Laser Cut Acrylic Parts. 1 ea. 6" Plastic Coated Wire. 5 ea. Sidewalk Parts. 14 ea. Cast Resin Dormers. 12 ea. Window Glass Templates, 12
A Day House. A View of One Way to Finish the Exterior of The Day House. Read these instructions all the way through before beginning this project.
 A Day House A View of One Way to Finish the Exterior of The Day House Read these instructions all the way through before beginning this project. General Comments For the purposes of this project, the standard
The Lansdowne One Car Garage Assembly Instruction by Laser Dollhouse Designs
 The Lansdowne One Car Garage Assembly Instruction by Laser Dollhouse Designs NOTE 1: Please do a dry assembly using only tape to hold house together. This will get you familiar with parts, location, and
INSTALLATION MANUAL FORTRESS SERIES
 Guardian Security Structures TEL 1-406-212-2334 EMAIL rg@gssdoors.com WEB www.gssdoors.com FORTRESS SERIES GENERAL INSTALLATION GUIDELINES 1. The door frame is installed using 16 bolt screws 7,5 mm in
ASSIGNMENT 4. Textbook Assignment: The point, edge, face, heel, and tang are the five parts of which of the following tools?
 ASSIGNMENT 4 Textbook Assignment: "Files," "Grinders and Sharpening Stones," "Scrapers," "Awls," "Bolt and Cable Cutters," "Glass Cutters," "Knives,' 'Pipe Cutting and Threading Tools," "Tube Cutting and
The Park Hotel Instructions for Assembly of N Scale Kit
 The Park Hotel Instructions for Assembly of N Scale Kit Kit Contents: 198 ea. Laser Cut Acrylic Parts, 2 ea. Chimney Parts Sheets, 1 ea.2".040 styrene rod, 5 ea. Sidewalk Parts, 14 ea. Cast Resin Dormers,
Question 1. Flat file. Half -round. Round file. Three square ( triangle ) Needle files. Page 1 of 46
 Needle files. Page 1 of 46") Question 1 Name Picture Cross section Uses: Cut pattern:: Flat file Half -round Round file Three square ( triangle ) Needle files Page 1 of 46 Question 2 The graph shown below is the data collected for
Question 1 Name Picture Cross section Uses: Cut pattern:: Flat file Half -round Round file Three square ( triangle ) Needle files Page 1 of 46 Question 2 The graph shown below is the data collected for
3Position the hull of the ship as
 Yamato: Step-by-step 25 The hull and stern deck c b d a b d c e e f a Rear frame b Stern deck x 2 c Stern deck x 2 d Side wall x 2 Wood glue Sandpaper (no. 400 grain) Craft knife Pliers d Side wall x 2
The Hamlin Assembly Instruction By Laser Dollhouse Designs
 The Hamlin Assembly Instruction By Laser Dollhouse Designs NOTE 1: Please do a dry assembly using only tape to hold house together. This will get you familiar with parts, location, and fit. This also gives
Jigsaw Puzzle Tray. Premium Plan. In this plan you ll find: America s leading woodworking authority
 America s leading woodworking authority Premium Plan In this plan you ll find: Step-by-step construction instruction. A complete bill of materials. Construction drawings and related photos. Tips to help
LOCKN LOAD FIRST TIME INSTALLATION
 LOCKN LOAD TM TRACK MOUNTING KIT NISSAN NAVARA D40 2004-2015 2 BAR TRACK HEAVY DUTY ROOF RACK SYSTEM MAX VEHICLE ROOF LOAD RATING: 100KG TOTAL LOAD EQUALS WEIGHT OF ROOF RACKS + ACCESSORIES + CARGO FIRST
Chapter 19. Interior Finish Work
 Chapter 19. Interior Finish Work 19.1 INSTALLING FLOOR TRIM 19.2 INSTALLING CLOSET SHELVES AND POLES 19.3 INSTALLING BATHROOM ACCESSORIES 19.4 HANGING MINI-BLINDS 19.5 INSTALLING APPLIANCES 19.6 INSTALLING
Tools: Scissors, hand held single-hole punch, metal ruler or other good straight-edge, sharp knife or Exacto-knife.
 Instructions for Building a Kepler Paper Model Version 30 Mar 3, 2010 You need the following files: File Sheet # Printer Paper Color Kepler_model_instructionspdf plain b/w Photometerpdf 1 Photo stock color
1Smooth pieces 4, 5 and 6, using
 Yamato: Step-by-step 109 Machine-guns, anti-aircraft guns and decking h e f a b c g d e f a Anti-aircraft gun base x 2 b Anti-aircraft gun (bottom) x 2 c Anti-aircraft gun (top) x 2 d Machine-gun base
Small 45 Roof Houses 1 or 2 Story 1 /24 th Scale Patterns
 BA GARDEN TOWNS 45 Roof Houses 10" x 10" 1 or Story Scaled and easy to read patterns and instructions for wood houses. Yard and Garden Buildings Compatible with Garden Railroads or a delight for any child's
The image above is intended to give you an idea of what the dovecote will look like when finished.
 Thank you for buying my book, I hope it is useful and enjoyable in your quest to building your own dovecote. This book will give you step-by step instructions on how to build your own dovecote also included
How to install backchecks
 How to install backchecks Note: All pictures can be enlarged for better clarification. Revision 7 8/2009 Backchecks wear out in a piano much like brake pads in an automobile. While wear is a valid reason
136 PLYWOOD DESK 522
 136 PLYWOOD DESK 522 Simple in design and inexpensive, this plywood desk is made from a single 4- x 8-foot panel. Plywood is available with many hardwood veneers; it can also be covered with plastic laminate,
*Patent Pending. *Trademarked. Series II. Glass Conversion Kit. (888) One-Products (888)
 One-Products (888)") *Patent Pending *Trademarked Series II Glass Conversion Kit www.onepieceproducts.com (888) One-Products (888) 663-7763 Installation Manual Full One Piece Door Glass Conversion Kit Series II 1967-1972 Chevy
*Patent Pending *Trademarked Series II Glass Conversion Kit www.onepieceproducts.com (888) One-Products (888) 663-7763 Installation Manual Full One Piece Door Glass Conversion Kit Series II 1967-1972 Chevy
Slicing Jig For Pen Inlays
 Slicing Jig For Pen Inlays By Randall Smith (randyrls) May 2008 This article has been downloaded from the library of the International Association of Penturners. www.penturners.org You are welcome to reproduce
Small Town Buildings. Scaled and easy to read patterns and instructions. Shoe / Western Union (with and without porch)
") 1 /24 th Scale Patterns kiva design G R O U P E 1 Story Flat Roof Yard and Garden Buildings Compatible with Garden Railroads or a delight for any child's collection Overall Dimensions Foundation: 10" x
1 /24 th Scale Patterns kiva design G R O U P E 1 Story Flat Roof Yard and Garden Buildings Compatible with Garden Railroads or a delight for any child's collection Overall Dimensions Foundation: 10" x
Fidelity & Guaranty Building
 Fidelity & Guaranty Building N Scale Model Kit Instructions for Assembly of the Fidelity & Guaranty Building Kit Contents: 69 each laser cut acrylic parts. Sidewalk material 1 each Window Glass Templates
BUZZ S SAWMILL PF5195 WOODLAND SCENICS BUILDING KIT
 1:87 BUILDING KIT BUZZ S SAWMILL PF5195 Buzz s Sawmill is a detailed work of art with all workings of a vintage steam-fired, belt-driven sawmill. Details include interior rafters and shake roof, attached
Finish Neck and Fretboard Wednesday, January 16, :36 PM
 ASL Breakdown Page 1 Finish Neck and Fretboard Wednesday, January 16, 2013 9:36 PM Layer on the fret board, making sure registration pins are in place and everything lays flat. The 3/16" aluminum nutsurrogate
Fidelity & Guaranty Building
 Fidelity & Guaranty Building Instructions for Assembly of the Fidelity & Guaranty Building Kit Contents: 69 each laser cut acrylic parts. 1 each sheet of AC roof unit parts. 1 each sidewalk base. 4 each
The Virgo/Libra Steam Engine
 The Virgo/Libra Steam Engine Congratulations on becoming the owner of a Virgo or Libra Steam Engine. With careful use and maintenance it will give many years of satisfying performance. Contents 1) Notes