Collage Pendant from Recycled Tin
|
|
|
- Norman McCarthy
- 6 years ago
- Views:
Transcription

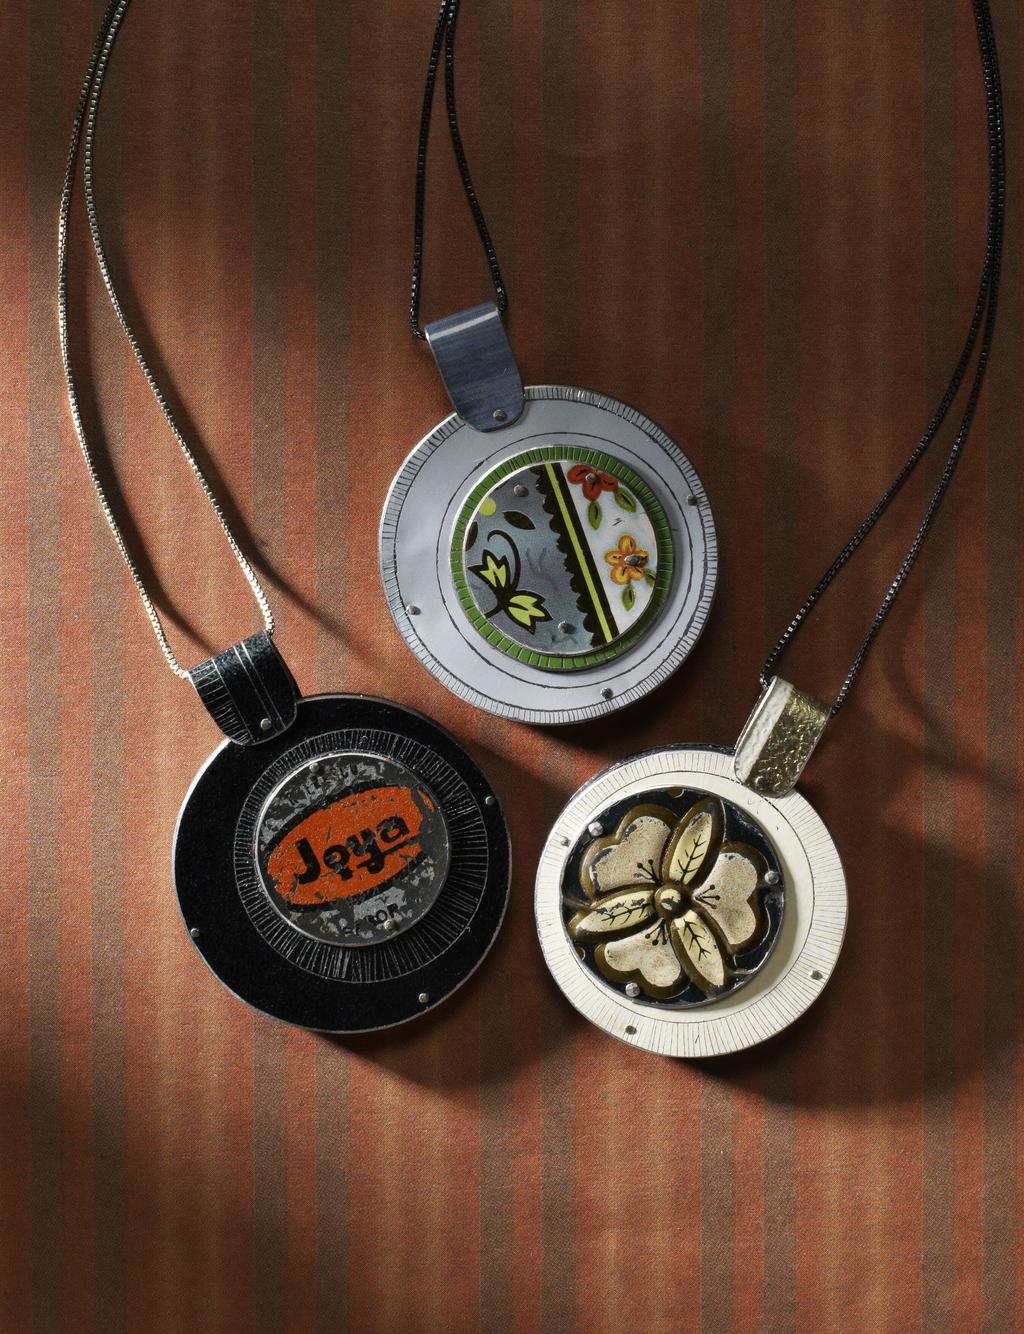
1 PROJECT BEGINNER METAL Construct a Collage Pendant from Recycled Tin Cut, stack, and rivet elements from colorful tin containers to create a reversible pendant with a wooden core. by Christine Terrell Almost everyone has memories of an old coffee, cookie, or tea tin put to work as a catch-all to store household caches like screws, coins, and pencils. While these tins are lovely in their own right, don t overlook their potential to be repurposed as a raw material for your metalsmithing projects. The impressive array of color and imagery is more than enough to recommend lithographic tins, but they also happen to be great fun to work with since they re simultaneously strong and thin. Their lightweight nature is a boon for earrings, but that quality doesn t always translate well for pendants. While searching for a way to add heft and rigidity to the material, I struck on the idea of a medallion with a heart of wood. Since riveting requires metal on both sides, it made sense to make the medallion double-sided. I constructed my first pendant with just two circles of tin, but quickly realized it was more interesting to layer circles on each side to make tiny collages. FCT-MW Kalmbach Publishing Co. This material may not be reproduced in any form without permission from the publisher. facetjewelry.com
2
 toolbox Riveting additional tools & supplies Circle template Handheld shears Disk cutter (optional) Fine-cut hand file #0000 steel wool Dot adhesive Rawhide mallet (optional) Flatnose or")
 diameter. Choose a piece of decorative tin. Use a circle template and scribe to mark a circle on the tin [1].")
![Use shop shears or a disk cutter to cut out the circle [2]. Cut the smaller circles. With your shears or disk cutter, cut out 1 3 smaller, coordinating tin circles.](/docs-images/80/80925766/images/3-2.jpg "File the edges and refine them with steel wool as before. Play with the placement of your circles until you have a pleasing collage [4].")


3 materials Lithographic tins, amount and style determined by design 1 8 -in. (3 mm) craft hardwood, amount determined by design gauge ( mm) copper or silver wire, hard, 4 in. (10.2 cm) toolbox Riveting additional tools & supplies Circle template Handheld shears Disk cutter (optional) Fine-cut hand file #0000 steel wool Dot adhesive Rawhide mallet (optional) Flatnose or linesman pliers Flush cutter Jeweler s saw with #0 saw blade 220-grit sanding stick (optional) Black acrylic paint Cut the base circle. Your pendant can be any size you choose; mine is 13 8 in. (35 mm) diameter. Choose a piece of decorative tin. Use a circle template and scribe to mark a circle on the tin [1]. Use shop shears or a disk cutter to cut out the circle [2]. Cut the smaller circles. With your shears or disk cutter, cut out 1 3 smaller, coordinating tin circles. File the edges and refine them with steel wool as before. Play with the placement of your circles until you have a pleasing collage [4]. NOTE: If you use shears, don t cut the circle directly from the large piece of tin like you would from paper. First, cut out a square of metal around your circle and then trim the remaining tin to the scribed line. Rivet the circles. Use dot adhesive to temporarily hold the pieces together. Use a fine-tip permanent marker to mark 3 4 rivet positions. Place your drill bit into a flex shaft, and drill the first hole through all the layers. Use a fine-cut hand file to remove any tin outside of the scribed line, and then use fine #0000 steel wool to smooth the edge. Be careful not to file or use steel wool on the painted surface. TIP: Because tin is so thin, it can be difficult to file. Make sure you use a fine-cut file and push the file along the edge of the tin. If you try to file at a more perpendicular angle, the tin will catch and distort. To de-bur the edge of the tin circle, hold the metal flat against your bench pin and run your file at a shallow angle across the arc of the circle [3]. NOTE: Choose a drill bit that is as close to the same size as your rivet wire as possible. Since I am using 20-gauge (0.8 mm) wire, my drill bit is a #67 (0.032 in./0.81 mm). The wire should fit snugly in the drilled hole. Cut a 1 in. (25.5 mm) piece of gauge ( mm) copper or silver wire. NOTE: If the wire is soft, harden it with a rawhide mallet on a steel bench block. Hold the wire firmly in a pair of flatnose or linesman pliers so that only 1 mm (1 32 in.) of wire extends above the jaws. Brace the pliers against your bench block, and use a riveting hammer or the rounded end of a ball-peen hammer to tap the end of the wire until the tip mushrooms over [5].

 craft hardwood [7].")
![Use a jeweler s saw with a #0 blade to saw out the circle [8]. Use the fine file to refine the wood circle until it is symmetrical.](/docs-images/80/80925766/images/4-2.jpg "NOTE: Don t get too detailed at this stage; final filing and sanding will be done after you have riveted all the pieces together. Rivet the tin to the wood.")
![Use dot adhesive to adhere one collage to one side of the wood. Determine the top of your pendant and mark the edge of the wood at that point [9].](/docs-images/80/80925766/images/4-3.jpg "Using this mark as a guide, adhere the second tin collage to the other side of the wood.")

4 7 Thread the straight end of the wire through the hole in your collage from the painted side of the tin and use flush cutters to trim it 1 mm from the tin at the back. Place the assembly on a steel bench block and use your hammer to create the second side of the rivet [6]. Flip the assembly as needed to refine and secure the rivet. Repeat to consecutively drill and set a rivet at each mark to complete one circle collage, then repeat the process to create a second riveted circle collage. Create the wood core. Use a pencil and the circle template to mark a circle the same size as your base tin circle on a piece of 1 8 -in. (3 mm) craft hardwood [7]. Use a jeweler s saw with a #0 blade to saw out the circle [8]. Use the fine file to refine the wood circle until it is symmetrical. NOTE: Don t get too detailed at this stage; final filing and sanding will be done after you have riveted all the pieces together. Rivet the tin to the wood. Use dot adhesive to adhere one collage to one side of the wood. Determine the top of your pendant and mark the edge of the wood at that point [9]. Using this mark as a guide, adhere the second tin collage to the other side of the wood. If either collage isn t flush with the wood, remove it and gently file the rivet heads to flatten them slightly. Mark 3 4 rivet positions. NOTE: For this size pendant, I like four equally spaced rivets. You need a minimum of three, but you can set as many as you would like for your design. No matter how many rivets you choose, plan to set 8 9 play with your food tins Tin has become a frequent guest material for many artists in recent years. Most are attracted to the lovely floral and advertising tins of bygone years, but I have an affinity for the bright colors and patterns of those from more modern times. I ve become particularly interested in adding a personal touch by scribing and distressing the surfaces. The tough, enamel-like finishes are great blank canvases for a variety of distressing experiments. The effects are rarely predictable but always intriguing. your bail rivet last. Drill your first hole through all layers and set one rivet, then drill the second hole and set the second rivet. Once two rivets are set, you can drill all of the remaining holes and set the rivets consecutively. Finish the edges. Use the fine-cut file or a 220-grit sanding stick to remove any excess wood or metal to make the edge of the assembly as smooth and symmetrical as possible. To de-bur the tin circle edges against the wood, hold the assembly flat on your bench pin and file at a angle, as before [10]. Create a tight mass of fine steel wool and vigorously rub the piece all along the edge [11]. Dab a small amount of acrylic paint the same color as your base tin circle onto the wood with your fingertip or a small paintbrush [12]. Clean up any paint To add more visual interest, use a circle template and scribe to scratch designs into the tin.


, then round the corners. Use your file and steel wool to refine the edges as before.")


5 Process photos by Christine Terrell a note about tools What we commonly call tin is mostly cold-rolled steel with a painted finish. If you work primarily with precious metals, you may not want to expose your tools to the rigors of steel. Consider purchasing inexpensive shears, files, and cutters for working with tin. that may have gotten on the metal, and let the edge dry for a few minutes. Make the bail. Bails can vary widely in design, but I like simple, capsule-shaped bands. Use your shears to cut a small, rectangular piece of tin (my bail here is approximately 3 8 x 3 4 in. [9.5 x 19 mm]), then round the corners. Use your file and steel wool to refine the edges as before. Scribe in any designs you wish. Mark and drill centered holes at each end of the rectangle. Bend the rectangle over an awl at the midpoint to form a U-shape [13]. Adjust the curve so both sides are symmetrical. Fit the rectangle over your riveted circle at the point where you planned to put the bail. Make a mark through the drilled hole on one side of the bail onto the circle. Remove the bail and drill all the way through the assembly at the mark. Fit the bail back on your assembly, and rivet as before [14]. Slide the finished pendant onto the chain of your choice. By making a separate collage for each side, you can make your pendant reversible. ASK THE ARTIST: CHRISTINE TERRELL What qualities do you look for in your jewelry materials? Unlike most jewelers, I think, The less precious the better! I use some vintage tins, but my collection leans heavily toward modern tins that, on first blush, seem to have little to offer. Finding or creating beauty from mundane materials is the interesting part for me. Contact:
Learn how to make decorative rivets while working with this uncommon alloy. by Addie Kidd
 PROJECT INTERMEDIATE METAL Shibuichi Cuff: Learn how to make decorative rivets while working with this uncommon alloy. by Addie Kidd To take full advantage of shibuichi, you ve got to use patinas. One
Design and Build a Bracelet. a la Carte. by Deborah Francis
 PROJECT BEGINNER METAL Design and Build a Bracelet a la Carte Use basic cold connections to mix and match found objects, base metals, and polymer components. by Deborah Francis This inexpensive bracelet
Cold-connect Silver &
 PROJECT COVER STORY INTERMEDIATE METAL/PLASTIC Cold-connect Silver & ACR YLI C in a Layered Ring Learn to work with modern, lightweight acrylic sheet to introduce transparent color to your work. by Maria
Riveted Spinner Ring. Last summer I took a weekend workshop. eye-catching. quick cold connection. online exclusive. Make a simple, ring with a
 online exclusive beginner metal Make a simple, eye-catching ring with a quick cold connection. Riveted Spinner Ring PUT YOUR OWN SPIN ON IT by Jill L. Erickson Last summer I took a weekend workshop on
polymer clay. by Jill Erickson
 intermediate polymer clay You ought to be in pictures... Transfer your favorite photographs to jewelry using polymer clay. by Jill Erickson This direct image-transfer technique is easy to master and does
Mixed Metal Heart Author: Patti Bullard Ph.D.
 Mixed Metal Heart Author: Patti Bullard Ph.D. Mixed Metal Heart Difficulty: Easy The beauty of mixed metals paired with a traditional heart shape is sure to bring joy to the jewelry maker as well as the
Triangles. Pendulum. Dangling from handmade curvilinear ear wires, Construct earrings from carefully fitted panels. METAL CLAY EARRINGS
 The front of each earring is impressed with a slightly different pattern than those used on the sides and backs. 1¾ in. (44mm). beginner/intermediate metal clay METAL CLAY EARRINGS Pendulum Triangles Construct
FCT-MW _ Kalmbach Publishing Co. This material may not be reproduced in any form without permission from the publisher. facetjewelry.
 FCT-MW-082216_04 2007 Kalmbach Publishing Co. This material may not be reproduced in any form without permission from the publisher. facetjewelry.com intermediate metal Chain Reaction Forge sterling silver
MIXED-MEDIA LINKS. With three different paisley-shaped links and four ways to embellish. Combine woven wire and polymer clay to make bold links.
 Soldered wire frames are the backbone of each link in the bracelet. 8½ x 1¼ in. (21.6 x 3.2cm). WIRE AND POLYMER CLAY BRACELET MIXED-MEDIA LINKS Combine woven wire and polymer clay to make bold links.
Fusion. Déjà. Fuse and solder a removable medallion that. fits on a fused, free-form chain.
 FUSE, SOLDER, FUSE AGAIN beginner metal Déjà Fusion Fuse and solder a removable medallion that fits on a fused, free-form chain. This chunky fused fine-silver chain looks equally striking with or without
MIX ARGENTIUM &METAL CLAY
 PROJECT INTERMEDIATE/ADVANCED METAL CLAY/METAL MIX ARGENTIUM &METAL CLAY in a Floral Pendant FCT-CR-032017_07 Combine two modern forms of silver in a project that plays to the strengths of each material.
A Fresh Take. Tap the potential of repoussé to give your jewelry dimension without added weight.
 intermediate metal BOUQUET OF TECHNIQUES A Fresh Take on a Floral Tap the potential of repoussé to give your jewelry dimension without added weight. by Grace Stokes T he floral brooch is a time-honored
to Precious From Plumbing PROJECT INTERMEDIATE METALS facetjewelry.com FCT-MW
 PROJECT INTERMEDIATE METALS From Plumbing to Precious FCT-MW-061217-07 2013 Kalmbach Publishing Co. This material may not be reproduced in any form without permission from the publisher. facetjewelry.com
Copper Copper windows showcase beautifully woven bands in a simple but stylish pendant
 beginner metal Woven in Copper Copper windows showcase beautifully woven bands in a simple but stylish pendant by Mary Hettmansperger C opper is one of the most colorful and economical metals on the market,
There s a trick to using only two prongs. Think Again! Think Two Prongs Can t Secure a Stone? Use sturdy, strategically placed prongs
 PROJECT INTERMEDIATE/ADVANCED METAL Think Two Prongs Can t Secure a Stone? Think Again! Use sturdy, strategically placed prongs to set a custom-cut stone. by Jessica Dow and Mark Anderson There s a trick
Layered Cuff. Uncover the. Secrets of a. Elegantly simple fabrication tricks are the key to making this intricate bracelet.
 Uncover the Secrets of a Layered Cuff Elegantly simple fabrication tricks are the key to making this intricate bracelet. by Hiromi Suter FCT-MW-042417-04 2011 Kalmbach Publishing Co. This material may
Table of Contents. Introduction 4 Materials 5 Tools 7 Basic Tool Kit General Tools. Techniques 97 Common Techniques Making Components
 Table of Contents Introduction 4 Materials 5 Tools 7 Basic Tool Kit General Tools Techniques 97 Common Techniques Making Components Acknowledgments 111 About the Author 111 Earrings Square Dangles...12
Dye, Form, & Staple. a Mixed-media Cuff. Stabilize custom-dyed and formed leather using functional embellishments of textured brass and copper wire.
 PROJECT BEGINNER METAL/LEATHER Dye, Form, & Staple a Mixed-media Cuff Stabilize custom-dyed and formed leather using functional embellishments of textured brass and copper wire. FCT-FC-061917-08 by Karen
FINISH 14 LINKS IN ONE EVENING. Pearls Wire. Grade A necklace no matter the. grade of your pearls. by Cynthia B. Wuller
 beginner wirework FINISH 4 LINKS IN ONE EVENING Pearls Wire and on Any Budget Make a Grade A necklace no matter the grade of your pearls. by Cynthia B. Wuller W hether you use economical materials or splurge
facetjewelry.com FCT-CR _ Kalmbach Publishing Co. This material may not be reproduced in any form without permission from the publisher.
 The organic bell shape of the calla lily makes a graceful jewelry component. The pendant is 1½ x ¾ in. (38 x 19mm), and the earrings are 2 x ½ in. (51 x 13mm), including the ear wires. FCT-CR-071116_04
ascading Create the tiered appearance of chandelier crystals in this elegant set by Jennifer Jordan Park
 intermediate wire ascading carnelian Create the tiered appearance of chandelier crystals in this elegant set by Jennifer Jordan Park Jewelry designers are especially receptive to color, shape, and texture.
TECHNIQUE. Because of the flexibility of the woven paper elements, this necklace moves nicely when worn. BEGINNER PAPER/WOOD. facetjewelry.
 TECHNIQUE FCT-SR-09248-03 BEGINNER PAPER/WOOD Because of the flexibility of the woven paper elements, this necklace moves nicely when worn. 203 Kalmbach Publishing Co. This material may not be reproduced
Name Hour Course Jewelry/A. Brass Tile Sampler. (use the metal cutter press or hand shears / tin snips)
") Jewelry/A Intro: Brass Tile Sampler How do jewelers refine their skills in order to make complex and unique work? The work you do throughout these assignments and units will be the stepping stones for
Jewelry/A Intro: Brass Tile Sampler How do jewelers refine their skills in order to make complex and unique work? The work you do throughout these assignments and units will be the stepping stones for
Witch Hat Pendant By Valorie Clifton
 Witch Hat Pendant By Valorie Clifton Ah, Halloween! It s always been one of my favorite holidays. The kids and I like to watch Halloween movies. We decorate the house and enjoy the cooler temperatures
Buckle bracelet trio. Buckle up three styles of leather bracelets with three different handmade wire closures. By Brenda Schweder. facetjewelry.
 Buckle bracelet trio Buckle up three styles of leather bracelets with three different handmade wire closures. By Brenda Schweder FCT-FCON036_WRK26 204 Kalmbach Publishing Co. This material may not be reproduced
Openwork. Pendant. Bezel-Set Cabochon. with Free Form. open spaces and a bezel-set stone. Frame a dimensional design accented with.
 ADVANCED Openwork Pendant with Free Form Bezel-Set Cabochon FCT-CRON0316_ART105 Frame a dimensional design accented with open spaces and a bezel-set stone. by Deb Fitz To create the focal point of my pendant,
FREE-FORM WIRE BROOCH Get in Touch. Leave your pliers on your bench and work your wire by hand. by Karen Rakoski
 beginner wire FREE-FORM WIRE BROOCH Get in Touch with Your Leave your pliers on your bench and work your wire by hand. by Karen Rakoski FCT-MWON0216_ART39 lay as you make this brooch! The novelty of working
Hollow metal clay forms are typically built over organic cores like. Coreless Construction: Rethinking the Metal Clay
 PROJECT INTERMEDIATE METAL CLAY Coreless Construction: Rethinking the Metal Clay Build this four-sided pendant using forethought and a 3-D template. by Cindy Ambrose FCT-MWON0216_ART17 Hollow metal clay
Easy. Wire. Symmetry Made. Symmetry can be beautiful. leaf forms. matched pairs. Shape your. two at a time to make perfectly
 n asymmetrical pendant (3 in. [76 mm] long) punctuates the predominant symmetry of this necklace-andearring set. intermediate wirework by Lilian hen with ddie Kidd Shape your leaf forms two at a time to
Serendipity. Earrings. Solder one-of-a-kind water-cast components into. truly organic jewelry. FORMED BY CHANCE, ASSEMBLED BY DESIGN.
 intermediate metal Serendipity FORMED BY CHANCE, ASSEMBLED BY DESIGN Earrings Solder one-of-a-kind water-cast components into truly organic jewelry. by Addie Kidd FCT-MWON06_ART84 009 Kalmbach Publishing
PROJECT BEGINNER/INTERMEDIATE METAL/RESIN
 PROJECT BEGINNER/INTERMEDIATE METAL/RESIN FCT-CR-091816_05 A photograph taken by the Hubble Space Telescope inspired the design of this 13 4 x 1½-in. (44 x 38 mm) pendant. 2009 Kalmbach Publishing Co.
Heat, Color, Set & Fire
 LARK JEWELRY & BEADING Heat, Color, Set & Fire Surface Effects for Metal Jewelry MARY HETTMANSPERGER 122 Heat, Color, Set & Fire Etched Copper Neckpiece Add a green patina on etched copper to create a
advanced metal The pachinko balls rotate freely in their 18k gold flanged cages. The bracelet is 102 x 11mm (4 x 7 16 in.). facetjewelry.
. facetjewelry.") advanced metal The pachinko balls rotate freely in their 18k gold flanged cages. The bracelet is 102 x 11mm (4 x 7 16 in.). FCT-MWON0216_ART26 2006 Kalmbach Publishing Co. This material may not be reproduced
advanced metal The pachinko balls rotate freely in their 18k gold flanged cages. The bracelet is 102 x 11mm (4 x 7 16 in.). FCT-MWON0216_ART26 2006 Kalmbach Publishing Co. This material may not be reproduced
The brooch s leaf and bud inserts are made of polymer clay. 5 x 3 8 in. (12.7 x 0.95cm). FCT-CRON0216_ART35
. FCT-CRON0216_ART35") FCT-CRON0216_ART35 The brooch s leaf and bud inserts are made of polymer clay. 5 x 3 8 in. (12.7 x 0.95cm). intermediate polymer clay/metal STERLING SILVER AND POLYMER CLAY BROOCH Less is More Sophisticated
FCT-CRON0216_ART35 The brooch s leaf and bud inserts are made of polymer clay. 5 x 3 8 in. (12.7 x 0.95cm). intermediate polymer clay/metal STERLING SILVER AND POLYMER CLAY BROOCH Less is More Sophisticated
Once you ve mastered these circular bangles, expand your design vocabulary with other shapes. Gohaywirewithovals,squares,ortriangles!
 Haywire Bangles Once you ve mastered these circular bangles, expand your design vocabulary with other shapes. Go haywire with ovals, squares, or triangles! 42 what you will need 20- or 18-gauge half-hard
Beaded Knitting Stitch Marker Using beads made from recycled plastic bags
 Beaded Knitting Stitch Marker Using beads made from recycled plastic bags Why have boring plastic rings or messy looking scraps of yarn to mark your knitting stitches? These delightful stitch markers look
Metal clay. Skill Set. Whether you want to learn how to bezel-set a cabochon, Step Up Your. earring project.
 PROJECT INTERMEDIATE METAL CLAY Step Up Your Metal clay Skill Set Improve your craft à la carte in this technique-packed earring project. by Deb Fitz FCT-CRON0216_ART48 Whether you want to learn how to
shine to by Jana Roberts Benzon
 intermediate/ advanced polymer clay Taking a shine to polymer clay Give polymer clay a glossy surface with sandpaper and a quick buffing. FCT-CRON0216_ART30 The featured pendant s intricate cane pattern
Heat, Color, Set & Fire
 LARK JEWELRY & BEADING Heat, Color, Set & Fire Surface Effects for Metal Jewelry MARY HETTMANSPERGER Liquid Enamel Necklace Liquid enamel applied over a copper wire coil creates a pendant with great texture.
Circles and Swirls by FusionBeads.com
 Circles and Swirls by FusionBeads.com Approximate finished length: 18.5 inches Beads and other products needed for one necklace: 1-14.5x10mm Antique Silver Plated Pewter Leaf Toggle Clasp by TierraCast
The word origami is derived from the Japanese oru, meaning to fold, and kami, meaning
 MASTERING THE MINIATURE ORIGAMI A PERENNIAL FAVORITE Metal clay paper tulips take traditional origami from ephemeral to permanent. by Sara Jayne Cole The word origami is derived from the Japanese oru,
Build a Better. hollow-form metal clay beads. Use tools designed for polymer clay to make. intermediate metal clay OPENWORK BEADS
 intermediate metal clay OPENWORK BEADS Use tools designed for polymer clay to make hollow-form metal clay beads. Build a Better Hollow The metal clay beads and bead caps are constructed over a bead form
MAKE 1 NECKLACE. wire skills. by Cynthia Wuller. The links in this 16-in. (40.6cm) necklace are forged so they become flat and work-hardened.
 necklace are forged so they become flat and work-hardened.") 6 MAKE 1 NECKLACE Learn basic wire skills by Cynthia Wuller The links in this 16-in. (40.6cm) necklace are forged so they become flat and work-hardened. The pearl in the featured necklace is held in place
6 MAKE 1 NECKLACE Learn basic wire skills by Cynthia Wuller The links in this 16-in. (40.6cm) necklace are forged so they become flat and work-hardened. The pearl in the featured necklace is held in place
Beaded Viking knit. necklace
 Beaded Viking knit necklace Add dimension and sparkle to Viking knit by incorporating beads into the weave and working with two different colors of wire simultaneously. By Stephanie Eddy FCT-MWON0316_WRK19
A candle stick addresses transferring and reproducing dimensions from a plan and breaking the project into steps.
 Activities Discussion These projects allow more skill development including making items to match a drawing, sizing projects to specific dimensions, and just trying fun stuff for the first time! A candle
Sheet Metal Toolbox. Tools:
 Sheet Metal Toolbox Name: Date: Description: 15 long sheet metal toolbox with wood ends and a dowel for handle. Useful for tools or supplies. Combines both beginning sheet metal skills and wood working..
Wanderlust Suitcase Vanity
 Wanderlust Suitcase Vanity If you re like me, you re always up for an adventure. When I saw some examples of DIY reclaimed suitcases, paired with the exciting new Wanderlust embroidery design collection,
GoldenOpportunity. earrings accented with rubies and pearls. Make gold GOLD AND PEARL EARRINGS. by Nanz Aalund. intermediate/advanced metal
 intermediate/advanced metal GoldenOpportunity GOLD AND PEARL EARRINGS Make gold earrings accented with rubies and pearls. by Nanz Aalund The featured 11 2 -in. (38mm) earrings are an ideal project to expand
Flower. Clay. Fine Silver. from Metal. Assemble painted leaves to create a beautifully detailed flower, then add gold for contrast and drama.
 BEGINNER/INTERMEDIATE Simple painted leaves take on a whole new dimension when assembled into a flower. 2 1 2 in. (64 mm) diameter. Fine Silver Flower from Metal FCT-CRON0316_ART110 Assemble painted leaves
FITTING INTRODUCTION:
 FITTING INTRODUCTION: Machine tools are capable of producing work at a faster rate, but there are occasions when components are processed at the bench. Sometimes it becomes necessary to replace or repair
Jewellery in a concrete look made out of FIMOair light
 Jewellery in a concrete look made out of FIMOair light Urban lifestyle design Concrete is a highly popular material at the moment for furniture, home deco accessories and jewellery. Casting concrete yourself
Tools: Sharpie, Square, Vise, Hack saw, Ruler, Punch, Hammer, File. 2. Cut the stock Place stock in vise and cut with hack saw
 Purpose: MAKE CATAPULT ARM Step 1 Tools: Sharpie, Square, Vise, Hack saw, Ruler, Punch, Hammer, File Materials: Flat aluminum ½ inch stock (see picture below) Gloves required 1. Pick up the aluminum ½
Designed by Melissa DiRenzo thesweetescape.ca
 instructions Designed by Melissa DiRenzo thesweetescape.ca YOU WILL NEED 3 -diameter foam ball Christmas sweater Hot glue gun and glue sticks 3/8 -wide satin ribbon Elastic thread: metallic Note: A child
beautiful Bold & The pin is back in style, and not in a small way. Big and
 intermediate metal Bold & beautiful by Donna Blow Simple elements combine for a dynamic, lively piece in this three-dimensional pin. Contrasting textures and colors provide harmonious interest, and free-moving
Hands On. 6 Here, three pieces of thermoplastic are cut to the designated die size. I make one layer of the die at a time.
 Hands On Jan s method of creating die forms is both effective and fascinating. Her demonstration includes essential information, such as constructing a well-made die, forming metal with the hydraulic press,
Make a Mini Shield and Letter Opener
 Youth Explore Trades Skills Description Metal fabrication involves the use of a basic set of skills cutting, bending, and assembling processes to create something from raw material. In this activity plan,
Sheet Metal Tools. by:prem Mahendranathan
 Sheet Metal Tools by: SHEET METAL TOOL KIT SHEET METAL TOOLS Rivet Gun 3/32, 1/8, 5/32, 3/16",Cupped Set Mini Bucking Bar Footed Heel-Toe Bucking Bar Air Tool Oil Mechanics Tool Bag High-Speed Air Drill
Hands On. 6 Here, three pieces of thermoplastic are cut to the designated die size. I make one layer of the die at a time.
 Hands On Jan s method of creating die forms is both effective and fascinating. Her demonstration includes essential information, such as constructing a well-made die, forming metal with the hydraulic press,
Take a Crash Course in Metal Clay with this. Appliquéd. Bisque-bead. Pendant. Discover how to use four types of metal clay paper, paste,
 PROJECT INTERMEDIATE METAL CLAY Take a Crash Course in Metal Clay with this Appliquéd Bisque-bead Pendant Discover how to use four types of metal clay paper, paste, syringe, and lump to create a detailed
in Metal Clay Bezels by Patrik Kusek
 PROJECT BEGINNER METAL CLAY Frame Stones in Metal Clay Bezels Embed kiln-safe stones in metal clay to give them a bezel-set look, then arrange the components into clusters. by Patrik Kusek Setting gemstones
Pachinko Machine. Supplies: Part One: Construction. Optional: (1) 21" x 15.5" piece of wood. jumbo craft sticks. (2) 17" x 1" pieces of wood
 21 x 15.5 piece of wood. jumbo craft sticks. (2) 17 x 1 pieces of wood") Supplies: (1) 21" x 15.5" piece of wood jumbo craft sticks (2) 17" x 1" pieces of wood standard craft sticks (2) 14.5" x 1" pieces of wood 1" wooden craft circles (2) 4" x 2" pieces of wood drill (1) 14.5
Supplies: (1) 21" x 15.5" piece of wood jumbo craft sticks (2) 17" x 1" pieces of wood standard craft sticks (2) 14.5" x 1" pieces of wood 1" wooden craft circles (2) 4" x 2" pieces of wood drill (1) 14.5
CA to each one. You may have to hold the end down while to glue sets or use an accelerator like I did.
 The following information and photographs are what I did to build the kit. Your methods and needs may differ from this which is fine. There is no right or wrong way if you are used to scratch building.
Dainty Doorknocker Pendant
 Dainty Doorknocker Pendant www.nicolehannajewelry.com NOTES MATERIALS & TOOLS: 3 Pieces 30cm 22 Gauge Round Wire (Dead Soft) 1 Piece 400cm 28 Gauge Round Wire (Dead Soft) 1 Piece 8mm Round Bead (Large
Personalize. Metal Clay and Resin. Making your own molds is one way to. Make your own texture molds, use your own photo.
 intermediate metal clay/resin Personalize CAPTURE A MOMENT Metal Clay and Resin Make your own texture molds, use your own photo. by Elaine D. Luther FCT-CR-050718-02 Making your own molds is one way to
Make a BBQ Flipper. Description. Lesson Objectives. Assumptions
 Youth Explore Trades Skills Make a BBQ Flipper Description The purpose of this activity is to introduce students to the metal shop through practical activity. This activity is an introduction to sheet
Leaf Necklace Use keum-boo to enrich a handmade, asymmetrical collar.
 intermediate metal Leaf Necklace Use keum-boo to enrich a handmade, asymmetrical collar. by Noël Yovovich Inspired by ancient torques, rigid collars that open in the front, this delicate, contemporary
beadpunk d Incorporate a touch of steampunk into a necklace with eclectic appeal stepbystep
 Get beadpunk d BEAD EMBROIDERY / JEWELRY ASSEMBLY Incorporate a touch of steampunk into a necklace with eclectic appeal designed by Diane Hyde If you ve been intrigued by steampunk design, but think it
Nanton Grain Mill Assembly
 ( 1 ) Nanton Grain Mill Assembly Locate package for assembling storage building. These are cut from 1/8 masonite. Inspect and lightly sand edges where it will be bonded. Use white glue or CA glue to bond.
Shoulder Plane. dovetailed. fine tools. Make an heirloom tool and learn the secret to creating double dovetails in metal it s easier than you think.
 fine tools dovetailed Shoulder Plane Make an heirloom tool and learn the secret to creating double dovetails in metal it s easier than you think. I ve always been fascinated by old, metal hand planes.
Colors in Line. The French word cloisonné means partitioned. Cloisonné. Keep Your. enameling repertoire. Add a timeless technique to your
 intermediate/advanced metal/enamel CLASSIC CLOISONNÉ Keep Your Colors in Line Add a timeless technique to your enameling repertoire. by Jennifer Jordan Park and Cyndi Kuchler The French word cloisonné
Pressed Flowers. Materials: Directions: Pressed flowers Heavyweight paper Picture frame Craft glue Small paint brush Tweezers
 Pressed Flowers Pressed flowers Heavyweight paper Picture frame Craft glue Small paint brush Tweezers 1. Pressed flowers can be purchased online or you can easily press them yourself. Begin by folding
LEARN CHASING & REPOUSSÉ
 PROJECT BEGINNER METAL High Relief, Low Risk: LEARN CHASING & REPOUSSÉ Transform a common tin container into a custom decorative trinket box. by Laurie Jane Kern FCT-MWON0216_ART05 62 materials Used tin
Tools and Tips: ( 1 )
") Tools and Tips: As you build instructions will show in my many picture manual how to assemble. You can use your own methods as you desire, my results are very good. A smooth, flat work surface is very
Tools and Tips: As you build instructions will show in my many picture manual how to assemble. You can use your own methods as you desire, my results are very good. A smooth, flat work surface is very
By Laurie Pessetto. Create your pattern. The decorative fabric will be on the edges of the circle layers.
 By Laurie Pessetto Create an elegant, soft, travel pouch to protect jewelry from damage and keep it organized even when your suitcase gets tossed into a plane or trunk! Skill Level Good sewing skills,
Marlene s Favorite Tools
 Marlene s Favorite Tools Shears or tin snips Item #111236 Light-duty shears are great for intricate work. Use the curved-blade shears to cut smooth, even curves. Straightblade shears for straight cuts
Golden angels in an elegant design
 Golden angels in an elegant design The magic of advent these modern-looking, golden-gowned angels are simply perfect for giving your home a festive Christmas feel. Made using the clay-like FIMOair basic
Introduction 6 Basics 7 Materials 8 Tools & workspace 12. Projects 16. Extra goodies. Pro tips 95 About the author 95
 Contents Kalmbach Books 21027 Crossroads Circle Waukesha, Wisconsin 53186 www.kalmbach.com/books 2012 Martine Callaghan All rights reserved. Except for brief excerpts for review, this book may not be reproduced
A Precision 2000 Mixed Media Project
 Día de los Muertos (Day of the Dead) Panel A Precision 2000 Mixed Media Project PROJECT TITLE: Día de los Muertos (Day of the Dead) Panel DESIGNED BY: Andy Spencer SKILL LEVEL: (Adult 1-5: 1 being the
the wire, less is better. And make sure the bends on each truss wire are in line with the other. See the next photo.
 The following information and photographs are what I did to build the kit. Your methods and needs may differ from this which is fine. There is no right or wrong way if you are used to scratch building.
ASSIGNMENT 4. Textbook Assignment: The point, edge, face, heel, and tang are the five parts of which of the following tools?
 ASSIGNMENT 4 Textbook Assignment: "Files," "Grinders and Sharpening Stones," "Scrapers," "Awls," "Bolt and Cable Cutters," "Glass Cutters," "Knives,' 'Pipe Cutting and Threading Tools," "Tube Cutting and
CONTENTS. 4 Introduction 5 Materials 6 Workspace Safety 7 Fabrication Tools & Techniques 31 Torchwork Tools & Techniques
 CONTENTS 4 Introduction 5 Materials 6 Workspace Safety 7 Fabrication Tools & Techniques 31 Torchwork Tools & Techniques Projects 42 Sweet & Easy Pearl Drop Earrings 45 Silver Bar & Ruby Earrings 48 Kimono
OFFSET TURNINGS. By using an eccentric chuck, SHOPMADE CHUCK BUILD A FOR. David Mueller FEATURE. Build the chuck body
 FEATURE BUILD A SHOPMADE CHUCK FOR OFFSET TURNINGS David Mueller By using an eccentric chuck, you can add interest to turnings such as pendants and box lids. The workpiece is mounted out of alignment with
Hinge Mortising Jig. One of the make it or break it parts of building a. 6 ShopNotes No. 74
 Hinge Mortising Jig A Mortise for a Hinge. Quick, clean, and accurate that s the only way to describe the mortise you get with a trim router and this hinge mortising jig. One of the make it or break it
Silver Bumblebee. This little bumblebee in silver and gold is as relevant as he is. Sculpt a pendant from silver clay and wire
 Materials Metal Clay by Mitsubishi Materials PMC Flex Aura Gold paste Silver paste or slip 20 awg fine silver wire (20awg) Teflon sheet Nonstick spray Small paintbrush Jewelry pliers Wire cutters Roundnose
Turkey Football Panel
 Turkey Football Panel PROJECT TITLE: Turkey Football Turkey Football Panel A Stained Glass Project DESIGNED BY: Jeanne Baruth for Diamond Tech SKILL LEVEL: (Adult 1-5 1 being the easiest, 5 being difficult)
From "American Woodturner" the Journal of the American Association of Woodturners, April 2015, vol 30, no 2 - CUSTOM - TOOL HANDLES
 From "American Woodturner" the Journal of the American Association of Woodturners, April 2015, vol 30, no 2 - CUSTOM - TOOL HANDLES Carl Ford I have found most commercially available tool handles uncomfortable
3Insert the second rod no. 4
 Yamato: Step-by-step 37 The stern block and searchlight control towers a b c d e f Recommended tools and materials Wood glue Sandpaper (no. 800 grain) Metal file Putty Craft knife For metal: Super Glue
this clip Sure it looks fab, but this frameon-frame
 There s more than meets the eye with these darling frames. Everyday enough for favorite photos, yet versatile enough to create clever projects like these handy organizers & many more! {CREATIVE INSPIRATIONS
Hubble Space Telescope Paper Model Directions Downloads, patterns, and other information at:
 Hubble Space Telescope Paper Model Directions Downloads, patterns, and other information at: www.hubblesite.org/go/model Materials: model pattern printed onto cardstock/coverstock instructions printed
Build the Spitfire: Step-By-step. Pack 7 Stages 61-71
 Pack 7 Stages 61-71 1 Stage Contents Page Number 61 212-215 62 216-218 63 219-221 64 222-224 65 225-228 66 229-231 67 232-235 68 236-238 69 239-241 70 242-245 71 246-249 Editorial and design by Continuo
Any Questions? Contact us or BSA Atomic Blinkie
 BSA Atomic Blinkie The heart of this blinkie is a tiny electronic chip embedded in each of the three LEDs. When power is applied, the chip tells the LED to turn on and off, or fade different colors By
G. Building the Cab, Cab Roof and Cab Boiler Extension Page 14 and Backhead.
 G. Building the Cab, Cab Roof and Cab Boiler Extension Page 14 and Backhead. Cab. In order to ensure that the cab and tender would actually look right, as what often appears on a drawing is not always
SEIZE THE CLAY. Shape your success as a sculptor with these six easy projects. TRY IT
 TRY IT SEIZE THE CLAY Shape your success as a sculptor with these six easy projects. PROJECTS JODI MENSING HARRIS PHOTOGRAPHS STEVEN MCDONALD WORDS HEIDI PALKOVIC 8 DO IT YOURSELF Spring 2017 A PRESS TO
DIY DISNEY CHAR M BR ACELET
 DIY CHAR M BR ACELET YOU WILL NEED: Polymer clay in various colors 5/32 Silver/Gold eyelets Sculpting tools Clay gloss varnish or polyurethane matte varnish* Paint brush Craft knife An oven and pan A ruler
Note Pad Holder. Tools:
 Note Pad Holder Name: Date: Description: The note pad holder is a cold metal project that involves layout skills and sheet metal fabrication skills Materials: 3 1/8 x ¼ Aluminum Pop Rivet 18 ga. Galvanized
30 Creative Jewelry Components. Denise Peck & Jane Dickerson
 30 Creative Jewelry Components Denise Peck & Jane Dickerson CONTENTS Introduction To Buy or Not to Buy? The Projects Easily Charmed by Jane Dickerson Bullet End Caps by Denise Peck Poppy Bead Caps by Keirsten
Growler Getter. Supplies: ½ yard main fabric. ½ yard Insul-Shine. 8 x 10 piece of Fusible Fleece 2. ¼ yard or fat quarter of coordinating fabric
 Supplies: ½ yard main fabric ½ yard Insul-Shine 8 x 10 piece of Fusible Fleece 2 ¼ yard or fat quarter of coordinating fabric 1 9 x 12 sheet of Steam-A-Seam 2 1 yard nylon cord 1 cord stop Coordinating
Ways to get the most out of your
 5 Ways to get the most out of your router table When you mount a router on a table, you expand your shop s potential. To help you take advantage of this potential, we assembled five router table techniques
ASSIGNMENT 3. Textbook Assignment: 3-5. Which of the following types of hammers is used for driving and pulling nails?
 ASSIGNMENT 3 Textbook Assignment: "Clamps," "Jacks," Hammers, Mallets, and Mauls," "Screwdrivers," "Manual Drills," "Screw and Tap Extractors," "Wrenches," "Chisels," and "Punches," chapters 19 through
MANUFACTURING TECHNOLOGY
 MANUFACTURING TECHNOLOGY UNIT II SHEET METAL FORMING PROCESSES Sheet metal Process in detail Cutting (Shearing) Operations Manufacturing Technology In this operation, the work piece is stressed beyond