Cold-connect Silver &
|
|
|
- Janis Fisher
- 5 years ago
- Views:
Transcription
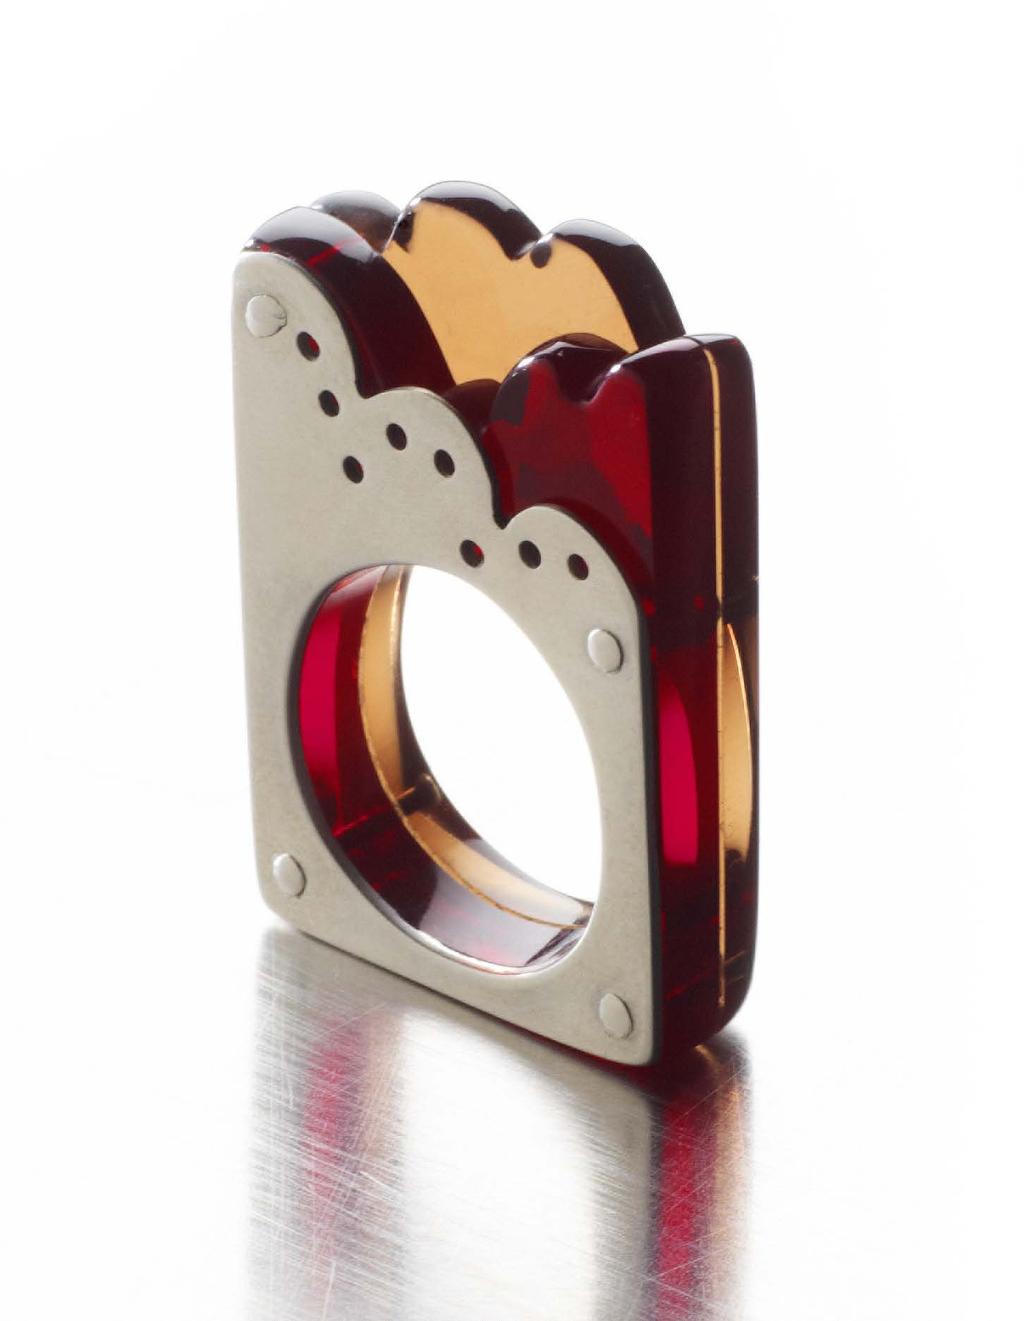
1 PROJECT COVER STORY INTERMEDIATE METAL/PLASTIC Cold-connect Silver & ACR YLI C in a Layered Ring Learn to work with modern, lightweight acrylic sheet to introduce transparent color to your work. by Maria Apostolou exploring the interconnections between precious and non-precious materials is one of the main themes of my work. Acrylic sheet is a strong, lightweight, industrial material, and it becomes even more interesting for jewelry making due to its availability in a wide array of colors and the play of light that happens when multiple layers of transparent acrylic are stacked together. In this cold-connected ring, I combined two transparent, colored sheets of acrylic with sterling silver. You can mix up the colors of acrylic, add layers, or change the shape of the ring to create a design that is truly your own. FCT-MWON0216_ART Kalmbach Publishing Co. This material may not be reproduced in any form without permission from the publisher. facetjewelry.com
2
 thick, 2 colors (red, brown) Sterling silver wire: 18-gauge (1.0 mm), round, 2 in.")
 Ball bur: 1.")
![8 mm Riveting hammer Polishing compound for plastics (such as Dialux Jaune [yellow] or Vonax) Toothbrush (optional) SAFETY TIP: Sawing, drilling, filing, and sanding acrylic](/docs-images/82/85829249/images/3-2.jpg "sheet generates dust and fumes that you don t want to inhale. Protect yourself by wearing a respirator rated for dust and fumes, and always use wet sandpaper.")
 piece of 24-gauge (0.5 mm) sterling silver sheet. Choose a circle on a plastic circle template that corresponds to your ring size.")
 drill bit.")
![Thread the saw blade through the hole, and pierce the circle [2]. File and sand the silver component.](/docs-images/82/85829249/images/3-5.jpg "File the edges of the silver to remove any saw marks and to refine its shape. Sand the silver with 320-grit sandpaper to remove the file marks.")
3 materials Sterling silver sheet: 24-gauge (0.5 mm), 13/8 x 1 3/16 in. (35 x 30 mm) Transparent acrylic sheet: 1½ x 1¼ in. (38 x 32 mm), 5/32 in. (4 mm) thick, 2 colors (red, brown) Sterling silver wire: 18-gauge (1.0 mm), round, 2 in. toolboxes Sawing/piercing Finishing additional tools & supplies Tracing paper Carbon paper Plastic circle template Mini-fiber wheel, coarse (brown) Wide masking tape Spiral wax saw blades Wood block Sewing needle (optional) Ball bur: 1.8 mm Riveting hammer Polishing compound for plastics (such as Dialux Jaune [yellow] or Vonax) Toothbrush (optional) SAFETY TIP: Sawing, drilling, filing, and sanding acrylic sheet generates dust and fumes that you don t want to inhale. Protect yourself by wearing a respirator rated for dust and fumes, and always use wet sandpaper. Sterling silver and acrylic components Cut the sterling silver sheet. Trace Template 1 onto tracing paper. Use carbon paper to transfer the design onto a 13/8 x 1 3/16 in. (35 x 30 mm) piece of 24-gauge (0.5 mm) sterling silver sheet. Choose a circle on a plastic circle template that corresponds to your ring size. Place the circle template on the silver near the bottom edge of the ring. Trace the circle onto the silver with a scribe. Use a jeweler s saw with a 4/0 blade to carefully saw out the silver [1]. Drill a hole inside the circle with a #61 (0.039-in./1 mm) drill bit. Thread the saw blade through the hole, and pierce the circle [2]. File and sand the silver component. File the edges of the silver to remove any saw marks and to refine its shape. Sand the silver with 320-grit sandpaper to remove the file marks. Drill holes in the silver component. Place Template 1 on the silver, and use a scribe to mark the spots where you will drill holes. Drill a hole at each mark with a #61 (0.039-in./1 mm) drill bit. NOTE: The wire rivets will be set in four holes, one in each corner of the ring; position these holes for maximum stability. The other holes are decorative, and can be positioned wherever you want them. Template 1 Template 2 Template 3 Template 4 36

 mini-fiber wheel in a flex shaft to give the back of the silver a matte finish, or sand the silver with any other product you prefer.")
 red acrylic sheet and Template 3 to a brown acrylic sheet of the same size [3].")
4 Look at the back! The silver rivets pop against the two colors of stacked transparent acrylic. 7 designed for metal. Their advantages are that they cut acrylic faster than standard jeweler s saw blades and they re less likely to get stuck in the acrylic sheet due to heat from friction. 8 Finish the silver component. Sand the back of the silver component to smooth any burrs left from drilling. Use a coarse (brown) mini-fiber wheel in a flex shaft to give the back of the silver a matte finish, or sand the silver with any other product you prefer. This surface will not be accessible after the ring is riveted together, so it s important to clean and finish it at this stage. Saw out the acrylic. Trace Template 2 and Template 3 onto two pieces of masking tape. Place Template 2 onto a 1½ x 1¼ -in. (38 x 32 mm) red acrylic sheet and Template 3 to a brown acrylic sheet of the same size [3]. NOTE: Acrylic sheet usually comes with a protective sheet of plastic or paper attached to its surface. I removed the film to take clear pictures, but I suggest you leave it on until you re ready to assemble your ring to prevent scratching the surface of the acrylic. Thread a spiral saw blade into your saw frame. Lubricate your blade, and saw outside of the designs edges, leaving enough material for filing and sanding [4]. NOTE: Spiral blades, which are designed for wax, are less accurate than saw blades Be precise when you saw the top, curved edges of the acrylic components. It s not necessary to be as careful sawing the straight edges of your acrylic [5], because you ll align, file, and sand all three layers together after riveting the ring. File and sand the acrylic. Use a halfround needle file to file the top, curved edges of the two acrylic components [6]. Sand the top, curved edge of the red acrylic component with 320-grit wet sandpaper [7]. Move through progressively finer grits of sandpaper until you reach 2000 grit. This gives your piece a frosted finish [8] that can be polished along with everything else at the final stage. NOTE: It s important to sand the top, curved edge of the piece of acrylic sheet that will be in the center of the stacked ring at this stage (in my ring, it s the red acrylic). It will be difficult to sand after you ve riveted the ring together. learn more about thermoplastics Acrylic, or polymethyl methacrylate (PMMA), is a thermoplastic. It s a manufactured (cast or extruded), industrial plastic that becomes soft and malleable when it s heated. While it s warm, it can be shaped and formed, and after it cools down, it hardens and holds its shape. One perk of thermoplastics is that they can be reheated, formed, and cooled repeatedly while still maintaining their strength and clarity. Acrylic sheet can be found under different brand names, including Plexiglas, Perspex, Acrylite, and Lucite. 37
 sheet is adequate. 2.")
. Follow the dye manufacturer s instructions, and test the dye on scrap acrylic before dyeing your ring.")


5 how to choose acrylic sheet for your project There are three main factors to consider when choosing acrylic sheet for your project. 1. Thickness: You can find acrylic sheet in a variety of thicknesses. For rings and other jewelry-scale projects, 1/8 3/16-in. (3 5 mm) sheet is adequate. 2. Color: In addition to the many color options available from suppliers, clear acrylic is also suitable for dyeing, using disperse dyes formulated for plastics (the same type of dye used for acrylic fabric). Follow the dye manufacturer s instructions, and test the dye on scrap acrylic before dyeing your ring. Note that the dye only penetrates the top layer of the acrylic and the color can be removed by sanding, so be sure to dye the acrylic after finishing its surface. 3. Transparency: Acrylic sheet is available in a variety of transparency levels, including transparent, translucent, frosted, fluorescent, and opaque. Transparent acrylic is a bit more brittle than opaque acrylic, but the advantage of the transparent is that it allows the light to come through. And, depending on the colors you choose to layer, you can create a wide range of color effects. Riveting Drill the first hole in the acrylic. Arrange the three components in this order: Sterling silver on top, red acrylic in the middle, and brown acrylic in the back [Template 4]. Place the three components on a wood block, and hold them together firmly. Drill through the two layers of acrylic with the #61 (0.039-in./1 mm) drill bit, using the hole in the top left corner of the sterling silver component as a guide. TIP: You don t need to make a divot in acrylic before drilling, as you would in metal. The acrylic is soft enough that the tip of the drill bit will catch immediately. Drill slowly to avoid shattering the acrylic around the hole. After drilling, use a sewing needle to remove any acrylic that may be trapped inside the hole. Set the first wire rivet. Use a 1.8 mm ball bur to slightly enlarge and countersink the top left hole on the top of the silver [9] and the back of the brown acrylic component. You can do this by hand: Hold the ball bur steady with your index finger and thumb, place it in the drilled hole, and rotate the bur in your fingertips. To make the rivet, insert a small piece of 18-gauge (1.0 mm) sterling silver wire into the hole, and trim it 1 mm above the hole with flush cutters. Make sure both ends of the wire are smooth and flush; sand the ends if necessary. Place the three stacked components on a bench block. Make sure half the diameter of the wire extends from each side of the stack. Lightly hammer one end of the wire with the cross-peen face of a riveting hammer until the wire slightly upsets [10]. 38 Art Jewelry November 2012


6 Process photos by Maria Apostolou and Anastasios Baltas. Flip the assembly over, and repeat to upset the opposite side of the wire. Keep flipping the assembly as necessary until the rivet head is even and round on each side. Set the remaining rivets. Repeat to drill and countersink a hole and set a rivet in the bottom right corner of the stacked components. After the first two rivets are set, drill the holes and set the rivets in the two remaining corners of the ring. Saw out the interior circle. Drill a hole in the acrylic inside the circle with the #61 (0.039-in./1 mm) drill bit. Thread a spiral wax blade through the hole and saw out the interior circle, leaving a slight border to allow room for filing [11]. Finishing File the edges of the ring. File the straight outside edges and interior edges of the ring with a coarse half-round file. After you remove the excess material, use a fine needle file to get rid of all the coarse file marks. File the interior circle until it s smooth and the ring size is correct. NOTE: Filing after the layers are riveted together ensures that all three layers will be aligned perfectly. Sand the edges of the ring. Use wet sandpaper to sand the outside and interior edges of the ring. Begin with 320-grit wet sandpaper, and move through progressively finer grits of sandpaper until you reach 2000 grit. Be meticulous when sanding the ring. Do not move onto the next-finer grit of sandpaper until you ve removed all of the marks from the previous grit. If you miss any, they will show up after polishing and you ll need to repeat the sanding process. NOTE: To sand the flat edges of the ring, place a piece of sandpaper on a flat, level surface, and sand each side in a circular or figure-8 motion [12]. To sand the interior circle, use your index finger as a mandrel. Wrap a piece of sandpaper around your finger, and rotate it inside the hole [13]. Polish the acrylic. Insert a miniature cotton buffing wheel in your flex shaft. Charge it with plastic-polishing compound, and polish the acrylic parts of the ring until it is uniformly polished [14]. Recharge the buff with polishing compound as needed. NOTE: Polishing brings out the transparency of the acrylic sheet; it also highlights any imperfections on its surface. If you notice any imperfections left from sanding, go back through progressively finer grits of sandpaper to remove any marks. After you polish the acrylic, clean any residual polishing compound off of the ring with a soft toothbrush and dishwashing liquid. Rinse and dry the ring. Cover the acrylic with masking tape, and use a coarse mini-fiber wheel to give the silver a matte finish. NOTE: If you want a shiny finish, polish the silver with tripoli and then rouge. ASK THE ARTIST: MARIA APOSTOLOU design variations The ring in this project calls for one piece of silver and two pieces of acrylic, but you can easily adjust the number of layers in your ring. Add or remove a layer of acrylic, or add a layer of silver to the back of the ring, sandwiching the acrylic between two layers of silver. For an easier alternative, omit the curved edges at the top of the ring. Choose a square, rectangular, or even circular design. Keep in mind that straight lines are easier to saw, sand, and polish than complex, curved lines. Once you practice and become familiar with the working properties of acrylics, you will come up with endless variations on this theme by changing the shape of the ring, the color, and the number of layers. What s the most unusual material you ve used to make jewelry? I often incorporate natural materials and found objects in my work. Recently, I chose a tiny green urchin shell, filled it with resin to make it more durable, and combined it with a shell and a found piece of white coral to make a brooch. Contact: 39
Learn how to make decorative rivets while working with this uncommon alloy. by Addie Kidd
 PROJECT INTERMEDIATE METAL Shibuichi Cuff: Learn how to make decorative rivets while working with this uncommon alloy. by Addie Kidd To take full advantage of shibuichi, you ve got to use patinas. One
There s a trick to using only two prongs. Think Again! Think Two Prongs Can t Secure a Stone? Use sturdy, strategically placed prongs
 PROJECT INTERMEDIATE/ADVANCED METAL Think Two Prongs Can t Secure a Stone? Think Again! Use sturdy, strategically placed prongs to set a custom-cut stone. by Jessica Dow and Mark Anderson There s a trick
Collage Pendant from Recycled Tin
 PROJECT BEGINNER METAL Construct a Collage Pendant from Recycled Tin Cut, stack, and rivet elements from colorful tin containers to create a reversible pendant with a wooden core. by Christine Terrell
PROJECT BEGINNER/INTERMEDIATE METAL/RESIN
 PROJECT BEGINNER/INTERMEDIATE METAL/RESIN FCT-CR-091816_05 A photograph taken by the Hubble Space Telescope inspired the design of this 13 4 x 1½-in. (44 x 38 mm) pendant. 2009 Kalmbach Publishing Co.
Layered Cuff. Uncover the. Secrets of a. Elegantly simple fabrication tricks are the key to making this intricate bracelet.
 Uncover the Secrets of a Layered Cuff Elegantly simple fabrication tricks are the key to making this intricate bracelet. by Hiromi Suter FCT-MW-042417-04 2011 Kalmbach Publishing Co. This material may
A Fresh Take. Tap the potential of repoussé to give your jewelry dimension without added weight.
 intermediate metal BOUQUET OF TECHNIQUES A Fresh Take on a Floral Tap the potential of repoussé to give your jewelry dimension without added weight. by Grace Stokes T he floral brooch is a time-honored
Design and Build a Bracelet. a la Carte. by Deborah Francis
 PROJECT BEGINNER METAL Design and Build a Bracelet a la Carte Use basic cold connections to mix and match found objects, base metals, and polymer components. by Deborah Francis This inexpensive bracelet
ascading Create the tiered appearance of chandelier crystals in this elegant set by Jennifer Jordan Park
 intermediate wire ascading carnelian Create the tiered appearance of chandelier crystals in this elegant set by Jennifer Jordan Park Jewelry designers are especially receptive to color, shape, and texture.
Riveted Spinner Ring. Last summer I took a weekend workshop. eye-catching. quick cold connection. online exclusive. Make a simple, ring with a
 online exclusive beginner metal Make a simple, eye-catching ring with a quick cold connection. Riveted Spinner Ring PUT YOUR OWN SPIN ON IT by Jill L. Erickson Last summer I took a weekend workshop on
Serendipity. Earrings. Solder one-of-a-kind water-cast components into. truly organic jewelry. FORMED BY CHANCE, ASSEMBLED BY DESIGN.
 intermediate metal Serendipity FORMED BY CHANCE, ASSEMBLED BY DESIGN Earrings Solder one-of-a-kind water-cast components into truly organic jewelry. by Addie Kidd FCT-MWON06_ART84 009 Kalmbach Publishing
Dye, Form, & Staple. a Mixed-media Cuff. Stabilize custom-dyed and formed leather using functional embellishments of textured brass and copper wire.
 PROJECT BEGINNER METAL/LEATHER Dye, Form, & Staple a Mixed-media Cuff Stabilize custom-dyed and formed leather using functional embellishments of textured brass and copper wire. FCT-FC-061917-08 by Karen
polymer clay. by Jill Erickson
 intermediate polymer clay You ought to be in pictures... Transfer your favorite photographs to jewelry using polymer clay. by Jill Erickson This direct image-transfer technique is easy to master and does
advanced metal The pachinko balls rotate freely in their 18k gold flanged cages. The bracelet is 102 x 11mm (4 x 7 16 in.). facetjewelry.
. facetjewelry.") advanced metal The pachinko balls rotate freely in their 18k gold flanged cages. The bracelet is 102 x 11mm (4 x 7 16 in.). FCT-MWON0216_ART26 2006 Kalmbach Publishing Co. This material may not be reproduced
advanced metal The pachinko balls rotate freely in their 18k gold flanged cages. The bracelet is 102 x 11mm (4 x 7 16 in.). FCT-MWON0216_ART26 2006 Kalmbach Publishing Co. This material may not be reproduced
Triangles. Pendulum. Dangling from handmade curvilinear ear wires, Construct earrings from carefully fitted panels. METAL CLAY EARRINGS
 The front of each earring is impressed with a slightly different pattern than those used on the sides and backs. 1¾ in. (44mm). beginner/intermediate metal clay METAL CLAY EARRINGS Pendulum Triangles Construct
Openwork. Pendant. Bezel-Set Cabochon. with Free Form. open spaces and a bezel-set stone. Frame a dimensional design accented with.
 ADVANCED Openwork Pendant with Free Form Bezel-Set Cabochon FCT-CRON0316_ART105 Frame a dimensional design accented with open spaces and a bezel-set stone. by Deb Fitz To create the focal point of my pendant,
to Precious From Plumbing PROJECT INTERMEDIATE METALS facetjewelry.com FCT-MW
 PROJECT INTERMEDIATE METALS From Plumbing to Precious FCT-MW-061217-07 2013 Kalmbach Publishing Co. This material may not be reproduced in any form without permission from the publisher. facetjewelry.com
Hollow metal clay forms are typically built over organic cores like. Coreless Construction: Rethinking the Metal Clay
 PROJECT INTERMEDIATE METAL CLAY Coreless Construction: Rethinking the Metal Clay Build this four-sided pendant using forethought and a 3-D template. by Cindy Ambrose FCT-MWON0216_ART17 Hollow metal clay
GoldenOpportunity. earrings accented with rubies and pearls. Make gold GOLD AND PEARL EARRINGS. by Nanz Aalund. intermediate/advanced metal
 intermediate/advanced metal GoldenOpportunity GOLD AND PEARL EARRINGS Make gold earrings accented with rubies and pearls. by Nanz Aalund The featured 11 2 -in. (38mm) earrings are an ideal project to expand
FREE-FORM WIRE BROOCH Get in Touch. Leave your pliers on your bench and work your wire by hand. by Karen Rakoski
 beginner wire FREE-FORM WIRE BROOCH Get in Touch with Your Leave your pliers on your bench and work your wire by hand. by Karen Rakoski FCT-MWON0216_ART39 lay as you make this brooch! The novelty of working
shine to by Jana Roberts Benzon
 intermediate/ advanced polymer clay Taking a shine to polymer clay Give polymer clay a glossy surface with sandpaper and a quick buffing. FCT-CRON0216_ART30 The featured pendant s intricate cane pattern
Table of Contents. Introduction 4 Materials 5 Tools 7 Basic Tool Kit General Tools. Techniques 97 Common Techniques Making Components
 Table of Contents Introduction 4 Materials 5 Tools 7 Basic Tool Kit General Tools Techniques 97 Common Techniques Making Components Acknowledgments 111 About the Author 111 Earrings Square Dangles...12
The brooch s leaf and bud inserts are made of polymer clay. 5 x 3 8 in. (12.7 x 0.95cm). FCT-CRON0216_ART35
. FCT-CRON0216_ART35") FCT-CRON0216_ART35 The brooch s leaf and bud inserts are made of polymer clay. 5 x 3 8 in. (12.7 x 0.95cm). intermediate polymer clay/metal STERLING SILVER AND POLYMER CLAY BROOCH Less is More Sophisticated
FCT-CRON0216_ART35 The brooch s leaf and bud inserts are made of polymer clay. 5 x 3 8 in. (12.7 x 0.95cm). intermediate polymer clay/metal STERLING SILVER AND POLYMER CLAY BROOCH Less is More Sophisticated
MIX ARGENTIUM &METAL CLAY
 PROJECT INTERMEDIATE/ADVANCED METAL CLAY/METAL MIX ARGENTIUM &METAL CLAY in a Floral Pendant FCT-CR-032017_07 Combine two modern forms of silver in a project that plays to the strengths of each material.
Ways to get the most out of your
 5 Ways to get the most out of your router table When you mount a router on a table, you expand your shop s potential. To help you take advantage of this potential, we assembled five router table techniques
Metal clay. Skill Set. Whether you want to learn how to bezel-set a cabochon, Step Up Your. earring project.
 PROJECT INTERMEDIATE METAL CLAY Step Up Your Metal clay Skill Set Improve your craft à la carte in this technique-packed earring project. by Deb Fitz FCT-CRON0216_ART48 Whether you want to learn how to
TECHNIQUE. Because of the flexibility of the woven paper elements, this necklace moves nicely when worn. BEGINNER PAPER/WOOD. facetjewelry.
 TECHNIQUE FCT-SR-09248-03 BEGINNER PAPER/WOOD Because of the flexibility of the woven paper elements, this necklace moves nicely when worn. 203 Kalmbach Publishing Co. This material may not be reproduced
CONTENTS. 4 Introduction 5 Materials 6 Workspace Safety 7 Fabrication Tools & Techniques 31 Torchwork Tools & Techniques
 CONTENTS 4 Introduction 5 Materials 6 Workspace Safety 7 Fabrication Tools & Techniques 31 Torchwork Tools & Techniques Projects 42 Sweet & Easy Pearl Drop Earrings 45 Silver Bar & Ruby Earrings 48 Kimono
Metal Clay-Wrapped. used a commercially available sterling silver and tear department, bracelets are not
 PROJECT INTERMEDIATE METAL CLAY Metal Clay-Wrapped Bangle by Pam East and Jane Levy Make a lightweight custom bracelet with metal clay and a prefabricated tube bangle. Take texture full circle with metal
facetjewelry.com FCT-CR _ Kalmbach Publishing Co. This material may not be reproduced in any form without permission from the publisher.
 The organic bell shape of the calla lily makes a graceful jewelry component. The pendant is 1½ x ¾ in. (38 x 19mm), and the earrings are 2 x ½ in. (51 x 13mm), including the ear wires. FCT-CR-071116_04
Beaded Viking knit. necklace
 Beaded Viking knit necklace Add dimension and sparkle to Viking knit by incorporating beads into the weave and working with two different colors of wire simultaneously. By Stephanie Eddy FCT-MWON0316_WRK19
Take a Crash Course in Metal Clay with this. Appliquéd. Bisque-bead. Pendant. Discover how to use four types of metal clay paper, paste,
 PROJECT INTERMEDIATE METAL CLAY Take a Crash Course in Metal Clay with this Appliquéd Bisque-bead Pendant Discover how to use four types of metal clay paper, paste, syringe, and lump to create a detailed
MIXED-MEDIA LINKS. With three different paisley-shaped links and four ways to embellish. Combine woven wire and polymer clay to make bold links.
 Soldered wire frames are the backbone of each link in the bracelet. 8½ x 1¼ in. (21.6 x 3.2cm). WIRE AND POLYMER CLAY BRACELET MIXED-MEDIA LINKS Combine woven wire and polymer clay to make bold links.
in Metal Clay Bezels by Patrik Kusek
 PROJECT BEGINNER METAL CLAY Frame Stones in Metal Clay Bezels Embed kiln-safe stones in metal clay to give them a bezel-set look, then arrange the components into clusters. by Patrik Kusek Setting gemstones
FCT-MW _ Kalmbach Publishing Co. This material may not be reproduced in any form without permission from the publisher. facetjewelry.
 FCT-MW-082216_04 2007 Kalmbach Publishing Co. This material may not be reproduced in any form without permission from the publisher. facetjewelry.com intermediate metal Chain Reaction Forge sterling silver
Subtractive Wax Working
 Society of North American Goldsmiths Artists Designers Jewelers Metalsmiths January 2010 15 TECHNICAL ARTICLE Please note the following correction to the Technical Article TIG Welding for Metalsmiths,
stars nikolina otržan with Stars with Nikolina Otržan A CraftArtEdu Class Web: Customer Service:
 stars with nikolina otržan TOOLS & MATERIALS: pasta machine acrylic roller stiff blade craft knife/scalpel needle tool shape cutter or a template coarse sandpaper or a texture hand drill curved base for
Repoussé is an ancient metalworking process that traditionally requires an
 This 6 x 2-in. (15.2 x 5.1 cm) fine-silver cuff features a metal clay paper repoussé image of a bishop s cap cactus. Try Entry-Level Repoussé Use household items to make a low-relief image emerge from
Hands On. 6 Here, three pieces of thermoplastic are cut to the designated die size. I make one layer of the die at a time.
 Hands On Jan s method of creating die forms is both effective and fascinating. Her demonstration includes essential information, such as constructing a well-made die, forming metal with the hydraulic press,
FINISH 14 LINKS IN ONE EVENING. Pearls Wire. Grade A necklace no matter the. grade of your pearls. by Cynthia B. Wuller
 beginner wirework FINISH 4 LINKS IN ONE EVENING Pearls Wire and on Any Budget Make a Grade A necklace no matter the grade of your pearls. by Cynthia B. Wuller W hether you use economical materials or splurge
Build a Better. hollow-form metal clay beads. Use tools designed for polymer clay to make. intermediate metal clay OPENWORK BEADS
 intermediate metal clay OPENWORK BEADS Use tools designed for polymer clay to make hollow-form metal clay beads. Build a Better Hollow The metal clay beads and bead caps are constructed over a bead form
Hands On. 6 Here, three pieces of thermoplastic are cut to the designated die size. I make one layer of the die at a time.
 Hands On Jan s method of creating die forms is both effective and fascinating. Her demonstration includes essential information, such as constructing a well-made die, forming metal with the hydraulic press,
Souffle Fairy House Table Set
 Souffle Fairy House Table Set If you frequent the garden centers, you KNOW the hottest thing now is not even a plant! It s a fairy garden! You can spend a fortune at the garden center or create your own
Flexicryl Splashback Installation Guide Easy DIY Add a Pop of Colour!
 Flexicryl Splashback Installation Guide Easy DIY Add a Pop of Colour! Product Information - 4mm High Gloss Flexicryl Splashback Panels - Hard-co-extruded surface for hygienic clean sustaining daily use
Buckle bracelet trio. Buckle up three styles of leather bracelets with three different handmade wire closures. By Brenda Schweder. facetjewelry.
 Buckle bracelet trio Buckle up three styles of leather bracelets with three different handmade wire closures. By Brenda Schweder FCT-FCON036_WRK26 204 Kalmbach Publishing Co. This material may not be reproduced
Guidelines for working with
 Guidelines for working with 1. Sawing Circular Saws When using circular saws, only the circular saw blades that are not set are suitable for cutting PARAPAN. Hardened metal saw blades that have the greatest
Shoulder Plane. dovetailed. fine tools. Make an heirloom tool and learn the secret to creating double dovetails in metal it s easier than you think.
 fine tools dovetailed Shoulder Plane Make an heirloom tool and learn the secret to creating double dovetails in metal it s easier than you think. I ve always been fascinated by old, metal hand planes.
beautiful Bold & The pin is back in style, and not in a small way. Big and
 intermediate metal Bold & beautiful by Donna Blow Simple elements combine for a dynamic, lively piece in this three-dimensional pin. Contrasting textures and colors provide harmonious interest, and free-moving
Rosalina Accessories Tutorial Version March 2011 Martyn
 Rosalina Accessories Tutorial Version 1.0 - March 2011 Martyn Star Brooch Feel free to experiment with these dimensions, you should make a template you are happy with, the method still works. 1) Creating
Fusion. Déjà. Fuse and solder a removable medallion that. fits on a fused, free-form chain.
 FUSE, SOLDER, FUSE AGAIN beginner metal Déjà Fusion Fuse and solder a removable medallion that fits on a fused, free-form chain. This chunky fused fine-silver chain looks equally striking with or without
Once you ve mastered these circular bangles, expand your design vocabulary with other shapes. Gohaywirewithovals,squares,ortriangles!
 Haywire Bangles Once you ve mastered these circular bangles, expand your design vocabulary with other shapes. Go haywire with ovals, squares, or triangles! 42 what you will need 20- or 18-gauge half-hard
Heat, Color, Set & Fire
 LARK JEWELRY & BEADING Heat, Color, Set & Fire Surface Effects for Metal Jewelry MARY HETTMANSPERGER 122 Heat, Color, Set & Fire Etched Copper Neckpiece Add a green patina on etched copper to create a
TOOL LIST FOR TAILGATE HIDDEN LATCH & LINK ASSY FOR FORD FLARESIDE TRUCKS
 TOOL LIST FOR TAILGATE HIDDEN LATCH & LINK ASSY FOR 53-87 FORD FLARESIDE TRUCKS Vise Grip Clamps C-clamps Sharpie Marker Ball Peen Hammer Center Punch 3/8 or 1/2 Drill 5/32, 7/32, 9/32, and 3/8 Drill Bits
A Precision 2000 Mixed Media Project
 Día de los Muertos (Day of the Dead) Panel A Precision 2000 Mixed Media Project PROJECT TITLE: Día de los Muertos (Day of the Dead) Panel DESIGNED BY: Andy Spencer SKILL LEVEL: (Adult 1-5: 1 being the
wiping Varnish Wipe it on for a low-luster look or brush it on for a higher sheen
 wiping Varnish The only Finish You ll Ever Need Wipe it on for a low-luster look or brush it on for a higher sheen B Y M I C H A E L P E K O V I C H For me, the ideal finish for handmade furniture is a
Copper Copper windows showcase beautifully woven bands in a simple but stylish pendant
 beginner metal Woven in Copper Copper windows showcase beautifully woven bands in a simple but stylish pendant by Mary Hettmansperger C opper is one of the most colorful and economical metals on the market,
Mixed Metal Heart Author: Patti Bullard Ph.D.
 Mixed Metal Heart Author: Patti Bullard Ph.D. Mixed Metal Heart Difficulty: Easy The beauty of mixed metals paired with a traditional heart shape is sure to bring joy to the jewelry maker as well as the
Building Tips This model can be built using the following types of adhesives:
 Page 1 Building Tips This model can be built using the following types of adhesives: Epoxy (with or without microballons) Odorless cyanoacrylate (CA) with accelerator UHU Creativ for Styrofoam (or UHU
How to make climbing grips. By,
 How to make climbing grips By, Items needed: * Items may be needed depending on your preference. - Carving Foam - Level Table - Cardboard - Pen - Ruler - Straight Edge - Box cutter - Hot melt glue gun
Name Hour Course Jewelry/A. Brass Tile Sampler. (use the metal cutter press or hand shears / tin snips)
") Jewelry/A Intro: Brass Tile Sampler How do jewelers refine their skills in order to make complex and unique work? The work you do throughout these assignments and units will be the stepping stones for
Jewelry/A Intro: Brass Tile Sampler How do jewelers refine their skills in order to make complex and unique work? The work you do throughout these assignments and units will be the stepping stones for
1 SELECT suitable material. It takes time to cut a cab. Don t waste it on rubbish.
 7 July 09 CUTTING A STANDARD CABOCHON A Standard Cabochon or CAB is an oval or round stone with one flat side and the other side having an even curved dome shape. Top of Cab It will have a narrow bevel
Colors in Line. The French word cloisonné means partitioned. Cloisonné. Keep Your. enameling repertoire. Add a timeless technique to your
 intermediate/advanced metal/enamel CLASSIC CLOISONNÉ Keep Your Colors in Line Add a timeless technique to your enameling repertoire. by Jennifer Jordan Park and Cyndi Kuchler The French word cloisonné
Curved Metal Segmenting
 Curved Metal Segmenting A Tutorial by: David Washburn A.K.A djwood1 This tutorial was downloaded from The International Association of Penturners Introduction As I continue to learn about pen turning,
How to Sharpen a Knife
 How to Sharpen a Knife Even a good knife will lose some of its sharpness with time. However, sharpening a knife is easy if you have the right tool and know how to use it. Generally three different materials
Build an Aluminum Whistle
 Youth Explore Trades Skills Description In this activity plan the students will further develop their machining and metalworking skills by fabricating a two-piece aluminum whistle. The project will cover
Heat, Color, Set & Fire
 LARK JEWELRY & BEADING Heat, Color, Set & Fire Surface Effects for Metal Jewelry MARY HETTMANSPERGER Liquid Enamel Necklace Liquid enamel applied over a copper wire coil creates a pendant with great texture.
Table by Clay Spencer
 Table by Clay Spencer (steel scribe points) construct a horizontal line through the center of the vertical line. Draw the vertical and horizontal lines with This description covers making a small circular
Personalize. Metal Clay and Resin. Making your own molds is one way to. Make your own texture molds, use your own photo.
 intermediate metal clay/resin Personalize CAPTURE A MOMENT Metal Clay and Resin Make your own texture molds, use your own photo. by Elaine D. Luther FCT-CR-050718-02 Making your own molds is one way to
Sheet Metal Tools. by:prem Mahendranathan
 Sheet Metal Tools by: SHEET METAL TOOL KIT SHEET METAL TOOLS Rivet Gun 3/32, 1/8, 5/32, 3/16",Cupped Set Mini Bucking Bar Footed Heel-Toe Bucking Bar Air Tool Oil Mechanics Tool Bag High-Speed Air Drill
Freehand Back-Filling: Polymer Clay and Resin Tutorial
 Page 1 of 9 Eugena Topina, 2016 Freehand Back-Filling: Polymer Clay and Resin Tutorial This tutorial is offered for your personal use only. Please do not distribute. Back-filling is a simple and very versatile
ARTS AND CRAFTS CHAIR
 ARTS AND CRAFTS CHAIR 491 MATERIALS LIST--DINING CHAIR Key No. Size and description (use) A 2 1-3/4 x 1-3/4 x 16-1/4'' oak (front leg) B 2 1-3/4 x 3-3/4 x 40-1/2'' oak (rear leg) C 1 1-3/4 x 3-3/16 x 15''
Design and Technology Resistant materials Key words and definitions
 Design and Technology Resistant materials Key words and definitions Word Acrylic Definition a type of thermoplastic, which is hard and can be transparent. Used to make shop signs. Perspex is a trade/brand
MANUAL 3. Wrapping with Graficast Automotive & Deco Films HIGH LE VEL. GrafiWrap. Grafityp wrapping films
 MANUAL 3 GrafiWrap Grafityp wrapping films Wrapping with Graficast Automotive & Deco Films 2017 1 WHAT IS GRAFIWRAP? GrafiWrap is a trade name that was registered by Grafityp Selfadhesive Products, which
The Virgo/Libra Steam Engine
 The Virgo/Libra Steam Engine Congratulations on becoming the owner of a Virgo or Libra Steam Engine. With careful use and maintenance it will give many years of satisfying performance. Contents 1) Notes
Witch Hat Pendant By Valorie Clifton
 Witch Hat Pendant By Valorie Clifton Ah, Halloween! It s always been one of my favorite holidays. The kids and I like to watch Halloween movies. We decorate the house and enjoy the cooler temperatures
Build the Spitfire: Step-By-step. Pack 7 Stages 61-71
 Pack 7 Stages 61-71 1 Stage Contents Page Number 61 212-215 62 216-218 63 219-221 64 222-224 65 225-228 66 229-231 67 232-235 68 236-238 69 239-241 70 242-245 71 246-249 Editorial and design by Continuo
Flexible Diamond Disc
 Diamond Burs - with 2.37mm HP Shanks The abrasive properties of Diamond bonded to the tool ensure fast, easy action & long durability. Used for engraving, drilling, cutting, cleaning castings, etc. Always
Agricultural Mechanics and Technology Power Tool Safety Rules
 Agricultural Mechanics and Technology Power Tool Safety Rules Name: BAND SAW Use: Cutting curves, circles and irregular shapes. 1. Use clean SHARP blades. 2. The teeth should always point DOWN. 3. Adjust
The word origami is derived from the Japanese oru, meaning to fold, and kami, meaning
 MASTERING THE MINIATURE ORIGAMI A PERENNIAL FAVORITE Metal clay paper tulips take traditional origami from ephemeral to permanent. by Sara Jayne Cole The word origami is derived from the Japanese oru,
WOOD TOY NEWS. July 23, 2013 Tuesday
 WOOD TOY NEWS Make your own perfect turntable for spray painting toys with these useful tips. And it s fast, fun and easy to build! by Imants Udris Watch the video on our website at : http://www.toymakingplans.com/website/how-to/
Make a cupboard as a BCATS
 National Certificate in Building, Construction, and Allied Trades Skills (BCATS) Make a cupboard as a BCATS project Unit Standard 25921 Level 2, Credit 6 Name: Contents Reference Page What you need to
The Cradles Caress Pendant
 The Cradles Caress Pendant www.nicolehannajewelry.com NOTES MATERIALS & TOOLS: 1 Piece 8mm Round Bead 3 Pieces 29cm 20 Gauge Round Wire (Dead Soft) 1 Piece 450cm 28 Gauge Round Wire (Dead Soft) 1 Piece
The Rubley Building Instructions for Assembly of the N scale kit. v1.1
 The Rubley Building Instructions for Assembly of the N scale kit. v1.1 Kit Contents: 197 ea. laser cut 1/16" acrylic parts. 1ea. adhesive backed.020 styrene part. 10 ea..060 x 1" styrene alignment pins.
Photographic Print Finishing and Mounting
 Photographic Print Finishing and Mounting Finishing and Mounting Print Finishing Finishing and mounting (or matting) the photograph is important because it clarifies to viewers your intentions to consider
Make a Mini Shield and Letter Opener
 Youth Explore Trades Skills Description Metal fabrication involves the use of a basic set of skills cutting, bending, and assembling processes to create something from raw material. In this activity plan,
3Insert the second rod no. 4
 Yamato: Step-by-step 37 The stern block and searchlight control towers a b c d e f Recommended tools and materials Wood glue Sandpaper (no. 800 grain) Metal file Putty Craft knife For metal: Super Glue
3Position the hull of the ship as
 Yamato: Step-by-step 25 The hull and stern deck c b d a b d c e e f a Rear frame b Stern deck x 2 c Stern deck x 2 d Side wall x 2 Wood glue Sandpaper (no. 400 grain) Craft knife Pliers d Side wall x 2
1Smooth pieces 4, 5 and 6, using
 Yamato: Step-by-step 109 Machine-guns, anti-aircraft guns and decking h e f a b c g d e f a Anti-aircraft gun base x 2 b Anti-aircraft gun (bottom) x 2 c Anti-aircraft gun (top) x 2 d Machine-gun base
Contents. pages 20-24: Installing Edge sinks into. custom laminate countertops page 8: Installing Edge sinks into postform laminate countertops
 Contents pages 2-8: Installing Edge sinks into custom laminate countertops page 8: Installing Edge sinks into postform laminate countertops pages 9-14: Installing Acrylic sinks into custom laminate countertops
Dainty Doorknocker Pendant
 Dainty Doorknocker Pendant www.nicolehannajewelry.com NOTES MATERIALS & TOOLS: 3 Pieces 30cm 22 Gauge Round Wire (Dead Soft) 1 Piece 400cm 28 Gauge Round Wire (Dead Soft) 1 Piece 8mm Round Bead (Large
Binding a Limp-bound Book which make great site tokens or personal largess
 Binding a Limp-bound Book which make great site tokens or personal largess As presented by THLady Jorhildr Hrafnkelsdottir version 1.2 2 Miniature Bookbinding - THLady Jorhildr Hrafnkelsdottir Larger books
Cross Peen Hammer. Introduction. Lesson Objectives. Assumptions
 Introduction In this activity plan students will develop various machining and metalworking skills by building a two-piece steel hammer. This project will introduce basic operations for initial familiarization
Tape Measure Metal Clippers Screw Bit Set With Extensions
 IMPORTANT: Read through instructions thoroughly before beginning to replace any damaged material. Minor damage can be fixed with a fiberglass repair kit and color matched paint. Tools Required Tape Measure
Circles and Swirls by FusionBeads.com
 Circles and Swirls by FusionBeads.com Approximate finished length: 18.5 inches Beads and other products needed for one necklace: 1-14.5x10mm Antique Silver Plated Pewter Leaf Toggle Clasp by TierraCast
REVISION LIST CHAPTER 25: AFT WINDOWS. The following list of revisions will allow you to update the Legacy construction manual chapter listed above.
 REVISION LIST CHAPTER 25: The following list of revisions will allow you to update the Legacy construction manual chapter listed above. Under the Action column, R&R directs you to remove and replace the
For Barrel Tapers. Installation and Operating Instructions For use with small combination belt & disk sanders. Assembled Taper Tool
 Tim s Taper Tool For Barrel Tapers Installation and Operating Instructions For use with small combination belt & disk sanders Assembled Taper Tool Your taper tool is capable of making barrel tapered shafts.
The Beall Wood Buff System modified and used by Eugen Schlaak
 The Beall Wood Buff System modified and used by Eugen Schlaak Many systems always existed for polishing properly sanded work produced on the wood turning lathe, but all components required to achieve good
PROJECT PLANS WOODEN GIFT BOX
 PROJECT PLANS WOODEN GIFT BOX Make the gifts you give even more special by presenting them in this one-of-a-kind gift box. In fact, the box may be valued more than whatever it contains. The box is sized
COFFEE TABLE WITH RECESSED TRAY
 COFFEE TABLE WITH RECESSED TRAY Why not treat your guests to a tray laid with delicacies and then remove it from sight in your new coffee table. There's no easier way to show that you are a thoughtful
Make a BBQ Flipper. Description. Lesson Objectives. Assumptions
 Youth Explore Trades Skills Make a BBQ Flipper Description The purpose of this activity is to introduce students to the metal shop through practical activity. This activity is an introduction to sheet
Car Construction E-Book
 Physics Lecture 15 - Building the Simple But Fast (SBF) Car - Part 2 Introduction - This lecture continues on where Lecture 14 left off- Explain to your Cub partner how Archimedes in about 100 AD first