Buildings Space City from Fireball XL5 December 2018 By Gary Reighn
|
|
|
- Marcus Johnson
- 5 years ago
- Views:
Transcription
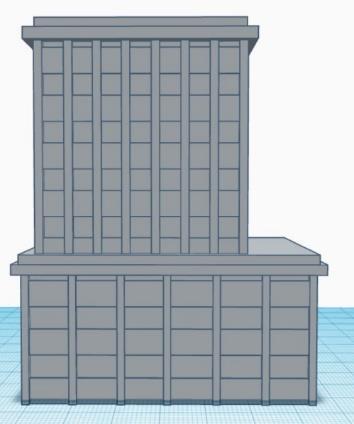
1 Buildings Space City from Fireball XL5 December 2018 By Gary Reighn General 3D Printing and Assembly Instructions Introduction: The models described below are 3D renderings of the rotating control tower and two other buildings found at Space City from the 1962 s Gerry Anderson TV show, Fireball XL5. These models are intended for use as background structures in a Fireball XL5 diorama. Additional details can be added or modifications made to these models to suit your needs. Files and Licensing: The Space City Control Tower and associated buildings have been designed and rendered by me using TinkerCAD, a free 3D modeling program. You may use these files to build a model or models for your own personal use without compensation [However, if you would like to leave a tip for the designer, please send it to my PayPal account gmr@reighn.com. And thank you!]. You may also modify any of these files to change the look, design, size, etc. of these objects as part of your assembly. My licensing requirement is that you do not use these files, even if modified by you, to create a kit or built up model for sale to the public or upload them to any 3D sites (i.e. Thingiverse, etc.) without contacting me first. I also do not take any responsibly or liability for how these files are used or their suitability for any purpose. Use them at your own risk. The 3D printable files in.stl format files can be found on my web site at Scaling: The models have been drawn at 100% to produce a printed version of the tower approximately 10.5 (26cm) high). The files can also be scaled larger or smaller as necessary. Please note that reducing the files below about 50% reduction can result in missing details and fragile parts. Scaling the models can be done using your slicer software or any 3D CAD program you are familiar with. The tower building was also broken into several pieces for two reasons, 1) to reduce the amount of support required by the 3D printing process and 2) to allow for the printing of a much larger building on even small printers. The files shown should all print at 100% scale (or smaller) with no supports required by the printer. Of course, this may vary based on your specific printer. It is suggested you try printing some portion of these files to ensure the entire model will print without supports. Layer Height: As is always the case with FDM printers, the smaller the layer height, the finer the results. However, reducing the layer height below 0.2mm increases the build time substantially. Use your own judgment for this. I used a 0.4mm nozzle for all my prints. Glues I use a plastic adhesive which melts the parts together. It is called Same Stuff available from Micromark.com. You can also use CA adhesive or other plastic cements or epoxy. Test first for best results. Finishing The finish you achieve for the parts largely depends on the quality of your printer. You should print some test pieces to determine the appropriate settings to achieve the desired results. Use whatever settings work best for you and your printer. Expect to need to use a good filler/primer paint to hide some of the layer lines if an FDM printer was used. Plastic putty is also a good for fixing any other larger printing flaws or gaps that may result. The tower model was designed to facilitate rotation, as the original did on the show. A post can be found in the bottom of the middle tower section that fits into the hole in the top of the base. The base is hollow in case further mechanization is desired. A skilled modeler could figure out how to motorize it. Parts List A picture of all the.stl files for this project can be found at the end of this document. Copyright 2018 Gary Reighn pg. 1


2 Printing the Parts The base part, the ring, the middle tower section and the two wings should be printed upside down to eliminate the need for any support material. The top of the building can be printed with the bottom down on the build plate. Here is how they should be oriented on the build plate. However, if you have problems with the overhang on the roof of the top section, use your slicer or other program of choice to split the.stl file into two pieces like this. They should then print OK without requiring any support. Copyright 2018 Gary Reighn pg. 2


3 Assembling the Model The model assembles quite easily once printed. Clean and prep the parts and assemble as shown below. The two wings at the top should fit into slots in the tower section. If they don t fit perfectly, you can try sanding them down or print them at a reduction of 1-2%. The middle tower piece should have the post fit into the base in the hole provided. That can be left unglued so that you can rotate the top of the tower into any position you like. Copyright 2018 Gary Reighn pg. 3


4 There are a couple of details I included that may or may not be printable depending on the scale you choose. The awning contains some very small details like posts that may not print depending on the scale chosen. Even if they do print, they may be too delicate or crude to use. You can substitute some plastic extrusion (Evergreen or Plastruct) or brass wire for the posts. Included in the files is a version of the awning without the posts and with holes for wire. Here is a photo of using some brass wire for the supports. The radar dish should be printed with Support On touching baseplate only. Again, if printed at a small scale it may not print or come out too crude or delicate. You may have to fabricate your own from plastic or brass. Here is the 3D render on the build plate and the dish printed at 100% scale, 0.1 layer height, supports touching baseplate only and 100% infill. When finished the tower building should look like this. Copyright 2018 Gary Reighn pg. 4


5 The other two buildings at Space City are also available to be printed and are included in the zip file. These should print fine without the need for any support. And this completes the build. Enjoy! Parts List and File Identification: Space City Command Building base.stl Space City Command Building mid.stl Space City Command Building round.stl Space City Command Building top.stl Copyright 2018 Gary Reighn pg. 5


6 Space City Command Building wings.stl Space City Command Building awning.stl Space City Command Building awning only.stl Space City Command Building radar.stl Space City Building 2.stl Space City Building 3.stl Copyright 2018 Gary Reighn pg. 6
The Saint Paul Building
 The Saint Paul Building Instructions for Assembly of The Saint Paul Building. Kit Contents: 65 each laser cut acrylic parts. 1 each sheet of AC roof unit parts. 1 each sidewalk. 3 each Window Glass Templates,
Fidelity & Guaranty Building
 Fidelity & Guaranty Building N Scale Model Kit Instructions for Assembly of the Fidelity & Guaranty Building Kit Contents: 69 each laser cut acrylic parts. Sidewalk material 1 each Window Glass Templates
Fidelity & Guaranty Building
 Fidelity & Guaranty Building Instructions for Assembly of the Fidelity & Guaranty Building Kit Contents: 69 each laser cut acrylic parts. 1 each sheet of AC roof unit parts. 1 each sidewalk base. 4 each
The Midtown Apartment Building
 The Midtown Apartment Building Instructions for Assembly of The Midtown Apartment Building. Kit Contents: 70 each laser cut acrylic parts. 3 each sidewalk parts. 3each Window Glass Templates, 3 each Window
Donaldson s Department Store
 Donaldson s Department Store Instructions for Assembly of Donaldson s Department Store Kit Contents: 80 each laser cut acrylic parts. 1 each sheet of canopy parts. 1 each sheet of AC roof unit parts. 1
User Manual Creatr HS
 1 Leapfrog BV Dear customer, Congratulations with the purchase of your very own Leapfrog Creatr HS! We would like to help you get started so you can make your first 3D print on the Creatr HS and many more.
Making the Easy 35. A Complete Guide
 Making the Easy 35 A Complete Guide Design Clint O Connor, creator of the 2013 Pinhole Printed Kickstarter project, is back again with a new 3D printed pinhole camera that anyone with access to a 3D printer
The Fyfe Building Instructions for Assembly of the N scale kit.
 The Fyfe Building Instructions for Assembly of the N scale kit. Kit Contents: 150 each laser cut 1/16" acrylic parts. 6 each 020 adhesive backed part 6 each column caps 2 each decorative canopy 1 each.125"
Ultimaker 2+ / 3. Guide for. General Information. Self-service 3d printing at the AOC. Ultimaker 2+ UItimaker 3
 Guide for Ultimaker 2+ / 3 Self-service 3d printing at the AOC General Information Location:, 1232 Sullivan (see page 9 for full list of Ultimakers on campus) Access: You can walk-in or reserve the Ultimakers
ADVANCED INFORMATION REPORT #4 ACE FUGUE SHROUD METHOD PIONEERED BY KOREY KLINE. Expanded and written by Jerry Irvine.
 ADVANCED INFORMATION REPORT #4 $2.95 AIR-4 ACE FUGUE SHROUD METHOD PIONEERED BY KOREY KLINE Expanded and written by Jerry Irvine III 11 1.1 California I Since 1980. See us in I 11 Rocketry @J ~ Publishing
The Park Hotel Instructions for Assembly of N Scale Kit
 The Park Hotel Instructions for Assembly of N Scale Kit Kit Contents: 198 ea. Laser Cut Acrylic Parts, 2 ea. Chimney Parts Sheets, 1 ea.2".040 styrene rod, 5 ea. Sidewalk Parts, 14 ea. Cast Resin Dormers,
The Park Hotel Instructions for Assembly
 The Park Hotel Instructions for Assembly Kit Contents: 280 ea. Laser Cut Acrylic Parts. 1 ea. 6" Plastic Coated Wire. 5 ea. Sidewalk Parts. 14 ea. Cast Resin Dormers. 12 ea. Window Glass Templates, 12
Hotel Belvedere Instructions for Assembly of the HO scale kit. v1.1
 Hotel Belvedere Instructions for Assembly of the HO scale kit. v1.1 Kit Contents: 319 ea. laser cut.090" acrylic parts. 132 ea. laser cut.060" acrylic parts. 8 ea. window glass templates 8 ea. window glazing
Notes on printing Addison Library students things
 Notes on printing Addison Library students things 5/9/14 jw Printing the objects we didn t have time to print at the Library was an interesting task, and I learned a lot while doing it. I was also able
3Insert the second rod no. 4
 Yamato: Step-by-step 37 The stern block and searchlight control towers a b c d e f Recommended tools and materials Wood glue Sandpaper (no. 800 grain) Metal file Putty Craft knife For metal: Super Glue
Assembly Instructions for Summit Motel Kits # SMFS and SMBD
 Assembly Instructions for Summit Motel Kits # SMFS and SMBD Introduction Thank you for your purchase of the Summit Motel. This modern motel can be converted to almost any chain motel of your choice, depending
SCHWERE PLATTFORMWAGON TYPE SSY 60TON
 TWS 5094 SCHWERE PLATTFORMWAGON TYPE SSY 60TON Congratulations on purchasing one of the finer aftermarket resin kits sets available. The photo below is of the completed kit. The Panther tank is not included
Drawings of all parts have been included for ease of part identification.
 Acme Corporation Instructions for Assembly of the HO Scale Acme Corporation HO Kit Contents: 156 ea. white 1/16" laser cut acrylic part 10 ea. white 1/8" laser cut acrylic part 37 ea. adhesive-backed brick
Hardee s Restaurant kit in HO scale
 Hardee s Restaurant kit in HO scale Parking lot base and cars not included This kit includes all building parts milled in white styrene plastic and laser cut white acrylic, clear acrylic window glazing,
Instructions for Assembly of the HO Scale The Charles
 The Charles Instructions for Assembly of the HO Scale The Charles HO Kit Contents: 337 ea. white 1/16" laser cut acrylic part 19 ea. Clear 1/16" laser cut acrylic part 69 ea. white 1/8" laser cut acrylic
SUGAR CREEK HOTEL PHOTO REAL BUILD KIT
 SUGAR CREEK HOTEL PHOTO REAL BUILD KIT by Innovative Hobby Supply INSTRUCTIONS FOR: Kit BK 6407 Sugar Creek Hotel Build Kit ~ S scale Free replacement parts are available simply by calling 866 712 4059.
3D Printing with Ultimaker2, User Guide
 February 25, 2015 3D Printing with Ultimaker2, User Guide University of Victoria, (BDSL) Biomedical Systems Design Laboratory 1 Cleaning and Leveling the Build- Plate Step 1: Use screwdriver to remove
Subway building kit in HO scale
 Subway building kit in HO scale This kit includes all building parts and signs milled in white and black styrene plastic, clear window glazing, and self-adhesive decals. All parts fit together but may
Modern Gas Station backdrop building kit in HO scale
 Modern Gas Station backdrop building kit in HO scale This kit includes all building parts, pumps, signs, and base milled in white styrene plastic, clear window glazing, Plastruct Ridgid Clay Tile roofing,
The Severn Instructions for Assembly of the N scale kit.
 The Severn Instructions for Assembly of the N scale kit. Kit ontents: 172 each laser cut 1/16" acrylic parts 102 each adhesive backed styrene parts 1 each cast entryway 3 each cast balcony 4 each cast
Please read and understand all instructions before building!
 The X-Calibur kit contains all the parts necessary* to build a flying high power rocket: (1) Pre-slotted main airframe (1) Payload airframe (1) Airframe coupler tube (1) Coupler bulkplate (1) Coupler hardware
Blossburg MT Northern Pacific Depot
 Uploaded to NPRHA site: 3/10/2003 Date Created: 3/10/2003 Title: Blossburg MT Northern Pacific Depot Keywords: Blossburg, Northern Pacific Railway Depot, Mullan Pass, American Model Builders Author: Dean
Instructions for using the CRR10: Creality 3D - Our Trustworthy 3D printer
 Instructions for using the CRR10: Creality 3D - Our Trustworthy 3D printer FABLAB BRIGHTON 2018 Installing Curamaker software The first step is to download the software for this machine. The one we ve
I do hope you build and enjoy a model from this plan package. Paul Bradley
 There are several notes I need to provide to aid you with the enclosed package. The original kits used 1/16" balsa. Since I wanted to print these directly on balsa sheet I developed the parts for 1/32"
1/6 PA-25 PAWNEE. *Specifications are subject to change without notice.*
 1/6 PA-25 PAWNEE INSTRUCTION MANUAL [ A335 Kit ] Wing Span : 72 in / 1830 mm Wing Area : 736 sq in / 47.5 sq dm Flying Weight : 6.6 lbs / 3000 g Fuselage Length : 48 in / 1220 mm Requires : "Glow Power"
Tools and Tips: ( 1 )
") Tools and Tips: As you build instructions will show in my many picture manual how to assemble. You can use your own methods as you desire, my results are very good. A smooth, flat work surface is very
Tools and Tips: As you build instructions will show in my many picture manual how to assemble. You can use your own methods as you desire, my results are very good. A smooth, flat work surface is very
1Smooth pieces 4, 5 and 6, using
 Yamato: Step-by-step 109 Machine-guns, anti-aircraft guns and decking h e f a b c g d e f a Anti-aircraft gun base x 2 b Anti-aircraft gun (bottom) x 2 c Anti-aircraft gun (top) x 2 d Machine-gun base
Please read and understand all instructions before building!
 D-Region Tomahawk The D-Region Tomahawk kit contains all the parts necessary* to build a flying high power rocket: (1) Pre-slotted main airframe (1) Payload airframe (1) Airframe coupler tube (1) Coupler
The Rubley Building Instructions for Assembly of the N scale kit. v1.1
 The Rubley Building Instructions for Assembly of the N scale kit. v1.1 Kit Contents: 197 ea. laser cut 1/16" acrylic parts. 1ea. adhesive backed.020 styrene part. 10 ea..060 x 1" styrene alignment pins.
Cleveland Quickie Luscombe Silvaire
 Cleveland Quickie Luscombe Silvaire This plan package is not a 100% copy of the original kit. As you make your way through the instructions you will see the differences. Here s just a few of them: The
1. Change units to inches: Tools > Options > Document Properties > Units and then select: IPS (inch, pound, second)
") Steps to Draw Pump Impeller: The steps below show one way to draw the impeller. You should make sure that your impeller is not larger than the one shown or it may not fit in the pump housing. 1. Change
Steps to Draw Pump Impeller: The steps below show one way to draw the impeller. You should make sure that your impeller is not larger than the one shown or it may not fit in the pump housing. 1. Change
Parts & Tools. O'Cello printing and assembly instructions. o-cello.com
 The O'Cello is a 3D-printable cello developed by Conor O'Kane, which is free to download and print for personal use. This document will show you how to print and assemble your own O'Cello. For the latest
1Use the metal file to smooth
 Yamato: Step-by-step 85 Parts of the bridge and the hull a b c d e f a Part of the bridge b Part of the bridge c Part of the bridge d Radar x 2 e Part of the bridge x 2 f Wire Recommended tools and materials
CURA WANHAO EDITION USER MANUEL
 CURA WANHAO EDITION USER MANUEL 1.1 Cura Overview We recommend that new users start with Cura as it includes a slicing engine. Host software we recommend to use Repitator. There is separate introduction
Building Instructions V 1.0 for a Styrene R0 Dome
 Building Instructions V 1.0 for a Styrene R0 Dome Created by R2 Builders Sweden: Lars-Åke Siggelin, Lars Lindberg, Alexander Arvidsson & David Bergelv This building instruction is using 1mm and 3mm Polystyrene,
Assembly Instructions
 Assembly Instructions Note: Prior to assembly, be sure to remove all printing pads from the printed parts and also be sure to sort through and organize all of your hardware before assembly this will help
Kitchen Stainer to filter Vitrolite
 Vitrolite is a photocurable polymer resin for use in SLA or DLP printers. After firing, Vitrolite is a glass ceramic with high strength, low porosity/high density and thermal shock tolerance. Vitrolite
User s Guide. Please read carefully this manual before using your equipment for the first time. Copyright by Opale- Paramodels 2011 v1.
 t rik em User s Guide Please read carefully this manual before using your equipment for the first time. Copyright by Opale- Paramodels 2011 v1.0 Page 1 / 12 Thanks for having chosen an Opale-Parmodels
Open Source Foam Cutter
 Open Source oam utter 4 axis, cheap, modular N hot wire foam cutter Ver. esc. y ate 0.2 OpenS version R. Lodde 22-10-15 Specifications This machine cuts foam (PS, PP, etc.) by moving a hot wire. The wire
USER MANUAL TABLE OF CONTENT
 USER MANUAL TABLE OF CONTENT A Precautions 2 B Check List 3 C Component Diagram 4 D LCD control Menu and its Function 5 E Technical Specifications 6 F Hardware Installation on Printer 7 G Software installation
For Barrel Tapers. Installation and Operating Instructions For use with small combination belt & disk sanders. Assembled Taper Tool
 Tim s Taper Tool For Barrel Tapers Installation and Operating Instructions For use with small combination belt & disk sanders Assembled Taper Tool Your taper tool is capable of making barrel tapered shafts.
CURA WANHAO EDITION USER MANUEL
 CURA WANHAO EDITION USER MANUEL 1.1 Cura Overview We recommend that new users start with Cura as it includes a slicing engine. Host software we recommend to use Repitator. There is separate introduction
Porcelite is ideal for objects requiring high resolution details. It s capable of printing at 25 micron layer thickness.
 fa is a UV-curable porcelain resin suitable for 3D printers that utilize SLA, DLP or CLIP technologies with UV wavelengths between 350-405 nm. Porcelite is ideal for objects requiring high resolution details.
SE5a Instrument Board part 2 - rev 1.1
 SE5a Instrument Board part 2 - rev 1.1 Fuel (Petrol) Valve This valve uses two circular name plates, eight brass screws, one black plastic base, copper wire and two black plastic risers. You can pick any
Assembly Instructions
 Assembly Instructions Note: Prior to assembly, be sure to remove all printing pads from the printed parts and also be sure to sort through and organize all of your hardware before assembly this will help
Quick Hook SS & LS Standard and Low Height Hooks for Side Mount Rails
 Quick Hook SS & LS Standard and Low Height Hooks for Side Mount Rails Installation Instructions Quick Hook SS & LS Instructions for Installing Standard and Low Height Hooks for Side Mount Rails Installation
Printing Guide. Revision 1.3. Kudo3D Titan 1 Printing Guide Ver of 11
 Printing Guide Revision 1.3 1 of 11 Copyright 2015 by Kudo3D. This material may be distributed only subject to the terms and conditions set forth in the Creative Commons Attribution-NonCommercial-NoDerivatives
The Queen Quilter Professional Quilters Kit Frame
 The Queen Quilter Professional Quilters Kit Frame Assembly Instructions Table of Contents: Before you begin......................... Pg. 2 Wood parts............................. Pg. 3 Hardware..............................
Front View Side View Top View
 Instructions: Below is a detailed instructional guide to producing a functioning Brace assembly from the provided CAD files. Sizing guide Measurements for brace sizing are best taken using a flexible measuring
Please read and understand all instructions before building!
 AGM-256 Pit Bull This kit contains all the parts necessary* to build a flying high power rocket: 1) Pre-slotted main airframe 1) Pre-slotted boat tail 1) Nose cone 4) Main fins 4) Canard fins 1) Piston
Assembly Instructions 10 X 10 Aluminum Roof Support
 Assembly Instructions 10 X 10 Aluminum Roof Support Aluminum Roof Support Bolt Package 16-5/16 X 2 ¼ SS Bolt 24-5/16 X 1 SS Bolt 40-5/16 SS Nylon Lock Nuts 16-5/16 SS Flat Washers 28-4 ½ Wood Screws 36-1
The IntoPlay build. This section will show how to fill the components into the case halves, and also the case base, which will look like this:
 The IntoPlay build Ok, I presume you have read the sections about cutting the holes in the case front, speaker holes and spray painting, modding components, preparing the case, etc. So far, the guides
Scratch Build a Water Tower
 Here s some Prototype details Photos Courtesy of Rodney Doster Water Spout and Discharge Pipe Tank Bands Here s some more Prototype details Photos Courtesy of Rodney Doster Weather Vane as a Finial Using
Taco Bell Restaurant kit in HO scale
 Taco Bell Restaurant kit in HO scale Parking lot base and cars not included This kit includes all building parts milled in white styrene plastic, clear window glazing, Plastruct tile roofing, and logo
ASSEMBLY INSTRUCTIONS
 WWW.NUKE.ROCKS ASSEMBLY INSTRUCTIONS 1 Let s begin our satisfying journey to 3D Printed music by downloading a copy of Nuke s 3D model from www.nuke.rocks. You will obtain a ZIP file which you must decompress,
1Take the keel (3) and
 and") 1 The hull and the bridge 1Take the keel (3) and apply PVA wood glue in the second slot from the left: a toothpick may make it easier. Take care: the left end is the one that has a projection. THE HULL
1 The hull and the bridge 1Take the keel (3) and apply PVA wood glue in the second slot from the left: a toothpick may make it easier. Take care: the left end is the one that has a projection. THE HULL
Quick Hook SB & LB Standard and Low Height Hooks for Bottom Mount Rails
 Quick Hook SB & LB Standard and Low Height Hooks for Bottom Mount Rails Installation Instructions Quick Hook SB & LB Instructions for Installing Standard and Low Height Hooks for Bottom Mount Rails Installation
Quick Start Guide. Simplify3D. Zeemanlaan MV IJsselstein The Netherlands
 Quick Start Guide Simplify3D www.felixprinters.com/support support@felixprinters.com Zeemanlaan 15 3401 MV IJsselstein The Netherlands 1 Introduction Introduction Simplify3D is software to control your
LAB 1A: Intro to SolidWorks: 2D -> 3D Brackets
 LAB 1A: Intro to SolidWorks: 2D -> 3D Brackets Set units Create Sketch Add relations Linear patterns Mirror Fillet Extrude Extrude cut First, set units. click Option on top of main menu Open Document Properties
Intro to 3D Printing. Anatomy of the Printer. Intro to 3D Printing & Certification imagine create learn grow
 Intro to 3D Printing 3D printing is a process of additive manufacture, this is where layers upon layers of material are built up to create a three dimensional object from a digital design. The 3D printer
Plate 5 Letterings and decorations
 Plate 5 Letterings and decorations 17 8 7 20 12 13 1 Required tools 2 13 14 15 9 4 15 19 18 17 11 5 6 3 2 10 1 Handling small parts If possible, do not use tweezers but pointed pliers, as they reduce the
Domino's Take-out Pizza building kit in HO scale, latest design
 Domino's Take-out Pizza building kit in HO scale, latest design This kit includes all building parts and signs milled in white and black styrene plastic, clear window glazing, and self-adhesive decals.
Parts list: Original Bear Chair BC Bear chair Nederland Postbus AM Zeist
 INSTRUCTIONS KIT BEAR CHAIR BC201 Parts list: NR. parts Quanty Legs 2 Seat slats 6 Arm support 2 Triangles 2 5. Arms 2 Additional Arm Support 2 Struts 2 Sides, left (L) en right (R) 2 Bottom Back Support
Table of Contents CONTENTS
 Table of Contents CONTENTS Introduction... 2 Contact TKI... 2 Printer Features & Definitions... 3 Software Parameter Setup... 8 Setting Up A Printer Profile in Cura... 8 Printing Settings... 13 Printing
INCREASING INTERLAMINAR STRENGTH IN LARGE SCALE ADDITIVE MANUFACTURING
 Solid Freeform Fabrication 2018: Proceedings of the 29th Annual International Solid Freeform Fabrication Symposium An Additive Manufacturing Conference INCREASING INTERLAMINAR STRENGTH IN LARGE SCALE ADDITIVE
Photo-Etch Demonstration Notes. Presented at the AMPS Central SC August 11, 2011 Meeting
 The basic steps in using PE up-date sets: Photo-Etch Demonstration Notes Presented at the AMPS Central SC August 11, 2011 Meeting 1. Plan Use 2. Cut Part from Fret / Clean up Burrs 3. Bend / Form Part
Slicer"CURA" User Instructions for Olivetti S2 3D Printer
 Slicer"CURA" User Instructions for Olivetti S2 3D Printer 1 Cura Install - 1 Click Next 2 Cura Install - 2 Check all components. Then click Install 3 Cura Install - 3 Click Next 4 Cura Install - 4 The
-1- Coach Instructions.
 -1- Coach Instructions. Insert the bogie pivot pins through the bottom of the coach body ensuring the dimples fit into the recesses. Glue the.06 x.25 short strips each side of the pivot head, bridge the
HOW TO ASSEMBLE THE NANOCADE KIT
 KIT HOW TO ASSEMBLE THE NANOCADE KIT v 1.1 10 STEPS Second Edition 1.10 Work in progress COPYRIGHT NANOCADE.COM 2011 1 INDEX The Nanocade KIT parts... 3 SPECIFICATION AND INFORMATION... 4 IMPORTANT INFORMATION...
Your kit contains the following parts. Please check your kit for any missing or damaged parts before starting construction.
 Your kit contains the following parts Please check your kit for any missing or damaged parts before starting construction COMPLETE KIT PARTS LIST 1 Plan Sheet #1 1 Plan Sheet #2 2 Decal Sheet 2 White Tissue
User s Guide. Please read carefully this manual before using your equipment for the first time. Copyright by Opale- Paramodels 2011 v1.
 t rik el User s Guide Please read carefully this manual before using your equipment for the first time. Copyright by Opale- Paramodels 2011 v1.0 Page 1 / 14 Thanks for having chosen an Opale-Parmodels
3Position the hull of the ship as
 Yamato: Step-by-step 25 The hull and stern deck c b d a b d c e e f a Rear frame b Stern deck x 2 c Stern deck x 2 d Side wall x 2 Wood glue Sandpaper (no. 400 grain) Craft knife Pliers d Side wall x 2
2-D to 3-D Toy Story: A Multi-Age Collaboration
 2-D to 3-D Toy Story: A Multi-Age Collaboration Cynthia Gaub Middle School Modified T.A.B. Choice Instructor North Middle School Everett, Washington www.artechtivity.com Art of Apex High School 2012 Monsters
Part Seven. FrankenCasing Overview
 Part Seven FrankenCasing Overview Though a very unique term, it is quite fitting to the practice that it describes. Like the good doctor Frankenstein, the art of FrankenCasing follows the steps of taking
Please read and understand all instructions before building!
 Patriot M i s s i l e The 1/6-Scale Patriot kit contains all the parts necessary* to build a flying high power rocket: (1) Pre-slotted main airframe (1) Nose cone (4) Fins (1) Piston ejection kit: (1)
Homemade Weaving Jig By David Dosser
 Homemade Weaving Jig By David Dosser Items needed for a 100 thread weaving jig: 1. 8x10 -.080 Plastic sheet (Optix brand or Lexan). Clear or white Plastic is easier to work with and can be found at most
Press and Media Tower PHOTO REAL BUILD KIT Innovative Hobbies Making Traditional Hobbies Better!
 Press and Media Tower PHOTO REAL BUILD KIT Innovative Hobbies Making Traditional Hobbies Better! INSTRUCTIONS for Kit # BK 6424 Free replacement parts are available simply by calling or by simply emailing
ZODIAC CH 601 Series Kit Aircraft
 ZODIAC CH 601 Series Kit Aircraft THE FOLLOWING IS A DRAFT MANUAL This manual has been written and published strictly for informational purpose. It has been prepared as a guide to facilitate the assembly
Installation Manual Using StairFurb Handraail Version 5.1 OCT 2017
 Installation Manual Using StairFurb Handraail Version 5.1 OCT 2017 ORDER OF ASSEMBLY TOOLS YOU WILL NEED - Fine Saw - Sander - Wood Filler - Allen keys - Screw Driver - Drill - Suitable Screws PROTECTING
Lulzbot Taz Workflow Computation + Construction Lab Iowa State University
 Lulzbot Taz Workflow Computation + Construction Lab Iowa State University 3D Printing on the Lulzbot Taz - Guidelines - The following steps that will guide the user on how to 3D print using the Lulzbot
AM8 Printer A metal frame for your Anet A8 By Pheneeny v1.0 April 20, 2017
 AM8 Printer A metal frame for your Anet A8 By Pheneeny v1.0 April 20, 2017 Please read this entire document before printing parts or building this frame Disclaimer: This guide is for informational purposes
Printing and Assembly of Kwawu Arm
 Printing and Assembly of Kwawu Arm Jacquin Buchanan December 2016 This work is licensed under the Creative Commons Attribution-NonCommercial-ShareAlike 4.0 International License. To view a copy of this
Instructions to build the Hexapod in plywood
 Instructions to build the Hexapod in plywood Author: Jørgen Vendorf Disclaimer The author can in no regards be held responsible for anything regarding this instruction, drawings or anything that goes wrong
Modular ottoman. assembly instructions
 Modular ottoman assembly instructions Smooth & Wrinkle-Free Fabric Covers: In addition to these printed instructions, you may want to watch our beauty tips videos on the customer service page of our website.
Seascape Bungalow Assembly instructions. Laser Dollhouse Designs
 Seascape Bungalow Assembly instructions Laser Dollhouse Designs NOTE: Please do a dry assembly using only tape to hold house together. This will get you familiar with parts, location, and fit. This also
Airport Terminal Building #1 (AD-TB01-0A)
") Thank you for purchasing the Airport Terminal Building #1. I know you will be pleased with the final product. Before you get started, here is a list of what you ll need: Paper. For best results I recommend
Thank you for purchasing the Airport Terminal Building #1. I know you will be pleased with the final product. Before you get started, here is a list of what you ll need: Paper. For best results I recommend
Star Trek TOS communicator MOTOR upgrade kit Install instructions Hyperdyne Labs 2002
 Star Trek TOS communicator MOTOR upgrade kit Install instructions Hyperdyne Labs 2002 Package Your package should include: Moiré motor Button cell battery holder with 357 1.5V battery wires for switch
Tools and Tips: ( 1 )
") Tools and Tips: As you build instructions will show in my many picture manual how to assemble. You can use your own methods as you desire, my results are very good. A smooth, flat work surface is very
Tools and Tips: As you build instructions will show in my many picture manual how to assemble. You can use your own methods as you desire, my results are very good. A smooth, flat work surface is very
Tevo Tarantula Auto Level Instructions. By ArcadEd. Mounting the Sensor:
 Tevo Tarantula Auto Level Instructions By ArcadEd Mounting the Sensor: First off, the kit does not seem to come with a screw for mounting the sensor. Maybe it does now, but at the time I got my kits, it
Post & Rail Crossbuck
 Post & Rail Crossbuck 1. Getting Started 6. Crossbuck Be sure to call underground prior to digging Assemble gates (if necessary) and decide where they will be located Stake out the fence line Space and
Manufacturing and installation instruction. Solidare Verso. Pergola awning (bottom mounted)
") Manufacturing and installation instruction Solidare Verso Pergola awning (bottom mounted) Solidare Verso pergola awning 11-05-2017 * * A T T E N T I O N * * AVZ accepts no liability for any errors in this
Manufacturing and installation instruction Solidare Verso Pergola awning (bottom mounted) Solidare Verso pergola awning 11-05-2017 * * A T T E N T I O N * * AVZ accepts no liability for any errors in this
Slicer"CURA" User Instructions for Olivetti 3D DESK
 Slicer"CURA" User Instructions for Olivetti 3D DESK 1 Cura Install - 1 Click Next 2 Cura Install - 2 Check all components. Then click Install 3 Cura Install - 3 Click Next 4 Cura Install - 4 The Wizard
Parts Identification
 We are excited to introduce the Model Aero Aqua Sport. This is an excellent sport flyer, equally at home flying from grass fields, water, or even snow! The unique V-tail gives the Aqua Sport a distinctive
Kossel Rev B Build Guide V1.0
 Kossel Rev B Build Guide V1.0 1 Table of Contents: Step 1: BASE ASSEMBLY Gathering parts: Building the Corners and Base: Step 2: UPPER ASSEMBLY Building Upper: Step 3: VERTICAL RAIL INSTALLATION Building
Signal Lights Demonstration Video Time Duration: - 38 sec. Use the right hand mouse button for video control.
 Tip: - Working Turntable Signals and Cabin Lights using Gold TC7.0F1 and Above Hi All, At long last I completed the project to have working signals and cabin lights on my turntable. This is a record of