1/6 PA-25 PAWNEE. *Specifications are subject to change without notice.*
|
|
|
- Alan Haynes
- 6 years ago
- Views:
Transcription
![1/6 PA-25 PAWNEE INSTRUCTION MANUAL [ A335 Kit ] Wing Span : 72 in / 1830 mm Wing Area : 736 sq in / 47.5 sq dm Flying Weight : 6.](/docs-images/77/76486218/images/1-0.jpg "6 lbs / 3000 g Fuselage Length : 48 in / 1220 mm Requires : \"Glow Power\" requires: 6-channel radio w/4 mini servos, 3 standard servos, 2-stroke 0.40-0.46 engine.")

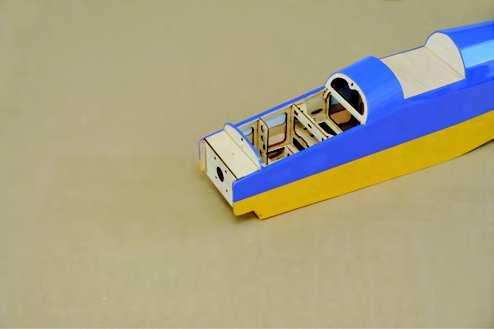
1 1/6 PA-25 PAWNEE INSTRUCTION MANUAL [ A335 Kit ] Wing Span : 72 in / 1830 mm Wing Area : 736 sq in / 47.5 sq dm Flying Weight : 6.6 lbs / 3000 g Fuselage Length : 48 in / 1220 mm Requires : "Glow Power" requires: 6-channel radio w/4 mini servos, 3 standard servos, 2-stroke engine. "Electric Power" requires: 6-channel radio w/6 mini servos, Outrunner Motor KM w/radial Mount Adaptor HW , 40A Brushless ESC, 4 cells 14.8V 3200mAh Lipo battery and charger. *Specifications are subject to change without notice.* Warning! This model is not a toy. It is designed for maximum performance. Please seek advice if one is not familiar with this kind of engine powered precision model. Operating this model without prior preparation may cause injuries. Remember, safety is the most important thing. Always keep this instruction manual at hand for quick reference. T he World Models Manufacturing Co., Ltd. PRECISION LASER CUT EASY BUILT KIT SERIES MADE IN CHINA


2 FUSELAGE ASSEMBLY Lay out the fuselage parts on a flat table top. 1.4 Flip the fuselage over with bottom up, take F29 and latch it between the two side panels. Note that the side with small plywood sheet should be facing inside of the fuselage. 1.1 Remove parts from plywood, cut connecting taps when required. 1.5 Use tape to hold F29 in place. 1.2 Use tape to bind the left and right fuselage panel together at the ends. 1.6 F29 in position. 1.3 Hold the panels by tape. 1.7 Flip the fuselage over now with top up, take F10 and latch it between the panels. Make sure the open slot of F10 is at the top. P.1


3 1.8 F10 in position Take F5 and latch between the panels. Make sure the side with glued plywood block is facing the rear. Apply a few drop of CA to temporary fix its position perpendicular to the left side panel. F Latch in F31. F22 F Latch in F21, F22 and F23 and apply glue to from the landing gear housing. F17 F16 F27 landing gear housing F How it looks when F31 is in position Latch in F16, F17, F20, F27 and landing gear housing perpendicular the the left side panel and apply a few drops of CA to fix them in place. Make sure F20 and F27 have the grooved side facing outward. F17 with the small plywood blocks facing inward. F4 F5B 1.11 Cut open CA glue tip for CA application. Make sure opening is not pointing at anyone Latch in F4 and F5B in the same manner as 1.14 above. P.2


4 1.16 Press and fit right side fuselage to F4, F5, F5B, F16, F17, F20, F27 and landing gear housing, use tape to hold them in position. F3 F9 F8 F7 F6 F15 F Latch in F6, F7, F8 and F9 between the fuselage panels. Pay attention to the tenons and cut outs, they may not be symmetrical and if they don't seem to fit, flip it left to right will do. F Insert two black and one white pushrod guide sleeve into the partition panels Latch in F3, F15, F2 and F1 one after the other from back to front and secure with tape. It is recommended to glue in F1 with epoxy glue for additional strength. P.3


5 1.20 Basic fabrication of fuselage is complete. Check any loose joints and distortion of the frame work. Prepare to apply glue in the next step. 2.2 If epoxy was not used in Step 1.19, apply adequate CA to the F1 joints. 2.3 Expose 5~10mm length section for the pushrod sleeves outside the plywood partition and apply CA to fix it in position. Make sure glue does not get inside sleeve. 2.1 Apply CA glue to all surfaces in contact. Apply from both sides in and out and let glue seep into joints. Use extension tube through side panel holes to get access to inside of fuselage. Avoid area with tapes at this stage, when glue is cured at other areas, remove tape and apply glue to area under the tapes. 3.1 Remove tapes after glue is cured, flip over fuselage and prepare to work on bottom of fuselage. Rest fuselage on foam blocks or other material to clear the partition plywood from table, which could be damaged under stress. P.4


6 F28 F28C F28A 3.3 Latch in F28, apply glue to inside and outside of the fuselage. F23A F23A F Insert F28C into tail section of fuselage, note that it should pass through the notch of F10, and share the notch of F7 with F28A, apply glue to fix in position. 3.4 With fuselage bottom up, glue in two F23A and then F26A. Note groove of F26A should match opening of landing gear housing. P.5


7 F14 F14A F27A F27B F16B F16B F24 F25 F20A 3.5 Flip over fuselage and glue in reinforcement bars F16B, F20A, F24, F25, F27A and F27B. F45 F46 F14B F46 F Glue in F14A to F14, then glue in bottom of fuselage. Flip over fuselage, glue in F45 and F46, then F14B. F19A F With fuselage bottom up, latch in F19A and F25. After fitting 3.8 Insert wing tube sleeves into fuselage. Apply glue to fix in tenons and cut outs, apply glue to fix it in position. them in position. When cured use sand paper to grind Flip over fuselage to apply glue from the inside. down sleeves to flush with fuselage side panels. P.6


8 F18 F36 F36 F35 F36 F36 F18A F18A F18B F38 F39 F40 F38 F39 F40 F7A 3.9 Glue in F35 and F36, when cured, glue in F38, F39 and F Glue in F18, F18A and F18B. Note that F18A should be flushed with F18, so F18B could be flushed with the fuselage side panel. Use sand paper to grind down uneven surface before glue in F7A. P.7


9 S1 F32 F41 F42 F42 F41 F43 F6A F5A Glue in F41 and F42, don't force F5B and F6 to accommodate the length of F41 and F42, grind them down with sand paper after gluing in F43. Glue in F5A and F6A. P.8 Sand down uneven surface of F10, glue in F32. Use S1 as template to align F32. Since you have to remove S1 after gluing, apply tape to S1 to protect it from sticking to F32.


10 BATTERY COVER ASSEMBLY Lay out parts for the battery cover Cut and trim plastic sleeves to flush with fuselage. 4.1 Apply thin plastic sheet to protect battery cover opening. F48A F48 F Use sand paper to remove rough edges. 4.2 Insert F59 into F48, then F48A, align the edges and the semi-circle cut outs. Apply CA to glue them in position. When cured, insert the assembly to the fuselage, with F59 through the upper hole of F1. P.9


11 F47 F50 F50A F57 F56 F55 F57 F56 F55 F Glue in F47, then F50, F50A and F When cured, remove from fuselage and glue in F55, F56 and F57, apply glue on both sides. F52 F51 F53 F52 F Glue in F51, F52 and F53. Make sure CA glue do not get inside F53 latch. 4.6 When cured, use sand paper to remove rough edges and insert to fuselage, grind down uneven surface if necessary. P.10


12 MAIN WING ASSEMBLY W9 Lay out parts for the wings. 5.3 Glue in W12A/W13 assembly perpendicularly to W9, note that W9 is the wing tip end and should be perpendicular to W12A/W13. W12A W13 W1R W2 W3R W4 W5 W6 W7 W8 W9 5.1 Apply glue to the narrower side of W12A and glue to W13. W1R W21 W21 W19 W Insert and glue in the W12A/W13 assembly perpendicularly to W1R, make sure it is all the way in. W1R should have an angle with W12A/W13, which is the dihedral angle of the wing half and is completely normal. 5.4 Glue in W2, W3R, W4, W5, W6, W7 and W8, note that they should be perpendicular and flushed with W12A/W13. Latch in W21 to W2 and W3R, W6 and W7 and apply glue. Glue in W19 between W7 and W8, make sure blind nuts are facing inside of wing. P.11


13 W14 W Glue in W11 and W14, make sure the ends are flushed with the ribs W2...W Insert fiber glass sleeves for wing tubes into W1R, W2, and W3R. Glue them in place and when cure, use sand paper to remove edges to make it flush with W1R. W11 W23 W11 W31 W32 W30 W22 W29 W Glue in reinforcement plate W23, (15 pcs. ). Glue in W Glue in balsa sheets W22, W28, W29, W30, W31 and W32. Pay attention when gluing W28 and W32, not to allow glue to get inside blind nuts. Apply glue to outside of balsa sheets, when cured, apply glue to underside of balsa sheets. P.12


14 W40 W37 W37A W40A W27 W27A W27A W26 W25 W24 W38A W39A 5.9 Glue in W24, W25, W26, W27 and W27A Glue in W37 and W40, then flip over to the flat side and glue in W37A and W40A, then W38A and W39A. W36 W41 W38 W39 W Glue in W41 to W36, then W38 and W39. When cured glue in W Use sand paper to grind down uneven surface of W9, then glue in W10 wing tip assembly. P.13


15 VERTICAL STABILIZER AND RUDDER ASSEMBLY Lay out parts for the vertical fin and rudder V3 V Use sand paper to remove rough edges of the wing assembly. V1 W15R 5.14 Glue in W15R. Dry fit W16 flap and W17 aileron with the hinges, do not apply glue at this stage. 6.1 Place V2 and V3 on flat surface and apply glue to glue them together. Insert CA hinges to the vertical stabilizer hinge grooves, install rudder and check alignment of rudder. Do not apply glue to the CA hinges at this stage. Sand down rough edges if necessary. P.14


16 HORIZONTAL STABILIZER AND ELEVATOR ASSEMBLY STABILIZER, RUDDER, MAIN WING AND FUSELAGE SETTING Lay out parts for horizontal stabilizer and elevator 8.1 Dry fit all the main components of the plane. Remove left elevator from horizontal stabilizer and pass through the tail slot, align the middle slot of the horizontal stabilizer and install back the left elevator. S2 S3 S1 8.2 Install the vertical stabilizer, make sure the bottom tenon pass through the center slot of the horizontal stabilizer. Install the rudder. 7.1 Place S2 and S3 on flat surface and apply glue to glue them together. Insert CA hinges to the elevator hinge grooves and fit in the horizontal stabilizer, check alignment of the elevator. Do not apply glue to the CA hinges at this stage. Sand down rough edges if necessary. Carefully inspect all the glue joints for the assembled parts. If you find gaps between contacting surfaces, add gap filling CA glue or epoxy to reinforce the joints. 8.3 Install wing tube and wings. Check for imperfections and repair if necessary. P.15


17 COVERING The following ironing procedure is for the World Models Tough- Lon covering. Please follow the instructions included with the covering material. Please completely remove dust from the surface before covering, or the covering will not stick to the surface. The covering adhesive is activated at 58ºC/136ºF, and shrinking starts at 90ºC/194ºF. Set your iron at about 60ºC/ 140ºF to begin Place covering on fuselage bottom, completely covering the surface with 5mm overhang at all sides. Lay out the Fuselage coverings. 9.3 Tack the covering at corners, this will temporarily fix the position of the covering, and start ironing on the covering. If position is not right, apply heat and peel off the covering and rework. Never try to peel off covering when the covering is cold and adhesive has set, you may pull away wood or separate the color layer. Always heat up the covering to melt the adhesive before peeling. 9.1 Cover iron with cotton cloth to eliminate scratch and better temperature distribution. A hobby grade sealing iron with cover sock is recommended for better handling. 9.2 Take out the covering piece for the bottom of fuselage, and peel off backing sheet. P Iron on the overhangs to cover the edges. If you need to shrink the covering to conform to the shape of edges, you can do so by raising the iron temperature. Just apply heat at the required spot only. Since the shrinking temperature is much higher than the adhesive melting temperature, if you apply high heat at area near the edge or seams of covering, the covering will pull away from the edge or seams. Trim off unwanted material.


18 9.9 Paint the cockpit black. 9.5 Iron on covering for the side panels. Always use lower heat to stick on the covering. Use high heat carefully only for shrinking covering around corners Cover the battery hatch. Cut a slit on the covering for the latch knob before ironing. 9.6 Iron on upper blue covering. Lay out the vertical fin and rudder coverings. 9.7 Iron on top partition board. 9.8 Iron on color trimmings Cover vertical stabilizer and rudder. You may need to install the stabilizer and rudder and mark trimming position for professional result. P.17


19 11.1 Cover the horizontal stabilizer and elevator Prepare openings for aileron and flap servo trays Cover the wing struts Cover the aileron servo tray. Lay out the Wings coverings Cover wing tip, bottom first then the top. Apply higher heat to shrink covering around the round edges Cover the right wing panel. Cover the bottom panel, and then the top panel Cover the aileron and flap. Cover the left wing panel with similar procedure. The plane is now ready for equipment installation. P.18


20 Manufacturing Co., Ltd
INSTRUCTION MANUAL. Specifications. Wing Area Flying Weight Fuselage Length. 28 oz / 800 g 30.0 in / 760 mm
 ALMOST-READY-TO-FLY INSTRUCTION MANUAL Requires : -channel radio w/ micro servos, Outrunner Motor w/ Propeller Adaptor 0A Brushless ESC, 3 cells 11.1V 100 mah Li - Po battery & charger. Wing Span Wing
FUSELAGE CONSTRUCTION
 FUSELAGE CONSTRUCTION Note: prior to building and gluing on the work surface use protective covering on your building surface. (wax paper or clear wrap) Fit the laser cut Fuselage Front and Fuselage Rear
Specifications. Before commencing assembly, please read these instructions thoroughly.
 INSTRUCTION MANUAL Before commencing assembly, please read these instructions thoroughly. Specifications Wing Span: 8.5 in / 30 mm Wing Area: 330 sq in /.3 sq dm Flying Weight: 6 oz / 70 g Fuselage Length:
DRAFT COPY BUILDING INSTRUCTIONS FOR BLACKBURN BUCCANEER S2 VERSION 1 (BETA BUILD) BY MARK DOUGLAS
 BY MARK DOUGLAS") BUILDING INSTRUCTIONS FOR BLACKBURN BUCCANEER S2 VERSION 1 (BETA BUILD) BY MARK DOUGLAS COPYRIGHT MARK DOUGLAS 2011 THIS IS A "SHORT" KIT FOR EXPERIENCED BUILDERS AND FLYERS ONLY, DESIGNED BY A SHED DWELLING
BUILDING INSTRUCTIONS FOR BLACKBURN BUCCANEER S2 VERSION 1 (BETA BUILD) BY MARK DOUGLAS COPYRIGHT MARK DOUGLAS 2011 THIS IS A "SHORT" KIT FOR EXPERIENCED BUILDERS AND FLYERS ONLY, DESIGNED BY A SHED DWELLING
E-AERO EPP PITTS KIT From BP HOBBIES. Parts Included in kit
 E-AERO EPP PITTS KIT From BP HOBBIES Parts Included in kit Thank you for purchasing the BP Hobbies/E-aero EPP Pitts. Please take the time to read through the instruction manual before beginning the build.
Citabria Pro. Aerobatic Parkflyer. by Joel Dirnberger
 Citabria Pro Aerobatic Parkflyer by Joel Dirnberger Revision C: December 21, 2004 Citabria Pro Building Instructions Length: Wingspan: Wing Area: Flying Weight: Wing Loading: Functions: Specifications:
C-180 Builder s Manual
 C-180 Builder s Manual. May 20, 2002 Last revised July 11, 2002 Copyright! 2002 Douglas Binder, Mountain Models www.mountainmodels.com sales@mountainmodels.com (719) 630-3186 1 Required Equipment! Xacto
ULS Cherokee. Ultra Low Speed aircraft for indoor RC flying. Zippkits. Specifications: Required to complete:
 Zippkits ULS Cherokee Ultra Low Speed aircraft for indoor RC flying. Specifications: Span- 28 inches Wing Area- 151 Sq/In Wing Loading- 3.0 ounces/ft Weight- 3.5 ounces RTF Build time- 1-2 Hours Radio-
INCLUDED IN THIS KIT: SPECIFICATION: NEEDED BUILDING TOOLS: REQUIRED EQUIPMENT:
 Please review this entire manual before beginning assembly. By doing so it will help you better understand each step as you progress in the actual building of your kit, and you will do a better job in
LANDING GEAR. 1. Fit landing gear into slots on bottom of fuselage.
 LANDING GEAR 1. Fit landing gear into slots on bottom of fuselage. 4. Use channel-lock pliers to press blind nuts into position (note: drilled hole should be slightly smaller than shaft of blind nut for
Specifications. Before commencing assembly, please read these instructions thoroughly. INSTRUCTION MANUAL
 INSTRUCTION MANUAL Before commencing assembly, please read these instructions thoroughly. Specifications Wing Span: 50 in / 170 mm Wing Area: 484 sq in / 31. sq dm Flying Weight: 3.5 lbs / 1600 g Fuselage
Corvus Racer CC
 Corvus Racer 540 35CC Item No:L-G035008 Specifications Wing Span Length Wing Area Flying Weight Glow Gasoline Electric Radio mm mm 1200sq in (77.4sqdm) 9.9-12lbs(4.5-5.5kg) 91-1.20(2C) 1.10-1.40(4C) 20-40cc
ORIGAMI E2. An electric powered model made from sheet foam based on the configuration of a paper glider. Concept and general arrangement by
 ORIGAMI E2 An electric powered model made from sheet foam based on the configuration of a paper glider. Concept and general arrangement by Jack Pignolo Plan by Paul Bradley February 2010 ORIGAMI E2 38
RESolution V2 Manual
 RESolution V2 Manual Note for the German Manual: Yellow Bottle thick CA Pink Bottle Med CA Blue tube 5 minute Epoxy Green tube 90 Minute Epoxy Construction of the Fuselage Step 1: Cover the plan with a
Corvus Racer Colour schemes. AeroPlus RC Copyright 2013 All Rights Reserved
 Corvus Racer 540 59 Item No:A E050003 Specifications WING SPAN: 59"(1500mm) LENGTH: 54.1"(1374mm) WING AREA: 654sq.in.(42.2sq.dm.) FLYING WEIGHT: 4.6 5.3lbs(2000 2300g) Electric:Brushless outrunner 8Oz.
Taylorcraft Indoor / Cul-De-Sac Flyer
 Taylorcraft Indoor / Cul-De-Sac Flyer Taylocraft Specifications Wingspan: 28.0 in. Wing Area: 117 sq. in. Weight (Ready to Fly): 3.0 3.1 oz. Wing Loading: 3.7 3.8 oz. / sq. ft. LIABILITY RELEASE In that
High performance 90mm fiberglass jet
 High performance 90mm fiberglass jet Assembly manual For intermediate and advanced fliers only! Specs Wingspan: 1255mm Fuselage length: 1250mm Flying weight: 2600-3000g Wing area: 22.6 dm² Wing loading:
Piper Cherokee /3 scale. Construction Manual
 Piper Cherokee 140 1/3 scale Construction Manual STAB CONSTRUCTION 1. Remove foam cores from cradle and place on flat surface. Inspect pieces before you epoxy halves together making sure leading and trailing
(Build Instructions)
") (Build Instructions) Specifications * Wingspan: 58cm * Length: 50cm * Flying Weight: 59 grams * Channels: 3 (Rudder Elevator Throttle) * Suggested Receiver: 4Ch Micro * Motor: 8mm GearDrive * Prop: GWS
(Build Instructions) Specifications * Wingspan: 58cm * Length: 50cm * Flying Weight: 59 grams * Channels: 3 (Rudder Elevator Throttle) * Suggested Receiver: 4Ch Micro * Motor: 8mm GearDrive * Prop: GWS
HIGH-END TECHNOLOGY. Electric ducted fan rafale
 HIGH-END TECHNOLOGY RC Electric ducted fan rafale First we want to thank and congratulate you with your decision in buying one of our Kits. The Rafale puts together very easily so there is not much explanation
HIGH-END TECHNOLOGY. Electric ducted fan Starfighter
 HIGH-END TECHNOLOGY RC Electric ducted fan Starfighter First we want to thank and congratulate you with your decision in buying one of our Kits. The Starfighter puts together very easily so there is not
4. Bevel the LE face of HS1-HS11 to match the horizontal stab leading edge sweep angle.
 BEFORE YOU BUILD 1. Unroll each sheet of the plans. Roll them inside out so that they will lie flat on the building surface. 2. Assemble the tools that you will need to build each section so that they
INCLUDED IN THIS KIT: SPECIFICATION: NEEDED BUILDING TOOLS: REQUIRED EQUIPMENT:
 Please review this entire manual before beginning assembly. By doing so it will help you better understand each step as you progress in the actual building of your kit, and you will do a better job in
R/C Scale Model Instructions
 Vickers 151 Jockey 32.6 Vickers 151 Jockey 32.6 1/12 Scale R/C Scale Model Instructions CONTACT INFORMATION Designed by M.K. Bengtson Prototype by Bert Ayers Manufactured and Distributed by: Bengtson Company
Edge 540 V3 35CC. Scheme A. Item No:L G Specifications. Flying Weight
 Edge 540 V3 35CC Item No:L G035016 Specifications Wing Span Length Wing Area Flying Weight Glow Gasoline Electric Radio Description 76 (1930mm) 74 (1879mm) 1200sq in(77.4sqdm) 9.9 12lbs(4.5 5.5kg) 91 1.20(2C)
Aure. Radio required : 3 channels, 4 servos airplane radio. Specifications. * Specifications are subject to change without notice.
 A L M O S T- R E A D Y- T O - F LY Aure INSTRUCTION MANUAL Radio required : 3 channels, 4 servos airplane radio Specifications Wing Span Wing Area Flying Weight Fuselage Length 81.5 in / 2070mm 572.0 sq
ParkJet Builder s Manual
 ParkJet Builder s Manual Thank you for purchasing the ParkJet. The ParkJet is a profile ducted fan airplane that can be flown in a larger park. The ParkJet was initially designed by Scott Stoops and modified
Stearman PT-17 KIT WARRANTY
 Stearman PT-17 KIT # K-306 Assembly Instructions Version 2 02-17-16 Designed by Tom Herr WARRANTY Sig Manufacturing Co, Inc. guarantees this kit to be free from defects in both material and workmanship
PITTS S2S CONSTRUCTION
 PITTS S2S CONSTRUCTION FUSELAGE CONSTRUCTION 1) Place the right fuselage side over the plan and mark the former positions. Place the left side over the right side and mark the former positions. Glue F1
Parts Identification
 We are excited to introduce the Model Aero Aqua Sport. This is an excellent sport flyer, equally at home flying from grass fields, water, or even snow! The unique V-tail gives the Aqua Sport a distinctive
COMET 24" HELLCAT REPRODUCTION ASSEMBLY GUIDE
 COMET 24" HELLCAT REPRODUCTION A RUBBER POWERED 24" WING SPAN MODEL BY PAUL BRADLEY ASSEMBLY GUIDE AUGUST 2016 CHANGES MADE TO THE ORIGINAL The following changes were made to the original Comet kit structural
S.E.5a (Build Instructions)
") S.E.5a (Build Instructions) Specifications Wingspan: 38 cm Length: 31cm Flying Weight: 41 Channels: 3 (Rudder Elevator Throttle) Suggested Receiver: 3Ch Brick Motor: 7mm Geared Motor Airframe Only Kit
S.E.5a (Build Instructions) Specifications Wingspan: 38 cm Length: 31cm Flying Weight: 41 Channels: 3 (Rudder Elevator Throttle) Suggested Receiver: 3Ch Brick Motor: 7mm Geared Motor Airframe Only Kit
NASTY Build Guide. Supplies needed
 NASTY Build Guide Supplies needed Blucore or Depron Foam. Blucore (Fan Fold Foam) is available at Lowes. Approximately $25 for 50 feet of Blucore. Depron can be ordered on the internet for slightly more.
THE APOGEE A 100-INCH AMA DURATION SAILPLANE FROM DYNAFLITE
 THE APOGEE A 100-INCH AMA DURATION SAILPLANE FROM DYNAFLITE Apogee is the intermediate sailplane designed to be competitive in AMA duration contests. Effective spoilers, rudder and full flying stabilizer
Instruction Manual book
 Instruction Manual book ITEM CODE BH53. SPECIFICATION Wingspan : 1,250mm 49.21 in. Length : 930mm 36.61in. Weight : 1.1kg 2.42 Lbs. Parts listing required (not included). Battery: 3 CELLS-LI-POLY-11.1V-2,500
Dandy Sport Builder s Manual
 Dandy Sport Builder s Manual Thank you for purchasing the Dandy Sport. The Dandy Sport has been designed as an easy to build aileron trainer. Take your time and enjoy building this plane. Specifications:
Super Sky Surfer 2000 Assembly Instructions
 Super Sky Surfer 2000 Assembly Instructions Note: Plug and Play version of the Sky Surfer comes with fuselage pre-glued and motor/servos installed. If you wish to route antennas or wires through the tail,
Magpie. Foam Trainer. Magpie Specifications
 Magpie Foam Trainer Magpie Specifications Length: 34in. Wingspan (SF): 46in. Wing Area (SF): 414in 2 Wingspan (SP): 40in. Wing Area (SP): 360in 2 Weight (without battery): 12oz. Thank you for purchasing
Thank you for your purchase of the Lee Ulinger, FoamtanaS, Yak-55, or Extra 330 3D Depron foam, Aerobatic airplane.
 Thank you for your purchase of the Lee Ulinger, FoamtanaS, Yak-55, or Extra 330 3D Depron foam, Aerobatic airplane. Tools you will need to build Recommended additional items: #11 hobby knife Motor: Hacker
STICK 2 IT. Fuselage Construction:
 RCCD 2014 CLUB PROJECT STICK 2 IT Fuselage Construction: The fuselage is constructed without the use of a set of plans. The fuselage will be constructed on your previously prepared work surface and by
MXS R 30CC. Item No:L G Specifications. 67 1/2"(1720mm) (2C) (4C) 26 35cc gas DLE 30/35RA MLD35 JC30Evo.
 (2C) (4C) 26 35cc gas DLE 30/35RA MLD35 JC30Evo.") MXS R 30CC Item No:L G030008 Specifications Wing Span Length Wing Area Flying Weight Glow Gasoline Electric Radio Description Covering Material Carbon Fibre : 75"(1915mm) 67 1/2"(1720mm) 1023sq in(66sq
MXS R 30CC Item No:L G030008 Specifications Wing Span Length Wing Area Flying Weight Glow Gasoline Electric Radio Description Covering Material Carbon Fibre : 75"(1915mm) 67 1/2"(1720mm) 1023sq in(66sq
Sbach 1,2m 3D/aerobatic EPP model Building instructions
 Sbach 1,2m 3D/aerobatic EPP model Building instructions Please refer to the Diagram sheet Diagrams A, B Press 2 carbon strips (1x3x1000 mm) into the grooves in the sides of the fuselage central part (the
Designed in 2005 by Bernard Burton. Assembly manual Bernard Burton DRAFT 1
 Designed in 2005 by Bernard Burton Assembly manual 2005 - Bernard Burton DRAFT 1 The plans can be requested via this link http://www.gundersonaerodesign.com/m12plansreq.htm The laser kit is available here
VT-ALLROUNDER V4 1500MM CORO 3/4 Channel Trainer Airplane
 Congratulations on your purchase of the VT- AllRounder 1500MM Trainer Airplane Kit.. Hope these build instructions help you complete the build. Though the build itself doesn't take much time, just be sure
96 WING SPAN SPITFIRE (COPYRIGHT PROTECTED 2014) ALL RIGHTS RESERVED
 ALL RIGHTS RESERVED") 96 WING SPAN SPITFIRE (COPYRIGHT PROTECTED 2014) ALL RIGHTS RESERVED GENERAL INSTRUCTIONS Should you elect to use the recommended Door Skin, which is 1/8 mahogany plywood measuring 36 x 88. Have it cut
96 WING SPAN SPITFIRE (COPYRIGHT PROTECTED 2014) ALL RIGHTS RESERVED GENERAL INSTRUCTIONS Should you elect to use the recommended Door Skin, which is 1/8 mahogany plywood measuring 36 x 88. Have it cut
INS TRUC T I ON M A NU A L
 INS TRUC T I ON M A NU A L Packing list: 1: PP F6F fuselage *1 2: Carbon tube 5*5*940mm *1 3: Pull rod *4 4: Motor mount *1 5: Quick rod adjuster *4 6: Hinge *4 7: M3 screws *4 8: Hook and loop tape *1
I hope you enjoy the Spirit as much as I have. Scott DeTray Model Aero
 We are excited to introduce the Model Aero Spirit. Inspired by the magnificent Northrop Grumman B-2 Spirit Stealth Bomber, the Spirit is a great flyer, on land or water. It tracks like an arrow and is
Switchback Sport Builder s Manual
 Switchback Sport Builder s Manual Thank you for purchasing the Switchback Sport. The Switchback Sport has been designed for the novice to intermediate pilot who wants a plane with good performance that
Millennium RC presents The New and Improved (now even easier to build and cover!) SSX X-Trainer Build Kit
 SSX X-Trainer Build Kit") Millennium RC presents The New and Improved (now even easier to build and cover!) SSX X-Trainer Build Kit Wing span: Approx. 42 Wing Area: 504 sq. in. Wing Loading: 6.71 oz/ sq. ft. Introduction: The Slow
Millennium RC presents The New and Improved (now even easier to build and cover!) SSX X-Trainer Build Kit Wing span: Approx. 42 Wing Area: 504 sq. in. Wing Loading: 6.71 oz/ sq. ft. Introduction: The Slow
EPP Rebel Z 35. White Red w/ Blue Orange w/ Blue Orange w/burgundy Other. Specs. Color - Bottom White Black Checkers Silver Checkers Other Checkers
 EPP Rebel Z 35 Specs AUW ~10.0oz Width 35.28 Length 34.67 Wing Area 1.44 sqft Horz Area 2.35 sqft Vert Area.91 sqft
SPUNKY ASSEMBLY MANUAL
 SPUNKY ASSEMBLY MANUAL Please read the tips section at the back of this manual regarding the use of laser cut parts. The proper removal and preparation of these parts is important. When laser cut, some
F-16 Falcon 70mm EDF
 F-16 Falcon 70mm EDF Instruction manual Specifications: Winspan: 640 mm Length: 990 mm Weight: 900-1100 gram Ducted fans 70mm x 1 Required tools and components:. 4 ch. Computer Radio system w/ 2 servos.
Instruction Manual. Specification:
 Instruction Manual H I G Specification: Wingspan: 133 cm (52.3 inches) Length : 104 cm (40.9 inches) Weight : 1830gr Engine : 25-32 two stroke Radio : 4 channel - 4 servo H W I N G KIT CONTENTS: We have
SZD-10 bis CZAPLA ASSEMBLY MANUAL IN PICTURES
 1 RUDDER Plan and parts: 2 Assembly steps: Photo above: glue together rudder spar, ribs and trailing edge. Clamp spar to a flat surface (chipboard on the photo) and make sure the straight aligment of the
JAMISON SPECIAL. Building Guide
 JAMISON SPECIAL Building Guide WING Mark then drill holes for wing jig rods. Slide Ribs onto jig rods Mark the rib positions on 1/16 x 1 trailing edge, 1/4 x 1/4 leading edge & 1/4 x 1/4 spars Pin ribs
Hobby Lobby Zip Supplementary instructions Please refer to the included drawings while using these assembly instructions
 Materials needed: 15 or 30 minute epoxy Medium CA Masking tape Scotch tape Servo Tape Wax paper Tools Needed: Pencil or marker Flat building surface Hobby knife or razor blade 7/64" or 3mm drill bit 3/16"
LARK. Classic Legal Precision Stunter RSM DISTRIBUTION. presents. Charles Mackey. Wing Area 570sq. Wingspan 52.
 RSM DISTRIBUTION presents LARK By Charles Mackey Photo _ Bob Hunt Classic Legal Precision Stunter Wingspan 52 Length 39.5 Wing Area 570sq Motor 35-46 www.rsmdistribution.com Page 2 Thank you for purchasing
Revolution 3D-mini ARF
 Revolution 3D-mini ARF 1 Included Hardware 4 Dubro Micro Control Horns #DUB848 2.32 x 18" Linkage Wire (Music Wire) 1 1.5 x 1.25 x 1/8 Balsa Ply (for motor mount) 1 5" piece of Velcro (Optional recommended,
Designed by Steve Shumate Adapted from the North Star design by Laddie Mikulasko
 Model Aero Polaris Specifications: Designed by Steve Shumate Adapted from the North Star design by Laddie Mikulasko Wing area: 343 sq in Span: 29.0" Length: 38.4" Weight RTF: 18 to 22 oz (prototype weighed
EXTRA 330SC 60CC. Item No:H G Specifications cc gas DA50,DA60, DLE55, DLE60(twin), 3W55. Description
, 3W55. Description") EXTRA 330SC 60CC Item No:H G060011 Specifications Wing Span Length Wing Area Flying Weight Gasoline Radio Description Carbon Fibre : 92" (2347mm) 84 1/2 " (2060mm) 1526.8 sq in(98.5sq dm) 16 17lbs(7300
EXTRA 330SC 60CC Item No:H G060011 Specifications Wing Span Length Wing Area Flying Weight Gasoline Radio Description Carbon Fibre : 92" (2347mm) 84 1/2 " (2060mm) 1526.8 sq in(98.5sq dm) 16 17lbs(7300
RYAN STA SAFETY PRECAUTIONS. "Sport Scale E-Power ARF" For Intermediate and Advanced Fliers. This radio control model is not a toy!
 RYAN STA "Sport Scale E-Power ARF" For Intermediate and Advanced Fliers. SAFETY PRECAUTIONS This radio control model is not a toy! First-time builders should seek advice from people with model building
Magpie AP. Aerial Photography Airplane
 Magpie AP Aerial Photography Airplane Magpie Specifications Length: 36in. Wingspan: 54in. Wing Area: 486in 2 Weight (without battery): 19 oz. Thank you for purchasing the Magpie AP. This model is an elevator/rudder
CARL GOLDBERG PRODUCTS, LTD.
 Eagle 400 WARNING A radio-controlled model is not a toy and is not intended for persons under 16 years old. Keep this kit out of the reach of younger children, as it contains parts that could be dangerous.
90 WING SPAN P-51D MUSTANG (COPYRIGHT PROTECTED 2014) ALL RIGHTS RESERVED
 ALL RIGHTS RESERVED") 90 WING SPAN P-51D MUSTANG (COPYRIGHT PROTECTED 2014) ALL RIGHTS RESERVED GENERAL INSTRUCTIONS This design is basically an enlargement of the very popular fun scale Mustang 60 Size. You can build it light
90 WING SPAN P-51D MUSTANG (COPYRIGHT PROTECTED 2014) ALL RIGHTS RESERVED GENERAL INSTRUCTIONS This design is basically an enlargement of the very popular fun scale Mustang 60 Size. You can build it light
MECOA EZ-4061 Trainer
 MECOA EZ-4061 Trainer EZ-4061 is a newly designed, Almost Ready to Fly kit. It is an extremely easy to control trainer with strong construction and excellent aerodynamic performance. This is a great choice
Print template tiles and put together with clear tape to complete template.
 Print template tiles and put together with clear tape to complete template. Cut each pattern out with scissors or use a razor and strait edge ruler. Use the ruler as a guide for the razor to get nice strait
The Olympic DLG. (Discus launch glider) by Chris Brislin
 by Chris Brislin") The Olympic DLG (Discus launch glider) by Chris Brislin 1 Contents Parts List/ What you need 3 Before you begin 4 Wing Construction 5-9 Pod Construction 9-13 Tail assembly 13-? Control linkages 9-10 Finishing
The Olympic DLG (Discus launch glider) by Chris Brislin 1 Contents Parts List/ What you need 3 Before you begin 4 Wing Construction 5-9 Pod Construction 9-13 Tail assembly 13-? Control linkages 9-10 Finishing
Elevator Rudder Airbrake Aero-tow release (optional) Throttle (electric version)
 Throttle (electric version)") Building Instructions Fauvel AV-361 RC glider Order No. 1363/00 Specification: Wingspan: Length: Wing area: Weight, glider: Wing loading: Weight, electric glider: Wing loading: RC functions: Recommended
Building Instructions Fauvel AV-361 RC glider Order No. 1363/00 Specification: Wingspan: Length: Wing area: Weight, glider: Wing loading: Weight, electric glider: Wing loading: RC functions: Recommended
MiniacRC MIGHTY MINI P40 WARHAWK
 Hand-Cutting and Skins) MiniacRC MIGHTY MINI P40 WARHAWK FliteTest style RC model Build Instructions Make sure that the orientation for molded pieces such as the scoop rings and landing gear housings are
MOUNTAIN MODELS P-51 Mustang. 1/12 Scale Electric Park Flyer. Copyright Mountain Models
 1 MOUNTAIN MODELS www.mountainmodels.com P-51 Mustang 1/12 Scale Electric Park Flyer Wingspan: 37, Wing Area: 254 sq. in., Weight: 15 to 19.5 oz Instructions Version 1.4, May 23, 2007 Kit Contents: 2 1.
35 Magnum. Instruction Manual
 EPP EPP 35 35 Magnum Rebel Z Instruction Manual This is how your kit will arrive When cutting the hardware package open use caution. The contents are semi-coiled to fit in the box. They will spring open
Cheeper Assembly instruction
 1. Equipment, materials and tools for assembly.......2 2. Assembly.....3 3. Setting of the model.....11 1. Equipment, materials and tools for assembly 1 Wing; 2 Fuselage; 3 Stabilizer; 4 Fin; 5 Dowel for
Park Scale Models AT-17 Bobcat Assembly Manual
 Park Scale Models AT-17 Bobcat Assembly Manual Fuselage Construction 1. Glue the two ¼ balsa servo rails SR to BB5. SR BB5 2. Assemble the wing mount block by gluing WM1(x2), WM2 and WM3 together as shown.
CARL GOLDBERG PRODUCTS, LTD.
 Chipmunk 400 WARNING A radio-controlled model is not a toy and is not intended for persons under 16 years old. Keep this kit out of the reach of younger children, as it contains parts that could be dangerous.
FLITZEBOGEN-2 Assembly instructions
 FLITZEBOGEN-2 Assembly instructions Trim the end of the fuselage to the length of 925mm from the nose. Be careful to avoid splitting the carbon fibers. Sand the base of the stab mount in preparation for
Specifications Wingspan: 43cm Flying Weight: 33 grams (with battery) Channels: 3 Suggested Receiver: 4Ch Micro Motor: 7mm Brushed Geardrive
 Channels: 3 Suggested Receiver: 4Ch Micro Motor: 7mm Brushed Geardrive") Specifications Wingspan: 43cm Flying Weight: 33 grams (with battery) Channels: 3 Suggested Receiver: 4Ch Micro Motor: 7mm Brushed Geardrive Airframe Kit (Included Contents) * Airframe Parts Sheets (Depron)
Specifications Wingspan: 43cm Flying Weight: 33 grams (with battery) Channels: 3 Suggested Receiver: 4Ch Micro Motor: 7mm Brushed Geardrive Airframe Kit (Included Contents) * Airframe Parts Sheets (Depron)
ITEMS NEEDED TO COMPLETE KIT INCLUDES. GWS EPS-400C-DS(3:1) or BL motor (4~5.33:1 geared, 10~13A)
 or BL motor (4~5.33:1 geared, 10~13A)") SUPER DECATHLON INSTRUCTIONS KIT INCLUDES www.estarmodels.com ITEMS NEEDED TO COMPLETE Full size plan Lasercut parts 1.5mm(1/16 )xl600mm(24 ) balsa : 1sheet 1.5mm(1/16 )xl500mm(20 ) balsa : 2sheets 1.5mm(1/16
SUPER DECATHLON INSTRUCTIONS KIT INCLUDES www.estarmodels.com ITEMS NEEDED TO COMPLETE Full size plan Lasercut parts 1.5mm(1/16 )xl600mm(24 ) balsa : 1sheet 1.5mm(1/16 )xl500mm(20 ) balsa : 2sheets 1.5mm(1/16
Venturi EVO 2 FPV. Thank you for purchasing the Venturi EVO FPV wing
 Thank you for purchasing the Venturi EVO FPV wing The Venturi FPV is designed for First Person Viewing (FPV) and for UAV/Drone experimentation. There is a power system for this model, see the website for
Cleveland Quickie Luscombe Silvaire
 Cleveland Quickie Luscombe Silvaire This plan package is not a 100% copy of the original kit. As you make your way through the instructions you will see the differences. Here s just a few of them: The
Ryan STA Sport Scale Model Aircraft Assembly and Instruction Manual
 Ryan STA Sport Scale Model Aircraft Assembly and Instruction Manual Warning: This radio controlled model is not a toy. It requires skill to fly and is not recommended for the novice pilot. It should not
Building Tips This model can be built using the following types of adhesives:
 Page 1 Building Tips This model can be built using the following types of adhesives: Epoxy (with or without microballons) Odorless cyanoacrylate (CA) with accelerator UHU Creativ for Styrofoam (or UHU
Cessna 185 INSTRUCTION MANUAL SAFETY PRECAUTIONS
 Cessna Specification: Length :0 mm(") Wing Span :00 mm(.") Wing Area :. sq. dm.9 sq. ft Wing Loading :7. g/sq. dm. oz/sq. ft Flying Weight :. kg(. lbs) Radio :ch&9 servos Engine :0 -cycle 0 -cycle INSTRUCTION
Parkflyer F6F Hellcat
 Parkflyer F6F Hellcat Page 1 of 19 MOLT MODELS Background Design Philosophy When I was first introduced to this hobby seventeen years ago I saw my first WWII warbird and I was hooked. Several years later
FOKKER D.VII 1:7.4. No.EP-46K. MTH HOBBY PRODUCTS INDUSTRIAL CO., LTD. MTH HOBBY 2015
 No.EP-46K FOKKER D.VII 1:7.4 MTH HOBBY PRODUCTS INDUSTRIAL CO., LTD. www.mth.com.tw mthhobby@mth.com.tw MTH HOBBY 2015 SPECIFICATION: Wing span: 1200mm Wing area: 41 dm Length: 990mm Weight: 1400g, including
BUILDING THE A6M2 ZERO
 BUILDING THE A6M2 ZERO Product Support (Do Not Remove From Department) TOP FLITE MODELS, INC CONGRATULATIONS' You now own the most accurate R/C Stand-Off Scale kit ever produced We at Top Flite hope that
25mm EPP SU31. Instruction Manual. Specifications
 25mm EPP SU31 Instruction Manual Specifications Wingspan: 39.4in (1000mm) Length: 42in (1070mm) Wing Area: 448sq in (28.9sq dm) Flying Weight: Approx. 1.5lb (650-710g) Dear Customer, www.valuehobby.com/su31-epp.html
B-25 Mitchell INSTRUCTION MANUAL SAFETY PRECAUTIONS
 B-5 Mitchell Specification: Length :935 mm(76.") Wing Span :0 mm(95") Wing Area :77.6 sq. dm 7./sq.ft Wing Loading : g/sq. dm oz/sq. ft Flying Weight :0 kg(. lbs) Radio :6ch&3 servos Engine(a pair) :9
6mmFlyRC.com Super Bandit Assembly Instructions
 Assembly Instructions Start the assembly with forward fuselage. Lay the two fuselage sides down on a flat surface and glue the foam corner doublers to the locations shown on the plans. Make sure to make
Eva. Extremely Versatile Airframe
 Eva Extremely Versatile Airframe Eva Specifications Length: 32 Weight (without battery): ~12oz. Revision History Date Revision Notes/Comments 6/3/05 Document initial creation. Thank you for purchasing
Admas A500. Specification:
 Admas A500 Specification: Length :07 mm(8.7") Wing Span :00 mm(9.5") Wing Area :8.8 sq. dm 5.5 sq. ft Wing Loading :3 g/sq. dm 53.7 oz/sq. ft Flying Weight :8 kg(7.lbs) Radio :ch &3 servos Engine : -cycle
Zlín Z-37A Čmelák ("Bumblebee ) 850 mm. Assembly Instructions and recommended equipment of the RC model
 850 mm. Assembly Instructions and recommended equipment of the RC model") Zlín Z-37A Čmelák ("Bumblebee ) 850 mm Assembly Instructions and recommended equipment of the RC model 1 Technical information: Wingspan: Overall Length: Flying weight: RC Functions: 850 mm 610 mm ~380
Zlín Z-37A Čmelák ("Bumblebee ) 850 mm Assembly Instructions and recommended equipment of the RC model 1 Technical information: Wingspan: Overall Length: Flying weight: RC Functions: 850 mm 610 mm ~380
43in EPP Acrocub Instruction Manual
 43in EPP Acrocub Instruction Manual Specifications Wingspan: 43.3in (1100mm) Length: 41.3in (1050mm) Flying Weight: Approx. 1.5lb (670g) Dear Customer, Congratulations on your purchase of 43in EPP Acrocub
L 410 UVP-E Turbolet. Recommended equipment and guide for the building of RC model aircraft.
 L 410 UVP-E Turbolet Recommended equipment and guide for the building of RC model aircraft. - 1 - History of L-410 It has been 45 years since the first small commercial L-410 prototype took off. The first
Extra 330LT CC. 2 Colour schemes H-G120001A ORACOVER FERRARI RED # ORACOVER WITH # ORACOVER BLACK # ORACOVER SILVER #
 Extra 330LT 85-125CC Item No:A-G120001 Specs: WING SPAN: LENGTH: WING AREA: FLYING WEIGHT: ENGINE: RADIO: Description Covering Material Carbon Fibre: 111 (2833mm) 100" (2530mm) 2139sq in (138sq dm) 25.3-28lbs
uin RC FPRC ZERO Specificationss Empty Weight
 Flying Pengu uin RC FPRC ZERO Specificationss Wing Span 42.75 (1085 mm) Fuselage length 30.5 ( 775 mm) Empty Weight 9.5 10 oz. (150 160g) Estimated Flying Weight 20 255 oz. (320 400g) Wing Area: 151 sq.
Instructions - Stobel V2
 Instructions - Stobel V2 Congratulations on the purchase of your Stobel, a high end DLG-competition model from LE-composites. We hope you will be happy and successful. To ensure the optimum build we ask
F3A -70E ASSEMBLY MANUAL
 F3A -70E ASSEMBLY MANUAL The new F3A-70E, was designed in an extremely lightweight structure, the all wood airframe, and the new revolutionary Lift Generator on landing gear give the F3A-70E an impressive
GYM-E. Instruction Manual - Version 1.03
 GYM-E Original Design by Todd Long Instruction Manual - Version 1.03 Span 31 in. / Length 27 in. / Area 265 Sq. In. / Weight 4.5-6.5 oz. Gym-E kit reproduced with permission by Stevens AeroModel 2008 Stevens
For Fuselage Assembly.
 1.Find these Parts First. 2.Take out F11, F12 For Fuselage Assembly. 3.Assemble F13 as below. Do not glue!!! 4.Assemble F4 as below. Do not glue!!! Do not glue!!! 5. Assemble F16 Do not glue!!! 6. Turn
BUILDING INSTRUCTIONS FOR FINEWORX. Miles. 2M Class Competition Glider. Congratulations! You have purchased our Miles, 2M Class Competition Glider.
 BUILDING INSTRUCTIONS FOR FINEWORX Miles 2M Class Competition Glider Congratulations! You have purchased our Miles, 2M Class Competition Glider. The Miles is the first offering from FINEWORX, a new company