Photo-Etch Demonstration Notes. Presented at the AMPS Central SC August 11, 2011 Meeting
|
|
|
- Shannon Floyd
- 5 years ago
- Views:
Transcription
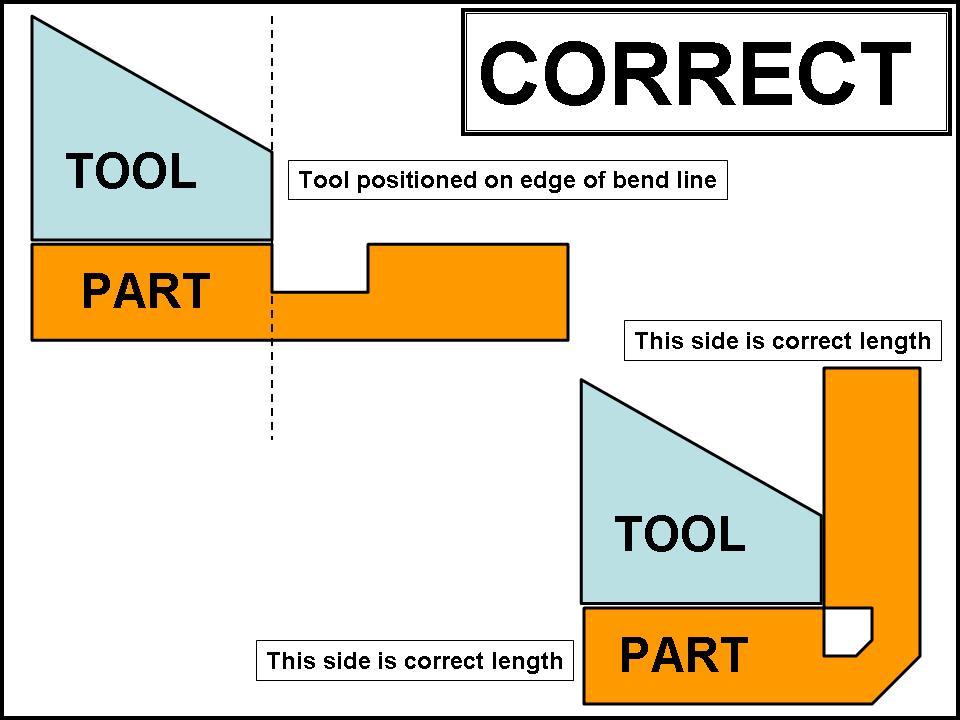
1 The basic steps in using PE up-date sets: Photo-Etch Demonstration Notes Presented at the AMPS Central SC August 11, 2011 Meeting 1. Plan Use 2. Cut Part from Fret / Clean up Burrs 3. Bend / Form Part (as needed) 4. Join PE Parts to Each other to form Sub-Assemblies (as needed) 5. Attach PE Parts / Sub-Assemblies to Model 6. Texture Welds / Fill Seams (as needed or desired) 1. Plan Use of PE Parts Is the PE Part Better or Necessary? Review Kit Instructions / Make Notes as Needed Review PE Instructions Review References What is the best sequence of Construction? Will Subsequent Bends Interfere with each other? Can joins be soldered without unsoldering previous joints? (Use varied melting temp solders or wet paper masks) Can details be embossed without deforming the part? Does the part need to be annealed for forming or embossing? 2. Cut Part from Fret / Clean up Burrs Hard cutting surface (glass or ceramic tile) Cutting tool (knife or scissors) Control cut-off part from flying away (Anti-Carpet Monster Techniques) Sanding / Filing Burrs (Flexi-File, Sanding Block, Needle Files, Sanding Sticks) Hold small parts with tweezers close to burr to keep control and prevent deformation. 3. Bend / Form Part (as needed some parts don't need to be formed) Tools" Tweezers Flat-tip Pliers Hemostats Bending Tools Etch Mate, Hold 'n Fold Soft / flexible surface for bending curves Annealing Gas flame (stove, torch, candle) Correct Use of Bending Lines (bend INTO the line usually!) Bending Sequence Embossing details Bending Curves Use soft surface Rollers 4. Join PE Parts to Each Other Glues (weak but easy to use) CA Two-Part Epoxy Soldering (hard to use but strong) Irons Electric or Gas Torch Solder Types High / Low Temp, 60:40, Rosin Core Cut Solder to useful size Flux Tinning Flux: Paste, Acid Flux: Liquid Apply and melt Flux How to Hold Parts? Apply heat and melt solder Solder will not flow until underlying metal is also at solder melting point. Tinning Technique
2 Use Brass / Copper Wire Filler for Large gaps in Joints and Seams Use Wet Paper Towel to Protect other Joints from Heat Reinforce / Hold with wire to protect other joints Clean up excess solder, Smooth Joints, Putty and Filler as Needed 5. Glue PE Parts / Sub-Assemblies to Model Glues CA Use rubber cement on tooth pick to position small parts Epoxy Use "puddle-dip" technique Layout / Positioning Use other parts to ensure correct spacing / positioning 6. Texture Welds / Fill Seams (as desired) Epoxy putty "welds" add strength to PE-model joints.

3
4 Examples of Sequence of Construction Note that the instructions simply show the parts already folded / bent to shape and where the parts are joined. However, it is up to the model builder to decide how to actually construct the assemblies, to include how to fold the parts, what sequence to use, and how to join the parts together. Simply changing the sequence of steps can have a significant impact on the final appearance of the finished parts. This is typical and common in all PE up-date sets and is nothing new here. PE sets require a great deal of thought on the part of the model builder. However, the more of them you do, the easier they become to figure out. This particular set also assumes that the builder has a certain level of knowledge about the Panther tank or access to references. There are several options available and parts are included for Panther Ausf. G tanks manufactured from the very beginning until the end of the war. This is also common with PE up-date sets: Most assume that the builder is very familiar with the subject. Example 1 - PE Detail Set Page 1: Rear Stowage Boxes This is the approximate process that I used to build my boxes. Stowage Boxes parts A28 and A29 1. Cut part from fret. 2. Clean-up burrs using Flexi-File. 3. Anneal part using gas torch. Prepare weather lip part A27B. Note that A27B is shorter than A27A and fits the opening in the box better and the lids parts A23 fit better on lips A27B than on A27A. I don't know how the lids D17 work. If you're going to build the boxes closed, you might not need to install the weather lips A27B and might be able to use lids D17. Test fit to see how this looks first. 1. Cut part from fret. 2. Clean-up burrs using Flexi-File (use tweezers to hold part) 3. Fold part into hollow square. Note that the "lip" should be on the outside of the part after folding, so the bend lines must face down. Prebend slightly to mark bends on side opposite of lines, then turn over and bend. 4. Fit this part into the square opening in part A28 (A29). Part A27 B might need to be shortened slightly to fit into A28 (A29). Note that this part should fit snugly. Solder part A27B into opening of A28 (A29) 1. Apply flux. 2. Melt flux. 3. Apply solder "chips" Fold part A28 (A29) 1. Fold the opening that has part A27B soldered into it first. 2. Fold sides. 3. Leave back of box open 4. Adjust sides for best fit at joints Solder side joints 1. Apply flux. 2. Melt Flux. 3. Apply solder "chips"
5 Note that there may be some joints that will not fit tightly and remain square. If necessary, apply straight sections of brass wire to inside of any open joint after flux, but before solder "chips" Emboss the stiffening ribs on box face by burnishing from inside of box with back open. Fold back of box closing box. Note, may need to use a wrap of wire around the box to hold back tightly to sides. Solder back of box. Note that the back only needs to be soldered along centers of the edges and not completely around its circumference. However, the top joint behind the square opening will still be visible after the box is finished. 1. Apply flux. 2. Melt flux 3. Apply solder "chips" 5. Clean-up joints around the back edge of the box so that the mounting frame part A30 (A31) will fit cleanly. Prepare part A30 (A31) mounting frame. 1. Cut part from the fret. 2. Clean-up burrs using Flexi-File (thread the Flexi-File strip into opening to clean inside burrs) 3. Fold / bend three sides. Do not bend the bottom side (with tabs and holes). Slightly "over" bend the three sides. Fit part A30 (A31) mounting frame to back of box A28 (A29). Note that the folded sides will "clamp" to the box if they are slightly "over" bent, but if bent too far from square, part A30 (A31) will not fit. Like "Goldie Locks," not too little, but not too much. Solder the mounting frame part A30 (A31) to the box. Note that the solder can be applied to the inside centers of the frame so that the solder will not be visible on the finished box on the model. Also, using a wrap of brass wire to hold the frame onto the box might be helpful. 1. Apply flux. 2. Melt flux. 3. Apply solder "chips" Complete bend / fold on bottom edge of mounting frame. Consider soldering the center of the bottom edge. Fold the tabs so that they're parallel to the back of the box / frame assembly. Prepare the mounting hooks A46 1. Cut parts from fret 2. Clean-up burrs. Use tweezers to hold parts. Fold / bend hooks. Note that the two folds / bends must go in opposite directions. So, make the first bend on the part of the hook with the bolt in the bending break table. Take the part out and now use the back of the bending break to clamp the part along the bending line. Bend up. Tin the mounting frame at the holes on the top edge of the frame. 1. Apply flux 2. Melt the flux 3. Apply a single "chip" of solder Tin the attaching points on the mounting hooks A46 1. Apply flux 2. Melt flux 3. Apply a single "chip" of solder 4. Hold in cross-lock tweezers 5. Heat
6 Solder tinned mounting hooks to frame 1. Hold hooks in position on mounting frame 2. Heat until solder melts 3. Stop heat as soon as solder melts Example 2 PE Detail Set Page 3: Front Fenders Note the instructions suggest embossing the stiffening ribs and rivet details while the fender parts B2 (B3) are still flat. Embossing the details before the fender sides are joined to the fenders allows the deformations imparted during the embossing to affect the final fit and finish. Therefore, I recommend the following sequence. Fenders parts B2 (B3) 1. Cut the part from the fret 2. Clean-up the burrs using a Flexi-File and sanding block 3. Anneal the part using a gas torch Bend the curved section of the fender. Note the curve starts along a line where the fender edge bend lines meet the fender side edges. The top of the fender is flat. Use a wooden dowel section and a soft / flexible surface to bend the curve. Match the curve to the radius on the fender edges. This will probably have to be adjusted after the fender edges are folded / bent. * Be careful and do not bend the fender edges when you bend the curve into the fender! Fold / bend the fender edges. * Note there is a small tab on the end of the long curved edge that must be bent to a 90 degree before bending the edge. Get this small tab bend as sharp as possible. Adjust the fender curve to match the curve on the edges. These will fit fairly tightly with some work. Solder the fender edges. 1. Clamp the fender edge and fender together tightly using cross-locking tweezers. 2. Apply flux 3. Melt flux 4. Apply solder "chips" 5. Heat Emboss the rib and rivet details. The instructions recommend using a turned brass scale ammunition round. This works well, but I recommend rounding the point of the brass ammunition round so that its tip is about ½ to ¾ the width of the etched grooves and holes. A super-fine ball point ink pen might work as an embossing / burnishing tool. Make sure that the tip isn't too large, though, or it will not give a "crisp" look to the work. 1. Use a soft surface for embossing the ribs. 2. Emboss the rivets in a small hole used as die 3. Use a small hammer to tap the punch to emboss the rivets. Count the number of "taps" and be consistent in the amount of force used to make the rivets the same size. For the first two or three rivets, check the size after each tap to determine the number of taps needed. 4. When embossing the ribs, count the number of "scribes" used in the same way as described for the rivets. Adjust the fender so that it is as "flat" across its front and rear edges as possible. Embossing the ribs and rivets will impart a side-to-side curve in the fender that must be bent out using finger pressure. Do not clean-up the solder joints on the outer edges of the fenders until the reinforcement part B4 (B5) has been soldered in and the clevis flap part B6 (B7) and the hinge part C26 have been soldered on. Tinning the hinges parts C26 and their mounting locations on the fenders parts B2 (B3) and clevis flaps parts B6 (b7) will make adding them easier than regular soldering.
7
8 Unidentified or Optional Parts Included in this PE Set Several optional parts are listed on page 5 of the instructions or in the body of the instructions. Note that early production Panther G models had the Panther A rear stowage box mounts and tail light (mounted on the left rear box) (pg. 1). Note that these Panther A mounts on the Panther G did not include the heat shields (D1 and B74). These were only used on the Panther A. This kit includes optional parts for all three types of rear exhausts set-ups (pg. 2). This kit includes the IR equipment stowage box for the right rear. However, the model builder must add the four mounting tabs for this box (pg. 1). There are two different chains for the gun travel lock. Parts C21 are for the lock around the gun barrel and C23 are for the lock "loose." (pg. 3) The Schurtzen locks, parts B20 + B19 were only used on the first and last Schurtzen mounting holes even though the kit gives you enough for every hole. (pg 5) Any number of heater cover parts C10 can be used on either the heater or shown stowed. (pg. 2) The right side winter intake covers C5 + C2 + C3 can be shown open or closed in combination with using heater covers C10. (pg. 2) The Anti-aircraft (AA) Machine Gun (MG) mount parts D13 + A38, 39, and 40 is only used on the cupola ring. On some late Panthers, this ring was not installed. (pg. 3) On page 5, the instructions list a bunch of Fret B parts (47, 48, 57, 59, 33, and 34) for relocating the tools onto the rear deck. You need to check your references for this unit modification. The standard factory set up is shown in the instructions. Fret A A24 + A25 Turret Rear Door Hold-Open Catch A50 AA MG Ring Sights. These are for the MG when it's mounted on the commander's cupola. A35 + A36 15 / 20 Ton Jack Body A37 Jack Block Reinforcing Straps (shown on PE inst. Pg 4) A3 "Closed" has Bolts in Holes (check references) A4 "Open" the Bolts are not in the Holes (check references) Fret B B60 Combine with B58 to make a correct / complete shovel head. B60 is the inside and B58 is the outside. B1 Stern Antenna for Befehls Panther. Requires either scratch-building the mount or a different kit. Two Un-numbered Parts on upper Right Corner of Fret B are the Mast Mounts that go on the Right Rear Stowage Box of the Befehls Panther. These parts roll into tubes, one with a closed end (lower mount). Fret E E10 The Lifting Cap for the Jack E11 Cool Little Cog Shapes E4 + E5 Type 2 Tool Clamps for Ax and Wire Cutters. These can be substituted by parts E1 + E2 Type 1 Tool Clamps. There are enough Type 1 clamps for the entire vehicle. Vehicle is correct either way depending on references.
AMPS Central SC "Wildcats" Group-Build No. 2 AM-Works, LW35054 Panther Ausf. G PE Detail Set Build Notes and Tips: Up-date 2
 AMPS Central SC "Wildcats" Group-Build No. 2 AM-Works, LW35054 Panther Ausf. G PE Detail Set Build Notes and Tips: Up-date 2 (Note that this Up-Date includes the original PE Part Comments in "PE Demonstration
"How-To" Build Alliance Model-Works WWII German Vehicle Tool Clamps
 Special "How-To" Edition Published by AMPS Central South Carolina October, 2011 "How-To" Build Alliance Model-Works WWII German Vehicle Tool Clamps The Alliance Model-Works (AM-Works) German WWII vehicle
1Smooth pieces 4, 5 and 6, using
 Yamato: Step-by-step 109 Machine-guns, anti-aircraft guns and decking h e f a b c g d e f a Anti-aircraft gun base x 2 b Anti-aircraft gun (bottom) x 2 c Anti-aircraft gun (top) x 2 d Machine-gun base
CUT OUT FLARES INSTALLATION INSTRUCTIONS FOR 20017, 20018, F100-F150 F250-F350 P.U. & BRONCO CUT OUTS
 20017 04/22/03 REV-A CUT OUT FLARES INSTALLATION INSTRUCTIONS FOR 20017, 20018, F100-F150 F250-F350 P.U. & BRONCO CUT OUTS Tools Required for Installation: (A) 3/16 Drill Bit (B) Pop-Rivet Gun (C) Air
Cobra X Q Construction Tips Construction: Bel y pan
 Cobra X Q Construction Tips : The white plastic in this kit is high impact styrene. It can be painted with most types of coatings if light coats are applied this is necessary due to the thickness of the
Heat, Color, Set & Fire
 LARK JEWELRY & BEADING Heat, Color, Set & Fire Surface Effects for Metal Jewelry MARY HETTMANSPERGER Liquid Enamel Necklace Liquid enamel applied over a copper wire coil creates a pendant with great texture.
Scratchbuild A Backwoods Water Tank Part V - Making the Frost Box and Hanging the Water Spout
 Scratchbuild A Backwoods Water Tank Part V - Making the Frost Box and Hanging the Water Spout By Dwight Ennis In this section, we're going to make the Frost Box, and we'll build the Spout Hanger Assembly
BRF-022 YGH SEALION. Building Instructions
 Tel 07747 018544 www.prmrp.com BRF-022 YGH SEALION Building Instructions SCALE MODEL PRODUCT FOR ADULT MODELLERS ONLY. WHITE METAL CONTAINS LEAD WASH HANDS AFTER USE. MAY CONTAIN SMALL PARTS. ETCHED BRASS
BRF-020 Type YCV Turbot Spoil Wagon. Building Instructions
 Tel 07747 018544 www.prmrp.com BRF-020 Type YCV Turbot Spoil Wagon Building Instructions SCALE MODEL PRODUCT FOR ADULT MODELLERS ONLY. WHITE METAL CONTAINS LEAD WASH HANDS AFTER USE. MAY CONTAIN SMALL
joining materials - wood
 UNIT D E S I G N A N D M A N U F A C T U R E : C O U R S E M A T E R I A L Wood joints joining materials - wood The majority of joints used in woodcraft have been designed specifically to attain the maximum
7mm/0Gauge BRF 025 ZUV SHARK Plough Brake. Building Instructions
 Tel 07807 225801 www.prmrp.com 7mm/0Gauge BRF 025 ZUV SHARK Plough Brake Building Instructions SCALE MODEL PRODUCT FOR ADULT MODELLERS ONLY. WHITE METAL CONTAINS LEAD WASH HANDS AFTER USE. MAY CONTAIN
BRF-012 Type OTA Timber Wagon. Building Instructions
 Tel 07747 018544 www.prmrp.com BRF-012 Type OTA Timber Wagon Building Instructions SCALE MODEL PRODUCT FOR ADULT MODELLERS ONLY. WHITE METAL CONTAINS LEAD WASH HANDS AFTER USE. MAY CONTAIN SMALL PARTS.
Field of Armor. 1/6th SCALE TIGER 1 MODEL TANK INSTRUCTIONS
 Field of Armor 1/6th SCALE TIGER 1 MODEL TANK INSTRUCTIONS Items needed for construction: - Well ventilated, clean 4' x 4' working space - 1 can black or clear ABS Glue (available in plumbing section of
Slide the stock rubber tank mount caps onto the ends of the CS-1 tank mount:
 RYCA CS-1 BODY PARTS INSTALLATION GUIDE [The CS-1 installation guides should be used as supplements to the videos found on our Youtube Channel. There is no strict order to the build process, but it is
SAW-PIERCING. 79. Fig. 29. Placing new blade in saw-frame.
 SAW-PIERCING. 79 First make a full-size drawing of the hinge, then by means of transfer paper transfer the design of the butt end to the copper or brass. Then lay out the knuckles as shown in Fig. 28,
Make a Safe. Description. Lesson Objectives. Assumptions. Terminology
 Youth Explore Trades Skills Make a Safe Description Welding is a vast area in the metalworking field and a widely used joining process for metal. In this activity plan students will learn how to MIG weld
Design and Technology Resistant materials Key words and definitions
 Design and Technology Resistant materials Key words and definitions Word Acrylic Definition a type of thermoplastic, which is hard and can be transparent. Used to make shop signs. Perspex is a trade/brand
Turkey Football Panel
 Turkey Football Panel PROJECT TITLE: Turkey Football Turkey Football Panel A Stained Glass Project DESIGNED BY: Jeanne Baruth for Diamond Tech SKILL LEVEL: (Adult 1-5 1 being the easiest, 5 being difficult)
Installation for Full Size Polaris Ranger Crew Doors
 Installation for Full Size Polaris Ranger Crew Doors Order of Installation: Heater Doors Wiper on to Windshield Windshield Top & Back Panel Note: Most of the steps in these instructions need to be repeated
 ARIZ NA www.arizonamodels.com Lewis.30 cal MACHINE GUN KIT Assembly Directions- All Scales Reprinted with the permission of Air Age Publications Inc. Lewis Gun Arrangements use for option variations and
Trim down the piece of casting being pointed to with the tip of the pencil in the first picture. It is only the 'inboard casting that needs to be
 1. File off the moulding pips from the wheel flanges. File the ends of the tube smooth and de-burr. Assemble the wheel sets with a drop of car engine oil on the axles. Glue the wheel sets into place. 2.
BRF-014 Type SPA Steel Plate Wagon. Building Instructions
 Tel 07747 018544 www.prmrp.com BRF-014 Type SPA Steel Plate Wagon Building Instructions SCALE MODEL PRODUCT FOR ADULT MODELLERS ONLY. WHITE METAL CONTAINS LEAD WASH HANDS AFTER USE. MAY CONTAIN SMALL PARTS.
Solder Technique Studio Soldering Iron Fundamentals for the Mixed Media Artist
 Solder Technique Studio Soldering Iron Fundamentals for the Mixed Media Artist Giuseppina Josie Cirincione north light books CreateMixedMedia.com Cincinnati, Ohio Materials Basic soldering tool kit Solder,
THE APOGEE A 100-INCH AMA DURATION SAILPLANE FROM DYNAFLITE
 THE APOGEE A 100-INCH AMA DURATION SAILPLANE FROM DYNAFLITE Apogee is the intermediate sailplane designed to be competitive in AMA duration contests. Effective spoilers, rudder and full flying stabilizer
SAVVY OFF ROAD GAS TANK SKID INSTALLATION INSTRUCTIONS
 It is best to work with a fuel tank that has the least amount of fuel in it as possible. Thank you for purchasing the best skid on the market. Please follow these instructions and your installation should
Induction Heater Coil Kit Compact low voltage, high current induction coil
 Induction Heater Coil Kit Compact low voltage, high current induction coil Model: CT-400-KIT Features and Specifications High power water cool-able copper coil PCB Layout designed to reduce eddy losses
EXTREME LOAD no. TWO
 1602 - EXTREME LOAD no. TWO Kit Features: 22' 4 " x 14' x 3'-6 Oversize Load 49mm (1.9") actual height Bolt Head Details Welded Load Mounting Fins Painting Handles Tools Required: Hobby Knife Tweezers
Explorer Wiring Kit (assembled)
") Explorer Wiring Kit (assembled) For Vintage, Firestorm & Standard Series Please Read All Instructions Before Beginning. Tools you will need: Soldering Iron (35 watt preferably) Solder Wet Sponge Wire Clippers
Explorer Wiring Kit (assembled) For Vintage, Firestorm & Standard Series Please Read All Instructions Before Beginning. Tools you will need: Soldering Iron (35 watt preferably) Solder Wet Sponge Wire Clippers
SZD-10 bis CZAPLA ASSEMBLY MANUAL IN PICTURES
 1 RUDDER Plan and parts: 2 Assembly steps: Photo above: glue together rudder spar, ribs and trailing edge. Clamp spar to a flat surface (chipboard on the photo) and make sure the straight aligment of the
3Insert the second rod no. 4
 Yamato: Step-by-step 37 The stern block and searchlight control towers a b c d e f Recommended tools and materials Wood glue Sandpaper (no. 800 grain) Metal file Putty Craft knife For metal: Super Glue
WPS crew Doors Installation instructions
 WPS-132-133 crew Doors Installation instructions ORDER OF INSTALLATION FOR A COMPLETE ENCLOSURE OF A CREW WPS (Weather Protection System) IS AS FOLLOWS: 1. Heater 2. Rear Thresholds - Right Hand & Left
Piper Cherokee /3 scale. Construction Manual
 Piper Cherokee 140 1/3 scale Construction Manual STAB CONSTRUCTION 1. Remove foam cores from cradle and place on flat surface. Inspect pieces before you epoxy halves together making sure leading and trailing
Stream NXT - assembly instructions
 Stream NXT - assembly instructions Recommended settings CG (measured from root leading edge): Speed/launch camber (+down, near the wing root): Cruise camber (+down, near the wing root): Thermal camber
Tools and Tips: ( 1 )
") Tools and Tips: As you build instructions will show in my many picture manual how to assemble. You can use your own methods as you desire, my results are very good. A smooth, flat work surface is very
Tools and Tips: As you build instructions will show in my many picture manual how to assemble. You can use your own methods as you desire, my results are very good. A smooth, flat work surface is very
FINNEY7 4500G May17 SR 4500G TENDER. Fig 1. Original Appearance. Side raves Sanding gear Front water fillers TIA Water treatment system
 Fig 1. Original Appearance Side raves Sanding gear Front water fillers TIA Water treatment system 4500G - 3 Fig 2. Rebuilt Condition Cut down side raves with fire iron tunnels# TIA removed and replaced
Modular Locomotive System Instruction Manual for HBK22 Fowler Body Kit
 Modular Locomotive System Instruction Manual for HBK22 Fowler Body Kit Roundhouse Engineering Co. Ltd. Units 6-10 Churchill Business Park. Churchill Road, Wheatley. Doncaster. DN1 2TF. England. Tel. 01302
TOYOTA MOTOR EUROPE CA Products Division Tel : Fax :
 TOYOTA MOTOR EUROPE CA Products Division Tel : + 32 2 745 26 77 Fax : + 33 2 745 26 99 Ordering part numbers Comments Part Numbers Wooden floor one hatch PZ449-D3C42-11 one hatch with carpet PZ449-D3C42-01
FORWARD FUSELAGE SIDES & REAR TOP SKINS
 FORWARD FUSELAGE SIDES & REAR TOP SKINS WORK REPORT Step No. Check Parts / Tools Qty Preparations. 1 [ ] 6F5-3 Upper Front Longerons 2 2 [ ] 6F5-5 Heel Support 1 3 [ ] 6F5-2 Front Floor Skin 1 3 [ ] Firewall
Cardboard Model Buildings
 Cardboard Model Buildings Get more model kits from http://www.modelbuildings.org PRINTING & ASSEMBLY TIPS: These OO designs can easily be resized by reducing the print percentage as follows: OO scale is
SE5a Instrument Board part 2 - rev 1.1
 SE5a Instrument Board part 2 - rev 1.1 Fuel (Petrol) Valve This valve uses two circular name plates, eight brass screws, one black plastic base, copper wire and two black plastic risers. You can pick any
Billy Body Kit HBK5 CHECKLIST. Modular Locomotive System Instruction Manual for HBK5 Billy Body Kit. Checked
 Billy Body Kit HBK5 CHECKLIST 1 Cab body panel (folded). 1 Cab floor. 1 Cab front panel. 1 Roof. 1 Body tank support. 2 Boiler bands with M2 Long Steel Screws & Nuts fitted. 1 Brass dome. 1 Cast brass
Peter Krause ABN
 Peter Krause ABN 25 736 637 163 T/as O-Aust Kits PO Box 743 ALBANY CREEK QLD 4035 AUSTRALIA Phone +61 (0)7 3298 6283 (7.00pm to 9.30pm ONLY) Facsimile +61 (0)7 3298 6287 (24 hours) Mobile 0419 680 584
Continue gluing the remaining top parts ensuring the angled piece is glued well. Set aside and let dry. See photo below
 Radiator rev 1.1 The SE5a s radiator is one of the most recognized radiators in WW1. It is one of the components that defines the SE5a. The original SE5a has seen multiple radiator designs used during
1909 Santos Dumont Demoiselle
 Historic Wings 1:72 Metal Kit of the Copyright unknown 1909 Santos Dumont Demoiselle History, Notes and Assembly Instructions History Alberto Santos-Dumont was born in Brazil on July 20, 1873, the young
Tools and Tips: ( 1 )
") Tools and Tips: As you build instructions will show in my many picture manual how to assemble. You can use your own methods as you desire, my results are very good. A smooth, flat work surface is very
Tools and Tips: As you build instructions will show in my many picture manual how to assemble. You can use your own methods as you desire, my results are very good. A smooth, flat work surface is very
Palladian/ Keystone Models 202/204 Maintenance Kit
 Palladian/ Keystone Models 202/204 Maintenance Kit Please read all of the instructions before you begin. Confirm that you have all the necessary tools and parts required. Allow about one hour to complete
G. Building the Cab, Cab Roof and Cab Boiler Extension Page 14 and Backhead.
 G. Building the Cab, Cab Roof and Cab Boiler Extension Page 14 and Backhead. Cab. In order to ensure that the cab and tender would actually look right, as what often appears on a drawing is not always
SASKATOON, Saskatchewan
 CONSTRUCTION GUIDE AVRO ARROW (CONTEST VERSION) Copyright, Bill Jones, 2004 SASKATOON, Saskatchewan This is a work in progress, so there are a couple of rough areas ( I ll point out those that I m aware
Heat, Color, Set & Fire
 LARK JEWELRY & BEADING Heat, Color, Set & Fire Surface Effects for Metal Jewelry MARY HETTMANSPERGER 122 Heat, Color, Set & Fire Etched Copper Neckpiece Add a green patina on etched copper to create a
RATICAL HARD TOP INSTALL
 RATICAL HARD TOP INSTALL MATERIALS AND TOOLS REQUIRED AIR COMPRESSOR (5HP OR BETTER) DIE GRINDER (WITH WAFER THIN DISCS) PNEUMATIC AIR SHEARS DRILL WITH 1/16", 1/8", 3?16" BITS HAND OR AIR RIVET GUN AIR
Assembly Instructions 10 X 10 Aluminum Frame Building
 Assembly Instructions 10 X 10 Aluminum Frame Building 27 97 9 8 47 36 74 52 10 10 X 10 Square Building W/ Dome Includes: The Steel Entry Door with a Dead Bolt Lock assembly and Aluminum Door Frame. Metal
Basic Modeling: Mold Seam Profiles
 Special Edition Modeling Reference Basic Modeling: Mold Seam Profiles By Michael D. Roof Jeffrey A. Nelson AMPS #1632 AMPS #2102 AMPS Central SC Wildcats Manufacturing Flaws on Injection Molded Kit Parts
Modernizing Your Opel GT: Power Rear Quarter Windows
 1 Modernizing Your Opel GT: Power Rear Quarter Windows By Wayne Torman (wayneto@msn.com) My 1973 Opel was going to be in the shop for a few weeks, and I had finished stripping my $25 wrecked 1971 in the
Model 209 Fireback Replacement
 Model 209 Fireback Replacement Please read all the instructions before you begin the procedure. Confirm that you have all the necessary tools and materials. If you have any questions, technical support
Activity Joinery, Fastener, Adhesive, Welding & Bonding Identification
 Name: Date Completed: Activity 3.3.1 Joinery, Fastener, Adhesive, Welding & Bonding Identification Introduction When you look at a fine piece of furniture, such as a chair with many different parts, it
1Take the keel (3) and
 and") 1 The hull and the bridge 1Take the keel (3) and apply PVA wood glue in the second slot from the left: a toothpick may make it easier. Take care: the left end is the one that has a projection. THE HULL
1 The hull and the bridge 1Take the keel (3) and apply PVA wood glue in the second slot from the left: a toothpick may make it easier. Take care: the left end is the one that has a projection. THE HULL
METAL FABRICATION MECHANICAL
 METAL FABRICATION MECHANICAL Machine Screws Machine screws have a parallel thread and need a threaded hole to screw into. They come in a wide variety of materials and sizes and are used for semi-permanent
Ford Ranger / Bronco II Set Part # Rev B 5-04
 Ford Ranger / Bronco II Set Part # 21008 Rev B 5-04 Step 1: Prior to Installation: A) Fit: Verify the fit of the flares to vehicle. (Some filing, sanding, or cutting may be necessary to ensure proper fit).
1Use the metal file to smooth
 Yamato: Step-by-step 85 Parts of the bridge and the hull a b c d e f a Part of the bridge b Part of the bridge c Part of the bridge d Radar x 2 e Part of the bridge x 2 f Wire Recommended tools and materials
TRUE TECHNICAL SERVICE MANUAL - ALL MODELS. DOORS/DRAWERS/LIDS
 DOORS/DRAWERS/LIDS 55 56 NOTES DOORS/DRAWERS/LIDS Swing s 73 74 NOTES INSTALLATION OF A GDM-SWING DOOR Phillips Head Screwdriver (2) - 1/8" Drift Punches (forged) Top Bracket NOTE: It may be necessary
Gold Wire Paper Clip Chain Wire Jewelry Making Pattern #103
 Gold Wire Paper Clip Chain Wire Jewelry Making Pattern #103 More Jewelry Making Patterns at http://wire-sculpture.com/patterns/ Supplies Needed * Approximately 4 feet of 21 gauge 14 karat gold filled square
LocoGear. Technical Bulletin - 14 November 28, 2003 Copyright 2003 by LocoGear LIVE STEAM CASTINGS. Tech Bulletin - 14
 LIVE STEAM CASTINGS LocoGear Tech Bulletin - 14 John D.L. Johnson 3879 Woods Walk Blvd Lake Worth, FL 33467-2359 jjohnson@locogear.com www.locogear.com Technical Bulletin - 14 November 28, 2003 Copyright
ASSIGNMENT 4. Textbook Assignment: The point, edge, face, heel, and tang are the five parts of which of the following tools?
 ASSIGNMENT 4 Textbook Assignment: "Files," "Grinders and Sharpening Stones," "Scrapers," "Awls," "Bolt and Cable Cutters," "Glass Cutters," "Knives,' 'Pipe Cutting and Threading Tools," "Tube Cutting and
Additional Parts List:
 THE TIME MACHINE Additional Parts List: In addition to the cast resin parts enclosed in this kit, there should also be a plastic bag containing the following items needed to complete your time machine
Fasteners. Metal Fasteners, Joining, and Adhesives. Bolts. Metal Fasteners, Joining, and Adhesives
 Metal Fasteners, Joining, and Adhesives Fasteners Metal assemblies are often held together with fasteners, hardware devices that mechanically join or affix two or more objects together. Assembling with
Scratch Built: Live Steam Garratt
 Scratch Built: Live Steam Garratt BY Bill Allen Woodside, CA. USA (Live Steam/Topic: Garratt build photos) (Live Steam/Topic: Garratt Photos Boiler & Cab Construction) (Live Steam/Topic: Tools & Gizmos
PS 5077 cu. ft. Boxcar with EOC device. 1:29 scale resin craftsman kit. by Burl Rice
 PS 5077 cu. ft. Boxcar with EOC device 1:29 scale resin craftsman kit by Burl Rice www.burlrice.com Bill of materials (not included): Thick/medium viscosity CA PL adhesive, or Gorilla Glue Heavy Duty Construction
Terminating D /-0289 Subminiature SolderTact Contacts to Twisted-Pair Cable
 Print 12-Jun-03 1 of 11 Terminating D-602-0288/-0289 Subminiature SolderTact Contacts to Twisted-Pair Cable 1. Purpose and Scope This engineering standard contains the termination procedures, inspection
(a) Work gloves may be cloth, leather palm, or all leather; (b) Welding gloves are gauntlet-type gloves with high
 Work gloves may be cloth, leather palm, or all leather; (b) Welding gloves are gauntlet-type gloves with high") Figure 16-1 cuffs (a) Work gloves may be cloth, leather palm, or all leather; (b) Welding gloves are gauntlet-type gloves with high Figure 16-2 Welding boots should have smooth toes to prevent sparks from
Figure 16-1 cuffs (a) Work gloves may be cloth, leather palm, or all leather; (b) Welding gloves are gauntlet-type gloves with high Figure 16-2 Welding boots should have smooth toes to prevent sparks from
Tools: Sharpie, Square, Vise, Hack saw, Ruler, Punch, Hammer, File. 2. Cut the stock Place stock in vise and cut with hack saw
 Purpose: MAKE CATAPULT ARM Step 1 Tools: Sharpie, Square, Vise, Hack saw, Ruler, Punch, Hammer, File Materials: Flat aluminum ½ inch stock (see picture below) Gloves required 1. Pick up the aluminum ½
Any Questions? Contact us or Alligator Blinkie
 Alligator Blinkie The heart of this blinkie is a 12F1822 PIC produced by a company called Microchip. A PIC is a tiny, yet surprisingly powerful little computer. By itself, it can t do much it needs someway
Fryer's Trebuchet Paper Kits
 Fryer's Trebuchet Paper Kits Things you will need 7 sheets of card approx. 0.3 mm or 0.01 inches thick 1 sheet of paper to print out to download. 2 x 6-7 mm dowel or pencils 1 paper clip String 6 cms (2.5
WESTERN PISTOL.22 CALIBER SINGLE SHOT. Entire pamphlet Copyrighted by JACO Designs 1972
 WESTERN PISTOL.22 CALIBER SINGLE SHOT Entire pamphlet Copyrighted by JACO Designs 1972 This pamphlet contains the plans and instructions necessary to construct the Western pistol. This pistol breaks open
Set Part # Rev
 Set Part # 21007 Rev-3 06-06-11 Step 1: Prior to Installation: A) Bushwacker only approves installing the flares according to these written instructions with the hardware provided. WARNING: Failure to
Ford Pick Up Rear leaf Spring Kit Installation Instructions
 1948-1956 Ford Pick Up Rear leaf Spring Kit Installation Instructions 1-800-984-6259 www.totalcostinvolved.com Parts 48 inch leaf (2) springs (4) U-bolts 3/8-24 x l 1/4bolts (16) & nuts (2) 1/2-20 x 4
10. Wing prep and subassembly
 Date Section Objective: Construct and fabricate the sub-assemblies of the wing panel. Required Parts: Wing left 11gal PN104-300, Wing right 1gal PN104-400, Wing left 15 gal option PN104-322, Wing right
HARDWARE - TRUNK PARTS
 CLAMPS SLAT CLAMPS EDGE CLAMPS All shown are copies from an 1898 trunk. Stamped steel. 774533 774534 774530 Covers end of slat 774540 Covers joint of slats 7745 Clamps slat to trunk Item # Length Width
Important Note. Tools Required: Welder capable of fully welding 10 GA.135 steel
 INSTALLATION INSTRUCTIONS Frame Reinforcement Kit 11100 (Patent Pending) 1968-72 GM A-Body Coupe/Sedan Read Instructions FULLY before starting Installation Important Note Installation of this kit requires
Scissor Stool. Written By: Feitan
 Scissor Stool If the stool is going to be kept indoors simply rub all the pieces with a Minwax WipeOn Poly before assembling the stool. If it is going to go outdoors use Minwax SparUrathane and coat all
Replacing Hunting Case Springs
 Replacing Hunting Case Springs By Dave Coatsworth Pocket watch hunting cases have a pair of springs that latch the cover and cause the cover to open when unlatched. These are called, respectively, the
PRO Brake Operating Instructions
 PRO Brake Operating Instructions Tapco Products Company P R O 9 a n d P R O B r a k e s PRO Brake System PRO Cut Off Gauge Simplifies cutting. PRO Cut-Off Quickly, safely, and easily makes factory quality
Curved Metal Segmenting
 Curved Metal Segmenting A Tutorial by: David Washburn A.K.A djwood1 This tutorial was downloaded from The International Association of Penturners Introduction As I continue to learn about pen turning,
STANDARD CANOPY WORK REPORT B-1
 STANDARD CANOPY WORK REPORT B-1 No. Check Parts / Tools Qty _ Canopy Lock 1 [ ] 6E2-3 Canopy Hinge Block 1 2 [ ] 6E4-5 Canopy Side Frame 2 2 [ ] 6E2-1 Canopy Lock Assembly 1L + 1R 3 [ ] 6E2-4 Rear Lock
General Prisoner Transport Install Instructions PT-2-INST
 General Prisoner Transport Install Instructions PT-2-INST 50 or 60 high x 80, 100 & 120 inch long / Double Compartment Inserts Also refer to PT-A-3XX instructions for vehicle specific mounting measurements
WARNING. Failure to observe these instructions could lead to severe injury or death.
 INSTALLATION INSTRUCTIONS WINCH MOUNTING KIT Part Number: 80156, 80160 Application: 2008 Ford F150 Your safety, and the safety of others, is very important. To help you make informed decisions about safety,
Shay Cab - Floor & Roof
 Shay Cab - Floor & Roof Nelson Riedel Nelson@NelsonsLocomotive.com Initial: 1/20/04 Last Revised: 06/06/2004 Cab Floor: A cab floor was made at the same time as the tender floor. I was unhappy with some
Central New York Rocket Team Challenge 2018 Rocket Assembly Instructions
 Central New York Rocket Team Challenge 2018 Rocket Assembly Instructions Note: These instructions vary from those provided by the manufacturer of the rocket kits. There is also considerable varying discussion
VICTORIAN RAILWAYS GY WAGON
 C/- P.O. Rhyll, Victoria, 3923. VICTORIAN RAILWAYS GY WAGON Prototype Notes The GY wagon fleet was one of the largest single classes of goods vehicle in VR service and was primarily a bulk commodities
Elastic-powered Bus : Assembly Instructions
 Elastic-powered Bus : Assembly Instructions Assembly Instructions 1. Carefully cut out the parts. 2. Fold along the dotted lines, making mountain or valley folds as indicated. 3. Attach the glue spots
RSM DISTRIBUTION Presents
 RSM DISTRIBUTION Presents MOSQUITO By Jack Sheeks Photo _ Jack Sheeks Semi Scale Twin Stunter Wing Span: 58" Length: 37-3/4 Area: 579 sq. in. Engine: Two.35 -.40 www.rsmdistribution.com Call (951) 678
Palatine Models. The Palatine Models Alex Jackson Turner Bending Jig. Introduction
 Palatine Models The Palatine Models Alex Jackson Turner Bending Jig Introduction This jig was designed by Graham Turner and written about in the book Alex Jackson The Man and the Coupling by Dave Booth,
Post-Paint>Fuselage>Interior>Controls>Fit rudder pedals
 Post-Paint>Fuselage>Interior>Controls>Fit rudder pedals Objectives of this task: To fit the rudder pedals and steering links to the aircraft, and fit the rudder cable to the rudder pedals and set the deflection
Hatch Installation For Pygmy Solo and Double Kayaks
 Introduction/Overview Hatch Installation For Pygmy Solo and Double Kayaks The hatch kit consists of several wooden lips, strapping and hardware. The hatch is constructed by cutting a hole in your deck,
Tools for Plumbing. Introduction
 2 Tools for Plumbing Introduction So far, we have studied the importance of plumbing system, its stages and the role and responsibilities of a plumber. We will now look at the various tools that help a
Woodchip Loader All Scales
 Woodchip Loader All Scales Before Starting PREPARING BRASS The easiest way to remove the brass parts from the sheet they are produced on, is to use rail nippers. The brass is soft and won't affect their
FINNEY7 SR 5500G TENDER IN ORIGINAL CONDITION
 IN ORIGINAL CONDITION Fig 1. Original Appearance Side raves Sanding gear TIA Water treatment system 5500G - 3 5500G TENDER IN REBUILT CONDITION Fig 2. Rebuilt Condition Cut down side raves with fire iron
There are three primary units to this box: two three-sided trays (one made to fit over the other) and one case that wraps around the trays.
 and one case that wraps around the trays.") Instructions for Basic Drop-Spine Box by Sandra Liddell Reese There are three primary units to this box: two three-sided trays (one made to fit over the other) and one case that wraps around the trays.
Instructions for Basic Drop-Spine Box by Sandra Liddell Reese There are three primary units to this box: two three-sided trays (one made to fit over the other) and one case that wraps around the trays.
INSTALLATION INSTRUCTIONS FOR & Chevy CUT OUT FLARE
 40009 7/10/03 REV-A INSTALLATION INSTRUCTIONS FOR 40009 & 40010 Chevy CUT OUT FLARE TOOLS REQUIRED FOR INSTALLATION: Drill Motor Pop Rivet Gun Flat File Hair Dryer or Heat Gun Sawzall Jack and Jack Stands
Witch Hat Pendant By Valorie Clifton
 Witch Hat Pendant By Valorie Clifton Ah, Halloween! It s always been one of my favorite holidays. The kids and I like to watch Halloween movies. We decorate the house and enjoy the cooler temperatures
Directive Systems & Engineering 2702 Rodgers Terrace Haymarket, VA
 Directive Systems & Engineering 2702 Rodgers Terrace Haymarket, VA 20169-1628 www.directivesystems.com 703-754-3876 25 Element 7.4 wl. K1FO Designed Yagi, Model DSEFO432-25 ELECTRICAL SPECIFICATIONS Frequency