Intermediate Doll. Materials. Tools
|
|
|
- Roberta Brown
- 6 years ago
- Views:
Transcription
1
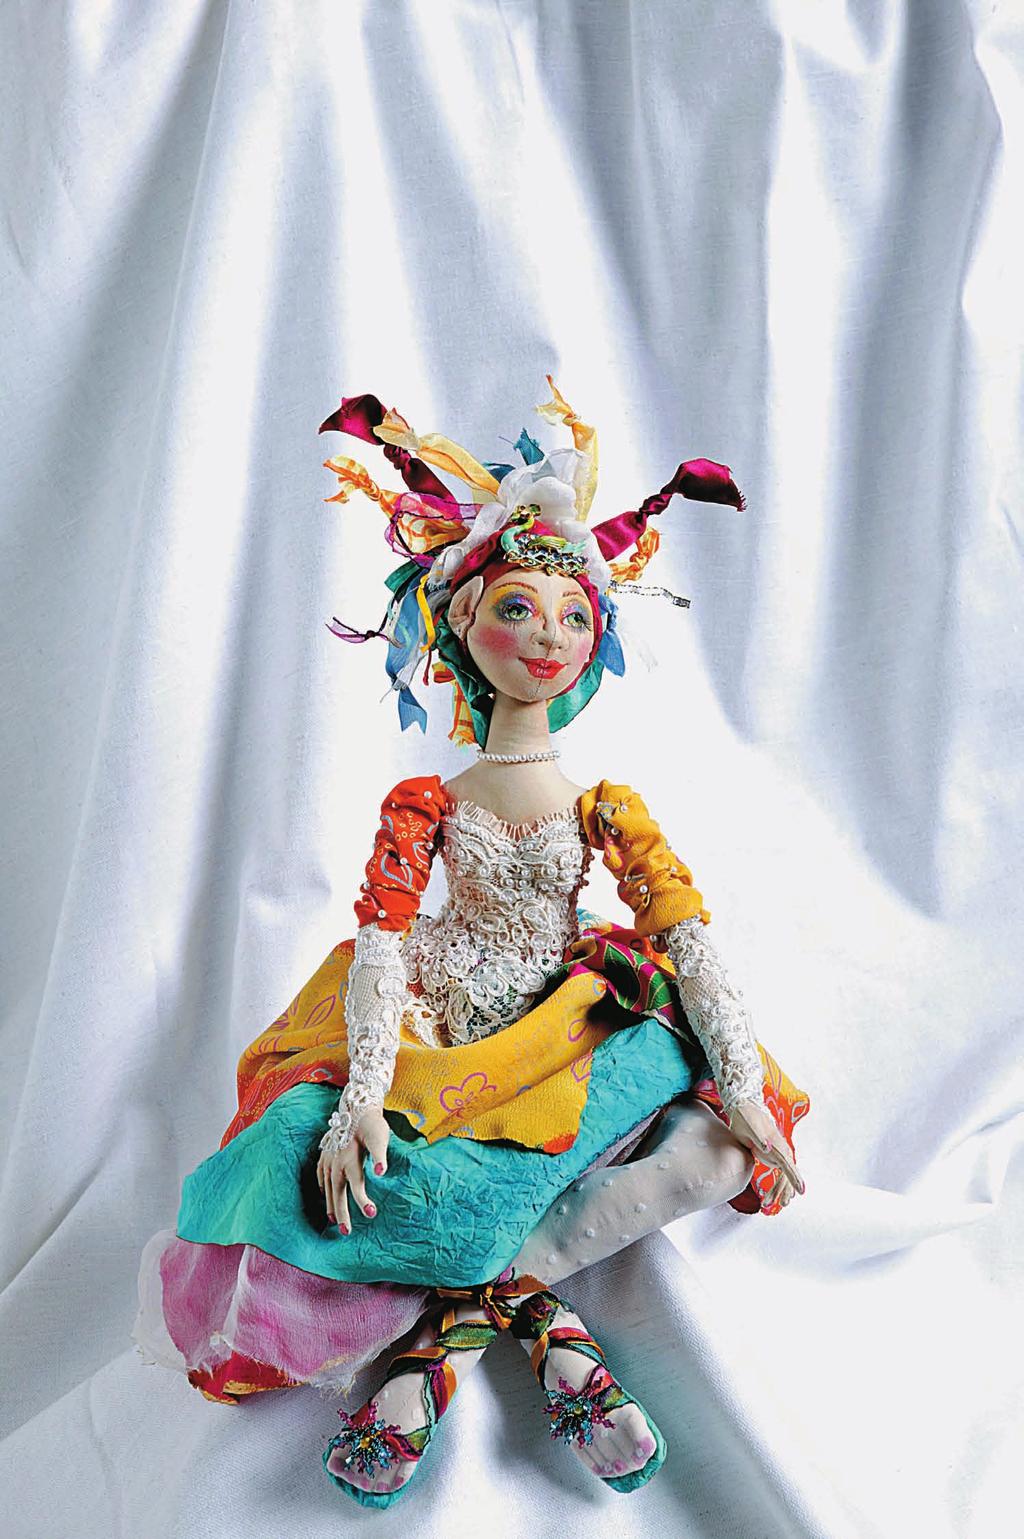
2 Intermediate Doll Tania is an elf princess who is getting ready for a grand affair. She is made with the second body pattern and the face pattern (pages in Creative Cloth Doll Collection). The body and clothing are very simple to put together, so that you can spend your time learning the sculpting and coloring techniques for the head. Materials 1 4 yard (23 cm) 100% cotton fabric in skin tones one 12-inch (30 cm) square cotton knit (a T-shirt will work great) thread to match the fabric mechanical pencil strong thread for sculpting, in colors to match the fabric; button, carpet, and upholstery thread work great stuffing 7 pipe cleaners colored pencils in sienna brown, beige, white, carmine red, scarlet lake, lavender, canary yellow, apple green, peacock blue, process red, and Mediterranean blue fabric pens in brown, black, red, blue, and purple white gel pen, or white acrylic paint and a small brush Ultimate Glitter Gel pens in pink, blue, orange, and violet Jacquard s Lumiere paint in Halo Pink Gold, or other metallic fabric paint Tsukineko s Fantastix for blending, or a small blending stick a piece of bridal lace; it can have sequins and beads pearl-colored beads, size 8, to match the bridal lace light-colored beading thread 1 4 yard (23 cm) each of 4 different colors of silk, or silklike fabric (the sample doll uses dupioni, crinkle crepe de chine, silk gauze, and a poly/silk blend) thread to match the silk 1 stocking from a pair of knee-hi s 1 small container of false eyelashes (can be found at drugstores) textile medium for fixing face brooch or antique pin for her headpiece various ribbons in colors to match her skirt; these ribbons can be from 1 4 (6 mm) to 1 (2.5 cm) wide. You will need 3 yards (2.7 m) of each color. silk ribbons, each 1 3 (7 mm) wide and 1 yard (0.9 m) long, in 3 different colors 12-inch (30 cm) square of craft felt Tacky Glue (or white glue) Tools toothpicks 3 (7.6 cm) doll sculpting needle turning and stuffing tools beading needle c r e a t i v e c l o t h d o l l c o l l e c t i o n 2

![3 c r e a t i v e c l o t h d o l l c o l l e c t i o n [Step 2] Sewing of back, Seam #4 author S S uggestion If you can t find really good-quality cotton for the body, use a cotton bed sheet that is](/docs-images/81/82796147/images/3-4.jpg "made of 100% Egyptian or pima cotton. 2. Sew Seam #4 on the center of the back, leaving open where marked. 3. Cut out. Sew the darts on both sides of the bottom of the back. 4.")
3 Instructions 1. Trace the head, ears, arms, hands, legs, breasts, and body pieces on the wrong side of the fleshcolored cotton (see pattern, pages in Creative Cloth Doll Collection). remember you ll need to trace two pieces each for the ears, arms, hands, and legs. 3 c r e a t i v e c l o t h d o l l c o l l e c t i o n [Step 2] Sewing of back, Seam #4 author S S uggestion If you can t find really good-quality cotton for the body, use a cotton bed sheet that is made of 100% Egyptian or pima cotton. 2. Sew Seam #4 on the center of the back, leaving open where marked. 3. Cut out. Sew the darts on both sides of the bottom of the back. 4. Place the front of the body on the fold, and then cut out. Pin the Body Front to the Body Back, right sides together. 5. Machine sew the body pieces all the way around, starting at the top of the neck. 6. Clip the curves, turn the pieces right side out, and fill the body firmly with stuffing. Place a pipe cleaner in the neck and pack stuffing firmly around the pipe cleaner. This prevents the head from drooping later. 7. Cut out the Breasts. Trace the darts and machine sew them, right sides together. [Step 4] Sewing front to back
.")

 14.")
4 8. Place a small amount of stuffing in each Breast. Pin the Breasts to the chest. 9. With your fingers, turn under the edges of the Breasts and hand sew them to the chest with a ladder stitch (see page 200 in Creative Cloth Doll Collection). Slip a little more stuffing inside each breast to fill them out. Close the Breasts, and set the body aside. 10. Machine sew the Legs all the way around, starting from the toes, leaving open where marked. Cut out the Legs with pinking shears. 11. Before turning, the toes must be sewn. Pin the toe section together with seams matching, as shown below. Draw in the type of feet you want, or use the guide in the illustration below. 12. Machine sew the toes along the line you drew. Clip the curves. 13. Cut slits at the top of each Leg, where marked. You will cut a slit only on one side. (See template, page 278 in Creative Cloth Doll Collection.) 14. Fill the Legs with stuffing through the slits, and then use a whip stitch to close them. Set the Legs aside. 15. Machine sew the Arms all the way around, starting from the opening at the wrist, leaving open where marked. 16. Cut out the Arms, clip the curves, and turn them right side out. Fill with stuffing. Set the arms aside. 17. Lower the stitch length on your sewing machine from 2.0 to Carefully machine sew around the Hands, leaving open where marked. When you get to the fingers, you must machine sew two stitches across each fingertip, and two stitches between each finger. Otherwise it will be almost impossible to turn the fingers. c r e a t i v e c l o t h d o l l c o l l e c t i o n 4 [Steps 18 19] Cut out hands after they are sewn [Steps 11 12] Illustration 3 Drawing and sewing toes 19. Cut out each Hand. Use your scissors to clip between each finger. Turn the Hands, using your favorite turning tools. Insert wires in the fingers, if you wish. Fill them with stuffing. 20. hand sew the Hands to the Arms. Don t worry about the stitches; the wrist will be covered up later on. Set the Arms aside. They won t be attached until the dress is on the body.

5 The Head 5 c r e a t i v e c l o t h d o l l c o l l e c t i o n author S S uggestion Why do I have you sew a tab on the back of the head? This gives you security when you fill the head with stuffing. And always start sewing with a backstitch. Along with the tab, this will guarantee that the seams won t split. 1. Machine sew Seam #1 on the Face, and Seam #2 on the Back of head, leaving open where marked. 2. Cut out the two pieces. open up the Face and the Back of head. Pin them, right sides together. Machine sew all the way around, leaving open where marked. Clip the curves, and turn right side out. Fill firmly with stuffing, and set aside. Don t worry about the stuffing in the nose. The sculpting will keep the stuffing in there. 3. Machine sew the ears. Cut out the pieces, turn right side out, and top stitch by machine. To do this, draw in pencil the lines you want for the inside of the ear. Then sew by machine. 4. attach the ears to the head with needle and thread. 5. hand sew the head to the neck of the body. gather your drawing and sculpting materials. [Step 2] Sew Face to Back of head aut hor S S uggestion If the hemostats or forceps slip in easily, there isn t enough stuffing in the body part. Keep packing it in.
6 Drawing and Sculpting the Face as with the flat face, you must first draw a grid. This time the grid is simpler, because there are already some reference points on the face from the sewing and stuffing. 5. For the width of each eye, you will halve each half. From each slice (#3) to #4, find the halfway point. Make a vertical pencil mark here (#5). Do the same on the other side. 6. halfway between #4 and the center seam of the face, make a pencil mark (#6). Simple grid for a profiled head 1. The seam designates the center of the face, lengthwise. To locate the center point widthwise, find where the nose starts to curve out, below the forehead. This is generally the center point between the forehead and the chin. When you have found this point, mark it with a pencil on either side of the center seam (#1). 2. Locate the halfway point between the nose and the chin. Make a mark here (#2). 3. To locate the center of the eyes, you must slice off a section on either side of the head. Look at the forehead to see where the top of the head starts to curve outward. Draw several dashes down the side of the head (#3). 4. Find the halfway point between one of these dashes and the center seam. Make a vertical pencil mark (#4) here; it should fall on the horizontal pencil mark (#1). Do the same on the other side. You should have one eye width between each eye. The width and the height of the eye will be the same. refer to Chapter 1 (page 24 in Creative Cloth Doll Collection), for more detail on drawing eyes. 7. Measure the width of the eye, and make a pencil mark above and below #1. Draw a square, using the pencil marks as a reference. 8. The nostrils are next. You ll see a slight curve inward on the face. on each side of the center seam, directly down from #6 (the inside of the eye), make a small dot with the pencil (#7). 9. each flare of the nose is straight up from the nostril, and halfway from the inside corner of the eye. Make a pencil mark on each side of the center seam for the flares (#8). refer to the close-up illustration below for these two steps. [Step 8 9] Close-up of nose 10. The outside corners of the lips are directly below the #4 marker. Make a small dot with the pencil (#9), in line with the center of the mouth (#2). c r e a t i v e c l o t h d o l l c o l l e c t i o n 6
![7 c r e a t i v e c l o t h d o l l c o l l e c t i o n [Step 11] Drawing and outlining the face 11.](/docs-images/81/82796147/images/7-0.jpg "Following the techniques in Chapter 1 (page 24 of Creative Cloth Doll Collection), draw the eyeballs, irises, pupils, lips, and eyebrows.")
 sculpting needle with 1 yard (0.")

![Push your needle into the head and out at #1 (the inside corner of the eye). [Steps 15 16] Sculpting the nose 15.](/docs-images/81/82796147/images/7-3.jpg "go back into the head, but not too close from where you came out. This can be a vertical or a horizontal stitch. Go down to the opposite nostril (#2).")
7 7 c r e a t i v e c l o t h d o l l c o l l e c t i o n [Step 11] Drawing and outlining the face 11. Following the techniques in Chapter 1 (page 24 of Creative Cloth Doll Collection), draw the eyeballs, irises, pupils, lips, and eyebrows. Outline these with a brown pen, and erase the unnecessary pencil marks. (Also, see page 24, in Creative Cloth Doll Collection for more about outlining.) 12. This face will not have eyelids completely drawn; separate ones will be added. 13. Thread the 3 (7.6 cm) sculpting needle with 1 yard (0.9 meter) of strong thread, and tie a knot in the end. Anchor the thread to the back of her head (that is, take a stitch in the back of the head). If you do not anchor the thread in the back of the head, the knot could pop through the face. Refer to the chart on the next page as you sculpt. 14. Push your needle into the head and out at #1 (the inside corner of the eye). [Steps 15 16] Sculpting the nose 15. go back into the head, but not too close from where you came out. This can be a vertical or a horizontal stitch. Go down to the opposite nostril (#2). As you go in and out, pull your thread to define the features but not too tightly, or you ll get wrinkles. This is also when you ll get the stuffing back in the nose. As you sew, use your needle to pull stuffing toward the face.
, back into the head, and up to the opposite inside corner of the eye (#6). 18.")
8 16. go back into the head, up and over to the opposite flare (#3), back into the head, and straight across to the other flare (#4). 17. go back into the head, down to the opposite nostril (#5), back into the head, and up to the opposite inside corner of the eye (#6). 18. go back into the head, and down to the outside corner of the mouth (#7), on the same side of the face. Go back into the head, and up to the outside corner of the eye (#8). 19. go back into the head, and over to the inside corner of the opposite eye (#1). Go back into the head, and down to the outside corner of the lips (#9). Go back into the head, and up to the outside corner of the eye (#10). 20. go back into the head, and then to the back of the head. Anchor off. c r e a t i v e c l o t h d o l l c o l l e c t i o n 8 [Step 17] Stitching from nose to eye [Steps 13 20] Chart of sculpting points
9 9 c r e a t i v e c l o t h d o l l c o l l e c t o i n Coloring the Head For this doll, you ll use colored pencils. There are many types and brands. all work fine on cloth, but the best are oil-based. These include Sanford Prismacolor (Karisma, internationally), Walnut hollow oil Pencils, and Van gogh s Colored Pencils. 1. Start with the shading. use sienna brown, if you have it, or another light brown. Shade the temples, around where the crease of the eyelids will be, down the sides of the nose, under the nose, around the flares, down the center seam under the nose, under the lower lip, and around the chin. Decide where your light is coming from, and shade a bit beyond the chin, toward the cheek on the shaded side of the face. Shade lightly on the upper lip, around the crease of the smile, and under the eyelids. really rub in the color; when it is blended, it will fade quite a bit. 2. next, with a lighter tan or beige pencil, add highlights. These are near the shading, but toward the higher points of the face: on the temples, down the sides of the nose, on the upper lip, on the chin, under the eyes, on the cheekbones, and below the eyebrows, on the brow bone. 3. use a white pencil to lighten the center of the forehead, the tan or beige area under the eyes, the cheekbones, and the center of the chin. This may not show on your fabric, but it is very important. When the face is blended, you will see how the white prevents the other colors from covering an area. 4. Lastly, use carmine red on cheek area. Put it exactly where you would put blush on a human face, but really layer it on. (See the photo below for these steps.) 5. Wrap a piece of fabric around your index finger, and use it to blend the colors. on the sample head (below), one side is blended, and the other side is not. This shows how dark to color with the pencils. as you can see, the colors blend beautifully. 6. The eyes are next. use three shades of one color, or three different colors in varying shades (a light, a medium, and a dark). The sample eye uses light green, grass green, and peacock blue. [Step 1 5] right side of face is blended
![c r e a t i v e c l o t h d o l l c o l l e c t i o n 10 [Steps 6 11] Left side of face is finished 7. With the lightest shade, fill in the iris.](/docs-images/81/82796147/images/10-0.jpg "On the side of the iris that would be in the shadow, use the medium shade; color that side and underneath the eyelid.")
10 c r e a t i v e c l o t h d o l l c o l l e c t i o n 10 [Steps 6 11] Left side of face is finished 7. With the lightest shade, fill in the iris. On the side of the iris that would be in the shadow, use the medium shade; color that side and underneath the eyelid. Use the darkest shade to trace an edge where the eyelid will be, darken the upper part of the iris, and touch the upper part of the pupil. (See Chapter 1, page 30 in Creative Cloth Doll Collection, for a detailed illustration of the eyes.) 8. The lips are colored the same way as in the previous chapters. (See Chapter 1, page 30 in Creative Cloth Doll Collection, for how to add life to the lips.) 9. When you have finished the face, seal it with a textile medium, and let dry for 24 hours. It is best to do this before detailing the face, or the pens can pick up the pigment from the pencils, and get clogged. 10. While the face is drying, start on the eyelids. Cut out the eyelids. Use the end of a toothpick to put a thin band of glue along the lower edge of each eyelid. Place three false eyelashes along the outer edge of each eyelid, angling them to make sure you have a right eye and a left eye. Let dry. 11. Once the face is dry, use a black pen to fill in the pupil.

11 11 c r e a t i v e c l o t h d o l l c o l l e c t i o n 12. use a white gel pen, or white paint and a small brush, to add a dot of highlight to each pupil, on the side of the eye that catches the light. (This is an important part of doing a face. The eyes are the windows to the soul; without this highlight, the eyes are dead.) Use your white pen or paint to whiten the whites of the eyes. 13. add a dot of red to the inside of each eye for the tear duct (refer to Chapter 1, page 30 in Creative Cloth Doll Collection, for details). 14. use a contrasting-colored pen to outline the iris, and draw the rods that radiate from the pupil. 15. use a toothpick to spread a bit of glue along the upper edge of each eyelid. Place the eyelids over the eyes. Press them down, and lift up the center of the eyelids; this will make them look more natural. Let dry. The sample head (below) has just one eyelid, so that you can see the difference. 16. Add eyeliner with a black or brown pen. 17. To color the eyelids, start with colored pencils. The inside of the sample eyelid is colored with Process Red, and the outside with Mediterranean Blue. Next, blend the colors with a small blending stick, such as Tsukineko s Fantastix. Finally, apply glitter gel pens in matching colors. 18. add some yellow to the upper part of the eyelid and up toward the brow. Use purple in the eye crease and down each side of the nose. On top of this, use glitter gel pens. 19. To hide the crease where the eyelid was glued, use metallic fabric paint, such as Lumiere or Stewart Gill s Byzantia paints. 20. Seal the face with the textile medium. [Steps 15 19] Add eyelids to eyes

12 c r e a t i v e c l o t h d o l l c o l l e c t i o n 12

![13 c r e a t i v e c l o t h d o l l c o l l e c t i o n [Step 2] Create stockings 2.](/docs-images/81/82796147/images/13-1.jpg "Machine sew, using a stretch stitch, from the bottom of the stocking up to the top, on one side.")
 3.")

 long, for each Shoe. 8.")

13 Stockings and Shoes it is easier to make the stockings and shoes before the legs are attached to the body. 1. Take one stocking from a pair of knee-hi s, and turn it wrong side out. 13 c r e a t i v e c l o t h d o l l c o l l e c t i o n [Step 2] Create stockings 2. Machine sew, using a stretch stitch, from the bottom of the stocking up to the top, on one side. Do the same on the other side. This will create two doll stockings. Cut out the stockings, turn them right side out, and slip them on the legs. (See illustration, left.) 3. Trace two Shoe Soles on the wrong side of the fabric you have chosen for the shoes. 4. Cut a slit down the center of each traced Shoe Sole. 5. Double the fabric, right sides together, and sew all the way around. Cut out the Shoe Soles, and turn them right side out through the slit. 6. Cut out two inner Soles from the piece of felt. Slip one into each Shoe Sole. Set aside. 7. Cut three ribbons, each 1 yard (0.9 m) long, for each Shoe. 8. Wrap three ribbons around each foot, crisscrossing from front to back. Tie the ribbons in an overhand knot at the front of the foot, just above the ankle. hand sew beads at the center of the ribbons, as shown (right). (instructions for making the beaded flowers are on pages in Creative Cloth Doll Collection.) hand sew the soles to the bottom of the feet. 9. hand sew the Legs to the sides of the Body, as shown (left), using a long sculpting needle and strong thread. [Step 9] attach legs to body

14 c r e a t i v e c l o t h d o l l c o l l e c t i o n 14

15 15 c r e a t i v e c l o t h d o l l c o l l e c t i o n
 wide by 7 1 2 (19 cm) long d. Top layer: 18 (46 cm) wide by 6 1 2 (16 cm) long 2.")
16 The Dress 1. Cut the four different layers of the skirt. a. Bottom layer: 20 (51 cm) wide by 10 (25 cm) long b. Third layer: 20 (51 cm) wide by (22 cm) long c. Second layer: 20 (51 cm) wide by (19 cm) long d. Top layer: 18 (46 cm) wide by (16 cm) long 2. Seal the edges of the fabric with a candle by running the edge of the silk along the edge of the flame to slightly melt it. Because silk can flare up, put your candle in a pie plate that has a little water in the bottom. 3. Machine sew the back seams of each layer, one by one, right sides together. 4. Put the layers in order, with the bottom layer first. Machine gather all layers together at the waist. it is best to use a quilting thread for this. That way, when you pull the threads to gather the skirt, the thread won t break. 5. Slip the layered skirt on the doll. Pull the threads to fit the waist, and hand sew with needle and thread directly to the body, using a running stitch. 6. Wrap the bridal lace around the doll to measure for the bodice. Cut the lace to fit, leaving enough at the back to overlap a bit. 8. hand sew the bodice directly to the body. it is best to do this with a beading needle and thread. Some of the beads may be loose from the cutting of the lace. as you tack the lace to the body, use your needle and thread to secure any loose beads. 9. The sleeves are also made from bridal lace. Cut pieces to fit from the wrists up to the biceps, or just above the elbows. hand sew in place, again catching any loose beads. note: This is done before the arms are attached to the body. 10. With one of the same fabrics used in the skirt, cut out the sleeves. The sleeves are two pieces of fabric, each measuring x 5 (16.5 x 12.7 cm). 11. With right sides together, machine sew up the back seam. Turn sleeves right side out, and slip them onto the arms. 12. Bunch up the sleeves, and hand sew them in place with a beading needle and thread. Sew on matching beads as desired. 13. hand sew the arms in place, using strong thread and a hand sewing needle. anchor the thread at the shoulders, then go into the arm. Sew through the sleeve fabric as you go into the arm. You won t go all the way through the arm, just partway, then back into the shoulder. repeat at least three times, then anchor off on the body, under the arm. Do the same with the other arm. c r e a t i v e c l o t h d o l l c o l l e c t i o n Cut out the motif at the bottom of the bodice. use any shape you like. The sample doll s bodice is staggered, giving interest to the dress. aut hor S S uggestion Silk dupioni will not seal via the candle method described above. If you use this type of fabric, paint the cut edge with Lumiere Halo paint. This will prevent it from fraying. [Step 13] hand sew arms to shoulders

17 17 c r e a t i v e c l o t h d o l l c o l l e c t i o n Headpiece 1. Cut one 7 (18 cm) square from each of three silk fabrics used for the skirt. 2. Fold two of the squares into two triangles. roll each triangle into a long shape, starting with the narrow end, rolling toward the longer edge. 3. Wrap one of these long pieces around her head, and hand sew in place. 4. Place the second long piece under the first one, making sure it shows. hand sew in place. 5. gather the last square at its center and place it inside the first two. hand sew in place. 6. Cut five of the ribbons into 7 (18 cm) lengths. Cut three silk ribbons into 7 (18 cm) lengths. 7. Tie all of the ribbons together at the center. hand sew them to the center of the doll s head. add some pearls to her neck, pin a brooch to her headpiece, and she s finished!
BONUS DOLL PATTERN: ILMARIA: GUARDIAN OF THE STARS 16-INCH (43CM) ALL CLOTH DOLL 2009 PATTI MEDARIS CULEA
 ALL CLOTH DOLL 2009 PATTI MEDARIS CULEA") BONUS DOLL PATTERN: ILMARIA: GUARDIAN OF THE STARS 16-INCH (43CM) ALL CLOTH DOLL 2009 PATTI MEDARIS CULEA 1 Ilmaria Cloth Doll Making Supplies 1/3 yard/meter White 100% Cotton Fabric for the body Thread
BONUS DOLL PATTERN: ILMARIA: GUARDIAN OF THE STARS 16-INCH (43CM) ALL CLOTH DOLL 2009 PATTI MEDARIS CULEA 1 Ilmaria Cloth Doll Making Supplies 1/3 yard/meter White 100% Cotton Fabric for the body Thread
Sewing. # Yanna Jo Doll. Fulk-size Patterns for 22" Doll and Clothing
 Sewing LeisureArtsLibrary.com #800613 Yanna Jo Doll Fulk-size Patterns for 22" Doll and Clothing Click Here to sign up for the FREE Leisure Arts E-newsletters at www.leisurearts.com to receive free projects,
A sweet 18 little girl just waiting to steal your heart
 A sweet 18 little girl just waiting to steal your heart I first designed this doll in 1999, during my formative years as a doll maker. She, like me has evolved over the ten years since she first came to
Kitschy Friend. Finished Size Approximately 23½in (60cm) tall
 tall") 1 Kitschy Friend This fun lady will always raise a smile, especially if you give her as a gift to your friends. We chose certain fabrics, with details given in the instructions, but you can easily replace
1 Kitschy Friend This fun lady will always raise a smile, especially if you give her as a gift to your friends. We chose certain fabrics, with details given in the instructions, but you can easily replace
CAMELOT FABRICS. 3. Draw a vertical line on the pointed end of each Strap, a tiny bit longer than the diameter of your buttons.
 Other Supplies - 2 buttons in coordinating color - paper printer - basic sewing supplies - sewing machine with buttonhole foot - iron & pressing surface - scissors & fabric shears - measuring tape - fabric
Country Commandments Stitchery
 Country Commandments Stitchery Notes 1. Read pattern through before starting. 2. Sewing Terms: RST-right sides together RSO right side(s) out 3. Thank you for purchasing my pattern! You may sell the finished
Original Designs for the Doll Industry, Inc. PO BOX 174 JAMESTOWN, MISSOURI March 31, 1998 (660) fax (660) Gigi - Painting Ins
 fax (660) Gigi - Painting Ins") Original Designs for the Doll Industry, Inc. PO BOX 174 JAMESTOWN, MISSOURI 65046 March 31, 1998 (660) 849-2114 fax (660) 849-2358 Gigi - Painting Instructions GiGi 14 Gigi bydiannaefner by DiannaEffner
Original Designs for the Doll Industry, Inc. PO BOX 174 JAMESTOWN, MISSOURI 65046 March 31, 1998 (660) 849-2114 fax (660) 849-2358 Gigi - Painting Instructions GiGi 14 Gigi bydiannaefner by DiannaEffner
 Supplies WARM AND NATURAL COTTON BATTING FIBER FILL STUFFING COTTON PRINT FABRIC FOR DRESS OLD LIGHT WEIGHT SWEATER TO CUT UP SMALL PIECE OF MUSLIN FOR CANDY RABBIT PLAID-APPLE BARREL NUTMEG BROWN CRAFT
Josephine Doll Pattern
 Josephine Doll Pattern Making these dolls means pulling out your scrap bin and button box and having a wonderful time pairing up patterns and prints. Each doll has felt hair and some have felt balls as
SUPPLIES OTHER SUPPLIES Carson 10 Teddy Bear Pattern
 SUPPLIES Fat 1/8 yd of 5/8 faux fur or mohair (sample is faux fur) 5 x 5 piece of wool felt for paw pads 11mm black glass eyes (1 pair) Small piece white felt (optional) eye whites 2 1 1/8 Joint discs
Jamie - 11 Soccer Bear
 Jamie - 11 Soccer Bear Artist Designed Bear with Flexlimb by Laura Matthews of TeddiesbyLauraLynn.com and FreeTeddyBearPatterns.NET This is not intended to be a child s toy due to the glass eyes and pellets.
PATTERNS BODY HEAD [1] [3] [5] [2] [4] Open neck. [1] Tracing and sewing line. [2] Leg attachment left. [3] Leg attachment right.
![PATTERNS BODY HEAD [1] [3] [5] [2] [4] Open neck. [1] Tracing and sewing line. [2] Leg attachment left. [3] Leg attachment right.](/thumbs/87/97074391.jpg "PATTERNS BODY HEAD [1] [3] [5] [2] [4] Open neck. [1] Tracing and sewing line. [2] Leg attachment left. [3] Leg attachment right.") PATTERNS Open neck DOLL #1 Body: Trace 1 sewing line Leg attachment left [3] Leg attachment right BODY DOLL #1 Head: Trace 2 [4] On grain [5] sewing line [3] HEAD [5] [4] 264 LEG ARM [3] DOLL #1 Leg: Trace
PATTERNS Open neck DOLL #1 Body: Trace 1 sewing line Leg attachment left [3] Leg attachment right BODY DOLL #1 Head: Trace 2 [4] On grain [5] sewing line [3] HEAD [5] [4] 264 LEG ARM [3] DOLL #1 Leg: Trace
HOW TO MAKE A COMPOSITION ZISA DOLL
 HOW TO MAKE A COMPOSITION ZISA DOLL WITH STUFFED FELT BODY AND 3D PRINTED HANDS AND HEAD A composition doll is made of different materials, in this case the body and limbs are sewn in felt and then padded,
SUPPLIES. OTHER SUPPLIES Marking pen Masking tape Aleene s Stop Fraying Toothpick Basic sewing supplies (See Tools link at
 SUPPLIES 30 x 9 piece of 5/8 curly matted mohair 7 x 6 piece of wool felt or ultrasuede 8 mm black glass eyes (1 pair) 6-1 fiberboard discs (neck & front legs) 4-1 ¼ fiberboard discs (rear legs) 5 Cotterpins
Easy way to needle sculpt dolls head
 Easy way to needle sculpt dolls head Crocheted head is done and stuffed firmly. Use pins as seen on the photo to help you follow the stitches when sculpting later. Yellow pin is where nose will be sewed.
1. Print our the Fox Hat pattern (pages 8-11 of this tutorial) at 100% of actual size. Cut out the
 at 100% of actual size. Cut out the") Other Supplies - 2 black buttons (for eyes) - One bag of fiber stuffing - Paper printer - Basic sewing supplies: - sewing machine - needle & coordinating thread - straight pins - scissors & fabric shears
Other Supplies - 2 black buttons (for eyes) - One bag of fiber stuffing - Paper printer - Basic sewing supplies: - sewing machine - needle & coordinating thread - straight pins - scissors & fabric shears
MATERIAL REQUIREMENTS:
 This pattern contains a pattern for a 30-inch doll. The doll may be made of flesh, tan or peach broadcloth, percale or any plain cotton material. Use six strand cotton for embroidering features and straw
SUPPLIES OTHER SUPPLIES Marco 12 Teddy Bear Pattern
 SUPPLIES Fat ¼ yd of 1 sparse, straight mohair 4 x 4 piece of wool felt or ultrasuede 10mm black glass eyes (1 pair) 2 1 ¼ Joint discs 4 1 ½ Joint discs 4 1 ¾ Joint discs Jointing hardware of choice (5
SUPPLIES TOOLS Mini Teddy Bear Pattern
 SUPPLIES TOOLS 7 X 9 piece of 1/2 ultra sparse mohair 2 x 2 piece of felt (footpads) 5 Mini T cotterpins 6 ½ joint discs 4 3/8 joint discs 5mm black glass eyes (1 pair) Artificial sinew (or strong waxed
Beautiful Bouquet. Designed by Heidi Pridemore. Page All Rights Reserved The Whimsical Workshop
 O - 3/5/12 Designed by Heidi Pridemore #FR-032 Fabric Requirements: 1/3 yard of Green- for all 1/3 yard of Yellow- Daisy 1/3 yard of Orange- Daisy 1/4 yard of Pink- Poppy 1/4 yard of Yellow Print- Poppy
Sock Lamb 2011 Cutest Creations
 Materials needed: Sock Lamb 2011 Cutest Creations sew-on Velcro Felt square for heart 1 square of black craft felt Invisible ink marker 1 pair of white ladies dress socks (preferably flat knit, cotton/poly
Sasha Sundress, Knickers, Bolero & Flip-flops
 Sasha Sundress, Knickers, Bolero & Flip-flops Materials: 0.5 metre Cotton Fabric 0.25 metre fabric for lining Bolero 0.5 metre 1/4 wide elastic for Waist and legs 2 Snap Fasteners Small Beads or Sequins
Dollytime. Tiny Topsy the tooth fairy. who are new to the craft. She measures 12cm (5 in) and is a topsy turvy or upside and added lots of pictures.
 and is a topsy turvy or upside and added lots of pictures.") Dollytime Tiny Topsy the tooth fairy As I d like to encourage e more people to knit I ve designed Tiny Topsy for knitters who are new to the craft. She measures 12cm (5 in) and is a topsy turvy or upside
Dollytime Tiny Topsy the tooth fairy As I d like to encourage e more people to knit I ve designed Tiny Topsy for knitters who are new to the craft. She measures 12cm (5 in) and is a topsy turvy or upside
1146 AD Norman. The under dress is of pale lavender linen with long tight fitting sleeves.
 Martha Rice The under dress is of pale lavender linen with long tight fitting sleeves. The over dress is of blue cotton. The neck facing and band at the sleeve seams are yellow cotton with embroidery.
a free sewing pattern by
 a free sewing pattern by 2 Kupo! Fans of Final Fantasy are sure to love this extra fuzzy Moogle! It has all the classic details that make the character so adorable -- including little wings, kitty ears,
1. Locate the pattern on the
 Here s a fine feathered friend who s as charming as he is wise. Find the perfect perch for him so you can display his plumage in all its glory. Size approximately 6 x 6 x 6 inches Materials ~ Pattern (see
Monster Marionette ART GRADE LEVEL FOURTH FIFTH MATERIALS
 MATERIALS FOR STUDENT: (one per student unless otherwise noted) FloraCraft Make It: Fun Foam: Rectangular pieces (arms & legs) cut from large Foam Block: Four 1" x 3" x 1" thick, Four 1" x 2 1/2" x 1"
Copyright Bumblebee Linens LLC
 Crafts Instructions Included 1. Hankie Wedding Dress 2. Pillowcase Dress 3. Hankie Bonnet 4. Hankie Pin Cushion 5. Hankie Angel 6. Hankie Bunny 7. Pillowcase Reusable Grocery Bag 8. Linen Towel Drawstring
Pin Cushion Instructions: Turtle, Zombie, Cupcake
 Pin Cushion Instructions: Turtle, Zombie, Cupcake Turtle Instructions: 1.Cut out two turtle body pieces and one turtle shell piece. Use felt. x2 x1 2. Pin the two body pieces together. Use the blanket
"Delores Bear" 16 (41cm) To make "Delores Bear" you will need:
 To make Delores Bear you will need:") "Delores Bear" 16 (41cm) To make "Delores Bear" you will need: Viscose plush fabric 22 x 16 Suedette 6 x 6 1/2 5 x 26mm Nut & bolt joints 2 x 12mm Black safety eyes Perli thread (nose) Floral fabric (drawers)
"Delores Bear" 16 (41cm) To make "Delores Bear" you will need: Viscose plush fabric 22 x 16 Suedette 6 x 6 1/2 5 x 26mm Nut & bolt joints 2 x 12mm Black safety eyes Perli thread (nose) Floral fabric (drawers)
a free sewing pattern by
 a free sewing pattern by 2 witch kitty plush Ready your broom and cape! This adorable little kitty is all decked out for Halloween. The pattern comes with loads of cute details, including a capelet with
Page 1. Jumblenut. The Head. Design by Barbara Allen
 Page 1 Needle felting Needle felting is quite different from creating felt by shrinking wet wool. There s no water involved, it requires very little space and creates no mess at all. It s a craft that
Pastel Pencil Skintones
 Pastel pencils and portraiture go hand in hand; enabling the artist to achieve both detail and subtle blended effects. As a forgiving medium they allow you to take away or add colour and texture without
NOTES 1. Please wash, dry & iron your fabric before beginning. 2. Use a 1/4 seam allowance throughout. 3. All seams are sewn Right Sides together.
 OTHER TOOLS & SUPPLIES - fiber stuffing or fabric scraps - paper printer - 24 contrasting embroidery floss & an embroidery hoop, for eyes - 2 yds of ribbon, for hanging (optional) - basic sewing supplies:
Cut 1 lightweight interfacing
 1 2 A note on interfacing for this bag: This pattern is intended to produce a slouchy bag, so you will want to look carefully at your fabrics before you decide on which interfacing and stabilisers to use.
astrobunny & cosmokitty plush a sewing pattern by
 astrobunny & cosmokitty plush a sewing pattern by astrobunny & cosmokitty plushies Ever on an adventure, best friends Astrobunny and Cosmokitty are searching the farthest reaches of space to see what new
Materials. 1 Cut out the pattern pieces for the doll. Cut out the pattern for the arms and legs twice in mirror image.
 Making the doll All the dolls are made from the same pattern (see Doll Template). The body and head are the same, only the facial expressions and the hair change. Carefully follow the instructions below,
Whimsy Rose. Party Dress. By Khristal Jouett. Pattern Adaptations and Construction Notes Continued from Issue #139
 Whimsy Rose Party Dress By Khristal Jouett Pattern Adaptations and Construction Notes Continued from Issue #139 View the Whimsy Flower Tutorial in Tutorials & Video Tips www.sewbeautifulmag.com 1 DESIGN
Little Knitted Polar Pug
 Little Knitted Polar Pug The Little Knitted Polar Pug is a woolly companion to accompany you through the snow-covered tale of Pugs of the Frozen North by Philip Reeve and Sarah McIntyre. Knit your pug
Sew Sweet Bunny Basket
 Sew Sweet Bunny Basket Crafter level: Intermediate to Advanced Time needed: 2½ hours What you'll need Printouts of templates ¾ yd. linen fabric for basket ¾ yd. cotton print fabric for lining Pins Sharp
Woodkirk Academy Summer Challenge Project Textiles Technology
 Woodkirk Academy Summer Challenge Project Textiles Technology Upcycling craft has become popular in society over the last few years. There are many different ways of recycling, upcycling and re-using old
Basic patterns. Bear:
 Basic patterns Bear: Materials 1 ball yarn Small quantity of soft textured, high quality safety stuffing 2 x 6mm round black beads for eyes Black embroidery thread or floss for features Sewing needles
Dolly. By Dianna Effner. Dolly Painting and Assembly Instructions. Original Designs for the Doll Industry, Inc. PO BOX 174 JAMESTOWN, MISSOURI 65046
 Original Designs for the Doll Industry, Inc. PO BOX 174 JAMESTOWN, MISSOURI 65046 Copyright 1991 Dolly By Dianna Effner Dolly Painting and Assembly Instructions SUPPLIES Slip- Bell Porcelain Doll Flesh
Raphael Tuck Costume for 2017 Convention Souvenir by Helen Kish by Susan Sirkis
 Raphael Tuck Costume for 2017 Convention Souvenir by Helen Kish by Susan Sirkis M any years ago Clara Hallard Fawcett wrote a book entitled, Paper Dolls, A Guide to Costume. The early researcher made the
Easter Bunnies. Finished Size Approximately 11½in (29cm) tall. Fig A
 tall. Fig A") 1 Easter Bunnies These sweet bunnies make cute gifts at any time of year. We chose certain fabrics, with details given in the instructions, but you can easily replace these fabrics with others from the
1 Easter Bunnies These sweet bunnies make cute gifts at any time of year. We chose certain fabrics, with details given in the instructions, but you can easily replace these fabrics with others from the
love dragon plush a free sewing pattern by
 love dragon plush a free sewing pattern by 2 love dragon plush A combination of a Valentine's and Chinese New Year celebration with the most adorable result! This little dragon pattern is done in the more
Pretty Poppet. Print out the pdf files. Do NOT select fit to page! They will come out wonky! No Margins! Margins are BAD!
 Pretty Poppet Please read through the entire instruction sheet before making this doll. These instructions are written for a beginning level doll maker. Tips for Beginners: 1. Set your sewing machine stitch
Basic Bearmaking Instructions
 Laying out the Pattern Basic Bearmaking Instructions We recommend that you read the instructions right through before commencing. This will help you to understand the steps you need to take. Copying your
Pattern Pieces Copy Paper with DinA4 Print: Cut the pattern pieces for your size
 Pattern Pieces 1 Bodice Front 2x 2 Bodice Back 1x 3 Neck Band 2x 4 Sleeves 2x 5 Sleeve Flounce 2x 6 Facing for Slit 2x 7 Skirt Front 1x 8 Skirt Back 1x 9 Front Hem Band 1x 10 Back Hem Band 1x 11 Skirt
by Dianna Effner Kayla, Sonny Boy, Molly Body Pattern 14 - Standing Body Pattern and Assembling Instructions
 Original Designs for the Doll Industry, Inc. PO BOX 174 JAMESTOWN, MISSOURI 65046 April 15, 1998 (660) 849-2114 fax (660) 849-2358 14 Kayla, Sonny Boy, Molly Body Pattern by Dianna Effner 14 - Standing
Sew from bottom to top making sure you have not sewn over the cord. ( you may need to hand stitch the very top of the skirt just to be careful)
") Instructions for making a new dress for Cinderella. What you will need. 1/2 yard fabric for 4 panels of the dress, shirt and sleeves. 1/4 yard fabric for the complimenting color front panel 1/2 yard of
Instructions for making a new dress for Cinderella. What you will need. 1/2 yard fabric for 4 panels of the dress, shirt and sleeves. 1/4 yard fabric for the complimenting color front panel 1/2 yard of
Instructions for the Bear. Cutting: Cut pieces from the bear fabric as marked on templates.
 Finished size: about 16 tall from his bottom to his ears. Trace all pattern pieces onto their respective fabrics adding 1/4 inch all around for seam allowance Supplies and materials: 12 oz. Poly-Fil Premium
Folk-Art Dish Garden
 Folk-Art Dish Garden Designed by Kim Diehl Finished quilt size: 20½" x 24½" Finished center block size: 11½" x 15½" ~ 1 ~ Materials ⅝ yard of tan print #1 for background 1 chubby sixteenth (9" x 11") each
Elf On a Shelf. LOOM: KB Sock Loom 2 (KB All-n-One Loom could also be used).
.") Designed by Bethany Dailey. LOOM: KB Sock Loom 2 (KB All-n-One Loom could also be used). YARN: 1 each (or portion of 1 skein each) Lion Brand Vanna's Choice (170 yrds per skein, #4 worsted weight, 100%
Designed by Bethany Dailey. LOOM: KB Sock Loom 2 (KB All-n-One Loom could also be used). YARN: 1 each (or portion of 1 skein each) Lion Brand Vanna's Choice (170 yrds per skein, #4 worsted weight, 100%
From the Office of the Northwest Territory Alliance Patternmaster Full Gaiters # Northwest Territory Alliance FULL GAITERS - #212
 FULL GAITERS - #212 ased on those in Making a ontinental Marine Uniform. Washington, D, US. Marine orps, 1975. ILL OF MATERIALS: 1 1/4 yards sturdy linen or cotton. Medium weight canvas is suitable in
Mer-kitty. plush. a free sewing pattern by
 Mer-kitty plush a free sewing pattern by 2 mer-kitty plush In celebration of Mer'may' is this adorable ocean feline! A combination of a mermaid and cute kitty, this mer-kitty has a big colorful fish tail
Arno Haft's Vogeldrachen (Bird Kite)
") Arno Haft's Vogeldrachen (Bird Kite) Bob and Charmayne Umbowers 31 March 2007 www.2kiters.com The Arno Haft Bird Kite Arno Haft's bird kite is from the 1950's. The original kite was made from cotton canvas
Arno Haft's Vogeldrachen (Bird Kite) Bob and Charmayne Umbowers 31 March 2007 www.2kiters.com The Arno Haft Bird Kite Arno Haft's bird kite is from the 1950's. The original kite was made from cotton canvas
19" emily, Jenny, & Portrait Dolls. By Dianna effner. Body Pattern and Construction. Strip
 Original Designs for the Doll Industry, Inc. PO BOX 174 JAMESTOWN, MISSOURI 65046 19" emily, Jenny, & Portrait Dolls Copyright 2001 By Dianna effner Body Pattern and Construction ArmATure ConSTruCTIon
You will need. Equipment
 1 KITE MOBILE Here s how to make a colourful kite to fly in your bedroom whatever the weather! You can use the kite tail to display favourite photos, postcards or trinkets. Just attach them with coloured
Fabergé Bunny. Skill level 2. Courtesy of Cranston Fabircs. Supplies: Directions:
 Skill level 2 Fabergé Bunny Courtesy of Cranston Fabircs Supplies: 3/4 yd. V.I.P. by Cranston Egg Print, for rabbit 1/4 yd. V.I.P. by Cranston Turquoise Crackle, for inner ears 1/4 yd. V.I.P. by Cranston
Martha s A-Line Skirt with Darts
 Martha s A-Line Skirt with Darts Add a tailored look to a basic skirt with darts, a zipper, and a waist facing made of fabric or ribbon. The waist is flat with no band, and the skirt lies smoothly over
j e n n y l o v e s b e n n y B o u t i q u e B e a r s Sunday by Jenny Lee
 j e n n y l o v e s b e n n y B o u t i q u e B e a r s Sunday by Jenny Lee Please meet an old friend of mine...the original Sunday!! Sunday loves nothing better than to laz around and do absolutely NOTHING!!...hmmm
Sweet Softies: Funny Bunny
 Published on Sew4Home Sweet Softies: Funny Bunny Editor: Liz Johnson Thursday, 08 April 2010 10:00 Stuffed animals make me happy. They live on my desk at home and at work, so I can glance over at them
Knit a Miracle by Nelly. presents Dorothy, the Lovely Girl
 Knit a Miracle by Nelly presents Dorothy, the Lovely Girl 2 Yarn and Equipment 1. Alize Cotton Gold, cotton (55%), acrylic (45%), color light-beige (67), 330 m - 100 g. Weight: Sport (5 ply) (Used for
Pure Joy! Finished Size: Approximately 38 ½ x 44 ½
 Pure Joy! Finished Size: Approximately 38 ½ x 44 ½ Easy strip-piecing and dimensional flowers make this darling baby quilt irresistible and a pure joy to make for someone special! The fabric used in the
shiba cube puppy plush a sewing pattern by
 shiba cube puppy plush a sewing pattern by If you ve ever sewn a cube before, this pattern takes it to the next level! The classic geometric shape forms a chubby little puppy body complete with four stubby
Santa Mold Project. Supplies:
 Santa Mold Project Supplies: Santa Face and Hand molds Glue Gun 6 oz. flesh colored polymer clay Toothpick 1 oz. red and green polymer clays Xacto knife Minuscule amount of acrylic Ceramic tile paint in
Jewelry Making Techniques
 Jewelry Making Techniques ITSY BITSY LEAVES: The itsy bitsy leaves are created by taking a piece of clay about one half the size of a pea and making a small leaf shape. The leaves do not have to be exact.
PDF Patterns & Instructions
 PDF Patterns & Instructions Mama and Baby Kangaroo Felt Hand Puppet Pattern 2015 The Tucson Puppet Lady Mama and Baby Kangaroo Felt Hand Puppet Pattern & Instructions PDF All Rights Reserved. Instructions,
Night fury. plush. a sewing pattern by
 Night fury plush a sewing pattern by 2 Night Fury Plush skills used: Get ready for your own dragon-riding adventure with this fun night fury plush! This pattern will show you how to make this cute dragon
Copy Paper with DinA4 Print: Cut the pattern pieces for your size. Lengthening or Shortening the Pattern How to: To lengthen: To shorten:
 Copy Paper with DinA4 Print: The pattern pieces are printed with a narrow border onto 24 pages. Wait until all pages are printed. Arrange the pages as depicted in the page with instructions on how to put
Waistline. Groin Seam. Outside Seam. Pajama Front: Right Side. Inseam
 Other Supplies - 1 yard of 2 wide elastic - paper printer - a buddy for hemming - basic sewing supplies - sewing machine - fabric shears & scissors - needle & coordinating thread - straight pins - fabric
Jodie s Sewing Studio
 Jodie s Sewing Studio Children s Kuspuk Pattern How to Use a Jodie s Sewing Studio Pattern For best results, study the pattern pieces first and read the notes and terms on each piece. Pieces are labeled
Read through everything carefully before beginning. View E from Simplicity C5461 5/8 yd
 Rare Bear Supply List and Sewing Instructions as of Sunday, March 04, 2018 Read through everything carefully before beginning. Pattern pieces - View E from Simplicity C5461 - pieces 33 through 41 Follow
pattern BONUS Ruffled Halter By LiesL Gibson {from page 41}
 ruffled halter This adorable halter has a simple pull-on style that s easy and fun for summer, featuring a casing formed by the first ruffle for a clean, uncluttered finish. For other fun looks, try making
Harry & Meghan. An original Fiona Goble knitting pattern. For more patterns including FREE ones, visit
 Harry & Meghan An original Fiona Goble knitting pattern For more patterns including FREE ones, visit www.fionagoble.com Prince Harry & Meghan Markle If you enjoyed my 2011 book, Knit your own Royal Wedding
Dancing Rain Dolls. Knot Doll. Created By. Amy Prentice
 Dancing Rain Dolls Knot Doll Created By Amy Prentice Copyright 2007 1 Dear Friends, This pattern is the easiest of all dolls to make. This doll will take about 2 hours to complete and is the perfect doll
Chapter 2: Sewing and stuffing the hands and feet
 [23] Fold doe suede in half with RST and place templates for upper and lower legs, and upper and lower arms on top. Trace around each template. Stitch on the tracing lines of each piece, leaving open where
Contact Info: Dana Burton
 Contact Info: Dana Burton Dana@Miniatureart.com www.minidolllist.com www.miniatureart.com This tutorial is dedicated to Fran. The original doll is in a private collection. There are no kits. I DO have
Sewing for Large Dolls
 Sewing for Large Dolls Sherralyn St. Clair COPYRIGHT Copyright 2013 Sherralyn St. Clair You may sell or give away as many of the dolls or the doll clothing as you can make by yourself. The dolls or clothing
Ruffle Bunnies: Fun Appliqué Kitchen Towels
 Published on Sew4Home Ruffle Bunnies: Fun Appliqué Kitchen Towels Editor: Liz Johnson Monday, 06 March 2017 1:00 These kitchen towel Ruffle Bunnies are ready to hop-to-it and help with your dish drying.
Lesson 2 CREATING THE SKIRT: LACE SHAPING
 1 Extension 1 Extension Lesson 2 CREATING THE SKIRT: LACE SHAPING For this lesson we will be working with the skirt pieces one skirt front and two skirt backs and your lace insertion. Are you ready to
Purse-onality Skill Level: Intermediate
 Purse-onality Skill Level: Intermediate http://www.pellonprojects.com Designed By Karen Bennett Sewn By Karen Bennett http://www.nelliesneedlequiltpatterns.com A perfect sized bag for day or evening that
CHOCOBO. plush. a free sewing pattern by
 CHOCOBO plush a free sewing pattern by 2 chocobo plush Kweh! Final Fantasy fans are sure to love this chibi version of the classic rideable bird. It has a large head, a prominent beak and a big feather
Pajama Sock Monkey 2009 Cutest Creations
 Materials needed: Pajama Sock Monkey 2009 Cutest Creations 1 pair of size Large Brown Red-Heel socks can be purchased from my online store www.ohboyorgirl.com Black embroidery thread Other color embroidery
Table of Contents. Crafts
 Crafts - Section I Table of Contents Crafts Aardvark to Zebra... I-3 Special Furniture Techniques... I-4 Stretchy Bracelet Jewelry... I-4 Miss Kitty...I-5 Patterns for Miss Kitty and Miss Annie...I-6 Miss
# Holiday Hanna Witch
 Tan or tea stained fabric for head and arms Deena s Shirt and bloomers....plain print Apron. 29 x 7 of print Apron straps.(2)1 x 5 pieces Apron ties (2) 1 x7 Body Muslin #174 19 Holiday Hanna Witch Witch
Section 1, Center Section Make One. Fabric Fabric # of Cutting Directions ID Location Strips
 Please read all instructions carefully prior to beginning quilt. All piecing uses a very accurate scant quarter inch seam allowance. In this quilt, accuracy is absolutely critical, so sew several sample
Little Dresses for Haiti - Revised
 Little Dresses for Haiti - Revised Now that the team has been to Haiti, we have discovered that the Haitians are a very modest people. It is not acceptable for girls over the age of 6 to have their shoulders
FANTASTIC DRAWSTRING PURSE Jenny Haskins
 FANTASTIC DRAWSTRING PURSE Jenny Haskins Purses are so in vogue at present but they are also really outrageously priced so here is a beautiful purse that is fun to make and looks just magic. NOTE: Pattern
Little Uns. Sweetie. When crocheted with yarns and hooks specified, Sweetie measures 13 inches L and 9 inches around waist.
 Little Uns Sweetie When crocheted with yarns and hooks specified, Sweetie measures 13 inches L and 9 inches around waist. The doll pattern is crocheted in the amigurumi style of continuous rounds beginning
Name: Class: Monster Doll. Grading Rubric
 Name: Class: Monster Doll Grading Rubric Grade yourself on the skills listed below. (0 being the lowest, and 5 being the highest.) Once you have graded yourself in each area, pin your grading sheet to
Focus, as you work, on getting many gradations of dark and light in your piece to guarantee something that is super interesting to the eyes.
 Hello! My name is Effy Wild, and Kara has tasked me with creating a mixed media face with an emphasis on building a lot of value contrast through the use of lights and darks (and glazes) to create depth
Jane/Amber/ Boy Wizard 17" by Dianna Effner Body Pattern and Assembling Instructions. May 15, 2002 (660) fax (660)
 fax (660)") May 15, 2002 (660) 849-2114 fax (660) 849-2358 17" Jane/Amber/ Boy Wizard by Dianna Effner 17 - Body Pattern and Assembling Instructions MATERIALS LIST Armature 38" of 12 gauge insulated copper wire Polyester
May 15, 2002 (660) 849-2114 fax (660) 849-2358 17" Jane/Amber/ Boy Wizard by Dianna Effner 17 - Body Pattern and Assembling Instructions MATERIALS LIST Armature 38" of 12 gauge insulated copper wire Polyester
Basic Sewing Portfolio. Name
 Basic Sewing Portfolio Name Back stitching Whip stitch Starting in the corner of a sample begin stitching diagonally. 3-4 stitches Hold up the back stitching lever and backstitch to the beginning. Release
 Flower Festival by Debbie Beckwith Graves 33" x 39" Featuring fabrics from the collection by Materials E30-BUNDLES-081 E60-1412-GRN E60-1414-ORG E60-1415-TURQ (backing) E60-1416-BLU (incl. binding) E60-1416-ORG
Happy Winter Snowmen Table Decoration
 Happy Winter Snowmen Table Decoration Materials Tilda Classic Basic fabrics (Fig A) Apliquick fusible stabilizer Appliqué glue pen (such as that used for paper piecing) Pointy end of a flower stick or
Figure Out Your Feet!
 i s s u e 1 7 Figure Out Your Feet! By Yvonne Porcella These feel good" sewing projects give you opportunities to try a variety of specialty presser feet that make stitching easier and the results better.
Aeoliah. by DANA. *The Ancient* Decadent Tea Party Series - Doll 4
 Aeoliah by DANA *The Ancient* Decadent Tea Party Series - Doll 4 Greetings and Welcome to our 4th doll in the Decadent Tea Party (DTP) series --- Aeoliah. So far we have Maree, Elle, Scarlet and on deck
PINWHEEL STAR WORKSHOP QUILT
 PINWHEEL STAR WORKSHOP QUILT Finished Size: 9" x 9" FABRIC REQUIREMENTS fat quarter or less of each fabric Fabric A - Medium (or dark) print for center star Fabric B - Dark (or medium) print for pinwheels,