Original Designs for the Doll Industry, Inc. PO BOX 174 JAMESTOWN, MISSOURI March 31, 1998 (660) fax (660) Gigi - Painting Ins
|
|
|
- Chloe Blair
- 5 years ago
- Views:
Transcription
1
2
3
4
5
6
7
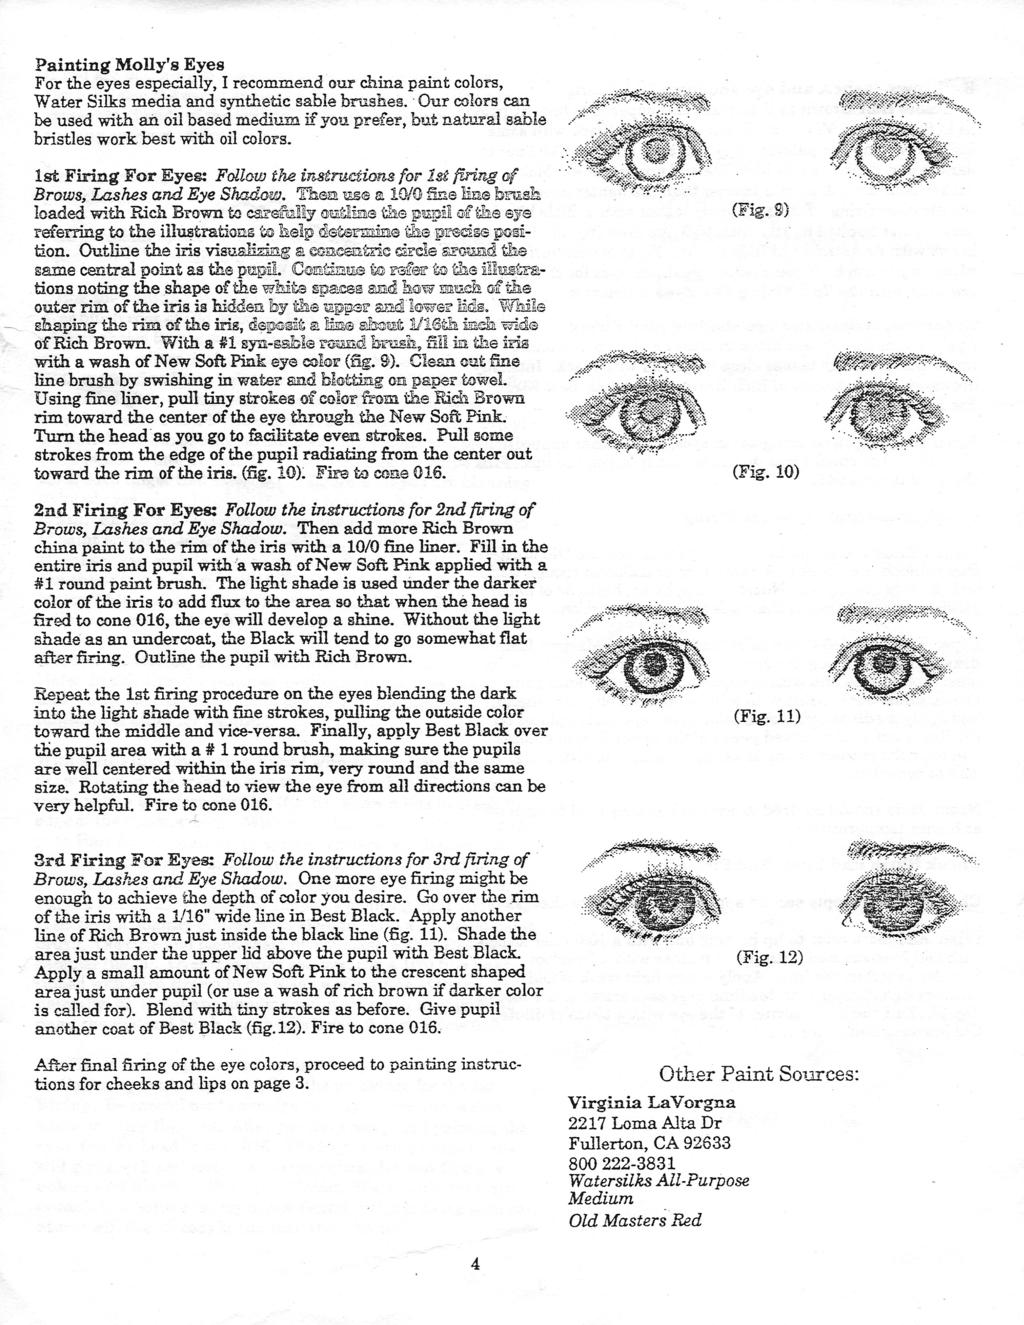
8 Original Designs for the Doll Industry, Inc. PO BOX 174 JAMESTOWN, MISSOURI March 31, 1998 (660) fax (660) Gigi - Painting Instructions GiGi 14 Gigi bydiannaefner by DiannaEffner MATERIALS LIST California Sunrise porcelain slip by Seeley s silk sponge rubber scrubber scalpel Water or Oil Based China paint Medium China paints: Old Masters Red, Matte White, Hair Brown, Best Black, Blue Black, Air Blue Deerfoot Stippler 10/0 fine liner #1 round China Mop (optional) mineral oil paper towel soft cloth make-up wedges china paint eraser by Bell Ceramics or Star Type Cleaner by Faber Castell (found in office supply stores) Gigi Wig available from Brushes and Eye Colors Available from Expressions (Fig. 1) (Fig. 2) GENERAL INFORMATION These directions are for painted eyes. If you are doing set in eyes you can paint shadows, lashes and brows and blush the cheeks in the same firing, (eliminating two firings) in this case, fire to cone 019. For the eyes especially, I recommend our china paint colors, Water Silks media and synthetic sable brushes. Our colors can be used with an oil based medium if you prefer, but natural sable bristles work best with oil colors. Do not fire eye colors and blush in the same firing. Wait until eyes are completed before doing blush firing. Higher firing temperatures will fire off reds or can turn them brown. Reds should be fired to cone 019. (Fig. 3) (Fig. 4) (Fig. 5) 1
9 with some Rich Brown in your palette. Use this color on your 10/0 liner to darken and define crease lash line and upper lashes. Make darker lash strokes a little shorter than the lighter ones from the previous firing. Touch up lower lashes with a little bit of darker color applied lightly with 10/0 fine liner (fig. 9). Refer to illustrations and photo as you work. If you are using painted eyes for this doll, continue with the 2nd Firing For Eyes instructions. If you are going to be using set in eyes, you might put another application of blush on the cheeks and do the second firing on the lips. Fire the head to cone 019. (Fig. 10) Cheek Blush and Lips - 1st Firing Cheek Blush: Use the Medium of your choice and Old Masters Red to blush the cheeks. A china mop or make-up sponge works well for this procedure. Note: Two light applications of blush yields a smoother result than one heavier application. Lips: With your 10/0 fine liner loaded with old Masters Red, draw a fine line along the crease where the upper and lower lip meet. Soften this line with a stippler. With a #1 round paint brush, dilute some paint with a little Medium on your palette and apply medium soft tint of color to certain accent places on the lips, such as the curved peaks of the upper lips, in creases and near the corners of the lower lips. Stipple to soften (fig. 10). Fire to cone 019. (Fig. 11) Note: Reds should be fired to cone 019 as they tend to burn off at higher temperatures. Cheek Blush and Lips - 2nd Firing Cheek Blush: Apply second application of blush to cheeks. Lips: Add more color to lip parting line with a 10/0 liner loaded with Old Masters Red. Stipple or feather with a Deerfoot Stippler to soften the line. Apply a very light wash of Old Masters Red diluted with Medium over entire area of the mouth (fig. 11). Tint the inner corner of the eye with a touch of diluted Old Masters Red. Fire to cone 019. PAINTING THE EYES Some fine points on achieving expressive eyes with china paints: 1) Plan to do several firings to develop the depth of color you desire. It's much better to apply paint lightly in three or four thin layers, than to pile it up in one or two firings. 2) Give some thought to the expression you would like to have on your doll. A slight shift in the position of the eyes can make a big difference in the expression of your doll. Allow me to illustrate. In figure 12, I have marked the approximate center of the eye with a small dot before beginning to paint the eyes. If I position the center of the iris of each eye over this center spot as in figure 13, the resulting gaze will be straight ahead and have a somewhat staring expression. Kayla was designed to gaze just slightly to her right and slightly up. (Fig. 12) (Fig. 13) 3) While painting the eyes, one must also consider the distance upon which you would have the eyes to focus. In other words, if you want Kayla to gaze into your eyes when you are standing near her, you must position the eyes a little bit differ- 3
10 Remove parting lines and so on, with the cleaning method of your choice. Fire porcelain to cone 6. Scrub with a rubber scrubber until satiny smooth. Wash and allow to dry. Using the painting Medium of your choice, give pieces an all over blush coat of Old Masters Red. Use mineral oil or medium of your choice to mix with pigment and to coat porcelain. Add extra blush where desired, on hands, feet, knees and elbows. With a 10/0 fine liner, paint a very thin line of Old Masters Red (diluted slightly with Medium) between fingers and toes. Stipple to soften and blend out with a deerfoot stippler. Stipple a small dot of blush color on dimples, finger nails and toe nails. With Matte White in your 10/0 fine liner, paint a stripe at the tip of each finger nail as shown in figure 6. If you are planning painted eyes, clean blush coat away from eye balls with a clean brush. Finish removing paint from the eyes with a small piece of paint eraser or type cleaner. (This stuff is handy to have whenever you wish to remove paint from the porcelain as you can shape it to a sharp point.) Paint the eyeball area with some Matte White using a #1 or #2 round paint brush. Stipple carefully to smooth out brush strokes. Fire all pieces to cone 019. Eyebrows, lashes, and eye shadow - 1st Firing Note: In painting the features, particularly the eyes, lashes, and brows, we use Water Silks to mix with the pigments and to lubricate brushes for painting. With a 10/0 fine liner brush tipped with Hair Brown paint, draw a line in the crease along the upper eyelids. Soften and blend with a Deerfoot Stippler (fig. 7). Draw a line beneath the edge of the upper eyelids. With tip of the 10/0 fine liner tipped with Hair Brown, pull wispy eyelash strokes which taper to nothing and curve up and away from the eyes. Paint short lashes with Hair Brown along the lower lid, as shown in figure 8. Paint a soft shadowy eyebrow shape by painting light strokes in Hair Brown slightly diluted with Medium with a #1 round paint brush. Obscure and blend them together by pouncing with a Deerfoot Stippler (fig. 7). Over this brow shadow, use a 10/0 fine liner tipped with Hair Brown to draw some wispy fine eyebrow hairs. Mix a little Light Blonde with a bit of Matte White and paint some light blonde hairs along upper edge of brows. If you are planning set in eyes, you may go on to paint the lips and blush the cheeks before firing to cone 019. NOTE: If you are planning to paint the eyes, please read the section on eye painting and follow the procedure for the 1st Firing. Be careful not to smudge your eyebrows and lashes while painting the eyes. After you have completed painting the eyes, fire the head to cone 016. The higher firing temperature will give depth and luster to the eye colors. Do not fire eye colors and blush in the same firing. Wait until eyes are completed before doing blush firing. Higher firing temperatures will fire off reds or can turn them brown. (Fig. 6) (Fig. 7) (Fig. 8) (Fig. 9) Eyebrows, lashes, and eye shadow - 2nd Firing Add more Hair Brown to the crease and upper lash line. Stipple as in first firing. Mix a small amount of Best Black 2
. (Fig.")
11 5th Firing Cheek Blush: Apply second application of blush to cheeks. Lips: Add more color to lip parting line with a 10/0 liner loaded with Old Masters Red. Stipple or feather with a Deerfoot Stippler to soften the line. Apply a very light wash of Old Masters Red diluted with Medium over entire area of the mouth (fig. 12). (Fig. 12) Expressions of Gigi 4
12
13
14
15
16
17
18 18" Molly by Dianna Effner Molly - Body Pattern and Assembling Instructions MATERIALS LIST Armature 34" of 3/16" armature links 2 "Y" joints, 3/16" diameter Armature pliers for 3/16" plastic links Polyester fiber-fil or paper toweling Low Temp glue and glue gun Finished porcelain hands, feet shoulder plate and head Acrylic baby beans for stuffing Cloth Body 1/2 yd. of 45" wide heavy weight muslin Thread to match 20 gauge copper wire Polyester fiber-fil 18" of 5/32" round elastic 16" of 1/2" twill tape Fray Check Craft glue such as Velverette "T" Joint "Y"Joint GENERAL INFORMATION Cut pattern carefully on bold line being sure to cut out all pieces. Mark darts and pattern dots on wrong side of fabric unless otherwise indicated. All seam allowances are 1/4 unless otherwise stated. If you wish to save the original pattern, use vellum or tracing paper for pattern pieces. Cut out all pattern pieces. You will have: 2 body pieces 2 arms 2 leg casing pieces 2 leg pieces Armature Construction Separate links into 3 parts as follows: 14 links for each arm, 8 links for torso, 17 links for each leg. (fig. 1) Armature Diagram 14 beads together for each arm. Attach trunk of "Y" joint into one arm and attach remaining ends to the other arm and torso. Snap trunk of other "Y" joint to end of torso. Snap together 17 beads for each leg and attach to remaining ends of "Y" joint. Legs: Attach porcelain legs by inserting 6 beads of leg armature into leg cavity leaving 6 beads outside. Pack polyester fiber-fil or strips of paper toweling inside leg cavity. Be sure to pack tightly around armature beads. Keep armature centered in leg cavity. Stuff to within 1" of leg rim. Fill remaining cavity with low temp glue, being careful to glue beneath leg rim and around armature beads. Keep armature centered in leg cavity (fig. 1). Using armature diagram as your guide, snap 1
19 Top Seam Porcelain arms will be glued to armature after cloth body construction. WARNING: All glue guns are hot enough to cause burns. Use care when handling. Cloth Body Construction Stitch darts on both body pieces. Press toward center seam. (fig. 2) Stitch top seams on both body pieces matching arrows. Clip curves and press (fig. 2). Ease fabric of shoulder seam. Pin and stitch seams as shown, being sure to taper seam at each end (fig. 3). Clip curves. (fig. 3) Referring to pattern pieces, with right sides together, match small dot on leg to small dot on body piece, Pin. Match large dots on leg. Pin. (fig 4.) Stitch between small and large dots. Lower needle into fabric. Swing leg piece 90 degrees matching curved leg seam lines of body and leg pieces. Ease curve and pin. Stitch leg seam line. Clip curves. match small dots on leg piece to small dot on body piece. Begin pinning right sides together. Sew easing leg piece in as you go. Clip curves. Fold casing length wise. Place on right side of leg piece matching raw edges, pin and stitch to leg piece. Press seam allowance toward body. (fig 5.) Matching top seams and with right sides together, pin and stitch body pieces together. Be sure to leave opening for stuffing in center back seam. Clip curves. With right sides together, pin and stitch crotch seam, matching center back and center front seams. Clip and press. Stitch arms to dot. Do not attach to body at this time. Body Construction Cut a small hole on either side of body top, 1/2" below the seam that runs across the top of body (fig. 6). These are the openings for the arm armatures. Apply Fray Check to edges of holes. Insert length of 20 gauge copper wire through casings of legs and arms. With cloth body right side out, pull over feet and legs until wire and leg casings are in place over porcelain groove in top of legs. Twist wire until cloth leg is securely in place. A little glue in the porcelain groove will help make leg more secure (fig. 7). Pull body up in place inserting arm armature through openings (fig. 9). With front of armature facing you, thread 18" of 5/32" round elastic starting from behind armature, under arms then up through loop (fig. 8). Firmly stuff body with polyester fiber-fil, packing tightly under arms. Blind stitch back opening leaving elastic exposed. Be sure elastic exits through the center back seam at the top. 2 (fig. 4) Opening for arm armature (fig. 6) (fig. 8) (fig. 5) (fig. 7)
20 Arms: With cloth arm right side out, slip over porcelain arm until wire and casing fit into porcelain groove. Twist to secure. Glue can be used in porcelain groove to make arm more secure. Fold cloth arm back over porcelain to expose inside cavity. Insert 6 armature beads into arm cavity. Firmly pack with polyester fiber-fil or paper toweling, keeping armature centered. Fill last 1" of arm cavity with low temperature glue (fig.10). Stuff cloth arms with polyester fiber-fil. Fold raw edge under 1/4" and stitch to body as shown in figure 11. Attaching Head and Shoulder Plate: Attach head to shoulder plate by running both strands of elastic through center hole in shoulder plate. Thread one strand of elastic through each hole at the top of head. Tie securely. Head should be adjustable, but not loose, in shoulder plate. Cut 4-4" strips of 1/2" twill tape. Thread through shoulder plate holes. Position shoulder plate on body and pin in place (fig. 12). Stitch twill tape with heavy duty thread. (fig. 9) (fig.10) (fig. 11) (fig. 12) 3
21
22
23
24
25
26
27
by Dianna Effner Kayla, Sonny Boy, Molly Body Pattern 14 - Standing Body Pattern and Assembling Instructions
 Original Designs for the Doll Industry, Inc. PO BOX 174 JAMESTOWN, MISSOURI 65046 April 15, 1998 (660) 849-2114 fax (660) 849-2358 14 Kayla, Sonny Boy, Molly Body Pattern by Dianna Effner 14 - Standing
Jane/Amber/ Boy Wizard 17" by Dianna Effner Body Pattern and Assembling Instructions. May 15, 2002 (660) fax (660)
 fax (660)") May 15, 2002 (660) 849-2114 fax (660) 849-2358 17" Jane/Amber/ Boy Wizard by Dianna Effner 17 - Body Pattern and Assembling Instructions MATERIALS LIST Armature 38" of 12 gauge insulated copper wire Polyester
May 15, 2002 (660) 849-2114 fax (660) 849-2358 17" Jane/Amber/ Boy Wizard by Dianna Effner 17 - Body Pattern and Assembling Instructions MATERIALS LIST Armature 38" of 12 gauge insulated copper wire Polyester
Dolly. By Dianna Effner. Dolly Painting and Assembly Instructions. Original Designs for the Doll Industry, Inc. PO BOX 174 JAMESTOWN, MISSOURI 65046
 Original Designs for the Doll Industry, Inc. PO BOX 174 JAMESTOWN, MISSOURI 65046 Copyright 1991 Dolly By Dianna Effner Dolly Painting and Assembly Instructions SUPPLIES Slip- Bell Porcelain Doll Flesh
19" emily, Jenny, & Portrait Dolls. By Dianna effner. Body Pattern and Construction. Strip
 Original Designs for the Doll Industry, Inc. PO BOX 174 JAMESTOWN, MISSOURI 65046 19" emily, Jenny, & Portrait Dolls Copyright 2001 By Dianna effner Body Pattern and Construction ArmATure ConSTruCTIon
Huggy Bear Body Pattern. by Dianna Effner
 Huggy Bear Body Pattern October 15, 2015 by Dianna Effner (660) 849-2114 fax (660) 849-2358 Original Designs for the Doll Industry, Inc PO Box 174 Jamestown, MO 65046 www.expressionsdolls.com Supplies
Sewing. # Yanna Jo Doll. Fulk-size Patterns for 22" Doll and Clothing
 Sewing LeisureArtsLibrary.com #800613 Yanna Jo Doll Fulk-size Patterns for 22" Doll and Clothing Click Here to sign up for the FREE Leisure Arts E-newsletters at www.leisurearts.com to receive free projects,
HOW TO MAKE A COMPOSITION ZISA DOLL
 HOW TO MAKE A COMPOSITION ZISA DOLL WITH STUFFED FELT BODY AND 3D PRINTED HANDS AND HEAD A composition doll is made of different materials, in this case the body and limbs are sewn in felt and then padded,
BONUS DOLL PATTERN: ILMARIA: GUARDIAN OF THE STARS 16-INCH (43CM) ALL CLOTH DOLL 2009 PATTI MEDARIS CULEA
 ALL CLOTH DOLL 2009 PATTI MEDARIS CULEA") BONUS DOLL PATTERN: ILMARIA: GUARDIAN OF THE STARS 16-INCH (43CM) ALL CLOTH DOLL 2009 PATTI MEDARIS CULEA 1 Ilmaria Cloth Doll Making Supplies 1/3 yard/meter White 100% Cotton Fabric for the body Thread
BONUS DOLL PATTERN: ILMARIA: GUARDIAN OF THE STARS 16-INCH (43CM) ALL CLOTH DOLL 2009 PATTI MEDARIS CULEA 1 Ilmaria Cloth Doll Making Supplies 1/3 yard/meter White 100% Cotton Fabric for the body Thread
1. Print our the Fox Hat pattern (pages 8-11 of this tutorial) at 100% of actual size. Cut out the
 at 100% of actual size. Cut out the") Other Supplies - 2 black buttons (for eyes) - One bag of fiber stuffing - Paper printer - Basic sewing supplies: - sewing machine - needle & coordinating thread - straight pins - scissors & fabric shears
Other Supplies - 2 black buttons (for eyes) - One bag of fiber stuffing - Paper printer - Basic sewing supplies: - sewing machine - needle & coordinating thread - straight pins - scissors & fabric shears
Country Commandments Stitchery
 Country Commandments Stitchery Notes 1. Read pattern through before starting. 2. Sewing Terms: RST-right sides together RSO right side(s) out 3. Thank you for purchasing my pattern! You may sell the finished
astrobunny & cosmokitty plush a sewing pattern by
 astrobunny & cosmokitty plush a sewing pattern by astrobunny & cosmokitty plushies Ever on an adventure, best friends Astrobunny and Cosmokitty are searching the farthest reaches of space to see what new
 Supplies WARM AND NATURAL COTTON BATTING FIBER FILL STUFFING COTTON PRINT FABRIC FOR DRESS OLD LIGHT WEIGHT SWEATER TO CUT UP SMALL PIECE OF MUSLIN FOR CANDY RABBIT PLAID-APPLE BARREL NUTMEG BROWN CRAFT
a free sewing pattern by
 kitty bean plush a free sewing pattern by 2 kitty bean plush This cute and simple plush is a variation on a tsum-tsum in that it has a long round body that's perfect for stacking! Though the basic shape
Basic Bearmaking Instructions
 Laying out the Pattern Basic Bearmaking Instructions We recommend that you read the instructions right through before commencing. This will help you to understand the steps you need to take. Copying your
Lolo the Llama. Featuring Coats Dual Duty XP. Supplies
 Technique: Designed By: Skill Level: Crafting Time: Finished size: Sewing Linda Turner Griepentrog Beginner Weekend 18 (45.72cm) tall, excluding ears Featuring Coats Dual Duty XP Lolo, with her furry fleece,
Intermediate Doll. Materials. Tools
 Intermediate Doll Tania is an elf princess who is getting ready for a grand affair. She is made with the second body pattern and the face pattern (pages 276 277 in Creative Cloth Doll Collection). The
Embroidery Floss: To match cuff, black, red, and to match doll's dress. 2 Rusty bells (medium size) or use rusting recipe below
 or use rusting recipe below") Approximately 18 inches tall You Will Need: Material: Material for stocking and cuff. Scraps of muslin, tea-dyed muslin, brown flannel (gingerbread man), material for snowman's hat & scarf, doll's dress,
Approximately 18 inches tall You Will Need: Material: Material for stocking and cuff. Scraps of muslin, tea-dyed muslin, brown flannel (gingerbread man), material for snowman's hat & scarf, doll's dress,
Kitschy Friend. Finished Size Approximately 23½in (60cm) tall
 tall") 1 Kitschy Friend This fun lady will always raise a smile, especially if you give her as a gift to your friends. We chose certain fabrics, with details given in the instructions, but you can easily replace
1 Kitschy Friend This fun lady will always raise a smile, especially if you give her as a gift to your friends. We chose certain fabrics, with details given in the instructions, but you can easily replace
Santa Mold Project. Supplies:
 Santa Mold Project Supplies: Santa Face and Hand molds Glue Gun 6 oz. flesh colored polymer clay Toothpick 1 oz. red and green polymer clays Xacto knife Minuscule amount of acrylic Ceramic tile paint in
Muslin Snow Family. Sewing # Approx Finished Sizes: 19", 12½", & 4½" h. 3 Designs by Susan Brack
 Sewing LeisureArtsLibrary.com #800468 Muslin Snow Family 3 Designs by Susan Brack Approx Finished Sizes: 19", 12½", & 4½" h Click Here to sign up for the FREE Leisure Arts E-newsletters at www.leisurearts.com
WELCOME SEASONS. by Deb Mishima
 WELCOME SEASONS by Deb Mishima EXCLUSIVE Welcome Seasons by Deb Mishima PALETTE DecoArt Americana Acrylics Aloe #13303 Antique White #13058 Asphaltum #13180 Buttermilk #13003 Canyon Orange #13238 Coral
Table of Contents. Crafts
 Crafts - Section I Table of Contents Crafts Aardvark to Zebra... I-3 Special Furniture Techniques... I-4 Stretchy Bracelet Jewelry... I-4 Miss Kitty...I-5 Patterns for Miss Kitty and Miss Annie...I-6 Miss
Josephine Doll Pattern
 Josephine Doll Pattern Making these dolls means pulling out your scrap bin and button box and having a wonderful time pairing up patterns and prints. Each doll has felt hair and some have felt balls as
TOTT Hair Bow Instructions Ribbon Covered Snap Clips These instructions may not be reproduced or copied. Hair Bows made using these instructions MAY
 Supplies & Tools Ribbon and supplies may be purchased from: http://www.theribbonretreat.com Hair Bow Making Tip Hair Bow Maker Ribbon Barrettes & Clips Cutting Mat Scissors Hi-Temp Glue Gun Glue Sticks
Pretty Poppet. Print out the pdf files. Do NOT select fit to page! They will come out wonky! No Margins! Margins are BAD!
 Pretty Poppet Please read through the entire instruction sheet before making this doll. These instructions are written for a beginning level doll maker. Tips for Beginners: 1. Set your sewing machine stitch
FREE. animal crackers softies. Creative Ideas from Jo-Ann more projects, tips & techniques at Joann.com
 animal crackers softies FREE SUPPLIES & TOOLS: 1/2 yd. of Animal Crackers fabric, 1/4 yd. of Illusions contrast fabric for elephant 1/2 yd. of Animal Crackers fabric, 1/8 yd. of Etchings contrast fabric
Christmas Blocks. by Susan Kelley
 Christmas Blocks by Susan Kelley Christmas Blocks By Susan Kelley Oh, what fun it is to paint a stack of wooden blocks! Display them as a set, or display them one by one. Whether you are a beginner or
cut & sew owl plush a sewing pattern by
 cut & sew owl plush a sewing pattern by 2 cut & sew owl plush If you re reading this, then you likely purchased some of my Cut & Sew Owl Plush fabric from Spoonflower. So thank you! This pattern is for
Mer-kitty. plush. a free sewing pattern by
 Mer-kitty plush a free sewing pattern by 2 mer-kitty plush In celebration of Mer'may' is this adorable ocean feline! A combination of a mermaid and cute kitty, this mer-kitty has a big colorful fish tail
SUPPLIES OTHER SUPPLIES Carson 10 Teddy Bear Pattern
 SUPPLIES Fat 1/8 yd of 5/8 faux fur or mohair (sample is faux fur) 5 x 5 piece of wool felt for paw pads 11mm black glass eyes (1 pair) Small piece white felt (optional) eye whites 2 1 1/8 Joint discs
Jamie - 11 Soccer Bear
 Jamie - 11 Soccer Bear Artist Designed Bear with Flexlimb by Laura Matthews of TeddiesbyLauraLynn.com and FreeTeddyBearPatterns.NET This is not intended to be a child s toy due to the glass eyes and pellets.
Jewelry Making Techniques
 Jewelry Making Techniques ITSY BITSY LEAVES: The itsy bitsy leaves are created by taking a piece of clay about one half the size of a pea and making a small leaf shape. The leaves do not have to be exact.
Beginning Level (9-11 Years)
") OKLAHOMA COOPERATIVE EXTENSION SERVICE 4-H Fabrics & Fashions Construction Items Beginning Level (9-11 Years) Division of Agricultural Sciences and Natural Resources Oklahoma State University OKLAHOMA
OKLAHOMA COOPERATIVE EXTENSION SERVICE 4-H Fabrics & Fashions Construction Items Beginning Level (9-11 Years) Division of Agricultural Sciences and Natural Resources Oklahoma State University OKLAHOMA
SUPPLIES TOOLS Mini Teddy Bear Pattern
 SUPPLIES TOOLS 7 X 9 piece of 1/2 ultra sparse mohair 2 x 2 piece of felt (footpads) 5 Mini T cotterpins 6 ½ joint discs 4 3/8 joint discs 5mm black glass eyes (1 pair) Artificial sinew (or strong waxed
HOW TO SEW FLEECE FABRIC
 1H HOW TO SEW FLEECE FABRIC http://localhost/techniques/how-to-sew-fleece-fabric Some tips to sew on a wonderful fabric. Step 1 Fleece fabrics are made of polyester or acrylic fibers which are water resistant.
Monster Marionette ART GRADE LEVEL FOURTH FIFTH MATERIALS
 MATERIALS FOR STUDENT: (one per student unless otherwise noted) FloraCraft Make It: Fun Foam: Rectangular pieces (arms & legs) cut from large Foam Block: Four 1" x 3" x 1" thick, Four 1" x 2 1/2" x 1"
Max Launch Abort System Prod. No *Kevlar is a registered trademark of Dupont
 Flying Model Parts List Max Launch Abort System Prod. No. 3014 A 11820 - Body Tube 3.5 Diam x 5.5" Long B 11824 - Orange Capsule Base Shoulder Ring C 16032 - Laser-cut Ring motor mount rear D 16033 - Laser-cut
neko atsume plushies a sewing pattern by
 neko atsume plushies a sewing pattern by neko atsume plushies These plushies are of course inspired by the adorable Neko Atsume (kitty collector) kitties -- specifically Pepper, Dottie, and Misty. They
MATERIAL REQUIREMENTS:
 This pattern contains a pattern for a 30-inch doll. The doll may be made of flesh, tan or peach broadcloth, percale or any plain cotton material. Use six strand cotton for embroidering features and straw
Beary Christmas Between the Vines 2012 Jamie Mills-Price
 Beary Christmas Between the Vines 2012 Jamie Mills-Price PALETTE: Deco Art Americana Bleached Sand Burnt Umber Crimson Tide Fawn Lamp Black Milk Chocolate Plantation Pine Rookwood Red Uniform Blue Warm
cut & sew AXOLOTL PLUSH a sewing pattern by
 cut & sew AXOLOTL PLUSH a sewing pattern by 2 axolotl plush If you re reading this, then you likely purchased some of my Cut & Sew Axolotl Plush fabric from Spoonflower. So thank you! This cute belly-down
a free sewing pattern by
 a free sewing pattern by 2 sloth plush Bask in your lazy side with this adorable and interactive sloth plush. The claws have Velcro so it's able to hang on anything at the ready like the corner of a door,
SUPPLIES OTHER SUPPLIES Marco 12 Teddy Bear Pattern
 SUPPLIES Fat ¼ yd of 1 sparse, straight mohair 4 x 4 piece of wool felt or ultrasuede 10mm black glass eyes (1 pair) 2 1 ¼ Joint discs 4 1 ½ Joint discs 4 1 ¾ Joint discs Jointing hardware of choice (5
a free sewing pattern by
 a free sewing pattern by 2 rat plush Whether you think rats are adorable or excitingly scary, this pattern is sure to make something you'll love! The instructions here go over making a sweet little rodent
Growler Getter. Supplies: ½ yard main fabric. ½ yard Insul-Shine. 8 x 10 piece of Fusible Fleece 2. ¼ yard or fat quarter of coordinating fabric
 Supplies: ½ yard main fabric ½ yard Insul-Shine 8 x 10 piece of Fusible Fleece 2 ¼ yard or fat quarter of coordinating fabric 1 9 x 12 sheet of Steam-A-Seam 2 1 yard nylon cord 1 cord stop Coordinating
ESPADRILLES Boots Instructions
 ESPADRILLES Boots Instructions SUPPLIES NEEDED: Espadrille Soles Espadrille Creative Yarn Espadrille Large Curved or Straight Needle Espadrille Needle Pullers Espadrille Yarn Wax Espadrille Glass Head
SUPPLIES. OTHER SUPPLIES Marking pen Masking tape Aleene s Stop Fraying Toothpick Basic sewing supplies (See Tools link at
 SUPPLIES 30 x 9 piece of 5/8 curly matted mohair 7 x 6 piece of wool felt or ultrasuede 8 mm black glass eyes (1 pair) 6-1 fiberboard discs (neck & front legs) 4-1 ¼ fiberboard discs (rear legs) 5 Cotterpins
Floral Welcome. by Gisele Pope
 Floral Welcome by Gisele Pope Floral Welcome By Gisele Pope Palette: DecoArt Americana Acrylics Payne s Grey 13167 Sapphire 13099 DecoArt Americana Décor Chalky Finish Paints Everlasting 15100 Surface:
sugar skull kit ty plush a sewing pattern by
 sugar skull kit ty plush a sewing pattern by sugar skull kit ty plush This pattern pays homage to the beautiful calaveras seen in Dia de Muertos art. It s a simple kitty plush with button jointed limbs
Winter Wolf. by Barb Halvorson
 Winter Wolf by Barb Halvorson Winter Wolf By Barb Halvorson Palette: DecoArt Americana Acrylics Burnt Sienna #13063 Cadmium Yellow #13010 Cocoa #13253 Lamp Black #13067 Slate Grey #13068 Traditional Burnt
a free sewing pattern by
 a free sewing pattern by 2 Kupo! Fans of Final Fantasy are sure to love this extra fuzzy Moogle! It has all the classic details that make the character so adorable -- including little wings, kitty ears,
CHAPTER 1. Kid Stuff
 CHAPTER 1 Kid Stuff KID STUFF SECTION 1 Child s Necklace, Bracelet & Pin Set CHILD S NECKLACE, BRACELET AND PIN SET Designed by Priscilla Hewitt Copyright 2001 Priscilla s Crochet Materials: Hot glue or
love dragon plush a free sewing pattern by
 love dragon plush a free sewing pattern by 2 love dragon plush A combination of a Valentine's and Chinese New Year celebration with the most adorable result! This little dragon pattern is done in the more
Sewing and Clothing ID
 Sewing and Clothing ID 1 Acrylic Ruler -- Ruler used in crafts and clothing showing different measurement. May come in different shapes and sizes. Aida Cloth Beautiful even-weave cloth, popular for cross
FINISHED HEAD SIZE: 0 3 MONTHS: 14"; 3 6 MONTHS: 16"; 6 9 MONTHS: 18"; 9 12 MONTHS: 20"
 Amy Butler s Little Stitches for Little Ones Two Very Cute Hats FINISHED HEAD SIZE: 0 3 MONTHS: 14"; 3 6 MONTHS: 16"; 6 9 MONTHS: 18"; 9 12 MONTHS: 20" DIFFICULTY LEVEL: 3 For hip baby boys and girls alike!
cut & sew ferret plush a sewing pattern by
 cut & sew ferret plush a sewing pattern by 2 ferret plush If you re reading this, then you likely purchased some of my Cut & Sew Ferret Plush fabric from Spoonflower. So thank you! Make your favorite cat
MewnicorN. pillow plush. a sewing pattern by
 MewnicorN pillow plush a sewing pattern by 2 A super cute plush that's big and cuddly enough to be a pillow! This simple stuffed cat is sure to warm the heart of any magic-lover with its majestic unicorn
Happy Winter Snowmen Table Decoration
 Happy Winter Snowmen Table Decoration Materials Tilda Classic Basic fabrics (Fig A) Apliquick fusible stabilizer Appliqué glue pen (such as that used for paper piecing) Pointy end of a flower stick or
Printing Instructions: This file is formatted to print on 8.5 x11 Letter paper. If printed on other paper, the scale may be off.
 Anatomy Doll Pattern by Cat Carlisle 1 Printing Instructions: This file is formatted to print on 8.5 x11 Letter paper. If printed on other paper, the scale may be off. 1. Open the PDF file using Acrobat
SUPPLY LIST. Chris Buckingham. Marathon Pictures
 SUPPLY LIST Chris Buckingham Marathon Pictures SUPPLY LIST For use with Puppet Building: Agoro Style, Series One The series can be found at http://www.agorothephobicmonster.com/video-reel Current as of
THE DDL~c A~TWD~KS RT. 9 BOX 119 HWYZ74 SEVEN POINTS. TX TEL Z-94Z6 FAX Z-9S0Z ORDERS ONLY Boo-BB6-36SS
 1996 (Fits Bailey sh.lpl. Hannah Rose arms 28" bent legs) FABRC AND NOTONS 5/8 yd. Denim 45" wide Oumper) 5/8 yd Blue Chambray (blouse) 5/8 yd. Plaid 1/2 yd Swimsuit Knit (bike pants) 1/2 yd. Stretch Lace
shiba cube puppy plush a sewing pattern by
 shiba cube puppy plush a sewing pattern by If you ve ever sewn a cube before, this pattern takes it to the next level! The classic geometric shape forms a chubby little puppy body complete with four stubby
axolotl PLUSH a free sewing pattern by
 axolotl PLUSH a free sewing pattern by 2 axolotl plush This cute belly-down plush is a chibi version of everyone's favorite amphibious salamander. It has the same external gills and tail fin as the original,
Burlap Pincushion Dolls #12556 / 4 Files / 2 Dolls
 #12556 / 4 Files / 2 Dolls Note: Some designs in this collection may have been created using unique special stitches and/or techniques. To preserve design integrity when rescaling or rotating designs in
narwhal plush a free sewing pattern by
 narwhal plush a free sewing pattern by 2 narwhal plush Make your own 'unicorn of the sea' with this cute pocket-sized narwhal! With just 4 pattern pieces, it sews up quickly and is great for a beginner
4-H FCS Skill-a-thon Sewing and Clothing ID
 4-H FCS Skill-a-thon Sewing and Clothing ID Revised March 2011 1 Fabrics Aida Cloth Beautiful even-weave cloth, popular for cross stitch work, crewel embroidery, and other stitchery. Cotton Good material
MARKING SEWING LINES
 MARKING SEWING LINES Press mark seams Stitching a straight seam without a line to follow not only requires perfect cutting but also an accurate eye for gauging the correct distance between the cut edge
After Bouguereau: The Bohemian
 After Bouguereau: The Bohemian www.kingslan.com painting@kingslan.com The Bohemian Surface Portrait grade 20x24 portrait grade canvas. Transfer Information Transfer the design to the surface with gray
Sasha Sundress, Knickers, Bolero & Flip-flops
 Sasha Sundress, Knickers, Bolero & Flip-flops Materials: 0.5 metre Cotton Fabric 0.25 metre fabric for lining Bolero 0.5 metre 1/4 wide elastic for Waist and legs 2 Snap Fasteners Small Beads or Sequins
An Angel for Spring by Tracy Meola
 An Angel for Spring by Tracy Meola An Angel for Spring By Tracy Meola Palette: DecoArt Americana Acrylic Paint Baby Pink #13031 Boysenberry #13029 Burnt Sienna #13063 Buttermilk #13003 Calypso Blue #13234
cut & sew kitty bean plush a free sewing pattern by
 cut & sew kitty bean plush a free sewing pattern by 2 cut & sew kitty bean plush If you re reading this, then you likely purchased some of my Cut & Sew Kitty Bean Plush fabric from Spoonflower. So thank
Bear-ied Treasure Box
 (c) 2006 dmalewski Bear-ied Treasure Box 2006 Deb Malewski debmalewski@sbcglobal.net http://www.debmalewski.com (517)256-9460 1308 Hall St. Eaton Rapids, MI 48827 USA The was specially designed for the
By Laurie Pessetto. Create your pattern. The decorative fabric will be on the edges of the circle layers.
 By Laurie Pessetto Create an elegant, soft, travel pouch to protect jewelry from damage and keep it organized even when your suitcase gets tossed into a plane or trunk! Skill Level Good sewing skills,
A few notes about PDF patterns from Designs by Jude...
 A few notes about PDF patterns from Designs by Jude.... This PDF pattern requires legal size paper (8.5 x 14 ) or A4 size paper (8.27 x 11.69, 210mm x 297mm). It will not print on standard letter. Patterns
Crochet Pattern Mo, the monsterboy
 Crochet Pattern Mo, the monsterboy Design by K. Godinez Material: Crochet hook 2,5 Catania wool from Schachenmayr in shades of green, beige and blue, a small amount of white wool to embroider the tooth
Elf On a Shelf. LOOM: KB Sock Loom 2 (KB All-n-One Loom could also be used).
.") Designed by Bethany Dailey. LOOM: KB Sock Loom 2 (KB All-n-One Loom could also be used). YARN: 1 each (or portion of 1 skein each) Lion Brand Vanna's Choice (170 yrds per skein, #4 worsted weight, 100%
Designed by Bethany Dailey. LOOM: KB Sock Loom 2 (KB All-n-One Loom could also be used). YARN: 1 each (or portion of 1 skein each) Lion Brand Vanna's Choice (170 yrds per skein, #4 worsted weight, 100%
j e n n y l o v e s b e n n y B o u t i q u e B e a r s Sunday by Jenny Lee
 j e n n y l o v e s b e n n y B o u t i q u e B e a r s Sunday by Jenny Lee Please meet an old friend of mine...the original Sunday!! Sunday loves nothing better than to laz around and do absolutely NOTHING!!...hmmm
Christmas Magic. by Linda Samuels
 Christmas Magic by Linda Samuels Christmas Magic By Linda Samuels Palette: DecoArt Americana Asphaltum #13180 Avocado # 13052 Black Green #13157 Black Plum #13172 Bleached Sand #13251 Burnt Sienna #13063
Chapter 2: Sewing and stuffing the hands and feet
 [23] Fold doe suede in half with RST and place templates for upper and lower legs, and upper and lower arms on top. Trace around each template. Stitch on the tracing lines of each piece, leaving open where
Valentine Boy. Pattern and Instructions. By Cutest Voodoo
 Valentine Boy Pattern and Instructions By Cutest Voodoo Before we start... This pa ern is copyrighted by Cutest Voodoo. This is an original design and is made for personal use only. Mass produc on of this
FANTASTIC DRAWSTRING PURSE Jenny Haskins
 FANTASTIC DRAWSTRING PURSE Jenny Haskins Purses are so in vogue at present but they are also really outrageously priced so here is a beautiful purse that is fun to make and looks just magic. NOTE: Pattern
Wanda the Witch. October 2012 EXCLUSIVE ONLINE PROJECT
 Everyone s out and about on All Hallow s Eve to experience the mystery of the magic. Supplies Viking Woodcrafts Barrel Stave, #20-11156 (29" x 4-1/2") DecoArt Americana Acrylic Paint: Blue Harbor, Boysenberry
Cut 1 lightweight interfacing
 1 2 A note on interfacing for this bag: This pattern is intended to produce a slouchy bag, so you will want to look carefully at your fabrics before you decide on which interfacing and stabilisers to use.
Make a dimensional candy holder with embroidery and quilted accents.
 By Evy Hawkins Santa Claus is coming to town and he has two bags of treats for good little girls and boys! A delightful addition to your holiday décor, this embroidered treat holder is assembled using
A few notes about PDF patterns from Designs by Jude...
 A few notes about PDF patterns from Designs by Jude.... This PDF pattern requires legal size paper (8.5 x 14 ) or A4 size paper (8.27 x 11.69, 210mm x 297mm). It will not print on standard letter. Patterns
1. Locate the pattern on the
 Here s a fine feathered friend who s as charming as he is wise. Find the perfect perch for him so you can display his plumage in all its glory. Size approximately 6 x 6 x 6 inches Materials ~ Pattern (see
Special thanks to the American Rabbit Breeders Association
 Rabbit Project Training Aid Pattern for Realistic Cloth Model Rabbit The model rabbit made from this pattern provides an excellent training aid for use by project helpers, extension educators, vocational
a free sewing pattern by
 a free sewing pattern by 2 witch kitty plush Ready your broom and cape! This adorable little kitty is all decked out for Halloween. The pattern comes with loads of cute details, including a capelet with
Figuring the amount of fabric needed: 0 Measure the window and record each measurement A. Width inside frame B. Length inside frame C. Width outside f
 _ MAKING DOM-AN smut-s : 1 y,_ H z i. I i 1 ~ :... L illiqlgiilliillql' 'iiliilliill'idnz The Roman shade is a popular, versatile window treat ment. Its tailored appearance blends with many decorating
PINWHEEL STAR WORKSHOP QUILT
 PINWHEEL STAR WORKSHOP QUILT Finished Size: 9" x 9" FABRIC REQUIREMENTS fat quarter or less of each fabric Fabric A - Medium (or dark) print for center star Fabric B - Dark (or medium) print for pinwheels,
Bound and Determined:
 Think You Don t Have Time to Create Beautiful Quilts? From quick-quilt adaptations of classic patterns to fun, fresh novelty designs, McCall s Quick Quilts provides you with a treasury of time- and effort-saving
SPRING SHORTS # 1403
 PATTERN RUNWAY SPRING SHORTS # 1403 Launch into spring with these super cute and easy to wear elastic waist shorts. With a Paper-Bag waist and front side pockets, these little sweeties are sure to be a
A sweet 18 little girl just waiting to steal your heart
 A sweet 18 little girl just waiting to steal your heart I first designed this doll in 1999, during my formative years as a doll maker. She, like me has evolved over the ten years since she first came to
"Delores Bear" 16 (41cm) To make "Delores Bear" you will need:
 To make Delores Bear you will need:") "Delores Bear" 16 (41cm) To make "Delores Bear" you will need: Viscose plush fabric 22 x 16 Suedette 6 x 6 1/2 5 x 26mm Nut & bolt joints 2 x 12mm Black safety eyes Perli thread (nose) Floral fabric (drawers)
"Delores Bear" 16 (41cm) To make "Delores Bear" you will need: Viscose plush fabric 22 x 16 Suedette 6 x 6 1/2 5 x 26mm Nut & bolt joints 2 x 12mm Black safety eyes Perli thread (nose) Floral fabric (drawers)
Ornament Finishing Techniques
 Ornament Finishing Techniques by Anne Gale The back of the ornament should enhance, not detract from the quality of the finished ornament. There are many ways to finish ornaments depending on type, shape
Designed by Melissa DiRenzo thesweetescape.ca
 instructions Designed by Melissa DiRenzo thesweetescape.ca YOU WILL NEED 3 -diameter foam ball Christmas sweater Hot glue gun and glue sticks 3/8 -wide satin ribbon Elastic thread: metallic Note: A child
Christmas Decorations Christmas Decorations RNata
 Christmas Decorations 24.11.2017 Christmas Decorations RNata COPYRIGHT: This is a pattern designed and written by RNata. It s for personal use only. You may not sell, share (printed or online), reproduce,
SPOOKY TOWN. by Betty Bowers
 SPOOKY TOWN by Betty Bowers EXCLUSIVE Spooky Town by Betty Bowers PALETTE DecoArt Americana Acrylics Antique Gold #13009 Canyon Orange #13238 Hauser Dark Green #13133 Hauser Light Green #13131 Lamp Black
Summer Day Teddy. DecoArt Paints. Dazzling Metallics Ice Blue, Splendid Gold Sharon Chinn Page 1. by Sharon Chinn
 DecoArt Paints Traditions Artist Acrylics or Titanium White - DAT35 Carbon Black - DAT42 Dark Grey Value 3 - DAT41 Medium Grey Value 6 - DAT40 Burnt Umber - DAT46 Raw Sienna - DAT43 Yellow Oxide - DAT12
Jodie s Sewing Studio
 Jodie s Sewing Studio Friday s Kuspuk Pattern How to Use a Jodie s Sewing Studio Pattern For best results, study the pattern pieces first and read the notes in the margins and the terms on each piece.