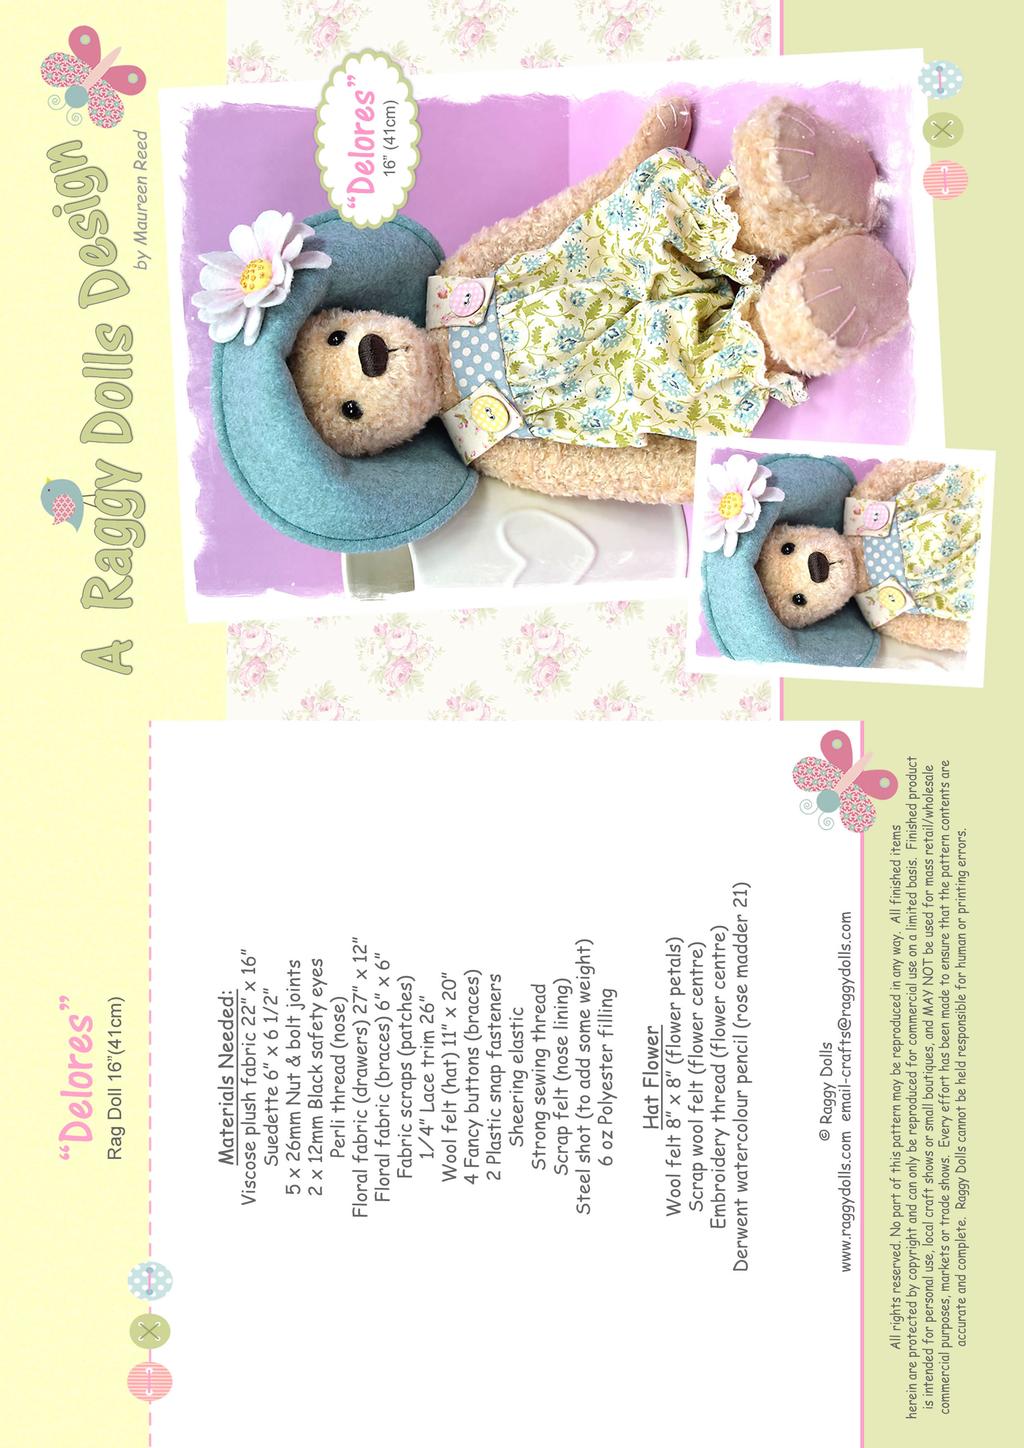
"Delores Bear" 16 (41cm) To make "Delores Bear" you will need:
|
|
|
- Derick Hamilton
- 5 years ago
- Views:
Transcription
1
 27 x 12 Floral fabric (braces) 6 x 6 Fabric scraps (patches) 1 4 Lace trim 26 Wool felt (hat) 11 x 20 4 Fancy buttons (braces) 2 Plastic snap fasteners Sheering elastic Strong sewing thread")
2 "Delores Bear" 16 (41cm) To make "Delores Bear" you will need: Viscose plush fabric 22 x 16 Suedette 6 x 6 1/2 5 x 26mm Nut & bolt joints 2 x 12mm Black safety eyes Perli thread (nose) Floral fabric (drawers) 27 x 12 Floral fabric (braces) 6 x 6 Fabric scraps (patches) 1 4 Lace trim 26 Wool felt (hat) 11 x 20 4 Fancy buttons (braces) 2 Plastic snap fasteners Sheering elastic Strong sewing thread Scrap felt (nose lining) Steel shot (to add some weight) 6 oz Polyester filling Hat Flower Wool felt 8 x 8 (flower petals) Scrap wool felt (flower centre) Embroidery thread (flower centre) Derwent watercolour pencil (rose madder 21) Please read the following carefully before you begin: LAYOUT AND CUTTING a. Cut out the paper pattern pieces, seam allowances of 6mm (¼") are included. b. Lay out the pattern pieces on the back of the fabric with the arrows following the direction of the pile. Draw around pattern pieces remembering to reverse parts of the head, inner arm, outer arm, legs body and paw pad. DIAGRAM 1 c. Cut out pieces carefully using the point of your scissors use small snipping actions to prevent damage to the fabric pile, (see diagram 1). Delores Bear 1
3 STITCHING YOUR BEAR a. When sewing always place pile sides of fabric together. b. Always pin and tack everything. c. Take care to place pins at right angles to the fabric so that you don't lose any pins, (see diagram 2). DIAGRAM 2 LEGS a. Sew legs together leaving open where indicated on pattern, (see diagram 3). LEG b. Sew foot pads to lower edge of legs matching centre front and center back points, (see diagram 4). c. Make small holes where indicated at leg joints, (always use a blunt tool such as a knitting needle or awl). DIAGRAM 3 d. Turn carefully. FOOT PAD ARMS a. Sew paw pads to the inner arm matching D (see diagram 5). b. Sew inner arms to outer arms leaving open where indicated on pattern, (see diagram 6). c. Make small holes at arm joints and turn carefully. INNER ARM DIAGRAM 4 INNER ARM D PAW PAW DIAGRAM 5 DIAGRAM 6 Delores Bear 2
4 BODY DART a. Sew darts in the two body sections, see diagram 7). b. Sew two body pieces together leaving open where indicated on the pattern, (see diagram 7). BODY b. Make small holes at arm and leg joints, turn carefully. DART DIAGRAM 7 HEAD AND EARS EAR a. Sew ears together in pairs leaving open where indicated on pattern, (see diagram 8). b. Turn carefully and slip stitch opening. c. Sew head from A to B, (See diagram 9). d. Sew in head gusset, the easiest way is to start at the centre nose and sew first one side and then the other (matching marks on side head with marks on head gusset), (see diagram 10). e. Carefully turn head. A DIAGRAM 8 SIDE HEAD B DIAGRAM 9 CENTRE NOSE HEAD GUSSET DIAGRAM 10 Delores Bear 3
5 FIXING EYES Note: The dots for the position of the eyes are marked on the pattern as a guide only. a. Stuff the head lightly. b. Cut two small circles of dark fabric or card, about the same size as the eyes. c. Using pins to hold the circles in place, try different eye positions until you are satisfied with the look of your bear, (see diagram 11). d. Mark this position carefully. e. Remove the stuffing and using your awl make small holes in the positions you have marked. f. To fix the eye, slip the stem through the hole and secure inside with the washer, (see diagram 12). EYE DIAGRAM 11 DIAGRAM 12 FUR FABRIC WASHER STUFFING AND JOINTING THE HEAD (See diagram 13). a. Stuff the head firmly paying particular attention to the nose, use small amounts of filler to start with and when you have a firm well shaped nose, larger amounts can be added. b. Using strong thread, run a gathering stitch around the neck edge. LOCKING NUT WOODEN DISCS DIAGRAM 13 WASHERS BOLT c. Fit the joint by sliding a washer onto the bolt followed by one of the wooden discs, (see diagram 14). d. Pull the gathers up tightly and secure in place with a few back stitches. e. Slip the stem of the joint through the small hole at neck of body. f. Slip first the wooden disc then the washer onto the bolt from inside the body. g. Fit the locking washer using a socket nut spinner. WASHER BOLT HEAD WOODEN DISC DIAGRAM 14 Delores Bear 4
6 JOINTING ARMS AND LEGS a. b. Fit the joint as before by sliding a washer onto the bolt followed by one of the wooden discs. Slip the stem of the joints through the holes one at a time, starting with the legs and assembling the joint on the inside of the body as you go, (see diagram 15 & 16). BOLT WASHER WOODEN DISCS 26mm JOINTS 26mm JOINTS LOCKING NUT 26mm JOINTS WASHER DIAGRAM 15 STUFFING YOUR BEAR DIAGRAM 16 OPTIONAL: To give your bear lots more cuddle appeal you can add some plastic pellets or steel shot. NOTE: This is not suitable for young children. An alternative to pellets and steel shot which would be suitable for young children is pudding rice. Bake the rice in an oven proof dish on a medium heat for approximately 30 minutes or until quite hard, allow to cool. Using diagram C as a guide and the following instructions carefully stuff your bear. FILL LIGHTLY FILL LIGHTLY RICE OR PELLETS FILL LIGHTLY FILLER RICE OR PELLETS FILL LIGHTLY FILL LIGHTLY DIAGRAM C a. RICE OR PELLETS Stuff the arms and legs firmly, making sure the paws and feet are well filled before continuing up the arms and legs. Delores Bear 5 FILLER
7 b. Close the openings with a ladder stitch using strong thread, (see diagram 17). c. Stuff the body firmly and close the back opening with a ladder stitch. LADDER STITCH NOSE AND MOUTH DIAGRAM 17 a. Cut a small rectangle of felt and place in position for nose, (see diagram 18). b. Stitch in place and oversew edges, (see diagram 18). c. Using Perle thread and the felt as a guide, going from top to bottom stitch the left side first and then the right, (see diagram 19). Finish with the needle at the bottom centre. d. The mouth is formed with an upside down Y shape, (see diagram 20). DIAGRAM 18 OVERSEW EDGES DIAGRAM 19 DIAGRAM 20 EARS a. Place the ears on the head and move them around until you find a position that you like. b. Pin them in place and stitch using strong thread and a ladder stitch, (see diagram 21). EAR EAR Delores Bear 6 DIAGRAM 21
8 CLAWS a. Using Perli thread, make a small knot in the end. b. Take your needle through the back of the paw and come out at position A. Pull firmly so that the knot slips through the fabric being careful not to pull the knot all the way through to the front, (see diagram 22). H F G E C A D B c. Take the needle through the back of the paw at position B and come out at C. d. Repeat until you have finished four claws, now run the thread back and forth through the back of the paw and lose the end of the thread. DIAGRAM 22 DELORES S CLOTHES DRAWERS a. Neaten lower edges of drawers legs. DRAWERS b. Press under 6mm (¼ ). c. Stitch 6mm (¼ ) lace trim to lower edge, (see diagram 23). GATHERING LINE FOR ELASTIC DIAGRAM 23 GATHERING LOWER EDGE OF DRAWERS WITH ELASTIC i. Using the widest Zig-Zag and a short stitch length. ii. Tack elastic at side seam, (see diagram 24). DIAGRAM 24 iii. iv. Stretch elastic out as far as possible and Zig-Zag over the elastic without catching it in the stitching. This will form a casing so that when you reach the end you can simply pull the elastic to desired length to fit around the bears legs, (see diagram 25). DIAGRAM 25 Delores Bear 7
9 d. With right sides together stitch centre front seam, (see diagram 26), neaten edges. e. Open drawers out, (see diagram 27). DRAWERS OPTIONAL: PATCHES i. Patches can be any size and placed in any position you wish. DIAGRAM 26 ii. Cut patch to desired size and press under 6mm (¼ ). f. Place patches in desired positions, pin tack and stitch in place, (see diagram 27). g. Neaten edges of centre backs. h. Stitch centre back seam leaving open where indicated on pattern. i. Press seam open and stitch, (see diagram 28). DIAGRAM 27 j. Bring centre seams together and stitch inside leg seams, (see diagram 29). k. Press under 6mm (¼ ) along one edge of waistband. L. Gather top edge of drawers to fit waist band matching centres, (see diagram 30), stitch in place. m. Fold waistband in half, stitch ends and trim (see diagram 31), turn and press. DIAGRAM 28 CLIP CORNERS WAISTBAND DIAGRAM 29 DIAGRAM 30 DIAGRAM 31 Delores Bear 8
10 n. Tack waistband in position and slip stitch, (see diagram 32). o. Stitch poppers in position marked on the pattern. WAISTBAND BRACES a. Fold braces in half and stitch around edge leaving open where indicated on pattern, (see diagram 33). b. Clip corners, turn right side and press. c. Slip stitch opening. d. Sew braces into position as marked on pattern using buttons, (see diagram 34 & photo). BRACES DIAGRAM 32 BRACES SLIP STITCH DRAWERS DIAGRAM 33 DIAGRAM 34 HAT a. Place right sides of hat brim together and sew, (see diagram 35). Turn right side and press. HAT BRIM b. Top stitch outside edge of brim, (see diagram 36) and tack inside edges of brim together to hold in place. c. Sew hat band to inside edge of brim matching centres, (see diagram 37). DIAGRAM 35 HAT BRIM HAT BAND HAT BRIM DIAGRAM 36 DIAGRAM 37 Delores Bear 9
11 d. Sew centre back seam, (see diagram 38). e. Gather top edge of hat band to fit hat crown, (see diagram 39), carefully sew in place and turn right side out. HAT BAND HAT CROWN HAT BAND HAT BRIM FLOWER DIAGRAM 38 DIAGRAM 39 a. Place the flowers one on top the other staggering the petals as shown, (see diagram 40). Pin to hold in place. GATHER b. Using strong thread gather inner circle using a running stitch through all layers, gently pull up gathers slightly and fasten off. a. Using strong thread sew a running stitch around flower centre, (see diagram 41). b. Gather slightly and stuff. c. Pull gathers up tightly and fasten off, (see diagram 42). DIAGRAM 40 d. Place the flower centre in a central position and carefully ladder stitch using a strong thread, (see diagram 17 & 43). RUNNING STITCH f. Using 2 strands of embroidery silk sew a few french knots to the flower centre, (see diagram 43 & 44). FLOWER CENTRE g. Using a Derwent Watercolour pencil shade flower petals, (see diagram 43). h. Ladder stitch flower to hat, (see diagram 17 & photo for positioning). DIAGRAM 41 GATHER SHADE FRENCH KNOTS FRENCH KNOT FLOWER CENTRE DIAGRAM 42 DIAGRAM 43 DIAGRAM 44 Delores Bear 10
12 "Delores Bear" is now finished. SAFETY This pattern has been designed with safety in mind and if made as per the instructions will be suitable for young children. All buttons and any other detachable items such as ribbons must be removed. However, I cannot be held responsible for the way each maker carries out the instructions. For full information on those regulations, a booklet can be obtained from the Department of Trade and Industry, 1-19 Victoria Street, London SW1. Delores Bear 11
13 D INNER ARM ARM JOINT LEG JOINT BODY ARM JOINT LEAVE OPEN OUTER ARM DELORES BEAR PATTERN PAGE 1 OF 7 OUTER ARM
14 ARM JOINT LEG JOINT BODY LEAVE OPEN INSIDE LEG LEG JOINT OUTSIDE LEG DELORES BEAR PATTERN PAGE 2 OF 7
15 ARM JOINT INNER ARM D DELORES BEAR PATTERN PAGE 3 OF 7 OUTSIDE LEG HEAD GUSSET NOSE LEG JOINT INSIDE LEG
16 A EYE SIDE HEAD DRAWERS ( CUT 2 ON FOLD ) PATTERNED FABRIC B B SIDE HEAD A EYE DELORES BEAR PATTERN PAGE 4 OF 7 CENTRE BACK SEAM PLACE ON FOLD OF FABRIC
17 PLACE ON FOLD OF FABRIC BRACES ( CUT 2 ) PATTERNED FABRIC HAT BRIM ( CUT 2 ON FOLD ) FELT EAR HAT CROWN FELT EAR DELORES BEAR PATTERN PAGE 5 OF 7 EAR EAR
18 P0PPERS P0PPERS BUTTON BUTTON D PAW SUEDETTE WAISTBAND ( CUT 1 ON FOLD ) PATTERNED FABRIC D HAT BAND FELT PLACE ON FOLD OF FABRIC PAW SUEDETTE DELORES BEAR PATTERN PAGE 6 OF 7 SOLE SUEDETTE SOLE SUEDETTE
19 FLOWER ( CUT 2 ) FELT FLOWER CENTRE FELT DELORES BEAR PATTERN PAGE 7 OF 7
j e n n y l o v e s b e n n y B o u t i q u e B e a r s Sunday by Jenny Lee
 j e n n y l o v e s b e n n y B o u t i q u e B e a r s Sunday by Jenny Lee Please meet an old friend of mine...the original Sunday!! Sunday loves nothing better than to laz around and do absolutely NOTHING!!...hmmm
Basic Bearmaking Instructions
 Laying out the Pattern Basic Bearmaking Instructions We recommend that you read the instructions right through before commencing. This will help you to understand the steps you need to take. Copying your
SUPPLIES OTHER SUPPLIES Carson 10 Teddy Bear Pattern
 SUPPLIES Fat 1/8 yd of 5/8 faux fur or mohair (sample is faux fur) 5 x 5 piece of wool felt for paw pads 11mm black glass eyes (1 pair) Small piece white felt (optional) eye whites 2 1 1/8 Joint discs
SUPPLIES OTHER SUPPLIES Marco 12 Teddy Bear Pattern
 SUPPLIES Fat ¼ yd of 1 sparse, straight mohair 4 x 4 piece of wool felt or ultrasuede 10mm black glass eyes (1 pair) 2 1 ¼ Joint discs 4 1 ½ Joint discs 4 1 ¾ Joint discs Jointing hardware of choice (5
SUPPLIES. OTHER SUPPLIES Marking pen Masking tape Aleene s Stop Fraying Toothpick Basic sewing supplies (See Tools link at
 SUPPLIES 30 x 9 piece of 5/8 curly matted mohair 7 x 6 piece of wool felt or ultrasuede 8 mm black glass eyes (1 pair) 6-1 fiberboard discs (neck & front legs) 4-1 ¼ fiberboard discs (rear legs) 5 Cotterpins
Jamie - 11 Soccer Bear
 Jamie - 11 Soccer Bear Artist Designed Bear with Flexlimb by Laura Matthews of TeddiesbyLauraLynn.com and FreeTeddyBearPatterns.NET This is not intended to be a child s toy due to the glass eyes and pellets.
SUPPLIES TOOLS Mini Teddy Bear Pattern
 SUPPLIES TOOLS 7 X 9 piece of 1/2 ultra sparse mohair 2 x 2 piece of felt (footpads) 5 Mini T cotterpins 6 ½ joint discs 4 3/8 joint discs 5mm black glass eyes (1 pair) Artificial sinew (or strong waxed
Welcome! Now, let s get started!
 Welcome! You re about to embark upon a wonderful journey, creating a Teddy Bear! But, I m warning you; once you start you just might get hooked! Whether you make this as a gift or for yourself, your heart
Sasha Sundress, Knickers, Bolero & Flip-flops
 Sasha Sundress, Knickers, Bolero & Flip-flops Materials: 0.5 metre Cotton Fabric 0.25 metre fabric for lining Bolero 0.5 metre 1/4 wide elastic for Waist and legs 2 Snap Fasteners Small Beads or Sequins
Vintage Style Teddy Bear Pattern
 9 by 12 wool or wool blend felt contrasting color wool felt (or blend) for paw pads and nose 6 mm safety eyes needle and thread doll making needle embroidery thread 100% mohair wool cotton fleece teddy
Materials. 1 Cut out the pattern pieces for the doll. Cut out the pattern for the arms and legs twice in mirror image.
 Making the doll All the dolls are made from the same pattern (see Doll Template). The body and head are the same, only the facial expressions and the hair change. Carefully follow the instructions below,
 Supplies WARM AND NATURAL COTTON BATTING FIBER FILL STUFFING COTTON PRINT FABRIC FOR DRESS OLD LIGHT WEIGHT SWEATER TO CUT UP SMALL PIECE OF MUSLIN FOR CANDY RABBIT PLAID-APPLE BARREL NUTMEG BROWN CRAFT
Fabergé Bunny. Skill level 2. Courtesy of Cranston Fabircs. Supplies: Directions:
 Skill level 2 Fabergé Bunny Courtesy of Cranston Fabircs Supplies: 3/4 yd. V.I.P. by Cranston Egg Print, for rabbit 1/4 yd. V.I.P. by Cranston Turquoise Crackle, for inner ears 1/4 yd. V.I.P. by Cranston
sew kids Delight your little one this Easter with
 easter bunny_layout 1 01/02/2013 14:40 Page 1 sew kids Delight your little one this Easter with Corinne Bradd s Tilda bunny Created using beautiful Tilda cotton, our girlie rabbit toy is the perfect springtime
astrobunny & cosmokitty plush a sewing pattern by
 astrobunny & cosmokitty plush a sewing pattern by astrobunny & cosmokitty plushies Ever on an adventure, best friends Astrobunny and Cosmokitty are searching the farthest reaches of space to see what new
Instructions for the Bear. Cutting: Cut pieces from the bear fabric as marked on templates.
 Finished size: about 16 tall from his bottom to his ears. Trace all pattern pieces onto their respective fabrics adding 1/4 inch all around for seam allowance Supplies and materials: 12 oz. Poly-Fil Premium
sugar skull kit ty plush a sewing pattern by
 sugar skull kit ty plush a sewing pattern by sugar skull kit ty plush This pattern pays homage to the beautiful calaveras seen in Dia de Muertos art. It s a simple kitty plush with button jointed limbs
axolotl PLUSH a free sewing pattern by
 axolotl PLUSH a free sewing pattern by 2 axolotl plush This cute belly-down plush is a chibi version of everyone's favorite amphibious salamander. It has the same external gills and tail fin as the original,
Materials. 1 Cut out the pattern pieces for the doll. Cut out the pattern for the arms and legs twice in mirror image.
 Making the doll All the dolls are made from the same pattern (see Doll Template). The body and head are the same, only the facial expressions and the hair change. Carefully follow the instructions below,
Page 1. Jumblenut. The Head. Design by Barbara Allen
 Page 1 Needle felting Needle felting is quite different from creating felt by shrinking wet wool. There s no water involved, it requires very little space and creates no mess at all. It s a craft that
Josephine Doll Pattern
 Josephine Doll Pattern Making these dolls means pulling out your scrap bin and button box and having a wonderful time pairing up patterns and prints. Each doll has felt hair and some have felt balls as
a free sewing pattern by
 a free sewing pattern by 2 witch kitty plush Ready your broom and cape! This adorable little kitty is all decked out for Halloween. The pattern comes with loads of cute details, including a capelet with
a free sewing pattern by
 kitty bean plush a free sewing pattern by 2 kitty bean plush This cute and simple plush is a variation on a tsum-tsum in that it has a long round body that's perfect for stacking! Though the basic shape
AMermaid s. Basic technique. Raising the surface. Jennifer Rochester creates simply folded containers encrusted with stitch
 Jennifer Rochester creates simply folded containers encrusted with stitch PHOTO BY ALAN BENNINGTON For centuries, nomadic tribes have used folded squares of fabric to create soft containers. These folded
Read through everything carefully before beginning. View E from Simplicity C5461 5/8 yd
 Rare Bear Supply List and Sewing Instructions as of Sunday, March 04, 2018 Read through everything carefully before beginning. Pattern pieces - View E from Simplicity C5461 - pieces 33 through 41 Follow
Sock Lamb 2011 Cutest Creations
 Materials needed: Sock Lamb 2011 Cutest Creations sew-on Velcro Felt square for heart 1 square of black craft felt Invisible ink marker 1 pair of white ladies dress socks (preferably flat knit, cotton/poly
TeleTubbie Hand Knit Pattern
 TeleTubbie Hand Knit Pattern Materials needed: about 40-50grms of double knitting or aran weight wool(washable), oddments of black and white and 20grms of brown for snout, inner ears and hands. use 3.5mm
neko atsume plushies a sewing pattern by
 neko atsume plushies a sewing pattern by neko atsume plushies These plushies are of course inspired by the adorable Neko Atsume (kitty collector) kitties -- specifically Pepper, Dottie, and Misty. They
Lolo the Llama. Featuring Coats Dual Duty XP. Supplies
 Technique: Designed By: Skill Level: Crafting Time: Finished size: Sewing Linda Turner Griepentrog Beginner Weekend 18 (45.72cm) tall, excluding ears Featuring Coats Dual Duty XP Lolo, with her furry fleece,
gunter plush a sewing pattern by
 a sewing pattern by gunter plush This project is a huggable little plush made to look like Gunter, the mischievous little penguin and the Ice King s buddy from Adventure Time. It features little wings
Mer-kitty. plush. a free sewing pattern by
 Mer-kitty plush a free sewing pattern by 2 mer-kitty plush In celebration of Mer'may' is this adorable ocean feline! A combination of a mermaid and cute kitty, this mer-kitty has a big colorful fish tail
STITCH A FLAMINGO 88 sewmag.co.uk
 DOWNLOAD TEMPLATES ONLINE Essentials Fabric, pink: spotty, light shade; dark shade; stripe; circles Felt: black; light pink; hot pink Thread: embroidery, white; sewing, coordinating Buttons, 12mm, two
Love Gnomes. Featuring Coats Machine Embroidery Thread. Supplies (for the pair)
") Technique: Designed By: Skill Level: Crafting Time: Finished size: Fabric Crafting Linda Turner Griepentrog Beginner An evening 6 (15.24cm) tall Featuring Coats Machine Embroidery Thread Send a little
Technique: Designed By: Skill Level: Crafting Time: Finished size: Fabric Crafting Linda Turner Griepentrog Beginner An evening 6 (15.24cm) tall Featuring Coats Machine Embroidery Thread Send a little
MewnicorN. pillow plush. a sewing pattern by
 MewnicorN pillow plush a sewing pattern by 2 A super cute plush that's big and cuddly enough to be a pillow! This simple stuffed cat is sure to warm the heart of any magic-lover with its majestic unicorn
# Holiday Hanna Witch
 Tan or tea stained fabric for head and arms Deena s Shirt and bloomers....plain print Apron. 29 x 7 of print Apron straps.(2)1 x 5 pieces Apron ties (2) 1 x7 Body Muslin #174 19 Holiday Hanna Witch Witch
a free sewing pattern by
 a free sewing pattern by 2 Decorate your desk or nightstand with this palm-sized fox! It's extra-large tail is especially charming as it wraps around the tiny fox body and helps it balance upright. But
A sweet 18 little girl just waiting to steal your heart
 A sweet 18 little girl just waiting to steal your heart I first designed this doll in 1999, during my formative years as a doll maker. She, like me has evolved over the ten years since she first came to
6050 Fashion and Fabrics November 2008
 www.onlineexamhelp.com 6050 Fashion and Fabrics November 2008 FASHION AND FABRICS Paper 6050/01 Written General Comments In general the scripts were well presented and handwriting was legible. Many candidates
Huggy Bear Body Pattern. by Dianna Effner
 Huggy Bear Body Pattern October 15, 2015 by Dianna Effner (660) 849-2114 fax (660) 849-2358 Original Designs for the Doll Industry, Inc PO Box 174 Jamestown, MO 65046 www.expressionsdolls.com Supplies
Pattern: Amelie, the Giraffe Free pattern - created by amiimaker
 1 amiimaker.com instagram.com/amiimaker facebook.com/amiimaker Pattern: Amelie, the Giraffe Free pattern - created by amiimaker June 18th, 2018 I love giraffes! And I love even more amigurumi giraffes!
Easter Bunnies. Finished Size Approximately 11½in (29cm) tall. Fig A
 tall. Fig A") 1 Easter Bunnies These sweet bunnies make cute gifts at any time of year. We chose certain fabrics, with details given in the instructions, but you can easily replace these fabrics with others from the
1 Easter Bunnies These sweet bunnies make cute gifts at any time of year. We chose certain fabrics, with details given in the instructions, but you can easily replace these fabrics with others from the
Freya tunic 300min. For a novice, add approx 195 min STITCH DICTIONARY
 tternfreepatternfreepatternfreepatternfreepatternfreepatternfreepatternfreepatternfreepatternf YourFREE Dress &Tunic Pattern Freya tunic 300min For a novice, add approx 195 min Your FREE downloadable pattern
Wild About Monkeys Kids Party Dolled Up
 Bring the party to life with giant sock monkeys that will become guests new BFFs. Place the costumed softies wherever you need a pop of silly decor on a bench by the front door or on a chair near the buffet
CAMELOT FABRICS. 3. Draw a vertical line on the pointed end of each Strap, a tiny bit longer than the diameter of your buttons.
 Other Supplies - 2 buttons in coordinating color - paper printer - basic sewing supplies - sewing machine with buttonhole foot - iron & pressing surface - scissors & fabric shears - measuring tape - fabric
BUDDY THE T-REX COSTUME DIRECTIONS FOR SUIT CONSTRUCTION
 BUDDY THE T-REX COSTUME DIRECTIONS FOR SUIT CONSTRUCTION SIZE: SMALL (5) Height: 42-45 Weight: 40-45lbs. Shoe size 11 What you need: Notes Fabric 2 yards, 60 wide, orange fleece for body, hood and feet.
Tumbles Bear. Crochet With Style Crochet Pattern
 Tumbles Bear Crochet With Style Crochet Pattern Step-by-step instructions Lots of photos & tips to help you make your very own Tumbles Bear. Designed by Toni Marie. Crochet with Style #3 Free Crochet Pattern
Kitschy Friend. Finished Size Approximately 23½in (60cm) tall
 tall") 1 Kitschy Friend This fun lady will always raise a smile, especially if you give her as a gift to your friends. We chose certain fabrics, with details given in the instructions, but you can easily replace
1 Kitschy Friend This fun lady will always raise a smile, especially if you give her as a gift to your friends. We chose certain fabrics, with details given in the instructions, but you can easily replace
MATERIAL REQUIREMENTS:
 This pattern contains a pattern for a 30-inch doll. The doll may be made of flesh, tan or peach broadcloth, percale or any plain cotton material. Use six strand cotton for embroidering features and straw
HOW TO MAKE A COMPOSITION ZISA DOLL
 HOW TO MAKE A COMPOSITION ZISA DOLL WITH STUFFED FELT BODY AND 3D PRINTED HANDS AND HEAD A composition doll is made of different materials, in this case the body and limbs are sewn in felt and then padded,
Pajama Sock Monkey 2009 Cutest Creations
 Materials needed: Pajama Sock Monkey 2009 Cutest Creations 1 pair of size Large Brown Red-Heel socks can be purchased from my online store www.ohboyorgirl.com Black embroidery thread Other color embroidery
Dollytime. Tiny Topsy the tooth fairy. who are new to the craft. She measures 12cm (5 in) and is a topsy turvy or upside and added lots of pictures.
 and is a topsy turvy or upside and added lots of pictures.") Dollytime Tiny Topsy the tooth fairy As I d like to encourage e more people to knit I ve designed Tiny Topsy for knitters who are new to the craft. She measures 12cm (5 in) and is a topsy turvy or upside
Dollytime Tiny Topsy the tooth fairy As I d like to encourage e more people to knit I ve designed Tiny Topsy for knitters who are new to the craft. She measures 12cm (5 in) and is a topsy turvy or upside
Sewing. # Yanna Jo Doll. Fulk-size Patterns for 22" Doll and Clothing
 Sewing LeisureArtsLibrary.com #800613 Yanna Jo Doll Fulk-size Patterns for 22" Doll and Clothing Click Here to sign up for the FREE Leisure Arts E-newsletters at www.leisurearts.com to receive free projects,
Here are the basic instructions for the teddy bear pattern. Please let me know if you have ANY questions.
 DOLLS OF HOPE TEDDY BEAR PATTERN - Created by Sarah Parson inthemiddleofthis@gmail.com for questions or call 801-369- 0915 Here are the basic instructions for the teddy bear pattern. Please let me know
1. Print our the Fox Hat pattern (pages 8-11 of this tutorial) at 100% of actual size. Cut out the
 at 100% of actual size. Cut out the") Other Supplies - 2 black buttons (for eyes) - One bag of fiber stuffing - Paper printer - Basic sewing supplies: - sewing machine - needle & coordinating thread - straight pins - scissors & fabric shears
Other Supplies - 2 black buttons (for eyes) - One bag of fiber stuffing - Paper printer - Basic sewing supplies: - sewing machine - needle & coordinating thread - straight pins - scissors & fabric shears
SPRING SHORTS # 1403
 PATTERN RUNWAY SPRING SHORTS # 1403 Launch into spring with these super cute and easy to wear elastic waist shorts. With a Paper-Bag waist and front side pockets, these little sweeties are sure to be a
love dragon plush a free sewing pattern by
 love dragon plush a free sewing pattern by 2 love dragon plush A combination of a Valentine's and Chinese New Year celebration with the most adorable result! This little dragon pattern is done in the more
Ornament Finishing Techniques
 Ornament Finishing Techniques by Anne Gale The back of the ornament should enhance, not detract from the quality of the finished ornament. There are many ways to finish ornaments depending on type, shape
wampa plush a sewing pattern by
 a sewing pattern by difficulty: wampa plush This project is an geeky Star Wars homage to the monster from the beginning of The Empire Strikes back. The creature features a detachable arm with a bloody
14 th Century Garment Construction Techniques by Merouda Tremayne May 2002 SINGLE HEM STITCH ROLLED HEM
 14 th Century Garment Construction Techniques by Merouda Tremayne May 2002 We are so fortunate that the Museum of London published a book on their City of London Thames River archaeological digs. These
Royal Navy Doll DOLL. Body and head Make 2 pieces Cast on 14 sts in navy. Work 9 rows in st st beg with a K row. Next row: K.
 Royal Navy Doll You will need: 31 m (13 g) navy DK yarn 11 m (5 g) white DK yarn 6 m (3 g) royal blue DK yarn 13 m (6 g) skin tone DK yarn 6 m (3 g) dark grey DK yarn A small amount of mid-brown yarn A
a free sewing pattern by
 a free sewing pattern by 2 Kupo! Fans of Final Fantasy are sure to love this extra fuzzy Moogle! It has all the classic details that make the character so adorable -- including little wings, kitty ears,
Sweet Softies: Funny Bunny
 Published on Sew4Home Sweet Softies: Funny Bunny Editor: Liz Johnson Thursday, 08 April 2010 10:00 Stuffed animals make me happy. They live on my desk at home and at work, so I can glance over at them
dragon & unicorn hooded cowl a free sewing pattern by
 dragon & unicorn hooded cowl a free sewing pattern by 2 hooded cowl When you re ready to break out a scarf or hat for chilly weather, try putting on this cozy cowl! It s a hood and scarf in one with cute
Special thanks to the American Rabbit Breeders Association
 Rabbit Project Training Aid Pattern for Realistic Cloth Model Rabbit The model rabbit made from this pattern provides an excellent training aid for use by project helpers, extension educators, vocational
Toy Horse & Stripe Sweater
 Technique: Handknitting Toy Horse & Stripe Sweater Brand: Crafting time: Patons Longer term Toy Horse Size 36cm (14 inches) Yarn (Colours, as pictured) 1 ball (100g) of Patons 100% Cotton 4 -PLY #726 Jade
Rattle - Baby Dragon
 Rattle - Baby Dragon Kristi Tullus, Size 11 cm (4 1/3") with fingering weight yarn and a 1,75 mm crochet hook. Difficulty 2. Beginner - suitable for novice crocheters, requires patience and precision when
Sewing Tutorial: The Wampa Plush
 Sewing Tutorial: The Wampa Plush This plush is one of the many free projects I ve started posting on my website as part of an adventure to destash my huge collection of scrap fabrics ^-^ I wanted to make
dolphin plushies a sewing pattern by
 a sewing pattern by dolphin plushies These plushies are made to mimic a cute baby dolphin! Completely chubby and pudgy with a tiny bottle nose, round body, and bitty dorsal, side, and tail fins. They re
a free sewing pattern by
 a free sewing pattern by 2 rat plush Whether you think rats are adorable or excitingly scary, this pattern is sure to make something you'll love! The instructions here go over making a sweet little rodent
cut & sew Mer-kitty plush a sewing pattern by
 cut & sew Mer-kitty plush a sewing pattern by 2 mer-kitty plush If you re reading this, then you likely purchased some of my Cut & Sew Mer-kitty Plush fabric from Spoonflower. So thank you! In celebration
Practicing Basic Machine Operation Sample #1
 Practicing Basic Machine Operation Sample #1 Listed below are various tasks required in basic sewing machine operation. Demonstrate your ability to perform each task by creating a sample. The samples that
WITH. CM103_48 Minkee Applique Flower X 2.67 in X mm 5,733 St.
 FUN WITH MINKEE GELATO Pack 12184 25 DESIGNS CM101_48 Minkee Applique Flower 3.94 X 4.06 in. 100.08 X 103.12 mm 12,533 St. CM102_48 Minkee Applique Flower 2 3.31 X 2.99 in. 84.07 X 75.95 mm 7,658 St. CM103_48
Puppy. Copyright 2010 Sarah Gasson - Knitables
 Puppy Puppy I hope you have fun knitting this adorable puppy, which has been designed to have many uses. It could be made into a soft and cuddly toy, a finger puppet or a catnip toy for the family pet.
Velindre Knitting Appeal Tiny Welsh Lady Badge
 Velindre Knitting Appeal Tiny Welsh Lady Badge Materials A pair of 3mm knitting needles. Small amounts of double knitting yarn in black, white, red, pink and brown. Polyester toy stuffing. Straight tipped
cut & sew kitty bean plush a free sewing pattern by
 cut & sew kitty bean plush a free sewing pattern by 2 cut & sew kitty bean plush If you re reading this, then you likely purchased some of my Cut & Sew Kitty Bean Plush fabric from Spoonflower. So thank
Misty Morning by Deanna Bertlesen
 Cover Project Misty Morning by Deanna Bertlesen Skill Level: Intermediate to Advanced Embroidery CANADA Mar 2005 11 12 x 12 broadcloth, light grey or blue 12 x 12 muslin backing fabric 12 x 12 piece of
You will need. Equipment
 1 KITE MOBILE Here s how to make a colourful kite to fly in your bedroom whatever the weather! You can use the kite tail to display favourite photos, postcards or trinkets. Just attach them with coloured
19" emily, Jenny, & Portrait Dolls. By Dianna effner. Body Pattern and Construction. Strip
 Original Designs for the Doll Industry, Inc. PO BOX 174 JAMESTOWN, MISSOURI 65046 19" emily, Jenny, & Portrait Dolls Copyright 2001 By Dianna effner Body Pattern and Construction ArmATure ConSTruCTIon
shiba cube puppy plush a sewing pattern by
 shiba cube puppy plush a sewing pattern by If you ve ever sewn a cube before, this pattern takes it to the next level! The classic geometric shape forms a chubby little puppy body complete with four stubby
Weighted Pincushion Organizer
 Weighted Pincushion Organizer from Sew, Mama, Sew! This sturdy pincushion has plenty of space to store pins and a wool felt strip for your needles. The hanging pocket is a perfect place for storing easily-misplaced
Dog With Fleas Play Set Crochet Pattern
 Dog With Fleas Play Set Crochet Pattern By: Donna Collinsworth Of Donna s Crochet Designs All rights are held by the author. No one can reproduce in any manner without written permission from the author
CHOCOBO. plush. a free sewing pattern by
 CHOCOBO plush a free sewing pattern by 2 chocobo plush Kweh! Final Fantasy fans are sure to love this chibi version of the classic rideable bird. It has a large head, a prominent beak and a big feather
Top Down Teddy Bear By Diane Dunwoodie
 Top Down Teddy Bear By Diane Dunwoodie I used Judy s Magic cast on to begin but you can do whatever works for you such as four double pointed needles. Any yarn can be used your bear will just be a slightly
cut & sew ferret plush a sewing pattern by
 cut & sew ferret plush a sewing pattern by 2 ferret plush If you re reading this, then you likely purchased some of my Cut & Sew Ferret Plush fabric from Spoonflower. So thank you! Make your favorite cat
Magic Loop Teddy. Instructions. Materials. Abbreviations PATTERN. [00:00] - indicates time instruction appears in video
![Magic Loop Teddy. Instructions. Materials. Abbreviations PATTERN. [00:00] - indicates time instruction appears in video](/thumbs/95/125804223.jpg "Magic Loop Teddy. Instructions. Materials. Abbreviations PATTERN. [00:00] - indicates time instruction appears in video") 1 PATTERN Magic Loop Teddy Materials 150 yards worsted yarn US 3 or 4 circular needle + another same sized needle Polyester Fiberfill 3 stitch markers Tapestry needle Stitch holders or waste yarn 18 mm
1 PATTERN Magic Loop Teddy Materials 150 yards worsted yarn US 3 or 4 circular needle + another same sized needle Polyester Fiberfill 3 stitch markers Tapestry needle Stitch holders or waste yarn 18 mm
Owyhee County 4-H. Cloverbud. Activity Book
 Owyhee County 4-H Cloverbud Activity Book Name Age Year in 4-H 20 Club Name Member s Signature Parent/Guardian s Signature Leader s Signature Projects or activities I worked on this year were: I attended
NOTES 1. Please wash, dry & iron your fabric before beginning. 2. Use a 1/4 seam allowance throughout. 3. All seams are sewn Right Sides together.
 OTHER TOOLS & SUPPLIES - fiber stuffing or fabric scraps - paper printer - 24 contrasting embroidery floss & an embroidery hoop, for eyes - 2 yds of ribbon, for hanging (optional) - basic sewing supplies:
Jack Rabbit Softie Pattern
 Jack Rabbit Softie Pattern Carlee Dynes, 2011 the-polka-do t-umbrella.blogspot.co m Jack Rabbit Softie Pattern You will need: Directions ½ Yard main fabric (quilting weight or home décor are both fine)
Make Your Own Symington Corset
 How-to guide: Make Your Own Symington Corset 3Reproduction from the original 1890s pattern made from drab coutil How-To Guide: 1890 s Symington Corset 2 Introduction The Symington Archive covers the period
For more free amigurumi patterns, hop over to by blog talesoftwistedfibers.wordpress.com 2013 FIBERELLA BY TALES OF TWISTED FIBERS 1
 For more free amigurumi patterns, hop over to by blog talesoftwistedfibers.wordpress.com 2013 FIBERELLA BY TALES OF TWISTED FIBERS 1 HANDCRAFTED GOODIES MATERIALS yarn: white, blue, plus blue novelty yarn
Jimmy Owl Pin Cushion
 Jimmy Owl Pin Cushion Designed by Christine Mitchell Read instructions carefully before starting the project. Note: I almost never wash fabric before using, I use good quality fabrics and rarely have trouble.
cut & sew owl plush a sewing pattern by
 cut & sew owl plush a sewing pattern by 2 cut & sew owl plush If you re reading this, then you likely purchased some of my Cut & Sew Owl Plush fabric from Spoonflower. So thank you! This pattern is for
KNITTING PATTERN FOR THE MINI WOOLLEY KNITTED DONKEYS. from:
 KNITTING PATTERN FOR THE MINI WOOLLEY KNITTED DONKEYS from: http://lovinghands.freeforums.org/donkey-pattern-t2769.html Height of finished Donkey to Ear Tips 5ins approx. photo: http://www.thedonkeysanctuary.org.uk/woolley
Pretty Poppet. Print out the pdf files. Do NOT select fit to page! They will come out wonky! No Margins! Margins are BAD!
 Pretty Poppet Please read through the entire instruction sheet before making this doll. These instructions are written for a beginning level doll maker. Tips for Beginners: 1. Set your sewing machine stitch
ALAN DA{Tdesigner of knitted & fabric toys
 ALAN DA{Tdesigner of knitted & fabric toys This pattern has been designed to raise funds to aid the victims of the Haitian Haiti and the Dominican Republic, and is wearing a dress inspired by the Please
narwhal plush a free sewing pattern by
 narwhal plush a free sewing pattern by 2 narwhal plush Make your own 'unicorn of the sea' with this cute pocket-sized narwhal! With just 4 pattern pieces, it sews up quickly and is great for a beginner
THE MINI WOOLLEY KNITTED DONKEYS
 KNITTING PATTERN FOR http://lovinghands.freeforums.org/donkey-pattern-t2769.html THE MINI WOOLLEY KNITTED DONKEYS Height of finished Donkey to Ear Tips 5ins approx Materials Double knitting wool in any
Knit Striped Funky Monkey
 7a Knit Striped Funky Monkey MeasureMent Approx 18 ins [45.5 cm] tall. tension 22 sts and 28 rows = 4 ins [10 cm] in stocking st. Materials Patons classic Wool (100 g/3.5 oz; 205 m/223 yds) Main color
Owen 2 of 9 Measurements: Standing: 34cm / 13.5 inches Sitting: 25.5cm / 10 inches
 Owen Jane Watling A truly special bear, Owen is worked in double knitting yarn and is based on a traditional teddy bear. He is knitted entirely in the round and has jointed arms and legs. The method used
Halloween House Candy Dish Cover
 Technique: Applique Halloween House Candy Dish Cover Skill level - Intermediate Brand: Crafting time: Dual Duty XP An Evening Materials Coats and Clark Dual Duty XP Thread, 7620 Pumpkin, 3690 Purple, 900