HOW TO MAKE A COMPOSITION ZISA DOLL
|
|
|
- Gary Skinner
- 5 years ago
- Views:
Transcription


1 HOW TO MAKE A COMPOSITION ZISA DOLL WITH STUFFED FELT BODY AND 3D PRINTED HANDS AND HEAD A composition doll is made of different materials, in this case the body and limbs are sewn in felt and then padded, while the head and hands are 3D printed using PLA filament. This tutorial, with illustrations and step-by-step explanations, allows you to make the soft retro style doll shown above. The website also offers patterns and tutorials to create your own Zisa Doll wardrobe
 of soft, 2 mm thick wool felt, of the desired skin color.")
2 Materials, tools and equipment needed: For the 3D printed head and hands: A 3D printer or nearby 3D printing service About 200 gr PLA filament of the desidered skin colour Sander and abrasive sponge Acrylic paints and brushes for facial details For the padded felt body: Vinyl glue A sewing machine. About 50 square cm. (eg. 35x150 cm.) of soft, 2 mm thick wool felt, of the desired skin color. The felt must be strong enough so as not to stretch when stuffed. Embroidery sewing thread of the skin colour. Kitchen string. Sewing and embroidery needles. A long upholstery needle. 4 two-hole buttons of the skin color, with sufficiently wide holes. Tailor s scissors, nail scissors, and thimble. Pen or chalk for marking. 4 hair extensions or about 100 grams of wool yarn to make the hair, color and thickness of your choice. Padding material for stuffing
, one is this tutorial and the other is the pattern to sew the doll s body.")


3 The product you purchased contains 4 files: 2 PDF files to be downloaded and printed on A4 paper (with a home printer or external printer service; can adapt to USA letter size), one is this tutorial and the other is the pattern to sew the doll s body. 2 STL files for 3D printing the head and hands with a home 3D printer or external 3D printing service; you will receive these by soon after the purchase. Above: the STL file for the head. The head is 13 cm tall and hollow; it should take approx. 6 hours to print. Left: the STL file for the hands. The hands are 8 cm tall and also hollow; they should take approx. 3 hours to print. Images shown are from the slicing software the comes with a 3D printer. Estimated printing time depends on the level of definition desired; the smaller the height of each printing layer, the longer print time but shorter the finishing time in the post production phase


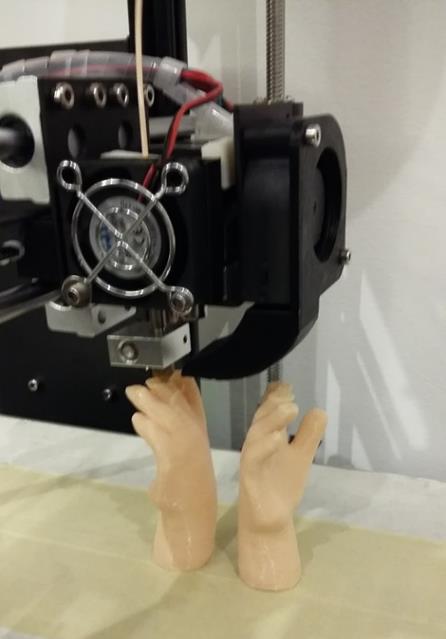

4 Above, the 3 printing process of the head and hands 4

 and an")


5 After the 3D printer has finished, smooth the head and hands with the aid of a sander (low speed) and an abrasive sponge. Your patience will be rewarded with a finished appearance

.")

6 Now you can proceed to paint the facial details: Use acrylic colors, preferably mixed with a good quality of vinyl glue (this allows the paint to adhere well to the PLA). Start with the eyes, first covering the oval orbit with white and painting over twice


7 When the white paint is dry, draw an iris at the center of each eye. To give a three dimensional effect, add white dots. With a fine brush and brown color, carefully draw the upper contour of the eyes and eyebrows. A slight outline in relief is there to help you draw the eyebrows in the right place


8 While eye color dries, draw the mouth following the outline in relief. Blend with a lighter color towards the center of each lip. Draw in the pupil with black color, at the exact center of each eye. Paint a large enough circle. Complete with a white reflection dot on each eye, just to give a lighting effect. Now the head and hands are ready and you can continue by sewing the body
9 Body pattern pieces The cutting scheme shown includes the four A4 pages with all the pattern pieces you ll need to make the body of your Zisa doll. Each piece includes seam allowances. Markings in red show the points where you will attach the limbs. Each piece includes its label and the number of copies that must be cut. Capital letters are reference points to help you follow the instructions following. First page, above left: Leg (cut 4) Arm (cut 4) Sole (cut 2 pieces to sew under the feet) Second page, above right: Body side (cut 2) Front body (cut 1). Capital letters indicate assembly points between front, sides and back body. Third page, bottom left: the two pieces needed to make the wig base; capital letters will guide you to assemble them together; the lateral wig is used to cut two pieces. Fourth page, bottom right: Back body (cut 1); capital letters indicate assembly points between front, sides and back body


10 After cutting out the paper pattern, pin the pieces on the felt, as shown below. You need to fold the felt so that you ll get four Arms and Legs pieces, two Head and Body Side and Sole pieces, and one each for front and back body. Each piece has a 7 mm seam allowance to facilitate the seam, corresponding to the width of a standard sewing machine foot-press


11 Transfer the markings With a pen, pencil or chalk, mark the limb joints on the right side of each leg, arm, and body side. Also transfer the two notches that will match up with the shoulder seams


12 Assemble the Body The Body consists of: two sides and one front and one back piece. Following the capital letters in the pattern, match the front and back body pieces at the shoulders and groin Pin together


13 Sew the shoulders Sew the groin Shown are the front and back body sewn together


14 Now pin each body side to the front and back body pieces. Start from the notch indicated in the pattern and go all around the contour Machine sew


15 Fill the Body Reverse the body right side out Fill with padding. The padding should be dense and compact, which is why it is necessary to choose felt that is strong enough to keep its shape. Make sure the padding reaches all areas of the Body


16 Insert the head Insert the 3D printed head into the hole defined by the neckline of the assembled body. Make little rotational movements to allow the little collar below the neck to fit snugly


17 Insert the spout of the vinyl glue bottle into the space between the 3D printed head and the body neck and apply a line of glue around the neck circumference. Clean the excess glue with a paper towel


18 Sew the arms Pin and sew the two arms, using two pieces for each arm. Sew from wrist to wrist, using the sewing machine s foot press as a guide for the seam allowance. Cut a V-shaped notch in each angle. Turn the arm right side out


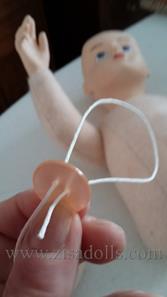
19 Complete the arms Fill arms with padding. Use a large crochet needle or other tool with a rounded end to help you push the padding into all parts. Insert each hand in the. Insert a line of glue between the hand and the wrist felt. Secure the glued area with a string and clean the excess glue When the glue is dry, remove the string


20 Sew and fill the legs Pin and sew the two legs, using two pieces for each leg. Use the sewing machine s foot press as a guide for the seam allowance. Start from the front tip of the foot and sew around to the heel. Leave the bottom of the foot open to insert the sole in a later step. Cut a V-shaped notch in the angles and corners and turn the leg right side out. Stuff the leg from the open sole. Make sure the filling is compact, so the legs will be able to support the standing Zisa doll

, glue a layer of heavier felt to the")


21 Above you see the soles, make sure they are mirrored to form a right and a left leg. For a sturdier sole (for a self-standing doll), glue a layer of heavier felt to the inside surface of each sole. To the right and below: Pin each sole to its leg and start to sew closed. Leave a small opening through which to add extra padding to ensure the leg is very dense. Then sew to close the opening


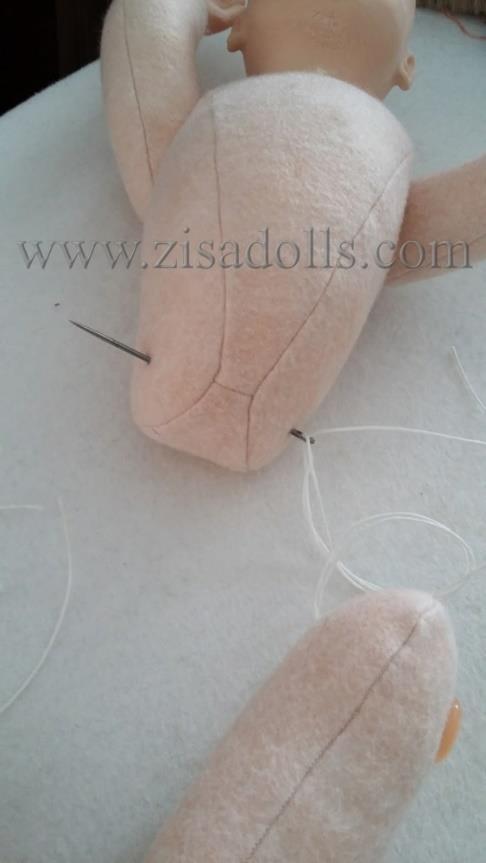
22 Assemble the doll You need: 4 skin coloured buttons 1 upholstery needle Kitchen string Here you see how the pieces fit together. Make sure arms and legs are in the right position. Pass the string through one of the button holes from the reverse side forward. Pass the string again through the other hole, this time from the front to the reverse side. Insert the two ends of the string in the eye of the needle. Pass the needle through one arm from outer side to the inner side. This has to be placed in correspondence with the red rounded markings in the paper pattern


23 Attach the arms Pass the needle through the body in correspondence with red markings in the paper pattern. Make sure the hands are positioned in the right direction. Pass the needle through the second arm. Remove the string from the needle. Pass one string end through both button holes, first from the inside outwards and then from the outside inwards. Tie the string and make a strong knot between the button and the arm. Cut the string, leaving some length. A drop of glue will prevent the string from coming out of the hole. Wait until the glue dries before continuing


24 Attach the legs Follow the same procedure you followed in attaching the arms


25 Now your Zisa Doll is ready to have a beautiful wig!


26 Prepare the wig-base: Above, the three wig-base pieces that will be sewn placing them side by side over the sewing machine foot-press and using a zig-zag stitch to unite the edges (as shown on the right) Below, the wig adheres perfectly to the doll's head


 all around the outer edge of")

27 The doll's hair can be of pure wool or synthetic material. Either way, the pieces must be stitched to form a long extension, like the one shown on the left. Then, machine stich the extension (or several overlapping extensions) all around the outer edge of the wigbase. Stick a strip of double-sided adhesive tape to the top of the head and then attach the wig in position


28 Starting from the nape of the neck and proceeding upwards, hand sew strips of hair to the wig base


29 Continue sewing hair in concentric circles. For a central part, gradually shift from circular rows to the center line. Now you can give Zisa her first haircut! Cut the bangs straight and trim around the shoulders and back


30 Zisa is almost ready. She's really cute, isn t she? Tie the hair in a ponytail and, keeping the double adhesive in place, gently insert glue between wig and head, If the glue drains on the hair or body, immediately clean with a damp cloth


31 When you have finished to insert the glue, press the wig firmly on the head and secure with a wide elastic strip. Leave the elastic strip on overnight, then remove. Your composition Zisa Doll is born! Now give her a beautiful wardrobe!
MATERIAL REQUIREMENTS:
 This pattern contains a pattern for a 30-inch doll. The doll may be made of flesh, tan or peach broadcloth, percale or any plain cotton material. Use six strand cotton for embroidering features and straw
Page 1. Jumblenut. The Head. Design by Barbara Allen
 Page 1 Needle felting Needle felting is quite different from creating felt by shrinking wet wool. There s no water involved, it requires very little space and creates no mess at all. It s a craft that
Vintage Style Teddy Bear Pattern
 9 by 12 wool or wool blend felt contrasting color wool felt (or blend) for paw pads and nose 6 mm safety eyes needle and thread doll making needle embroidery thread 100% mohair wool cotton fleece teddy
Josephine Doll Pattern
 Josephine Doll Pattern Making these dolls means pulling out your scrap bin and button box and having a wonderful time pairing up patterns and prints. Each doll has felt hair and some have felt balls as
Royal Navy Doll DOLL. Body and head Make 2 pieces Cast on 14 sts in navy. Work 9 rows in st st beg with a K row. Next row: K.
 Royal Navy Doll You will need: 31 m (13 g) navy DK yarn 11 m (5 g) white DK yarn 6 m (3 g) royal blue DK yarn 13 m (6 g) skin tone DK yarn 6 m (3 g) dark grey DK yarn A small amount of mid-brown yarn A
Original Designs for the Doll Industry, Inc. PO BOX 174 JAMESTOWN, MISSOURI March 31, 1998 (660) fax (660) Gigi - Painting Ins
 fax (660) Gigi - Painting Ins") Original Designs for the Doll Industry, Inc. PO BOX 174 JAMESTOWN, MISSOURI 65046 March 31, 1998 (660) 849-2114 fax (660) 849-2358 Gigi - Painting Instructions GiGi 14 Gigi bydiannaefner by DiannaEffner
Original Designs for the Doll Industry, Inc. PO BOX 174 JAMESTOWN, MISSOURI 65046 March 31, 1998 (660) 849-2114 fax (660) 849-2358 Gigi - Painting Instructions GiGi 14 Gigi bydiannaefner by DiannaEffner
Christmas Stocking 1. The finished size is 17.5 long from top of folded cuff to toe, 21.5 unfolded, and 6.5 wide.
 Christmas Stocking 1 The finished size is 17.5 long from top of folded cuff to toe, 21.5 unfolded, and 6.5 wide. For each stocking you ll need: 2 outside pieces 2 lining pieces 2 cuff pieces 1 6 piece
Kitschy Friend. Finished Size Approximately 23½in (60cm) tall
 tall") 1 Kitschy Friend This fun lady will always raise a smile, especially if you give her as a gift to your friends. We chose certain fabrics, with details given in the instructions, but you can easily replace
1 Kitschy Friend This fun lady will always raise a smile, especially if you give her as a gift to your friends. We chose certain fabrics, with details given in the instructions, but you can easily replace
Materials. 1 Cut out the pattern pieces for the doll. Cut out the pattern for the arms and legs twice in mirror image.
 Making the doll All the dolls are made from the same pattern (see Doll Template). The body and head are the same, only the facial expressions and the hair change. Carefully follow the instructions below,
Here are the basic instructions for the teddy bear pattern. Please let me know if you have ANY questions.
 DOLLS OF HOPE TEDDY BEAR PATTERN - Created by Sarah Parson inthemiddleofthis@gmail.com for questions or call 801-369- 0915 Here are the basic instructions for the teddy bear pattern. Please let me know
19" emily, Jenny, & Portrait Dolls. By Dianna effner. Body Pattern and Construction. Strip
 Original Designs for the Doll Industry, Inc. PO BOX 174 JAMESTOWN, MISSOURI 65046 19" emily, Jenny, & Portrait Dolls Copyright 2001 By Dianna effner Body Pattern and Construction ArmATure ConSTruCTIon
Pajama Sock Monkey 2009 Cutest Creations
 Materials needed: Pajama Sock Monkey 2009 Cutest Creations 1 pair of size Large Brown Red-Heel socks can be purchased from my online store www.ohboyorgirl.com Black embroidery thread Other color embroidery
j e n n y l o v e s b e n n y B o u t i q u e B e a r s Sunday by Jenny Lee
 j e n n y l o v e s b e n n y B o u t i q u e B e a r s Sunday by Jenny Lee Please meet an old friend of mine...the original Sunday!! Sunday loves nothing better than to laz around and do absolutely NOTHING!!...hmmm
jarswe are all familiar with the concept of recycling
 Gifts in jarswe are all familiar with the concept of recycling glass bottles and jars but for thrifty crafters there is also the possibility of upcycling turning plain unwanted items into something beautiful
Country Commandments Stitchery
 Country Commandments Stitchery Notes 1. Read pattern through before starting. 2. Sewing Terms: RST-right sides together RSO right side(s) out 3. Thank you for purchasing my pattern! You may sell the finished
Mer-kitty. plush. a free sewing pattern by
 Mer-kitty plush a free sewing pattern by 2 mer-kitty plush In celebration of Mer'may' is this adorable ocean feline! A combination of a mermaid and cute kitty, this mer-kitty has a big colorful fish tail
Marsupilami. Work is done in continuous rounds (spiral work). Use marker for easier round following Vanja Grundmann
. Use marker for easier round following Vanja Grundmann") Marsupilami Materials needed Matching yarn and hook accordingly you will need crochet hook (I used 2,5 mm and DK-medium weigh cotton yarn) yarn in: - yellow, - light peach (beige), - little bits of white
Marsupilami Materials needed Matching yarn and hook accordingly you will need crochet hook (I used 2,5 mm and DK-medium weigh cotton yarn) yarn in: - yellow, - light peach (beige), - little bits of white
Marie. Abbreviations (US Terms):
:") Marie Feel free to sell Your finished items. Mass production is - of course - not permitted. Do not copy, alter, share, publish or sell pattern, pictures or images. Copies be made for owner s personal
Marie Feel free to sell Your finished items. Mass production is - of course - not permitted. Do not copy, alter, share, publish or sell pattern, pictures or images. Copies be made for owner s personal
"Delores Bear" 16 (41cm) To make "Delores Bear" you will need:
 To make Delores Bear you will need:") "Delores Bear" 16 (41cm) To make "Delores Bear" you will need: Viscose plush fabric 22 x 16 Suedette 6 x 6 1/2 5 x 26mm Nut & bolt joints 2 x 12mm Black safety eyes Perli thread (nose) Floral fabric (drawers)
"Delores Bear" 16 (41cm) To make "Delores Bear" you will need: Viscose plush fabric 22 x 16 Suedette 6 x 6 1/2 5 x 26mm Nut & bolt joints 2 x 12mm Black safety eyes Perli thread (nose) Floral fabric (drawers)
Sasha Sundress, Knickers, Bolero & Flip-flops
 Sasha Sundress, Knickers, Bolero & Flip-flops Materials: 0.5 metre Cotton Fabric 0.25 metre fabric for lining Bolero 0.5 metre 1/4 wide elastic for Waist and legs 2 Snap Fasteners Small Beads or Sequins
INSTRUCTIONS BFC716 QIH LEOPARD BAG
 INSTRUCTIONS BFC716 QIH LEOPARD BAG This bag can be done in many ways! You can stitch it as I did the medium size bag shown at the end of this document (with the Orange trim). For this bag I embroidered
Home Yarns Pattern Boutique Gallery Guide to Style Cari's Blog Where to Buy
 Subscribe to Caron Connections, our free enewsletter Enter your e-mail address subscribe Home Yarns Pattern Boutique Gallery Guide to Style Cari's Blog Where to Buy Panama Dolls designed by KJ Hay Technique
Little darling 2.0. Abbreviations (US Terms):
:") Little darling 2.0 Feel free to sell Your finished items. Mass production is - of course - not permitted. Do not copy, alter, share, publish or sell pattern, pictures or images. Copies be made for owner
Little darling 2.0 Feel free to sell Your finished items. Mass production is - of course - not permitted. Do not copy, alter, share, publish or sell pattern, pictures or images. Copies be made for owner
Basic Peg Doll Tutorial
 Basic Peg Doll Tutorial from by Kelli Ann Wilson - 1 - Step 1: Get all of your materials in order. For this activity you will need wooden peg dolls that are 3 tall and 0.75 1 in diameter at the base. I
Basic Bearmaking Instructions
 Laying out the Pattern Basic Bearmaking Instructions We recommend that you read the instructions right through before commencing. This will help you to understand the steps you need to take. Copying your
A sweet 18 little girl just waiting to steal your heart
 A sweet 18 little girl just waiting to steal your heart I first designed this doll in 1999, during my formative years as a doll maker. She, like me has evolved over the ten years since she first came to
Level: Intermediate Beginner
 Some Bunny Loves You! Designed by Day Dreams 2012 (This is the pattern for the bunny above and depicted on Crochet 4 the Masses. See changes marked Options to make this for the Awareness Bunny) Level:
shaver to get rid of pills. If the item doesn t contain a pipe cleaner or glue, you could even run it through the washing machine.
 shaver to get rid of pills. If the item doesn t contain a pipe cleaner or glue, you could even run it through the washing machine. Wool felt will wear better and last longer. If you re creating something
Pretty Poppet. Print out the pdf files. Do NOT select fit to page! They will come out wonky! No Margins! Margins are BAD!
 Pretty Poppet Please read through the entire instruction sheet before making this doll. These instructions are written for a beginning level doll maker. Tips for Beginners: 1. Set your sewing machine stitch
Materials: unconditionally LED
 Glow bunny Feel free to sell Your finished items. Mass production is - of course - not permitted. Do not copy, alter, share, publish or sell pattern, pictures or images. Copies be made for owner s personal
cut & sew AXOLOTL PLUSH a sewing pattern by
 cut & sew AXOLOTL PLUSH a sewing pattern by 2 axolotl plush If you re reading this, then you likely purchased some of my Cut & Sew Axolotl Plush fabric from Spoonflower. So thank you! This cute belly-down
Merida the Brave. Abbreviations:
 Merida the Brave This doll model was made by Jo Merriman based on Fairy Doll Pattern by AmigurumiBB 2013-2014 Abbreviations: St(s) stitch(es) Sc - single crochet Sl st slip stitch Ch chain Hdc half double
Sock Lamb 2011 Cutest Creations
 Materials needed: Sock Lamb 2011 Cutest Creations sew-on Velcro Felt square for heart 1 square of black craft felt Invisible ink marker 1 pair of white ladies dress socks (preferably flat knit, cotton/poly
Furls. Amigurumi Unicorn. Crochet. designed by Jackie Laing
 Furls Crochet Amigurumi Unicorn designed by Jackie Laing Yarn 1 skein Red Heart Yarns, Super Saver, 150 yds Sample uses Soft White, Minty, and Lemon Materials 9.0mm N Furls Candy Shop hook Yarn Needle
cut & sew ferret plush a sewing pattern by
 cut & sew ferret plush a sewing pattern by 2 ferret plush If you re reading this, then you likely purchased some of my Cut & Sew Ferret Plush fabric from Spoonflower. So thank you! Make your favorite cat
Jamie - 11 Soccer Bear
 Jamie - 11 Soccer Bear Artist Designed Bear with Flexlimb by Laura Matthews of TeddiesbyLauraLynn.com and FreeTeddyBearPatterns.NET This is not intended to be a child s toy due to the glass eyes and pellets.
Crochet Pattern Mo, the monsterboy
 Crochet Pattern Mo, the monsterboy Design by K. Godinez Material: Crochet hook 2,5 Catania wool from Schachenmayr in shades of green, beige and blue, a small amount of white wool to embroider the tooth
Dancing Rain Dolls. Knot Doll. Created By. Amy Prentice
 Dancing Rain Dolls Knot Doll Created By Amy Prentice Copyright 2007 1 Dear Friends, This pattern is the easiest of all dolls to make. This doll will take about 2 hours to complete and is the perfect doll
cut & sew owl plush a sewing pattern by
 cut & sew owl plush a sewing pattern by 2 cut & sew owl plush If you re reading this, then you likely purchased some of my Cut & Sew Owl Plush fabric from Spoonflower. So thank you! This pattern is for
Jodie s Sewing Studio
 Jodie s Sewing Studio Children s Kuspuk Pattern How to Use a Jodie s Sewing Studio Pattern For best results, study the pattern pieces first and read the notes and terms on each piece. Pieces are labeled
BONUS DOLL PATTERN: ILMARIA: GUARDIAN OF THE STARS 16-INCH (43CM) ALL CLOTH DOLL 2009 PATTI MEDARIS CULEA
 ALL CLOTH DOLL 2009 PATTI MEDARIS CULEA") BONUS DOLL PATTERN: ILMARIA: GUARDIAN OF THE STARS 16-INCH (43CM) ALL CLOTH DOLL 2009 PATTI MEDARIS CULEA 1 Ilmaria Cloth Doll Making Supplies 1/3 yard/meter White 100% Cotton Fabric for the body Thread
BONUS DOLL PATTERN: ILMARIA: GUARDIAN OF THE STARS 16-INCH (43CM) ALL CLOTH DOLL 2009 PATTI MEDARIS CULEA 1 Ilmaria Cloth Doll Making Supplies 1/3 yard/meter White 100% Cotton Fabric for the body Thread
SUPPLIES OTHER SUPPLIES Carson 10 Teddy Bear Pattern
 SUPPLIES Fat 1/8 yd of 5/8 faux fur or mohair (sample is faux fur) 5 x 5 piece of wool felt for paw pads 11mm black glass eyes (1 pair) Small piece white felt (optional) eye whites 2 1 1/8 Joint discs
Sewing. # Yanna Jo Doll. Fulk-size Patterns for 22" Doll and Clothing
 Sewing LeisureArtsLibrary.com #800613 Yanna Jo Doll Fulk-size Patterns for 22" Doll and Clothing Click Here to sign up for the FREE Leisure Arts E-newsletters at www.leisurearts.com to receive free projects,
Material: 1 ½ balls of blue DK yarn (8 ply/ 22 sts=4 inches) 1 ball of white DK yarn Needles: 3.25mm (Imp. 10 / US 3) Oddments of black and red yarn
 1 ball of white DK yarn Needles: 3.25mm (Imp. 10 / US 3) Oddments of black and red yarn") Material: 1 ½ balls of blue DK yarn (8 ply/ 22 sts=4 inches) 1 ball of white DK yarn Needles: 3.25mm (Imp. 10 / US 3) Oddments of black and red yarn for the mouth 1 Tapestry needle White and black felt
Material: 1 ½ balls of blue DK yarn (8 ply/ 22 sts=4 inches) 1 ball of white DK yarn Needles: 3.25mm (Imp. 10 / US 3) Oddments of black and red yarn for the mouth 1 Tapestry needle White and black felt
cut & sew kitty bean plush a free sewing pattern by
 cut & sew kitty bean plush a free sewing pattern by 2 cut & sew kitty bean plush If you re reading this, then you likely purchased some of my Cut & Sew Kitty Bean Plush fabric from Spoonflower. So thank
sugar skull kit ty plush a sewing pattern by
 sugar skull kit ty plush a sewing pattern by sugar skull kit ty plush This pattern pays homage to the beautiful calaveras seen in Dia de Muertos art. It s a simple kitty plush with button jointed limbs
squid amigurumi free crochet pattern
 squid amigurumi free crochet pattern - squid amigurumi - 2 - introduction - squid amigurumi This angry little squid is ready to rage! The fun conical shape is adorned with two triangular fins and 8 cute
By: Bellis1282 On Ravelry:
 S A I L O R M O O N A M I G U R U M I By: Bellis1282 On Ravelry: http://ravel.me/bellis1282/sm Email: bellis1282@gmail.com Materials: E (3.5mm) sized hook o A note on hook size: I work VERY tightly and
Fryer's Trebuchet Paper Kits
 Fryer's Trebuchet Paper Kits Things you will need 7 sheets of card approx. 0.3 mm or 0.01 inches thick 1 sheet of paper to print out to download. 2 x 6-7 mm dowel or pencils 1 paper clip String 6 cms (2.5
Freya tunic 300min. For a novice, add approx 195 min STITCH DICTIONARY
 tternfreepatternfreepatternfreepatternfreepatternfreepatternfreepatternfreepatternfreepatternf YourFREE Dress &Tunic Pattern Freya tunic 300min For a novice, add approx 195 min Your FREE downloadable pattern
AMermaid s. Basic technique. Raising the surface. Jennifer Rochester creates simply folded containers encrusted with stitch
 Jennifer Rochester creates simply folded containers encrusted with stitch PHOTO BY ALAN BENNINGTON For centuries, nomadic tribes have used folded squares of fabric to create soft containers. These folded
love dragon plush a free sewing pattern by
 love dragon plush a free sewing pattern by 2 love dragon plush A combination of a Valentine's and Chinese New Year celebration with the most adorable result! This little dragon pattern is done in the more
dragon & unicorn hooded cowl a free sewing pattern by
 dragon & unicorn hooded cowl a free sewing pattern by 2 hooded cowl When you re ready to break out a scarf or hat for chilly weather, try putting on this cozy cowl! It s a hood and scarf in one with cute
3Insert the second rod no. 4
 Yamato: Step-by-step 37 The stern block and searchlight control towers a b c d e f Recommended tools and materials Wood glue Sandpaper (no. 800 grain) Metal file Putty Craft knife For metal: Super Glue
Read through everything carefully before beginning. View E from Simplicity C5461 5/8 yd
 Rare Bear Supply List and Sewing Instructions as of Sunday, March 04, 2018 Read through everything carefully before beginning. Pattern pieces - View E from Simplicity C5461 - pieces 33 through 41 Follow
The Flake Family. Skill level - Intermediate. By Elizabeth Hill. Technique: Satin Stitch. Brand: Dual Duty XP. Crafting time: Day
 The Flake Family Skill level - Intermediate Technique: Satin Stitch Brand: Dual Duty XP Crafting time: Day Size Final Measurements: 21 1/2 x 25 1/2 Materials Dual Duty XP General Purpose thread Coats Rayon
Ornament Dolls: A Doll Project Tutorial. Ornament Dolls
 1 Ornament Dolls These 6 (15cm) mini dolls make perfect holiday ornaments or small gifts! The faces are sealed paper, which makes these dolls fast and easy to create. Try printing and drawing your own
Personalized Footprint Slippers
 SINGER PROJECTS Personalized Footprint Slippers Make a pair of these fun and personalized slippers for your favorite mom she's sure to love them! Customize them using her favorite colors or printed fabrics,
Sewing & Fashion Section
 Sewing & Fashion Section Table of Contents Sewing and Fashion What is Japanese Tailoring?... I-2 Crayon Art with Snippets... I-2 Sewing with Spandex... I-3 Tuffets & Box Top Curtains... I-4 Machine Embroidery
1. Print our the Fox Hat pattern (pages 8-11 of this tutorial) at 100% of actual size. Cut out the
 at 100% of actual size. Cut out the") Other Supplies - 2 black buttons (for eyes) - One bag of fiber stuffing - Paper printer - Basic sewing supplies: - sewing machine - needle & coordinating thread - straight pins - scissors & fabric shears
Other Supplies - 2 black buttons (for eyes) - One bag of fiber stuffing - Paper printer - Basic sewing supplies: - sewing machine - needle & coordinating thread - straight pins - scissors & fabric shears
Santa Mold Project. Supplies:
 Santa Mold Project Supplies: Santa Face and Hand molds Glue Gun 6 oz. flesh colored polymer clay Toothpick 1 oz. red and green polymer clays Xacto knife Minuscule amount of acrylic Ceramic tile paint in
CUTE EASTER BUNNY. Pattern and Instructions. By Cutest Voodoo
 CUTE EASTER BUNNY Pattern and Instructions By Cutest Voodoo Before we start... This pa ern is copyrighted by Cutest Voodoo. This is an original design and is made for personal use only. Mass produc on
Butterfly Cushions. Finished size Approx. 22 wide x 14 tall
 Butterfly Cushions Finished size Approx. 22 wide x 14 tall Requirements A selection of off cuts to make the wings 13 x 5.5 for the body 18 x 24 for the back 8 x 8.5 for the internal wings Toy filler/stuffing
a free sewing pattern by
 kitty bean plush a free sewing pattern by 2 kitty bean plush This cute and simple plush is a variation on a tsum-tsum in that it has a long round body that's perfect for stacking! Though the basic shape
3D Lace and Organza Snowman
 3D Lace and Organza Snowman Create an enchanting winter wonderland with this friendly snowman! Stitch the fabric-accented lace pieces individually, then stitch them together to build your snowman. Battery-operated
Happy Winter Snowmen Table Decoration
 Happy Winter Snowmen Table Decoration Materials Tilda Classic Basic fabrics (Fig A) Apliquick fusible stabilizer Appliqué glue pen (such as that used for paper piecing) Pointy end of a flower stick or
Owen 2 of 9 Measurements: Standing: 34cm / 13.5 inches Sitting: 25.5cm / 10 inches
 Owen Jane Watling A truly special bear, Owen is worked in double knitting yarn and is based on a traditional teddy bear. He is knitted entirely in the round and has jointed arms and legs. The method used
3D Lace Deer Head. Project Needs & Notes:
 3D Lace Deer Head A rustic decor classic is reimagined in light and lovely lace! Stitch each piece of this 3D deer head separately, then assemble and mount on the wall or in a little frame. We'll show
1. Locate the pattern on the
 Here s a fine feathered friend who s as charming as he is wise. Find the perfect perch for him so you can display his plumage in all its glory. Size approximately 6 x 6 x 6 inches Materials ~ Pattern (see
Little Knitted Polar Pug
 Little Knitted Polar Pug The Little Knitted Polar Pug is a woolly companion to accompany you through the snow-covered tale of Pugs of the Frozen North by Philip Reeve and Sarah McIntyre. Knit your pug
shiba cube puppy plush a sewing pattern by
 shiba cube puppy plush a sewing pattern by If you ve ever sewn a cube before, this pattern takes it to the next level! The classic geometric shape forms a chubby little puppy body complete with four stubby
SEWING MACHINE NEEDLE ORGANIZER
 How to makeyour own SEWING MACHINE NEEDLE ORGANIZER I recently designed myself an organiser to store packets of new needles, and partially used ones, in a way that easily showed what they were (as I always
MewnicorN. pillow plush. a sewing pattern by
 MewnicorN pillow plush a sewing pattern by 2 A super cute plush that's big and cuddly enough to be a pillow! This simple stuffed cat is sure to warm the heart of any magic-lover with its majestic unicorn
cut & sew Mer-kitty plush a sewing pattern by
 cut & sew Mer-kitty plush a sewing pattern by 2 mer-kitty plush If you re reading this, then you likely purchased some of my Cut & Sew Mer-kitty Plush fabric from Spoonflower. So thank you! In celebration
SUPPLIES OTHER SUPPLIES Marco 12 Teddy Bear Pattern
 SUPPLIES Fat ¼ yd of 1 sparse, straight mohair 4 x 4 piece of wool felt or ultrasuede 10mm black glass eyes (1 pair) 2 1 ¼ Joint discs 4 1 ½ Joint discs 4 1 ¾ Joint discs Jointing hardware of choice (5
Bound and Determined:
 Think You Don t Have Time to Create Beautiful Quilts? From quick-quilt adaptations of classic patterns to fun, fresh novelty designs, McCall s Quick Quilts provides you with a treasury of time- and effort-saving
Kristoff Crocheted Doll Pattern Designed and crocheted by Becky Ann Smith.
 Kristoff Crocheted Doll Pattern Designed and crocheted by Becky Ann Smith. Disclaimer: I do not own or make any claim to this character. It is the property of the Walt Disney Corp. Stitches used: slip
 Supplies WARM AND NATURAL COTTON BATTING FIBER FILL STUFFING COTTON PRINT FABRIC FOR DRESS OLD LIGHT WEIGHT SWEATER TO CUT UP SMALL PIECE OF MUSLIN FOR CANDY RABBIT PLAID-APPLE BARREL NUTMEG BROWN CRAFT
Dolly s Darling Dungarees
 Dolly s Darling Dungarees All photos, text, and pattern pieces Dandelions n Dungarees 2013. All rights reserved. No part of this publication may be reproduced or transmitted in any form or by any means
Prairie Rose dress pattern. Sizes 18M to 6 years. A knee length dress with smocking in front and ties in back.
 Prairie Rose dress pattern. Sizes 18M to 6 years. A knee length dress with smocking in front and ties in back. Check out mytreasuredheirlooms.com/prairierose for a full size picture tutorial of this pattern.
jellyfish amigurumi free crochet pattern
 jellyfish amigurumi free crochet pattern - jellyfish amigurumi - 2 - introduction - jellyfish amigurumi This cute little jellyfish is a sweet and simple plush, with a round body and several swirly tentacles.
cut & sew tiny dino plush a sewing pattern by
 cut & sew tiny dino plush a sewing pattern by 2 cut & sew tiny dino plush If you re reading this, then you likely purchased some of my Cut & Sew Tiny Dino Plush fabric from Spoonflower. So thank you! These
Basic Sewing Portfolio. Name
 Basic Sewing Portfolio Name Back stitching Whip stitch Starting in the corner of a sample begin stitching diagonally. 3-4 stitches Hold up the back stitching lever and backstitch to the beginning. Release
Dolly. By Dianna Effner. Dolly Painting and Assembly Instructions. Original Designs for the Doll Industry, Inc. PO BOX 174 JAMESTOWN, MISSOURI 65046
 Original Designs for the Doll Industry, Inc. PO BOX 174 JAMESTOWN, MISSOURI 65046 Copyright 1991 Dolly By Dianna Effner Dolly Painting and Assembly Instructions SUPPLIES Slip- Bell Porcelain Doll Flesh
a free sewing pattern by
 a free sewing pattern by 2 sloth plush Bask in your lazy side with this adorable and interactive sloth plush. The claws have Velcro so it's able to hang on anything at the ready like the corner of a door,
Owyhee County 4-H. Cloverbud. Activity Book
 Owyhee County 4-H Cloverbud Activity Book Name Age Year in 4-H 20 Club Name Member s Signature Parent/Guardian s Signature Leader s Signature Projects or activities I worked on this year were: I attended
Crocheted Snoopy Look Alike Amigurumi
 Crocheted Snoopy Look Alike Amigurumi THIS WORK IS LICENSED UNDER THE CREATIVE COMMONS ATTRIBUTION-NONCOMMERCIAL-SHARE ALIKE 3.0 UNITED STATES LICENSE. TO VIEW A COPY OF THIS LICENSE, VISIT HTTP://CREATIVECOMMONS.ORG/LICENSES/BY-NC-SA/3.0/US/
Easter Bunnies. Finished Size Approximately 11½in (29cm) tall. Fig A
 tall. Fig A") 1 Easter Bunnies These sweet bunnies make cute gifts at any time of year. We chose certain fabrics, with details given in the instructions, but you can easily replace these fabrics with others from the
1 Easter Bunnies These sweet bunnies make cute gifts at any time of year. We chose certain fabrics, with details given in the instructions, but you can easily replace these fabrics with others from the
Fleece jacket. for mum and child
 Fleece jacket for mum and child This snuggly fleece jacket is just right when you re out walking in the autumn, harvesting the fruits of your labour in the garden or when you re doing the school run or
Copyright Bumblebee Linens LLC
 Crafts Instructions Included 1. Hankie Wedding Dress 2. Pillowcase Dress 3. Hankie Bonnet 4. Hankie Pin Cushion 5. Hankie Angel 6. Hankie Bunny 7. Pillowcase Reusable Grocery Bag 8. Linen Towel Drawstring
astrobunny & cosmokitty plush a sewing pattern by
 astrobunny & cosmokitty plush a sewing pattern by astrobunny & cosmokitty plushies Ever on an adventure, best friends Astrobunny and Cosmokitty are searching the farthest reaches of space to see what new
Printing Instructions: This file is formatted to print on 8.5 x11 Letter paper. If printed on other paper, the scale may be off.
 Anatomy Doll Pattern by Cat Carlisle 1 Printing Instructions: This file is formatted to print on 8.5 x11 Letter paper. If printed on other paper, the scale may be off. 1. Open the PDF file using Acrobat
OTHER TOOLS & SUPPLIES
 OTHER TOOLS & SUPPLIES - Fat Eighth of fusible fleece - 1/4 yd of fusible cotton interfacing (22 wide) - 1 yd of piping in coordinating color - (1) 1 D-Ring - (1) 1 swivel hook - (1) 8 closed-end zipper
# Holiday Hanna Witch
 Tan or tea stained fabric for head and arms Deena s Shirt and bloomers....plain print Apron. 29 x 7 of print Apron straps.(2)1 x 5 pieces Apron ties (2) 1 x7 Body Muslin #174 19 Holiday Hanna Witch Witch
ESPADRILLES Boots Instructions
 ESPADRILLES Boots Instructions SUPPLIES NEEDED: Espadrille Soles Espadrille Creative Yarn Espadrille Large Curved or Straight Needle Espadrille Needle Pullers Espadrille Yarn Wax Espadrille Glass Head
CAMELOT FABRICS. 3. Draw a vertical line on the pointed end of each Strap, a tiny bit longer than the diameter of your buttons.
 Other Supplies - 2 buttons in coordinating color - paper printer - basic sewing supplies - sewing machine with buttonhole foot - iron & pressing surface - scissors & fabric shears - measuring tape - fabric
3D Lace & Organza Angel
 3D Lace & Organza Angel A stunning combination of organza fabric and freestanding lace comes together to create this threedimensional angel. Great for topping your Christmas tree, or as a gorgeous table
SUPPLIES TOOLS Mini Teddy Bear Pattern
 SUPPLIES TOOLS 7 X 9 piece of 1/2 ultra sparse mohair 2 x 2 piece of felt (footpads) 5 Mini T cotterpins 6 ½ joint discs 4 3/8 joint discs 5mm black glass eyes (1 pair) Artificial sinew (or strong waxed
CHOCOBO. plush. a free sewing pattern by
 CHOCOBO plush a free sewing pattern by 2 chocobo plush Kweh! Final Fantasy fans are sure to love this chibi version of the classic rideable bird. It has a large head, a prominent beak and a big feather
Crochet Pattern. Doll in a Viking Monkey outfit. LittleOwlsHut. Materials and tools. About this pattern. Finished size.
 LittleOwlsHut Crochet Pattern By Galina Stelmakhova Skill level: Easy About this pattern The toy is crocheted in continuous spirals without joining the rounds. You will need a stitch marker to keep track