SUPPLIES OTHER SUPPLIES Marco 12 Teddy Bear Pattern
|
|
|
- Martin Wright
- 6 years ago
- Views:
Transcription
 (For eyes & closing head) Pearle cotton (for nose & mouth) Upholstery thread to match")
 Marco 12 Teddy Bear Pattern TeddyBearAcademy.")
1 SUPPLIES Fat ¼ yd of 1 sparse, straight mohair 4 x 4 piece of wool felt or ultrasuede 10mm black glass eyes (1 pair) 2 1 ¼ Joint discs 4 1 ½ Joint discs 4 1 ¾ Joint discs Jointing hardware of choice (5 T-cotterpins, or 1 T-cotterpin & 4 bolts 1/8 x ¾ And 10 metal washers Artificial sinew (or strong waxed floss) (For eyes & closing head) Pearle cotton (for nose & mouth) Upholstery thread to match fabric backing (for hand sewing & attaching ears) Fiberfill Stainless steel pellets (optional) OTHER SUPPLIES Marking pen Masking tape Clean pet slicker brush Aleene s Stop Fraying Toothpick Basic sewing supplies (See Tools link at Marco 12 Teddy Bear Pattern TeddyBearAcademy.net Bears made from this pattern may be sold, but the pattern itself may not be copied, sold or redistributed.
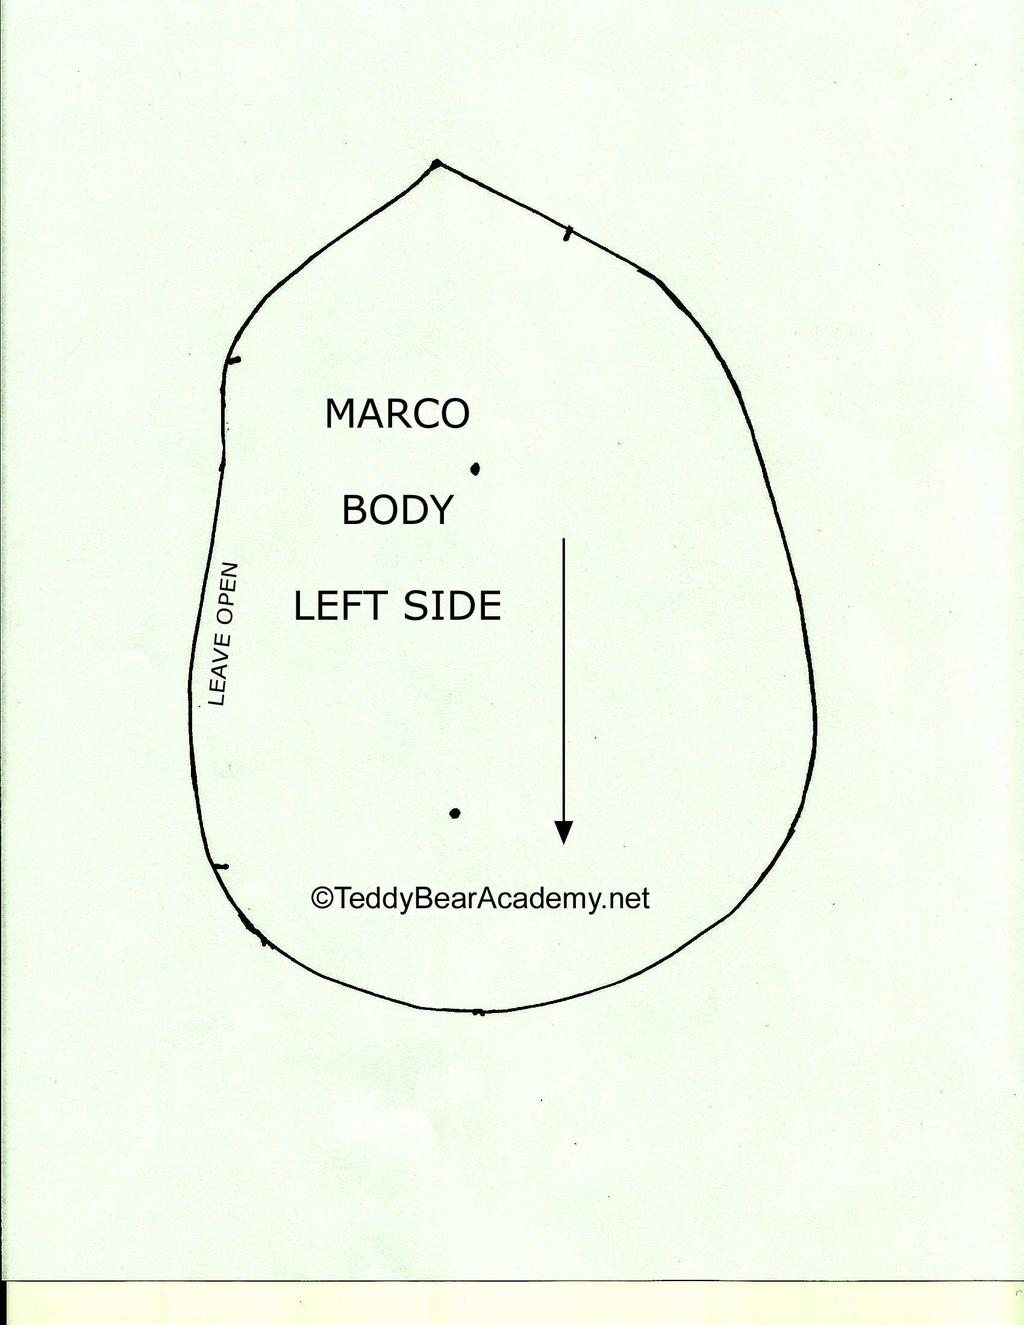
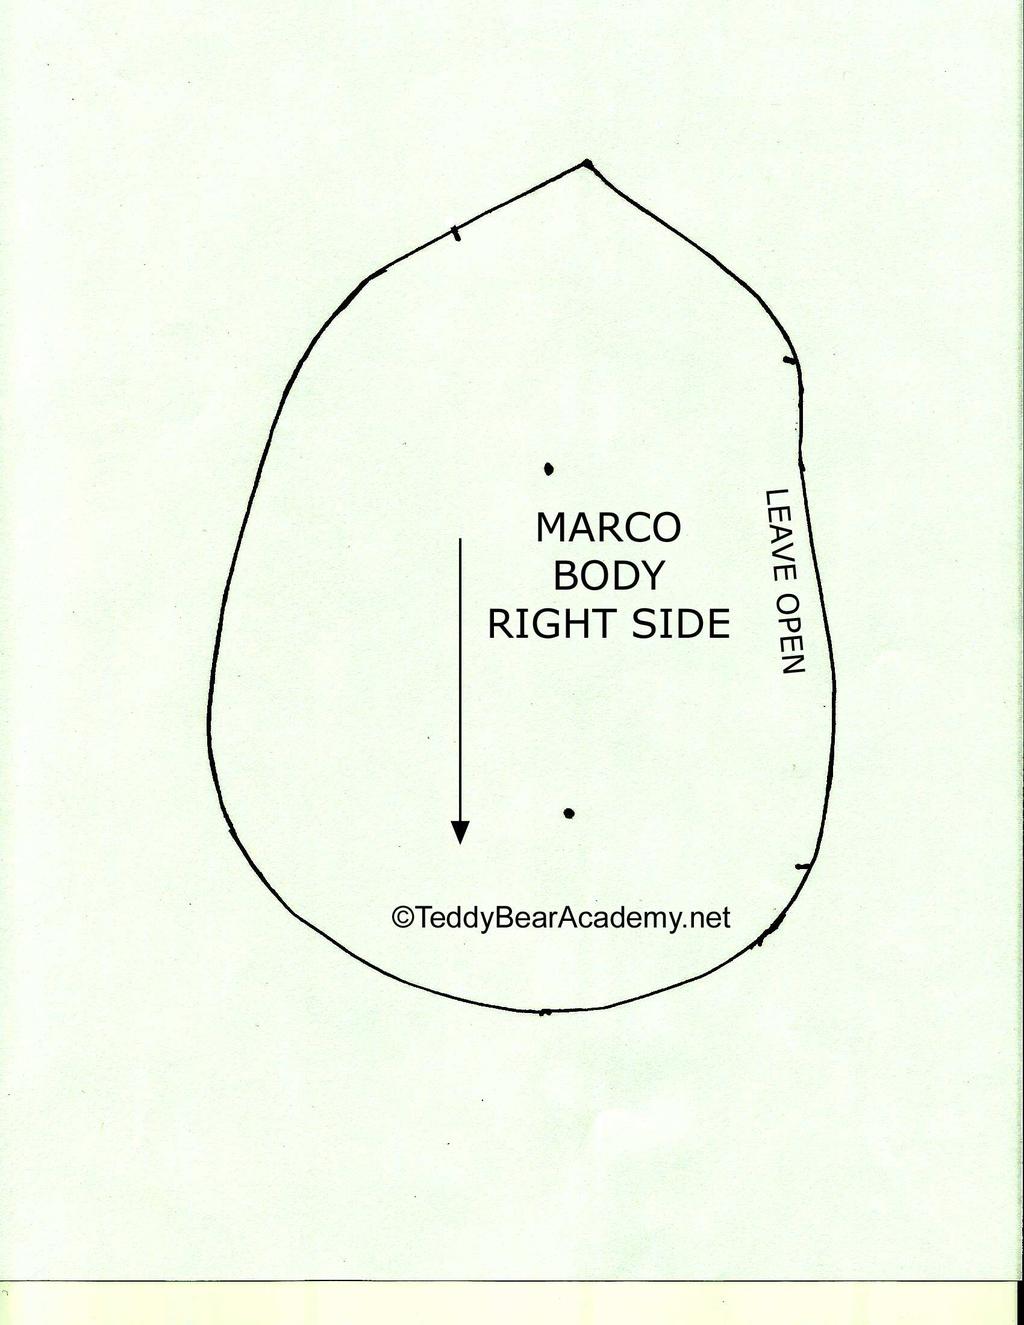
2 Marco 12 Teddy Bear Pattern Artist Designed Teddy Bear Pattern by Teddies by Laura Lynn for Teddy Bear Academy Instructions & Pattern are copyrighted 2014 The bear you make from this pattern is not intended to be a child s toy due to the glass eyes and pellets. 1) Trace pattern pieces onto paper, paste onto cardstock and cut out. A 1/4 seam allowance IS included Print out enough pieces so you have the entire teddy bear in pattern pieces (print out 4 legs, 2 head sides, 2 inner arms,...) This way you can lay out the entire bear on your fabric before drawing it out to be sure you have enough fabric... or if you can change the layout to be sure it all fits. 2) Lay pattern pieces on wrong side of your fabric. Be sure the arrows on the patterns run in the same direction as the direction of the fur. 3) Trace around each pattern with a permanent marker or gel pen. Be sure to mark all joint marks and seam openings. 4) Cut out your pieces. It is important to cut ONLY the backing of the fabric with a sharp, small scissors. Cut on the INSIDE of the lines. My scissors of choice for this are Fiskars Softouch Micro-Tip Scissors. They are awesome! Their "Softouch" design really does a good job to help keep my hands from getting sore. 5) As you first pin your pieces together, be sure to tuck all the fur to the inside. This will give you nice clean seams.
3 2 Use enough pins so that the pieces do not slide around... the fur makes the pattern pieces want to shift a bit more than regular fabric would. Or, if you are like me... you can now hand baste your bear parts together with a whip stitch, remove the pins, and then start sewing (either by machine or by hand). 6) SEWING BODY: Fur sides together, match up the right and left body pieces together, pin, baste if you prefer, and sew. Leave a opening at the back to turn and stuff. HEAD: Match 2 head side pieces together and sew the chin seam from the tip of the nose down to the neck opening. To insert the head gusset, match the line on the nose of the head gusset up to the seam of the 2 head sides. Tack in place at the seam. Pin the gusset in place, then baste together with a whip stitch. Sew the gusset in place. I prefer to hand sew the front of the gusset in (the nose and eye area) and then I machine sew the rest. REMOVE basting stitches! ARMS: Match the paw pads up to the corresponding inner arms and sew with a 3/8 seam allowance. Now match up the inner arms to the correct outer arms. Pin and sew. LEGS: Match legs be sure that each leg has one outer let and one inner leg. The inner leg will have the joint marking. Pin and sew closed, making sure to leave the seam opening open and also the bottom of the foot. Insert the footpad: Match up the lines on the footpads to the seams on the feet. Tack in place. Pin the rest of the footpad in place, baste together with a whipstitch. Sew in place with a backstitch. REMOVE basting stitches. EARS: Match up both pairs, sew from one corner, around the curve to the other corner. Leave the straight edge open. Turn all pieces right side out, use a needle or awl to pick out fur that may be trapped in the seams. 7) STUFFING ARMS: I like to take my fiberfill stuffing and pull it apart into small balls of fluff about an inch or larger in diameter. Take your first couple of bits and stuff it firmly (with your stuffing tool using the tool really does help get it nice and firm!) into the arm, all the way to the tip of the pawpad. Be sure to stuff the pawpad area nice and firm.
4 3 Now I insert the joint assembly. Take your awl or sharpened chopstick and find the joint marking on the inside of the arm. It will be on the inside of the arm the side WITH the pawpad on it. Now pierce the mohair fabric try to just separate the threads and not cut them if possible. Make an opening just large enough for your joint hardware to go thru. The disc will be on the inside of the arm. Now to finish stuffing the arm. Do you want a firm bear or a slightly squishy bear? Stuff the bear until he feels right to YOU. As you near the seam opening slow down stuffing a little. You need to allow some fabric for closing the seam. Close your seam using your upholstery thread.. doubled I like to start closing my seams before he s quite all the way stuffed. As I close, I add little bits more of stuffing so he s not too soft, not too hard but juuuust right! (Sorry, couldn t resist!) After you have finished closing the seam, tie it off and hide the threads Now that the arm is done, set it aside and finish the other parts. LEGS: I stuff my legs much the same way I stuff my arms but with one difference. I often add glass pellets to my bears feet. It helps them to stand up. I like to start with a small layer of fiberfill in the bottoms of the feet and then I add my pellets, bb s or what have you. I then add more fiberfill to the top of the foot and up the ankle a bit. I recommend stuffing this area firmly with some fiberfil also to give him support to stand. Assemble your leg joint. Take your awl or sharpened chopstick and find the joint marking on the inside of the leg. Remember you will have 1 Right Leg and 1 Left Leg! Now pierce the mohair fabric try to just separate the threads and not cut them if possible. Make an opening just large enough for your joint hardware to go thru. The disc will be on the inside of the leg. Now to finish stuffing the leg. Do you want a firm bear or a slightly squishy bear? Although I recommend firmly stuffed legs, stuff the bear until he feels right to YOU. As you near the seam opening slow down stuffing a little. You need to allow some fabric for closing the seam. Close your seam using your upholstery thread.. doubled using a ladder stitch. I like to start closing my seams before he s quite all the way stuffed. As I close, I add little bits more of stuffing here and there to fill in. After you have finished closing the seam, tie it off and hide the threads. Head STUFFING You want to stuff the head nice and evenly. Are you right handed or left handed? I am right handed and like to hold the bear s head in my left hand, and stuff with my right hand. If you are left handed, you may want to do it the other way around. I like to stuff the nose first. Take small bits of stuffing and stuff FIRMLY into the nose. This part must be very firmly stuffed as it will make it much easier when you embroider his nose.
5 4 I usually stuff the nose area about 1/3 ½ way to start and then start adding stuffing to the rest of the head. Now I finish stuffing the nose very firmly. I find that doing it this way helps to keep the stuffing in the nose area. When I stuff the head, I turn it in a circle as I add fiberfill. It helps me to keep my stuffing job even when I do it that way. Make sure the head, and especially the nose, are very firmly stuffed. Now if you wanted to.. you could insert your neck joint and close up the head. But I like to embroider the nose while the neck is still open. I like to be able to add more stuffing as needed, or shift it if necessary while I am embroidering the nose. My directions will be written in that order as that is how I do it. But you can change that order around if you prefer! EMBROIDERING the NOSE Decide what shape nose you would like your bear to have. If you are not sure, cut out some felt shapes and hold them against the bear s snout. When I am doing a nose, I like to use the 3 inch needle a good sharp one! Start with a length of pearle cotton about 30 long. I prefer to use 2 shorter pieces than one long piece as I find the long pieces get knotted up too easily. I enter the bear s nose thru the side, and don t pull the pearle cotton all the way thru, let a short tail hang out don t put a knot in the end of the floss! Bring your needle up near a top corner of where you want your nose to be, and then outline the shape of the nose. Now I take my scissors and trim the fur away from the area where I want to embroider the nose. Now stitch the nose. I prefer to make vertical stitches, but you can do horizontal if you like. Those outline stitches will help you keep the nose nice and even. I like to start in the middle, and take a few stitches to the right, and then left, working the nose out to both ends at the same time. If you have trouble getting the needle thru sometimes, use your needlenose pliers to help you. I use mine a lot! When you come near the end of your strand thread it onto your long 5 needle, and with your next stitch, go thru to the back of the neck on the other side of the head. Pull it nice and taut and snip the pearle cotton. Start your next piece the same way you started the first. When the nose is all done, carefully snip the beginning ends of the pearle cotton that you left hanging on his snout. Be sure to use a very sharp pair of scissors so you don t leave any pieces hanging.. **Now as I am stitching the nose with the neck still open, I keep adding little bits of fiberfill here and there as needed. I also am able to re-adjust the snout to be centered as it sometimes goes a little lopsided while I am stitching the nose. He does not have a mouth yet I prefer to do that after his neck is closed.
6 5 CLOSING THE NECK Now your head is all stuffed.. and if you chose to do the nose first, it is all stitched. Time to close up the neck. Assemble your neck joint assembly. Sit the bear s head in your lap or on your table upside down so the opening is up. Set the assembled joint inside. Thread your waxed thread/floss on your 3 needle and sew a gathering stitch all around the neck opening. Leave a long tail to start and to end. I like to start and end at the back of the neck. Now first make sure both tail ends are about the same length and pull the opening closed tightly. Tie a square knot. The waxed thread really helps here as it helps to keep the knot. I don t stop there, however. I want to be sure this stays closed Now I take each tail end of the floss and make large back stitches all round the joint, ending up at where I started. Do this with both tails. Now tie another square knot and sink the tails into the head (take your large 5 needle and go into the head right next to the knot, going thru to the other side of the head. Tug to pull the knot on the other side and then snip off the tails that now come out on the top part of the head. You now have a VERY secure neck joint! THE MOUTH I like to take another length of pearle cotton, and come up to the center of the nose from the lower back side of the head (near the neck joint) leaving a about 6 of the pearle cotton hanging out near the neck. I take that length and bring it thru also going in thru the head just a small space away from the first place, but coming out at a different spot on the head where I then clip it away. This helps anchor the pearle cotton in place. Now you can decide what shape mouth you would like to have. It may help to outline the mouth shape with some ball headed pins. Stitch the mouth and when you are done, bring the tail ends all the way thru the head near the same place you entered and snip the ends. The head is done for now.. I know he can t see or hear you yet. But it will be much easier to attach his eyes and ears when he is able to sit up on his own! Jointing the Bear Now he s really coming together! It s time to put all of your bear s parts and pieces together now. I like to start with the head. There is a small gap (marked on the inside) in the neck seam where his head joint will fit. I use my sharpened chopstick to GENTLY open this area up. I push it thru from the inside to out. I don t poke it all the way thru, I just want the point to come out to the fur side. Take your jointed head, and slip the joint hardware thru the neck opening. Now turn the body slightly inside out, so you can slip the 2 nd neck disc and 2 nd large washer over the hardware that is now sticking into the inside of the bear s body. Now secure your joint. (turn the cotterpin, tighten the nut ) I attach the arms next, ending with the legs. To attach the limbs, take your awl or chopstick and gently poke a hole (separate the threads) at the joint markings. Make an opening just large enough for each cotterpin or bolt to go thru. Attach the limb (Make
7 6 sure it is facing in the correct direction!!). Now take limb disc & washer and slip them over the cotterpin or bolt on the inside of the body in the order listed. Now, tighten each joint on the inside to secure each limb to the body. Now you have your bear all assembled and it s time to fill his tummy! You can make your bear as firm or as squishy as you like, but it is easier for your bear to sit up if he is at least slightly firm. This is how I stuff my bears I start with a thin layer of fiberfill in the bottom, especially around the leg joints. Then, I usually add my pellets for weight. I prefer glass pellets, but you could use plastic pellets, stainless steel bb s, ) How many do you add? I just pour some in and then feel how heavy the bear is. Till he feels right to you! Now add more fiberfill. I find it easier at this point to lay him on his tummy, face down. Keep adding fiberfill till he is the firmness you like. Don t forget to add fiberfill at his neck! This is an area that is very important so he can hold his head up. Close up his back with a ladderstitch adding small bits of fiberfill as you close as needed. You can now sit your teddy up to face you so that you can finish his face! I like to do the eyes first, then the ears. It really does not matter, do it however you are comfortable. The Eyes To insert the eyes you will need: The pair of glass eyes, the pair of waxed eye floss strands (should all be in the same packet) 5 long needle, needlenose pliers, awl (or sharpened chopstick), ball headed straight pins. First, fold each length of eye floss in half. Be sure each ½ is even. Now, loop end first, thread that thru the wire on each glass eye Pull the loop a little bit thru the eye wires, now take the tail and pull it thru that loop: Now pull the tails tightly, and you have tied the glass eye to the waxed floss securely. Take a look at your bear where do you want the eyes to be? Use your ball headed pins to help you place them. The common place is right where the forehead starts to slope up, just on the outside of the gusset seam. Be sure NOT to place them directly on the seam as that will weaken the head. Move the eyes (pins) away from and closer to the gusset to see which look pleases you best. When you are ready to insert the eyes, first, thread the tails of the waxed floss from one of the eyes onto your 5 needle. Take your awl (or chopstick) and carefully poke a small hole (separate the threads of the backing) where one of your pins is located. Now, take your threaded 5 needled and insert it thru that hole, coming out down at the neck of your bear, on the opposite side of the eye. Do the same for the other eye
8 7 At the back of the bear now, separate the tails of the floss for one of the eyes. With one tail, take a small stitch so it is next to its other tail, but not in the same hole. Do the same for the other eye s floss tail. Carefully tie one knot (just over once) and pull gently. Push gently on the eyes to help them sink in but you don t want to pull too tightly and accidentally break the glass eyes! Pushing gently on the eyes helps sink the eyes without breaking them. Now go back to those floss tails and tie a square knot. Sink the ends The Ears Using a 24 length of upholstery thread, whipstitch the ears closed and do NOT cut off the end! Tie off a quick knot to secure it, but leave the thread hanging from each ear. You will use these to attach them to the head. Now you have 2 closed ears with threads hanging from them. Position the ears onto your bear & pin them to your bear s head. Move them about until you are happy with their placement. You can really play with a bear s expression by moving those ears about! To make sure they are even, take a look at your bear in the mirror, and also look down on his head from above. These tricks can help you place them evenly. When you have the ears placed as you like, you just whipstitch them into place (removing pins as you go) very much like how you closed the ears in the first place. But on the ears when you just brought the thread OVER the ear and went thru on the front, you will bring the needle thru the head instead. When you finish at the bottom of the ear, tie a knot and hide the threads just like you did when you closed the seams. Now you can brush your new friend and accessorize him if you like! I hope you enjoyed creating Marco!
9
10
11
12
13
14
15
SUPPLIES OTHER SUPPLIES Carson 10 Teddy Bear Pattern
 SUPPLIES Fat 1/8 yd of 5/8 faux fur or mohair (sample is faux fur) 5 x 5 piece of wool felt for paw pads 11mm black glass eyes (1 pair) Small piece white felt (optional) eye whites 2 1 1/8 Joint discs
SUPPLIES. OTHER SUPPLIES Marking pen Masking tape Aleene s Stop Fraying Toothpick Basic sewing supplies (See Tools link at
 SUPPLIES 30 x 9 piece of 5/8 curly matted mohair 7 x 6 piece of wool felt or ultrasuede 8 mm black glass eyes (1 pair) 6-1 fiberboard discs (neck & front legs) 4-1 ¼ fiberboard discs (rear legs) 5 Cotterpins
SUPPLIES TOOLS Mini Teddy Bear Pattern
 SUPPLIES TOOLS 7 X 9 piece of 1/2 ultra sparse mohair 2 x 2 piece of felt (footpads) 5 Mini T cotterpins 6 ½ joint discs 4 3/8 joint discs 5mm black glass eyes (1 pair) Artificial sinew (or strong waxed
Jamie - 11 Soccer Bear
 Jamie - 11 Soccer Bear Artist Designed Bear with Flexlimb by Laura Matthews of TeddiesbyLauraLynn.com and FreeTeddyBearPatterns.NET This is not intended to be a child s toy due to the glass eyes and pellets.
Basic Bearmaking Instructions
 Laying out the Pattern Basic Bearmaking Instructions We recommend that you read the instructions right through before commencing. This will help you to understand the steps you need to take. Copying your
Welcome! Now, let s get started!
 Welcome! You re about to embark upon a wonderful journey, creating a Teddy Bear! But, I m warning you; once you start you just might get hooked! Whether you make this as a gift or for yourself, your heart
j e n n y l o v e s b e n n y B o u t i q u e B e a r s Sunday by Jenny Lee
 j e n n y l o v e s b e n n y B o u t i q u e B e a r s Sunday by Jenny Lee Please meet an old friend of mine...the original Sunday!! Sunday loves nothing better than to laz around and do absolutely NOTHING!!...hmmm
"Delores Bear" 16 (41cm) To make "Delores Bear" you will need:
 To make Delores Bear you will need:") "Delores Bear" 16 (41cm) To make "Delores Bear" you will need: Viscose plush fabric 22 x 16 Suedette 6 x 6 1/2 5 x 26mm Nut & bolt joints 2 x 12mm Black safety eyes Perli thread (nose) Floral fabric (drawers)
"Delores Bear" 16 (41cm) To make "Delores Bear" you will need: Viscose plush fabric 22 x 16 Suedette 6 x 6 1/2 5 x 26mm Nut & bolt joints 2 x 12mm Black safety eyes Perli thread (nose) Floral fabric (drawers)
NOTES 1. Please wash, dry & iron your fabric before beginning. 2. Use a 1/4 seam allowance throughout. 3. All seams are sewn Right Sides together.
 OTHER TOOLS & SUPPLIES - fiber stuffing or fabric scraps - paper printer - 24 contrasting embroidery floss & an embroidery hoop, for eyes - 2 yds of ribbon, for hanging (optional) - basic sewing supplies:
Vintage Style Teddy Bear Pattern
 9 by 12 wool or wool blend felt contrasting color wool felt (or blend) for paw pads and nose 6 mm safety eyes needle and thread doll making needle embroidery thread 100% mohair wool cotton fleece teddy
Page 1. Jumblenut. The Head. Design by Barbara Allen
 Page 1 Needle felting Needle felting is quite different from creating felt by shrinking wet wool. There s no water involved, it requires very little space and creates no mess at all. It s a craft that
sugar skull kit ty plush a sewing pattern by
 sugar skull kit ty plush a sewing pattern by sugar skull kit ty plush This pattern pays homage to the beautiful calaveras seen in Dia de Muertos art. It s a simple kitty plush with button jointed limbs
a free sewing pattern by
 kitty bean plush a free sewing pattern by 2 kitty bean plush This cute and simple plush is a variation on a tsum-tsum in that it has a long round body that's perfect for stacking! Though the basic shape
a free sewing pattern by
 a free sewing pattern by 2 Kupo! Fans of Final Fantasy are sure to love this extra fuzzy Moogle! It has all the classic details that make the character so adorable -- including little wings, kitty ears,
MewnicorN. pillow plush. a sewing pattern by
 MewnicorN pillow plush a sewing pattern by 2 A super cute plush that's big and cuddly enough to be a pillow! This simple stuffed cat is sure to warm the heart of any magic-lover with its majestic unicorn
love dragon plush a free sewing pattern by
 love dragon plush a free sewing pattern by 2 love dragon plush A combination of a Valentine's and Chinese New Year celebration with the most adorable result! This little dragon pattern is done in the more
dolphin plushies a sewing pattern by
 a sewing pattern by dolphin plushies These plushies are made to mimic a cute baby dolphin! Completely chubby and pudgy with a tiny bottle nose, round body, and bitty dorsal, side, and tail fins. They re
Josephine Doll Pattern
 Josephine Doll Pattern Making these dolls means pulling out your scrap bin and button box and having a wonderful time pairing up patterns and prints. Each doll has felt hair and some have felt balls as
neko atsume plushies a sewing pattern by
 neko atsume plushies a sewing pattern by neko atsume plushies These plushies are of course inspired by the adorable Neko Atsume (kitty collector) kitties -- specifically Pepper, Dottie, and Misty. They
axolotl PLUSH a free sewing pattern by
 axolotl PLUSH a free sewing pattern by 2 axolotl plush This cute belly-down plush is a chibi version of everyone's favorite amphibious salamander. It has the same external gills and tail fin as the original,
cut & sew ferret plush a sewing pattern by
 cut & sew ferret plush a sewing pattern by 2 ferret plush If you re reading this, then you likely purchased some of my Cut & Sew Ferret Plush fabric from Spoonflower. So thank you! Make your favorite cat
a free sewing pattern by
 a free sewing pattern by 2 witch kitty plush Ready your broom and cape! This adorable little kitty is all decked out for Halloween. The pattern comes with loads of cute details, including a capelet with
CHOCOBO. plush. a free sewing pattern by
 CHOCOBO plush a free sewing pattern by 2 chocobo plush Kweh! Final Fantasy fans are sure to love this chibi version of the classic rideable bird. It has a large head, a prominent beak and a big feather
owl bear plush a free sewing pattern by
 owl bear plush a free sewing pattern by 2 owl bear plush This pattern is a variation of my previous owl plush, an adorable bear version that's an homage to the classic monsters from Dungeons and Dragons
narwhal plush a free sewing pattern by
 narwhal plush a free sewing pattern by 2 narwhal plush Make your own 'unicorn of the sea' with this cute pocket-sized narwhal! With just 4 pattern pieces, it sews up quickly and is great for a beginner
cut & sew kitty bean plush a free sewing pattern by
 cut & sew kitty bean plush a free sewing pattern by 2 cut & sew kitty bean plush If you re reading this, then you likely purchased some of my Cut & Sew Kitty Bean Plush fabric from Spoonflower. So thank
a free sewing pattern by
 a free sewing pattern by 2 rat plush Whether you think rats are adorable or excitingly scary, this pattern is sure to make something you'll love! The instructions here go over making a sweet little rodent
cut & sew owl plush a sewing pattern by
 cut & sew owl plush a sewing pattern by 2 cut & sew owl plush If you re reading this, then you likely purchased some of my Cut & Sew Owl Plush fabric from Spoonflower. So thank you! This pattern is for
a free sewing pattern by
 a free sewing pattern by 2 Decorate your desk or nightstand with this palm-sized fox! It's extra-large tail is especially charming as it wraps around the tiny fox body and helps it balance upright. But
Here are the basic instructions for the teddy bear pattern. Please let me know if you have ANY questions.
 DOLLS OF HOPE TEDDY BEAR PATTERN - Created by Sarah Parson inthemiddleofthis@gmail.com for questions or call 801-369- 0915 Here are the basic instructions for the teddy bear pattern. Please let me know
Jack Rabbit Softie Pattern
 Jack Rabbit Softie Pattern Carlee Dynes, 2011 the-polka-do t-umbrella.blogspot.co m Jack Rabbit Softie Pattern You will need: Directions ½ Yard main fabric (quilting weight or home décor are both fine)
Mer-kitty. plush. a free sewing pattern by
 Mer-kitty plush a free sewing pattern by 2 mer-kitty plush In celebration of Mer'may' is this adorable ocean feline! A combination of a mermaid and cute kitty, this mer-kitty has a big colorful fish tail
Sock Lamb 2011 Cutest Creations
 Materials needed: Sock Lamb 2011 Cutest Creations sew-on Velcro Felt square for heart 1 square of black craft felt Invisible ink marker 1 pair of white ladies dress socks (preferably flat knit, cotton/poly
astrobunny & cosmokitty plush a sewing pattern by
 astrobunny & cosmokitty plush a sewing pattern by astrobunny & cosmokitty plushies Ever on an adventure, best friends Astrobunny and Cosmokitty are searching the farthest reaches of space to see what new
Read through everything carefully before beginning. View E from Simplicity C5461 5/8 yd
 Rare Bear Supply List and Sewing Instructions as of Sunday, March 04, 2018 Read through everything carefully before beginning. Pattern pieces - View E from Simplicity C5461 - pieces 33 through 41 Follow
Pajama Sock Monkey 2009 Cutest Creations
 Materials needed: Pajama Sock Monkey 2009 Cutest Creations 1 pair of size Large Brown Red-Heel socks can be purchased from my online store www.ohboyorgirl.com Black embroidery thread Other color embroidery
Owen 2 of 9 Measurements: Standing: 34cm / 13.5 inches Sitting: 25.5cm / 10 inches
 Owen Jane Watling A truly special bear, Owen is worked in double knitting yarn and is based on a traditional teddy bear. He is knitted entirely in the round and has jointed arms and legs. The method used
FUNKY FRIENDS FACTORY
 FUNKY FRINDS FACTORY the ASY Teddy An original design created by Pauline McArthur 2005 Hi there! Welcome to the Funky Friends Factory. Soft Toys you ll love to make! Finished Toy Size: 33cm/13inches is
Lolo the Llama. Featuring Coats Dual Duty XP. Supplies
 Technique: Designed By: Skill Level: Crafting Time: Finished size: Sewing Linda Turner Griepentrog Beginner Weekend 18 (45.72cm) tall, excluding ears Featuring Coats Dual Duty XP Lolo, with her furry fleece,
a free sewing pattern by
 a free sewing pattern by 2 sloth plush Bask in your lazy side with this adorable and interactive sloth plush. The claws have Velcro so it's able to hang on anything at the ready like the corner of a door,
Rattle - Baby Dragon
 Rattle - Baby Dragon Kristi Tullus, Size 11 cm (4 1/3") with fingering weight yarn and a 1,75 mm crochet hook. Difficulty 2. Beginner - suitable for novice crocheters, requires patience and precision when
Instructions for the Bear. Cutting: Cut pieces from the bear fabric as marked on templates.
 Finished size: about 16 tall from his bottom to his ears. Trace all pattern pieces onto their respective fabrics adding 1/4 inch all around for seam allowance Supplies and materials: 12 oz. Poly-Fil Premium
Night fury. plush. a sewing pattern by
 Night fury plush a sewing pattern by 2 Night Fury Plush skills used: Get ready for your own dragon-riding adventure with this fun night fury plush! This pattern will show you how to make this cute dragon
Tartan Plaid Horse. Skill Level: Intermediate
 Tartan Plaid Horse If you have a basic mastery of sewing, you will gallop right through this adorable handmade horse! Make one for the kids or grandkids or use it to decorate your own home. Skill Level:
Fabergé Bunny. Skill level 2. Courtesy of Cranston Fabircs. Supplies: Directions:
 Skill level 2 Fabergé Bunny Courtesy of Cranston Fabircs Supplies: 3/4 yd. V.I.P. by Cranston Egg Print, for rabbit 1/4 yd. V.I.P. by Cranston Turquoise Crackle, for inner ears 1/4 yd. V.I.P. by Cranston
Supplies Needed. Instructions. Project Instructions Ellie & Eliza Stuffed Elephants. Skill Level 2: Some experience necessary
 The Land of Whimzie The Land of Whimzie Project Instructions & Eliza Stuffed Elephants Finished Size: 10" x 16 ½"- 6" x 10 ½"-Eliza Skill Level 2: Some experience necessary Approx. Crafting Time: 3-5 hours
Sweet Softies: Funny Bunny
 Published on Sew4Home Sweet Softies: Funny Bunny Editor: Liz Johnson Thursday, 08 April 2010 10:00 Stuffed animals make me happy. They live on my desk at home and at work, so I can glance over at them
Sew Sweet Bunny Basket
 Sew Sweet Bunny Basket Crafter level: Intermediate to Advanced Time needed: 2½ hours What you'll need Printouts of templates ¾ yd. linen fabric for basket ¾ yd. cotton print fabric for lining Pins Sharp
cut & sew Mer-kitty plush a sewing pattern by
 cut & sew Mer-kitty plush a sewing pattern by 2 mer-kitty plush If you re reading this, then you likely purchased some of my Cut & Sew Mer-kitty Plush fabric from Spoonflower. So thank you! In celebration
cut & sew AXOLOTL PLUSH a sewing pattern by
 cut & sew AXOLOTL PLUSH a sewing pattern by 2 axolotl plush If you re reading this, then you likely purchased some of my Cut & Sew Axolotl Plush fabric from Spoonflower. So thank you! This cute belly-down
 Supplies WARM AND NATURAL COTTON BATTING FIBER FILL STUFFING COTTON PRINT FABRIC FOR DRESS OLD LIGHT WEIGHT SWEATER TO CUT UP SMALL PIECE OF MUSLIN FOR CANDY RABBIT PLAID-APPLE BARREL NUTMEG BROWN CRAFT
LITTLE VALENTINE BEAR
 LITTLE VALENTINE BEAR - Free Crochet Amigurumi Pattern by MJ Carlos - YOU WILL NEED: 3.5mm crochet hook 8ply (DK/Light worsted) acrylic yarn ball in light brown and red dark brown or black embroidery thread
dragon & unicorn hooded cowl a free sewing pattern by
 dragon & unicorn hooded cowl a free sewing pattern by 2 hooded cowl When you re ready to break out a scarf or hat for chilly weather, try putting on this cozy cowl! It s a hood and scarf in one with cute
cut & sew fox plush a free sewing pattern by
 cut & sew fox plush a free sewing pattern by 2 If you re reading this, then you likely purchased some of my Cut & Sew Fox Plush fabric from Spoonflower. So thank you! Decorate your desk or nightstand with
maneki neko coin pouch a sewing pattern by
 maneki neko coin pouch a sewing pattern by maneki neko coin pouch Maneki Neko is Japanese for beckoning cat, often known as a Lucky Cat in English. These adorable kitties are used in Asian businesses to
19" emily, Jenny, & Portrait Dolls. By Dianna effner. Body Pattern and Construction. Strip
 Original Designs for the Doll Industry, Inc. PO BOX 174 JAMESTOWN, MISSOURI 65046 19" emily, Jenny, & Portrait Dolls Copyright 2001 By Dianna effner Body Pattern and Construction ArmATure ConSTruCTIon
Dancing Rain Dolls. Knot Doll. Created By. Amy Prentice
 Dancing Rain Dolls Knot Doll Created By Amy Prentice Copyright 2007 1 Dear Friends, This pattern is the easiest of all dolls to make. This doll will take about 2 hours to complete and is the perfect doll
Baby Chinchilla. crocheted in James C. Brett Chinchilla and James C. Brett Chunky with Merino. Designed by Laura Sutcliffe:
 Baby Chinchilla crocheted in James C. Brett Chinchilla and James C. Brett Chunky with Merino Designed by Laura Sutcliffe: www.facebook.com/lauralovescrochet www.etsy.com/uk/shop/laulovescrochet laura.sutcliffe@hotmail.com
Calico Set. Pattern set includes patterns for calico kitten, bib and fuzzy ball.
 Pot Belly Babies Calico Set Pattern set includes patterns for calico kitten, bib and fuzzy ball. When made with the specified yarns and hooks, kitten measures 18 inches long and 19 inches around the belly,
gunter plush a sewing pattern by
 a sewing pattern by gunter plush This project is a huggable little plush made to look like Gunter, the mischievous little penguin and the Ice King s buddy from Adventure Time. It features little wings
Weighted Pincushion Organizer
 Weighted Pincushion Organizer from Sew, Mama, Sew! This sturdy pincushion has plenty of space to store pins and a wool felt strip for your needles. The hanging pocket is a perfect place for storing easily-misplaced
shiba cube puppy plush a sewing pattern by
 shiba cube puppy plush a sewing pattern by If you ve ever sewn a cube before, this pattern takes it to the next level! The classic geometric shape forms a chubby little puppy body complete with four stubby
cut & sew tiny dino plush a sewing pattern by
 cut & sew tiny dino plush a sewing pattern by 2 cut & sew tiny dino plush If you re reading this, then you likely purchased some of my Cut & Sew Tiny Dino Plush fabric from Spoonflower. So thank you! These
MOMO THE BABY MONKEY. Crochet Amigurumi Pattern by MJ Carlos
 MOMO THE BABY MONKEY Crochet Amigurumi Pattern by MJ Carlos Page 1 of 7 MATERIALS REQUIRED 4.5mm crochet hook (US 7 / UK 7) 1 x 8 ply yarn ball (US Light Worsted / UK DK) in Brown Colour A 1 x 8 ply yarn
NIGHT FURY HOODIE HACK. a free sewing pattern by
 NIGHT FURY HOODIE HACK a free sewing pattern by 2 NIGHT FURY HOODIE These instructions are meant to work alongside my cosplay hoodie pattern, but you can use the tips and templates here to modify your
Kitschy Friend. Finished Size Approximately 23½in (60cm) tall
 tall") 1 Kitschy Friend This fun lady will always raise a smile, especially if you give her as a gift to your friends. We chose certain fabrics, with details given in the instructions, but you can easily replace
1 Kitschy Friend This fun lady will always raise a smile, especially if you give her as a gift to your friends. We chose certain fabrics, with details given in the instructions, but you can easily replace
Huggy Bear Body Pattern. by Dianna Effner
 Huggy Bear Body Pattern October 15, 2015 by Dianna Effner (660) 849-2114 fax (660) 849-2358 Original Designs for the Doll Industry, Inc PO Box 174 Jamestown, MO 65046 www.expressionsdolls.com Supplies
Owyhee County 4-H. Cloverbud. Activity Book
 Owyhee County 4-H Cloverbud Activity Book Name Age Year in 4-H 20 Club Name Member s Signature Parent/Guardian s Signature Leader s Signature Projects or activities I worked on this year were: I attended
Pot Belly Babies. Troll Set. Pattern set includes patterns for troll, bib and mopsie.
 Pot Belly Babies Troll Set Pattern set includes patterns for troll, bib and mopsie. When crocheted with yarns and hook sizes specified, troll measures 16 inches standing height, 17 inches around belly;
TEDDY FUNKY FRIENDS FACT. Finished Toy Size: 33cm/13inches
 FUNY FRINDS FACT RY TDDY An original design created by Pauline McArthyr 2005 Finished Toy Size: 33cm/13inches Honey is one of the simplest and cutest teddy patterns around. With her slightly knocked knees
TEDDY FUNKY FRIENDS FACT. Finished Toy Size: 33cm/13inches
 FUNY FRINDS FACT RY TDDY An original design created by Pauline McArthyr 2005 Finished Toy Size: 33cm/13inches Honey is one of the simplest and cutest teddy patterns around. With her slightly knocked knees
Materials. 1 Cut out the pattern pieces for the doll. Cut out the pattern for the arms and legs twice in mirror image.
 Making the doll All the dolls are made from the same pattern (see Doll Template). The body and head are the same, only the facial expressions and the hair change. Carefully follow the instructions below,
Hello Kitty Sewing Basket & Pincushion
 Published on Sew4Home Hello Kitty Sewing Basket & Pincushion Editor: Liz Johnson Monday, 20 February 2012 9:00 One of our very favorite Storage Solutions patterns gets a update as the world's cutest sewing
MATERIAL REQUIREMENTS:
 This pattern contains a pattern for a 30-inch doll. The doll may be made of flesh, tan or peach broadcloth, percale or any plain cotton material. Use six strand cotton for embroidering features and straw
Basketball Coin Purse An in-the-hoop project
 Basketball Coin Purse An in-the-hoop project 2009 Peggy Severt, Pegboard Crafts pegboard1@yahoo.com or peggy@pegboardcrafts.com http://www.pegboardcrafts.com (419) 586-3135 Do not resize this design. The
Tiny sheep. FREE crochet toy pattern. designed by Masha Pogorielova (с) 2014 (mashutkalu)
 2014 (mashutkalu)") Tiny sheep FREE crochet toy pattern designed by Masha Pogorielova (с) 2014 (mashutkalu) If you want to share this pattern, please do it as a link to my blog or website. You can sell the finished toys made
Tiny sheep FREE crochet toy pattern designed by Masha Pogorielova (с) 2014 (mashutkalu) If you want to share this pattern, please do it as a link to my blog or website. You can sell the finished toys made
Tiny Treasures Tote. Edge Joining foot Clear foot Empty bobbin
 Back Tiny Treasures Tote I just love this little bag. Can t help myself, it s just one of my favorite things. The techniques are a lot of fun and the lining is a snap! It s both pretty and practical and
Large No Seams Teddy
 Large No Seams Teddy by Deborah V. Gardner Skill Level: Intermediate September 2017 Materials (for one toy): 2 skeins (about 440 yards) of worsted weight yarn. Sample in Tivoli Boucle (discontinued), 58%
london calling bag a sewing pattern by
 a sewing pattern by london calling bag This project on its own is a very big gusseted bag with a zippered top closure. But the optional details include a front pocket with Union Jack applique, buckle adjustable
Practicing Basic Machine Operation Sample #1
 Practicing Basic Machine Operation Sample #1 Listed below are various tasks required in basic sewing machine operation. Demonstrate your ability to perform each task by creating a sample. The samples that
Materials: unconditionally LED
 Glow bunny Feel free to sell Your finished items. Mass production is - of course - not permitted. Do not copy, alter, share, publish or sell pattern, pictures or images. Copies be made for owner s personal
Like to make the most of everything? Experiment with our challenge to create something special from a specific set of materials.
 Like to make the most of everything? Experiment with our challenge to create something special from a specific set of materials. + = 4 fat q uarters 1 fat quarter 2 1 Fabrics are from the Pumpkin Patch
sew kids Delight your little one this Easter with
 easter bunny_layout 1 01/02/2013 14:40 Page 1 sew kids Delight your little one this Easter with Corinne Bradd s Tilda bunny Created using beautiful Tilda cotton, our girlie rabbit toy is the perfect springtime
MOXIE THE DOXY AMY GUNSON 2010 BADSKIRT FOR HANDMADE HAPPINESS. B0201 a002
 MOXIE THE DOXY Pattern includes detailed step by step instructions, full color supplementary photographs and helpful tips. Also included are several variations to help build your own unique litter of pups!
Holi Babee. Pattern set includes patterns for babee, bib and yoga mat.
 Bengali Babees Holi Babee Pattern set includes patterns for babee, bib and yoga mat. When made with the specified yarns and hook sizes, the babee measures 16 inches L and 18 inches around belly, with a
Little Uns. Mermaid. When crocheted with yarns and hooks specified, mermaid measures 16 ½ inches L and 11 inches around belly.
 Little Uns Mermaid When crocheted with yarns and hooks specified, mermaid measures 16 ½ inches L and 11 inches around belly. Except for the tail section, this pattern is crocheted in the amigurumi style
A Button Owl Sewing Pattern.
 A Button Owl Sewing Pattern HELLO! Are you ready to start sewing? At the end of this fun project, you will not only have a cute BUTTON OWL, you will also be able to tell your friends that you know how
Triple-Flounce Apron: Short & Sassy
 Published on Sew4Home Triple-Flounce Apron: Short & Sassy Editor: Liz Johnson Wednesday, 22 August 2018 1:00 If you watch the TV cooking personalities on air or online, it seems like food preparation is
The Pea Pod. baby carrier. Created by Sascha Romeo Piccoli Piselli.
 The Pea Pod baby carrier Created by Sascha Romeo Piccoli Piselli www.piccolipiselli.blogspot.com sascharomeo@rocketmail.com This baby carrier is designed to be worn on the hip. The adjustable two buckle
1. Locate the pattern on the
 Here s a fine feathered friend who s as charming as he is wise. Find the perfect perch for him so you can display his plumage in all its glory. Size approximately 6 x 6 x 6 inches Materials ~ Pattern (see
Easter Bunnies. Finished Size Approximately 11½in (29cm) tall. Fig A
 tall. Fig A") 1 Easter Bunnies These sweet bunnies make cute gifts at any time of year. We chose certain fabrics, with details given in the instructions, but you can easily replace these fabrics with others from the
1 Easter Bunnies These sweet bunnies make cute gifts at any time of year. We chose certain fabrics, with details given in the instructions, but you can easily replace these fabrics with others from the
CRAFT/JEWELLERY SUPPLIES
 Dress the wine for your next dinner party with this beautiful wine bag and set of 6 wine charms in their own little pouch. Any hostess would be thrilled to receive this set (along with a bottle of wine!).
Gumnut Crochet Designs from Aus
 Size Splinter Doll Not Australian but made at the request of my adorable 3 year old grandson. Skill Level 21 cm in height Intermediate A beginner who has access to google and u- tube, should be able to
Little Uns. Sweetie. When crocheted with yarns and hooks specified, Sweetie measures 13 inches L and 9 inches around waist.
 Little Uns Sweetie When crocheted with yarns and hooks specified, Sweetie measures 13 inches L and 9 inches around waist. The doll pattern is crocheted in the amigurumi style of continuous rounds beginning
Crocheted Snoopy Look Alike Amigurumi
 Crocheted Snoopy Look Alike Amigurumi THIS WORK IS LICENSED UNDER THE CREATIVE COMMONS ATTRIBUTION-NONCOMMERCIAL-SHARE ALIKE 3.0 UNITED STATES LICENSE. TO VIEW A COPY OF THIS LICENSE, VISIT HTTP://CREATIVECOMMONS.ORG/LICENSES/BY-NC-SA/3.0/US/
Skull Coin Purse An in-the-hoop project
 Skull Coin Purse An in-the-hoop project 2009 Peggy Severt, Pegboard Crafts pegboard1@yahoo.com or peggy@pegboardcrafts.com http://www.pegboardcrafts.com (419) 586-3135 Do not resize this design. The zipper
Bound and Determined:
 Think You Don t Have Time to Create Beautiful Quilts? From quick-quilt adaptations of classic patterns to fun, fresh novelty designs, McCall s Quick Quilts provides you with a treasury of time- and effort-saving
CAMELOT FABRICS. 3. Draw a vertical line on the pointed end of each Strap, a tiny bit longer than the diameter of your buttons.
 Other Supplies - 2 buttons in coordinating color - paper printer - basic sewing supplies - sewing machine with buttonhole foot - iron & pressing surface - scissors & fabric shears - measuring tape - fabric
FREE. animal crackers softies. Creative Ideas from Jo-Ann more projects, tips & techniques at Joann.com
 animal crackers softies FREE SUPPLIES & TOOLS: 1/2 yd. of Animal Crackers fabric, 1/4 yd. of Illusions contrast fabric for elephant 1/2 yd. of Animal Crackers fabric, 1/8 yd. of Etchings contrast fabric
Union Jack Variation Free Pattern Approximately 75-3/8 x 57
 Paper Pieces P.O. Box 68 Sycamore, IL 60178 Paper Pieces Precut Paper Shapes for English Paper Piecing 1-800-337-1537 US ONLY 1-815-899-0925 1-815-899-2900 Fax or Direct Line Union Jack Variation Free