NOTES 1. Please wash, dry & iron your fabric before beginning. 2. Use a 1/4 seam allowance throughout. 3. All seams are sewn Right Sides together.
|
|
|
- Sharyl Bailey
- 5 years ago
- Views:
Transcription
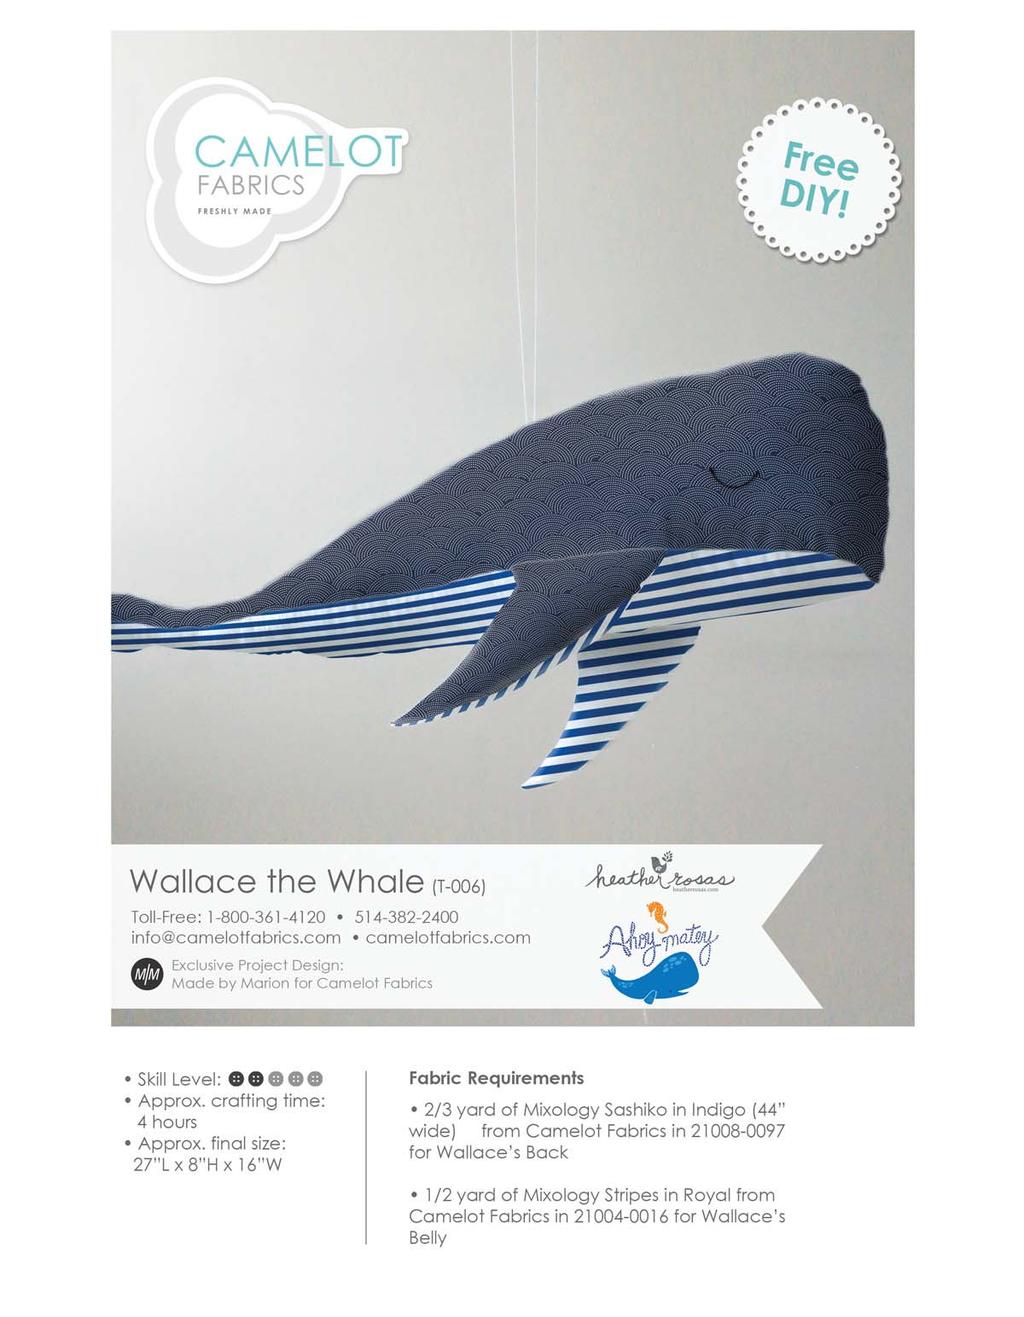
1
2 OTHER TOOLS & SUPPLIES - fiber stuffing or fabric scraps - paper printer - 24 contrasting embroidery floss & an embroidery hoop, for eyes - 2 yds of ribbon, for hanging (optional) - basic sewing supplies: - sewing machine - needle & coordinating thread - iron & pressing surface - scissors & fabric shears - straight pins - fabric marker NOTES 1. Please wash, dry & iron your fabric before beginning. 2. Use a 1/4 seam allowance throughout. 3. All seams are sewn Right Sides together. CUTTING 1. Print the Wallace the Whale template (pp 6-12) at 100% scale and cut out the pages at their marked borders. Join the pages according to their numbered triangles and cut out the template pieces. 2. Trace or pin the template to your fabric as indicated on the pattern pieces, and cut out the pieces in fabric. Take care to include the notches! You will have: - (2) Back pieces, mirror images of each other - (2) Back fins, mirror images of each other - (1) Belly, cut on the fold line - (2) Belly fins, mirror images of each other Note: For a directional print, trace the Back piece (2x) onto a single layer of fabric as shown, so that in both pieces the fabric s pattern runs from the top of Wallace s back toward his belly. For non-directional cottons, cut your pieces from folded double layers of fabric. grain (patterned fabric) 1
3 EYES 3. Transfer the Eye marks from the Back template to the Back fabric pieces. If you re having trouble seeing the Eye through your fabric, use straight pins to mark either end and the center of the Eye curve, then trace between the pin points. 4. Embroider a sleepy Eye on each Back piece with a chain stitch. See instructions on page 4. ASSEMBLY 5. Sew the Fins to their matching body pieces as shown right sides facing, with the notches aligned (the fins should point toward the tail ends of the body pieces). Press these seams toward the fins. Fold the belly piece in half and mark the center of the curved end of the piece as shown. Center mark 6. Baste the ends of your ribbon to the Wrong Side of one Back piece as shown, at the notch in its top edge. The raw ends of the ribbon should point toward the fabric s edge, and the long loop should point away from the edge. 2
4 7. Pin & sew the Back pieces together as shown, from the center of the tail to the tip of the nose. Backstitch at the beginning & end of this seam. Clip into your curves & press the seam open. Turn Wallace Right Side out, press the seam again and turn him Wrong Side out once more. 8. Pin & sew the Belly & its Fins to the Back & its Fins, Right Sides facing. Begin by pinning the tails together, then the Fins where they join the bodies, then around the remaining body, fin & nose edges. Make sure to line up the center mark of the belly piece to the center seam of the body piece. TIP: using lots of pins to distribute the fabric evenly around the curve will help to avoid any puckering when sewing. Leave a 6in. gap behind one Fin, for turning. Backstitch at the beginning & end of this seam Clip into the corners where the Fins join the body, and around your curves. Press the seam open & turn the whale Right Side out through the gap behind his Fin. A knitting needle or chopstick makes it easier to invert the tips of his Fins & tail. 10. Stuff Wallace firmly. Begin by stuffing one fin. Stitch in the ditch by hand or machine, between the top and bottom seams of one fin, closing the gap between them. Repeat with the second fin. 11- Stuff the rest of Wallace firmly, making sure to stuff all the way into his tail. Sew the opening closed using a ladder stitch. See instructions on page 5. 3
5 Chain Stitch 1. Thread needle with the embroidery floss and knot your thread, leaving small tail at the other end. 2. Insert needle from the back into the very beginning of your drawn line (you will be sewing from right to left if you are right-handed). 3. Reinsert the needle right back into where it emerges from the fabric and bring it out a stitch length away along the drawn line. Hold down the excess thread with your left thumb and pass the needle over the thread. Pull taught - but not too tight! This will make the first link in the chain. 4. Reinsert the needle right back into where the thread emerges from the fabric and repeat step three to create the next link. 5. Continue making the chain stitch in this manner until you get to the end of the drawn line. 6. When you have made your final link, insert the needle in the fabric just outside of the loop or link, and bring the thread to the back. Knot your thread and clip it. 4
6 Ladder Stitch 1. Working from right to left (or left to right, if left handed) insert the needle into the body and bring it out into the fold of the seam allowance. 2. Insert needle into the fold directly across where it came out. Let the needle travel in the fold towards the left and bring it out about 1/8 further. 3. Repeat Steps 1 & 2 until you get to the end of the opening. 4. Holding the fabric with your right hand, pull the thread with your left hand to close the gap in the opening, being careful not to pull too tightly. 5. Make a knot: take a tiny backstitch and pull the thread until you have a small loop. Insert the needle into the loop from right to left. Pull the thread until you have a second loop. Insert the needle into the loop from left to right. Pull to tighten the knot. 6. Push the needle back into the work right where you made the knot. Come out about 1/2 further and snip the thread. 5
7 Back Cut (2) from Back fabric (mirrored) 6 grain (patterned fabric) 1
8 Test Square 1in. 2.5cm 1 2 7

9 2 8
10 6 3
11 7 Belly Cut (1) on folded double layer 3 4 grain (patterned fabric) fold
12 8 4 5
13 5 grain (patterned fabric) Fin Cut (2) from Back fabric (mirrored) Cut (2) from Belly fabric (mirrored)
dolphin plushies a sewing pattern by
 a sewing pattern by dolphin plushies These plushies are made to mimic a cute baby dolphin! Completely chubby and pudgy with a tiny bottle nose, round body, and bitty dorsal, side, and tail fins. They re
Venn Diagram Placemats (D-031)
") OTHER TOOLS & SUPPLIES For (4) Mats - (2) Large, (2) Mini - 1/4 yd quilt batting (60 wide) - 5 yds extra-wide double-fold bias binding - Basic sewing supplies; - sewing machine - needle & coordinating
OTHER TOOLS & SUPPLIES For (4) Mats - (2) Large, (2) Mini - 1/4 yd quilt batting (60 wide) - 5 yds extra-wide double-fold bias binding - Basic sewing supplies; - sewing machine - needle & coordinating
Enjoy creating the Bird Pin Cushion/Sachet created by Joel Dewberry!
 Thank you for watching Season 3, Episode 1 of "The DIY Dish." We appreciate this week's sponsor, Janome, for making it possible. Visit http://www.janome.com to find their entire line of sewing and embroidery
1. Print our the Fox Hat pattern (pages 8-11 of this tutorial) at 100% of actual size. Cut out the
 at 100% of actual size. Cut out the") Other Supplies - 2 black buttons (for eyes) - One bag of fiber stuffing - Paper printer - Basic sewing supplies: - sewing machine - needle & coordinating thread - straight pins - scissors & fabric shears
Other Supplies - 2 black buttons (for eyes) - One bag of fiber stuffing - Paper printer - Basic sewing supplies: - sewing machine - needle & coordinating thread - straight pins - scissors & fabric shears
The Sleepy Fish Toy. Introduction
 The Sleepy Fish Toy Introduction I made my fish with leftover layer cake pieces but it is a great project for any scraps.the scales in the pattern only require about an inch square so don t throw away
Sew Sweet Bunny Basket
 Sew Sweet Bunny Basket Crafter level: Intermediate to Advanced Time needed: 2½ hours What you'll need Printouts of templates ¾ yd. linen fabric for basket ¾ yd. cotton print fabric for lining Pins Sharp
narwhal plush a free sewing pattern by
 narwhal plush a free sewing pattern by 2 narwhal plush Make your own 'unicorn of the sea' with this cute pocket-sized narwhal! With just 4 pattern pieces, it sews up quickly and is great for a beginner
Jamie - 11 Soccer Bear
 Jamie - 11 Soccer Bear Artist Designed Bear with Flexlimb by Laura Matthews of TeddiesbyLauraLynn.com and FreeTeddyBearPatterns.NET This is not intended to be a child s toy due to the glass eyes and pellets.
a free sewing pattern by
 kitty bean plush a free sewing pattern by 2 kitty bean plush This cute and simple plush is a variation on a tsum-tsum in that it has a long round body that's perfect for stacking! Though the basic shape
a free sewing pattern by
 a free sewing pattern by 2 rat plush Whether you think rats are adorable or excitingly scary, this pattern is sure to make something you'll love! The instructions here go over making a sweet little rodent
Supplies Needed. Instructions. Project Instructions Ellie & Eliza Stuffed Elephants. Skill Level 2: Some experience necessary
 The Land of Whimzie The Land of Whimzie Project Instructions & Eliza Stuffed Elephants Finished Size: 10" x 16 ½"- 6" x 10 ½"-Eliza Skill Level 2: Some experience necessary Approx. Crafting Time: 3-5 hours
Josephine Doll Pattern
 Josephine Doll Pattern Making these dolls means pulling out your scrap bin and button box and having a wonderful time pairing up patterns and prints. Each doll has felt hair and some have felt balls as
Mer-kitty. plush. a free sewing pattern by
 Mer-kitty plush a free sewing pattern by 2 mer-kitty plush In celebration of Mer'may' is this adorable ocean feline! A combination of a mermaid and cute kitty, this mer-kitty has a big colorful fish tail
love dragon plush a free sewing pattern by
 love dragon plush a free sewing pattern by 2 love dragon plush A combination of a Valentine's and Chinese New Year celebration with the most adorable result! This little dragon pattern is done in the more
cut & sew AXOLOTL PLUSH a sewing pattern by
 cut & sew AXOLOTL PLUSH a sewing pattern by 2 axolotl plush If you re reading this, then you likely purchased some of my Cut & Sew Axolotl Plush fabric from Spoonflower. So thank you! This cute belly-down
sugar skull kit ty plush a sewing pattern by
 sugar skull kit ty plush a sewing pattern by sugar skull kit ty plush This pattern pays homage to the beautiful calaveras seen in Dia de Muertos art. It s a simple kitty plush with button jointed limbs
5. Fold & press the Binding strip in half lengthwise, Wrong Sides facing, and unfold.
 OTHER TOOLS & SUPPLIES - 2/3 yd of pom-pom trim - paper printer - basic sewing supplies: - sewing machine - needle & coordinating thread - iron & pressing surface - scissors, fabric shears & pinking shears
OTHER TOOLS & SUPPLIES
 OTHER TOOLS & SUPPLIES - Fat Eighth of fusible fleece - 1/4 yd of fusible cotton interfacing (22 wide) - 1 yd of piping in coordinating color - (1) 1 D-Ring - (1) 1 swivel hook - (1) 8 closed-end zipper
a free sewing pattern by
 a free sewing pattern by 2 witch kitty plush Ready your broom and cape! This adorable little kitty is all decked out for Halloween. The pattern comes with loads of cute details, including a capelet with
cut & sew Mer-kitty plush a sewing pattern by
 cut & sew Mer-kitty plush a sewing pattern by 2 mer-kitty plush If you re reading this, then you likely purchased some of my Cut & Sew Mer-kitty Plush fabric from Spoonflower. So thank you! In celebration
a free sewing pattern by
 a free sewing pattern by 2 Decorate your desk or nightstand with this palm-sized fox! It's extra-large tail is especially charming as it wraps around the tiny fox body and helps it balance upright. But
cut & sew kitty bean plush a free sewing pattern by
 cut & sew kitty bean plush a free sewing pattern by 2 cut & sew kitty bean plush If you re reading this, then you likely purchased some of my Cut & Sew Kitty Bean Plush fabric from Spoonflower. So thank
axolotl PLUSH a free sewing pattern by
 axolotl PLUSH a free sewing pattern by 2 axolotl plush This cute belly-down plush is a chibi version of everyone's favorite amphibious salamander. It has the same external gills and tail fin as the original,
CAMELOT FABRICS. 3. Draw a vertical line on the pointed end of each Strap, a tiny bit longer than the diameter of your buttons.
 Other Supplies - 2 buttons in coordinating color - paper printer - basic sewing supplies - sewing machine with buttonhole foot - iron & pressing surface - scissors & fabric shears - measuring tape - fabric
cut & sew tiny dino plush a sewing pattern by
 cut & sew tiny dino plush a sewing pattern by 2 cut & sew tiny dino plush If you re reading this, then you likely purchased some of my Cut & Sew Tiny Dino Plush fabric from Spoonflower. So thank you! These
CHOCOBO. plush. a free sewing pattern by
 CHOCOBO plush a free sewing pattern by 2 chocobo plush Kweh! Final Fantasy fans are sure to love this chibi version of the classic rideable bird. It has a large head, a prominent beak and a big feather
a free sewing pattern by
 a free sewing pattern by 2 Kupo! Fans of Final Fantasy are sure to love this extra fuzzy Moogle! It has all the classic details that make the character so adorable -- including little wings, kitty ears,
SUPPLIES. OTHER SUPPLIES Marking pen Masking tape Aleene s Stop Fraying Toothpick Basic sewing supplies (See Tools link at
 SUPPLIES 30 x 9 piece of 5/8 curly matted mohair 7 x 6 piece of wool felt or ultrasuede 8 mm black glass eyes (1 pair) 6-1 fiberboard discs (neck & front legs) 4-1 ¼ fiberboard discs (rear legs) 5 Cotterpins
a free sewing pattern by
 a free sewing pattern by 2 sloth plush Bask in your lazy side with this adorable and interactive sloth plush. The claws have Velcro so it's able to hang on anything at the ready like the corner of a door,
MewnicorN. pillow plush. a sewing pattern by
 MewnicorN pillow plush a sewing pattern by 2 A super cute plush that's big and cuddly enough to be a pillow! This simple stuffed cat is sure to warm the heart of any magic-lover with its majestic unicorn
Basic Sewing Portfolio. Name
 Basic Sewing Portfolio Name Back stitching Whip stitch Starting in the corner of a sample begin stitching diagonally. 3-4 stitches Hold up the back stitching lever and backstitch to the beginning. Release
c) Fold & press the Binding in half lengthwise, Wrong Sides facing, and unfold.
 Fold & press the Binding in half lengthwise, Wrong Sides facing, and unfold.") OTHER TOOLS & SUPPLIES - 1 yd of quilt batting (58 wide) - (2) 1-1/2 to 2 metal rings - (10) 7/16 metal grommets - paper printer - basic sewing supplies: - sewing machine with even feed foot - needle &
OTHER TOOLS & SUPPLIES - 1 yd of quilt batting (58 wide) - (2) 1-1/2 to 2 metal rings - (10) 7/16 metal grommets - paper printer - basic sewing supplies: - sewing machine with even feed foot - needle &
Embroidered Scrap Bag Carol A. Brown
 Embroidered Scrap Bag Carol A. Brown Materials: 1. Outer fabric (sturdy fabric such as poplin): at least 12 1/2 wide by 22 high. 2. Medium weight fusible interfacing: same size as for fabric. 3. Lining
Bunny Bag. by Jen Frost
 by Jen Frost Project Overview Note: 1/4 yard of fabric will make multiple bunny bags; however, instructions are written (for simplicity) to make just one bag. Supplies: 4 fat quarters in Easter prints
SUPPLIES OTHER SUPPLIES Carson 10 Teddy Bear Pattern
 SUPPLIES Fat 1/8 yd of 5/8 faux fur or mohair (sample is faux fur) 5 x 5 piece of wool felt for paw pads 11mm black glass eyes (1 pair) Small piece white felt (optional) eye whites 2 1 1/8 Joint discs
SUPPLIES OTHER SUPPLIES Marco 12 Teddy Bear Pattern
 SUPPLIES Fat ¼ yd of 1 sparse, straight mohair 4 x 4 piece of wool felt or ultrasuede 10mm black glass eyes (1 pair) 2 1 ¼ Joint discs 4 1 ½ Joint discs 4 1 ¾ Joint discs Jointing hardware of choice (5
Basic Bearmaking Instructions
 Laying out the Pattern Basic Bearmaking Instructions We recommend that you read the instructions right through before commencing. This will help you to understand the steps you need to take. Copying your
dragon & unicorn hooded cowl a free sewing pattern by
 dragon & unicorn hooded cowl a free sewing pattern by 2 hooded cowl When you re ready to break out a scarf or hat for chilly weather, try putting on this cozy cowl! It s a hood and scarf in one with cute
eevee evolution blob plush a free sewing pattern by
 eevee evolution blob plush a free sewing pattern by 2 eevee blob plush Everyone s got a favorite Eevee evolution! This pattern will take you through making ALL 9 evolutions in cute blob plush form! At
Night fury. plush. a sewing pattern by
 Night fury plush a sewing pattern by 2 Night Fury Plush skills used: Get ready for your own dragon-riding adventure with this fun night fury plush! This pattern will show you how to make this cute dragon
Note: Yardage and supplies listed are for all three bags.
 Stash Pouches Finished sizes: Large 10" (25.4 cm) wide x 81/2" (21.6 cm) tall x 31/2" (8.9 cm) deep Medium 9" (22.9 cm) wide x 7" (17.8 cm) tall x 3" (7.6 cm) deep Small 8" (20.3 cm) wide x 6" (15.2 cm)
neko atsume plushies a sewing pattern by
 neko atsume plushies a sewing pattern by neko atsume plushies These plushies are of course inspired by the adorable Neko Atsume (kitty collector) kitties -- specifically Pepper, Dottie, and Misty. They
Rattle - Baby Dragon
 Rattle - Baby Dragon Kristi Tullus, Size 11 cm (4 1/3") with fingering weight yarn and a 1,75 mm crochet hook. Difficulty 2. Beginner - suitable for novice crocheters, requires patience and precision when
owl bear plush a free sewing pattern by
 owl bear plush a free sewing pattern by 2 owl bear plush This pattern is a variation of my previous owl plush, an adorable bear version that's an homage to the classic monsters from Dungeons and Dragons
NIGHT FURY HOODIE HACK. a free sewing pattern by
 NIGHT FURY HOODIE HACK a free sewing pattern by 2 NIGHT FURY HOODIE These instructions are meant to work alongside my cosplay hoodie pattern, but you can use the tips and templates here to modify your
cut & sew owl plush a sewing pattern by
 cut & sew owl plush a sewing pattern by 2 cut & sew owl plush If you re reading this, then you likely purchased some of my Cut & Sew Owl Plush fabric from Spoonflower. So thank you! This pattern is for
cut & sew ferret plush a sewing pattern by
 cut & sew ferret plush a sewing pattern by 2 ferret plush If you re reading this, then you likely purchased some of my Cut & Sew Ferret Plush fabric from Spoonflower. So thank you! Make your favorite cat
shiba cube puppy plush a sewing pattern by
 shiba cube puppy plush a sewing pattern by If you ve ever sewn a cube before, this pattern takes it to the next level! The classic geometric shape forms a chubby little puppy body complete with four stubby
Easter Bunnies. Finished Size Approximately 11½in (29cm) tall. Fig A
 tall. Fig A") 1 Easter Bunnies These sweet bunnies make cute gifts at any time of year. We chose certain fabrics, with details given in the instructions, but you can easily replace these fabrics with others from the
1 Easter Bunnies These sweet bunnies make cute gifts at any time of year. We chose certain fabrics, with details given in the instructions, but you can easily replace these fabrics with others from the
Cross & Crown Quilt. Approx Design Size: 27" square
 LeisureArtsLibrary.com Quilt #800382 ross & rown Quilt Approx Design Size: 27" square Originally published in the Spring 1994 issue of elebrations to ross Stitch and raft magazine 2008 by Leisure Arts,
cut & sew fox plush a free sewing pattern by
 cut & sew fox plush a free sewing pattern by 2 If you re reading this, then you likely purchased some of my Cut & Sew Fox Plush fabric from Spoonflower. So thank you! Decorate your desk or nightstand with
design project Mother s Day Flower Scarf
 design project Mother s Day Flower Scarf Sewing Mother S Day Flower ScarF Stringing SWAROVSKI ELEMENTS Article Product Group Article No. Amount Size Color Color Code Beads 5000 120 pcs. 3 mm Crystal 001
love koi plushies a sewing pattern by
 love koi plushies a sewing pattern by love koi plushies This project was both inspired by the Japanese pun where koi means both carp and love and the beautiful yin-yang moon-spirit carp from Avatar: The
My Color Notes. Finished Dimensions: 7" square cube, 6" square cube, 5" square cube, 4" square cube, 3" square cube, 2" square cube
 Nesting Cubes H Light- to medium-weight woven cotton fabric: 10 squares of fabric measuring 8" 8" 10 squares of fabric measuring 7" 7" 10 squares of fabric measuring 6" 6" 10 squares of fabric measuring
gunter plush a sewing pattern by
 a sewing pattern by gunter plush This project is a huggable little plush made to look like Gunter, the mischievous little penguin and the Ice King s buddy from Adventure Time. It features little wings
astrobunny & cosmokitty plush a sewing pattern by
 astrobunny & cosmokitty plush a sewing pattern by astrobunny & cosmokitty plushies Ever on an adventure, best friends Astrobunny and Cosmokitty are searching the farthest reaches of space to see what new
Central. Fabric. Dot to Dot Quilt. Supplies Needed. Instructions. Skill Level 2: Experience necessary. Project Instructions
 Fabric Project Instructions Central Dot to Dot Quilt Skill Level 2: Experience necessary Crafting Time: Weekend Project Supplies Needed 1 Fabric Central Dot Bundle 1 1 Fabric Central Dot Bundle 2 Fabric
Welcome! Now, let s get started!
 Welcome! You re about to embark upon a wonderful journey, creating a Teddy Bear! But, I m warning you; once you start you just might get hooked! Whether you make this as a gift or for yourself, your heart
Figure Out Your Feet!
 i s s u e 1 7 Figure Out Your Feet! By Yvonne Porcella These feel good" sewing projects give you opportunities to try a variety of specialty presser feet that make stitching easier and the results better.
Accent on Amish Welcome!
 Quilt Along Accent on Amish Welcome! Designed by The Staff of McCall s Quilting Made and Machine Quilted by Sheryl Martin Skill Level Beginner Finished Quilt Size 44H x 44H Number of Blocks & Finished
1. Locate the pattern on the
 Here s a fine feathered friend who s as charming as he is wise. Find the perfect perch for him so you can display his plumage in all its glory. Size approximately 6 x 6 x 6 inches Materials ~ Pattern (see
Laptop Bag, Backpack, Suitcase, Purse Organizer By Gail Dodson
 Laptop Bag, Backpack, Suitcase, Purse Organizer By Gail Dodson Version A Version B Version C A great way to keep all your accessories/gadgets organized. You choose how many pockets you want and where you
Under The S ea Table Runner
 Finished Size: 12" x 48" (30.48cm x 121.92cm) Under The S ea Supp lies Needed B efore you begin 3 Wishes Fabric Under the Sea Collection 1 yd. (91.44cm) 12281-Lt. Blue 3 8 yd. (34.29cm) 12289-Lt. Blue
a sewing pattern by moon kitty headband
 a sewing pattern by moon kitty headband moon kitty headbands These headbands are a classic piece for your head with a twist for Sailor Moon fans -- or at least cat fans! Make yours from black, white, or
FREE. animal crackers softies. Creative Ideas from Jo-Ann more projects, tips & techniques at Joann.com
 animal crackers softies FREE SUPPLIES & TOOLS: 1/2 yd. of Animal Crackers fabric, 1/4 yd. of Illusions contrast fabric for elephant 1/2 yd. of Animal Crackers fabric, 1/8 yd. of Etchings contrast fabric
SUPPLIES TOOLS Mini Teddy Bear Pattern
 SUPPLIES TOOLS 7 X 9 piece of 1/2 ultra sparse mohair 2 x 2 piece of felt (footpads) 5 Mini T cotterpins 6 ½ joint discs 4 3/8 joint discs 5mm black glass eyes (1 pair) Artificial sinew (or strong waxed
Waistline. Groin Seam. Outside Seam. Pajama Front: Right Side. Inseam
 Other Supplies - 1 yard of 2 wide elastic - paper printer - a buddy for hemming - basic sewing supplies - sewing machine - fabric shears & scissors - needle & coordinating thread - straight pins - fabric
Serger Daygown. It's Sew Easy. By Kathy McMakin Martha Pullen Company
 Serger It's Sew Easy By Kathy McMakin 2014 Martha Pullen Company Serger It's Sew Easy By Kath y McMaki n Expand your serger skills while making this soft batiste daygown for that special baby. Constructed
1 fat quarter (small prints work best) large scraps of cotton quilt batting Matching thread Embroidery floss for stitching the bunny's face
 large scraps of cotton quilt batting Matching thread Embroidery floss for stitching the bunny's face") Rag Quilt Bunny Rag Quilt Bunny Pattern Page 1 To make one Rag Quilt Bunny you will need: 1 fat quarter (small prints work best) large scraps of cotton quilt batting Matching thread Embroidery floss for
Rag Quilt Bunny Rag Quilt Bunny Pattern Page 1 To make one Rag Quilt Bunny you will need: 1 fat quarter (small prints work best) large scraps of cotton quilt batting Matching thread Embroidery floss for
Projects. Tooth Fairy Pillow
 Projects Tooth Fairy Pillow Tooth Fairy Patchwork Pillow This adorable Tooth Fairy pillow is easy to make and will be a memento for you and your little one to cherish for a lifetime! Created by: Tori Thompson,
School & Crayon Totes
 LeisureArtsLibrary.com Sewing #803361 School & Crayon Totes Basic Tote Design by Nancy Burdette 2 Variations by Paula Hagerman Approx Design Size: 12" x 13 3 /4" each Click Here to sign up for the FREE
Wild About Monkeys Kids Party Dolled Up
 Bring the party to life with giant sock monkeys that will become guests new BFFs. Place the costumed softies wherever you need a pop of silly decor on a bench by the front door or on a chair near the buffet
Like to make the most of everything? Experiment with our challenge to create something special from a specific set of materials.
 Like to make the most of everything? Experiment with our challenge to create something special from a specific set of materials. + = 4 fat q uarters 1 fat quarter 2 1 Fabrics are from the Pumpkin Patch
Sewing Roll. Base Fabric. Base Fabric. Third Fabric. Second Fabric (Bottom Pockets) Pockets)
 Pockets)") You will need Brother Creative Sewing Pack (Free Motion Foot, Braiding Foot, Narrow Hem Foot, Piping Foot and Concealed Zipper Foot) Base fabric 1 x fat ¼ (50cm square) cut in half Second fabric 50cm x
You will need Brother Creative Sewing Pack (Free Motion Foot, Braiding Foot, Narrow Hem Foot, Piping Foot and Concealed Zipper Foot) Base fabric 1 x fat ¼ (50cm square) cut in half Second fabric 50cm x
- OUR TOP TIPS - Seam allowance is 1.5cm or 5/8 unless otherwise stated. Use the markings on the base of your machine to help you keep to this.
 - OUR TOP TIPS - Always check the size chart to work out which size is best suited to you. Sew Over It patterns tend to have less ease than other patterns as most of the designs are intended to have a
Prett y Panda Snap Purse
 112 Prett y Panda Snap Purse DIFFICULTY «««FINISHED SIZE 5½" 4½" (14cm 11.4cm), excluding ears Pandas are universally popular. Children will love this cute pouch, which features a darling appliquéd panda
Christmas Tree Pillow
 Supplies: Baby Lock Sewing Machine Three different fabric designs. Fabric #1: 1/2 yard (includes pillow back) Fabric #2: 1.5"x full width of fabric or ¼ yard for Ruffled Pillow version Fabric #3: small
Intermediate Laptop Holdall
 Intermediate Laptop Holdall Add a stylish twist to your laptop holdall with this personalised yet practical design from online sewing and embroidery expert Sally McCollin of www.stitcharena.co.uk You will
2015 Amanda Clark. Adding Christmas decorations is optional, but it does add a beautiful touch of sparkle to your finished Christmas tree.
 2015 Amanda Clark This Christmas tree is made using fabric triangles. The triangles are first sewn together on a sewing machine, and then folded and hand stitched into place. Finally, the folded triangles
Angel Pets Memorial Mug Rug PDF Pattern
 Angel Pets Memorial Mug Rug PDF Pattern Finished Size: 6 1/2 x 8 inches If you are only making one animal, be sure to print only that page. Use these with a snack, or hang on your wall. They also make
Pure Joy! Finished Size: Approximately 38 ½ x 44 ½
 Pure Joy! Finished Size: Approximately 38 ½ x 44 ½ Easy strip-piecing and dimensional flowers make this darling baby quilt irresistible and a pure joy to make for someone special! The fabric used in the
Weighted Pincushion Organizer
 Weighted Pincushion Organizer from Sew, Mama, Sew! This sturdy pincushion has plenty of space to store pins and a wool felt strip for your needles. The hanging pocket is a perfect place for storing easily-misplaced
Project One: Pincushion
 Project One: Pincushion The objectives of this project are to follow the production plan (tutorial) to produce and evaluate a pincushion. Throughout this project, you will be required to: follow the production
A Needle Case to hold your needle packets by Celeste Chalasani
 A Needle Case to hold your needle packets by Celeste Chalasani Materials list: A. Your finished embroidery 12 long x 6 wide B. Light weight cotton for lining, 27 long x 6 wide C. #12 perle cotton D. Ribbon
Sewing Machine Cover. Project Needs & Notes
 Sewing Machine Cover Create a stylish and sophisticated sewing machine cover for your craft room. A handy pocket holds all your sewing needs; adjustable measurements and side straps means this cover will
Bead embroidery tutorial for a brooch Blue Whale
 Bead embroidery tutorial for a brooch Blue Whale This tutorial will show you the creation of a brooch in the bead embroidery technique. We well show and walk you through all the work stages, so that anyone
Sweet Softies: Funny Bunny
 Published on Sew4Home Sweet Softies: Funny Bunny Editor: Liz Johnson Thursday, 08 April 2010 10:00 Stuffed animals make me happy. They live on my desk at home and at work, so I can glance over at them
Courtesy of Simplicity Creative Group
 Courtesy of Simplicity Creative Group Project inspired by The Beekeeper's Quilt by Tiny Owl Knits (www.ravelry.com/patterns/library/the-beekeepers-quilt) MATERIALS #4 Worsted Weight Yarn: Background color:
Pear Basket. Fabric Requirements. Cutting Guide
 Pear Basket Fabric Requirements Note: if the Pear Christmas Wall Hanging was made, you will not have to make the half-square triangles. Trim the extra ones made in the pear quilt to 1-3/4" x 1-3/4". You
You will need. Equipment
 1 KITE MOBILE Here s how to make a colourful kite to fly in your bedroom whatever the weather! You can use the kite tail to display favourite photos, postcards or trinkets. Just attach them with coloured
A Button Owl Sewing Pattern.
 A Button Owl Sewing Pattern HELLO! Are you ready to start sewing? At the end of this fun project, you will not only have a cute BUTTON OWL, you will also be able to tell your friends that you know how
A. Preparing the fabric (not shown):
:") INSERTING ZIPPERS - CENTER INSERTION The zipper can be snapped on to the right or to the left side of the needle so that you can sew close to the zipper. When sewing on the right side of the zipper, attach
INSERTING ZIPPERS - CENTER INSERTION The zipper can be snapped on to the right or to the left side of the needle so that you can sew close to the zipper. When sewing on the right side of the zipper, attach
Sewing Tutorial: The Wampa Plush
 Sewing Tutorial: The Wampa Plush This plush is one of the many free projects I ve started posting on my website as part of an adventure to destash my huge collection of scrap fabrics ^-^ I wanted to make
maneki neko coin pouch a sewing pattern by
 maneki neko coin pouch a sewing pattern by maneki neko coin pouch Maneki Neko is Japanese for beckoning cat, often known as a Lucky Cat in English. These adorable kitties are used in Asian businesses to
Handmade toys are the best kind that you can give your own children, and they make loving gifts for
 Nesting Cubes Nesting Cubes Handmade toys are the best kind that you can give your own children, and they make loving gifts for expectant friends and family members. Because these are sweet and soft, they
Butterfly Cushions. Finished size Approx. 22 wide x 14 tall
 Butterfly Cushions Finished size Approx. 22 wide x 14 tall Requirements A selection of off cuts to make the wings 13 x 5.5 for the body 18 x 24 for the back 8 x 8.5 for the internal wings Toy filler/stuffing
Tartan Plaid Horse. Skill Level: Intermediate
 Tartan Plaid Horse If you have a basic mastery of sewing, you will gallop right through this adorable handmade horse! Make one for the kids or grandkids or use it to decorate your own home. Skill Level:
mario block plush a sewing pattern by
 mario block plush a sewing pattern by mario block plush difficulty: This plush was of course inspired by the? block from the various Super Mario games. It s a simple cube done up with the details to make
Eddie Earthworm. Terms of Use for this epattern Fair use of this epattern is subject to the following terms and conditions:
 Eddie Earthworm Background on Eddie Earthworm Eddie was inspired by my son s desire to celebrate Earth Day. What better way to celebrate than to to create an earth worm, right? To make Eddie more Earth-friendly,
2016 Courtesy of Art Gallery Quilts LLC. All Rights Reserved.
 ST YL E NAME 2016 Courtesy of Art Gallery Quilts LLC. All Rights Reserved. CONSTRUCTION Sew all rights sides together with ¼"seam allowance. Arrange the triangles together in rows. QUILT DESIGNED BY AGF