The Sleepy Fish Toy. Introduction
|
|
|
- Donna Houston
- 5 years ago
- Views:
Transcription

1 The Sleepy Fish Toy Introduction I made my fish with leftover layer cake pieces but it is a great project for any scraps.the scales in the pattern only require about an inch square so don t throw away anything! What s more, because this is for little people, the more variety of scraps you can incorporate, the more interesting it will be. Ingredients Fabric left overs Toy stuffing Rattle ball Cellophane Needle and Thread Fabric Pen Turning tool

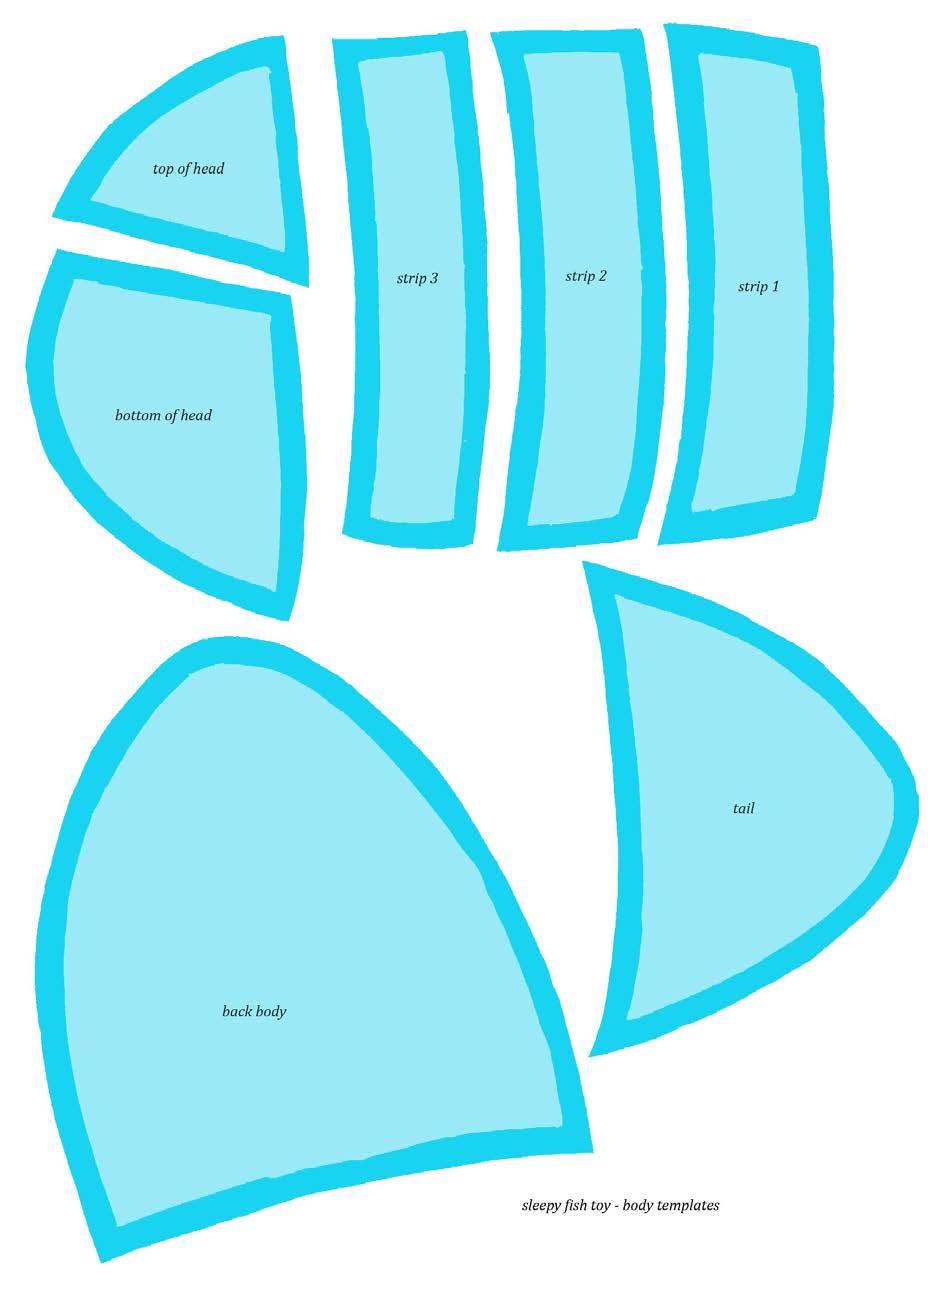
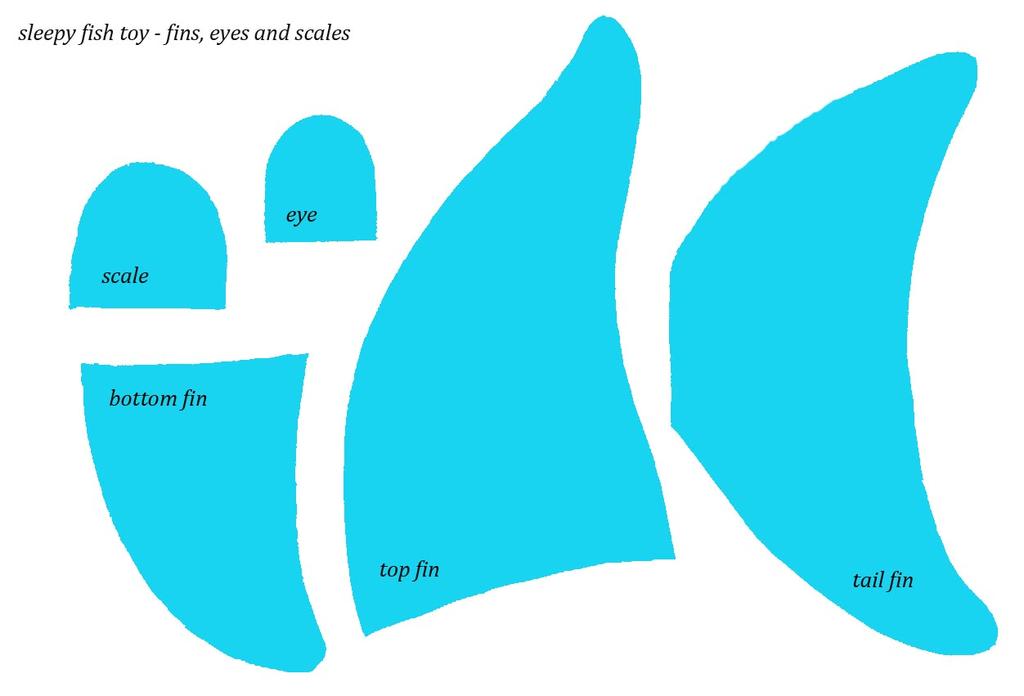
2 Assorted ribbons Instructions Step 1 Cut out your templates The two sets of templates in this project are to be used in different ways. The fin, eye and scale templates are given without a seam allowance and will provide you with a line to stitch on. The body templates are given with an added seam allowance and will provide you with a line on which to cut. Step 2 Make the fins, eyes and scales. - Lets start with the tail fin Select a scrap that is big enough to fit the template with an extra ¼ around the outside. - Draw around the template directly onto the wrong side of the fabric and mark where the turning gap will be. - Layer this on top of a second scrap with right sides together. - Lastly add a third layer of cellophane on the bottom. - Sew together following the line, starting and stopping at the turning gap. Backstitch a few stitches either side of the gap to hold the seam securely when you are turning. - Cut the fin out ¼ from the stitch line. - Clip the curves all the way around the outside to remove the bulk..


3 - Turn the fin right sides out through the turning gap. Don t be afraid of creasing the cellophane! Just pretend it s not there! - Use a blunt pointed tool like a knitting needle or a wooden BBQ skewer to help you push into the corners. - Press the finished fin flat *** do not have your iron on the highest setting for this and do not hold the iron on the pieces for more than about 2 seconds. Otherwise you might distort the cellophane. *** - Repeat this process to make the top and bottom fins, 2 eyes and 14 scales. You will not need to mark the turning gap on the other pieces as they all have an obvious open edge.

4 Step 3 cut out the body pieces - Use the templates to cut your body pieces from your fabric left overs. You get to be creative here. You may want to choose a wide variety of prints and colours or decided to keep it more uniformed in colour. I picked a variety for the front and selected greens and blues for the back. - To make the front of the fish, cut pieces by drawing round the templates onto the right side of the fabric. Cut one tail piece, one strip 1, one strip 2, one strip 3, one top of head piece and one bottom of head piece. - To make the back of the fish cut pieces by drawing round the template onto the wrong side of the fabric. Cut one top of head piece, one bottom of head piece and one back body piece. Step 4 sew the parts together - Take the tail piece and place it right side up on a flat surface. - Arrange 3 fins along the left edge. As the scales are double sided, have a look at both sides and decide which you like best and arrange you colours as you go. Allow enough space either side so the scales are at least ¼ away from the edge at all points. This will mean that you will not sew through a scale when you are sewing the 2 sides of the body together later. - Cut 2 lengths of ribbon 2 ½ - Fold them in half and place between the scales - Clip these in place. You can use pins if you prefer but I find clips a lot easier.


5 - Sew these pieces in place with an approximate 1/8 seam to secure - Place strip 1 on top right sides together and clip in place - Sew together using ¼ seam - Fold strip 1 back and press in place. - Continue to add strips and fins in this way - After strip 1 has been pressed add 4 scales


6 - After strip 2 has been pressed add 3 scales and 2 pieces of ribbon or ric rac either side - When adding the strips, secure on one side first. As the edges are slightly curved it will be at an angle so manipulate the edges in to place as you go. - After strip 3 has been pressed add 4 scales


7 - Take one of the eyes and place it on the top edge of the bottom of head piece, just slightly left of the centre - Secure with 1/8 seam - Place the top of head piece on top and sew together using ¼ seam


8 - Fold back and press the seam so the eye faces down. - Clip the head to the body and sew together using ¼ seam.


9 - Fold back and press in place - Sew the back body pieces together in the same way

10 Step 5 Add the fins - Place the fins, in their correct places, on the right side of the back of the fish. - Place with the fins pointing inwards and line up the raw edges. - Place the top fin at the top in the centre. Add the bottom fin to the bottom in the centre and add the tail fin in the middle of the tail. - Secure with 1/8 seams Step 6 Add the ribbon tags - Cut six 2 ½ lengths of ribbon. - Fold them in half and press. - Add the ribbons to the front side of the fish on the tail piece. Place 3 at the top and 3 at the bottom. - Secure with 1/8 seam

11 Step 7 - Add the hanging loop - Cut a strip of fabric 20 x 1 ½ or if you are using a layer cake cut two 1 ½ strips from one square and sew them together. - Fold the edges ¼ into the middle along the length.


12 - Fold the whole strip in half so the folds meet and secure with a line of stitching close to the edge - Cut a piece of velcro ¼ x 1 ½ - At one end of the prepared hanging loop strip, fold the raw edge over ¼. - Place one side of the Velcro on top and sew around the outside to secure in place


13 - At the other end of the hanging loop strip, add the other half of the Velcro 1 from the edge. This will be the end that is sewn to the fish. - Take the back of the fish and add the hanging loop in the middle of the top fin. Secure with 1/8 seam. Step 8 Complete the fish - Take the back of the fish and place it right side up on a flat surface - Fold all the pieces into the middle and pin them to hold them out of the way when sewing the two sides of the fish together.


14 - Place the front of the fish on top right sides together and clip in place. - Leave a turning gap in the head piece.

15 - Sew around the outside with a ¼ seam starting and stopping at the turning gap. - Backstitch a few stitches either side of the gap to strengthen when turning. - Turn the fish right sides out being careful of the pins as you do so. - Ensure none of the scales have been caught in the stitching and all the parts are sitting neatly. - Press well - Stuff the fish with toy stuffing - Add the rattle half way through so it is in the middle of the fish s body. - Close the gap with a slip stitch.

16 - Now give your fish a name and a new little owner
17
18
NOTES 1. Please wash, dry & iron your fabric before beginning. 2. Use a 1/4 seam allowance throughout. 3. All seams are sewn Right Sides together.
 OTHER TOOLS & SUPPLIES - fiber stuffing or fabric scraps - paper printer - 24 contrasting embroidery floss & an embroidery hoop, for eyes - 2 yds of ribbon, for hanging (optional) - basic sewing supplies:
2015 Amanda Clark. Adding Christmas decorations is optional, but it does add a beautiful touch of sparkle to your finished Christmas tree.
 2015 Amanda Clark This Christmas tree is made using fabric triangles. The triangles are first sewn together on a sewing machine, and then folded and hand stitched into place. Finally, the folded triangles
CAMELOT FABRICS. 3. Draw a vertical line on the pointed end of each Strap, a tiny bit longer than the diameter of your buttons.
 Other Supplies - 2 buttons in coordinating color - paper printer - basic sewing supplies - sewing machine with buttonhole foot - iron & pressing surface - scissors & fabric shears - measuring tape - fabric
DIY Christmas Advent Calendar Sewing Tutorial
 DIY Christmas Advent Calendar Sewing Tutorial I love counting down the days until Christmas with my children and seeing the smiles on their faces each morning as they get to check the advent calendar to
Skylines Easy Market Bag by Abigail (Gail) Baker October 2015
 Baker October 2015") Skylines Easy Market Bag by Abigail (Gail) Baker October 2015 Market bags are very easy to make and go pretty quickly. The finished bag measures 20 inches by 20 inches - but sometimes if I am a little
Skylines Easy Market Bag by Abigail (Gail) Baker October 2015 Market bags are very easy to make and go pretty quickly. The finished bag measures 20 inches by 20 inches - but sometimes if I am a little
Candy Cone Mouse. Adorable little mouse - and unlike most kids - can be trusted not to steal candy from the tree!
 Candy Cone Adorable little mouse - and unlike most kids - can be trusted not to steal candy from the tree! 1 Candy Cone This little mouse and his cone measure 8 long from the bottom of the Cone (excluding
Cut 1 lightweight interfacing
 1 2 A note on interfacing for this bag: This pattern is intended to produce a slouchy bag, so you will want to look carefully at your fabrics before you decide on which interfacing and stabilisers to use.
The Panty Pack Skill Level: Intermediate
 The Panty Pack Skill Level: Intermediate http://www.pellonprojects.com Designed By Michelle Dorsey Sewn By Michelle Dorsey What girly girl wouldn t want a special bag to hold her delicate undies when she
Butterfly Cushions. Finished size Approx. 22 wide x 14 tall
 Butterfly Cushions Finished size Approx. 22 wide x 14 tall Requirements A selection of off cuts to make the wings 13 x 5.5 for the body 18 x 24 for the back 8 x 8.5 for the internal wings Toy filler/stuffing
Rehab Easy Reference Sheet
 Pattern Rescue Basket Cover Version 1 March 2018 This pattern is for a fabric cover for the plastic picnic baskets commonly used by wildlife carers. Please read the instructions fully before commencing.
Basic Sewing Portfolio. Name
 Basic Sewing Portfolio Name Back stitching Whip stitch Starting in the corner of a sample begin stitching diagonally. 3-4 stitches Hold up the back stitching lever and backstitch to the beginning. Release
Retro Gathered Apron
 Retro Gathered Apron I inherited my nan s collection of aprons when she moved into sheltered accommodation, and with my heart in my mouth, took to scissors to one to create this pattern, I think it was
Embroidered Scrap Bag Carol A. Brown
 Embroidered Scrap Bag Carol A. Brown Materials: 1. Outer fabric (sturdy fabric such as poplin): at least 12 1/2 wide by 22 high. 2. Medium weight fusible interfacing: same size as for fabric. 3. Lining
- OUR TOP TIPS - Seam allowance is 1.5cm or 5/8 unless otherwise stated. Use the markings on the base of your machine to help you keep to this.
 - OUR TOP TIPS - Always check the size chart to work out which size is best suited to you. Sew Over It patterns tend to have less ease than other patterns as most of the designs are intended to have a
Waffle Floor Cushion
 Waffle Floor Cushion Finished Size: Approx 19.5 square (large) 16.5 square (medium) Requirements: Large Medium 21 square top fabric 18 square top fabric 21 square bottom fabric 18 square bottom fabric
Bowled Over Bag. Supplies Needed. Notes. Swatches. Special Thanks To
 Supplies Needed Main fabric (front, back, and side panels) 1yd Contrasting fabric and lining 2 yds 20in Coats heavyweight metal zipper 2/3 of a yard of VELCRO FABRIC FUSION brand fastener Dual duty xp
Christmas Tree Pillow
 Supplies: Baby Lock Sewing Machine Three different fabric designs. Fabric #1: 1/2 yard (includes pillow back) Fabric #2: 1.5"x full width of fabric or ¼ yard for Ruffled Pillow version Fabric #3: small
Weighted Pincushion Organizer
 Weighted Pincushion Organizer from Sew, Mama, Sew! This sturdy pincushion has plenty of space to store pins and a wool felt strip for your needles. The hanging pocket is a perfect place for storing easily-misplaced
5. Fold & press the Binding strip in half lengthwise, Wrong Sides facing, and unfold.
 OTHER TOOLS & SUPPLIES - 2/3 yd of pom-pom trim - paper printer - basic sewing supplies: - sewing machine - needle & coordinating thread - iron & pressing surface - scissors, fabric shears & pinking shears
Creative Sewing. Quilt Block Pillow Instructions and Visual Aid
 Creative Sewing Quilt Block Pillow Instructions and Visual Aid 1. You will need (2) 3 wide strips of fabric that will coordinate well with a T-Shirt of your choice. Place the strips right sides together
Happy Winter Snowmen Table Decoration
 Happy Winter Snowmen Table Decoration Materials Tilda Classic Basic fabrics (Fig A) Apliquick fusible stabilizer Appliqué glue pen (such as that used for paper piecing) Pointy end of a flower stick or
Pillow Case 3 Styles
 Pillow Case 3 Styles Materials Needed: Fabric (amount based off your design and size) Fabric to buy Standard Queen King Tri-Color Cuff Main: ¾ yard Cuff: ¼ yard Trim: ¼ yard Main: ¾ yard Cuff: ¼ yard Trim:
Chinese lantern cushion
 Chinese lantern cushion Fabric requirements 3 fat quarters printed fabric for the 3 layers of the lantern 1 fat quarter cream/solid for the background 2 pieces 16 x 12 printed fabric - for the cushion
Trick or Treat Fabric Baskets
 Trick or Treat Fabric Baskets Trick or Treat Fabric provided by Riley Blake Designs Stitch up one of our baskets to delight your little trick-or-treaters! They re easy and fun to make they d also make
SHARING AND FURTHERING THE ART OF SEWING. Couture Waistband
 SHARING AND FURTHERING THE ART OF SEWING Couture Waistband A waistband on pants or skirt should be firm enough to support the weight of the garment and also to lie flat against the body. It also needs
Summer Picnic Blanket
 Technique: Machine sewing Summer Picnic Blanket Brand: Crafting time: Size 56 x 70 Dual Duty XP An Evening Skill level - Beginner/Easy Materials Coats and Clark Dual Duty XP Heavy thread in a coordinating
Attic Windows Skill Level: Beginner
 Attic Windows Skill Level: Beginner Sewn by Jo Ann Lepore Quilted by Mary Diamond P&B solid fabrics shown The traditional Attic Windows pattern is easily accomplished. Beginning quilters of all ages will
FREE PATTERN. featuring RAISE THE VOLUME COLLECTION BY AGF STUDIO
 FREE PATTERN featuring RAISE THE VOLUME COLLECTION BY AGF STUDIO QUILT DESIGNED BY AGF STUDIO FABRICS DESIGNED BY AGF STUDIO CAP-RV-8000 MEASURED TEMPO CAP-RV-8001 WAVES OF ECHO CAP-RV-8002 TWINKLING TUNE
On The Go Baby Changing Pad Skill Level: Beginner
 On The Go Baby Changing Pad Skill Level: Beginner Designed By Marni Weaver Sewn By Marni Weaver www.haberdasheryfun.com Do you know a new mom or do you have a new baby in the house? Use this easy step
Valentine Patchwork Pillow
 Valentine Patchwork Pillow Valentine's Day is fast approaching, and you might be short on ideas. Roses? Chocolates? So done before. Instead of heading to the store, take a peek at that stash of fabric
FINISHED HEAD SIZE: 0 3 MONTHS: 14"; 3 6 MONTHS: 16"; 6 9 MONTHS: 18"; 9 12 MONTHS: 20"
 Amy Butler s Little Stitches for Little Ones Two Very Cute Hats FINISHED HEAD SIZE: 0 3 MONTHS: 14"; 3 6 MONTHS: 16"; 6 9 MONTHS: 18"; 9 12 MONTHS: 20" DIFFICULTY LEVEL: 3 For hip baby boys and girls alike!
1. Print our the Fox Hat pattern (pages 8-11 of this tutorial) at 100% of actual size. Cut out the
 at 100% of actual size. Cut out the") Other Supplies - 2 black buttons (for eyes) - One bag of fiber stuffing - Paper printer - Basic sewing supplies: - sewing machine - needle & coordinating thread - straight pins - scissors & fabric shears
Other Supplies - 2 black buttons (for eyes) - One bag of fiber stuffing - Paper printer - Basic sewing supplies: - sewing machine - needle & coordinating thread - straight pins - scissors & fabric shears
You will need. Equipment
 1 KITE MOBILE Here s how to make a colourful kite to fly in your bedroom whatever the weather! You can use the kite tail to display favourite photos, postcards or trinkets. Just attach them with coloured
Bunny Bag. by Jen Frost
 by Jen Frost Project Overview Note: 1/4 yard of fabric will make multiple bunny bags; however, instructions are written (for simplicity) to make just one bag. Supplies: 4 fat quarters in Easter prints
Double Wedding Ring Table Runner. Double Wedding Ring Table Runner. LITTLE RED JUG Designs by Susan Carr. Finished Size: 100cm x 45 cm
 Double Wedding Ring Table Runner Finished Size: 100cm x 45 cm 30cm Centre - Main Fabric. More required if fussy cutting 30cm Melon sections - Secondary fabric (May be the same as for the centres) 30cm
Original Recipe. Let s Go Trippin by Polly Monica
 Original Recipe Let s Go Trippin by Polly Monica Hello again! I m Polly from Aunt Polly s Porch blog {auntpollysporch.blogspot.com} and I m so happy to be sharing my designs again on the Moda Bake Shop!
cut & sew AXOLOTL PLUSH a sewing pattern by
 cut & sew AXOLOTL PLUSH a sewing pattern by 2 axolotl plush If you re reading this, then you likely purchased some of my Cut & Sew Axolotl Plush fabric from Spoonflower. So thank you! This cute belly-down
How to Make Twirly Shorts By Stacy at thelandofka.com
 How to Make Twirly Shorts By Stacy at thelandofka.com Description: This tutorial is for making a skirt/short combo. It will be a drop waist twirly skirt with attached shorts underneath. You can add the
Enjoy creating the Bird Pin Cushion/Sachet created by Joel Dewberry!
 Thank you for watching Season 3, Episode 1 of "The DIY Dish." We appreciate this week's sponsor, Janome, for making it possible. Visit http://www.janome.com to find their entire line of sewing and embroidery
Keepsake T-Shirt Pillow with Knotted Corners
 Published on Sew4Home Keepsake T-Shirt Pillow with Knotted Corners Editor: Liz Johnson Wednesday, 06 August 2014 1:00 We all have them: those "special" T-shirts from events, vacations or sports teams.
Make your own. Quilted Tree. Wall Hanging. Please be safe when you sew!
 Make your own Quilted Tree Wall Hanging Please be safe when you sew! Ask an adult for help if you need it and check your equipment before you start. Quilted Tree Wall Hanging Design a unique tree-inspired
Frilly Jelly Bag. Bag Dimensions are 12 inches wide x 15 inches high (to base of handle), and 4 ½ inches deep.
, and 4 ½ inches deep.") Frilly Jelly Bag This frilly fun bag is another great one to use up some favourite left-over Jelly Roll Strips (or a bag worth buying a bright new jelly roll for!) Aside from the gathered jelly roll strips,
Frilly Jelly Bag This frilly fun bag is another great one to use up some favourite left-over Jelly Roll Strips (or a bag worth buying a bright new jelly roll for!) Aside from the gathered jelly roll strips,
Chandeliers & Frames #12395 / 18 Designs
 #12395 / 18 Designs Note: Some designs in this collection may have been created using unique special stitches and/or techniques. To preserve design integrity when rescaling or rotating designs in your
Beaded Clutch. Other Supplies 7 zipper
 Beaded Clutch Other Supplies 7 zipper Preparation 1. Print out the templates found on the last three pages of this tutorial at 100% of actual size and trace them onto folded double layers of your fabric
2017 Doll Tag Clothing Rebel Bandolier 1
 2017 Doll Tag Clothing Rebel Bandolier 1 INDEX Cover Page Page 1 Pattern Information Page 2 Cutting Instructions Page 3 2017 Doll Tag Clothing Rebel Bandolier 2 Bandolier Instructions Page 4-6 Pattern
a free sewing pattern by
 a free sewing pattern by 2 sloth plush Bask in your lazy side with this adorable and interactive sloth plush. The claws have Velcro so it's able to hang on anything at the ready like the corner of a door,
Red Cross. A free pattern designed by Tracey Petersen of Peppermint Patch Quilts. finished size 58 by 60
 Red Cross A free pattern designed by Tracey Petersen of finished size 58 by 60 Red Cross What you make: A 58 by 60 simply pieced quilt. The offset cross design makes a stunning quilt. This quilt uses a
Fabric Basket with Divider
 Fabric Basket with Divider Craft interfacing keeps the box in shape! Size: 5 x 10 x 5 ¼ tall This pattern is provided for your personal use only and may not be reproduced, sold, or kitted without written
Owen 2 of 9 Measurements: Standing: 34cm / 13.5 inches Sitting: 25.5cm / 10 inches
 Owen Jane Watling A truly special bear, Owen is worked in double knitting yarn and is based on a traditional teddy bear. He is knitted entirely in the round and has jointed arms and legs. The method used
Main Fabric ¾ yard. Contrast Fabric for handle, sides and bottom (I used decoratorweight for strength and the wider width) ½ yard
 ½ yard") Laptop Bag Tutorial http://laundryontheline.wordpress.com Copyright 2009 Dreams in Seams For home use only. Not to be published, reproduced, used or sold commercially without express permission of Dreams
Laptop Bag Tutorial http://laundryontheline.wordpress.com Copyright 2009 Dreams in Seams For home use only. Not to be published, reproduced, used or sold commercially without express permission of Dreams
Holiday Holly in 3-D A Wallhanging Ellen O. Designs for Sulky of America
 A Wallhanging Ellen O. Designs for Sulky of America What We Used WHAT FABRICS WE USED: Cotton Fabrics 42 to 44 (Image 1) Dark green 1/2 yard Medium green 1/4 yard Light green 1/4 yard Christmas/Holiday
Original Recipe. Original Recipe can be found at
 Original Recipe Hi! I'm one of the Elizabeth's from over at Simple Simon and Company and today we are sharing how to make one of our favorite things---skirts for our girls. This skirt in particular was
Embroidered Scrap Bag and Bed Caddy Carol A. Brown
 Embroidered Scrap Bag and Bed Caddy Carol A. Brown Materials: 1. Outer fabric for Scrap Bag (sturdy fabric such as poplin): at least 12-1/2 wide by 22 high. 2. Outer fabric for Bed Caddy (sturdy fabric
SEWING BAG INSTRUCTIONS
 SEWING BAG INSTRUCTIONS REQUIREMENTS Note: Fabric quantity is based on 110cm (44in) wide. 1 metre fabric for bag 1 metre contrast fabric for bag lining Pellon or similar iron-on batting Stabilizer Embroidery
Home for Christmas Hatched and Patched
 Finished Size - 7½ x 12¾ (19cmx32.5cm) Fabric Requirements Assorted scraps of red fabrics for strippy background scallops Cream applique background - 8"x11" Applique - SCRAPS of red, beige, brown, yellow,
Christmas Stocking 1. The finished size is 17.5 long from top of folded cuff to toe, 21.5 unfolded, and 6.5 wide.
 Christmas Stocking 1 The finished size is 17.5 long from top of folded cuff to toe, 21.5 unfolded, and 6.5 wide. For each stocking you ll need: 2 outside pieces 2 lining pieces 2 cuff pieces 1 6 piece
Mer-kitty. plush. a free sewing pattern by
 Mer-kitty plush a free sewing pattern by 2 mer-kitty plush In celebration of Mer'may' is this adorable ocean feline! A combination of a mermaid and cute kitty, this mer-kitty has a big colorful fish tail
Shimmer Braid. Month 4
 Shimmer Braid Month 4 4 star blocks 1 center block Star Block Size 10 square = Finished Block Size. Finished means after it is sewn into the quilt. 10 ½ square = Unfinished Size. Unfinished means before
Pinafore Pillow Jacket
 Published on Sew4Home Pinafore Pillow Jacket Editor: Liz Johnson Thursday, 11 June 2015 1:00 Sew4Home Creative Director, Alicia Thommas was pondering a pillow one day, as she is often known to do, when
london calling bag a sewing pattern by
 a sewing pattern by london calling bag This project on its own is a very big gusseted bag with a zippered top closure. But the optional details include a front pocket with Union Jack applique, buckle adjustable
Canadian Quilters Association Pattern: Quilting Tools Tote Bag
 Canadian Quilters Association Pattern: Quilting Tools Tote Bag Description: * Size: 24 x 28", storage for: 6 x 24" ruler and 18 x 24" cutting mat, and all other equipment. * Easy to carry to workshops
"Fiskars Unzipped" Shoulder Bag
 "Fiskars Unzipped" Shoulder Bag By: Adrienne Hendrix http://www.burdastyle.com/techniques/fiskars-unzipped-shoulder-b I have been making purses for a while now and have been pretty successful in selling
Purse-onality Skill Level: Intermediate
 Purse-onality Skill Level: Intermediate http://www.pellonprojects.com Designed By Karen Bennett Sewn By Karen Bennett http://www.nelliesneedlequiltpatterns.com A perfect sized bag for day or evening that
Kitchen Curtains with Ribbon Ties
 Published on Sew4Home Kitchen Curtains with Ribbon Ties Editor: Liz Johnson Wednesday, 27 September 2017 1:00 Curtain panels are a perfect beginner project. They're fast, super simple, and you get a great
A SPOOKY SLEEPOVER. The Red Boot Quilt Company
 A SPOOKY SLEEPOVER The Red Boot Quilt Company www.theredbootquiltcompany.com A SPOOKY SLEEPOVER Approx. Size 38 1/2in x 57 1/2in BEFORE THE FUN BEGINS Please read all instructions before you begin. Abbreviations.
A SPOOKY SLEEPOVER. This is a free pattern provided by The Red Boot Quilt Company The Red Boot Quilt Company
 A SPOOKY SLEEPOVER The Red Boot Quilt Company The Red Boot Quilt Company A SPOOKY SLEEPOVER Approx. Size 38 1/2in x 57 1/2in BEFORE THE FUN BEGINS Please read all instructions before you begin. Abbreviations.
dolphin plushies a sewing pattern by
 a sewing pattern by dolphin plushies These plushies are made to mimic a cute baby dolphin! Completely chubby and pudgy with a tiny bottle nose, round body, and bitty dorsal, side, and tail fins. They re
The Little Bow Zipper Wallet PDF Pattern
 A PDF PATTERN BY MICHAEL ANN MADE The Little Bow Zipper Wallet PDF Pattern By Michael Ann Made Photo Instructions PDF This pattern was created by Michael Ann Shreeve for MichaelAnnMade.com. So glad you're
Name: Class: Monster Doll. Grading Rubric
 Name: Class: Monster Doll Grading Rubric Grade yourself on the skills listed below. (0 being the lowest, and 5 being the highest.) Once you have graded yourself in each area, pin your grading sheet to
Kid-Size Lil' Chef Apron
 Published on Sew4Home Kid-Size Lil' Chef Apron Editor: Liz Johnson Wednesday, 07 September 2016 1:00 If you hang out with us here at Sew4Home on a regular basis, you know we love aprons! We've done retro
Original Recipe. Flowers in the Park Table Topper by Susan Allen
 Original Recipe Flowers in the Park Table Topper by Susan Allen Hi! I'm Tilly from The Quilt Asylum {thequiltsasylum.com} and our store owner Susan Allen has had the best time playing in Central Park with
Ruffle Apron. Sewing Pattern. By: Ashley Hough
 Sewing Pattern Ruffle Apron By: Ashley Hough This ruffle front apron is the perfect accessory for the sewing room or the kitchen. Front pockets allow you to easily keep marking pencils, snips, spoons or
Cuddle Coffee Sleeve Gift Card Holder Skill Level: Beginner
 Cuddle Coffee Sleeve Gift Card Holder Skill Level: Beginner Designed By Jennie Pickett Sewn By Jennie Pickett www.cloverandviolet.com Everyone loves a good cup of coffee and a visit with a friend. A perfect
Re-Make & Re-Use: Up-cyled Cloth Grocery Bags - Stronger, Cuter
 Published on Sew4Home Re-Make & Re-Use: Up-cyled Cloth Grocery Bags - Stronger, Cuter Editor: Liz Johnson Friday, 17 February 2012 9:00 This clever idea of how to strengthen and 'makeover' existing cloth
Scooter Strips Wall Hanging
 Scooter Strips Wall Hanging This wall hanging is a quirky take on the traditional log cabin quilt block. It uses fabric of different widths to make the central block off-centre. Adding border strips to
Beautiful Bouquet. Designed by Heidi Pridemore. Page All Rights Reserved The Whimsical Workshop
 O - 3/5/12 Designed by Heidi Pridemore #FR-032 Fabric Requirements: 1/3 yard of Green- for all 1/3 yard of Yellow- Daisy 1/3 yard of Orange- Daisy 1/4 yard of Pink- Poppy 1/4 yard of Yellow Print- Poppy
axolotl PLUSH a free sewing pattern by
 axolotl PLUSH a free sewing pattern by 2 axolotl plush This cute belly-down plush is a chibi version of everyone's favorite amphibious salamander. It has the same external gills and tail fin as the original,
Bon Voyage - bag pattern -
 ~~~ Bon Voyage Bag Pattern ~~~ 2014 Geta Grama; www.romanianquiltstudio.com Bon Voyage - bag pattern - Size: 18 wide at top; 21 wide at bottom; 15'' tall (without straps); 5'' deep; two interior pockets;
Valentine Hearts Table Topper A Foundation Pieced Design Skill Level: Beginner
 Valentine Hearts Table Topper A Foundation Pieced Design Skill Level: Beginner Designed By Alexandra Henry Sewn By Alexandra Henry http://www.artbyalexa.com Use Pellon Stitch-N-Tear Lite to foundation
Making Double Fold Straight of Grain Quilt Binding
 Making Double Fold Straight of Grain Quilt Binding Tools and Supplies: Cutting mat, rotary cutter with a sharp blade, walking foot, 6x24 ruler, seam allowance guide, pencil, quilting gloves Be sure your
Christmas Stocking Template Elf Stocking Template Paw Print Stocking Template
 Article 4: Directions for a Stocking with a Cuff and Without a Cuff Be sure to refer to Article 1 that provides an overview of the 3 Martelli Stocking Templates. Interested in purchasing the templates?
Eye Spy Bags. materials and tools. step one. 10 x 10 square of fleece or woven cotton fabric
 created by Stacy Schlyer materials and tools 10 x 10 square of fleece or woven cotton fabric Keep the kids busy for hours with these portable eye spy bags. Perfect for little or big hands, this toy can
Happy December! On the wrong side of Fabric A, mark 1/4" from each edge on all four corners.
 Happy December! The holidays are almost here, but there is still time to whip up some of these fun napkins. Not only did I need napkins for table, but I love any opportunity to sit down at the Horizon
BEAR PAW MUG RUG Skill Level: Beginner
 BEAR PAW MUG RUG Skill Level: Beginner Designed & Stitched By Alexandra Henry The bear paw is a traditional quilt block pattern. Use it to make this easy little mug rug to brighten your morning coffee.
Pajama Sock Monkey 2009 Cutest Creations
 Materials needed: Pajama Sock Monkey 2009 Cutest Creations 1 pair of size Large Brown Red-Heel socks can be purchased from my online store www.ohboyorgirl.com Black embroidery thread Other color embroidery
The Million-Use Bucket Bag By Devon Iott
 The Million-Use Bucket Bag By Devon Iott This cute and functional bucket bag has a million uses It s the perfect size for a knitting project on the go, a lunch, toys for the kiddos in the back seat, or
THE PLUM PUDDING BIRD Tree Ornament
 Tree Ornament This is a free pattern provided by Me & My Red Boots The Red Boot Quilt Company 2015 NOT FOR RESALE The Red Boot Quilt Company www.theredbootquiltcompany.com Approx. Size 3in x 3 1/2in BEFORE
Original Recipe. Star Light, Star Bright Quilt by Kristy
 Original Recipe Star Light, Star Bright Quilt by Kristy Hi, Kristy from HandmadeRetro {handmaderetro.blogspot.com} back again with another quilt design. This is the smallest quilt I have made for the Bake
Easter Bunnies. Finished Size Approximately 11½in (29cm) tall. Fig A
 tall. Fig A") 1 Easter Bunnies These sweet bunnies make cute gifts at any time of year. We chose certain fabrics, with details given in the instructions, but you can easily replace these fabrics with others from the
1 Easter Bunnies These sweet bunnies make cute gifts at any time of year. We chose certain fabrics, with details given in the instructions, but you can easily replace these fabrics with others from the
Sports Team Tailgate Apron
 Published on Sew4Home Sports Team Tailgate Apron Editor: Liz Johnson Tuesday, 18 October 2016 1:00 Show your team spirit with a fan-favorite tailgate apron in team logo fabric. Since Sew4Home is located
Falling Flakes Stocking Skill Level: Beginner
 Falling Flakes Stocking Skill Level: Beginner Designed By Rachael Gander Sewn By Rachael Gander www.imaginegnats.com Use the quilt-as-you-go method to create this festive stocking. This stocking is fast
Prima Diva. .Style, function and loads of compliments That s what the Stella Sling Bag brings!!
 .Style, function and loads of compliments That s what the Stella Sling Bag brings!! Supplies: 1/2 Yard Main Print (Outside of wallet, Outside of pockets, optional strap, etc..) 5/8 Yard Accent Print (Lining
Pocketfuls of Christmas Door or Wall Tree
 Pocketfuls of Christmas Door or Wall Tree 25 pockets to help count down the days before Christmas! Supply list: Color #1: Color #2: 5/8 yd green for tree and tree stump 1 yd for backing and binding ½ yd
Ashbury Heights Apron by Shelly Pagliai
 Ashbury Heights Apron by Shelly Pagliai Here I am again, with an apron tutorial for you. I made this apron using the Ashbury Heights line by Doohikey Designs for Riley Blake. I m in love with the telephone
Bound and Determined:
 Think You Don t Have Time to Create Beautiful Quilts? From quick-quilt adaptations of classic patterns to fun, fresh novelty designs, McCall s Quick Quilts provides you with a treasury of time- and effort-saving
2016 Courtesy of Art Gallery Quilts LLC. All Rights Reserved.
 ST YL E NAME 2016 Courtesy of Art Gallery Quilts LLC. All Rights Reserved. CONSTRUCTION Sew all rights sides together with ¼"seam allowance. Arrange the triangles together in rows. QUILT DESIGNED BY AGF
Embroidered Heart. Hearts are always a popular design trend and this embroidered version is especially pretty
 Embroidered Heart Hearts are always a popular design trend and this embroidered version is especially pretty Embroidered Heart Lovely floral heart in summer shades is a great little embroidery that fits
A Needle Case to hold your needle packets by Celeste Chalasani
 A Needle Case to hold your needle packets by Celeste Chalasani Materials list: A. Your finished embroidery 12 long x 6 wide B. Light weight cotton for lining, 27 long x 6 wide C. #12 perle cotton D. Ribbon
Timber! Reading Pillow
 Timber! Reading Pillow Designed by Rachel Rossi Downloadable Version For more great patterns, fabrics, & tutorials be sure to visit www.rachelrossi.design Please Do not reproduce this pattern or create
Projects. Tooth Fairy Pillow
 Projects Tooth Fairy Pillow Tooth Fairy Patchwork Pillow This adorable Tooth Fairy pillow is easy to make and will be a memento for you and your little one to cherish for a lifetime! Created by: Tori Thompson,