FINISHED HEAD SIZE: 0 3 MONTHS: 14"; 3 6 MONTHS: 16"; 6 9 MONTHS: 18"; 9 12 MONTHS: 20"
|
|
|
- Candice Potter
- 5 years ago
- Views:
Transcription
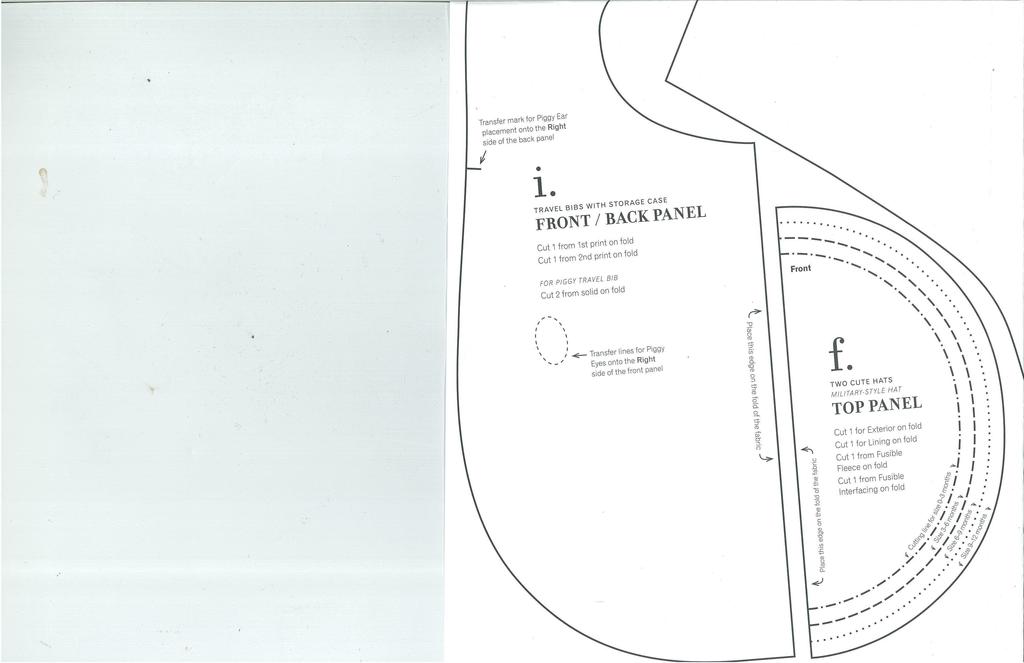
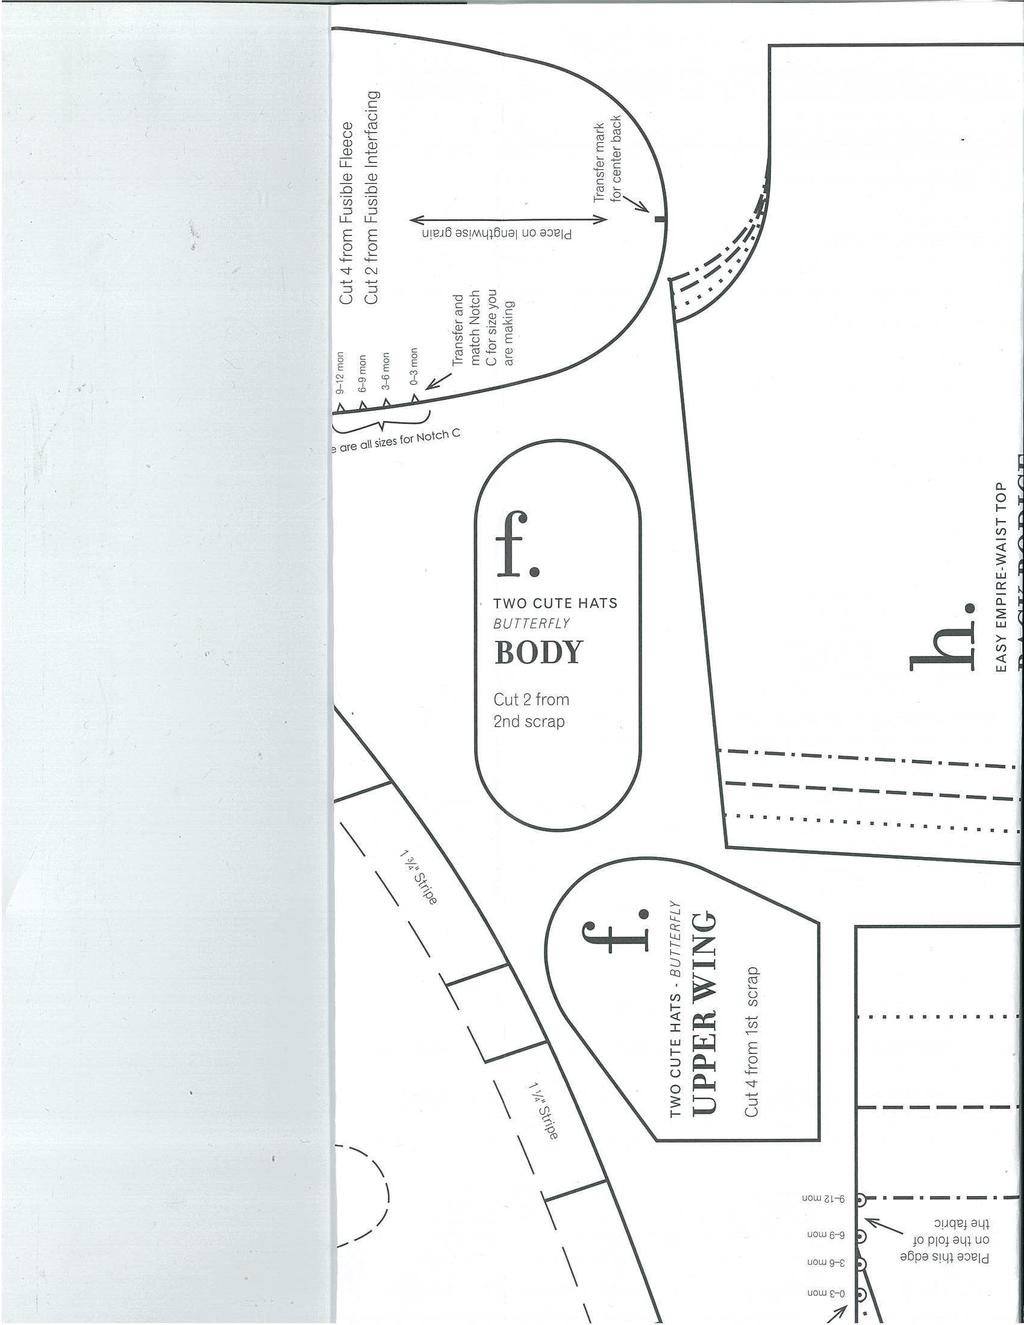
1 Amy Butler s Little Stitches for Little Ones Two Very Cute Hats FINISHED HEAD SIZE: 0 3 MONTHS: 14"; 3 6 MONTHS: 16"; 6 9 MONTHS: 18"; 9 12 MONTHS: 20" DIFFICULTY LEVEL: 3 For hip baby boys and girls alike! A simple cap with a removable butterfly lets baby keep a fun toy close at hand. A miniature version of the military cap with a soft bill is a cinch to make and a charming way to get attention. NOTES All seams are 1/2" unless otherwise stated. (The 1/2" seam allowance is included in the pattern pieces and all cutting measurements.) Preshrink fabric by washing, drying, and pressing it before starting the project. See Getting Started (page XX) for all the basic tools needed for this project. See Fabric Reference Guide (page XX) for a list of the specific fabrics used in this project. The first time a term is mentioned and followed by an asterisk (*) it is defined in Glossary and Techniques (page XX). To cut a pattern piece on the fold lay it even with the folded edge of the fabric. Once the fabric piece is cut out, open it up to yield one full-size panel. [PT2]Cap with Butterfly FABRICS 1/4 yard (44" or 54" wide) mid-weight fabric for exterior 1/4 yard (44" or 54" wide) mid-weight fabric for the lining OTHER SUPPLIES Handful of Nature-fil (all-natural premium fiberfill by Fairfield) 3 scraps of coordinating fabric for the butterfly 5/8 yard (1/4" wide) elastic 4" (3/4" wide) sew-on Velcro 1 spool coordinating all-purpose thread (we use Coats Dual Duty Plus) Sharp hand-sewing needle Tailor s ham* (optional) Medium size safety pin Step 1. Cut out the pattern piece. From the pattern sheet included with this book, cut out: Crown Step 2. Cut out all of the pieces from the fabric. a. Fold the fabric in half, Wrong sides together matching the selvage edges*. Place the crown pattern piece on the bias* of the fabric, matching the grain line on the pattern piece with the lengthwise grain* of the fabric. Pin it in place.
2 b. From the exterior fabric, cut: 6 crowns on the bias c. From the lining fabric, cut: 6 crowns on the bias d. From the elastic, cut: 1 piece o 0 3 months: 14" long o 3 6 months: 16" long o 6 9 months: 18" long o 9 12 months: 20" long) e. From the Velcro, cut: 1 piece, 2" long 2 pieces, each 1" long Step 3. Transfer lines* for Velcro placement and attach Velcro to the exterior of crown. a. Use tracing paper*, a tracing wheel* or chalk pencil, and the pattern piece as a guide. Transfer the lines for Velcro placement from the pattern piece onto one exterior crown. b. Round off all of the corners on both the male and female Velcro pieces. c. Set the male half of the Velcro aside (it will be used to attach to the butterfly s back). d. Place the female half of the Velcro in the marked lines and pin it in place. Sew a large zigzag stitch completely around each piece, backstitching* at each end. Step 4. Sew the exterior pieces together. (FIGURE 1) a. Place two exterior crown pieces Right sides together, matching the side edges, and pin down one side. Stitch a 1/2" seam down the matched edges, and backstitch at each end. Press the seam allowances* open. Use a tailor s ham or a folded towel to press around the top curve. b. Repeat the above step to attach the third crown piece to one unstitched side edge, making the first 3-panel section. Set it aside. c. Repeat steps 4a and 4b to make the second 3-panel section of exterior crown pieces. d. Place the two 3-panel sections Right sides together, matching the crown pieces at the tops of the sections. Pin them in place. Stitch a 1/2" seam across the matched edges, backstitching at each end. Press the seam allowance open. (FIGURE 1) Step 5. Sew the lining pieces together. a. Repeat step 4 to make the lining.
3 Step 6. Sew the exterior and the lining together. (FIGURE 2) a. Place the exterior and the lining Right sides together matching the seams, and pin around the bottom raw edge. Stitch a 1/2" seam around the bottom edge, leaving a 1" opening along the edge and backstitching at each end. b. Turn the cap Right side out and push the lining inside the cap. Fold the unfinished edges of the opening under 1/2" and pin them closed. Press. c. Topstitch* a 1/2" seam completely around the finished edge of the cap to create a casing for the elastic, and backstitch at each end. Remove the pins from the opening. (FIGURE 2) Step 7. Insert the elastic. a. Attach the safety pin to one end of the elastic. Insert the pin into the opening. Thread the elastic through the casing and out the same opening. Be careful not to twist the elastic. b. Attach both ends of the elastic together with a 1/2" seam, and backstitch at each end. Push the joined ends of the elastic into the opening and pin it closed. Slipstitch* the opening closed. [PT2]Butterfly Note: Use a 1/4" seam to make the butterfly. Step 1. Cut out the pattern pieces. From the pattern sheet included with this book, cut out: Upper wing Lower wing Body Step 2. Cut out all of the pieces from the fabric. a. Fold the fabric in half lengthwise Wrong sides together. Use the pattern pieces to cut out the fabric pieces. b. From the first fabric scrap, cut: 4 upper wings c. From the second fabric scrap, cut: 4 lower wings d. From the third fabric scrap, cut: 2 bodies Step 3. Sew the upper and lower wings together.
4 a. Place the first upper and lower wings Right sides together, matching the center edges. Pin them in place. Stitch a 1/4" seam across the matched edges, backstitching at each end. Press the seam allowance toward the bottom. b. Repeat to attach the other three other upper and lower wings. Step 4. Attach the wings to the body. a. Fold the butterfly body in half, matching the short, rounded edges. Gently press a crease to mark the center of the body. b. Place the first wing and the body Right sides together, matching the center crease on the body with the center seam on the wing. Pin it in place. Stitch a 1/4" seam to attach the wing, backstitching at each end. Press the seam allowance toward the wing. c. Place the second wing onto other side of the body, Right sides together. Pin it in place. Stitch a 1/4" seam, 1/2" in length, at the top and bottom of the wing. The opening will be used to stuff the butterfly. d. Repeat to attach the other set of wings to the second body, except this time stitch all the way down the second wing do not leave an opening. Step 5. Attach Velcro to the butterfly back. a. Center the butterfly back (the piece with the opening) on the cap s Velcro. Mark the placement for the male half of the Velcro on each wing. Center the 2" piece of male Velcro onto the body. Pin it in place. Then place the 1" pieces of male Velcro on each wing at the marks you just made. Pin them in place. b. Use a large zigzag stitch and sew completely around each Velcro piece, backstitching at each end. Step 6. Attach the front of the butterfly to the back. (FIGURE 3) a. Place the front and back of the butterfly Right sides together matching the outside edges. Stitch a 1/4" seam completely around the outside edges, pivoting* at each corner, and backstitch at each end. b. Clip* into the seam allowance around the wings, head, and tail. Make sure not to clip your stitching. (FIGURE 3) Step 7. Stuff the butterfly. a. Turn the butterfly Right side out through the opening you left in Step 4. Push out the wings, head, and tail using a turning tool*. Press the butterfly flat.
5 b. Lightly fill the butterfly with fiberfill. Do not overstuff. Pin the opening closed. c. With a hand-sewing needle and thread, slipstitch the opening closed. d. Match the front and back seams on each side of the body and pin them together. Stitch-in theditch* between the wings and the body on each side, backstitching at each end.
6 Military-style Cap FABRICS 1/2 yard (44" or 54" wide) mid-weight fabric for the exterior 3/8 yard (44" or 54" wide) mid-weight fabric for the lining OTHER SUPPLIES 3/8 yard of fusible fleece (we use fusible Thermolam Plus by Pellon) 3/8 yard of fusible woven interfacing (we use SF101 by Pellon) 1 spool coordinating all-purpose thread (we use Coats Dual-Duty Plus) Sharp hand-sewing needle Tailor s ham (optional) Medium size safety pin Step 1. Cut out the pattern pieces. From the pattern piece included with this book, cut out: Top panel Front bill Step 2. Cut out all of the pieces from the fabric. a. Unfold the fabric. Fold over each selvage edge* 6" toward the Wrong side. Gently press a crease along the folded edges. Use the pattern pieces and the dimensions below to measure and mark directly onto Right side of fabric. Cut along the marked lines. a. From the exterior fabric, cut: 1 top panel on the fold (see Notes) 2 front bills on the fold Unfold the exterior fabric and cut: 1 side panel o 0 3 months: 15" wide x 2 3/4" long o 3 6 months: 17" wide x 3" long o 6 9 months: 19" wide x 3 1/4" long o 9 12 months: 21 1/2" wide x 3 1/2" long 1 trim o 0 3 months: 15" wide x 2 1/4" long o 3 6 months: 17" wide x 2 1/2" long o 6 9 months: 19" wide x 2 3/4" long o 9 12 months: 21 1/2" wide x 3" long b. From the lining fabric, cut: 1 top panel on the fold Unfold the lining fabric and cut: 1 side panel o 0 3 months: 15" wide x 2 3/4" long o 3 6 months: 17" wide x 3" long o 6 9 months: 19" wide x 3 1/4" long o 9 12 months: 21 1/2" wide x 3 1/2" long c. From the fusible fleece, cut: 1 top panel on the fold 1 bill on the fold Unfold the fleece and cut: 1 side panel o 0 3 months: 15" wide x 2 3/4" long o 3 6 months: 17" wide x 3" long
7 o o 6 9 months: 19" wide x 3 1/4" long 9 12 months: 21 1/2" wide x 3 1/2" long d. From fusible interfacing, cut: 1 top panel on the fold 1 front bill on the fold Unfold the interfacing and cut: 1 side panel o 0 3 months: 15" wide x 2 3/4" long o 3 6 months: 17" wide x 3" long o 6 9 months: 19" wide x 3 1/4" long o 9 12 months: 21 1/2" wide x 3 1/2" long Step 3. Attach the interfacings. a. Place the Wrong side of the exterior top and side panels, and one bill, on the top of the interfacing s fusible side. Use a pressing cloth* and follow manufacturer s instruction to fuse them together. b. Place the interfaced side of the exterior top and side panels, and the Wrong side of the second front bill, on top of the fleece s fusible side. Use a pressing cloth and follow manufacturer s instruction to fuse them together. Step 4. Make the front bill. a. Place both bills Right sides together matching the outside curved edges, and pin them in place. Stitch a 1/2" seam around the outside curve, backstitching at each end. Trim the seam allowance* to 1/4". Clip* into the seam allowance every 1/2" to 1" around the curve. b. Turn the bill Right side out, pushing out the curved edge. Match the inside raw edges and pin them together. Press the bill flat. c. Machine baste* a 1/2" seam around the unfinished edge. Clip into the curve s seam allowance. Step 5. Attach the trim to the side panel. a. Fold the trim in half lengthwise, and press along the folded edge. Place the trim on the Right side of the side panel at the bottom edge, and pin it in place. Machine baste a seam across the matched edges, just short of 1/2" from the edge. Trim the bottom edges even. b. Edge stitch* along the trim s top folded edge, and backstitch at each end. Step 6. Attach the side panel to the top panel. (FIGURE 4) a. Fold the side panel in half, Right sides together matching the short edges. Press a center crease. Fold it in half again and press. b. Open the side panel one time so the short ends remain matched. Pin the short edges together. Stitch a 1/2" seam across the short edges, backstitching at each end. Press the seam allowance open. Topstitch* 1/2" on each side of center back seam, backstitching at each end. c. Sew a 1/2" stay stitching* line around the top edge of side panel. Clip into the seam allowance every 1/2" to 3/4". d. Fold the top panel in half lengthwise, and then again across its width. Gently press the folded edges along the sides as a guide to attach the side panel. e. Place the top and side panel Right sides together. Match the seam on side panel with the back crease on the top panel, then match the three other creases on each panel together. Ease the
8 side panel around the edges of the top panel and pin it in place. Stitch a 1/2" seam around matched edges, backstitching at each end. Press the seam allowance toward the side panel. f. Topstitch a 1/4" seam completely around the top of the side panel, backstitching at each end. (FIGURE 4) Step 7. Attach the front bill to the side panel. a. Fold the bill in half lengthwise. Press a center crease along the raw edges on the inside curve. Place the bill and side panel Right sides together, matching the front center creases. Pin in place. b. Stitch a 1/2" seam around the bill s inside curved edge, backstitching at each end. Press. Step 8. Make and attach the lining to the hat s exterior. (FIGURE 4) a. Repeat step 6 to make the lining for the hat. b. With the hat s exterior Right side out and the lining Wrong side out, slip the lining over the exterior, matching the back seam and side and the front creases. Pin around the bottom edges. Stitch a 1/2" seam around the bottom edges, leaving a 4" opening along the side of the hat, and backstitch at each end. c. Turn the hat Right side out through the 4" opening. Push the lining inside the hat and press. Fold under 1/2" on each edge of the opening and pin it closed. Slipstitch* the opening closed. Press along the finished seam. d. Smooth the lining side panel up into hat. Pin though the exterior and the lining on the exterior of the hat. Stitch-in the-ditch* along the top of the trim on the side panel. Sew completely around the bottom edge of the trim, backstitching at each end.
9
10

11
12
13
14
Note: Yardage and supplies listed are for all three bags.
 Stash Pouches Finished sizes: Large 10" (25.4 cm) wide x 81/2" (21.6 cm) tall x 31/2" (8.9 cm) deep Medium 9" (22.9 cm) wide x 7" (17.8 cm) tall x 3" (7.6 cm) deep Small 8" (20.3 cm) wide x 6" (15.2 cm)
Below is an updated Materials List followed by instructions for the added option of interfacing the Tote and Handbag with Timtex!.
 Chelsea Bags New! Instructions for interfacing the Chelsea Bags with Timtex!. Below is an updated Materials List followed by instructions for the added option of interfacing the Tote and Handbag with Timtex!.
Urban Jungle Bag Advanced
 Urban Jungle Bag Advanced Designed by Sara Lawson Sewn By Sara Lawson http://sewsweetness.com This adorable bag features leather handles and accent detailing on the front and sides. With a zipper top,
My Color Notes. Finished Dimensions: 7" square cube, 6" square cube, 5" square cube, 4" square cube, 3" square cube, 2" square cube
 Nesting Cubes H Light- to medium-weight woven cotton fabric: 10 squares of fabric measuring 8" 8" 10 squares of fabric measuring 7" 7" 10 squares of fabric measuring 6" 6" 10 squares of fabric measuring
Elizabeth Floral Tote
 Technique: Designed By: Sewing Melissa Peda Elizabeth Floral Tote Skill Level: Intermediate Brand: Crafting Time: FreeSpirit Weekend Finished Size: 16" x 5" x 16" (40.64cm x 12.7cm x 40.64cm) FreeSpirit
Evie Carry All Trio. Tools: Needle and thread PURSE
 Evie Carry All Trio Purse Make Up Bag Sunglasses Case 9 zipper 1 spool all purpose thread SUNGLASSES CASE 1/8 yd exterior 1/8 yd 810 Tru-Grid 1/8 yd interior 1/8 yd 987 Fusible Fleece ½ dia. Circular Velcro
Evie Carry All Trio Skill level: Intermediate
 Evie Carry All Trio Skill level: Intermediate http://www.pellonprojects.com Designed by Sara Lanan Make this cute ensemble with a sunglass case, make-up bag and purse. Fabric Needed (For all three items)
Frou Frou Bag Intermediate
 Frou Frou Bag Intermediate Sewn By Sara Lawson http://www.sewsweetness.com This bag features ruffled flaps, snap closure and an adjustable strap. The small front pockets are 3-dimensional. Beautiful detailing
Sunday: My Way-Life s Little Everything Bag
 Sunday: My Way-Life s Little Everything Bag The Sunday Bag was designed to be like a lazy Sunday afternoon- A Blank Canvas. The design was created to be simple; a beginner sew, but an open canvas for those
Beginning Level (9-11 Years)
") OKLAHOMA COOPERATIVE EXTENSION SERVICE 4-H Fabrics & Fashions Construction Items Beginning Level (9-11 Years) Division of Agricultural Sciences and Natural Resources Oklahoma State University OKLAHOMA
OKLAHOMA COOPERATIVE EXTENSION SERVICE 4-H Fabrics & Fashions Construction Items Beginning Level (9-11 Years) Division of Agricultural Sciences and Natural Resources Oklahoma State University OKLAHOMA
Handmade toys are the best kind that you can give your own children, and they make loving gifts for
 Nesting Cubes Nesting Cubes Handmade toys are the best kind that you can give your own children, and they make loving gifts for expectant friends and family members. Because these are sweet and soft, they
Color Pop ipad Case Skill Level: Beginner
 Color Pop ipad Case Skill Level: Beginner Make this stylish case to protect your ipad. This is a quick and easy project. Fabrics Needed Fabric Lining Materials Needed Pellon SF-101Shape-Flex Pellon 987F
On The Go Baby Changing Pad Skill Level: Beginner
 On The Go Baby Changing Pad Skill Level: Beginner Designed By Marni Weaver Sewn By Marni Weaver www.haberdasheryfun.com Do you know a new mom or do you have a new baby in the house? Use this easy step
When printing, do not select Fit to Printable Area or enlarge/shrink in any way. Always print at Actual Size or 100%.
 ethel tote bag A roomy, sturdy and stylish open tote bag. With a teardrop shape, Ethel veers away from the usual boxy tote. It s a stuff it in and run out the door kind of bag, designed to comfortably
BIG Bucket Tote Skill Level: Beginner
 BIG Bucket Tote Skill Level: Beginner Designed By Jennifer Mathis Sewn By Jennifer Mathis www.ellisonlane.blogspot.com Sometimes you just need a really BIG bag! This colorful tote has room for everything
Cuddle Coffee Sleeve Gift Card Holder Skill Level: Beginner
 Cuddle Coffee Sleeve Gift Card Holder Skill Level: Beginner Designed By Jennie Pickett Sewn By Jennie Pickett www.cloverandviolet.com Everyone loves a good cup of coffee and a visit with a friend. A perfect
Underwater Stripes Bag Skill Level: Beginner
 Underwater Stripes Bag Skill Level: Beginner Designed By Sara Lawson Sewn By Sara Lawson www.sewsweetness.com Fabric Needed Exterior Lining Materials Needed Pellon TP971F Thermolam Plus Pellon SF101 Shape-Flex
The Pea Pod. baby carrier. Created by Sascha Romeo Piccoli Piselli.
 The Pea Pod baby carrier Created by Sascha Romeo Piccoli Piselli www.piccolipiselli.blogspot.com sascharomeo@rocketmail.com This baby carrier is designed to be worn on the hip. The adjustable two buckle
Ashbury Heights Apron by Shelly Pagliai
 Ashbury Heights Apron by Shelly Pagliai Here I am again, with an apron tutorial for you. I made this apron using the Ashbury Heights line by Doohikey Designs for Riley Blake. I m in love with the telephone
Embroidered Scrap Bag Carol A. Brown
 Embroidered Scrap Bag Carol A. Brown Materials: 1. Outer fabric (sturdy fabric such as poplin): at least 12 1/2 wide by 22 high. 2. Medium weight fusible interfacing: same size as for fabric. 3. Lining
The Panty Pack Skill Level: Intermediate
 The Panty Pack Skill Level: Intermediate http://www.pellonprojects.com Designed By Michelle Dorsey Sewn By Michelle Dorsey What girly girl wouldn t want a special bag to hold her delicate undies when she
BIG Bucket Tote Skill Level: Beginner
 BIG Bucket Tote Skill Level: Beginner Designed By Jennifer Mathis Sewn By Jennifer Mathis www.ellisonlane.blogspot.com Sometimes you just need a really BIG bag! This colorful tote has room for everything
1. Print our the Fox Hat pattern (pages 8-11 of this tutorial) at 100% of actual size. Cut out the
 at 100% of actual size. Cut out the") Other Supplies - 2 black buttons (for eyes) - One bag of fiber stuffing - Paper printer - Basic sewing supplies: - sewing machine - needle & coordinating thread - straight pins - scissors & fabric shears
Other Supplies - 2 black buttons (for eyes) - One bag of fiber stuffing - Paper printer - Basic sewing supplies: - sewing machine - needle & coordinating thread - straight pins - scissors & fabric shears
Happy Handbag. Required Materials: 1/2 yd. each of two coordinating prints. 1/2 yd. Décor Bond. 1 pkg. Bosal In-R-Form Fusible Foam Stabilizer
 Happy Handbag Required Materials: 1/2 yd. each of two coordinating prints 1/2 yd. Décor Bond 1 pkg. Bosal In-R-Form Fusible Foam Stabilizer Sewing Thread to match Optional: magnetic snap NOTE: Seam allowances
Trick or Treat Fabric Baskets
 Trick or Treat Fabric Baskets Trick or Treat Fabric provided by Riley Blake Designs Stitch up one of our baskets to delight your little trick-or-treaters! They re easy and fun to make they d also make
All seam allowances are 1/2 unless otherwise noted. All pattern pieces include the seam allowance. Please read all instructions before beginning.
 This small bag will allow you to try out several fun bag-making techniques; adding a metal twist lock, using piping in a bag, making darts, and adding elastic pockets. Use your favorite print and combine
Ruffle Apron. Sewing Pattern. By: Ashley Hough
 Sewing Pattern Ruffle Apron By: Ashley Hough This ruffle front apron is the perfect accessory for the sewing room or the kitchen. Front pockets allow you to easily keep marking pencils, snips, spoons or
Designed by Anna Graham
 Just Kisses BAG GATHERER CROSSBODY Designed by Anna Graham www.noodle-head.com Featuring A small crossbody bag that s fun and satisfying to make and easy to use. Holds the basics without weighing you down!
CAMELOT FABRICS. 3. Draw a vertical line on the pointed end of each Strap, a tiny bit longer than the diameter of your buttons.
 Other Supplies - 2 buttons in coordinating color - paper printer - basic sewing supplies - sewing machine with buttonhole foot - iron & pressing surface - scissors & fabric shears - measuring tape - fabric
All seam allowances are 1/2 unless otherwise noted. All pattern pieces include the seam allowance. Please read all instructions before beginning.
 This beginner-friendly bag features an easy to install top zipper, and two topstitched pockets on the inside. Use your favorite fabric print and adorn it with the optional grosgrain ribbons! All seam allowances
Squares Tote. Supplies Needed. B efore you begin. Cutting. Sewing. Paris Collection. Finished Size: 15" x 20" x 5"
 Squares Tote Finished Size: 15" x 20" x 5" Supplies Needed Paris Collection 2 pkgs. Fabric Palette Paris Charms (5" x 5") 3 Fabric Palette Singles ( x 21") 2 matching for lining & 1 for handles and tabs
One Step Quilts - handbag and pouch
 One Step Quilts - handbag and pouch A sweet handbag and pouch pattern sewn from one yard of pre-printed fabric from Lecien. Fabric and notions: 1 yard of the One Step Quilts handbag and pouch fabric 1
Sew Sweetness. Oriole Bag. Sara Lawson
 Sew Sweetness Oriole Bag Sara Lawson Oriole Bag This bag comes in 2 different sizes and comes together quickly with the creative use of darts and front and back fabrics! Try your hand at using a bit of
Purse-onality Skill Level: Intermediate
 Purse-onality Skill Level: Intermediate http://www.pellonprojects.com Designed By Karen Bennett Sewn By Karen Bennett http://www.nelliesneedlequiltpatterns.com A perfect sized bag for day or evening that
Uptown Bag Skill Level: Intermediate
 Uptown Bag Skill Level: Intermediate Designed By Deborah Vollbracht Sewn By Deborah Vollbracht www.creativefolkquilting.blogspot.com Create a shopping/traveling tote (15-1/2 wide x 16-1/2 high, 30 from
Travel Jewelry Case. Skill Level: Experienced beginner. by Caroline Fairbanks- Critchfield. About Caroline Fairbanks-Critchfield
 Travel Jewelry Case by Caroline Fairbanks- Critchfield Skill Level: Experienced beginner This sweet case has spots for your earrings, rings, necklaces, and bracelets. It s a perfect way to show off coordinating
CHAIR COVER AND PILLOW A. 1 Front. 2 Side. 3 Arm Front. 4 Skirt Front. 5 Back. 6 Pillow CUTTING LAYOUTS CHAIR COVER AND PILLOW A
 ## PATTERN PIECES 4069 McCALL'S CRAFTS CHAIR COVER AND PILLOW A 1 Front 2 Side CHAIR COVER C,D 7 Guide PAGE 1 of 6 3 Arm Front 4 Skirt Front 5 Back 6 Pillow CUTTING LAYOUTS Cut other pieces first, allowing
Sew Easy Sun Visor. Skill level - Beginner/Easy. Fabric by Brandon Mably Project by Elizabth Hill. Technique: Machine sewing. Brand: Dual Duty XP
 Technique: Machine sewing Sew Easy Sun Visor Brand: Crafting time: Dual Duty XP An Evening Skill level - Beginner/Easy Materials Dual Duty XP general purpose thread Additional Requirements ¼ yard cotton
Royal Purple Blossoms
 Royal Purple Blossoms The cutwork and colors of this mat have a distinctly Oriental flair. Project Specifications Skill Level: Beginner Candle Mat Size: 17" diameter Fabric & Batting Fat quarter of light
Scandia Overnight Bag
 Scandia Overnight Bag Featuring Scandia by Jane Sassaman Whether you re off on a weekend jaunt, or just toting things to the gym, this fun zippered bag will keep things safe and secure on the go. Collection:
Halloween House Candy Dish Cover
 Technique: Applique Halloween House Candy Dish Cover Skill level - Intermediate Brand: Crafting time: Dual Duty XP An Evening Materials Coats and Clark Dual Duty XP Thread, 7620 Pumpkin, 3690 Purple, 900
Martha s A-Line Skirt with Darts
 Martha s A-Line Skirt with Darts Add a tailored look to a basic skirt with darts, a zipper, and a waist facing made of fabric or ribbon. The waist is flat with no band, and the skirt lies smoothly over
Escape Mini Bags Finished size: 8" x 10" x 2" Makes 2 Bags
 TM Escape Mini Bags Finished size: 8" x 10" x 2" Makes 2 Bags SUPPLIES NEEDED 2-1 Yard Cottons (Escape Brown Floral and ) 2 - ¼ Yard Cottons (Escape Green Floral) 3 8 yd. Pellon 987F Fusible Fleece 1 ½
Skill level: Intermediate. Featuring: Dual Duty XP Thread. Finished Size of Project: long (fits sizes 4-6) Supplies: Shark tail and hood:
 Supplies: Shark tail and hood:") Dress-up Tails- Shark Skill level: Technique: Designed By: Brand: Crafting time: Sewing/Fabric Crafting Linda Turner Griepentrog Dual Duty XP Weekend Intermediate Kid s love to play dress-up and take on
Dress-up Tails- Shark Skill level: Technique: Designed By: Brand: Crafting time: Sewing/Fabric Crafting Linda Turner Griepentrog Dual Duty XP Weekend Intermediate Kid s love to play dress-up and take on
Featuring Coats Dual Duty XP Thread. Supplies. You ll love snuggling up by the fire in these extra-cushy fuzzy slippers with a roll-down cuff.
 Cushy Soft & Snuggly Slippers Technique: Designed By: Skill Level: Crafting Time: Finished size: Sewing Lori Harder Intermediate Weekend Fits size 8-8 1 2 women s shoe size Featuring Coats Dual Duty XP
Main Fabric ¾ yard. Contrast Fabric for handle, sides and bottom (I used decoratorweight for strength and the wider width) ½ yard
 ½ yard") Laptop Bag Tutorial http://laundryontheline.wordpress.com Copyright 2009 Dreams in Seams For home use only. Not to be published, reproduced, used or sold commercially without express permission of Dreams
Laptop Bag Tutorial http://laundryontheline.wordpress.com Copyright 2009 Dreams in Seams For home use only. Not to be published, reproduced, used or sold commercially without express permission of Dreams
Christmas Tree Pillow
 Supplies: Baby Lock Sewing Machine Three different fabric designs. Fabric #1: 1/2 yard (includes pillow back) Fabric #2: 1.5"x full width of fabric or ¼ yard for Ruffled Pillow version Fabric #3: small
Kid-Size Lil' Chef Apron
 Published on Sew4Home Kid-Size Lil' Chef Apron Editor: Liz Johnson Wednesday, 07 September 2016 1:00 If you hang out with us here at Sew4Home on a regular basis, you know we love aprons! We've done retro
3. Press fusible fleece to the wrong side of these exterior pieces, or use batting pieces as interfacing and baste around all edges to hold in place.
 Catch more fun tutorials and patterns on my blog at hungryhippiesews.com or find me sewing away on Instagram @sewhungryhippie. This bag finished is approx 14"H x 18"W x 4" deep 1 Jelly Roll Moda Bella
The Lydia Bag, featuring 2018 Pantone Color of the Year: Ultra Violet
 Published on Sew4Home The Lydia Bag, featuring 2018 Pantone Color of the Year: Ultra Violet Editor: Liz Johnson Monday, 29 January 2018 1:00 Sometimes you just need something simple! This beautiful bag
Fox Fun Mug Rug H I J. Figure 1
 one day only DESIGN BY JOANNA WILCZYNSKA Fox Fun Mug Rug Good things come in small packages. Create a cute coaster that may end up on a wall instead. ScRap- FRIENDLY PROJECT SPECIFICATIONS Skill Level:
HOW TO MAKE A SLIPCOVER INSTRUCTIONS Instructions are for slipcovering a wing-back chair. The principle is the same for an arm chair or sofa.
 HOW TO MAKE A SLIPCOVER INSTRUCTIONS Instructions are for slipcovering a wing-back chair. The principle is the same for an arm chair or sofa. YOU WILL NEED: Slipcover fabric Piping cord Zipper Thread Ruler
Football Cornhole Bags
 Football Cornhole Bags Skill level - Beginner/Easy By Lucy Fazely Technique: Applique Brand: Dual Duty XP Crafting time: An Evening Materials Dual Duty XP general purpose, colors #3690 Purple and #7540
Prett y Panda Snap Purse
 112 Prett y Panda Snap Purse DIFFICULTY «««FINISHED SIZE 5½" 4½" (14cm 11.4cm), excluding ears Pandas are universally popular. Children will love this cute pouch, which features a darling appliquéd panda
Embroidered Scrap Bag and Bed Caddy Carol A. Brown
 Embroidered Scrap Bag and Bed Caddy Carol A. Brown Materials: 1. Outer fabric for Scrap Bag (sturdy fabric such as poplin): at least 12-1/2 wide by 22 high. 2. Outer fabric for Bed Caddy (sturdy fabric
Susannah Bee Quilt. Quilt designed by Terri Butler Finished size is approximately 43" x 60" A DIVISION OF HAMIL GROUP
 Susannah Bee Quilt Quilt designed by Terri Butler Finished size is approximately 43" x 60" A DIVISION OF HAMIL GROUP Quilt designed by Terri Butler Materials and Cutting Note: WOF is width of fabric from
gunter plush a sewing pattern by
 a sewing pattern by gunter plush This project is a huggable little plush made to look like Gunter, the mischievous little penguin and the Ice King s buddy from Adventure Time. It features little wings
SINGER PROJECTS Stadium Blanket, Cushion & Tote PROJECT SKILL LEVEL:
 SINGER PROJECTS Stadium Blanket, Cushion & Tote Stay warm at those fall outdoor events! This versatile tote not only serves as a convenient carrier for your stadium blanket, but it s your seat cushion
 Size approximatly: 9 W x 6,5 H https://www.facebook.com/ideiasegostos-222596481249947/ Materials: 3 different FQ of fabric : -Fabric A and B for the exterior -Fabric C for the lining A B C -Light weight/medium
Fabric Basket with Divider
 Fabric Basket with Divider Craft interfacing keeps the box in shape! Size: 5 x 10 x 5 ¼ tall This pattern is provided for your personal use only and may not be reproduced, sold, or kitted without written
OTHER TOOLS & SUPPLIES
 OTHER TOOLS & SUPPLIES - Fat Eighth of fusible fleece - 1/4 yd of fusible cotton interfacing (22 wide) - 1 yd of piping in coordinating color - (1) 1 D-Ring - (1) 1 swivel hook - (1) 8 closed-end zipper
FREE QUILT PATTERN ALCHEMY QUILT
 FREE QUILT PATTERN ALHEMY QUILT ALHEMY QUILT I love this spirited quilt desgned by my husband David and made from my new Alchemy prints. It has a very organic feel to it giving you the freedom to play
FREE. animal crackers softies. Creative Ideas from Jo-Ann more projects, tips & techniques at Joann.com
 animal crackers softies FREE SUPPLIES & TOOLS: 1/2 yd. of Animal Crackers fabric, 1/4 yd. of Illusions contrast fabric for elephant 1/2 yd. of Animal Crackers fabric, 1/8 yd. of Etchings contrast fabric
The Million-Use Bucket Bag By Devon Iott
 The Million-Use Bucket Bag By Devon Iott This cute and functional bucket bag has a million uses It s the perfect size for a knitting project on the go, a lunch, toys for the kiddos in the back seat, or
Kings Cape Designed and Created by Tinneke Pot
 Kings Cape Designed and Created by Tinneke Pot This fun and easy cape is sized for a child about 5 years old. Sewing Supplies Husqvarna Viking Sewing machine 1 yd (90 cm) of red plush fabric, at least
Constellation. Splendor by Amy Butler
 Featuring Splendor by Amy Butler Blazing Star blocks and Half-Star triangles create a vibrating constellation surrounding the large star in the center of this colorful quilt. The Splendor collection by
How to Sew an Oilcloth Wallet By: Aurora Sisneros
 Sewing Project How to Sew an Oilcloth Wallet By: Aurora Sisneros Let s face it, our wallets get a lot of wear and tear on a daily basis. Being pulled in and out of purses, opened and closed over and over
Weighted Pincushion Organizer
 Weighted Pincushion Organizer from Sew, Mama, Sew! This sturdy pincushion has plenty of space to store pins and a wool felt strip for your needles. The hanging pocket is a perfect place for storing easily-misplaced
Hip Packing Holster. ¼ yd lining fabric one - 7 ½ x 24 lining one - 8 x 4 ½ (C) elastic pocket. ¼ yd fusible fleece one - 7 ½ x 24
 elastic pocket. ¼ yd fusible fleece one - 7 ½ x 24") Hip Packing Holster Read directions before starting. Seam allowances are ¼, basting is 1/8. Options are given to make slits for a belt or for a strap. Or you can do both. Make the following cuts in the
Hip Packing Holster Read directions before starting. Seam allowances are ¼, basting is 1/8. Options are given to make slits for a belt or for a strap. Or you can do both. Make the following cuts in the
AmbrosiaTwirly Skirt
 AmbrosiaTwirly Skirt This skirt has just enough ruffled detail to make it feminine and fun while still draping nicely, and it works well in a variety of fabrics. Whip up a couple in fun prints for your
Simple, Sturdy Tote Bag Skill Level: Beginner
 Simple, Sturdy Tote Bag Skill Level: Beginner Designed By Amy Smart Sewn By Amy Smart www.diaryofaquilter.com This tote bag is a simple project, easy to complete quickly, and is the perfect size. It is
PLANNER COVER BY SARAH THOMAS OF SARIDITTY
 XXy asdf asdfy XXX Star Blazer PLANNER COVER BY SARAH THOMAS OF SARIDITTY Thank you for downloading this pattern for your Quilter s Planner. Sarah originally developed her Star Blazer Mini for Modern Quilts
dolphin plushies a sewing pattern by
 a sewing pattern by dolphin plushies These plushies are made to mimic a cute baby dolphin! Completely chubby and pudgy with a tiny bottle nose, round body, and bitty dorsal, side, and tail fins. They re
Cosmetics Case with Vinyl Interior Skill Level: Intermediate
 Cosmetics Case with Vinyl Interior Skill Level: Intermediate Designed By Lindsey Rhodes Sewn By Lindsey Rhodes http://lrstitched.com Use this step by step tutorial to create a roll-up cosmetics case with
Sashiko Autumn Leaves Wool Quilt
 Sashiko Autumn Leaves Wool Quilt Transform richly colored wool, into a beautiful and warm autumn lap quilt. Use the Baby Lock Sashiko Machine to achieve the look of hand quilting. Skill Level: Beginner
SPRING SHORTS # 1403
 PATTERN RUNWAY SPRING SHORTS # 1403 Launch into spring with these super cute and easy to wear elastic waist shorts. With a Paper-Bag waist and front side pockets, these little sweeties are sure to be a
Zippy QUILTER'S PLANNER COVER. Supplies. Before you begin
 Zippy QUILTER'S PLANNER COVER By Amanda Hines of What the Bobbin and Stephanie Palmer of Late Night Quilter. Photos by Kitty Wilkin and Stephanie Palmer. Supplies Thank you for joining in the fun and making
astrobunny & cosmokitty plush a sewing pattern by
 astrobunny & cosmokitty plush a sewing pattern by astrobunny & cosmokitty plushies Ever on an adventure, best friends Astrobunny and Cosmokitty are searching the farthest reaches of space to see what new
Plenty of Pockets Duffel Bag
 Plenty of Pockets Duffel Bag By: Cheryl Bush of www.sewcando.com A bag that's amazing for organizing on the go. Two rows of pockets on the outside, another full row of pockets on the inside, with a drawstring
MAKEUP BAG. Materials required
 Is it time for a new make-up bag? This quick and easy box bag is perfect for make-up or other stashes. Make it in a fun floral cotton for the ladies or a cotton duck for a masculine look. If you want a
Little Mod Bag. Pattern weights Fabric marking pencil All-purpose foot (BERNINA Reverse Pattern Foot #1/1C/1D) Walking foot (BERNINA Walking Foot #50)
 Walking foot (BERNINA Walking Foot #50)") Created by Erika Mulvenna materials and tools ½ yard 54ʺ-wide RV/Marine grade upholstery weight vinyl Vinyl remnants, or ⅛ yard each of two contrasting colors for appliqué 1½ yards of 45ʺ-wide medium weight
Created by Erika Mulvenna materials and tools ½ yard 54ʺ-wide RV/Marine grade upholstery weight vinyl Vinyl remnants, or ⅛ yard each of two contrasting colors for appliqué 1½ yards of 45ʺ-wide medium weight
set; press. Repeat to make 17 strip sets. Cut each strip set into 8 (21/2" x 41/2") B segments as shown in Figure 1.
 B segments as shown in Figure 1.") DESIGN BY SUE HARVEY Posy Patch Frayed edges form the petals in this garden of pastel posies. SPECIFICATIONS Skill Level: Confident Beginner Quilt Size: 56" x 72" Block Size: 8" x 8" Number of Blocks:
DESIGN BY SUE HARVEY Posy Patch Frayed edges form the petals in this garden of pastel posies. SPECIFICATIONS Skill Level: Confident Beginner Quilt Size: 56" x 72" Block Size: 8" x 8" Number of Blocks:
Double Zipper Device Sleeve with Wrist Strap
 Published on Sew4Home Double Zipper Device Sleeve with Wrist Strap Editor: Liz Johnson Thursday, 13 July 2017 1:00 We love the idea of concealing a cutting-edge electronic device inside a vintage wrapper.
GO! Qube 8" Patchwork Portfolio Finished Size: Open 28" x 12½"; Closed 9¾" x 12½"
 GO! Qube 8" Patchwork Portfolio Finished Size: Open 28" x 12½"; Closed 9¾" x 12½" For use with GO! Qube Mix & Match 8" Block (55776) Fabrics are from the Soho Solids and Pop Basics Collection and are provided
3sew simple. purse patterns CORDUROY PURSE HAWAIIAN TOTE REVERSIBLE PURSE
 1 3 purse patterns CORDUROY PURSE 2 HAWAIIAN TOTE 3 REVERSIBLE PURSE BY ELLEN MARCH corduroy purse YOU WILL NEED: 1 3 yard each of two coordinating corduroy fabrics (fabric A and fabric B) 2 3 yard of
Name: Class: Monster Doll. Grading Rubric
 Name: Class: Monster Doll Grading Rubric Grade yourself on the skills listed below. (0 being the lowest, and 5 being the highest.) Once you have graded yourself in each area, pin your grading sheet to
1. Locate the pattern on the
 Here s a fine feathered friend who s as charming as he is wise. Find the perfect perch for him so you can display his plumage in all its glory. Size approximately 6 x 6 x 6 inches Materials ~ Pattern (see
featuring STARGAZER COLLECTION BY AGF STUDIO Space Trip FREE PATTERN
 featuring STARGAZER COLLECTION BY AGF STUDIO Space Trip FREE PATTERN Space Trip DESIGNED BY FABRICS DESIGNED BY CAP-ST-1106 TWINKLY PHASES CAP-ST-1108 PLANETARIUM CAP-ST-1103 INTERRUPTED SIGNAL CAP-ST-1104
Carissa is the perfect clutch for every day, not too big, not too small. Six card sl
 Carissa Clutch Carissa is the perfect clutch for every day, not too big, not too small. Six card slots, zippered pocket, wristlet strap and an optional hand strap. Finished size of bag is: Height 7 inch
The Easy Everything Bag!
 The Easy Everything Bag! Featuring The Four Seasons by Julie Paschkis In The Beginning fabrics Finished Bag Size: approx. 19 x 19 x 5 Instructions are given for tote s in four different colorways. A separate
Big Pocket Baby Clutch Tutorial The pattern pieces all include a 3/8'' seam allowance.
 Big Pocket Baby Clutch Tutorial The pattern pieces all include a 3/8'' seam allowance. You will need: 3-4 fat quarters of fabric (depending on how many different fabrics you want to use). More fabric will
Acrylic Ruler/Mat Tote Bag
 Acrylic Ruler/Mat Tote Bag Outside Pocket holds 12 1/2' and 16" square up rulers Inside pockets hold 6" x 24" ruler, 6" x 12" ruler, 6" x 6" ruler Plus the inside has pockets for other rulers, notions,
Original Recipe. Let s Go Trippin by Polly Monica
 Original Recipe Let s Go Trippin by Polly Monica Hello again! I m Polly from Aunt Polly s Porch blog {auntpollysporch.blogspot.com} and I m so happy to be sharing my designs again on the Moda Bake Shop!
battie treat bag a sewing pattern by
 a sewing pattern by battie treat bag This project is for a simple small bucket bag but with added details that make it perfect for stashing away treats for Halloween. It features tiny bat wings, ears,
Enjoy creating the Bird Pin Cushion/Sachet created by Joel Dewberry!
 Thank you for watching Season 3, Episode 1 of "The DIY Dish." We appreciate this week's sponsor, Janome, for making it possible. Visit http://www.janome.com to find their entire line of sewing and embroidery
narwhal plush a free sewing pattern by
 narwhal plush a free sewing pattern by 2 narwhal plush Make your own 'unicorn of the sea' with this cute pocket-sized narwhal! With just 4 pattern pieces, it sews up quickly and is great for a beginner
Holiday Holly in 3-D A Wallhanging Ellen O. Designs for Sulky of America
 A Wallhanging Ellen O. Designs for Sulky of America What We Used WHAT FABRICS WE USED: Cotton Fabrics 42 to 44 (Image 1) Dark green 1/2 yard Medium green 1/4 yard Light green 1/4 yard Christmas/Holiday
Sunshiney Day Tote & Zip Pouch
 Sunshiney Day Tote & Zip Pouch Sunshiney Day Tote 16 x 4 x 16 Yardage Requirements for Tote: 1/3 yd. Print 1 3/4 yd. Print 2 1 yd. Print 3 1 yd. Buckram 1 yd. Fusible Fleece (44 wide) 1/3 yd. Medium weight
a free sewing pattern by
 a free sewing pattern by 2 witch kitty plush Ready your broom and cape! This adorable little kitty is all decked out for Halloween. The pattern comes with loads of cute details, including a capelet with
*All seam allowances are 1/4 unless otherwise noted. All pattern pieces include the seam allowance.
 Kelley Crossbody Bag Supplemental Instructions to Online Video Course www.craftygemini.com http://craftygemini.com/2016cgbagclub 2015 Crafty Gemini LLC. All rights reserved. *This pattern cannot be photocopied,