Printing Instructions: This file is formatted to print on 8.5 x11 Letter paper. If printed on other paper, the scale may be off.
|
|
|
- Diana Wilkinson
- 5 years ago
- Views:
Transcription

1 Anatomy Doll Pattern by Cat Carlisle 1 Printing Instructions: This file is formatted to print on 8.5 x11 Letter paper. If printed on other paper, the scale may be off. 1. Open the PDF file using Acrobat Reader. 2. Go to File, then Print to open the Print window. 3. In the Page Handling box, look for the setting for Page Scaling. In the drop down box next to it, select None. 4. Before you print the entire file, test that the settings are correct by printing this page by itself. You will be able to tell if the scale is not right by measuring the 1 inch bar to the right. If it is not an inch (or at least pretty dang close), then you know the scale is off and you can fix your settings. 5. Once your settings are correct, you can print this entire file. Pages 2-15 are the patterns. Pages are the instructions.
2 Anatomy Doll Pattern by Cat Carlisle 2
3 Anatomy Doll Pattern by Cat Carlisle 3
4 Anatomy Doll Pattern by Cat Carlisle 4
5 Anatomy Doll Pattern by Cat Carlisle 5
6 Anatomy Doll Pattern by Cat Carlisle 6 Small Intestine: Because the Small Intestine is so long, I could not fit the pattern here. However, the pattern is a simple rectangle so you can easily make it yourself. To make the pattern, find a large piece of paper like newspaper, wrapping paper or freezer paper. Draw a rectangle 27 1/2 inches long and 1 1/4 inches wide (27.5 x 1.25 ). Cut out the rectangle. Write Small Intestine on it. There s your pattern!
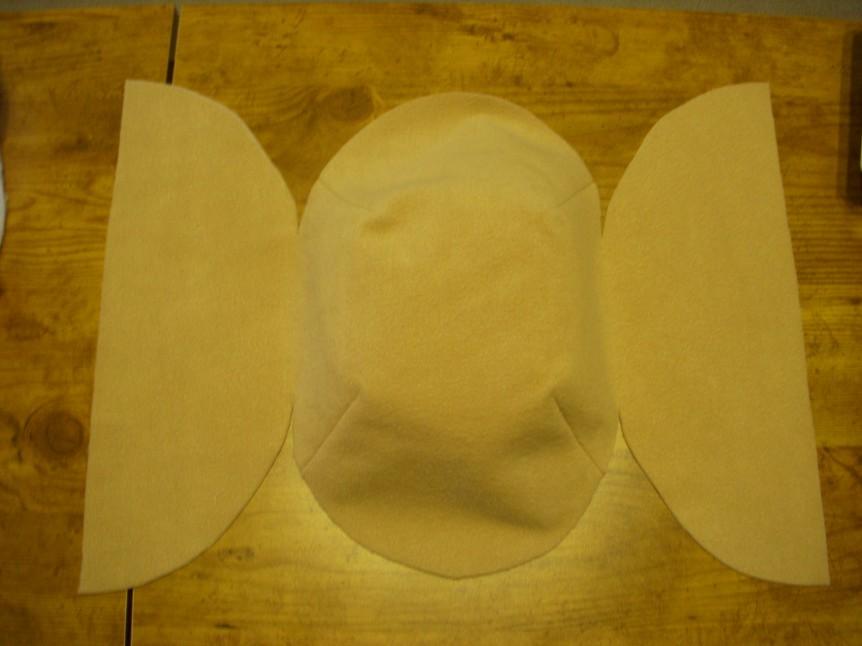
7 Anatomy Doll Pattern by Cat Carlisle 7 Assembling the Body Pattern: On the next 8 pages are pieces of the body pattern. The pieces must be printed, cut out and taped together before you can use the pattern to cut your fabric. When the pattern is assembled, it will look like this: How to assemble the body pattern: 1. After printing, cut out each piece along the outside lines. Leave a little extra paper outside the red lines so you will have some overlap. It will make taping easier. 2. On a large surface like a table, assemble the pieces according to the diagram above, using the piece numbers (A1, A2, etc.) as reference. Line them up so the red lines match. You may need to trim some of the overlap you left so the pieces will line up exactly. 3. Tape the pieces together along the red lines. You may want to add tape on the back side for extra support.
8 Anatomy Doll Pattern by Cat Carlisle 8
9 Anatomy Doll Pattern by Cat Carlisle 9
10 Anatomy Doll Pattern by Cat Carlisle 10
11 Anatomy Doll Pattern by Cat Carlisle 11
12 Anatomy Doll Pattern by Cat Carlisle 12
13 Anatomy Doll Pattern by Cat Carlisle 13
14 Anatomy Doll Pattern by Cat Carlisle 14
15 Anatomy Doll Pattern by Cat Carlisle 15
16 Anatomy Doll Pattern by Cat Carlisle 16 Recommended Fabrics: Outside Body, Head, Arms and Legs: skin-color fleece Lining Inside Body: shiny red fabric like satin or satinette Organs: 10 different colors of fleece (one color for each organ) Notions Thread to match each color of fabric Fusible interfacing Batting (stuffing) Yarn for the hair Embroidery floss for the mouth/facial features Safety eyes if desired (not recommended for children under 3 years) Velcro or magnets if desired (magnets not recommended for children under 3 years) Hooks and eyes, snaps, buttons, or Velcro for closure of the body Fabric Cutting Instructions Because fleece is not a sturdy fabric, I like to reinforce all parts of the doll with fusible interfacing. It also makes transferring the pattern easier. Here s what I do: 1. After you ve cut out all of the pattern pieces, transfer the pattern from all of the pieces to the non-fusible side of the fusible interfacing (the non-sticky / non-textured side). I recommend using a pencil because it will not smear. Here s how many times you need to transfer each piece: Body and Head: 2 times Small Intestine: 1 time Arms, Legs, Lung, Kidney: 4 times total, 2 times from the front side of the pattern and 2 times from the back All Other Organs: 2 times total, 1 time from the front side of the pattern and 1 time from the back Note that you are using the back of the pattern sometimes so you will end up with both a front and back of the piece, instead of two fronts and no back. 2. Cut out each piece, leaving an inch or so of interfacing around the pattern (don t cut right up to the line, leave some extra). 3. Follow the instructions from your interfacing to fuse it to the wrong side of the following fabrics: The Head, Arms, Legs and one of the Body pieces should be fused to the skin colored fabric. The second Body piece should be fused to the shiny red lining fabric. The Organs should be fused to the colors of fleece fabric that you chose for each. 4. Cut out each piece along the lines.
: 1. Match the two pieces of an organ together with the wrong sides facing out. 2.")
17 Anatomy Doll Pattern by Cat Carlisle 17 Organ Sewing Instructions Note: All patterns include a 1/4 inch seam allowance (0.25 ). Wrong Side means the side with the interfacing. The Organs (except Small Intestine): 1. Match the two pieces of an organ together with the wrong sides facing out. 2. Sew them together along the edges, stopping at least one inch from where you began so you can turn it inside out. 3. Clip curves in the seam allowance if needed. 4. Turn the organ right side out through the hole you left. 5. Stuff the organ. *If you would like the stomach, small intestine and large intestine to magnetically connect, you can place one magnet inside the lower end of the stomach and another in the beginning of the large intestine (remember magnets are not recommended for children under 3 years). 6. Close the hole using a blind hem stitch. 7. Add Velcro to the back of the organ if desired. The Small Intestine: 1. Fold the rectangle in half long ways (hot dog style) with the wrong side facing out. 2. Sew along the long edge to form a tube. Do not sew the short ends yet. Trim seam. 3. Turn the tube right side out. 4. Run some basting stitches around one end of the tube. Loosely run the needle through the tube so it comes out the other end. Fold the ends of the tube where the stitches are to the inside of the tube then pull the needle tight. The end of the tube should close with the unfinished edges inside and you can run the needle back through the tube and tie off the thread discreetly at the closed end. *If you would like the stomach, small intestine and large intestine to magnetically connect, you can place one magnet inside the closed end of the small intestine. Be sure to hold the magnet against the magnet in the stomach to make sure they will attach before you proceed. 5. Stuff the small intestine. Make sure it is not stuffed too tightly it should still be fairly flexible. *If you are using magnets, add a magnet to the other end of the small intestine now, being sure to check that it will attach to the magnet in the large intestine. 6. Run some basting stitches around the open end of the tube. Loosely run the needle through the tube so it comes out the side. Fold the ends of the tube where the stitches are to the inside of the tube then pull the needle tight. The end of the tube should close with the unfinished edges inside. Tie off the thread discreetly.

18 Anatomy Doll Pattern by Cat Carlisle 18 Head, Arms and Legs Sewing Instructions Note: All patterns include a 1/4 inch seam allowance (0.25 ). Wrong Side means the side with the interfacing. Head: 1. Before sewing the pieces of the head together, decorate one piece as the face. Embroider eyes, nose, mouth, etc. on it. 2. With the right sides together and wrong sides of the head facing out, sew the two pieces of the head together. Do not sew across the neck. 3. Turn the head right side out through the neck hole. 4. Add hair if desired. 5. Stuff the head. 6. Use a loose basting stitch within the seam allowance to sew it closed at the neck so the stuffing won t come out. Arms and Legs: 1. With the right sides together and the wrong sides facing out, sew the two pieces of each appendage together. Do not sew across the shoulder/hip. 2. Turn the appendage right side out through the hole. 3. Stuff the appendage. 4. Use a loose basting stitch within the seam allowance to sew the appendage closed at the shoulder/hip so the stuffing won t come out.
. Wrong Side means the side with the interfacing.")

 1.")
19 Anatomy Doll Pattern by Cat Carlisle 19 Body Sewing Instructions Note: All patterns include a 1/4 inch seam allowance (0.25 ). Wrong Side means the side with the interfacing. Outer Body (skin-colored piece): 1. Fold the dart so the two lines are together. The right side of the fabric should be inside the fold and the wrong side should be on the outside of the fold. Sew along the line. Cut off any excess fabric. 2. Repeat Step 1 for all other darts. Outer Body Wrong Side Outer Body Right Side Body Lining (shiny red piece) 1. Fold the dart so the two lines are together. The right side of the fabric should be inside the fold and the wrong side should be on the outside of the fold. Sew along the line. Cut off any excess fabric. 2. Repeat Step 1 for all other darts. Body Lining Wrong Side Body Lining Right Side
. Wrong Side means the side with the interfacing. 1. Pin the head, arms and legs in the appropriate places on the right side of the outer body, matching raw edges.")
20 Anatomy Doll Pattern by Cat Carlisle 20 Attaching the Head, Arms and Legs Note: All patterns include a 1/4 inch seam allowance (0.25 ). Wrong Side means the side with the interfacing. 1. Pin the head, arms and legs in the appropriate places on the right side of the outer body, matching raw edges. It won t seem right until you flip everything out like in the photo below: (face) 2. Make sure everything looks correct (thumbs and feet are pointing the right direction, face is facing forward), flip everything back and then sew all the pieces to the body within the seam allowance. Now s a good time to think about what sort of closure you want to use on the stomach flaps. If it s Velcro or snaps and you don t want your stitching to be visible on the outer body, you should attach them to the lining now. Also, if you want to use Velcro to attach the organs to the inside of the body cavity, now is the time to sew it to the lining as well. Attach the Lining to the Outer Body 1. Fold the limbs and head against the right side of the outer body. 2. Line up the lining and the outer body, right sides together and wrong sides facing out. Pin the edges. 3. Sew along the edges, leaving a gap between the legs so the doll can be turned right side out. Clip curves within seam allowance. 4. Turn the doll right side out and use a blind hem stitch to close the gap.


21 Anatomy Doll Pattern by Cat Carlisle 21 Finishing Touches If you haven t already put closures on the stomach, you can do so now. Place the organs inside the body cavity and you re done! You can make clothes or a hospital gown for the doll if you wish (I have a pattern for a gown somewhere, I will add it when I can find it).
Josephine Doll Pattern
 Josephine Doll Pattern Making these dolls means pulling out your scrap bin and button box and having a wonderful time pairing up patterns and prints. Each doll has felt hair and some have felt balls as
Dress-up Day. Additional Materials Needed. Project Fabric Requirements. Quilt Design by Susan Edmonson.
 Finished Quilt Size 70" x 78" Dress-up Day Quilt Design by Susan Edmonson 1737-100 1 panel 1738-11 ¼ yard 1738-44 ½ yard 1739-100 ½ yard 1740-11 ¼ yard 1740-100 ½ yard 1741-11(incl. binding) 1 ¾ yards
Sewing Organiser Pattern
 Sewing Organiser Pattern Requirements: 1m Outer Fabric 1m Lining Fabric 1m Cobweb fusible web (or similar) 1m Bag Batting 1m Parlon 4 x 30cm Open ended Zip Optional extras Fat Quarter of Clear Vinyl for
Vintage Style Teddy Bear Pattern
 9 by 12 wool or wool blend felt contrasting color wool felt (or blend) for paw pads and nose 6 mm safety eyes needle and thread doll making needle embroidery thread 100% mohair wool cotton fleece teddy
Pajama Sock Monkey 2009 Cutest Creations
 Materials needed: Pajama Sock Monkey 2009 Cutest Creations 1 pair of size Large Brown Red-Heel socks can be purchased from my online store www.ohboyorgirl.com Black embroidery thread Other color embroidery
An easy to make wallet pattern, ideal for giving gift cards or money
 1 An easy to make wallet pattern, ideal for giving gift cards or money You will need: 1. Outer fabric - Any light weight fabric of your choice. 2. Lining Any light weight fabric of your choice. Use a contrasting
A few notes about PDF patterns from Designs by Jude...
 A few notes about PDF patterns from.... This PDF pattern requires legal size paper (8.5 x 14 ) or A4 size paper (8.27 x 11.69, 210mm x 297mm). It will not print on standard letter. Patterns containing
YSR Everywear Tails Design by lila_
 1 YSR 12-10 Everywear Tails Design by lila_ PIECES 0 Print Check 1 Front Left 1x Fabric 2 Front Side Left 1x Fabric 3 Back Side 2x Fabric 4 Back 2x Fabric 5 Under Collar 2x Fabric 6 Upper Collar 2x Fabric
Big Pocket Baby Clutch Tutorial The pattern pieces all include a 3/8'' seam allowance.
 Big Pocket Baby Clutch Tutorial The pattern pieces all include a 3/8'' seam allowance. You will need: 3-4 fat quarters of fabric (depending on how many different fabrics you want to use). More fabric will
Child s Purse An In-the-Hoop Project
 Child s Purse An In-the-Hoop Project Shoulder bag in two sizes, with optional quilting. You may also choose to close the bag with Velcro or with a snap or other type of closure. Files and instructions
retro travel bag sewing patterns Materials List:
 sewing patterns M Supplies Needed Materials List: Fabric: 1 yard of cotton fabric, pattern is suitable for laminated fabrics, cotton fabrics such as quilting weight cotton, light weight home decor fabric.
Owyhee County 4-H. Cloverbud. Activity Book
 Owyhee County 4-H Cloverbud Activity Book Name Age Year in 4-H 20 Club Name Member s Signature Parent/Guardian s Signature Leader s Signature Projects or activities I worked on this year were: I attended
A few notes about PDF patterns from Designs by Jude...
 A few notes about PDF patterns from Designs by Jude.... This PDF pattern requires legal size paper (8.5 x 14 ) or A4 size paper (8.27 x 11.69, 210mm x 297mm). It will not print on standard letter. Patterns
Pretty Poppet. Print out the pdf files. Do NOT select fit to page! They will come out wonky! No Margins! Margins are BAD!
 Pretty Poppet Please read through the entire instruction sheet before making this doll. These instructions are written for a beginning level doll maker. Tips for Beginners: 1. Set your sewing machine stitch
Project #4: Tooth Fairy Pillow
 Project #4: Tooth Fairy Pillow This is the 4 th project in our Get Kids Sewing Series with SINGER and SkipToMyLou.org. The tooth fairy will always find you with your own special pillow! Choose your favorite
Floriani Embroidery Project Perfect Take along Play Mat (Beginner Project)
") Floriani Embroidery Project Perfect Take along Play Mat (Beginner Project) Floriani Embroidery Project Perfect Take along Play Mat (Beginner Project) Presented by RNK Distributing Supplies Needed: Sewing
Floriani Embroidery Project Perfect Take along Play Mat (Beginner Project) Floriani Embroidery Project Perfect Take along Play Mat (Beginner Project) Presented by RNK Distributing Supplies Needed: Sewing
~~~ Little Wonders Pouch Patterns ~~~ 2014 Geta Grama; Boxy Pouch
 Boxy Pouch Pouch size: 6 wide at bottom; 9 wide at top; 7½ tall; 3 deep ~ Please read all the instructions carefully before starting to make the pouch ~ Page 1 1. Materials List Main fabric: 10 x 20 (I
By Laurie Pessetto. Skill Level: This is a simple pattern and easy to sew. The challenge if using a plush fabric will be the nape.
 By Laurie Pessetto Stuffed animals are a favorite comfort toy and playmate. This 25 dinosaur is cuddly, and yet sturdy enough to stand alone. The fabric is stretchy, soft and smooth with a nice feel. Pick
Cut 1 lightweight interfacing
 1 2 A note on interfacing for this bag: This pattern is intended to produce a slouchy bag, so you will want to look carefully at your fabrics before you decide on which interfacing and stabilisers to use.
MATERIAL REQUIREMENTS:
 This pattern contains a pattern for a 30-inch doll. The doll may be made of flesh, tan or peach broadcloth, percale or any plain cotton material. Use six strand cotton for embroidering features and straw
A few notes about PDF patterns from Designs by Jude...
 A few notes about PDF patterns from.... This PDF pattern requires legal size paper (8.5 x 14 ) or A4 size paper (8.27 x 11.69, 210mm x 297mm). It will not print on standard letter. Patterns containing
A few notes about PDF patterns from Designs by Jude...
 A few notes about PDF patterns from Designs by Jude.... This PDF pattern requires legal size paper (8.5 x 14 ) or A4 size paper (8.27 x 11.69, 210mm x 297mm). It will not print on standard letter. Patterns
Monogrammed Clutch. Supplies Needed: **1/2 yard fabric (for back and flap - we used home decor fabric) **1/4 yard print fabric (for front of clutch)
 **1/4 yard print fabric (for front of clutch)") Monogrammed Clutch This monogrammed clutch is just the perfect size -- not too big and not too small. Embellished with a Text Frame Flourish and beautifully embroidered buttonhole, this clutch is a must-have
Monogrammed Clutch This monogrammed clutch is just the perfect size -- not too big and not too small. Embellished with a Text Frame Flourish and beautifully embroidered buttonhole, this clutch is a must-have
Created by Cathy
 Created by Cathy http://www.picklecreations.co.uk/ Description Sewing Caddy for your useful sewing items. Keep them to hand, or, make it easier to move to your various work stations. Could also be used
a free sewing pattern by
 a free sewing pattern by 2 sloth plush Bask in your lazy side with this adorable and interactive sloth plush. The claws have Velcro so it's able to hang on anything at the ready like the corner of a door,
Name: Class: Monster Doll. Grading Rubric
 Name: Class: Monster Doll Grading Rubric Grade yourself on the skills listed below. (0 being the lowest, and 5 being the highest.) Once you have graded yourself in each area, pin your grading sheet to
Beaded Clutch. Other Supplies 7 zipper
 Beaded Clutch Other Supplies 7 zipper Preparation 1. Print out the templates found on the last three pages of this tutorial at 100% of actual size and trace them onto folded double layers of your fabric
Christmas Stocking 1. The finished size is 17.5 long from top of folded cuff to toe, 21.5 unfolded, and 6.5 wide.
 Christmas Stocking 1 The finished size is 17.5 long from top of folded cuff to toe, 21.5 unfolded, and 6.5 wide. For each stocking you ll need: 2 outside pieces 2 lining pieces 2 cuff pieces 1 6 piece
Christmas Tree Pillow By Marie Duncan
 Christmas Tree Pillow By Marie Duncan Christmas is coming and you want to be ready! This fun piped, patchwork pillow made with the Hex N More Ruler will go together quickly and be a treasured holiday decoration
A few notes about PDF patterns from Designs by Jude...
 A few notes about PDF patterns from.... This PDF pattern requires legal size paper (8.5 x 14 ) or A4 size paper (8.27 x 11.69, 210mm x 297mm). It will not print on standard letter. Patterns containing
Angel Pets Memorial Mug Rug PDF Pattern
 Angel Pets Memorial Mug Rug PDF Pattern Finished Size: 6 1/2 x 8 inches If you are only making one animal, be sure to print only that page. Use these with a snack, or hang on your wall. They also make
Original Recipe. Let s Go Trippin by Polly Monica
 Original Recipe Let s Go Trippin by Polly Monica Hello again! I m Polly from Aunt Polly s Porch blog {auntpollysporch.blogspot.com} and I m so happy to be sharing my designs again on the Moda Bake Shop!
The Flake Family. Skill level - Intermediate. By Elizabeth Hill. Technique: Satin Stitch. Brand: Dual Duty XP. Crafting time: Day
 The Flake Family Skill level - Intermediate Technique: Satin Stitch Brand: Dual Duty XP Crafting time: Day Size Final Measurements: 21 1/2 x 25 1/2 Materials Dual Duty XP General Purpose thread Coats Rayon
NOTES 1. Please wash, dry & iron your fabric before beginning. 2. Use a 1/4 seam allowance throughout. 3. All seams are sewn Right Sides together.
 OTHER TOOLS & SUPPLIES - fiber stuffing or fabric scraps - paper printer - 24 contrasting embroidery floss & an embroidery hoop, for eyes - 2 yds of ribbon, for hanging (optional) - basic sewing supplies:
Designs by Jude. PlayTime for 12 Senson. SEN102 $12.95 US
 www.fletcherpatterncompany.com PlayTime for 12 Senson SEN102 $12.95 US 2010, All RIGHTS RESERVED. Personal use only. Not licensed for commercial use. Play Time for 12 Senson Dolls Notions & Fabric Cottons,
A few notes about PDF patterns from Designs by Jude...
 A few notes about PDF patterns from Designs by Jude.... This PDF pattern requires legal size paper (8.5 x 14 ) or A4 size paper (8.27 x 11.69, 210mm x 297mm). It will not print on standard letter. Patterns
Evie Carry All Trio. Tools: Needle and thread PURSE
 Evie Carry All Trio Purse Make Up Bag Sunglasses Case 9 zipper 1 spool all purpose thread SUNGLASSES CASE 1/8 yd exterior 1/8 yd 810 Tru-Grid 1/8 yd interior 1/8 yd 987 Fusible Fleece ½ dia. Circular Velcro
A. Preparing the fabric (not shown):
:") INSERTING ZIPPERS - CENTER INSERTION The zipper can be snapped on to the right or to the left side of the needle so that you can sew close to the zipper. When sewing on the right side of the zipper, attach
INSERTING ZIPPERS - CENTER INSERTION The zipper can be snapped on to the right or to the left side of the needle so that you can sew close to the zipper. When sewing on the right side of the zipper, attach
dragon & unicorn hooded cowl a free sewing pattern by
 dragon & unicorn hooded cowl a free sewing pattern by 2 hooded cowl When you re ready to break out a scarf or hat for chilly weather, try putting on this cozy cowl! It s a hood and scarf in one with cute
A few notes about PDF patterns from Designs by Jude...
 A few notes about PDF patterns from Designs by Jude.... This PDF pattern requires legal size paper (8.5 x 14 ) or A4 size paper (8.27 x 11.69, 210mm x 297mm). It will not print on standard letter. Patterns
Read through everything carefully before beginning. View E from Simplicity C5461 5/8 yd
 Rare Bear Supply List and Sewing Instructions as of Sunday, March 04, 2018 Read through everything carefully before beginning. Pattern pieces - View E from Simplicity C5461 - pieces 33 through 41 Follow
Fashion-Forward Combo Clutch
 Fashion-Forward Combo Clutch A 2-in-1 convertible clutch is two cute bags in one! Unfolded, it's the perfect purse for daytime activities. Simply fold the top of the bag over, and in a snap, you have a
Copyright 2016 MKKB Enterprises, INC
 Copyright 2016 MKKB Enterprises, INC 1 General Sewing Supplies Rotary Cutter, Mat, Ruler Thread snips Iron and ironing surface Fabric Marker of your choice (pen, pencil, chalk ) Microtex size 80 or 90
Pattern: Amelie, the Giraffe Free pattern - created by amiimaker
 1 amiimaker.com instagram.com/amiimaker facebook.com/amiimaker Pattern: Amelie, the Giraffe Free pattern - created by amiimaker June 18th, 2018 I love giraffes! And I love even more amigurumi giraffes!
Bowled Over Bag. Supplies Needed. Notes. Swatches. Special Thanks To
 Supplies Needed Main fabric (front, back, and side panels) 1yd Contrasting fabric and lining 2 yds 20in Coats heavyweight metal zipper 2/3 of a yard of VELCRO FABRIC FUSION brand fastener Dual duty xp
Gentleman s Suit. for 17 Super Hero. Tamara Casey. Designed by. Super103 $12.95 US
 www.fletcherpatterncompany.com Gentleman s Suit for 17 Super Hero Designed by Tamara Casey Super103 $12.95 US 2010, All RIGHTS RESERVED. Personal use only. Not licensed for commercial use. Gentleman s
sugar skull kit ty plush a sewing pattern by
 sugar skull kit ty plush a sewing pattern by sugar skull kit ty plush This pattern pays homage to the beautiful calaveras seen in Dia de Muertos art. It s a simple kitty plush with button jointed limbs
Wren Feathers. Waldorf doll for your dolls
 Wren Feathers Waldorf doll for your 16-18 dolls As always this pattern is by me (Jennie Bagrowski) and is for your personal use only, you MAY share it by linking to this blog, you may NOT sell it. If you
Dollytime. Tiny Topsy the tooth fairy. who are new to the craft. She measures 12cm (5 in) and is a topsy turvy or upside and added lots of pictures.
 and is a topsy turvy or upside and added lots of pictures.") Dollytime Tiny Topsy the tooth fairy As I d like to encourage e more people to knit I ve designed Tiny Topsy for knitters who are new to the craft. She measures 12cm (5 in) and is a topsy turvy or upside
Dollytime Tiny Topsy the tooth fairy As I d like to encourage e more people to knit I ve designed Tiny Topsy for knitters who are new to the craft. She measures 12cm (5 in) and is a topsy turvy or upside
Practicing Basic Machine Operation Sample #1
 Practicing Basic Machine Operation Sample #1 Listed below are various tasks required in basic sewing machine operation. Demonstrate your ability to perform each task by creating a sample. The samples that
BUDDY THE T-REX COSTUME DIRECTIONS FOR SUIT CONSTRUCTION
 BUDDY THE T-REX COSTUME DIRECTIONS FOR SUIT CONSTRUCTION SIZE: SMALL (5) Height: 42-45 Weight: 40-45lbs. Shoe size 11 What you need: Notes Fabric 2 yards, 60 wide, orange fleece for body, hood and feet.
Prett y Panda Snap Purse
 112 Prett y Panda Snap Purse DIFFICULTY «««FINISHED SIZE 5½" 4½" (14cm 11.4cm), excluding ears Pandas are universally popular. Children will love this cute pouch, which features a darling appliquéd panda
DOUBLE POT HOLDER. Materials
 DOUBLE POT HOLDER My favorite pot holder was a double pot holder that I received as a gift years ago. This pot holder has places for your hands at each end with quilter fabric between. It is made with
Basic Sewing Portfolio. Name
 Basic Sewing Portfolio Name Back stitching Whip stitch Starting in the corner of a sample begin stitching diagonally. 3-4 stitches Hold up the back stitching lever and backstitch to the beginning. Release
Tumbles Bear. Crochet With Style Crochet Pattern
 Tumbles Bear Crochet With Style Crochet Pattern Step-by-step instructions Lots of photos & tips to help you make your very own Tumbles Bear. Designed by Toni Marie. Crochet with Style #3 Free Crochet Pattern
london calling bag a sewing pattern by
 a sewing pattern by london calling bag This project on its own is a very big gusseted bag with a zippered top closure. But the optional details include a front pocket with Union Jack applique, buckle adjustable
When printing, do not select Fit to Printable Area or enlarge/shrink in any way. Always print at Actual Size or 100%.
 ethel tote bag A roomy, sturdy and stylish open tote bag. With a teardrop shape, Ethel veers away from the usual boxy tote. It s a stuff it in and run out the door kind of bag, designed to comfortably
INSTRUCTIONS BFC716 QIH LEOPARD BAG
 INSTRUCTIONS BFC716 QIH LEOPARD BAG This bag can be done in many ways! You can stitch it as I did the medium size bag shown at the end of this document (with the Orange trim). For this bag I embroidered
Dog Cape. materials and tools. step one
 materials and tools materials and tools ¼ yard white fabric (shirt) ⅓ yard black fabric (cape and belt) ⅓ yard red satin (cape lining) ½ yard red ⅝ʺ-wide ribbon (flower) ⅔ yard black 1ʺ-wide ribbon (tie)
Insulated Lunch Bag. Project Needs & Notes:
 Insulated Lunch Bag Bring your lunch on the go with a chic embroidered lunch bag. An insulated lining keeps food cool while beautiful embroidery and fabric choices tailor it to your personal style and
Color Pop ipad Case Skill Level: Beginner
 Color Pop ipad Case Skill Level: Beginner Make this stylish case to protect your ipad. This is a quick and easy project. Fabrics Needed Fabric Lining Materials Needed Pellon SF-101Shape-Flex Pellon 987F
Here are the basic instructions for the teddy bear pattern. Please let me know if you have ANY questions.
 DOLLS OF HOPE TEDDY BEAR PATTERN - Created by Sarah Parson inthemiddleofthis@gmail.com for questions or call 801-369- 0915 Here are the basic instructions for the teddy bear pattern. Please let me know
Embroidered Scrap Bag and Bed Caddy Carol A. Brown
 Embroidered Scrap Bag and Bed Caddy Carol A. Brown Materials: 1. Outer fabric for Scrap Bag (sturdy fabric such as poplin): at least 12-1/2 wide by 22 high. 2. Outer fabric for Bed Caddy (sturdy fabric
cut & sew ferret plush a sewing pattern by
 cut & sew ferret plush a sewing pattern by 2 ferret plush If you re reading this, then you likely purchased some of my Cut & Sew Ferret Plush fabric from Spoonflower. So thank you! Make your favorite cat
Silver Lining FABRIC REQUIREMENTS. Fabric A WND-2536 ¾ yd. Fabric B WND-1532 ⅝ yd. Fabric C WND-1537 ⅓ yd. Fabric D PE-431 ¾ yd.
 Silver Lining HANDBAG DESIGNED BY AGF STUDIO FABRIC REQUIREMENTS FABRICS DESIGNED BY Fabric A WND-2536 ¾ yd. Fabric B WND-1532 ⅝ yd. Fabric C WND-1537 ⅓ yd. Fabric D PE-431 ¾ yd. Additional Materials Magnetic
Burlap Pincushion Dolls #12556 / 4 Files / 2 Dolls
 #12556 / 4 Files / 2 Dolls Note: Some designs in this collection may have been created using unique special stitches and/or techniques. To preserve design integrity when rescaling or rotating designs in
What you will need: 9 x 12 piece of fabric (interior pocket) 9 x 8.5 piece of fabric (bottom of zipper pocket) 4 x 9 piece of fabric (top of zipper
 9 x 8.5 piece of fabric (bottom of zipper pocket) 4 x 9 piece of fabric (top of zipper") What you will need: 9 x 12 piece of fabric (interior pocket) 9 x 8.5 piece of fabric (bottom of zipper pocket) 4 x 9 piece of fabric (top of zipper pocket) 6 x 9 piece of fabric (zipper pocket lining)
What you will need: 9 x 12 piece of fabric (interior pocket) 9 x 8.5 piece of fabric (bottom of zipper pocket) 4 x 9 piece of fabric (top of zipper pocket) 6 x 9 piece of fabric (zipper pocket lining)
Pincushion and Thread Catcher Organiser
 Pincushion and Thread Catcher Organiser Designed by Angie Wilson of GnomeAngel.com Read instructions carefully before starting the project. Tools Required: Brother Sewing Machine General Sewing Supplies
Plenty of Pockets Duffel Bag
 Plenty of Pockets Duffel Bag By: Cheryl Bush of www.sewcando.com A bag that's amazing for organizing on the go. Two rows of pockets on the outside, another full row of pockets on the inside, with a drawstring
Cup O' Crafty Organizer
 Cup O' Crafty Organizer Keeping your pens, pencils, and sewing supplies nearby and ready to use just got easier! Stitch a design of your choice onto a cup caddy to create a cup o' crafty organizer. With
By Laurie Pessetto. Create your pattern. The decorative fabric will be on the edges of the circle layers.
 By Laurie Pessetto Create an elegant, soft, travel pouch to protect jewelry from damage and keep it organized even when your suitcase gets tossed into a plane or trunk! Skill Level Good sewing skills,
All seam allowances are 1/2 unless otherwise noted. All pattern pieces include the seam allowance. Please read all instructions before beginning.
 This small bag will allow you to try out several fun bag-making techniques; adding a metal twist lock, using piping in a bag, making darts, and adding elastic pockets. Use your favorite print and combine
Huggy Bear Body Pattern. by Dianna Effner
 Huggy Bear Body Pattern October 15, 2015 by Dianna Effner (660) 849-2114 fax (660) 849-2358 Original Designs for the Doll Industry, Inc PO Box 174 Jamestown, MO 65046 www.expressionsdolls.com Supplies
Personalize An Off-The-Rack Tee
 Published on Sew4Home Personalize An Off-The-Rack Tee Editor: Liz Johnson Friday, 26 June 2015 1:00 Now's the time to stock up on cute summer tees. They're on sale nearly everywhere. We hit the local Target
Material Amount Cost Where to Purchase 1.1oz Breathable Ripstop 4 yards $12.80 DIY Gear Supply
 Sin50 The pattern below is made to fit me (5 10, 155lb side sleeper), so others can work from there as to the dimensions they need. If you would like this to work as a top bag for winter use, I would also
Made for Each Other Pillows
 Two embroidered pillows create the shape of a heart when displayed together. Use to decorate your home, or give as a wedding gift! Project Needs & Notes: - 18" pillow forms - 1 1/2 yards print cotton fabric
Embroidered Scrap Bag Carol A. Brown
 Embroidered Scrap Bag Carol A. Brown Materials: 1. Outer fabric (sturdy fabric such as poplin): at least 12 1/2 wide by 22 high. 2. Medium weight fusible interfacing: same size as for fabric. 3. Lining
Snowman Gift Card Case In-the-hoop project
 Snowman Gift Card Case In-the-hoop project 2008 Peggy Severt, Pegboard Crafts pegboard1@yahoo.com or peggy@pegboardcrafts.com http://www.pegboardcrafts.com (419) 586-3135 Do not resize these designs. The
Small Messenger Bag. Supplies:
 Small Messenger Bag Supplies: -main fabric: 3/4 yard -lining fabric: 1/3 yard (more if not using contrast for inner pockets) -contrast fabric for inner pockets (optional): approx 1/2 yard, depending on
tri-fold wallet a sewing pattern by
 a sewing pattern by tri-fold wallet This project is for a basic wallet that folds up into thirds, but it features a contrast front band, snap closure, credit card pockets, cash pocket, and zippered coin
Autumn Stroll for 12 Marley
 Designs by Jude www.fletcherpatterncompany.com Autumn Stroll for 12 Marley Designed by Tamara Casey Mw117 $12.95 US Designs by Jude Autumn Stroll For 12 Marley Basic Instructions Use a ¼ seam allowance
Bee #2 - Tea Cozy. ** All seam allowances are ¼. ** To avoid dull or broken needles, always remove pins while sewing.
 How do you keep your last cup of tea as piping hot as the first? Follow these instructions to make a decorative and practical tea cozy. This Bee includes all of the instructions, supply list and 4 beautiful
Big & Bold Bamboo Clutch
 Big & Bold Bamboo Clutch Carry your necessities in style with this Big & Bold Bamboo Clutch. Slim and elegant in in appearance, this bag will hold all of your essentials. Customize your own by using your
a free sewing pattern by
 a free sewing pattern by 2 Decorate your desk or nightstand with this palm-sized fox! It's extra-large tail is especially charming as it wraps around the tiny fox body and helps it balance upright. But
Original Recipe. Chic Mama Stroller Organizer
 Original Recipe Chic Mama Stroller Organizer Hello again, it's Jennie from Clover & Violet and I'm here today with a fun project for those with little ones! As a busy mom, I am always looking for ways
Marsupilami. Work is done in continuous rounds (spiral work). Use marker for easier round following Vanja Grundmann
. Use marker for easier round following Vanja Grundmann") Marsupilami Materials needed Matching yarn and hook accordingly you will need crochet hook (I used 2,5 mm and DK-medium weigh cotton yarn) yarn in: - yellow, - light peach (beige), - little bits of white
Marsupilami Materials needed Matching yarn and hook accordingly you will need crochet hook (I used 2,5 mm and DK-medium weigh cotton yarn) yarn in: - yellow, - light peach (beige), - little bits of white
The Panty Pack Skill Level: Intermediate
 The Panty Pack Skill Level: Intermediate http://www.pellonprojects.com Designed By Michelle Dorsey Sewn By Michelle Dorsey What girly girl wouldn t want a special bag to hold her delicate undies when she
Kitschy Friend. Finished Size Approximately 23½in (60cm) tall
 tall") 1 Kitschy Friend This fun lady will always raise a smile, especially if you give her as a gift to your friends. We chose certain fabrics, with details given in the instructions, but you can easily replace
1 Kitschy Friend This fun lady will always raise a smile, especially if you give her as a gift to your friends. We chose certain fabrics, with details given in the instructions, but you can easily replace
Greek Square Table Runner
 Greek Square Table Runner Quilt Finished Size: 70-1/2" x 25-1/2" Block Finished Size: 12" Printing Options: Printer-Friendly Web Page or PDF Fabric Requirements: Dark: 1 yard Medium: 3/4 yard Light: 3/4
SINGER PROJECTS Sewing Machine Mat with Pockets PROJECT SKILL LEVEL:
 SINGER PROJECTS Sewing Machine Mat with Pockets This handy sewing machine mat with pockets not only helps protect your table surface, it keeps your go-to notions right at your fingertips. The four pockets
love koi plushies a sewing pattern by
 love koi plushies a sewing pattern by love koi plushies This project was both inspired by the Japanese pun where koi means both carp and love and the beautiful yin-yang moon-spirit carp from Avatar: The
A few notes about PDF patterns from Designs by Jude...
 A few notes about PDF patterns from Designs by Jude.... This PDF pattern requires legal size paper (8.5 x 14 ) or A4 size paper (8.27 x 11.69, 210mm x 297mm). It will not print on standard letter. Patterns
shiba cube puppy plush a sewing pattern by
 shiba cube puppy plush a sewing pattern by If you ve ever sewn a cube before, this pattern takes it to the next level! The classic geometric shape forms a chubby little puppy body complete with four stubby
A few notes about PDF patterns from Designs by Jude...
 A few notes about PDF patterns from Designs by Jude.... This PDF pattern requires legal size paper (8.5 x 14 ) or A4 size paper (8.27 x 11.69, 210mm x 297mm). It will not print on standard letter. Patterns
Frou Frou Bag Intermediate
 Frou Frou Bag Intermediate Sewn By Sara Lawson http://www.sewsweetness.com This bag features ruffled flaps, snap closure and an adjustable strap. The small front pockets are 3-dimensional. Beautiful detailing
Full details of the products you ll need including the colours of Decracraft Felt, can be found on the next page.
 PATTERN BY Our light yet sturdy drawstring bag features a combination of stunning colours from our Decracraft Felt range. Create your own drawstring bag using this pattern. Full details of the products
Women's Travel Toiletry Bag
 Traveling just got a little more organized with this handy toiletry bag, designed specifically for the ladies! Large inside pockets made of clear vinyl and mesh make it easy to find just what you need.
Serged Blanket, Bib, and Burp Cloth by Stephanie Struckmann at Totally Stitchin
 Serged Blanket, Bib, and Burp Cloth by Stephanie Struckmann at Totally Stitchin SUPPLIES: You can make these cute baby gifts in a jiffy with Baby Lock Sergers! Created by: Stephanie Struckmann, www.totallystitchin.net
A few notes about PDF patterns from Designs by Jude...
 A few notes about PDF patterns from Designs by Jude.... This PDF pattern requires legal size paper (8.5 x 14 ) or A4 size paper (8.27 x 11.69, 210mm x 297mm). It will not print on standard letter. Patterns
Royal Navy Doll DOLL. Body and head Make 2 pieces Cast on 14 sts in navy. Work 9 rows in st st beg with a K row. Next row: K.
 Royal Navy Doll You will need: 31 m (13 g) navy DK yarn 11 m (5 g) white DK yarn 6 m (3 g) royal blue DK yarn 13 m (6 g) skin tone DK yarn 6 m (3 g) dark grey DK yarn A small amount of mid-brown yarn A