Pin Cushion Instructions: Turtle, Zombie, Cupcake
|
|
|
- James Griffith
- 5 years ago
- Views:
Transcription
1 Pin Cushion Instructions: Turtle, Zombie, Cupcake
2 Turtle Instructions:
3 1.Cut out two turtle body pieces and one turtle shell piece. Use felt. x2 x1
4 2. Pin the two body pieces together. Use the blanket stitch (hand stitch) to sew the two body pieces together. Stitches should be about 1/8 to ¼ apart. Leave the head open. *Two inches before running out of thread, do a 2 nd blanket stitch on top of your last stitch and put the thread through the center of the felt, tie a knot inside the turtle, and cut off the thread. Begin where you left off with a new piece of thread. Start here!

5 3. Stuff the turtle with stuffing. *Sew on beads or buttons for the eyes or glue on wiggle eyes. 4. Blanket stitch the head closed.

6 5. Do a running stitch around the shell (a hand stitch that goes up and down). Every Stitch should be about ¼ apart. 6. Pull on the end of your thread to gather the shell up so it is 3-D. 7. Put stuffing under your shell and pin it to your turtle body

7 8. Blanket stitch the shell to the turtle. *Use a seam ripper to remove your running stitches.

8 9. You are finished!
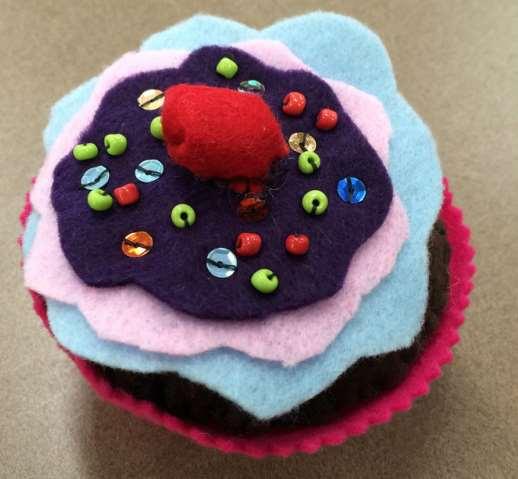
9 Cupcake Instructions:
10 1. Cut out all three pages of pattern pieces. *The cupcake side piece and top should be the same color of felt. *The wrapper should be a different color. *There are three layers of icing. They can all be the same color, but it is more fun if they are different colors. *The cherry is usually red.
11 2. Sew the cupcake side piece together with a blanket stitch (hand stitch). Overlap the side piece enough for the cupcake top to still fit. Sew at an angle through both layers. ***Do not sew from the back! Stitches should be about 1/8 to ¼ apart. *Two inches before running out of thread, do a 2 nd blanket stitch on top of your last stitch and put the thread through the center of the felt, tie a knot inside the cupcake, and cut off the thread. Begin where you left off with a new piece of thread.

12 3. Sew at an angle through the cupcake side and the cupcake bottom. Remember your cupcake will be 3-D. You are sewing around the circular bottom piece. ***Do not sew from the back!
.")
13 4. Lay the three frosting pattern pieces on top of the cupcake top piece. You will then sew sequins or beads (to represent sprinkles) through all four pattern piece layers. This will anchor all the pieces together. *If you are doing the cherry, leave a small hole in the center of your cupcake (don t sew beads or sequins there). *You may also use a small amount of tacky glue to hold all the layers together (especially if you do not want sprinkles on your cupcake). Front Back

14 5. Sew a running stitch around the outside of the cherry. (looks like a dash lined and goes up and down through the fabric). Pull tight on the thread and the cherry will pull up into a ball. Stuff the cherry and tie a knot in the end of the thread. Hand sew the cherry onto the center of the cupcake icing layers. Example of a running stitch. Do a running stitch around your cherry. Stuffed cherry hand sewed to the cupcake frosting layers.
15 6. Stuff your cupcake with stuffing & blanket stitch the cupcake top pieces (top, 3 frosting layers, and cherry) to the cupcake bottom and side pieces. Stitches should be about 1/8 apart.

16 6. Pictures continued: Minus the wrapper step *Cupcake sides and top blanket stitched together.


17 7. Use pinking shears to pink (the triangle/ruffled look) the outer edge of your cupcake wrapper pattern piece.
18 8. Wrap the cupcake wrapper piece around the outside of the cupcake. It should overlap slightly. * Make sure the pinked edge (triangle edge) is facing up. Blanket stitch the wrapper onto your cupcake at the sides and on the bottom. * Use thread to match the color of your cupcake wrapper. Now you are finished
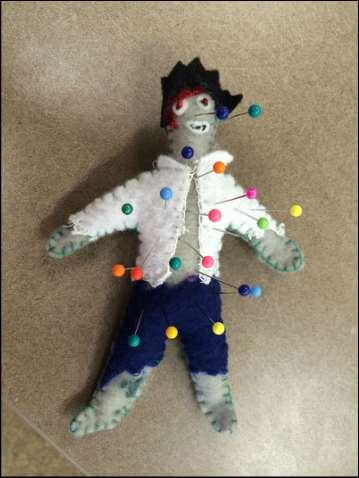
19 Zombie Instructions:
20 1. Cut out two zombie body pieces. Cut out one of every other pattern piece. *Optional: cut out wounds for the zombie Use felt. x2

21 2. Pin the two body pieces together. Use the blanket stitch (hand stitch) to sew the two body pieces together. Stitches should be about 1/8 to ¼ apart. Leave a small space under one arm open. *Two inches before running out of thread, do a 2 nd blanket stitch on top of your last stitch and put the thread through the center of the felt, tie a knot inside the zombie, and cut off the thread. Begin where you left off with a new piece of thread. Start here!

22 3. Stuff your zombie with stuffing. You will now blanket stitch the zombie clothes onto the front side of the zombie. *Stitches should be about 1/8 apart. Make sure your thread matches the color of your zombie clothes. *There will be two layers of blanket stitches on your zombie. When you sew the shirt onto the zombie, the small hole near the arm will be closed. *Also hand sew on the zombie hair. *Any wounds or eyes will be glued on with a small amount of tacky glue. The End!
Basic Sewing Portfolio. Name
 Basic Sewing Portfolio Name Back stitching Whip stitch Starting in the corner of a sample begin stitching diagonally. 3-4 stitches Hold up the back stitching lever and backstitch to the beginning. Release
Felt Gingerbread Boy & Girl Ornaments PDF Pattern
 Felt Gingerbread Boy & Girl Ornaments PDF Pattern So quick and easy! Make them both! Make LOTS of them! These look so cute on your wrapped packages! Sher Hastings Designs Page 1 Supplies to make one boy
Woodkirk Academy Summer Challenge Project Textiles Technology
 Woodkirk Academy Summer Challenge Project Textiles Technology Upcycling craft has become popular in society over the last few years. There are many different ways of recycling, upcycling and re-using old
Josephine Doll Pattern
 Josephine Doll Pattern Making these dolls means pulling out your scrap bin and button box and having a wonderful time pairing up patterns and prints. Each doll has felt hair and some have felt balls as
Owyhee County 4-H. Cloverbud. Activity Book
 Owyhee County 4-H Cloverbud Activity Book Name Age Year in 4-H 20 Club Name Member s Signature Parent/Guardian s Signature Leader s Signature Projects or activities I worked on this year were: I attended
How to Sew for starters
 How to Sew for starters An easy guide to sewing stitches This is an easy, step-by-step guide to how to sew some really useful stitches. When you ve practised the stitches you can have a go at the sewing
Waffle Floor Cushion
 Waffle Floor Cushion Finished Size: Approx 19.5 square (large) 16.5 square (medium) Requirements: Large Medium 21 square top fabric 18 square top fabric 21 square bottom fabric 18 square bottom fabric
A Stuffed Fabric Pumpkin - For Decorating Your Home Debbie Colgrove, Licensed to About.com
 A Stuffed Fabric Pumpkin - For Decorating Your Home Debbie Colgrove, Licensed to About.com Pumpkin Pillows with Artificial Vines to Decorate for Thanksgiving and Halloween This free pillow pattern creates
j e n n y l o v e s b e n n y B o u t i q u e B e a r s Sunday by Jenny Lee
 j e n n y l o v e s b e n n y B o u t i q u e B e a r s Sunday by Jenny Lee Please meet an old friend of mine...the original Sunday!! Sunday loves nothing better than to laz around and do absolutely NOTHING!!...hmmm
CAMELOT FABRICS. 3. Draw a vertical line on the pointed end of each Strap, a tiny bit longer than the diameter of your buttons.
 Other Supplies - 2 buttons in coordinating color - paper printer - basic sewing supplies - sewing machine with buttonhole foot - iron & pressing surface - scissors & fabric shears - measuring tape - fabric
Practicing Basic Machine Operation Sample #1
 Practicing Basic Machine Operation Sample #1 Listed below are various tasks required in basic sewing machine operation. Demonstrate your ability to perform each task by creating a sample. The samples that
Pajama Sock Monkey 2009 Cutest Creations
 Materials needed: Pajama Sock Monkey 2009 Cutest Creations 1 pair of size Large Brown Red-Heel socks can be purchased from my online store www.ohboyorgirl.com Black embroidery thread Other color embroidery
Vintage Style Teddy Bear Pattern
 9 by 12 wool or wool blend felt contrasting color wool felt (or blend) for paw pads and nose 6 mm safety eyes needle and thread doll making needle embroidery thread 100% mohair wool cotton fleece teddy
Fabergé Bunny. Skill level 2. Courtesy of Cranston Fabircs. Supplies: Directions:
 Skill level 2 Fabergé Bunny Courtesy of Cranston Fabircs Supplies: 3/4 yd. V.I.P. by Cranston Egg Print, for rabbit 1/4 yd. V.I.P. by Cranston Turquoise Crackle, for inner ears 1/4 yd. V.I.P. by Cranston
Beautiful Bouquet. Designed by Heidi Pridemore. Page All Rights Reserved The Whimsical Workshop
 O - 3/5/12 Designed by Heidi Pridemore #FR-032 Fabric Requirements: 1/3 yard of Green- for all 1/3 yard of Yellow- Daisy 1/3 yard of Orange- Daisy 1/4 yard of Pink- Poppy 1/4 yard of Yellow Print- Poppy
Written By: Sherri Haab
 Macramé 101 Written By: Sherri Haab PARTS: Cotton yarn (1) 4-ply worsted weight. Corrugated cardboard (1) Binder clip (1) Wooden beads (1) Hem sealant (1) or fabric glue. Needle (1) Thread (1) Button (1)
Dog With Fleas Play Set Crochet Pattern
 Dog With Fleas Play Set Crochet Pattern By: Donna Collinsworth Of Donna s Crochet Designs All rights are held by the author. No one can reproduce in any manner without written permission from the author
Beaded Clutch. Other Supplies 7 zipper
 Beaded Clutch Other Supplies 7 zipper Preparation 1. Print out the templates found on the last three pages of this tutorial at 100% of actual size and trace them onto folded double layers of your fabric
Sewing Instructions for Vest 9302 Sizes 34,36,38, 40,42. Length in Back: About 40 cm (about inches)
") Sewing Instructions for Vest 9302 Sizes 34,36,38, 40,42 Length in Back: About 40 cm (about 15.74 inches) Fabric needed Glencheck, 150 cm (about 59 inches) wide, 0.60 meters (about 23.62 inches) long for
Sewing Instructions for Vest 9302 Sizes 34,36,38, 40,42 Length in Back: About 40 cm (about 15.74 inches) Fabric needed Glencheck, 150 cm (about 59 inches) wide, 0.60 meters (about 23.62 inches) long for
Ornament Finishing Techniques
 Ornament Finishing Techniques by Anne Gale The back of the ornament should enhance, not detract from the quality of the finished ornament. There are many ways to finish ornaments depending on type, shape
Yardage and Cutting Directions. Making the Blades
 Yardage and Cutting Directions Amount Placement First Strip Cut Sub Cut 4 fabrics at least 3 by 7 each Dresden Blades Cut 1 strip of each fabric 3" wide Use Blade Template or fast2cut ruler (mini blade)
Level: Intermediate Beginner
 Some Bunny Loves You! Designed by Day Dreams 2012 (This is the pattern for the bunny above and depicted on Crochet 4 the Masses. See changes marked Options to make this for the Awareness Bunny) Level:
Printing Instructions: This file is formatted to print on 8.5 x11 Letter paper. If printed on other paper, the scale may be off.
 Anatomy Doll Pattern by Cat Carlisle 1 Printing Instructions: This file is formatted to print on 8.5 x11 Letter paper. If printed on other paper, the scale may be off. 1. Open the PDF file using Acrobat
Sew from bottom to top making sure you have not sewn over the cord. ( you may need to hand stitch the very top of the skirt just to be careful)
") Instructions for making a new dress for Cinderella. What you will need. 1/2 yard fabric for 4 panels of the dress, shirt and sleeves. 1/4 yard fabric for the complimenting color front panel 1/2 yard of
Instructions for making a new dress for Cinderella. What you will need. 1/2 yard fabric for 4 panels of the dress, shirt and sleeves. 1/4 yard fabric for the complimenting color front panel 1/2 yard of
Finished Fabric Pinwheel being guarded by Jean Luc. Materials needed: Matching Thread. Sewing machine
 Puppy Pinwheel Toy www.lagniappepeddler.com Description: This pattern was designed for a fabric toy shaped like a pinwheel that can be sewn utilizing 1/4 yard remnants. The toy would be excellent for any
A Button Owl Sewing Pattern.
 A Button Owl Sewing Pattern HELLO! Are you ready to start sewing? At the end of this fun project, you will not only have a cute BUTTON OWL, you will also be able to tell your friends that you know how
Let s get started! You will need the following to create your Felt Milkshake:
 Wool felt will wear better and last longer. If you re creating something that you d like to pass down from child to child, wool felt is best. If you plan to use wool felt, you may want to first practice
PILOT SEAT AND HARNESS
 1. Locate the following parts PILOT SEAT AND HARNESS #84 threading needle, 1 each #88 lacing cord, 1 each #119 aluminum seat, 1 each #120 plywood, pilot seat bottom, 1 each #121 wood screw, 3 each #293
2018 Doll Tag Clothing Simply a Skirt 1
 2018 Doll Tag Clothing Simply a Skirt 1 GETTING STARTED 2018 Doll Tag Clothing Simply a Skirt 2 Doll Model Size The models I used to fit this pattern is: 14.5 inch WellieWishers doll 14 Inch Hearts for
1. Print our the Fox Hat pattern (pages 8-11 of this tutorial) at 100% of actual size. Cut out the
 at 100% of actual size. Cut out the") Other Supplies - 2 black buttons (for eyes) - One bag of fiber stuffing - Paper printer - Basic sewing supplies: - sewing machine - needle & coordinating thread - straight pins - scissors & fabric shears
Other Supplies - 2 black buttons (for eyes) - One bag of fiber stuffing - Paper printer - Basic sewing supplies: - sewing machine - needle & coordinating thread - straight pins - scissors & fabric shears
AMY S GURUMIS MANUAL TABLE OF CONTENTS. Yarn Weight and Hook Size. Tips and Tricks p. 3. Magic Loop p.5. Attaching Limbs p. 7. Puppets p.
 AMY S GURUMIS MANUAL version 1 December 2015 amysgurmis Everything you need to know to assemble your own delightful amigurumis! This manual does not include instructions on how to crochet. If that s what
TEDDY FUNKY FRIENDS FACT. Finished Toy Size: 33cm/13inches
 FUNY FRINDS FACT RY TDDY An original design created by Pauline McArthyr 2005 Finished Toy Size: 33cm/13inches Honey is one of the simplest and cutest teddy patterns around. With her slightly knocked knees
Knit Hedgehog Pattern A pattern by Amy Gaines
 Knit Hedgehog Pattern A pattern by Amy Gaines Measurements: 6 inches tall Materials: Worsted Weight yarn: Light Brown, Dark Brown, Red and White. Polyfil for stuffing the body Pair of size 4 (U.S.) knitting
Crochet Pattern Peppa Pig Design by K. Godinez
 1 Crochet Pattern Peppa Pig Design by K. Godinez 2 Material: crochet hook size 2.5 Mouzakis Butterfly Super 10, ply, with the colors red, black, pink, white optional: a small amount of white fuzzy yarn
Pot Belly Babies. Troll Set. Pattern set includes patterns for troll, bib and mopsie.
 Pot Belly Babies Troll Set Pattern set includes patterns for troll, bib and mopsie. When crocheted with yarns and hook sizes specified, troll measures 16 inches standing height, 17 inches around belly;
Burlap Pincushion Dolls #12556 / 4 Files / 2 Dolls
 #12556 / 4 Files / 2 Dolls Note: Some designs in this collection may have been created using unique special stitches and/or techniques. To preserve design integrity when rescaling or rotating designs in
15 Sided Biscornu Finishing
 15 Sided Biscornu Finishing By Kathrin Ellison To begin, you will need 15 designs each positioned within their own backstitched square. These squares must all be the same stitch count and all stitched
By Laurie Pessetto. Create your pattern. The decorative fabric will be on the edges of the circle layers.
 By Laurie Pessetto Create an elegant, soft, travel pouch to protect jewelry from damage and keep it organized even when your suitcase gets tossed into a plane or trunk! Skill Level Good sewing skills,
Designs in Machine Embroidery Volume 64 September/October 2010
 2 Overnight Suitcase Gift Set By Rehbecca Lowder Embroidery Products Star Studded Applique Alphabet Set by Planet Applique at www.planetapplique.com Materials Papier-mâché suitcase or box Onesie Baby socks
1. Fuse different fabric to each side of a 6 round. 2. Cut into a 5 circle (or use the pattern on. page 28).
.") Circle Bell Two for the time of one! This sweet little bell will charm everyone especially if you really hang a small jingle bell inside. You ll Need 1 piece each of 2 different fabrics and 1 piece of
Circle Bell Two for the time of one! This sweet little bell will charm everyone especially if you really hang a small jingle bell inside. You ll Need 1 piece each of 2 different fabrics and 1 piece of
dragon & unicorn hooded cowl a free sewing pattern by
 dragon & unicorn hooded cowl a free sewing pattern by 2 hooded cowl When you re ready to break out a scarf or hat for chilly weather, try putting on this cozy cowl! It s a hood and scarf in one with cute
Name: Class: Monster Doll. Grading Rubric
 Name: Class: Monster Doll Grading Rubric Grade yourself on the skills listed below. (0 being the lowest, and 5 being the highest.) Once you have graded yourself in each area, pin your grading sheet to
This is an original pattern not intended for sale.
 These fabric flowers make perfect use of your mini charm packs, and are suited to so many uses! So simple and sweet, these quick hand-sewing projects will have you wearing your favourite fabric as gorgeous
Top Down Teddy Bear By Diane Dunwoodie
 Top Down Teddy Bear By Diane Dunwoodie I used Judy s Magic cast on to begin but you can do whatever works for you such as four double pointed needles. Any yarn can be used your bear will just be a slightly
J.M.J. Baby s First Rosary. Tag Blanket. Instructions & materials. 3 sheets felt (2 colors for your letters, one fun pattern for the heart pieces)
") J.M.J. Baby s First Rosary Tag Blanket Instructions & materials You will need: ½ yard Minky (or other soft blanket fabric) 3 sheets felt (2 colors for your letters, one fun pattern for the heart pieces)
J.M.J. Baby s First Rosary Tag Blanket Instructions & materials You will need: ½ yard Minky (or other soft blanket fabric) 3 sheets felt (2 colors for your letters, one fun pattern for the heart pieces)
Basic Peg Doll Tutorial
 Basic Peg Doll Tutorial from by Kelli Ann Wilson - 1 - Step 1: Get all of your materials in order. For this activity you will need wooden peg dolls that are 3 tall and 0.75 1 in diameter at the base. I
1. Locate the pattern on the
 Here s a fine feathered friend who s as charming as he is wise. Find the perfect perch for him so you can display his plumage in all its glory. Size approximately 6 x 6 x 6 inches Materials ~ Pattern (see
Krista Cupcake. Bit of Whimsy Dolls - Krista Cupcake. Fair use of this epattern is subject to the following terms and conditions:
 Krista Cupcake Background on Krista Cupcake Krista began her journey two years ago when I made a little cupcake doll for Valentine s Day. I decided not to make a pattern and leave the doll as a one of
3D Snowman A B C D. Jennifer Williams 2009
 Snowman Jennifer Williams 2009 Requirements:- white, black, red and brown size 20 cotton, 0 black beads size 9 or, 2 orange bugle beads, matching orange size 9/ bead, lollypop stick picot gauge and a inch
Kitschy Friend. Finished Size Approximately 23½in (60cm) tall
 tall") 1 Kitschy Friend This fun lady will always raise a smile, especially if you give her as a gift to your friends. We chose certain fabrics, with details given in the instructions, but you can easily replace
1 Kitschy Friend This fun lady will always raise a smile, especially if you give her as a gift to your friends. We chose certain fabrics, with details given in the instructions, but you can easily replace
Cut squares as indicated:
 Quilt by Deb Mosa Finished Quilt Approximately: 52" x 52" - Finished Block Size: 9" x 9" Cupcake Cuties fabrics by Exclusively Quilters - Style #3893 Fabric Requirements: Based on 44" wide fabric 7/8 yard
Like to make the most of everything? Experiment with our challenge to create something special from a specific set of materials.
 Like to make the most of everything? Experiment with our challenge to create something special from a specific set of materials. + = 4 fat q uarters 1 fat quarter 2 1 Fabrics are from the Pumpkin Patch
"Fiskars Unzipped" Shoulder Bag
 "Fiskars Unzipped" Shoulder Bag By: Adrienne Hendrix http://www.burdastyle.com/techniques/fiskars-unzipped-shoulder-b I have been making purses for a while now and have been pretty successful in selling
FUNKY FRIENDS FACTORY
 FUNKY FRINDS FACTORY the ASY Teddy An original design created by Pauline McArthur 2005 Hi there! Welcome to the Funky Friends Factory. Soft Toys you ll love to make! Finished Toy Size: 33cm/13inches is
Material: 1 ½ balls of blue DK yarn (8 ply/ 22 sts=4 inches) 1 ball of white DK yarn Needles: 3.25mm (Imp. 10 / US 3) Oddments of black and red yarn
 1 ball of white DK yarn Needles: 3.25mm (Imp. 10 / US 3) Oddments of black and red yarn") Material: 1 ½ balls of blue DK yarn (8 ply/ 22 sts=4 inches) 1 ball of white DK yarn Needles: 3.25mm (Imp. 10 / US 3) Oddments of black and red yarn for the mouth 1 Tapestry needle White and black felt
Material: 1 ½ balls of blue DK yarn (8 ply/ 22 sts=4 inches) 1 ball of white DK yarn Needles: 3.25mm (Imp. 10 / US 3) Oddments of black and red yarn for the mouth 1 Tapestry needle White and black felt
shaver to get rid of pills. If the item doesn t contain a pipe cleaner or glue, you could even run it through the washing machine.
 shaver to get rid of pills. If the item doesn t contain a pipe cleaner or glue, you could even run it through the washing machine. Wool felt will wear better and last longer. If you re creating something
Medical Play Doll Hospital Gown
 Medical Play Doll Hospital Gown Open Shoulder open shoulder gowns allow IV s to be placed in the arm of the doll. This gown is made primarily with the use of a serger. Please note: use white thread only
Materials required: Sixteen 5 charm squares
 Materials required: Sixteen 5 charm squares 5 X10 scrap of cotton fabric or two 5 squares (These will be completely covered so use whatever scraps you have. I used scraps of thrifted cotton sheets.) Polyester
Original Recipe. Cell Phone / Gadget Purse by Nicole Willmore. Ingredients: Original Recipe can be found at
 Original Recipe Cell Phone / Gadget Purse by Nicole Willmore Ingredients: 1 Mill House Inn Honey Bun by Fig Tree Quilts 1/3 yard of Coordinating fabric (bottom of bag, handles) 1/4 yard of Coordinating
Dollytime. Tiny Topsy the tooth fairy. who are new to the craft. She measures 12cm (5 in) and is a topsy turvy or upside and added lots of pictures.
 and is a topsy turvy or upside and added lots of pictures.") Dollytime Tiny Topsy the tooth fairy As I d like to encourage e more people to knit I ve designed Tiny Topsy for knitters who are new to the craft. She measures 12cm (5 in) and is a topsy turvy or upside
Dollytime Tiny Topsy the tooth fairy As I d like to encourage e more people to knit I ve designed Tiny Topsy for knitters who are new to the craft. She measures 12cm (5 in) and is a topsy turvy or upside
MOMO THE BABY MONKEY. Crochet Amigurumi Pattern by MJ Carlos
 MOMO THE BABY MONKEY Crochet Amigurumi Pattern by MJ Carlos Page 1 of 7 MATERIALS REQUIRED 4.5mm crochet hook (US 7 / UK 7) 1 x 8 ply yarn ball (US Light Worsted / UK DK) in Brown Colour A 1 x 8 ply yarn
Sasha Sundress, Knickers, Bolero & Flip-flops
 Sasha Sundress, Knickers, Bolero & Flip-flops Materials: 0.5 metre Cotton Fabric 0.25 metre fabric for lining Bolero 0.5 metre 1/4 wide elastic for Waist and legs 2 Snap Fasteners Small Beads or Sequins
Cut first cork in half in the middle (the two pieces will serve for two horses). Cut 2 corks in half lengthwise for the four legs.
. Cut 2 corks in half lengthwise for the four legs.") Christmas Cork Horse Supplies: 3 1/2 corks. 4 x 4 piece red bandanna material for bandanna (cut in half diagonally makes two bandannas). White/Black yarn for mane & tail. Two black push pins for eyes.
Christmas Cork Horse Supplies: 3 1/2 corks. 4 x 4 piece red bandanna material for bandanna (cut in half diagonally makes two bandannas). White/Black yarn for mane & tail. Two black push pins for eyes.
Planner / Journal Tutorial
 Planner / Journal Tutorial Sewing your own planners and journals is so much fun! You get to choose every part of the design, and your new book will delight you every time you open it. This method quickly
THE PLUM PUDDING BIRD Tree Ornament
 Tree Ornament This is a free pattern provided by Me & My Red Boots The Red Boot Quilt Company 2015 NOT FOR RESALE The Red Boot Quilt Company www.theredbootquiltcompany.com Approx. Size 3in x 3 1/2in BEFORE
Fryer's Trebuchet Paper Kits
 Fryer's Trebuchet Paper Kits Things you will need 7 sheets of card approx. 0.3 mm or 0.01 inches thick 1 sheet of paper to print out to download. 2 x 6-7 mm dowel or pencils 1 paper clip String 6 cms (2.5
Bunny Bag. by Jen Frost
 by Jen Frost Project Overview Note: 1/4 yard of fabric will make multiple bunny bags; however, instructions are written (for simplicity) to make just one bag. Supplies: 4 fat quarters in Easter prints
TEDDY FUNKY FRIENDS FACT. Finished Toy Size: 33cm/13inches
 FUNY FRINDS FACT RY TDDY An original design created by Pauline McArthyr 2005 Finished Toy Size: 33cm/13inches Honey is one of the simplest and cutest teddy patterns around. With her slightly knocked knees
Enjoy creating the Bird Pin Cushion/Sachet created by Joel Dewberry!
 Thank you for watching Season 3, Episode 1 of "The DIY Dish." We appreciate this week's sponsor, Janome, for making it possible. Visit http://www.janome.com to find their entire line of sewing and embroidery
Beauty Bloom Tutorial/ with compliments from: MakeHairBowsNow.com
 MakeHairBowsNow.com/Home of the Premier HairBow/ Accessory Making Master Course Over 88bows Page 1 Beauty Bloom MakeHairBowsNow.com/Home of the Premier HairBow/ Accessory Making Master Course Over 88bows
Maritime Knots. Materials: Directions: Red jute twine Scissors
 Maritime Knots Red jute twine 1. Measure twine to gift box size (with a little extra). 2. Cut 6 equal lengths. 3. Separate into two sets of 3 strands. 4. Form each into a loop. 5. Arrange side-by-side.
Chatelaine. Read on for project instructions to create a beautiful and useful chatelaine! Chatelaine
 Chatelaine Chatelaines have a long history, dating back to the 18th century. A chatelaine is a decorative belt hook or clasp worn at the waist with a series of chains (or cords, in this project) suspended
Leather Clutch Bag Pattern Pieces & Method. I used 3 sheets of A4 paper as shown below the flap and front/back piece are folded in half.
 Leather Clutch Bag Pattern Pieces & Method I used 3 sheets of A4 paper as shown below the flap and front/back piece are folded in half. The base and sides: We will be cutting 2 side pieces out. The front
Tumbles Bear. Crochet With Style Crochet Pattern
 Tumbles Bear Crochet With Style Crochet Pattern Step-by-step instructions Lots of photos & tips to help you make your very own Tumbles Bear. Designed by Toni Marie. Crochet with Style #3 Free Crochet Pattern
Basic Bearmaking Instructions
 Laying out the Pattern Basic Bearmaking Instructions We recommend that you read the instructions right through before commencing. This will help you to understand the steps you need to take. Copying your
Country Commandments Stitchery
 Country Commandments Stitchery Notes 1. Read pattern through before starting. 2. Sewing Terms: RST-right sides together RSO right side(s) out 3. Thank you for purchasing my pattern! You may sell the finished
Clothing Construction I Samples Packet
 Clothing Construction I Samples Packet Name Objectives: 1. To identify how to use and care for the sewing machine and tools. (#1 & #2) 2. Demonstrate how to use a variety of stitches and presser feet.
raven plushies by rose hughes
 raven plushies by rose hughes overall materials: Fun fabrics for the body fat quarter Beak 5 X 7 scrap of fabric or wool (fabric should be fused for stability before cutting to shape) Fabric for wings
shiba cube puppy plush a sewing pattern by
 shiba cube puppy plush a sewing pattern by If you ve ever sewn a cube before, this pattern takes it to the next level! The classic geometric shape forms a chubby little puppy body complete with four stubby
Huggy Bear Body Pattern. by Dianna Effner
 Huggy Bear Body Pattern October 15, 2015 by Dianna Effner (660) 849-2114 fax (660) 849-2358 Original Designs for the Doll Industry, Inc PO Box 174 Jamestown, MO 65046 www.expressionsdolls.com Supplies
Sewing Organiser Pattern
 Sewing Organiser Pattern Requirements: 1m Outer Fabric 1m Lining Fabric 1m Cobweb fusible web (or similar) 1m Bag Batting 1m Parlon 4 x 30cm Open ended Zip Optional extras Fat Quarter of Clear Vinyl for
Star Stuffies Thread Riding Hood, 2013
 Star Stuffies This pdf contains point form notes on construction + s for all 7 Star Stuffies. Please use your sewing knowledge and normal sewing practices to interpret the instructions. These are by no
Design, Build and Upholster a Custom Chair
 Rowley How-To Guide Design, Build and Upholster a Custom Chair Sometimes the perfect furniture piece to complete a room may not exist. In this case, why not design, build and upholster to your own specifications,
Thread Catcher Patern. withdetachable Pincushion and OptionalPosy
 Thread Catcher Patern withdetachable Pincushion and OptionalPosy andscisorstab Sew In Style Thr hread Catcher with Detachable Pincushion and Optional Posy and Scissors Tab Materials and Supplies Outside
Pink Butterflies - Kit by Radda Pty Ltd 2005 Radda Pty Ltd
 Pink Butterflies - Kit by Radda Pty Ltd 2005 Radda Pty Ltd This kit was designed and created on StitchCraft software http://www.stitchcraft.info INSTRUCTIONS FOR CROSS STITCH 1. Always begin stitching
Easy way to needle sculpt dolls head
 Easy way to needle sculpt dolls head Crocheted head is done and stuffed firmly. Use pins as seen on the photo to help you follow the stitches when sculpting later. Yellow pin is where nose will be sewed.
To receive a service letter, please scan the Volunteer Log and it to:
 Thank you for your interest in helping the animals at San Diego Humane Society! We would not be able to provide the level of care and commitment to our animals without the help of people like you. This
Wren Feathers. Waldorf doll for your dolls
 Wren Feathers Waldorf doll for your 16-18 dolls As always this pattern is by me (Jennie Bagrowski) and is for your personal use only, you MAY share it by linking to this blog, you may NOT sell it. If you
Easter Bunnies. Finished Size Approximately 11½in (29cm) tall. Fig A
 tall. Fig A") 1 Easter Bunnies These sweet bunnies make cute gifts at any time of year. We chose certain fabrics, with details given in the instructions, but you can easily replace these fabrics with others from the
1 Easter Bunnies These sweet bunnies make cute gifts at any time of year. We chose certain fabrics, with details given in the instructions, but you can easily replace these fabrics with others from the
Santa's Toy Sack. Project Needs & Notes
 Santa's Toy Sack Watch eyes light up on Christmas morning when your little ones walk in to a sack full of Santa's gifts! This jumbo-sized drawstring bag is the perfect way to add a little festivity to
Doll Tag Clothing Simply a Skirt Pattern 1
 Doll Tag Clothing Simply a Skirt Pattern 1 GETTING STARTED Doll Tag Clothing Simply a Skirt Pattern 2 Doll Model Size The model I use to fit my patterns is an American Girl Doll, Julie, and she has a fuller
Solsta Olarp Revamp. You will need: By Fawna Sidoryk Solsta Olarp chair from Ikea
 Solsta Olarp Revamp By Fawna Sidoryk - www.mommamyway.wordpress.com You will need: 1 Solsta Olarp chair from Ikea http://www.ikea.com/ca/en/search/?query=solsta+olarp+armchair+white 4 yards of desired
Materials: Abbreviations (US Terms):
:") Bedtime Lilly Feel free to sell Your finished items. Mass production is - of course - not permitted. Do not copy, alter, share, publish or sell pattern, pictures or images. Copies be made for owner s personal
Bedtime Lilly Feel free to sell Your finished items. Mass production is - of course - not permitted. Do not copy, alter, share, publish or sell pattern, pictures or images. Copies be made for owner s personal
Rag Quilt Stamper s Tote Designed By: Carrie Rhoades January 2012
 Rag Quilt Stamper s Tote Designed By: Carrie Rhoades January 2012 The Rag Quilt Stamper s Tote is the perfect accessory for any crafter. It will organize your essentials and it is so cute!!! Load it up
Animals on the Edge Hats
 Animals on the Edge Hats Animals on the Edge designs are cuter than ever, smiling from a fleece hat! Choose your little one's favorite critter and create a hat sure to keep them cozy and warm this winter.
jarswe are all familiar with the concept of recycling
 Gifts in jarswe are all familiar with the concept of recycling glass bottles and jars but for thrifty crafters there is also the possibility of upcycling turning plain unwanted items into something beautiful
a free sewing pattern by
 a free sewing pattern by 2 witch kitty plush Ready your broom and cape! This adorable little kitty is all decked out for Halloween. The pattern comes with loads of cute details, including a capelet with
5. Cut a piece of cream ribbon long enough to wrap around the entire box 4 times.
 Vintage Wedding A timeless elegance is created with the classic style of antique wedding gowns. This look was created using floral craft paper, ribbon and flowers, all with the same cream tone. 1 Small
Design by K. Godinez
 1 Crochet Pattern Bling Bling Dolls Wicked Witch of the West Design by K. Godinez 2 Material: crochet hook size 2.5 Catania wool from Schachenmayr in the colors black, green and brown fiberfill 2 Safety
Let s get started! You will need the following to create your Felt Steak:
 Wool felt will wear better and last longer. If you re creating something that you d like to pass down from child to child, wool felt is best. If you plan to use wool felt, you may want to first practice