The Reading Tug Schuylkill By: Barry Hensel
|
|
|
- August Blake
- 6 years ago
- Views:
Transcription


1 The Reading Tug Schuylkill By: Barry Hensel My Reading Lines Central Division layout has needed a tug boat for the Port Richmond coal dock scene for some time. I finally found a Walthers Tug kit for a reasonable price at a local train show. And that has started this journey and clinic. I am not trying to model a Reading Tug precisely, but make this model enough of a Reading Tug to be recognized as a Reading Tug. Here is the kit which is the starting point. The Reading Railroad had a tug fleet of 6 tugs in two different classes. This kit closely matches the first class, of which the Schuylkill is also a class 1 Reading Tug.
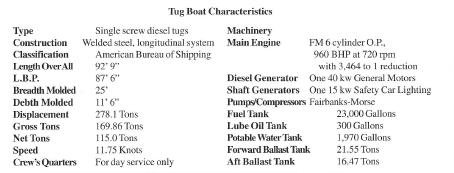


2 Some specifications of the Schuylkill, a class 1 Reading Tug.

3

4


5 Here are two pictures of the different classes Note the differences in the upper deck and pilot house areas. Class 1 top photo is very much like the model with a pilot house in the front only. Class 2 bottom photo has an extended pilot house with stairs on both sides to a side door. I m also taking a bit of modelers/layout owner license, as the Schuylkill tug did not operate in the Port Richmond area, but it will be stationed there on my layout. Now that some basic research has been done (Thanks to the members of the Reading Modeler web-forum!) we can get started with the build.


6 Here s some of the basic kit components these are the hull parts, which is built first. The right side of the hull gets glued to the bottom after some supports are glued in. The bottom edge between the hull and bottom does not have tabs so be careful when aligning these parts. I used some ACC to hold them together more quickly.

7 One would think you glue the left hull to this assembly NO!! the deck must now be glued to the right side and bottom. This is because the hull sides are wrapped over the decking and you would never get the deck installed if the hull was glued together. BE VERY careful lining up the deck with the hull side!! (don t ask me how I know ) The deck is curved so some weights were added to help hold it down while the glue dried. My mistake was not being careful when aligning the desk and it was too far forward See how I did not get the front lined-up properly!

 it would help hide my mistake.")


8 One possible solution would have been to trim the deck to a new point to match the right side hull piece. But I figured that tug boats would not need a sharp hull point, plus when you add the fender (the large mass at the front of a tug that it uses to push with) it would help hide my mistake. I proceeded to fill the gap with some strip styrene and putty - Gluing the left side hull on I again used ACC to tack it in place, as you have to line it up and there are no good tabs to do that. Now when you try to glue the left side hull on, you end up with a gap at the front - Again, it doesn t look too bad and most will be covered anyway. It was my mistake, just didn't take the extra minute to be sure it was lined-up correctly. It looks OK at the rear, but you have to double check the front... as I found out!

9 I then turned to the lower cabin construction. I decided to deviate from the instructions and build the lower cabin onto the upper deck instead of gluing everything to the lower deck. I believe this will help with painting later on. Looking at many pictures I noticed that the lower cabin is not rounded like the kit, but more square. I cut some off of the upper deck and squared the corners with a file to get a good straight cut I measured from a feature, drew a line and cut with an xacto knife.

10 Next, also realized through photos, the Reading Tugs did not have the inside stairways to the upper deck as on the model. Thus the holes in the deck were filled and the stairs not installed, but I did install the walls. To help in a bit less trimming, I installed the two side walls on the opposite sides, so the stairway support would be on the inside. Thus the wall showing through the open doors will be flat.


11 Back to the cabin sides, glued them in place and again, used weights to hold them together because the walls are curved to match the main deck. Had to modify the front wall remember, the kit is quite curved and we ve flattened the deck contour to be more straight. I took the wall and blasted it with a hair dryer on HOT and pushed down on the wall piece to try to flatten it. This worked fairly well and the wall was flatter but still had a bit of curve. Next, since we flattened the wall it grew in length, so it had to be trimmed to match the side wall opening. I trimmed about 1/8 or so, trial and error is best here. Below you can see the wall glued on and the pieces I trimmed off. You can also see the squared off deck here too.


12 With the lower cabin basics completed, we return to the main deck and modify the ribbing, which was curved to match the stock walls, so we trim them short so the modified wall fits. Then also on the upper deck, trim off some of the stack ribbing.

13 Using plain styrene I fashioned the upper deck extension. I drilled holes for the port-holes, but did not do the best job I could... It will due.

14 Adding a piece of stairway to the front and placing the pieces together to get a preview of the tug! I had also built the stack and used a roof vent from my scrap box to make the stack top vent. I filed it to shape as best as possible looking at photos for guidance. Because of the paint scheme, I have not glued many of these pieces together yet.

15 Here s my attempt to do the hand rails, per kit instructions. They are supposed to simply bend in place right!! I also tried a hair dryer and melted a few spots. Not happy, I stripped these off of the model and sought out some Central Valley railings.


16 Using a pot of hot water, it was easy to bend the railings to near perfect size! In the upper right photo is one railing that has been bent, the other waiting to be bent. Then I bent one railing piece for the entire back. This left a gap on each side which was filled with extra railing pieces. Here s the railings completed. And I added the stairway railings.

17 The BIG questions is... Do I modify the railings to be like the prototype? The Central Valley railings are in thirds, as opposed to the real railings that are in half s. So do I cut out the middle railings? The overall height of the railings is correct, as seen in the pictures. Not sure at this time which way I ll go cut or leave as is...

18 Starting on the pilot house. The rear wall needs modifications. Again referring to pictures, there are four windows, not the two that are in the model. I cut out the wall window space and glued strips in place to create the four windows. Then I glued the walls to the roof.

19 The mast on the rear of the upper deck is different than the kit. A base was made from styrene. The mast will be glued to the new base support and then to the upper deck. Added more details to the roof of the pilot house per the kit instructions and referring to photos. I trimmed back the widow awnings to match the photos. Railings will be added soon.

20 Here s the pilot house with the railing attached. Noting in the ref pictures that the railing has only one cross bar. Thus I cut off the top and bottom bars to get the result on the right. Noticing that the tall pilot house is see-through! Time to build a floor and some interior details.


21 Here s the pilot house interior... based on the floor plan shown on slide 4. A control stand with wheel, Capt. seat, benches or cabinets and a desk. I also added a dresser that I m calling a cabinet of some sort. The cut-out in the corner will be for a ladder access. Primed the whole thing and then did a little detail painting. BTW the Capt. seat is a seat from a coach interior, just cut apart. Yes... The wheel is a brake wheel...! The notch on the rounded part is to clear a protrusion on the pilot house inside. Here s the interior, all painted and with the Capt. at the helm.

22 Most everything is now built... Time for primer!! Did the application from a standard spray can, outdoors and let dry for a few days.

23 After a week of letting the primer dry (and no time to get back to this) I finally got everything painted! I had a couple of bottles of PolyScale Reading Green perfect! Here s everything done and drying.


24 For the life boat, I noticed that the Schuylkill did not have the standard boat like in the kit. Instead, it had a more oval life raft, located on the rear upper deck. I was temped to use the lit boat, but decided to stay true to the real thing. Taking some styrene strips, glued together and then shaped it on a bench grinder. Used alum foil to make the cover and pained it all white and mounted it on a few strips.


25 While not the best putty job, it did the trick and now the rear of the hull is flat. Some side details, like tires and rope, will help hide the roughness. Had another opps moment as I was painting the white stripe on the hull, there was a bump molded in, while the Reading Tugs were flat. Thus I puttied the rear to smooth it out.


26 Started to install the top railing to the main hull, which is held on my several pilings posts. But, noticed they were too tight to fit and not positive if it was the paint. I took a 7/64 drill and cleaned out the holes in the hull and the railing. Now everything fit much better. I glued from the front and moved toward the rear.


27 OH.. Another OOPS! The rear of the top rail is short! This could be due to that error I had at the start. No matter, need to fix it. I cut the railing and glued it on, then filled the gaps with styrene. When painted, almost invisible.


28 Detail painting didn t take as long as I expected and went well. I was able to achieve the red trim on all the windows, using a micro-brush! Here we can see the main cabin, pilot house and top deck painted, with windows and the pilot house interior. In the portholes, I used the kit s window parts as they fit into the holes and appear flush. For the pilot house, I cut sheet acetate and it curved right into place.


29 I decided (with some advice from others) that the main deck would have been a marine gray color, so after two coats of paint, it s time for some dull coat. On the upper deck, main cabin and pilot house, I applied gloss coat, as I expect that these tugs were maintained very well and would be a bit shinier, longer.


30 SCHUYLKILL Here are the decals I made for the lettering and stack logo. These were printed on standard paper and glued on with Elmers. The text is Bookman Old Style in bold in a dark green and a gold. Text size 12 pt. The gold goes on the pilot house sides, the green on the hull sides. The name for the end of the hull was done in word-art to a curve with the same format/color as the gold lettering. Text size is 14 pt and I added a space between each letter. The Reading logo was taken from the internet and simply sized to be approx. 1 across. I tried some locomotive decals, but they were too old and broke apart.

 I glued the")


31 After installing a fire line on the starboard side (right) I glued the pilot house and top deck to the main cabin, finishing half of the tug. Also added the rigging and flag!


32 Time to detail the hull tires on the side, some extra rope, crates, barrels and crew on deck. Also the large fender, the large mass on the front of the tug for pushing other ships. More on that in a second...


33 Here is the fender! Made of craft twine/string, my wife crocheted several strings of the twine. I cut them in sections approx. 4 inches in length and then folded them. I took a long length of string and folded it several times to a total length of 4. I coated that with Elmers glue to bind it together. After it had dried for awhile, I strung the length through the crocheted pieces, forming the basic mass. I did a second string as well. I then coated the entire mass with Elmers glue and water, to bind it all together. After it had dried for awhile, I mounted it on the hull. Notice it hides that first mistake I made in construction!


34 OK... We re done!! Here s some pictures of the finished tug SCHUYLKILL!


35


36 Here s a couple of views of the Reading tug Schuylkill in action on the Reading Lines Central Division
Hotel Belvedere Instructions for Assembly of the HO scale kit. v1.1
 Hotel Belvedere Instructions for Assembly of the HO scale kit. v1.1 Kit Contents: 319 ea. laser cut.090" acrylic parts. 132 ea. laser cut.060" acrylic parts. 8 ea. window glass templates 8 ea. window glazing
The Rubley Building Instructions for Assembly of the N scale kit. v1.1
 The Rubley Building Instructions for Assembly of the N scale kit. v1.1 Kit Contents: 197 ea. laser cut 1/16" acrylic parts. 1ea. adhesive backed.020 styrene part. 10 ea..060 x 1" styrene alignment pins.
The Fyfe Building Instructions for Assembly of the N scale kit.
 The Fyfe Building Instructions for Assembly of the N scale kit. Kit Contents: 150 each laser cut 1/16" acrylic parts. 6 each 020 adhesive backed part 6 each column caps 2 each decorative canopy 1 each.125"
Bates 1/8 scale B-26. Parts List. Instructions
 Bates 1/8 scale B-26 Vacuform Pieces Swivel Ball 1 Cockpit Floor 1 Ball 2 Cockpit Back Wall 2 Two Flanges 3 Dash 3 Seven 0-64 x 1/4 Bolts 4 Dash Hood 4 Seven 0-64 Nuts 5 Center Console 6 Pilot Seat Fire
The Park Hotel Instructions for Assembly
 The Park Hotel Instructions for Assembly Kit Contents: 280 ea. Laser Cut Acrylic Parts. 1 ea. 6" Plastic Coated Wire. 5 ea. Sidewalk Parts. 14 ea. Cast Resin Dormers. 12 ea. Window Glass Templates, 12
The Park Hotel Instructions for Assembly of N Scale Kit
 The Park Hotel Instructions for Assembly of N Scale Kit Kit Contents: 198 ea. Laser Cut Acrylic Parts, 2 ea. Chimney Parts Sheets, 1 ea.2".040 styrene rod, 5 ea. Sidewalk Parts, 14 ea. Cast Resin Dormers,
Hardee s Restaurant kit in HO scale
 Hardee s Restaurant kit in HO scale Parking lot base and cars not included This kit includes all building parts milled in white styrene plastic and laser cut white acrylic, clear acrylic window glazing,
Donaldson s Department Store
 Donaldson s Department Store Instructions for Assembly of Donaldson s Department Store Kit Contents: 80 each laser cut acrylic parts. 1 each sheet of canopy parts. 1 each sheet of AC roof unit parts. 1
Cockpit Kit. Full Depth - Builds Quickly - Light Weight READ THROUGH THIS INSTRUCTION MANUAL FIRST. IT CONTAINS IM- laser cut wood kit
 The Savage Light Sukhoi Su- 27 Cockpit Kit contains everything you need to build a full depth semi scale Su-27 cockpit, yet adds less than an ounce to your finished model s weight (not including pilot).
The Hamlin Assembly Instruction By Laser Dollhouse Designs
 The Hamlin Assembly Instruction By Laser Dollhouse Designs NOTE 1: Please do a dry assembly using only tape to hold house together. This will get you familiar with parts, location, and fit. This also gives
Nanton Grain Mill Assembly
 ( 1 ) Nanton Grain Mill Assembly Locate package for assembling storage building. These are cut from 1/8 masonite. Inspect and lightly sand edges where it will be bonded. Use white glue or CA glue to bond.
Tools and Tips: ( 1 )
") Tools and Tips: As you build instructions will show in my many picture manual how to assemble. You can use your own methods as you desire, my results are very good. A smooth, flat work surface is very
Tools and Tips: As you build instructions will show in my many picture manual how to assemble. You can use your own methods as you desire, my results are very good. A smooth, flat work surface is very
Continue gluing the remaining top parts ensuring the angled piece is glued well. Set aside and let dry. See photo below
 Radiator rev 1.1 The SE5a s radiator is one of the most recognized radiators in WW1. It is one of the components that defines the SE5a. The original SE5a has seen multiple radiator designs used during
Tools and Tips: ( 1 )
") Tools and Tips: As you build instructions will show in my many picture manual how to assemble. You can use your own methods as you desire, my results are very good. A smooth, flat work surface is very
Tools and Tips: As you build instructions will show in my many picture manual how to assemble. You can use your own methods as you desire, my results are very good. A smooth, flat work surface is very
The Midtown Apartment Building
 The Midtown Apartment Building Instructions for Assembly of The Midtown Apartment Building. Kit Contents: 70 each laser cut acrylic parts. 3 each sidewalk parts. 3each Window Glass Templates, 3 each Window
G. Building the Cab, Cab Roof and Cab Boiler Extension Page 14 and Backhead.
 G. Building the Cab, Cab Roof and Cab Boiler Extension Page 14 and Backhead. Cab. In order to ensure that the cab and tender would actually look right, as what often appears on a drawing is not always
Fidelity & Guaranty Building
 Fidelity & Guaranty Building N Scale Model Kit Instructions for Assembly of the Fidelity & Guaranty Building Kit Contents: 69 each laser cut acrylic parts. Sidewalk material 1 each Window Glass Templates
RACETRACK BLEACHERS PHOTO REAL BUILD KIT
 RACETRACK BLEACHERS PHOTO REAL BUILD KIT by INSTRUCTIONS FOR: Kit BK 6402 Racetrack Bleachers Build Kit ~ S scale Free replacement parts are available simply by calling 866 712 4059. Includes two (2 ea.)
Fidelity & Guaranty Building
 Fidelity & Guaranty Building Instructions for Assembly of the Fidelity & Guaranty Building Kit Contents: 69 each laser cut acrylic parts. 1 each sheet of AC roof unit parts. 1 each sidewalk base. 4 each
PS 5077 cu. ft. Boxcar with EOC device. 1:29 scale resin craftsman kit. by Burl Rice
 PS 5077 cu. ft. Boxcar with EOC device 1:29 scale resin craftsman kit by Burl Rice www.burlrice.com Bill of materials (not included): Thick/medium viscosity CA PL adhesive, or Gorilla Glue Heavy Duty Construction
Drawings of all parts have been included for ease of part identification.
 Acme Corporation Instructions for Assembly of the HO Scale Acme Corporation HO Kit Contents: 156 ea. white 1/16" laser cut acrylic part 10 ea. white 1/8" laser cut acrylic part 37 ea. adhesive-backed brick
N Scale Concrete Coal Dock Instruction Manual
 N Scale Concrete Coal Dock Instruction Manual 1. General Overview This kit combines precision laser cut acrylic, photo etched brass and wood parts to make a highly detailed model of the Roberts and Schaefer
CA to each one. You may have to hold the end down while to glue sets or use an accelerator like I did.
 The following information and photographs are what I did to build the kit. Your methods and needs may differ from this which is fine. There is no right or wrong way if you are used to scratch building.
The Saint Paul Building
 The Saint Paul Building Instructions for Assembly of The Saint Paul Building. Kit Contents: 65 each laser cut acrylic parts. 1 each sheet of AC roof unit parts. 1 each sidewalk. 3 each Window Glass Templates,
GENERAL INSTRUCTIONS. Woodland Scenics PO BOX 98, LINN CREEK, MO woodlandscenics.com PREPARE PLASTIC PARTS PREPARE METAL CASTINGS
 #40700 Popa Weelie's Saloon INSTRUCTIONS CAUTION: Cutting tools recommended. Use with care. This item is not a Children s Product and is not intended for use by Children. Conforms to Health Requirements
Background: For the Modeler:
 Right On Replicas, LLC Step-by-Step Review 20141020* Space Shuttle with Fuel Tank and Boosters 1:72 Scale Monogram Model Kit #85-5089 Review (Part 1 of 2) Background: The United States Space Transportation
RoR Step-by-Step Review * Boot Hill Express 1:24 Scale Monogram Kit # Review
 RoR Step-by-Step Review 20130506* Boot Hill Express 1:24 Scale Monogram Kit #85-4999 Review This is what happens when you combine a dragster with an exceptionally ornate hearse. The beautiful wood lines
The Severn Instructions for Assembly of the N scale kit.
 The Severn Instructions for Assembly of the N scale kit. Kit ontents: 172 each laser cut 1/16" acrylic parts 102 each adhesive backed styrene parts 1 each cast entryway 3 each cast balcony 4 each cast
Ziroli D-17 Beech Staggerwing
 Ziroli D-17 Beech Staggerwing Parts List Vacuform Parts: Miscellanous Pieces 1 Four Side Panels 1 3/16" Tube, 2" Long 2 Lower Dash - Back Dash 2 Felt, 12x24 3 Dash 3 Cordury 12x24 4 Dash Hood 4 Aluminum
SUGAR CREEK HOTEL PHOTO REAL BUILD KIT
 SUGAR CREEK HOTEL PHOTO REAL BUILD KIT by Innovative Hobby Supply INSTRUCTIONS FOR: Kit BK 6407 Sugar Creek Hotel Build Kit ~ S scale Free replacement parts are available simply by calling 866 712 4059.
Taco Bell Restaurant kit in HO scale
 Taco Bell Restaurant kit in HO scale Parking lot base and cars not included This kit includes all building parts milled in white styrene plastic, clear window glazing, Plastruct tile roofing, and logo
Assembly Instructions for Summit Motel Kits # SMFS and SMBD
 Assembly Instructions for Summit Motel Kits # SMFS and SMBD Introduction Thank you for your purchase of the Summit Motel. This modern motel can be converted to almost any chain motel of your choice, depending
Continued on next page
 Please read these instructions completely through to be sure you are familiar with all the steps. Then following along again as you build your structure. Download a.zip file of all the pictures including
Kentucky 4H Wood Science Plans Notebook. Plans Level 1
 Kentucky 4H Wood Science Plans Notebook Plans Level 1 MATERIALS NEEDED: 1 piece wood 3/4" x 2 x 2 1 piece wood 3/4" x 3 x 3 1/2" 1 wooden spring-type clothespin 2-1 1/2" nails 1-1/2 woodscrew Wood Glue
Seascape Bungalow Assembly instructions. Laser Dollhouse Designs
 Seascape Bungalow Assembly instructions Laser Dollhouse Designs NOTE: Please do a dry assembly using only tape to hold house together. This will get you familiar with parts, location, and fit. This also
1Use the metal file to smooth
 Yamato: Step-by-step 85 Parts of the bridge and the hull a b c d e f a Part of the bridge b Part of the bridge c Part of the bridge d Radar x 2 e Part of the bridge x 2 f Wire Recommended tools and materials
EXTREME LOAD no. TWO
 1602 - EXTREME LOAD no. TWO Kit Features: 22' 4 " x 14' x 3'-6 Oversize Load 49mm (1.9") actual height Bolt Head Details Welded Load Mounting Fins Painting Handles Tools Required: Hobby Knife Tweezers
After printing these plans, several pages will need to be taped together to form a larger plan. Below is a diagram of which pages need assembled.
 Watermill Building Plans For complete building instructions and instructional videos, please visit the main web site at www.hirstarts.com/watermill/watermill.html. Using these plans alone will not give
Corona Concepts presents The Laurel All Wood Dollhouse. Instructions and Assembly Guides
 Corona Concepts presents The Laurel All Wood Dollhouse Instructions and Assembly Guides Introduction In Short... Welcome to the exciting world of dollhouses and miniatures. Since the first tab and slot
The Gothic Chess Set
 The Gothic Chess Set Please note that this chess set is a fairly difficult and time consuming project. I strongly suggest building one or two easier models before tackling this one! The miniatures used
3Insert the second rod no. 4
 Yamato: Step-by-step 37 The stern block and searchlight control towers a b c d e f Recommended tools and materials Wood glue Sandpaper (no. 800 grain) Metal file Putty Craft knife For metal: Super Glue
Instructions for Assembly of the HO Scale The Charles
 The Charles Instructions for Assembly of the HO Scale The Charles HO Kit Contents: 337 ea. white 1/16" laser cut acrylic part 19 ea. Clear 1/16" laser cut acrylic part 69 ea. white 1/8" laser cut acrylic
CONCEPT MODELS INSTRUCTIONS FOR UP DC-10 WING CAR El Toro Way Stockton, CA Web Address:
 CONCEPT MODELS Web Address: http://www.con-sys.com 8810 El Toro Way Stockton, CA 95210 INSTRUCTIONS FOR UP DC-10 WING CAR 2 CONCEPT MODELS PARTS DC-10 WING CAR Item No. Part No. DESCRIPTION QTY. 1 2003-1
The Lansdowne One Car Garage Assembly Instruction by Laser Dollhouse Designs
 The Lansdowne One Car Garage Assembly Instruction by Laser Dollhouse Designs NOTE 1: Please do a dry assembly using only tape to hold house together. This will get you familiar with parts, location, and
Building Instructions Diva cabin boat
 Building Instructions Diva cabin boat Order no. 3093/00 aero-naut Modellbau Stuttgarterstr. 18-22 D-72766 Reutlingen / Germany http://www.aero-naut.com 1 For pictured building instructions please see the
RACETRACK BLEACHERS PHOTO REAL BUILD KIT
 RACETRACK BLEACHERS PHOTO REAL BUILD KIT by INSTRUCTIONS FOR: Kit BK 4802 Racetrack Bleachers Build Kit ~ O scale Free replacement parts are available simply by calling 866 712 4059. Includes two (2 ea.)
3Position the hull of the ship as
 Yamato: Step-by-step 25 The hull and stern deck c b d a b d c e e f a Rear frame b Stern deck x 2 c Stern deck x 2 d Side wall x 2 Wood glue Sandpaper (no. 400 grain) Craft knife Pliers d Side wall x 2
Instructions and Assembly Guide
 Corona Concepts presents The Creekside Cabin All Wood Dollhouse 1997 Corona Concepts Schenevus, NY 12155 All rights reserved These instructions were printed in New York State Instructions and Assembly
CVS Pharmacy kit in HO scale
 CVS Pharmacy kit in HO scale Parking lot base and cars not included This kit includes all building parts and wall-mounted signs milled in white styrene plastic, clear window glazing and pre-cut Plastruct
Cobra X Q Construction Tips Construction: Bel y pan
 Cobra X Q Construction Tips : The white plastic in this kit is high impact styrene. It can be painted with most types of coatings if light coats are applied this is necessary due to the thickness of the
the wire, less is better. And make sure the bends on each truss wire are in line with the other. See the next photo.
 The following information and photographs are what I did to build the kit. Your methods and needs may differ from this which is fine. There is no right or wrong way if you are used to scratch building.
The Festival Assembly Instructions
 The Festival Assembly Instructions Toll Free: 866.768.8465 Hours: 9-5 Monday-Friday EST www.homeplacestructures.com Package ships as shown CONTACT INFORMATION: HomePlace Structures 301 Commerce Drive New
The Castle House Assembly Instructions By Laser Dollhouse Designs
 The Castle House Assembly Instructions By Laser Dollhouse Designs HOUSE PARTS First floor slots labeled 1A-1G First floor Walls labeled 1A-1G First floor interior door frames (4) Wall 1A frames (6) Main
5If the protruding part is. 6Place 1 as is shown in the. 7Place what was assembled
 Yamato: Step-by-step 49 The base of the bridge and strakes a c b d a Base of the bridge b Base of the bridge c Base of the bridge d Strakes x 10 THE BASE OF THE BRIDGE 1Smooth 1 to 3, first using the metal
Pump Assembly. Lloyd Matthews September 2013
 Pump Assembly Lloyd Matthews September 2013 Before proceeding with this part of the build, the author recommends that Pt. No 227 1 mm diameter Brass Wire Figure H1, is replaced with 0.8 mm straight brass
The Hearse Carriage Assembly Instructions Page 1.
 The Hearse Carriage Assembly Instructions Page 1. The Hearse Carriage Assembly Instructions Page 2. WHAT YOU'LL NEED: Scissors, Elmer's glue (or a glue stick), a needle, two toothpicks, a sharpened pencil,
STOP! READ THIS FIRST! TIPS FOR BUILDING LASER CUT MODELS
 INSTRUCTIONS STOP! READ THIS FIRST! TIPS FOR BUILDING LASER CUT MODELS 1. Test fit all parts and make sure you know how everything goes together before gluing. If you are contemplating cutting a part to
SAN FELIPE: Step by Step Pack 2
 Pack 2 Your parts Stern reinforcement Bulkheads The poop deck Bulkhead planks Planks Tools and equipment Knife Pencil Wood glue Sandpaper File a Using leftover 5 x 5-mm wooden strips, measure and cut beams
Press and Media Tower PHOTO REAL BUILD KIT Innovative Hobbies Making Traditional Hobbies Better!
 Press and Media Tower PHOTO REAL BUILD KIT Innovative Hobbies Making Traditional Hobbies Better! INSTRUCTIONS for Kit # BK 6424 Free replacement parts are available simply by calling or by simply emailing
Cowper From Steve Wolverton on the T&TTT forum, Feb 2005 For Reference Only Do not use to build a trailer. Check on Teardrop and Tiny Travel Trailers
 Cowper From Steve Wolverton on the T&TTT forum, Feb 2005 For Reference Only Do not use to build a trailer. Check on Teardrop and Tiny Travel Trailers for up to date building information; http://www.mikenchell.com/forums
How to assemble the Reims Gueux Pit End Modules #005
 How to assemble the Reims Gueux Pit End Modules #005 Depending on which kit you have purchased you will either have a pair of end sections, some centre sections or both. We will describe building of the
Rural Shamrock Gas Station & Store kit in HO scale
 Rural Shamrock Gas Station & Store kit in HO scale Parking lot base and cars not included This kit includes all building parts and signs milled in white and black styrene plastic, clear window glazing
After the glue dries, trim the trussrod ends with your cutting pliers
 The following information and photographs are what I did to build the kit. Your methods and needs may differ from this which is fine. There is no right or wrong way if you are used to scratch building.
Castle loft bed [1] Additional Photos. Castle loft bed Published on Ana White (http://www.ana-white.com)
![Castle loft bed [1] Additional Photos. Castle loft bed Published on Ana White (http://www.ana-white.com)](/thumbs/76/73086219.jpg "Castle loft bed [1] Additional Photos. Castle loft bed Published on Ana White (http://www.ana-white.com)") [1] Submitted by fsmumford [2] on Tue, 2011-10-18 21:51 [1] Additional Photos [3] [4] Page 1 of 31 [5] [6] [7] Summary: I stumbled upon Ana s blog about a year ago. Since, like many of you, I have become
[1] Submitted by fsmumford [2] on Tue, 2011-10-18 21:51 [1] Additional Photos [3] [4] Page 1 of 31 [5] [6] [7] Summary: I stumbled upon Ana s blog about a year ago. Since, like many of you, I have become
Wallpaper. the Right Way. Wallpaper is trendy again, both with designers, who are speccing it more often, and
 Wallpaper the Right Way Installed correctly, this wall covering should last a lifetime and come off easily once it has worn out its welcome By John Clift Wallpaper is trendy again, both with designers,
Shell Gas Station & Convenience Store kit in HO scale
 Shell Gas Station & Convenience Store kit in HO scale Parking lot base and cars not included This kit includes all building parts and signs milled in white and black styrene plastic, clear window glazing,
Thank you for purchasing E.L. Moore Window & Door.
 Thank you for purchasing E.L. Moore Window & Door. Instructions Version 4.28.15 I ve named this kit after one of the greatest modelers I ve ever known, the late Elliot Moore Jr. Rest in peace my friend.
FIRE STATION PHOTO REAL BUILD KIT
 FIRE STATION PHOTO REAL BUILD KIT by Innovative Hobby Supply INSTRUCTIONS FOR: Kit BK 4814 Fire Station Build Kit ~ O scale Free replacement parts are available simply by calling 866 712 4059. Includes
Vivian Mansion Assembly Instruction By Laser Dollhouse Designs
 Vivian Mansion Assembly Instruction By Laser Dollhouse Designs NOTE 1: Please do a dry assembly using only tape to hold house together. This will get you familiar with parts, location, and fit. This also
LASER-ART. The DuBois House. LASER-ARTSTRUCTURES by BRANCHLINE TRAINS BRANCHLINE TRAINS STRUCTURES
 LASER-ARTSTRUCTURES by BRANCHLINE TRAINS LASER-ART STRUCTURES by BRANCHLINE TRAINS The DuBois House History With their gingerbread trim and ornate decoration the Queen Anne style is what most people imagine
(56501) Corona Concepts presents The Willow All Wood Dollhouse. Instructions and Assembly Guide RTD AA
 Corona Concepts presents The Willow All Wood Dollhouse. Instructions and Assembly Guide RTD AA") (56501) Corona Concepts presents The Willow All Wood Dollhouse Instructions and Assembly Guide RTD10000572AA Introduction In Short... Welcome to the exciting world of dollhouses and miniatures. Since the
(56501) Corona Concepts presents The Willow All Wood Dollhouse Instructions and Assembly Guide RTD10000572AA Introduction In Short... Welcome to the exciting world of dollhouses and miniatures. Since the
San Felipe: Step by Step Pack 3
 Pack 3 Your parts Bulwarks Gun port covers x 2 Tools and equipment Wood glue Sandpaper Brushes Wood stain Hammer Pin pusher/nails Razor saw a Remove the longer bulwark and test-fit it in place at the bow
I m going to say that Rob coerced me to take part in the club Shell 4000 theme build. He promised me an engine free Tamiya kit. This is what I got
 I m going to say that Rob coerced me to take part in the club Shell 4000 theme build. He promised me an engine free Tamiya kit. This is what I got instead. Looks like it s an older Fujimi kit and it does
MLS MasterClass 2002
 MLS MasterClass 2002 Build a 2-6-6T / 0-6-6T Mason Bogie An Adventure in 1:20.3 By Doc Watson Chapter 6 - A Laser Cut Styrene 6-Wheel Rear Truck BY Bronson-Tate Architectural Models Construction - Supplement
La Grange, Texas MKT Depot kit in HO scale
 La Grange, Texas MKT Depot kit in HO scale This kit includes all building parts laser cut in plywood, white and clear acrylic, and laser cut self-adhesive shingles. All parts fit together but may need
SCHWERE PLATTFORMWAGON TYPE SSY 60TON
 TWS 5094 SCHWERE PLATTFORMWAGON TYPE SSY 60TON Congratulations on purchasing one of the finer aftermarket resin kits sets available. The photo below is of the completed kit. The Panther tank is not included
Scratch Build a Water Tower
 Here s some Prototype details Photos Courtesy of Rodney Doster Water Spout and Discharge Pipe Tank Bands Here s some more Prototype details Photos Courtesy of Rodney Doster Weather Vane as a Finial Using
Darjeeling Coach 4-Wheel First/Second Class
 Darjeeling Coach 4-Wheel First/Second Class Introduction This kit was designed in 16mm scale from early Darjeeling drawings and photographs. It uses brass castings available from Brandbright. The instructions
7/8n2 Scale Plantation Coach
 7/8n2 Scale Plantation Coach Introduction This small coach modeled in 7/8 n2 was inspired from a Hawaiian Railway Company plantation excursion car from the late 19 century. While not an exact replica,
Chapter Ten. Continuation of all inboard details
 Chapter Ten Continuation of all inboard details Inboard stern details There are several details at the stern that need to be completed. The photo above shows all of them finished and painted. Let us break
HAPPY HUNTER BUILD LOG
 HAPPY HUNTER BUILD LOG After finishing a Billings model of the Calypso in January, 2012, I decided to build a model of the Happy Hunter, a Robbe kit I had stashed 3036 3037 3038 3039 from an earlier purchase.
1. Underframe/Tank Bottom
 1. Underframe/Tank Bottom The construction process for the Class X tank cars is a little different as there is no true underframe. Instead we will use the tank bottom as part of the underframe, attaching
Corona Concepts presents The Buttercup All Wood Dollhouse. Instructions and Assembly Guides
 Corona Concepts presents The Buttercup All Wood Dollhouse Instructions and Assembly Guides Introduction In Short...Welcome to the exciting world of dollhouses and miniatures. Since the first tab and slot
Firehouse Manual. Tools Needed:
 Tools Needed: -Cordless Drill (12V or higher) -#2 Square Drive Bit -Hammer -6 Step Ladder -Tape Measure -Square utility knife w/ blade & hook blade -Speed Square Little Cottage Co. PO Box 455 Berlin, OH
KIT BUILDING ED SCHULTZ
 KIT BUILDING ED SCHULTZ KIT BUILDING FIVE BASIC MATERIALS: PLASTIC (STYRENE) WOOD LASER CUT & STANDARD PLASTER METAL RESIN ADDING DETAILS PLASTIC KITS TYPICALLY STYRENE TYPE PLASTIC DPM WALTHERS BACHMANN
Cylon Raider Lighting Kit
 Cylon Raider Lighting Kit By Madman Lighting Inc Copyright June 2015, all rights reserved. All trademarks property of their respective owners. WARNING: This product contains small parts not suitable for
Peach, Daisy, Rosalina Crown Tutorial Version August 2010 Martyn
 Peach, Daisy, Rosalina Crown Tutorial Version 1.0 - August 2010 Martyn 1) Creating the template Right, this isn't the most enjoyable part but it is required, get your calculator out we're going to do some
USS. Build the CONSTITUTION. The world s oldest commissioned naval vessel afloat
 USS CONSTITUTION Build the The world s oldest commissioned naval vessel afloat 08 Build the USS STAGE CONSTITUTION Contents PAGE 7 Gun port lids, wooden strips and guns 7 7 Gun port lids, wooden strip
 Allied Tool is a freelance model of a small manufacturing company that grew from production in a home basement to a new building. Assume a gentleman starts assembling gauges in his basement and the business
How to assemble the Reims Gueux Pit Centre Module #005
 How to assemble the Reims Gueux Pit Centre Module #005 We recommend quick drying super glue for our models. Just a few drops on the joining edges, press and hold them for a few seconds and the connection
Max Launch Abort System Prod. No *Kevlar is a registered trademark of Dupont
 Flying Model Parts List Max Launch Abort System Prod. No. 3014 A 11820 - Body Tube 3.5 Diam x 5.5" Long B 11824 - Orange Capsule Base Shoulder Ring C 16032 - Laser-cut Ring motor mount rear D 16033 - Laser-cut
DAVENPORT DEPARTMENT STORE PF5214
 1:160 BUILDING KIT DAVENPORT DEPARTMENT STORE PF5214 Dress up your downtown scene with the classic Victorian architecture and large first-floor picture windows of the Davenport Department Store. Details
MUDGUN Drywall Finishing System
 Watch the demonstration video online at hydetools.com MUDGUN Drywall Finishing System Quick Start Guide Hyde Tools, Inc. / A Hyde Group Company / 800-872-4933 / custrelations@hydetools.com / hydetools.com
Advanced Gothic Dungeon Pieces
 Advanced Gothic Dungeon Pieces Basing Your Dungeon Pieces......1 Construction Guidelines......2 Peak Hall......3 Modular Doorways......4 Modular Gates......5 Stair Piece......6 Stair Room......7 Opening
Southern Pacific C-30-4/6 Bay Window Caboose N-Scale & HO-Scale
 Southern Pacific C-30-4/6 Bay Window Caboose N-Scale & HO-Scale Before Starting PREPARING BRASS The easiest way to remove the brass parts from the sheet they are produced on, is to use rail nippers. The
Cabins and Hatchways. Bluenose II Part 5
 With the hull fully prepared, we can now add the deck furniture and other fittings. Unfortunately, this is where things begin to go badly wrong with this kit. If you compare the AL plans to the plans in
Wayside Cottage Assembly Instructions By Laser Dollhouse Designs
 Wayside Cottage Assembly Instructions By Laser Dollhouse Designs Parts for assembly Base Floor marked 1A thru 1L 13 post and 11 fences With one gate Walls 1A thru 1L and Alcove roof panels 3 lg and 1 sm
Corona Concepts presents The Lily All Wood Dollhouse. Instructions and Assembly Guide
 Corona Concepts presents The Lily All Wood Dollhouse Instructions and Assembly Guide Introduction In Short... Welcome to the exciting world of dollhouses and miniatures. Since the first tab and slot die-cut
THE PHANTOM SEMI Assembly Instructions Page 1.
 THE PHANTOM SEMI Assembly Instructions Page 1. (Continued on next page...) THE PHANTOM SEMI Assembly Instructions Page 2. (Continued on next page...) THE PHANTOM SEMI Assembly Instructions Page 3. WHAT
Building the Bell Tower
 Building the Bell Tower Mold #55 does not contain all of the blocks to build this tower. You will need extra regular blocks (1/2" x 1/2" x 1") and square blocks (1/2" x 1/2" x 1/2"). These blocks can be