Continued on next page
|
|
|
- Julius Walters
- 5 years ago
- Views:
Transcription


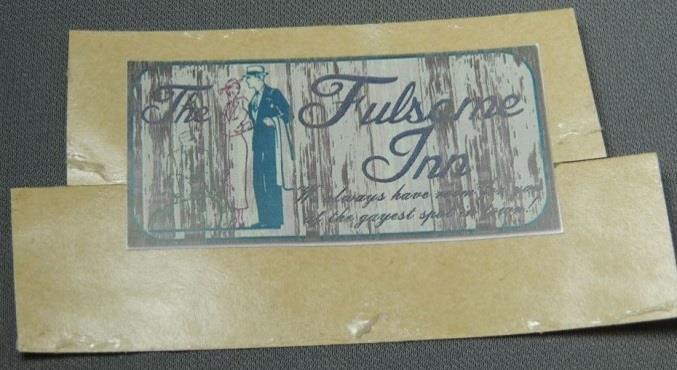
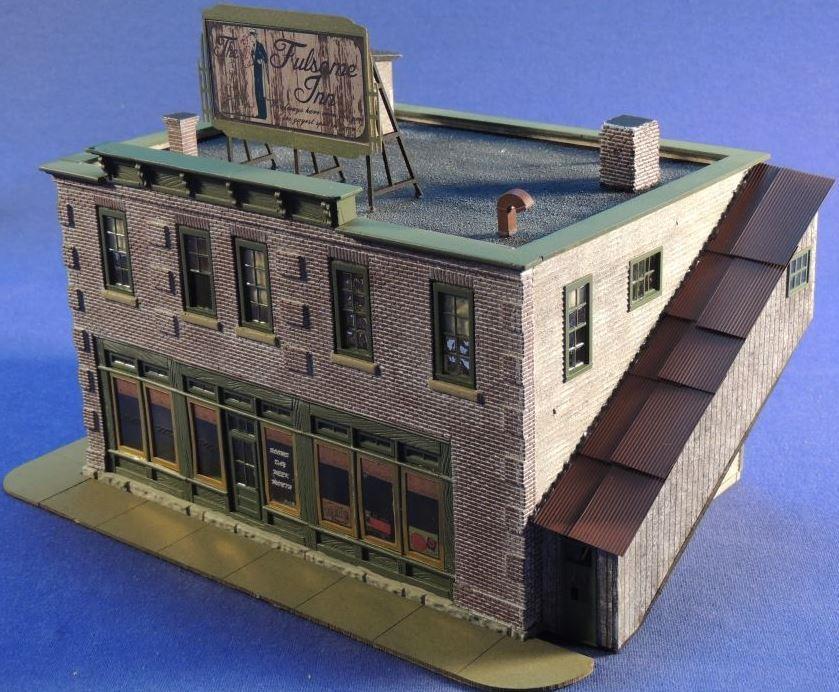
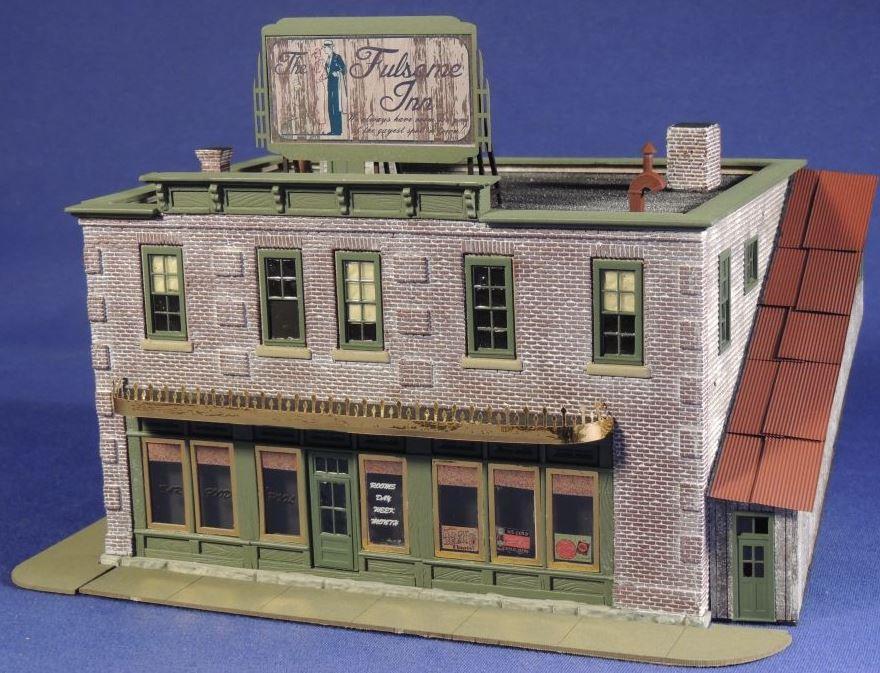
1 Please read these instructions completely through to be sure you are familiar with all the steps. Then following along again as you build your structure. Download a.zip file of all the pictures including many more assembly pictures HERE! HYDROCAL: The front portion of The Fulsome Inn is Hydrocal. It is very fragile so please handle it with extreme care! A small crack or two is easily repaired with glue. A finished crack adds an extra type of realism. Who hasn t seen a crack in an older brick building? 1. Using a pencil color in the back of the casting as shown. Then you ll want to attach a full piece of sandpaper to a flat surface. I use a 12x12 ceramic tile I bought at a home improvement store. Lightly, with very little yet even pressure, sand the casting with a gentle circular motion. You are trying to remove the pencil marks and flatten, or true the rear of the casting. The pencil marks will show you the areas that are still not even with the surface. When the pencil marks are gone, the back of the casting will be flat. 2. Using a new (sharp) #11 blade, remove any imperfections or bubbles from the front of the casting. Remember Hydrocal is very fragile! Then, with very light pressure, cut out any remaining material left in the window openings. Use multiple passes just slightly scoring the plaster with each pass. The window frames are very delicate and will break if you aren t careful! Make the corners of the openings 90 square.


2 3. You can choose to paint the entire casting with your brick color, then go back and hand paint the storefront with a brush. We sprayed ours, so the brick was masked off then we painted the storefront with Model Master SAC Bomber Green. We then masked the storefront, and painted the brick with a Rust-Oleum brown primer. Go one step further and color or paint a few random bricks with a darker color. A wash of a white, slightly watered down, acrylic paint was then applied over the brick, and wiped off. The result will leave white in the brick lines, or mortar do a small area at a time - we don t want the white to dry. Paint the granite foundation & blocks below the windows too. 4. Prepare the windows and doors for installation. First, we ll clean them up. Then cut them off of the sprues. Use a sprue cutter, a chisel blade, or a #11 blade. Whatever you use, make sure its new & sharp! Clean up any burrs with a small file and/or sandpaper. We ll spray paint them as this is the best method. Using a brush is time consuming and messy, with paint tending to pool up or collect in the corners. Attach the windows, doors, and frames to a piece of masking tape to hold them for painting. Lightly coat them multiple times until covered. Allow time to dry between coats. We used the Model Master color that we also used on the Hydrocal storefront portion. 5. Assemble the windows that have 2 parts. You can model them open. Vary the amount that each window is open. Apply your glass to the window openings. Clear Acetate can be used, but we prefer clear drying Canopy Glue or Gallery Glass (available at craft stores.) Follow the manufacturer s instructions to obtain results like we have.


3 6. Place the door and windows into the Hydrocal casting. We glued them using Formula 560 Canopy Glue. The storefront has printed Acetate windows. They can be placed behind the casting, if you chose to just use the window frames that are molded into it. Or, you can put them in front of the casting, but behind the gold window frames as shown. Cut the Acetate carefully using a new sharp blade. Score it lightly, multiple times until you re completely through it. 7. Cut out the window and door openings in the wood clapboard walls. Clean up/remove any wood tabs or burrs. Brace the walls using the 5/32 bracing according to the bracing diagram included with the kit. Mark the back of each wall at 3/16 from the top edge. You don t want the bracing past this point. Use white, yellow, or Canopy Glue for all the wood-to-wood assembly. Keep the wall flat while the glue is drying. A good amount of clamps can be very helpful for this step!


 to the both sides of the rear wall.")


4 8. Paint the walls and stripwood trim at this step if you d like. We first aged the clapboard walls by lifting a few random boards. Add seams too where boards would meet. We then covered the walls with a mix of alcohol & India ink. This is often referred to as A&I stain. We lightly painted the walls with an off-the-shelf acrylic gray. A sponge coat was then applied with white paint that was first dabbed on a piece of paper to remove all but a slight trace of the white. This effect can be mixed with a few different earth tones. It will give the effect of a weathered and worn look to the clapboard. 9. We ll assemble the building walls. Begin by gluing on the corner trim (1/16 th square stripwood) to the both sides of the rear wall. Keep the building walls 90 square while you allow it to dry thoroughly. We cut 2 pieces of 5/32 bracing the same length as the Hydrocal building front to help keep the front distance correct. We glued these behind the first piece of bracing on the side walls. These will also hold the view block we ll talk about in the next step. You can see what this in the pictures shown for Step 10 on the next page. 10. You can glue in all the doors and windows. (You can chose to put them in before Step 9 if you prefer.) In the pictures on the next page, you ll notice we put in window shades of various lengths. We used a piece of black paper to cover the front view of the picture windows on the storefront. Otherwise you d be able to see inside to the empty cavernous shell. Unless you plan on doing an interior. Another idea may be to search the internet and find/print out pictures of a storefront and put those behind the windows. Don t be afraid to experiment and try various things! Continued on next page


5 Step 10 pictures 11. Cut or trim the matboard roof card to fit the opening. It should be flush with the front walls. After you ve verified a proper fit, cut a piece of sandpaper and attach it to the roof card. As shown in the second picture below, we used 3M #465 Transfer Tape to adhere it. Glue will work too. We used chalk powders to weather the sandpaper on out model. Another method is to apply glue to the roof card and simply sprinkle a fine sifted sand or dirt onto the roof card then shake off the excess. A sand roof version is shown in the 5 th picture below. 12. Paint the foundation base the same color as you did the granite blocks of the Hydrocal casting (Step 3.) Attach the Hydrocal casting to the front (straight) edge of the matboard foundation. Keep it square! You can see we used a 90 angle weight we bought from the Micro-Mark.com catalog.


 or Super Glue will also work to")


6 13. Attach the wood portion of the building to the Hydrocal front. 14. Assemble the add-ons. The walk-up stairway first. Brace according to the included diagram if you haven t already. The walk-up stairway has three wood pieces and two matboard pieces for the floor and roof. Install the door and window. Glue the assembled unit to the side of the building. The roofing material is corrugated metal or paper, depending on which kit you purchased. Both are attached to the roof cards using 3M #465 Transfer Tape. A CA (Cyanoacrylate Adhesive) or Super Glue will also work to attach the metal roofing. Just about any type glue will work well for the paper versions. We painted our metal roofing with the same primer we used for the brick color on our Hydrocal. They should be cut into scale 4 x8 or similar sized sections. We then weathered it further with chalk powders. We also ran a bit of black paint where the metal roofing meets the wood wall to simulate a tar sealant. Pictures of walk-up stairway continued on next page


7 Step 14 pictures continued 15. In this step we ll build the rooftop access shack. It s four walls & a roof. 1/16 stripwood corners. Brace according to the diagram. Paint & glue it. Cover the roof card with any roofing material you d like. Glue in the door. (Not shown.)


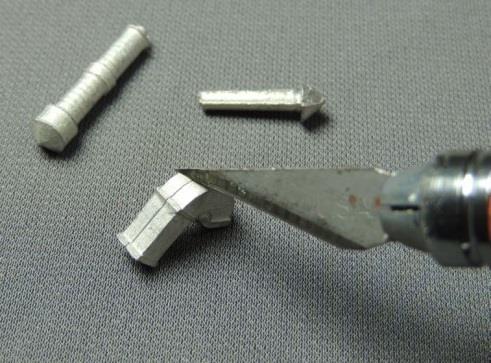
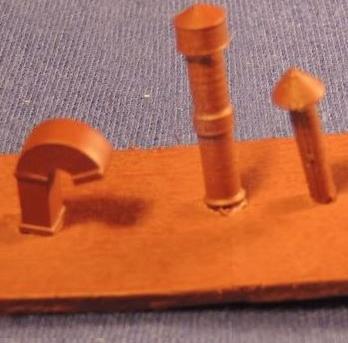

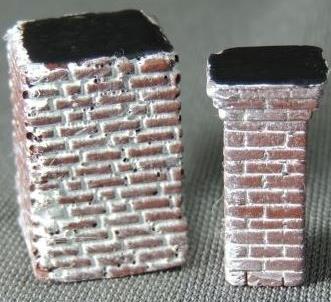
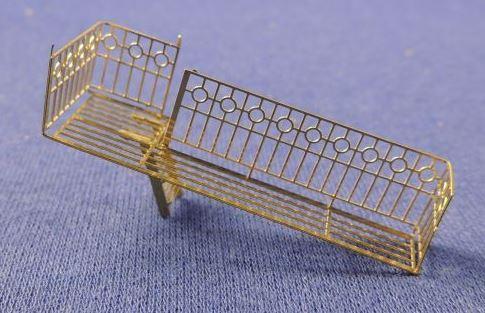
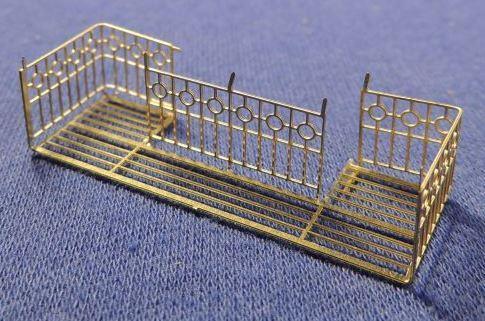
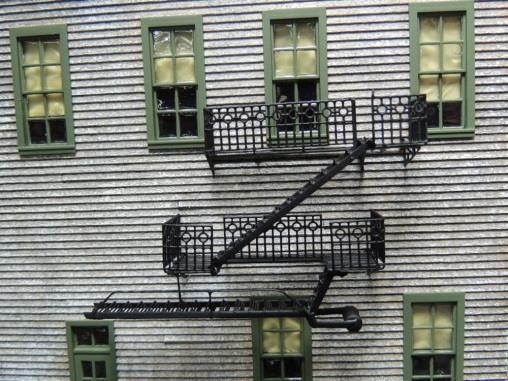
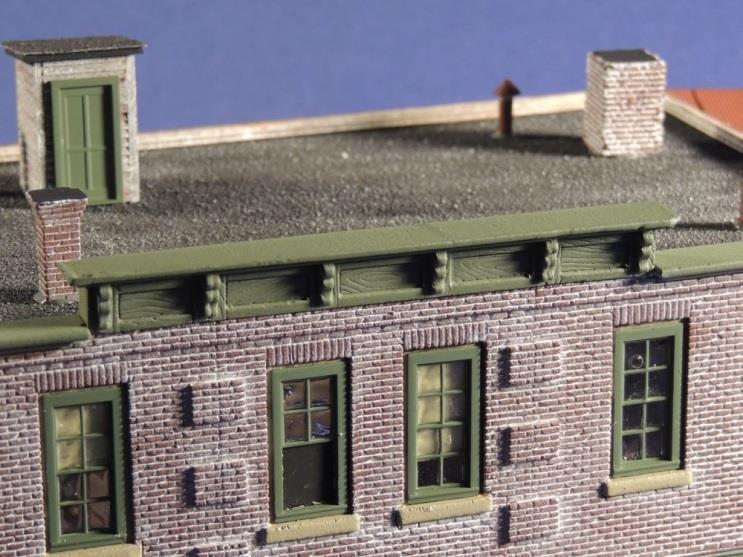
8 16. Assemble the roof top billboard. We attached the sign with 3M #465 Transfer Tape. 17. Paint the rooftop chimneys/accessories/vents. Clean up any flashing before priming the metal details. 18. The fire escapes are best assembled using CA or Super Glue. Use a square edge to gently fold the corners of the brass versions. Spray paint them with a flat black. We used the CA to attach them to the wood also. 19. Glue the remaining items onto the roof. This includes the Hydrocal cornice piece & the matboard top edge trim.

9 20. For the awning there is a curved piece of matboard that you can attach to the front of the building. Wrap this with the simulated brass decorative trim piece as shown below. 21. To finish up the structure we ve include a sidewalk that wraps around the building. This can be painted a concrete color and weathered with chalks. THANK YOU FOR BUILDING THE FULSOME INN. SPECIAL THANKS TO ROBERT SECKLER FOR BUILDING THE PILOT MODEL AND MARK PANZERA FOR BUILDING AND PHOTOGRAPHING THE INSTRUCTION MODEL!
10
Thank you for purchasing E.L. Moore Window & Door.
 Thank you for purchasing E.L. Moore Window & Door. Instructions Version 4.28.15 I ve named this kit after one of the greatest modelers I ve ever known, the late Elliot Moore Jr. Rest in peace my friend.
Tools: Every craftsman kit builder should have the basic tools you need to construct this kit. They are:
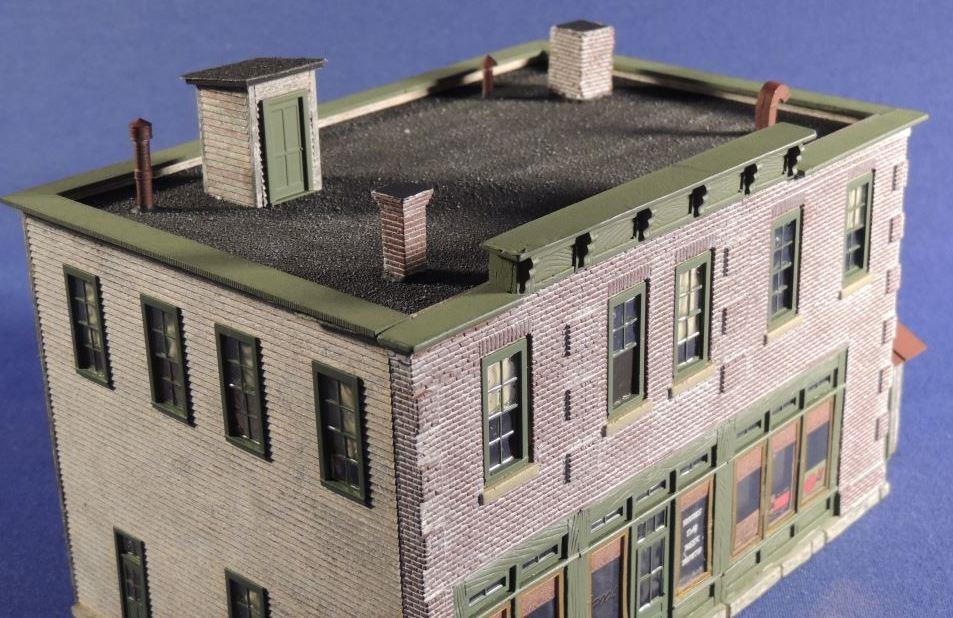
 Thank you for purchasing the Railroad Kits EF20 Car & Loco Repair Shed. This kit is the second one that I ve had the pleasure of working with Ed Fulasz on. Ed painstakingly hand carved the Hydrocal master
DAVENPORT DEPARTMENT STORE PF5214
 1:160 BUILDING KIT DAVENPORT DEPARTMENT STORE PF5214 Dress up your downtown scene with the classic Victorian architecture and large first-floor picture windows of the Davenport Department Store. Details
HARRISON S HARDWARE PF5891
 1:48 BUILDING KIT HARRISON S HARDWARE PF5891 Model the local hardware store where layout residents can find all they need to keep their homes in tip-top shape and workshops running smooth. The positive
J.W. cobbler 1:160 BUILDING KIT PF5210 WOODLAND SCENICS
 1:160 BUILDING KIT J.W. cobbler PF5210 The partially assembled walls, positive alignment system and prefinished edges make kit assembly quick, easy and accurate. This three-story brownstone features stacked
CORNER PORCH HOUSE PF5196
 1:87 BUILDING KIT CORNER PORCH HOUSE PF5196 Two-story home with cedar-shake roof and a corner wrap-around porch. Clapboard siding, paned windows, and loaded with accessories, such as a bicycle built for
Building the 1, 2, or 3 Car
 Building the 1, 2, or 3 Car Garage kit by Railroad Kits. Thanks to Bob Butts for doing the building construction and writing / taking pictures. If this is your first craftsman kit or Railroad Kits purchase
Donaldson s Department Store
 Donaldson s Department Store Instructions for Assembly of Donaldson s Department Store Kit Contents: 80 each laser cut acrylic parts. 1 each sheet of canopy parts. 1 each sheet of AC roof unit parts. 1
The Fyfe Building Instructions for Assembly of the N scale kit.
 The Fyfe Building Instructions for Assembly of the N scale kit. Kit Contents: 150 each laser cut 1/16" acrylic parts. 6 each 020 adhesive backed part 6 each column caps 2 each decorative canopy 1 each.125"
Drawings of all parts have been included for ease of part identification.
 Acme Corporation Instructions for Assembly of the HO Scale Acme Corporation HO Kit Contents: 156 ea. white 1/16" laser cut acrylic part 10 ea. white 1/8" laser cut acrylic part 37 ea. adhesive-backed brick
The Rubley Building Instructions for Assembly of the N scale kit. v1.1
 The Rubley Building Instructions for Assembly of the N scale kit. v1.1 Kit Contents: 197 ea. laser cut 1/16" acrylic parts. 1ea. adhesive backed.020 styrene part. 10 ea..060 x 1" styrene alignment pins.
BUILDING ST. MARTIN S CORNER GAS & GROCERIES By RAILROAD KITS
 Thank you for purchasing this kit. I need to first thank Bob Butts for building the pilot model, and most of all for this wonderful set of instructions. 32 pages. Over 110 super color photos documenting
BUZZ S SAWMILL PF5195 WOODLAND SCENICS BUILDING KIT
 1:87 BUILDING KIT BUZZ S SAWMILL PF5195 Buzz s Sawmill is a detailed work of art with all workings of a vintage steam-fired, belt-driven sawmill. Details include interior rafters and shake roof, attached
The Park Hotel Instructions for Assembly of N Scale Kit
 The Park Hotel Instructions for Assembly of N Scale Kit Kit Contents: 198 ea. Laser Cut Acrylic Parts, 2 ea. Chimney Parts Sheets, 1 ea.2".040 styrene rod, 5 ea. Sidewalk Parts, 14 ea. Cast Resin Dormers,
Railroad Kits PO Box 461 Holden, MA
 (Formerly Downtown Deco DD 1004 Fallburg Station) HO Scale. Thanks for purchasing one of my kits. Because different people have different degrees of experience, I'll walk you through, step by step, explaining
Building the Circular Tower
 Building the Circular Tower You will need to fill this mold 18 times to have enough blocks to build the circular tower. Be sure the blocks are completely dry before gluing them together. For detailed instructions
The Severn Instructions for Assembly of the N scale kit.
 The Severn Instructions for Assembly of the N scale kit. Kit ontents: 172 each laser cut 1/16" acrylic parts 102 each adhesive backed styrene parts 1 each cast entryway 3 each cast balcony 4 each cast
Building the Bell Tower
 Building the Bell Tower Mold #55 does not contain all of the blocks to build this tower. You will need extra regular blocks (1/2" x 1/2" x 1") and square blocks (1/2" x 1/2" x 1/2"). These blocks can be
The Park Hotel Instructions for Assembly
 The Park Hotel Instructions for Assembly Kit Contents: 280 ea. Laser Cut Acrylic Parts. 1 ea. 6" Plastic Coated Wire. 5 ea. Sidewalk Parts. 14 ea. Cast Resin Dormers. 12 ea. Window Glass Templates, 12
Model Grandma and Grandpa s cozy cottage, a. Country Cottage Instructions HO Scale 1:87 WOODLAND SCENICS PF5186
 PF586 Country Cottage Instructions HO Scale :87 Model Grandma and Grandpa s cozy cottage, a young family s first home or give this vintage Victorian cottage the run-down look of an abandoned shack. This
Hotel Belvedere Instructions for Assembly of the HO scale kit. v1.1
 Hotel Belvedere Instructions for Assembly of the HO scale kit. v1.1 Kit Contents: 319 ea. laser cut.090" acrylic parts. 132 ea. laser cut.060" acrylic parts. 8 ea. window glass templates 8 ea. window glazing
Model the hub of your layout s rural setting. Planters Feed and Seed Supply Instructions N Scale 1:160 WOODLAND SCENICS
 PF5201 Planters Feed and Seed Supply Instructions N Scale 1:10 Model the hub of your layout s rural setting. Planters Feed and Seed Supply presents a vintage agricultural center where farmers and rural
Building the Gothic Church
 Building the Gothic Church Mold #54 does not contain all of the blocks to build this church. You will need extra regular blocks (1/2" x 1/2" x 1") and square blocks (1/2" x 1/2" x 1/2"). These blocks can
The Midtown Apartment Building
 The Midtown Apartment Building Instructions for Assembly of The Midtown Apartment Building. Kit Contents: 70 each laser cut acrylic parts. 3 each sidewalk parts. 3each Window Glass Templates, 3 each Window
The Saint Paul Building
 The Saint Paul Building Instructions for Assembly of The Saint Paul Building. Kit Contents: 65 each laser cut acrylic parts. 1 each sheet of AC roof unit parts. 1 each sidewalk. 3 each Window Glass Templates,
KIT BUILDING ED SCHULTZ
 KIT BUILDING ED SCHULTZ KIT BUILDING FIVE BASIC MATERIALS: PLASTIC (STYRENE) WOOD LASER CUT & STANDARD PLASTER METAL RESIN ADDING DETAILS PLASTIC KITS TYPICALLY STYRENE TYPE PLASTIC DPM WALTHERS BACHMANN
Ben Franklin 5&10 Store
 Ben Franklin 5&10 Store RIVER LEAF MODELS, LLC RIVER LEAF MODELS, LLC Thank you for purchasing the Ben Franklin 5&10 structure kit. Your kit includes everything you need to assemble the final product.
Fidelity & Guaranty Building
 Fidelity & Guaranty Building N Scale Model Kit Instructions for Assembly of the Fidelity & Guaranty Building Kit Contents: 69 each laser cut acrylic parts. Sidewalk material 1 each Window Glass Templates
Basic Stenciling Techniques
 Metal Stencil Techniques For each technique you ll need the equipment listed in addition to your stencil and removable tape. To avoid bending your stainless steel stencils, keep them flat at all times.
Scratchbuilding with 3D Building Materials Cut Lintels, Install Corners
 The most realistic brick on the market today, these 3D engraved sheets are from actual photos of brick walls. We engrave every detail into basswood with a laser. Why put brick on wood? For modelers who
Hardee s Restaurant kit in HO scale
 Hardee s Restaurant kit in HO scale Parking lot base and cars not included This kit includes all building parts milled in white styrene plastic and laser cut white acrylic, clear acrylic window glazing,
After printing these plans, several pages will need to be taped together to form a larger plan. Below is a diagram of which pages need assembled.
 Watermill Building Plans For complete building instructions and instructional videos, please visit the main web site at www.hirstarts.com/watermill/watermill.html. Using these plans alone will not give
Corona Concepts presents The Buttercup All Wood Dollhouse. Instructions and Assembly Guides
 Corona Concepts presents The Buttercup All Wood Dollhouse Instructions and Assembly Guides Introduction In Short...Welcome to the exciting world of dollhouses and miniatures. Since the first tab and slot
Wallpaper. the Right Way. Wallpaper is trendy again, both with designers, who are speccing it more often, and
 Wallpaper the Right Way Installed correctly, this wall covering should last a lifetime and come off easily once it has worn out its welcome By John Clift Wallpaper is trendy again, both with designers,
Cardboard Model Buildings
 Cardboard Model Buildings Get more model kits from http://www.modelbuildings.org PRINTING & ASSEMBLY TIPS: These OO designs can easily be resized by reducing the print percentage as follows: OO scale is
Corona Concepts presents The Laurel All Wood Dollhouse. Instructions and Assembly Guides
 Corona Concepts presents The Laurel All Wood Dollhouse Instructions and Assembly Guides Introduction In Short... Welcome to the exciting world of dollhouses and miniatures. Since the first tab and slot
Instructions for Assembly of the HO Scale The Charles
 The Charles Instructions for Assembly of the HO Scale The Charles HO Kit Contents: 337 ea. white 1/16" laser cut acrylic part 19 ea. Clear 1/16" laser cut acrylic part 69 ea. white 1/8" laser cut acrylic
Vivian Mansion Assembly Instruction By Laser Dollhouse Designs
 Vivian Mansion Assembly Instruction By Laser Dollhouse Designs NOTE 1: Please do a dry assembly using only tape to hold house together. This will get you familiar with parts, location, and fit. This also
Fidelity & Guaranty Building
 Fidelity & Guaranty Building Instructions for Assembly of the Fidelity & Guaranty Building Kit Contents: 69 each laser cut acrylic parts. 1 each sheet of AC roof unit parts. 1 each sidewalk base. 4 each
Instructions and Assembly Guide
 Corona Concepts presents The Creekside Cabin All Wood Dollhouse 1997 Corona Concepts Schenevus, NY 12155 All rights reserved These instructions were printed in New York State Instructions and Assembly
If by chance a part is missing or broken please contact us indicating the kit name and part description and we will send you a replacement.
 Six Stall Roundhouse Instructions for Assembly of the HO Scale Six Stall Roundhouse Roundhouse Kit Contents: 18ea. Roof Pieces 12 ea. 1/16" Parts Sheets 9ea. 1/8" Parts Sheets 12ea. Floor Pieces 1ea. 1/4"
Tips & Tricks using Part 2
 Tips & Tricks using Part 2 Using the cobblestone mold #210...1 Making a dungeon diorama...2 Making torches...3 Making a textured door...4 Making a portcullis...5 Adding moss...6 Tips & Tricks using Bruce
GENERAL INSTRUCTIONS. Woodland Scenics PO BOX 98, LINN CREEK, MO woodlandscenics.com PREPARE PLASTIC PARTS PREPARE METAL CASTINGS
 #40700 Popa Weelie's Saloon INSTRUCTIONS CAUTION: Cutting tools recommended. Use with care. This item is not a Children s Product and is not intended for use by Children. Conforms to Health Requirements
Corona Concepts presents The Lily All Wood Dollhouse. Instructions and Assembly Guide
 Corona Concepts presents The Lily All Wood Dollhouse Instructions and Assembly Guide Introduction In Short... Welcome to the exciting world of dollhouses and miniatures. Since the first tab and slot die-cut
Assembly Instructions for Summit Motel Kits # SMFS and SMBD
 Assembly Instructions for Summit Motel Kits # SMFS and SMBD Introduction Thank you for your purchase of the Summit Motel. This modern motel can be converted to almost any chain motel of your choice, depending
Nanton Grain Mill Assembly
 ( 1 ) Nanton Grain Mill Assembly Locate package for assembling storage building. These are cut from 1/8 masonite. Inspect and lightly sand edges where it will be bonded. Use white glue or CA glue to bond.
Taco Bell Restaurant kit in HO scale
 Taco Bell Restaurant kit in HO scale Parking lot base and cars not included This kit includes all building parts milled in white styrene plastic, clear window glazing, Plastruct tile roofing, and logo
Tape Measure Metal Clippers Screw Bit Set With Extensions
 IMPORTANT: Read through instructions thoroughly before beginning to replace any damaged material. Minor damage can be fixed with a fiberglass repair kit and color matched paint. Tools Required Tape Measure
The Hamlin Assembly Instruction By Laser Dollhouse Designs
 The Hamlin Assembly Instruction By Laser Dollhouse Designs NOTE 1: Please do a dry assembly using only tape to hold house together. This will get you familiar with parts, location, and fit. This also gives
La Grange, Texas MKT Depot kit in HO scale
 La Grange, Texas MKT Depot kit in HO scale This kit includes all building parts laser cut in plywood, white and clear acrylic, and laser cut self-adhesive shingles. All parts fit together but may need
Little Briana Cottage Dollhouse assembly instructions
 Little Briana Cottage Dollhouse assembly instructions NOTE 1: Please do a dry assembly using only tape to hold house together. This will get you familiar with parts, location, and fit. This also gives
Building the Cathedral
 Building the Cathedral Please note that the cathedral is a fairly difficult and time consuming project. I strongly suggest building one or two easier models before tackling this one! Four molds are needed
3Insert the second rod no. 4
 Yamato: Step-by-step 37 The stern block and searchlight control towers a b c d e f Recommended tools and materials Wood glue Sandpaper (no. 800 grain) Metal file Putty Craft knife For metal: Super Glue
Tools and Tips: ( 1 )
") Tools and Tips: As you build instructions will show in my many picture manual how to assemble. You can use your own methods as you desire, my results are very good. A smooth, flat work surface is very
Tools and Tips: As you build instructions will show in my many picture manual how to assemble. You can use your own methods as you desire, my results are very good. A smooth, flat work surface is very
How to Use the Wooden Plank Mold
 How to Use the Wooden Plank Mold Even though I'm giving instructions for only two projects, there are tons of uses for this mold. Some of these include: Floors Steps Doors Tables Benches Crates Drawbridge
(56501) Corona Concepts presents The Willow All Wood Dollhouse. Instructions and Assembly Guide RTD AA
 Corona Concepts presents The Willow All Wood Dollhouse. Instructions and Assembly Guide RTD AA") (56501) Corona Concepts presents The Willow All Wood Dollhouse Instructions and Assembly Guide RTD10000572AA Introduction In Short... Welcome to the exciting world of dollhouses and miniatures. Since the
(56501) Corona Concepts presents The Willow All Wood Dollhouse Instructions and Assembly Guide RTD10000572AA Introduction In Short... Welcome to the exciting world of dollhouses and miniatures. Since the
LASER-ART. The DuBois House. LASER-ARTSTRUCTURES by BRANCHLINE TRAINS BRANCHLINE TRAINS STRUCTURES
 LASER-ARTSTRUCTURES by BRANCHLINE TRAINS LASER-ART STRUCTURES by BRANCHLINE TRAINS The DuBois House History With their gingerbread trim and ornate decoration the Queen Anne style is what most people imagine
A Day House. A View of One Way to Finish the Exterior of The Day House. Read these instructions all the way through before beginning this project.
 A Day House A View of One Way to Finish the Exterior of The Day House Read these instructions all the way through before beginning this project. General Comments For the purposes of this project, the standard
B J SCOTT LUMBER COMPANY. Presented by. Railroad Kits / kit formerly by White River Structures. Kit # WRS21
 B J SCOTT LUMBER COMPANY Presented by Railroad Kits / kit formerly by White River Structures Kit # WRS21 We are proud to present the second kit in this series of structures for your enjoyment. Your response
Hubble Space Telescope Paper Model Directions Downloads, patterns, and other information at:
 Hubble Space Telescope Paper Model Directions Downloads, patterns, and other information at: www.hubblesite.org/go/model Materials: model pattern printed onto cardstock/coverstock instructions printed
Craftman One Car Garage Assembly Instruction by Laser Dollhouse Designs
 Craftman One Car Garage Assembly Instruction by Laser Dollhouse Designs NOTE 1: Please do a dry assembly using only tape to hold house together. This will get you familiar with parts, location, and fit.
Wayside Cottage Assembly Instructions By Laser Dollhouse Designs
 Wayside Cottage Assembly Instructions By Laser Dollhouse Designs Parts for assembly Base Floor marked 1A thru 1L 13 post and 11 fences With one gate Walls 1A thru 1L and Alcove roof panels 3 lg and 1 sm
CVS Pharmacy kit in HO scale
 CVS Pharmacy kit in HO scale Parking lot base and cars not included This kit includes all building parts and wall-mounted signs milled in white styrene plastic, clear window glazing and pre-cut Plastruct
a V1 launch site How To Build... .net By Paul Davies
 By Paul Davies How To Build... a V1 launch site Some weeks ago, I was fortunate enough to get a sneak preview of the Flames Of War Open Fire boxed set when I was invited to the Wargames Illustrated 300th
The Lansdowne One Car Garage Assembly Instruction by Laser Dollhouse Designs
 The Lansdowne One Car Garage Assembly Instruction by Laser Dollhouse Designs NOTE 1: Please do a dry assembly using only tape to hold house together. This will get you familiar with parts, location, and
EXTREME LOAD no. TWO
 1602 - EXTREME LOAD no. TWO Kit Features: 22' 4 " x 14' x 3'-6 Oversize Load 49mm (1.9") actual height Bolt Head Details Welded Load Mounting Fins Painting Handles Tools Required: Hobby Knife Tweezers
SUGAR CREEK HOTEL PHOTO REAL BUILD KIT
 SUGAR CREEK HOTEL PHOTO REAL BUILD KIT by Innovative Hobby Supply INSTRUCTIONS FOR: Kit BK 6407 Sugar Creek Hotel Build Kit ~ S scale Free replacement parts are available simply by calling 866 712 4059.
Background: For the Modeler:
 Right On Replicas, LLC Step-by-Step Review 20141020* Space Shuttle with Fuel Tank and Boosters 1:72 Scale Monogram Model Kit #85-5089 Review (Part 1 of 2) Background: The United States Space Transportation
Flash Coving. Chapter 8 Flash Coving 8. 1
 8 Flash Coving Chapter 8 Flash Coving 8. 1 Flash Coving A. TOOLS In addition to the normal tools (knives, dividers, recess scribers, straightedges, rollers, trowels, etc.), other tools are also needed
All aspects of the installation of maia are also covered in a DVD that is available to view on-line at
 41405015530 41405015730 41405016130 41405015930 41405015520 41405015720 41405016120 41405015920 41405016520 41405016530 B All aspects of the installation of maia are also covered in a DVD that is available
Step 1. Step 2. Step 3. Step 4. Painting Guide RF Reversible Slate Roof. RF Reversible Slate Roof Page 1 of 3. Side 1. Side 2.
 RF-008 - Reversible Slate Roof Step 1 Step 2 White Base Gray (12:1) Step 3 White (GT002-W) Base Wood* (GT002-BW) Apply Base Wood over the wooden beams and window trim with a #3 (Painting) brush. Be careful
Basic Instructions. Preparing the Moulds
 Preparing the Moulds Basic Instructions 1. Make sure the moulds are clean and free of plaster residue (see our CARE & CLEANING instructions for more information). 2. Rinse the moulds in warm water and
4" Round Fieldstone Tower
 4" Round Fieldstone Tower This page contains instructions on how to use mold #72 to build the round fieldstone tower. You will have to cast the mold 18 times to build the tower. This round tower is slightly
G. Building the Cab, Cab Roof and Cab Boiler Extension Page 14 and Backhead.
 G. Building the Cab, Cab Roof and Cab Boiler Extension Page 14 and Backhead. Cab. In order to ensure that the cab and tender would actually look right, as what often appears on a drawing is not always
STOP! READ THIS FIRST! TIPS FOR BUILDING LASER CUT MODELS
 INSTRUCTIONS STOP! READ THIS FIRST! TIPS FOR BUILDING LASER CUT MODELS 1. Test fit all parts and make sure you know how everything goes together before gluing. If you are contemplating cutting a part to
Repairs. Chapter 10 Repairs 10. 1
 10 Repairs Chapter 10 Repairs 10. 1 Repairs As an installer, you will probably be called upon to repair damage to a resilient floor. Here are some of the most common problems and the recommended repairs
Football Silhouettes Project Sheet 1 of 2: Classic Beads
 Project Sheet 1 of 2: Classic Beads This project as shown at left has 4 designs 2 in classic beads and 2 in mini beads. They are intended to be displayed together; however, you may choose to make only
CA to each one. You may have to hold the end down while to glue sets or use an accelerator like I did.
 The following information and photographs are what I did to build the kit. Your methods and needs may differ from this which is fine. There is no right or wrong way if you are used to scratch building.
Media Center Woodworking Plans Our Home from Scratch
 Media Center Woodworking Plans by Our Home from Scratch Our Home from Scratch LLC Page 1 Disclaimer Our Home from Scratch LLC and its legal owners cannot be held responsible for any loss, damage, injury
Cockpit Kit. Full Depth - Builds Quickly - Light Weight READ THROUGH THIS INSTRUCTION MANUAL FIRST. IT CONTAINS IM- laser cut wood kit
 The Savage Light Sukhoi Su- 27 Cockpit Kit contains everything you need to build a full depth semi scale Su-27 cockpit, yet adds less than an ounce to your finished model s weight (not including pilot).
How to repair a wall or ceiling FREE
 How to repair a wall or ceiling FREE How to repair a wall or ceiling This guide shows how to repair walls and ceilings throughout the guide we only refer to walls but the same principles apply to ceiling
Tools and Tips: ( 1 )
") Tools and Tips: As you build the book will show in my many picture manual how to assemble. You can use your own methods as you desire, but these worked best for me. A smooth, flat work surface is very
Tools and Tips: As you build the book will show in my many picture manual how to assemble. You can use your own methods as you desire, but these worked best for me. A smooth, flat work surface is very
After the glue dries, trim the trussrod ends with your cutting pliers.
 The following information and photographs are what I did to build the kit. Your methods and needs may differ from this which is fine. There is no right or wrong way if you are used to scratch building.
REVISION LIST CHAPTER 25: AFT WINDOWS. The following list of revisions will allow you to update the Legacy construction manual chapter listed above.
 REVISION LIST CHAPTER 25: The following list of revisions will allow you to update the Legacy construction manual chapter listed above. Under the Action column, R&R directs you to remove and replace the
Please read through the entire document before starting your installation process to better understand what is required.
 1 P a g e How s It Hanging? Step-by-Step Guide for Hanging your Wallpaper Walls Republic offers a richer and wider selection of designs, textures and colours than ever before found in the wallpaper world,
Floral Welcome. by Gisele Pope
 Floral Welcome by Gisele Pope Floral Welcome By Gisele Pope Palette: DecoArt Americana Acrylics Payne s Grey 13167 Sapphire 13099 DecoArt Americana Décor Chalky Finish Paints Everlasting 15100 Surface:
1Smooth pieces 4, 5 and 6, using
 Yamato: Step-by-step 109 Machine-guns, anti-aircraft guns and decking h e f a b c g d e f a Anti-aircraft gun base x 2 b Anti-aircraft gun (bottom) x 2 c Anti-aircraft gun (top) x 2 d Machine-gun base
Real Good Toys 10 Quarry St Barre, VT
 Real Good Toys Special Edition Kit #SE-RR 29 /5 Congratulations on your choice of a Real Good Toys product. Your kit has been precision made with meticulous care by our craftspeople using carefully selected
Finishing Finishing Instructions Painting Tips Aluminum Astragal Painting Doorlite Frame Finishing
 Finishing... 2.3 Painting Tips... 2.6 Aluminum Astragal Painting... 2.9 Doorlite Frame Finishing... 2.10 SITE 2 2017 2.1 2.2 2017 SITE 2 SITE 2 2017 2.3 2.4 2017 SITE 2 SITE 2 2017 2.5 Painting Tips Therma-Tru
French Bunnies. Kerryanne English 2012
 French Bunnies Kerryanne English 2012 Page2 French Bunnies Kerryanne English 2012 When I designed the bunnies I wanted something that could be used not only for Easter, but at any time of the year for
MUDGUN Drywall Finishing System
 Watch the demonstration video online at hydetools.com MUDGUN Drywall Finishing System Quick Start Guide Hyde Tools, Inc. / A Hyde Group Company / 800-872-4933 / custrelations@hydetools.com / hydetools.com
Mustang Eleanor Style Louvers - Pre-painted (05-10) - Installation Instructions
 - Installation Instructions") Mustang Eleanor Style Louvers - Pre-painted (05-10) - Installation Instructions The below installation instructions work for the following products: Mustang Eleanor Style Louvers - Pre-painted (05-10)
Mustang Eleanor Style Louvers - Pre-painted (05-10) - Installation Instructions The below installation instructions work for the following products: Mustang Eleanor Style Louvers - Pre-painted (05-10)
Tools and Tips: ( 1 )
") Tools and Tips: As you build instructions will show in my many picture manual how to assemble. You can use your own methods as you desire, my results are very good. A smooth, flat work surface is very
Tools and Tips: As you build instructions will show in my many picture manual how to assemble. You can use your own methods as you desire, my results are very good. A smooth, flat work surface is very
7/8n2 Scale Plantation Coach
 7/8n2 Scale Plantation Coach Introduction This small coach modeled in 7/8 n2 was inspired from a Hawaiian Railway Company plantation excursion car from the late 19 century. While not an exact replica,
How to assemble the Reims Gueux Pit Centre Module #005
 How to assemble the Reims Gueux Pit Centre Module #005 We recommend quick drying super glue for our models. Just a few drops on the joining edges, press and hold them for a few seconds and the connection
FLEXITEEK INSTALLATION INSTRUCTIONS
 an Advanced Plastic Fabrications Company 99 marcus Blvd., 631.244.3620 631.231.4466fax FLEXITEEK INSTALLATION INSTRUCTIONS Before you begin, take your new Flexiteek deck out of the shipping package and
Wall Panel Installation
 Wall Panel Installation Special care must be taken in handling of panels with grout lines, especially in cold weather. The indented grout lines are by necessity a little thinner than other areas of the
Tutorials. To create your antique embroidered book, you'll need:
 Tutorials Part of the beauty in some books is simply how they look, and if we can t find them that way, we ll make 'em! It s a perfect and unusual way to display your favorite literary embroidery designs
The Rowen Victorian Assembly Instructions By Laser Dollhouse Designs
 The Rowen Victorian Assembly Instructions By Laser Dollhouse Designs Parts Listing 1. Four main floors A. Base Floor with markings S1 thru S6 B. 1 st Floor with markings 1A thru 1H C. 2 nd Floor with markings
CIRRUS AIRPLANE MAINTENANCE MANUAL MODELS SR22 AND SR22T CHAPTER 56-30: DOOR GENERAL. Door 56-30: DOOR. 1. General
 CIRRUS AIRPLANE MAINTENANCE MANUAL Door CHAPTER 56-30: DOOR GENERAL 56-30: DOOR 1. General The cabin door windows are manufactured of acrylic and adhesive bonded to the door structure. Replacement is accomplished