FLL Coaches Clinic Chassis and Attachments. Patrick R. Michaud
|
|
|
- Maximilian Collin Fox
- 5 years ago
- Views:
Transcription
1 FLL Coaches Clinic Chassis and Attachments Patrick R. Michaud Erik Jonsson School of Engineering and Computer Science University of Texas at Dallas September 23, 2017
2 Presentation Outline LEGO basics Chassis design Attachments
3 LEGO basics
4 Coaching tip Have all team members identify and use pieces by name Correct: "beam", "L-beam", "axle", "axle peg" Incorrect: "stick", "thingy", "that"

 Four")

5 EV3 brick Brains of the robot Mindstorms EV3 programming environment Four motor ports (A-D) Four sensor ports (1-4) Highly recommended: Rechargeable battery + charger


6 EV3 motors Large motor Good for driving wheels Higher torque / power Medium motor Good for arms & attachments Smaller size Lower torque / power


7 EV3 sensors Gyro sensor detects robot turns Color sensor senses color and light Touch sensor detects button press Ultrasonic sensor distance to surface


8 Beams Beams are the basic building pieces for most LEGO robots Length of beam determined by number of holes 2M 3M 5M 7M 9M 11M 13M 15M Often called M or L units Center-to-center distance is 8mm Can be thin or thick
9 Quickly determining beam size To quickly determine the size of a beam Place a finger over the center hole Count the holes on one side Double that and add one
10 Pegs Used to connect beams and other components Fit inside beam holes Friction pegs do not turn freely in holes Connector peg with friction ( peg ) 3M connector peg with friction ( long peg ) Connector peg with cross-axle ( axle peg ) Connector peg with cross-hole ( bushing peg ) Ball with friction snap
11 Pegs Non-friction pegs will turn in beam holes Connector peg 3M connector peg Connector peg cross axle

12 Connecting beams Use pegs to connect beams At least two pegs are needed to make a rigid structure Greater distance between pegs reduces flex More pegs increases hold between beams


13 Axles Used for wheels, gears, and attachments Length also measured in M units Grey axles are typically odd lengths, black axles are typically even lengths Axles will rotate and slide in beam holes unless constrained 10 12


14 Wheels Many types of wheels and tires available Wheel consists of rim and tire Tire measurements printed on sidewall Cross hole attaches to axles Rim wide 43.2 x Tyre Low Wide 56 x c01 Wheel 62.4 x 20, with Black Tire 62.4 x 20


15 Bushings Used to hold axles on beams Also used as spacers to prevent tires from hitting beams or other elements Half-bushing 6590 Bushing


16 Bushings Other elements can also be used as bushings or spacers


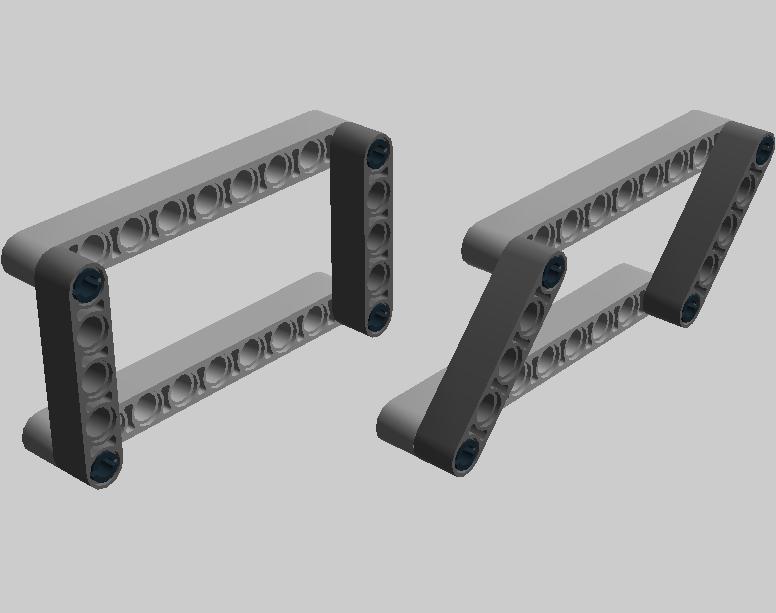
17 Angle beams Allow beams to be connected at rigid angles Excellent for structure Some beams have cross holes 32526: 3x5 L beam 32140: 2x4 L beam 60484: 3x3 T beam 32009: 3x7 double-angle beam 32271: 3x7 angle beam 6629: 4x6 angle beam 32348: 4x4 angle beam


18 Structural strength Weak Strong Strong Strong

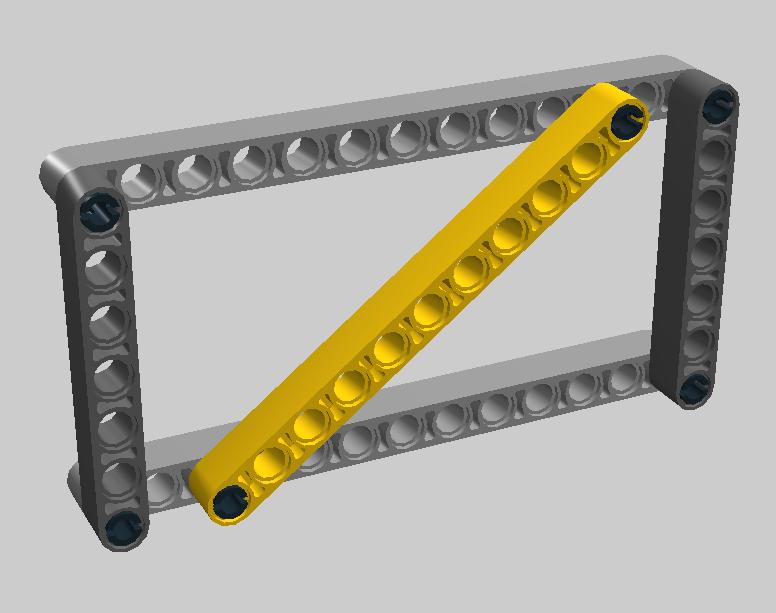
19 3:4:5 triangles Angled bracing is very strong 10 Use 3:4:5 spacing to ensure right angles and proper alignment
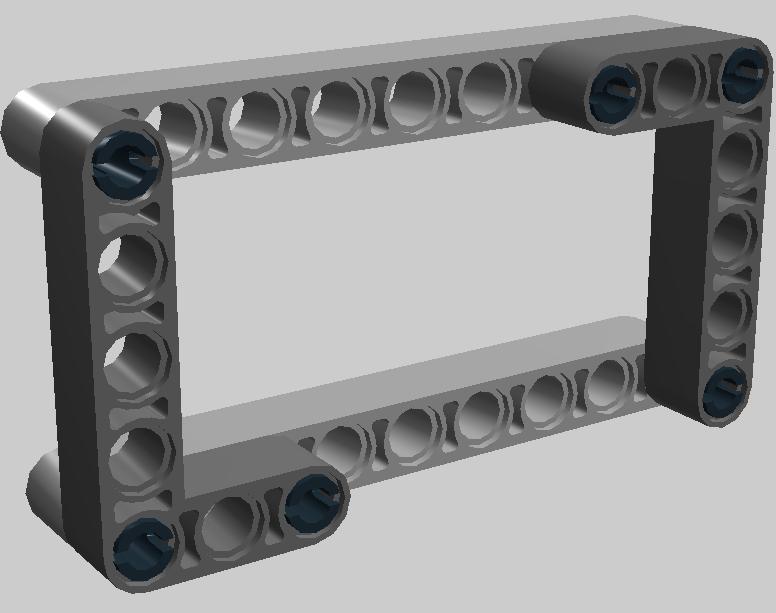
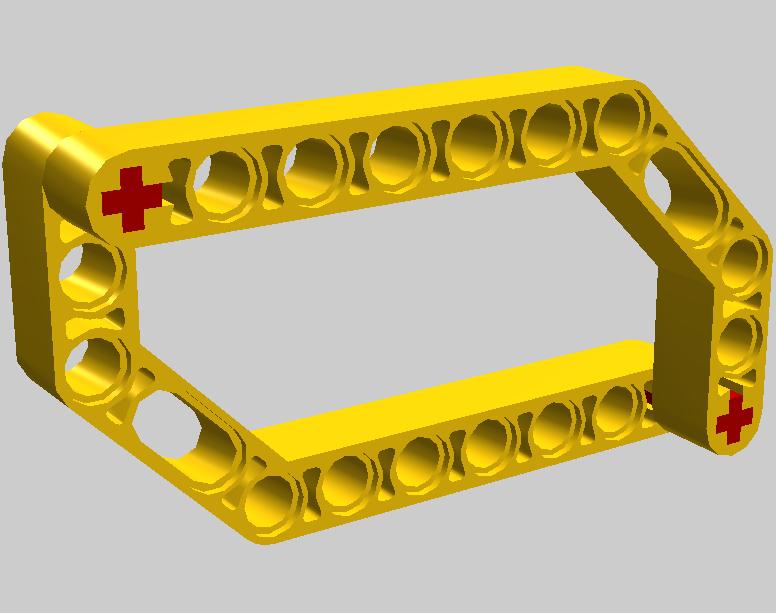
20 Frames and panels These pieces are excellent for building large structures and boxes Holes in all three axes for multiple mounting options 64179: Beam frame 5x7 ( box frame ) 64170: Beam H frame 5x11 ( H frame ) 64782: Flat Panel
21 Useful LEGO pieces - misc 2654: Slide shoe round 2x2 (good for skids) 41531: Turbine x 2 (wheels that also slide)
22 Robot design and strategy
23 Chassis and attachments The chassis is the part of the robot that is responsible for navigating the field and providing a base for attachments Attachments are the things added to the chassis to solve missions and manipulate models Design is about creating a chassis and attachments that will perform well in the Robot Game
24 Consistency wins Good programming and strategy are essential to consistently good performance Programming overcomes the limitations of the hardware Great robot + poor strategy inconsistent scores Fair robot + good strategy consistent scores
25 Robot Game Strategy - Base The robot must always start from Base Base is the only place where changes can be made
26 Robot Game Strategy - Time Matches are 2:30 When the Robot is in Base, it's not scoring minimize time spent in Base Travel on the field takes time minimize time spent moving from place to place solve multiple missions in the same region
27 Robot Game Strategy - reliability Distance: Error increases with distance 1 degree is 1.7cm error after 100cm Missions that are close become easier Missions that are far become harder Use field elements (lines, walls, models) to guide the robot to make things seem close Size: Large targets are easy to hit Small targets are hard to hit Use large attachments to make small targets bigger
28 Robot game strategy - humans The Robot does exactly what physics and programming say to do Humans (drivers) make mistakes and are inconsistent Design the robot and strategy to prevent human mistakes Always start robot from same location Don't require humans to aim Build safeties into robot Robot must adapt to humans, not vice-versa
29 Republic of Pi's design mantra Whenever the robot or humans make a mistake in scoring, redesign the robot so that mistake cannot happen again.

30 Tip: Start every mission from same spot Put solid edges on robot Align robot with solid edges, not by sight-aiming Robot can always start with known location and heading Faster setup in Base between mission runs Place flat edge against wall Pick a marking to align robot To save match time, always start from same spot
31 Common FLL robot characteristics Two motors for drive wheels - one for each side Multiple attachments for different missions Attachments may be passive or powered Third and fourth motors can be used for power Maximum of four motors allowed during match

32 Recommended first build EV3 Education Kits come with instructions for building a simple educator vehicle robot This robot is a good start for learning about LEGO parts, sensors, and programming

33 Robot design characteristics From the Robot Design judging rubrics: Evaluate the robot: Does the robot break often? Does it seem solid? Does it have a lot of flex? Do the wheels make good contact with the surface? Does it perform well in the game?
34 Chassis design
35 Chassis design considerations The chassis gets the robot from place to place Size Smaller robots are easier to navigate Robot must fit completely in Base when starting Consistency and reliability Robot needs to act consistently when moving Speed Faster robot time to solve more missions Slower robot more consistent and accurate
36 Chassis basics Good motor and wheel design are key to consistency Motor and wheel frame needs to be solid with very little flex flex produces inconsistent runs Use cross bracing, frames, and angle beams to increase structural stability
37 Wheels Wheel selection is important Larger wheels are faster, but may be less accurate Tire shape, pattern, and field mat surface affect traction and consistency Wheels that slip on the mat produce inconsistency

38 Wheels Wheels should be mounted close to supporting beam (but not rubbing against it): Good Poor Axles do better when supported by at least two beams. Beams on both sides of wheel are best. Better Best
 Works fine, may be a little unstable 2 wheels and 2 balls (4-point design) Very nice")
39 Wheel styles 2 wheels and skid(s) Works great, may have difficulty with ramps/obstacles 2 wheels and caster Caster wheel will make driving inconsistent 2 wheels and ball pivot (3-point design) Works fine, may be a little unstable 2 wheels and 2 balls (4-point design) Very nice
40 Wheel styles continued 4 wheels (4-point design) Make sure non-driving wheels can slide while turning #41531 Turbine has worked well for my teams 6 wheels Stable, but generally quite large and turning may be imprecise Treads Good for obstacles, hard to predict turns Exotics
41 Balance and center of gravity Balance and center of gravity affects stability and consistency of robot Center of gravity is the average location of weight of the robot If the center of gravity is outside the wheelbase, the robot will tip over High center of gravity will make robot more likely to tip
42 Weight Heavier robots are more accurate, but slower and use more battery Try to keep weight over driving wheels (but watch the center of gravity!)

43 Other chassis considerations Put solid edges on robot Align robot with solid edges, not by sight Robot can always start with known location and heading Provides attachment mounting points Place flat edge against wall Can be used for wall navigation and aligning with mission models Pick a marking to align robot To save match time, always start from same spot
44 Attachments
45 Attachments Attachments are the things added to the chassis to solve missions and manipulate models Good attachment design makes solving missions easy
46 Attachment design principles Robot precision often limited to 1.5cm If a target is small, try to make the attachment big Use mission models and walls for precise alignment Things that seem easy for humans can be hard for a robot Manually test attachments with eyes closed
47 Mounting attachments The best attachments are those that never need to be added or removed from the robot saves time during matches If an attachment must be added or removed, make sure it can be done quickly Avoid using pegs for removable attachments Use axles and axle pegs Use gravity Removing is usually faster than adding Rubber bands can be used to snap attachments into place
48 Attachment types FLL missions usually involve Pushing Pulling Lifting Dropping / dumping Placing / delivering Releasing Capturing / collecting Shooting Turning
49 Attachment building tips Tend to use axles and plates when possible Axles are easy to adjust, resize, and relocate Plates and frames are better than walls of beams Sources of energy for attachments (Republic of Pi s preferences) 1. Gravity 2. Leverage 3. Elastics 4. Motors
 64170: Beam H frame 5x11 ( H frame ) 64782: Flat")
50 Useful LEGO pieces - frames and panels These pieces are excellent for building large structures and boxes Holes in all three axes for multiple mounting options 64179: Beam frame 5x7 ( box frame ) 64170: Beam H frame 5x11 ( H frame ) 64782: Flat Panel

51 Useful LEGO pieces - Axle connectors Axles can be joined using a wide variety of connectors
52 Useful LEGO pieces - cross blocks and beams These allow connections in multiple directions 42003: Cross block 3M 32184: Double cross block 48989: Beam 3M with 4 snaps 55615: Angular beam 90 degrees with 4 snaps 14720: Beam I-Frame 3x5 90 degrees
 41678: Cross block")

53 Useful LEGO pieces - cross blocks These cross blocks have a wide variety of uses 32291: Cross block 2x1 ( Mickey ) 41678: Cross block fork 2x2 ( Minnie ) Connect two parallel beams Create holes at right angles Mount axles in different directions Create beams with even # of holes

54 Passive attachment: Pusher One of the simplest (and useful) attachments is a bumper. A bumper can easily push/deliver objects It can also provide places for other attachments

55 Passive attachment: Hook A hook can be used to capture objects Axles allow quick attach / removal

56 Passive attachment: Fork A fork has multiple prongs for capturing objects This helps make a wider target

57 Passive attachment: Dumper Dumpers use gravity and simple pegs to release contents

58 Passive attachment: Wedge A wedge can be used to push things up or down
59 Passive attachment: guides Guides can be used to align things with mission models Around a model Along a wall


60 Powered attachment: Vertical lifts Forklift will raise or lower as worm gear turns The 8t gear doesn't turn Turn this gear to raise/lower lift


61 Powered attachment: Four-bar linkage Raise/lower bar without rotating it Turn this gear to raise/lower lift Fork moves up and down without rotating
The Nomenclature and Geometry of LEGO
 The Nomenclature and Geometry of LEGO AN OVERVIEW OF LEGO EV3 MINDSTORMS ELEMENTS AND HOW THEY WORK TOGETHER UPDATED 9/27/2015 Required Stuff Please do not wander the building. Rest Rooms Location. Food
Chassis & Attachments 101. Chassis Overview
 Chassis & Attachments 101 Chassis Overview 2016 1 Introductions Rest rooms location. Food and Drink: Complementary bottled water. Snacks available for purchase from UME FTC teams. Cell phones. Today presentation
Chassis & Attachments 101. Part 1: Chassis Overview
 Chassis & Attachments 101 Part 1: Chassis Overview 2017 1 Introductions Rest rooms location. Food and Drink. Cell phones. Today presentation available at: http://www.roboplex.org/fll 2 What can be used
Deriving Consistency from LEGOs
 Deriving Consistency from LEGOs What we have learned in 6 years of FLL and 7 years of Lego Robotics by Austin and Travis Schuh 1 2006 Austin and Travis Schuh, all rights reserved Objectives Basic Building
FLL Robot Design Workshop
 FLL Robot Design Workshop Tool Design and Mechanism Prepared by Dr. C. H. (Tony) Lin Principal Engineer Tire and Vehicle Mechanics Goodyear Tire & Rubber Company tony_lin@goodyear.com Description Mechanism
The Wheels Module The Seats Module Integrate the seats and Wheels modules Ferris Wheel base Build the Gear System...
 Alternate Motorization Kit The Wheels Module... 2 The Seats Module... 3 Integrate the seats and Wheels modules... 4 Ferris Wheel base... 5 Build the Gear System... 7 Ferris Wheel Final Integration!!!...
Robot Design.
 Robot Design Michael Hartwig kcfllref@gmail.com Agenda 2016 KC Region robots Design Elements and Process Robot Design Attachment Design Missions Demonstration Resources Questions 9/9/2017 2017 KC FLL Coaches
Team #3691 FLL Technical Manual. Ashburn Robotics NXTreme (Team#3691)
") FLL 2010-11 Team #3691 http://www.ashburnrobotics.com/ TechManual NXTreme 3691 - FLL 2010-11.doc Body Forward Page 1 of 44 TechManual NXTreme 3691 - FLL 2010-11.doc Body Forward Page 2 of 44 Ashburn Robotics
FLL 2010-11 Team #3691 http://www.ashburnrobotics.com/ TechManual NXTreme 3691 - FLL 2010-11.doc Body Forward Page 1 of 44 TechManual NXTreme 3691 - FLL 2010-11.doc Body Forward Page 2 of 44 Ashburn Robotics
LEGO 2D Planar Manipulator (with zero offset between Z1 and Z2 axes of rotation)
") LEGO 2D Planar Manipulator (with zero offset between Z1 and Z2 axes of rotation) Uses some parts not found in NXT Mindstorms Kit 9797 e.g. 2 nd Turntable, 1x12 plates, and 15100: Pin-hole Friction Peg.
LEGO 2D Planar Manipulator (with zero offset between Z1 and Z2 axes of rotation) Uses some parts not found in NXT Mindstorms Kit 9797 e.g. 2 nd Turntable, 1x12 plates, and 15100: Pin-hole Friction Peg.
FLL Programming Workshop Series
 FLL Programming 2017 Workshop Series 2017 1 Prerequisites & Equipment Required Basic computer skills Assembled EV3 Educational robot or equivalent Computer or Laptop with LEGO Mindstorms software installed
the complete parts reference bricks
 the complete parts reference Here s a detailed overview of all the pieces in your LEGO BOOST kit. You can also identify LEGO elements precisely by their LEGO ID, which is printed on the LEGO BOOST test
LEGO Mindstorms Class: Lesson 1
 LEGO Mindstorms Class: Lesson 1 Some Important LEGO Mindstorm Parts Brick Ultrasonic Sensor Light Sensor Touch Sensor Color Sensor Motor Gears Axle Straight Beam Angled Beam Cable 1 The NXT-G Programming
ORTOP Modular Robot v3.0 Arm Assembly
 Base Plate Assembly Parts Needed: Arm Assembly BAG 1 2 Socket Head Cap Screw, 1-1/4" 2 Socket Head Cap Screw, 1/2" 2 Button Head Cap Screw, 3/8" 6 Nuts 1 Gear Hub Spacer 1 Flat Building Plate 1 Single
BUILDING A COMPETITION ROBOT SESHAN BROTHERS
 BUILDING A COMPETITION ROBOT SESHAN BROTHERS OUR RULES FOR ROBOT DESIGN RULE #1: Take your time to build your base robot before jumping into attachment building and solving missions. RULE #2: If you are
Where C= circumference, π = 3.14, and D = diameter EV3 Distance. Developed by Joanna M. Skluzacek Wisconsin 4-H 2016 Page 1
 Instructor Guide Title: Distance the robot will travel based on wheel size Introduction Calculating the distance the robot will travel for each of the duration variables (rotations, degrees, seconds) can
Spare Parts. Contents. Contents Contents
 Spare Parts 2013 Spare Parts Contents Contents Contents LEGO Education StoryStarter 3 LEGO Education WeDo 4 Machines and Mechanisms 5 LEGO MINDSTORMS Education 6-8 TETRIX by Pitsco 9-16 LEGOeducation.us
Patterns of Building LEGO MINDSTORMS Robots
 Patterns of Building LEGO MINDSTORMS Robots KYLE BROWN, IBM Software Services for WebSphere This paper discusses patterns found in the design and programming of robots built using LEGO MINDSTORMS, particularly
2018 First Responders 4-H Robotics Challenge Page 1
 2018 First Responders 4-H Robotics Challenge Page 1 Contents 2018 First Responders 4-H Robotics Challenge... 3 1 Teams... 3 2 The Game... 3 2.1 Competition kit... 3 2.2 Field Mat... 3 2.3 Playing Field...
Hare and Snail Challenges READY, GO!
 Hare and Snail Challenges READY, GO! Pre-Activity Quiz 1. What are some design considerations to make a fast robot? 2. What are some design considerations to make a slow robot? 2 Pre-Activity Quiz Answers
In order to do this project you should review the following concepts:
 Catapult In order to do this project you should review the following concepts: Catapult 18 Rope Lego Band Rubber Band Catapult: Arm Catapult: Arm Catapult: Arm Leave the other end of the rubber band loose
Appendix Course Notes MIT Course Organizers. Chapter 7: LEGO Design
 EECS40/43 Appendix 4 Appendix 4 6.70 1999 Course Notes MIT 6.70 Course Organizers Chapter 7: LEGO Design 1 Chapter 7 LEGO Design When you're rst introduced to the LEGO Technic system, you may be amazed
Instructors. Manual GEARED. After-School Robotics Program By Haley Hanson
 Instructors GEARED UP Manual After-School Robotics Program By Haley Hanson Table of Contents Introduction 3 Before you Start 4 Program Overview 5 Proposed Timeline 6 Itemized Materials List and Sample
Robotics using Lego Mindstorms EV3 (Intermediate)
") Robotics using Lego Mindstorms EV3 (Intermediate) Facebook.com/roboticsgateway @roboticsgateway Robotics using EV3 Are we ready to go Roboticists? Does each group have at least one laptop? Do you have
Robotics using Lego Mindstorms EV3 (Intermediate) Facebook.com/roboticsgateway @roboticsgateway Robotics using EV3 Are we ready to go Roboticists? Does each group have at least one laptop? Do you have
Introduction to Robotics Rubrics
 Introduction to Robotics Rubrics Students can evaluate their project work according to the learning goals. Each rubric includes four levels: Bronze, Silver, Gold, and Platinum. The intention is to help
understanding sensors
 The LEGO MINDSTORMS EV3 set includes three types of sensors: Touch, Color, and Infrared. You can use these sensors to make your robot respond to its environment. For example, you can program your robot
Unit 4: Robot Chassis Construction
 Unit 4: Robot Chassis Construction Unit 4: Teacher s Guide Lesson Overview: Paul s robotic assistant needs to operate in a real environment. The size, scale, and capabilities of the TETRIX materials are
TeacherGeek Sumo Bot Vehicle Application Guide
 SUMO BOT VEHICLE EXAMPLE BUILD TeacherGeek Sumo Bot Vehicle Application Guide TeacherGeek, 011 SUMO BOT VEHICLE EXAMPLE BUILD TeacherGeek TeacherGeek s Sumo Bot Vehicle Activity is the perfect way to encourage
Final Review Powerpoint
 Final Review Powerpoint Simple Machines- A device that makes work easier, faster, or changes the direction of force using few or no moving parts Rube Goldberg- a complex machine that does a simple task
introduction what do I need to use this book? playing without a computer the EV3 software whom is this book for?
 The idea for this book was born in 2012 during a sandstorm in Saudi Arabia. I was locked in my hotel room waiting for the weather to improve and listening to Paul Dukas s symphonic poem The Sorcerer s
Model Name: robo. Number of Bricks: Lego Digital Designer
 Model Name: robo Number of Bricks: 197 file:///c:/users/christos/desktop/adsf/building%20instructions%20[robo].html 1/58 Step 1 of 54 file:///c:/users/christos/desktop/adsf/building%20instructions%20[robo].html
COLLECT AND SORT FRUIT
 World Robot Olympiad 2018 WeDo Regular Category (Age up to 10 years) Game Description, Rules and Scoring FOOD MATTERS COLLECT AND SORT FRUIT Version: January 15 th Table of Contents 1. Game Description...
You should have received the following contents in the package:
 Greetings, and thank you for purchasing a center stand for your V-Strom from Murphs! We strive to provide quality products at a fair price, and hope you agree we do it well. Whether you purchased a stand
Erik Von Burg Mesa Public Schools Gifted and Talented Program Johnson Elementary School
 Erik Von Burg Mesa Public Schools Gifted and Talented Program Johnson Elementary School elvonbur@mpsaz.org Water Sabers (2008)* High Heelers (2009)* Helmeteers (2009)* Cyber Sleuths (2009)* LEGO All Stars
2015 Maryland State 4-H LEGO Robotic Challenge
 Trash Talk Utilizing Trash to Power the World 2015 Maryland State 4-H LEGO Robotic Challenge Through Trash Talk, 4-H members involved in robotics will create LEGO robots that complete tasks related to
acknowledgments...xv introduction...xvii 1 LEGO MINDSTORMS NXT 2.0: people, pieces, and potential getting started with the NXT 2.0 set...
 acknowledgments...xv introduction...xvii about this book...xvii part I: introduction to LEGO MINDSTORMS NXT 2.0...xviii part II: building...xviii part III: programming...xviii part IV: projects...xix companion
An Introduction to Programming using the NXT Robot:
 An Introduction to Programming using the NXT Robot: exploring the LEGO MINDSTORMS Common palette. Student Workbook for independent learners and small groups The following tasks have been completed by:
PoeBot Building Instructions CCISD. Upper Gripper. Lower Gripper/ Spatula. PoeBot Instructions PLTW. Clear Creek ISD
 Upper Gripper Lower Gripper/ Spatula PoeBot Instructions PLTW Clear Creek ISD 1. Chasis Construction (Split Group with half starting Step 1 and half starting Step 13.) Note: These flat bearings are offset
Elastic-powered Bus : Assembly Instructions
 Elastic-powered Bus : Assembly Instructions Assembly Instructions 1. Carefully cut out the parts. 2. Fold along the dotted lines, making mountain or valley folds as indicated. 3. Attach the glue spots
Iphone 5 Glass/Lcd REPAIR GUIDE. Version Edition
 Iphone 5 Glass/Lcd REPAIR GUIDE Version 1 2016 Edition IPhone 5 Glass/LCd REPAIR GUIDE RiAna Soto Repair Training Specialist rsoto@cellairis.com FOR EVERY REPAIR MAKE SURE TO COMPLETE, INITIAL, AND HAVE
This is a motor attachment option in which the motors attach closely to the sides of the NXT.
 6 II. Ways to Attach NXT Motors 1. Simple Side Attachment Model Description: This is a motor attachment option in which the motors attach closely to the sides of the NXT. 7 These are the parts that you
RC4WD Diablo V2 Instruction Manual
 Version 1.1 RC4WD Diablo V2 Instruction Manual Thank you for your purchase. Welcome to the RC4WD family. This kit is a combination of many specially engineered and manufactured parts. Enjoy your build.
The light sensor, rotation sensor, and motors may all be monitored using the view function on the RCX.
 Review the following material on sensors. Discuss how you might use each of these sensors. When you have completed reading through this material, build a robot of your choosing that has 2 motors (connected
AUTOMATIC ADVANCE MANUAL
 AUTOMATIC ADVANCE MANUAL AVL Looms, Inc. 3851 Morrow Lane, Suite #9 Chico, CA 95928-8305 530 893-4915 530 893-1372 fax # info@avlusa.com www.avlusa.com Copyright 2009 TABLE OF CONTENTS Page # I. Parts.........................
re3d Assembling Gigabot: "Flatpack"
 re3d Assembling Gigabot: "Flatpack" Your Gigabot was assembled, calibrated, tested, and taken apart for shipping purposes. All you need to do is reassemble it, and you're ready to go! Written By: Chris
Pre-Activity Quiz. 2 feet forward in a straight line? 1. What is a design challenge? 2. How do you program a robot to move
 Maze Challenge Pre-Activity Quiz 1. What is a design challenge? 2. How do you program a robot to move 2 feet forward in a straight line? 2 Pre-Activity Quiz Answers 1. What is a design challenge? A design
KIT. Assembly Instructions. HayDay, LLC
 KIT Assembly Instructions HayDay, LLC 1-800-732-1654 www.stablegrazer.com Read completely through the assembly instructions before starting assembly. The Stable Grazer Kit comes in two boxes. Remove all
ADDICTIVE DESERT DESIGNS
 Preparation: Disconnect the negative battery terminal. Park the vehicle on level ground and set the emergency brake. We recommend reading through the installation instructions in whole before performing
glossary Vex starter kit glossary 1 Inventor s Guide
 # 12 mode Control Subsystem A Transmitter driving mode where axes 1 and 2 are used to control the primary navigation of the robot. Also called Arcade-style controls. 23 mode Control Subsystem A Transmitter
Nebraska 4-H Robotics and GPS/GIS and SPIRIT Robotics Projects
 Name: Club or School: Robots Knowledge Survey (Pre) Multiple Choice: For each of the following questions, circle the letter of the answer that best answers the question. 1. A robot must be in order to
Student Guide Speed challenge and robotics challenge mat
 Student Guide Speed challenge and robotics challenge mat Speed Challenge It s The Speed Challenge! We are really excited about this! It is all about speed. Get your LEGO MINDSTORMS Education EV3 moving
owners manual CAUTION: Read Rules for Safe Operation and Instructions Carefully Safety Assembly Operation Maintenance Parts
 owners manual Model No. 45-0350 (ATV) 45-0351 (FARM) (45-0350 SHOWN) TANDEM AXLE CART CAUTION: Read Rules for Safe Operation and Instructions Carefully IMPORTANT! The wheel bearings are not pre lubricated.
001-Component-build. Build the following Contraptor components before assembly:
 001-Component-build Build the following Contraptor components before assembly: http://www.contraptor.org/make-linear-rail-v2#assembly http://www.contraptor.org/make-linear-bearings-v2#assembly http://www.contraptor.org/make-sliding-elements#assembly
ANATOMY OF A BIT TM how you can tell top from bottom. four on the floor!
 ARCADE GAME BASICS 1 Learn BITSNAP ANATOMY OF A BIT TM how you can tell top from bottom. TOP BOTTOM BIT FEET 2 which COLOR-CODED BY FUNCTION Bits TM are grouped into four different categories, are color-coded.
Worksheet Answer Key: Tree Measurer Projects > Tree Measurer
 Worksheet Answer Key: Tree Measurer Projects > Tree Measurer Maroon = exact answers Magenta = sample answers Construct: Test Questions: Caliper Reading Reading #1 Reading #2 1492 1236 1. Subtract to find
MN High School Robotics 2006 MISSIONS
 MN High School Robotics 2006 MISSIONS ATOMIC FORCE MICROSCOPY Mission: Free the probe s nanotip. The robot must separate the nanotip from the material surface. The nanotip separated from the surface is
Lab book. Exploring Robotics (CORC3303)
") Lab book Exploring Robotics (CORC3303) Dept of Computer and Information Science Brooklyn College of the City University of New York updated: Fall 2011 / Professor Elizabeth Sklar UNIT A Lab, part 1 : Robot
Lab book Exploring Robotics (CORC3303) Dept of Computer and Information Science Brooklyn College of the City University of New York updated: Fall 2011 / Professor Elizabeth Sklar UNIT A Lab, part 1 : Robot
BY ALIEN TECHNOLOGIES CORP
 BY ALIEN TECHNOLOGIES CORP Assembly Instructions TopLift Pros YOU MAY ALSO REVIEW OUR ASSEMBLY VIDEO, PLAY AND PAUSE AT YOUR CONVENIENCE. JUST VISIT US AT WWW.TOPLIFTPROS.COM AND GO TO Customer Support
Activity No. The Physics of Hula-Hoops
 Activity No. The Physics of Hula-Hoops Objective: In this activity you'll get to create your own Hula-Hoops and investigate how their weights affect how they spin. Which do you think will spin better,
Tilt Sensor Maze Game
 Tilt Sensor Maze Game How to Setup the tilt sensor This describes how to set up and subsequently use a tilt sensor. In this particular example, we will use the tilt sensor to control a maze game, but it
WARNING!! DO NOT LIFT DOORS UP WHEN THE HOOD IS OPEN. THE DOORS WILL HIT THE HOOD!
 WARNING!! DO NOT LIFT DOORS UP WHEN THE HOOD IS OPEN. THE DOORS WILL HIT THE HOOD! THIS KIT INCLUDES: 4 M8-1.25X30MM BOLTS WITH WASHERS 12 M8-1.25X40MM BOLTS WITH WASHERS 2 SHOULDER BOLTS WITH RIGHT AND
Parts of a Lego RCX Robot
 Parts of a Lego RCX Robot RCX / Brain A B C The red button turns the RCX on and off. The green button starts and stops programs. The grey button switches between 5 programs, indicated as 1-5 on right side
C-180 Builder s Manual
 C-180 Builder s Manual. May 20, 2002 Last revised July 11, 2002 Copyright! 2002 Douglas Binder, Mountain Models www.mountainmodels.com sales@mountainmodels.com (719) 630-3186 1 Required Equipment! Xacto
AN HYBRID LOCOMOTION SERVICE ROBOT FOR INDOOR SCENARIOS 1
 AN HYBRID LOCOMOTION SERVICE ROBOT FOR INDOOR SCENARIOS 1 Jorge Paiva Luís Tavares João Silva Sequeira Institute for Systems and Robotics Institute for Systems and Robotics Instituto Superior Técnico,
Efficiency. Efficiency is a measure of how much of the work put into a machine is changed into useful output work by the machine.
 Efficiency Efficiency is a measure of how much of the work put into a machine is changed into useful output work by the machine. A machine with high efficiency produces less heat from friction so more
How to install your Landroid
 How to install your Landroid 4 The installation of the Landroid is easy. Depending on the size of your garden, the entire process only takes a short amount of time. If you are like us, you hate wasting
2017 Current Ford Raptor ADD Pro Front Bumper Installation Instructions
 2017 Current Ford Raptor ADD Pro Front Bumper Installation Instructions PREPARATION 1. Disconnect the negative terminal on the battery. Park the vehicle on level ground and set the emergency brake. 2.
2016/02 Hideo Nakano STRAW KITE
 2016/02 Hideo Nakano nh1886@yahoo.co.jp STRAW KITE Introduction We can build up an improvised airplane, which has a plastic straw skeleton, a rubbish bag sheet wing and a rubber band powered toy propeller.
contents in detail PART I GETTING STARTED acknowledgments...xvii
 contents in detail acknowledgments...xvii introduction...xix why this book?...xix is this book for you?...xix how does this book work?...xix the discoveries...xix what to expect in each chapter...xx getting
RH-412 STEEL DOORS INSTALLATION INSTRUCTIONS
 RH-412 STEEL DOORS INSTALLATION INSTRUCTIONS By following the steps outlined below, the assembly, installation and adjustment of the steel doors, will be a simple process. Let s start with the Driver Side.
Tube-Line Baleliner 7800TX2
 Tube-Line Baleliner 7800TX2 Parts Manual 29667 (13/04/12) 2 3 Frame Assembly 4 Frame Assembly Item Qty Part # Description 1 1 27298 E-Stop Button 2 8 28663 Outside Rail Pin 3 1 28805 Wire Shield 4 1 28823
Casting Tool Kit, from Jewelry Television. Introduction. Tools That Come With The Casting Kit
 Tools That Come With The Casting Kit 1. 2. 3. 4. Stone Setting Pliers Pin Vise Prong Lifter 80mm Brass Gauge 5. 6. 7. 8. Tweezer Burnisher Prong Pusher Ring Clamp Casting Tool Kit, from Jewelry Television
INSTALLATION INSTRUCTIONS RH 412 STEEL DOORS
 By following the steps outlined below, the assembly, installation and adjustment of the steel doors, will be a simple process. Let s start with the Driver Side. Note: Having the hood open makes the job
LANDING GEAR. 1. Fit landing gear into slots on bottom of fuselage.
 LANDING GEAR 1. Fit landing gear into slots on bottom of fuselage. 4. Use channel-lock pliers to press blind nuts into position (note: drilled hole should be slightly smaller than shaft of blind nut for
Chapter 1. Robots and Programs
 Chapter 1 Robots and Programs 1 2 Chapter 1 Robots and Programs Introduction Without a program, a robot is just an assembly of electronic and mechanical components. This book shows you how to give it a
Strategic Design. Michael Corsetto
 Strategic Design Michael Corsetto Training Golden Rule #3 Steal From The Best, Invent The Rest Get Team familiar with past games and robots Games will often be similar to past games Examples: 2004, 2010,
STEP 1 : DESTROYER FRONT BUMPER INSTALL GATHER YOUR TOOLS AND LAY OUT YOUR PARTS... *shorty bumper to show hardware* Tools Required:
 DESTROYER FRONT BUMPER INSTALL JL STEP 1 : GATHER YOUR TOOLS AND LAY OUT YOUR PARTS... Tools Required: - Utility knife - 11/16 Deep socket - Ratchet - 11/16 Crescent wrench - Ratchet Extension - 1/4 socket
Studuino Icon Programming Environment Guide
 Studuino Icon Programming Environment Guide Ver 0.9.6 4/17/2014 This manual introduces the Studuino Software environment. As the Studuino programming environment develops, these instructions may be edited
Mindstorms NXT. mindstorms.lego.com
 Mindstorms NXT mindstorms.lego.com A3B99RO Robots: course organization At the beginning of the semester the students are divided into small teams (2 to 3 students). Each team uses the basic set of the
Texas Essential Knowledge and Skills - Grade Three
 12 Texas Essential Knowledge and Skills - Grade Three (6) Force, (A) motion, explore and different energy. forms The student of energy, knows including that forces mechanical, cause change light, sound,
Installation Instructions Universal Crossmember Kit - 60 Track Width BEFORE Measure Twice, Weld Once! II
 Installation Instructions Universal Crossmember Kit - 60 Track Width Please read these instructions completely BEFORE starting your installation. Remember the basic rule for a successful installation:
Easy Engineering Guide
 Index: Unleash Your Creativity! Page 1: The Basics Page 2: Sorting Dowels Page 3: Measuring and Cutting Page 4: Dowels and Holes (Reaming Holes) Page 5: Reaming, Screws, Slide-Stop Material Page 6: Hydraulics/Pneumatics
Note to Teacher. Description of the investigation. Time Required. Materials. Procedures for Wheel Size Matters TEACHER. LESSONS WHEEL SIZE / Overview
 In this investigation students will identify a relationship between the size of the wheel and the distance traveled when the number of rotations of the motor axles remains constant. It is likely that many
e d u c a t i o n Detect Dark Line Objectives Connect Teacher s Notes
 e d u c a t i o n Objectives Learn how to make the robot interact with the environment: Detect a line drawn on the floor by means of its luminosity. Hint You will need a flashlight or other light source
The build should take around 2 to 3 hours. However, by leaving yourself more time you can go at a relaxed pace and be sure not to miss anything.
 Before We Start Before we jump into building your Picade, make sure you have everything to hand. I know you're eager to jump right into the construction, but we need to get set up properly first! 1. Prepare
How to Insert Metal Snaps in Fabric
 Published on Sew4Home How to Insert Metal Snaps in Fabric Editor: Liz Johnson Tuesday, 18 August 2015 1:00 For some sewing applications, there's nothing that works quite as well as a metal snap. They're
a Motorized Robot Inventor s Guide What will yours look like?
 8+ a Motorized Robot Spark!Lab is a real place located in the Smithsonian s National Museum of American History. It s a hands-on invention activity center where visitors learn that invention is a process
MAKEBLOCK MUSIC ROBOT KIT V2.0
 MAKEBLOCK MUSIC ROBOT KIT V2.0 Catalog Music Robot Kit V2.0 Introduction... 1 1 What is Music Robot Kit V2.0?... 1 1.1 Mechanical part... 1 1.2 Electronic part... 1 1.3 Software part... 1 2 Music Robot
Students will design, program, and build a robot vehicle to traverse a maze in 30 seconds without touching any sidewalls or going out of bounds.
 Overview Challenge Students will design, program, and build a robot vehicle to traverse a maze in 30 seconds without touching any sidewalls or going out of bounds. Materials Needed One of these sets: TETRIX
Crestline Dampening System. Installation Instructions. Ryobi 2700, 2800, 3200, 3200E Itek 950, 960, 975 Parent. X /98 Rev-A
 Crestline Dampening System Installation Instructions Ryobi 2700, 2800, 3200, 3200E Itek 950, 960, 975 Parent X88-30 3/98 Rev-A GENERAL INFORMATION ATTENTION CRESTLINE DAMPENER OWNER! Accel Graphic Systems
HOLY ANGEL UNIVERSITY COLLEGE OF INFORMATION AND COMMUNICATIONS TECHNOLOGY ROBOT MODELING AND PROGRAMMING COURSE SYLLABUS
 HOLY ANGEL UNIVERSITY COLLEGE OF INFORMATION AND COMMUNICATIONS TECHNOLOGY ROBOT MODELING AND PROGRAMMING COURSE SYLLABUS Code : 6ROBOTMOD Prerequisite : 6ARTINTEL Credit : 3 s (3 hours LAB) Year Level:
Unit 2 Lesson 3 Machines. Copyright Houghton Mifflin Harcourt Publishing Company
 Work It Out What do simple machines do? A machine is any device that helps people do work by changing the way work is done. The machines that make up other machines are called simple machines. The six
Hollywood Swing Away 2 and 4 Bike Racks Assembly and Installation Guide
 Hollywood Swing Away 2 and 4 Bike Racks Assembly and Installation Guide Tools Required: two adjustable wrenches, pliers, ¾ socket wrench recommended Note: please do assembly near your vehicle as you Can
ELECTRIC RACER BASIC BUILD
 Page 1 Name: Set: Date: This guide will take you through the process of creating a basic electric racer. After you finish this build, you should be able to experiment, design and engineer your own racer.
BombiniBot Parts and Assembly
 BombiniBot Parts and Assembly Copyright 05 mindsensors.com / Parts Loose Parts: Part Quantity Tire Motor Mount 4-Wire Encoder Cable Encoder Wheel Velcro Strip Top Chasis Plate Bottom Chasis Plate Battery
Page 1 of 12 GENERAL INSTRUCTIONS KHJKK Installation
 Page 1 of 12 KHJKK PICTURE ABOVE IS THE UNIVERSAL KIT; YOUR KIT MAY BE DIFFERENT. THIS KIT INCLUDES: 8 M8-1.25X30MM BOLTS WITH WASHERS 8 M8-1.25X40MM BOLTS WITH WASHERS 2 PINS RIGHT AND LEFT HINGE ASSEMBLY
DOUBELL JUMBO SERIES OPERATIONS GUIDE
 Applicable Codes: JJM, JJMEVSP, JJMEV3P, JJMPV, JJMDV JJJM, JJJMEVSP, JJJMEV3P, JJJMPV, JJJMDV For any questions pertaining to this guide, contact us: EMAIL: sales@dme.co.za TEL: +27 41 5859060 1 CONTENTS:
2015 Current Ford F150/Raptor Adaptive Cruise Control Module Relocation Bracket Installation Instructions
 2015 Current Ford F150/Raptor Adaptive Cruise Control Module Relocation Bracket Installation Instructions PREPARATION 1. Disconnect the negative terminal on the battery. Park the vehicle on level ground
10/21/2009. d R. d L. r L d B L08. POSE ESTIMATION, MOTORS. EECS 498-6: Autonomous Robotics Laboratory. Midterm 1. Mean: 53.9/67 Stddev: 7.
 1 d R d L L08. POSE ESTIMATION, MOTORS EECS 498-6: Autonomous Robotics Laboratory r L d B Midterm 1 2 Mean: 53.9/67 Stddev: 7.73 1 Today 3 Position Estimation Odometry IMUs GPS Motor Modelling Kinematics:
DP-8 H. H. MØRCH. Instructions. Contents of the packing. Spatial requirements. Mounting the bush
 DP-8 Instructions H. H. MØRCH Contents of the packing In the packing of the tonearm you will find the arm base in which the bearings are encapsulated in a heavy body. This is the link between the moveable
Robot Class. Are all robots created equal?
 Robot Class Are all robots created equal? Robot Class Points to Remember: We add classes as we see new types of robots! None of the Classifications are any better (or worse) than any other. Robots can