LEGO Mindstorms Class: Lesson 1
|
|
|
- Gerard Barker
- 6 years ago
- Views:
Transcription


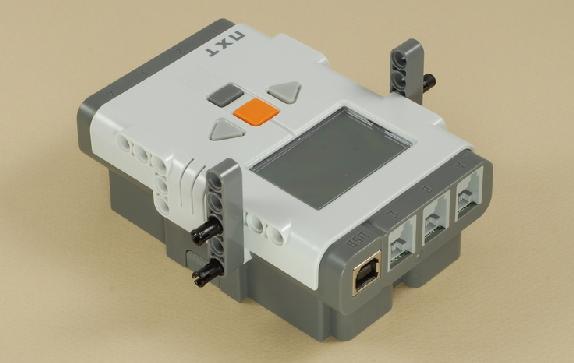
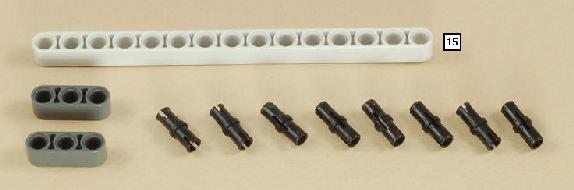
1 LEGO Mindstorms Class: Lesson 1 Some Important LEGO Mindstorm Parts Brick Ultrasonic Sensor Light Sensor Touch Sensor Color Sensor Motor Gears Axle Straight Beam Angled Beam Cable 1

2 The NXT-G Programming Environment 2


3 Write a simple program to make the brick play a sound 1. Connect the USB cable between the brick and the computer. 2. Select the Sound brick from the Action Blocks, and select a Sound file to play. The 'Play Sound' Program The Sound Block Settings 3. Select "Save" from the file menu, and save your program with the name "Play Sound". 4. Press the "Download and Run" button. Did it play? 5. Unplug your brick from the computer. See if you can find the program named "Play Sound" on the brick and play it directly from the brick. 6. Congratulations! You just wrote and ran your first NXT-G program! Change the "Play Sound" program to repeat itself 3 times using a loop 1. Select the "Loop" brick from the Flow Blocks and put it after the "Sound" block 2. Put the "Sound" block from before inside the loop, and set the loop to repeat 3 times. The Sound block inside a Loop The Loop Block settings 3. Download and play the"play Sound" program. Did it do what you expected? 3


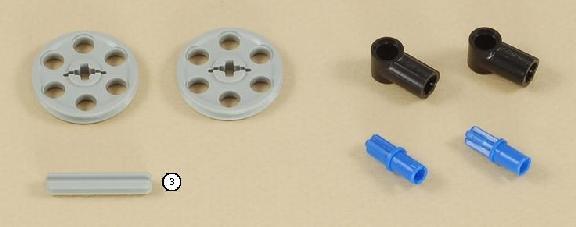
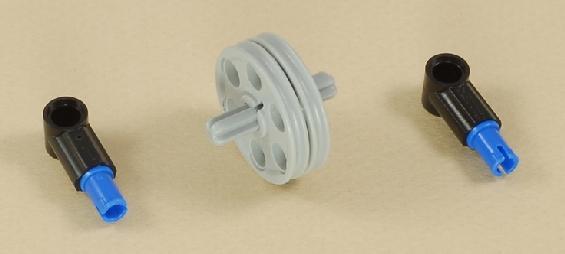
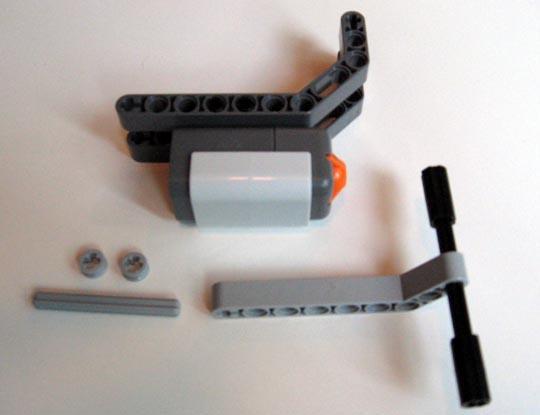
4 Building a Door Alarm: The parts you'll need: Step 1: Attach connectors to the arms: Step 2: Attach the arms together, and connect them to the ultrasonic sensor and the brick: 4
 Repeat forever a) Wait for Ultrasonic Sensor to detect an object")
 Write the Program: 1. Start with a Loop (from the Common Blocks List).")
5 Step 3: Connect a wire from the ultrasonic sensor to port 4 on the brick. Pseudocode: The Door Alarm Program: 1) Repeat forever a) Wait for Ultrasonic Sensor to detect an object closer than 16 inches i) When an object is detected repeat the following 3 times (1) Make a sound 2) Return to 1) Write the Program: 1. Start with a Loop (from the Common Blocks List). Set the Loop to run "Forever" The Loop Block The Loop Block Settings 5

, and the Distance is set to \"< 16 Inches\".")


6 2. Put a Wait Block (from the Common Blocks List) inside the loop. Set the control to "Sensor" and select "Ultrasonic Sensor" from the Sensor list. Make sure the Port is set to "4" (where the Ultrasonic Sensor is plugged in), and the Distance is set to "< 16 Inches". A Wait Block inside the Loop Block The Wait block Settings 3. Add a loop after the Wait block, and set the control to "Count" and the "Count" to "3". A loop inside the main loop The inner Loop settings 4. Put a sound block inside the inner loop and choose a sound to play when the alarm triggers The finished Door Alarm program 6
7 5. Save the program with the name "Door Alarm". Download and test your program. Did it work? Check with your instructors if you have any problems. If you finish the door alarm try this! (1) Pretty Tricky: Can you change the program so that the alarm makes a different sound if the object it detects is closer than 6 inches? Hint: You will have to use a "Switch" block to perform different actions if the object is closer than 6 inches, or further than 6 inches. Think carefully about where to put the Switch block, and if some of the existing program needs to go inside the Switch block. (2) Even Trickier: Can you change the program so that the screen on the brick displays the distance detected? This will require a block that will convert the distance (a number) to text (letters) to be displayed on the screen and a block to display the text. It also requires the use of data wires to carry the output data from the ultrasonic sensor to the converter block, and from the converter block to the display block. Don't worry if you can't do this one yet, we'll be covering data wires later in the class. (see your instructors for help with the answers) 7


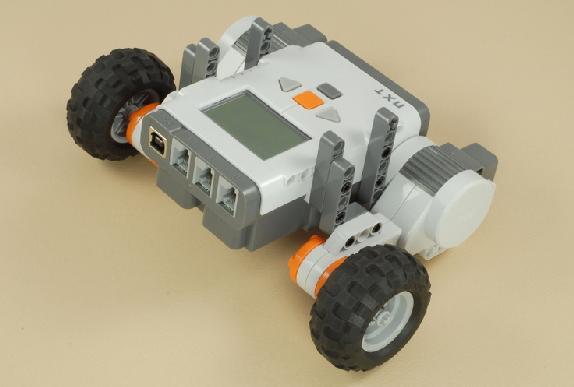
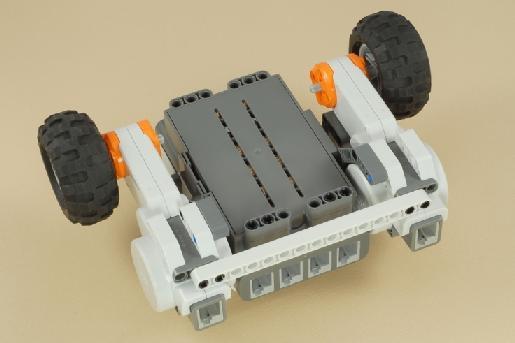
8 LEGO Mindstorms Class: Lesson 2 Build A Mindstorms Vehicle - 5 Minute Bot: (Copied from We will build a 3-wheeled robot vehicle with two motorized wheels, and an extra wheel that can pivot, called a "caster". It is possible to build a robot with 4 or 6 wheels, or with treads, like a tank, but the 3-wheeled robot is the easiest to program, so that's what we'll use. A robot with a caster generally runs best on very smooth, flat surfaces, so that the caster can glide easily. For rougher surfaces, 4 wheels or treads may work better. Follow the steps below to build the robot vehicle. Step 1: Attaching Wheels to the Motors 1


9 Step 2: Attaching Angled Beams to the Motors Step 3: Adding Wheels and Motors to the Bot 2

10 Step 4: The Attachment Bar 3

11 Step 5: The Caster 4
 wires to connect the")


12 Step 6 - The Wiring: Use two medium length (35 cm) wires to connect the motors to ports B and C on the NXT. Make sure that the motor on each side is connected to the port on that side. That's it! You made a robotic vehicle! 5


13 Making the Robot Move: Move Block vs. Motor Block To make the motors turn, we can either use the Move Block or the Motor Block. There are several differences between the two blocks, but the biggest is that the Move block can control one, two, or three motors at one time, while the Motor block can only control one motor at a time. The Motor block allows you to control the motor in more detail, but for driving, you usually want to have at least two motors running two wheels at the same time. This is why we'll stick with the Move block to drive our robot. The Move Block The Move block controls one, two or three motors simultaneously. Look at the settings for the move block. Let's figure out what each one does: Port: This tells the Move block which of the A, B and C ports are connected to motors to control Direction: This determines whether the wheels turn forwards or backwards. Steering: Depending on where the slider is, this gives more power to one motor or the other (you specify which of the two motors to use). Power: This specifies how much power overall to send to the motors. More power makes the motors turn faster, less power turns them slower Duration: This determines how many turns the motors make, or how long in seconds they run for. The duration can be specified in rotations, degrees, seconds or unlimited (run forever). Next Action: Brake means the motor will stop after it is finished. Coast means it will keep turning, though without any additional power. We will almost always use Brake. Q: What happens to the vehicle if the motor on the left side runs faster than the motor on the right side 6 (assume both motors are turning forwards)? A:

14 Moving in a Straight Line Let's figure out how far the car will go when we input certain data to the Move Block. Create a simple program in NXT- G, consisting of a single Move Block. Save it in your folder on the S drive with the name "Move Test". Use this program to answer some of the questions below. You may need a calculator: 1. What is the circumference (distance around) of a tire on your robot (in inches)? inches 2. How far do you think the car will go (in inches) when the wheel turns one time? inches 3. Try it. How far did it go? inches 4. How far do you think the car will go (in inches) when the wheel turns 5 times? inches 5. Try it 3 times and compare your results: How far did it go? inches inches inches 6. How accurate do you think the Move block is? 7. If you want the robot to travel 20 inches, how many turns should the wheel make? turns. Try it. Did it work? 8. How many degrees correspond to one rotation of the wheel? degrees 9. How far will the car go if the wheels turn 720 degrees? inches 10. Try it. How far did the car go for at 720 degree rotation? inches Turning: The robot will always turn when its wheels spin at different rates. In most cases, it's hard to predict where it will go when both wheels are turning at different rates, so we'll focus on two kinds of turns that we can predict: Pivoting in Place, and Turning with One Motor. You can control which kind of turn you make with the steering setting. The following steering values give you the following different kinds of turns: Steering Value Steering Results 100 Pivot in place to the right 50 Turn to the right using one motor 0 Go straight -50 Turn to the left using one motor -100 Pivot in place to the left Pivoting in Place If you turn both motorized wheels in opposite directions at the same power (speed), the vehicle will pivot around a point halfway between the two powered wheels, as 7

15 shown in the picture below. The wheels travel around a circle whose diameter is the length of the axle. The tricky part is to figure out how many rotations the wheels need to complete a single turn. Let's do the calculation, and then compare it to real life by programming our vehicle. You will probably need a calculator: 1. What is the distance across the circle the car makes when it turns? inches 2. The circumference (distance around) the turning circle is about 3.14 x diameter = inches 3. How many rotations does the tire have to make to travel the circumference of the circle? The formula for the answer is: (Circumference of turning circle) (circumference of tire) = rotations Let's program our Move Block to test our answer. Slide the Steering slider all the way to the right to specify a right turn about the center of the vehicle. Put the number of rotations from answer 3 above into the Duration setting to specify how far around the vehicle will turn. Download and run your program. Did it work? Check with your instructor if you're not sure of the answer. Turning with One Motor If you give power to only one motorized wheel, while holding the other one still, the vehicle will pivot around the unpowered wheel. Let's do a calculation like we did above. Remember, in this case, the diameter of the circle the car makes is two times the length of the axle. 4. What is the diameter (distance across) the circle the car makes when it turns? inches 5. The circumference (distance around) the turning circle is about 3.14 x diameter = inches 6. How many rotations does the tire have to make to travel the circumference of the circle? The formula for the answer is: (Circumference of Circle) (Circumference of Tire) = rotations Let's program our Move Block to test our answer. Slide the Steering slider to value 50 to specify a turn to the right using one motor. Put the number of rotations from answer 6 above into the Duration setting to specify how far around the vehicle will turn. Download and run your program. Did it work? Check with your instructor if you're not sure of the answer. 8

16 Commenting your program: Now that you know how to go straight and turn, you can combine a series of move blocks in a row to make your robot follow a certain path. When you have a lot of Move blocks in a row that look similar, it is a good idea to place comments near each move block so that you know what it's doing. That way if you have to make any changes, it's easy to find the right place. You can add comments to your program using the comment tool window. An example of a commented program is below: at the top of the NXT Challenges for You (1) Can you write a program to make the Robot travel in a 12 inch square, using only 2 move blocks? (2) Your instructor has set up a maze lined by blocks. Can you program your robot to navigate the maze without knocking over any blocks? Note: Before you start programming, measure the distances in the maze to predict where you want your robot to go. You will probably have to adjust your program afterwards, but you will have a good starting point. (3) Your instructor has set up a "parking garage" made of blocks. Can you drive your vehicle from the starting point to park in the garage, without knocking over any of the blocks? 9

17 LEGO Mindstorms Class: Lesson 3 Why Use Sensors? 1: Keep the Robot on Track: In Lesson 2 we saw that it can be difficult to get the robot to navigate around its environment by just telling it where it needs to go. Part of the problem is that small variations in its path can become really big errors once the robot has travelled a long distance. For example, if you are trying to get your robot to move straight ahead, and it is angled off path by just a little, it may only be a small amount off course after a few inches, but will be much further off course after it has travelled a few feet. You can see this in the picture below. 1) Starting off course by a small amount can grow to a big error in a short while. We can fix some of this inaccuracy by having the robot get information about its surroundings via sensors. This allows the robot to find out where it is by "seeing" what is around it, figure out if it is on the right path, and make corrections if needed. 2: Allow the Robot to interact with users and its environment Sometimes you want the Robot to respond to a person or thing that it meets, or to give you information about the outside world. A robot will only know about its environment if it can sense it in some way. With the right sensors, a robot can tell if it has come across a dangerous object or what the conditions around it are like (for example how hot or cold it is). For example, sensors allowed the Mars Rover, a robot that landed on the surface of Mars, to drive around the surface of the planet, without falling into a deep hole, or running into a big rock. Sensors also allowed the robot to detect and communicate the conditions on Mars back to scientists on Earth. 1


![It can notice if it has been: [1] pressed (the orange button has been pushed inwards) [2] released (the orange has moved from being](/docs-images/74/70636715/images/18-4.jpg "pushed in to its original position) [3] bumped (the orange button was pushed and released in a short period of time) There are two")
18 The Touch Sensor and Bumper: Today's lesson focuses on the touch sensor. It is a simple device that can detect whether someone or something touches, releases or "bumps" the orange button on its front. The button on the touch sensor is rather small, however, and it can be hard to press unless your robot is lined up perfectly with its target. To make the sensor easier to use, we will build and attach a "bumper" to it. The bumper simply consists of a bar which will trigger the touch sensor when any part of it is pushed. That way an object doesn't have to be touching the orange button directly to trigger the touch sensor. 2) The Touch Sensor 3) The Touch Sensor with a Bumper Programming with the Touch Sensor: The touch sensor can detect three different conditions. It can notice if it has been: [1] pressed (the orange button has been pushed inwards) [2] released (the orange has moved from being pushed in to its original position) [3] bumped (the orange button was pushed and released in a short period of time) There are two main ways to program with the touch sensor. The Touch Sensor block, checks in with the sensor, and waits to see if it has been triggered. 4) The Touch Sensor Block The Wait for Touch Sensor will not do anything until the action specified (pressed, released or bumped) happens. 5) The Wait for Touch Sensor Block 2


19 Now that we know how it works, let's add a touch sensor to our 5 Minute Bot from the last lesson, and program it to perform some tasks Adding a Touch Sensor to "5-Minute Bot" to make "Bumper Bot": We Start with 5-minute Bot from last time. (The motor wires have been removed to make it easier to see) Attach the Touch Sensor to a Bumper: Step 1: 3

20 Step 2: 4

21 5


22 Attach rails to 5-minute Bot: 6


23 Attach the Bumper to the 5-Minute Bot: 7


24 Attach the Wires (Connect the Touch Sensor to Port 1): You're done with Bumper Bot! 8


25 Programming Exercises: Exercise 1: Write a simple program to say "ouch" when the touch sensor is pressed and "hooray" when it is released. The pseudocode (program steps written in plain language) for this program looks like this: Wait for touch sensor to get pressed. Say "ouch". Wait for touch sensor to get released. Say "hooray". Repeat from the beginning. 1) We will want our program to repeat itself so that it can say "ouch"/"hooray" over and over again. Most of the time when you repeat actions inside a program it's a good idea to use a loop. 2) Wait for the touch sensor to get pressed. 3) Make an "ouch" sound. 4) Now wait for the touch sensor to get released 9

26 5) Say "hooray", and the loop will return you to the beginning of the cycle Exercise 2: Write your own program to have the "Bumper Bot" drive until the bumper hits something, then stop, back up about 6 inches, turn right and start over again. The pseudocode would look something like this: Start driving forward Wait until the bumper is touched Stop Back up about 6 inches Turn right Repeat from the beginning Challenges for You Challenge 1: See if you can get Bumper Bot drive up to a block, and stop when it touches it without knocking the block over. Challenge 2: Use the touch sensor to get Bumper Bot to knock a block off the edge of a low platform (your instructors will set one up for you) without falling over the edge of the platform itself. Challenge 3: (Advanced!): Have Bumper Bot travel to a wall, stop when it hits it and then travel backwards to the exact same starting place. You need to use the rotation sensor and data wires to do this. 10

27 LEGO Mindstorms Class: Lesson 4 The Light Sensor: The light sensor allows a Mindstorms robot to "see" the difference between light and dark. It detects light and dark surfaces by shining a light on the surface, and seeing how much of the light bounces back to the detector. Light surfaces reflect more light, and dark surfaces reflect less light. You can also turn off the light bulb in the light sensor, and then the sensor will detect the amount of light around it. We'll work with reflected light, and use the light sensor attached to 5-Minute Bot to detect dark and light surfaces that it drives over. Because lighting conditions differ depending on where you are or what time of day it is, the light sensor needs to be calibrated every time you use it under different lighting conditions (for example if you move from a dark room to a brightly lit room, or take your robot outside). What looks to be one color in a dark room may look different in bright sunlight. You have to tell the light sensor what you mean by "dark" and what you mean by "light". When you write a program that checks the light sensor, the sensor returns a value between 0 and is the darkest and 100 is the lightest. When you calibrate the sensor, it asks you to show it the darkest color it will be detecting, and it sets that as the 0 value. Similarly, it asks to see the lightest color you will be detecting, and it sets that value to 100. We'll see how to calibrate the sensor later on. Let's attach a light sensor to our robot. Attaching the Light Sensor to the 5-minute Bot: Take off the touch sensor from the last lesson so you are only left with the 5-minute Bot (below) 1


28 You will need these parts: Now we can assemble and attach the light sensor: 2


29 Attach the light sensor to the underside of 5-minute-Bot Connect the light sensor to Port 3 on the Brick. This is the default light sensor port. That's it! You're ready to follow the light! Calibrating the Light Sensor: You can calibrate the light sensor directly from the NXT-G programming environment, or write your own program to do it. If you use the NXT programming environment directly, your brick needs to be plugged in to the computer for calibration. Since we're using laptops, and can move them around easily, we'll use that method. 3
 Select \"Calibrate Sensors\" from the \"Tools\" menu in the NXT-G window. 3) From the pop-up window (shown below), select light sensor, port 3, and click the \"Calibrate\" button.")
30 Exercises: Exercise 1: Calibrating the light sensor in the NXT-G programming environment 1) Plug the brick into your computer. Be sure it is turned on. 2) Select "Calibrate Sensors" from the "Tools" menu in the NXT-G window. 3) From the pop-up window (shown below), select light sensor, port 3, and click the "Calibrate" button. 4) Look at the screen on the brick. It is asking you to hold the light sensor over the darkest surface it will be scanning. The changing numbers you see are the "raw" unprocessed output from the light sensor, and they range from 0 to about Move the sensor around to surfaces with different lightness/darkness, and watch how the numbers change. After you calibrate the sensor and use it in a program, the NXT-G program environment will convert the numbers to a value between 0 and ) Place the light sensor so that it is completely over a dark line on the paper your instructors have set up, then press "Enter" (the orange button). 6) The screen is now asking you to hold the light sensor over the lightest surface it will be scanning. Place the light sensor over the white part of the paper your instructors have set up, then press "Enter". 7) Your light sensor is now calibrated. The brick will remember these calibration settings until the next time you recalibrate it. You will only need to recalibrate if you are using the light sensor in a place with different lighting conditions. Exercise 2: Write a program to display the final light sensor readings Let's write a program to view the output from the calibrated light sensor. We're using some advanced concepts here, including data wires, which carry information from one NXT programming block to another. Data wires will let us take the numbers that are output by the light sensor block, and use them as input to the display block. To input and output data to a NXT-G programming block, many blocks have what is called a data "hub" which clicks in and out of the data block. You can click on the hub to make it slide in and out. Below is a picture of the Display Block with the data hub closed, and opened. The ports on the data hub are for taking in and putting out different kinds of data, such as numbers, text and images. 4


 output from the light sensor into a form that the display block can")

31 A Display Block with the data hub closed: To open the Data Hub, click on the line at the lower left of the Display Block. A Display Block with the data hub open: Each port is for inputting and outputting a different kind of information, such as text, start position, end position, etc. You will need to know how to display written information on the NXT brick's screen. The screen can write almost anything you tell it to, but it only understands numbers in "text" format. Letters and words are automatically "text", but numbers are not. To put the numerical (number) output from the light sensor into a form that the display block can understand, we will have to convert it to text. Create a program named "showlight.rbt" in the NXT-G programming window (be sure to save it to the shared drive!), and follow the steps below to write it. 1) We will want to run this program repeatedly, so set up a forever loop: 2) Add a Light Sensor Block (from the Sensor Menu), and make sure that it reads Port 3 3) Add a Number to Text Block (from the Advanced Menu) 5

 Add a Display Block, and click on the data hub to make sure it pops out.")
32 4) Now move the cursor to the plug sticking out of the bottom of the Light Sensor Block. It will turn into a picture of a little spool of wire. Click on the plug, and drag the cursor over to the plug to the left of the "#" plug at the bottom of the Number to Text Block. When you let go, you will create a yellow Data Wire connecting the output of the light sensor block to the input of the Number to Text Block. 5) Add a Display Block, and click on the data hub to make sure it pops out. 6) Connect a data wire from the output of the Number to Text box to the capital letter "T" (for Text) on the Display Block data hub. 6
 Now let's test out our program. o Run \"showlight.")


33 Set the Display block to display the input Text: 7) Add a Wait block, and set it to wait for 0.2 seconds before repeating 8) Now let's test out our program. o Run "showlight.rbt", and move the sensor around over different dark and light areas. Do you see the readout change? When is the readout higher, and when is it lower? Is that what you expected? o Try rolling your robot over the dark lines on the paper that your instructors set up. Watch the values change as the sensor starts to move over the line. Do the values make sense? 7
34 Challenges: Challenge 1: Write a program to make the robot drive until it detects a dark line and then stop. Use the paper that your instructors have provided, with electrical tape to make the dark lines. Before you attempt this challenge, think about what it means for your robot to detect a dark line. Think about what the sensor readings will be as the sensor approaches the line. When the light sensor is over the white paper, the readings will be pretty high. When the sensor is just a little bit over the black line, less light will get reflected, so the light sensor values will start to drop. The more of the sensor that is over the black line, the lower the light sensor values will be. Hint 1: Use the Wait for Sensor Block to let your robot keep moving until the value of the Light Sensor has dropped past a certain value. Think about what a reasonable value might be to indicate that the sensor is over the black line. Hint 2: Make sure that the first Move Block in your program uses the unlimited setting, so that your program will check the light sensor while the robot is still driving. Otherwise, the robot will finish running the move block before it checks the light sensor. Challenge 2: Your instructors have created a "ring" out of dark electrical tape on white paper. The ring has a hole in it, large enough for your robot to drive through. Write a program that allows your robot to find its way out of the ring without crossing over a black line. Hint: When you encounter a black line, you will want the robot to stop, turn, and travel in a different direction. So the pseudocode (description of your program in words) would look something like this: 1. Start driving forward. 2. If you come across a black line, stop. 3. Back up a few inches (you decide how many) 4. Turn (you decide how far the robot should turn - try different values and see what works best!) 5. Return to the start Remember, each line in pseudocode corresponds to one instruction for the robot (and one programming "block" in NXT- G) Once you get the program working, experiment with different values for the turn. See which value works best for getting your robot out of the "ring" the fastest. Challenge 3: (Advanced!) Your instructor has provided paper with dark parallel lines. Write a program that lets the robot drive over two black lines, and stop on the third. There are many ways to solve this problem. See how creative you can be! Talk to your instructors and see if your solution matches theirs. 8

35 LEGO Mindstorms Class: Lesson 5 Line Following with the Light Sensor: In the last class we used the Light Sensor to detect when our robot encountered a dark line. In this class, we're going to use the Light Sensor to help our robots follow along a dark line. Specifically, we will follow the edge of the line. Let's say we want our robot to follow a dark line on white paper. Remember, if we calibrated it, the light sensor will output a value from 0 to 100 depending on how much of the sensor is over the dark line. 0 means the sensor is totally over the line. 100 means the sensor is only over the white paper. Imagine what the sensor would see if it moved from left to right over a dark line (see picture below): Before we work with the line sensor, we'll need to calibrate it for the lighting conditions in the class today. Last week you loaded a program onto your robot called "Calibrate.rbt". Run it by holding the light sensor completely over the black line, and pressing the orange button on the brick, then holding the robot over the white paper and pressing the orange button again. You can test the calibration by viewing the output of the light sensor in a Light Sensor Block in the NXT-G window. Ask your instructors for help if you don't remember how to do this. Exercise 1: Write a line following program We're going to tell our robot to follow the left edge of the line. In the picture above, we see that the sensor reading is high (> 50) if the sensor is mostly over the paper, and the sensor reading is low (< 50) if the sensor is mostly over the line. We can use this fact to keep the sensor lined up with the left edge of the line while the robot moves forward. Let's write some pseudocode that does this: Get output from the sensor If the light sensor output is greater than ( > ) 50, we must be left of the line's edge o Move forward and turn slightly to the right If the output is less than ( < ) 50, we must be right of the line's edge o Move forward and turn slightly to the left Repeat from the beginning 1


 for this.")
36 Now let's turn this pseudocode into an actual NXT-G program. Create a program called linefollow.rbt, and save it to your folder. 1. Since the program repeats, we'll need a loop 2. Now notice we have an "If" statement in our pseudocode. This means we have to make a decision based on the output of the light sensor. We'll use the "Switch" block (from the Common menu) for this. Select the settings on the switch block to use the light sensor output, and make a decision based on whether it is greater than or less than 50. 2


37 3. First fill in the top part of the switch statement. This is what will happen if the light sensor value is greater than 50 (see that the "light symbol" looks bright). Remember that a value greater than 50 means that the robot is positioned left of the line. We want to make the robot move forward, and slightly to the right to get closer to the line. Instead of using a Move Block, we are going to use two Motor Blocks to do this. The motor blocks give the robot a little more control over the turn, and make the movement smoother. Notice we have one motor block for motor B, and one for Motor C. Since Motor B is on the left and Motor C is on the right, if motor B spins faster (has more power) than Motor C, the robot will move to the right. Set the power for Motor B to 50 and the power for Motor C to Now let's fill in the bottom part of the switch statement. This is what we do if the light sensor returns a value less than 50. When the value is less than 50, the light sensor is mostly over the line. Since we want the robot to follow the left edge of the line, we'll want it to move forward, and slightly to the left. In this case, we'll want Motor C to have more power than Motor B. Add two motor blocks like we did in step 3, but set the power for Motor B to 10 and the power for Motor C to 50. That's the whole program! Your instructor has made a course out of paper and electrical tape. Try placing the robot near the left edge of the line and seeing if it can follow the course. 3
38 Challenges: Challenge 1: The need for speed! Your instructors have set up a course mapped out in electrical tape. Time how long it takes your robot to complete the course. Can you think of ways to make it go faster without losing its way? Hint: Try completing Challenge 2 below for one method to make your robot a speedier line follower. Challenge 2: Write a 3-state line following program The line following program we just wrote works best following a line where the curves aren't too sharp. If you try to get the robot to follow a sharply angled turn, it may lose the line entirely. The robot also moves pretty slowly, since it has to spend so much time turning left and right to find the edge of the line. Let's try a method to make the robot move faster and more accurately. Instead of telling the robot what to do based on whether it is left or right of the line (two different states), let's make it more sensitive to its position. We will let the robot travel straight if it is close to the edge of the line, and only turn left or right when it moves away from the edge it is trying to follow. Since it reacts differently to three different conditions (left of edge, right of edge, close to edge) this is called a 3-State Program. Here is the pseudocode we want to follow: Get output from the sensor If the light sensor output is greater than ( > ) 60, we must be left of the line's edge o Move forward and turn slightly to the right Otherwise the light sensor output must be less than (<) 60 o If the light sensor is less than 60 but greater than 40, we must be close to the edge Move straight forward o Otherwise the light sensor is less than 40 and we are right of the line's edge Move forward and turn slightly to the left Repeat from the beginning The code may look tricky because it has an "if" statement inside another "if" statement, but if you think carefully, you will see how to write the program. You will need to use more than one switch statement to get it to work. Ask your instructors if you need help. 4

39 An example of a 3-state line following program. 5
40 Lesson 6: No formal lesson - just built two lines with electrical tape. Placed a ball on a ring at the end, and two loops along the way. Challenged the kids to design a robot to collect all 3 objects and bring them back to base.


41 LEGO Mindstorms Class: Lesson 8 Gears: The LEGO Mindstorms Set comes with all sorts of gears, but up to this point we haven't explored how to use them. Today we're going to see how gears work, and how they can be useful in building robots and other devices. Below is a picture of some of the basic gears that come with the Mindstorms set, as well as a definition of some of the different gear types that are included. The different shaped gears have different purposes, but we'll focus on the spur gears. Some Different Gear Types Spur Gears - Have straight teeth, and their axles are parallel (lined up) with each other. They are the most common type of gear. Bevel Gears - Can change the direction the axle is rotating by an angle (usually 90 degrees) Rack and Pinion Gears - Combine the motion of a round gear with a flattoothed platform. This lets you convert circular motion to straight-line motion. Worm Gear - This gear consists of a cylinder with a spiral groove (like a screw) that turns. Each time it turns around once, the round gear moves forward by one tooth. The cylinder can turn the round gear, but turning the round gear does not move the cylinder. LEGO Mindstorm Gears (spur gears are underlined in red)


42 Question 1: In the pictures below, what types of gears are being used in the hand mixer and the electric mixer? Write the answers in the spaces below the pictures: Gear Type: Gear Type To make the Mindstorms robot move, motors provide power to turn the wheels. We use gears for three main reasons: 1. Changing the speed of the wheels 2. Changing the power going to the wheels 3. Change the direction the axles are turning Let's see how that works. Gears have "Teeth" that mesh together, so when one gear turns, it makes the other gear turn, too. Notice that the gears turn in opposite directions. The driver gear is the one that provides the power, and the follower gear gets turned by the driver. The gears in the first picture below are the same size, so each time the driver completes one turn, the follower completes one turn. Two Gears Turn in Opposite Directions With Three Gears, the Driver and Follower Turn in the Same Direction Gearing down and Gearing Up: When you use two gears of different sizes, you will find that they turn at different rates. The picture on the left below below show a gear with 8 teeth turning a gear with 24 teeth. Because the small gear (the driver) goes around three times (8 x 3 = 24) for every one time the follower gear goes around, this means that a wheel attached to the follower axle will go three times more slowly than the driver gear. Similarly in the picture on the right, for every time the driver gear turns once, the follower gear will go around three times. Therefore the follower axle is turning three times as fast as the driver axle.


43 Gearing Down (8 Tooth Gear Drives a 24 Tooth Gear) Gearing Up (24 Tooth Gear Drives an 8 Tooth Gear) The follower axle turns more slowly than the driver but has more power. The follower axle turns more quickly than the driver but has less power. Making a LEGO Gear Chain: You can take advantage of gear ratios to put together a set of gears where the follower goes much more quickly than the driver (or vice versa). An example of a gear chain is shown below. The because the big gears have 40 teeth, and the small gears have 8 teeth, the small gears turn around 5 times for every turn of the big gear (5 x 8 = 40). That means, if we are gearing up, each set of gears increases the speed of the axle by a factor of 5. Since we have geared up twice, we have increased the speed by a factor of 5 x 5 = 25 times! Picture 1: A gear train. Picture 2: The same gear train, built a different way. As we said above, turning the rightmost crank in each picture, makes the leftmost crank turn 25 times faster. There is a trade-off for this increased speed, however. The faster crank will have a factor of 25 times less power. Exercise 1: Build a gear chain similar to the pictures above, and see if you can feel the difference in power that you get when turning each handle. You can feel this with your hands by trying to hold one handle still while trying to turn the other. You will notice that one of the handles will be harder to turn than the other one. Exercise 2: Can you build a gear chain so that the follower gear goes more than 100 times faster than the driver gear? Try it!

44 Question 2: In the picture below, if gear A is turning clockwise, as shown, what direction are each of the other gears going (clockwise or counter-clockwise)? Which gear is turning the slowest? Gear A: Clockwise Gear B: Gear C: Gear D: Slowest Gear? Exercise3: Build a "Gear-Bot" This is an engineering challenge. Can you build a robot that uses gear ratios to increase its speed? Your instructor has a geared robot that you can use as an example. How fast can you get your robot to go?
 3 seconds, then start pulling.")
45 LEGO Mindstorms Class: Tug-of-War Challenge! This class we will build robots which will compete against each other in a game of Tug-of-War. Two robots will be connected by a string with a paperclip on each end. When the referee says "start", the robots must wait (at least) 3 seconds, then start pulling. The winner is the robot which is able to pull its opponent over the line that is initially halfway between them. Rules: 1. No part of the robot may extend past the paperclip attached to the string. This means that the string can't wrap around your robot. It must be attached to a part of your robot that is facing its opponent. 2. Robots must wait 3 seconds after the referee says "start" to start pulling. Put this delay in the program you write for your robot. 3. If any part of a robot comes off during the pulling, that robot has lost the match. Build a sturdy structure, so your robot won't break. 4. The robot that pulls any part of its opponent over the midline is the winner. 5. Robots must have wheels, and pull their opponents by turning their wheels (you can't make a very heavy brick that the opponent has to drag) 6. The total weight of the robot must be less than 1 Kilogram (about 2.2) pounds. Your instructor has a scale so that you may check your robot's weight. Strategies: Weight - Heavier robots are harder to pull, but you must keep total weight under 1 Kilogram. Gears - Remember, gearing UP (connecting the drive axle gear to a larger gear, which is connected by an axle to the wheel), will increase your power. Traction (multiple tires) - We don't have treads available, but adding tires may help increase traction (the ability of your robot not to slip) on the ground. Angle of pull - You may find yourself at an advantage if you try to pull up on your opponents robot, causing it's wheels to lift up off the ground. Of course, this means that you will need a tall robot, and you will need to find a way to keep it from tipping over. If you don't know where to start, ask your instructor for directions to building a simple robot car. You can make additions to your robot from there.
An Introduction to Programming using the NXT Robot:
 An Introduction to Programming using the NXT Robot: exploring the LEGO MINDSTORMS Common palette. Student Workbook for independent learners and small groups The following tasks have been completed by:
Where C= circumference, π = 3.14, and D = diameter EV3 Distance. Developed by Joanna M. Skluzacek Wisconsin 4-H 2016 Page 1
 Instructor Guide Title: Distance the robot will travel based on wheel size Introduction Calculating the distance the robot will travel for each of the duration variables (rotations, degrees, seconds) can
The light sensor, rotation sensor, and motors may all be monitored using the view function on the RCX.
 Review the following material on sensors. Discuss how you might use each of these sensors. When you have completed reading through this material, build a robot of your choosing that has 2 motors (connected
Lab book. Exploring Robotics (CORC3303)
") Lab book Exploring Robotics (CORC3303) Dept of Computer and Information Science Brooklyn College of the City University of New York updated: Fall 2011 / Professor Elizabeth Sklar UNIT A Lab, part 1 : Robot
Lab book Exploring Robotics (CORC3303) Dept of Computer and Information Science Brooklyn College of the City University of New York updated: Fall 2011 / Professor Elizabeth Sklar UNIT A Lab, part 1 : Robot
Deriving Consistency from LEGOs
 Deriving Consistency from LEGOs What we have learned in 6 years of FLL and 7 years of Lego Robotics by Austin and Travis Schuh 1 2006 Austin and Travis Schuh, all rights reserved Objectives Basic Building
Hare and Snail Challenges READY, GO!
 Hare and Snail Challenges READY, GO! Pre-Activity Quiz 1. What are some design considerations to make a fast robot? 2. What are some design considerations to make a slow robot? 2 Pre-Activity Quiz Answers
Your EdVenture into Robotics 10 Lesson plans
 Your EdVenture into Robotics 10 Lesson plans Activity sheets and Worksheets Find Edison Robot @ Search: Edison Robot Call 800.962.4463 or email custserv@ Lesson 1 Worksheet 1.1 Meet Edison Edison is a
Robotics using Lego Mindstorms EV3 (Intermediate)
") Robotics using Lego Mindstorms EV3 (Intermediate) Facebook.com/roboticsgateway @roboticsgateway Robotics using EV3 Are we ready to go Roboticists? Does each group have at least one laptop? Do you have
Robotics using Lego Mindstorms EV3 (Intermediate) Facebook.com/roboticsgateway @roboticsgateway Robotics using EV3 Are we ready to go Roboticists? Does each group have at least one laptop? Do you have
FLL Coaches Clinic Chassis and Attachments. Patrick R. Michaud
 FLL Coaches Clinic Chassis and Attachments Patrick R. Michaud pmichaud@pobox.com Erik Jonsson School of Engineering and Computer Science University of Texas at Dallas September 23, 2017 Presentation Outline
understanding sensors
 The LEGO MINDSTORMS EV3 set includes three types of sensors: Touch, Color, and Infrared. You can use these sensors to make your robot respond to its environment. For example, you can program your robot
Chassis & Attachments 101. Chassis Overview
 Chassis & Attachments 101 Chassis Overview 2016 1 Introductions Rest rooms location. Food and Drink: Complementary bottled water. Snacks available for purchase from UME FTC teams. Cell phones. Today presentation
Robotics Workshop. for Parents and Teachers. September 27, 2014 Wichita State University College of Engineering. Karen Reynolds
 Robotics Workshop for Parents and Teachers September 27, 2014 Wichita State University College of Engineering Steve Smith Christa McAuliffe Academy ssmith3@usd259.net Karen Reynolds Wichita State University
Pre-Activity Quiz. 2 feet forward in a straight line? 1. What is a design challenge? 2. How do you program a robot to move
 Maze Challenge Pre-Activity Quiz 1. What is a design challenge? 2. How do you program a robot to move 2 feet forward in a straight line? 2 Pre-Activity Quiz Answers 1. What is a design challenge? A design
How Do You Make a Program Wait?
 How Do You Make a Program Wait? How Do You Make a Program Wait? Pre-Quiz 1. What is an algorithm? 2. Can you think of a reason why it might be inconvenient to program your robot to always go a precise
FLL Programming Workshop Series
 FLL Programming 2017 Workshop Series 2017 1 Prerequisites & Equipment Required Basic computer skills Assembled EV3 Educational robot or equivalent Computer or Laptop with LEGO Mindstorms software installed
Chassis & Attachments 101. Part 1: Chassis Overview
 Chassis & Attachments 101 Part 1: Chassis Overview 2017 1 Introductions Rest rooms location. Food and Drink. Cell phones. Today presentation available at: http://www.roboplex.org/fll 2 What can be used
The Nomenclature and Geometry of LEGO
 The Nomenclature and Geometry of LEGO AN OVERVIEW OF LEGO EV3 MINDSTORMS ELEMENTS AND HOW THEY WORK TOGETHER UPDATED 9/27/2015 Required Stuff Please do not wander the building. Rest Rooms Location. Food
Ev3 Robotics Programming 101
 Ev3 Robotics Programming 101 1. EV3 main components and use 2. Programming environment overview 3. Connecting your Robot wirelessly via bluetooth 4. Starting and understanding the EV3 programming environment
Nebraska 4-H Robotics and GPS/GIS and SPIRIT Robotics Projects
 Name: Club or School: Robots Knowledge Survey (Pre) Multiple Choice: For each of the following questions, circle the letter of the answer that best answers the question. 1. A robot must be in order to
Erik Von Burg Mesa Public Schools Gifted and Talented Program Johnson Elementary School
 Erik Von Burg Mesa Public Schools Gifted and Talented Program Johnson Elementary School elvonbur@mpsaz.org Water Sabers (2008)* High Heelers (2009)* Helmeteers (2009)* Cyber Sleuths (2009)* LEGO All Stars
the complete parts reference bricks
 the complete parts reference Here s a detailed overview of all the pieces in your LEGO BOOST kit. You can also identify LEGO elements precisely by their LEGO ID, which is printed on the LEGO BOOST test
Line Detection. Duration Minutes. Di culty Intermediate. Learning Objectives Students will:
 Line Detection Design ways to improve driving safety by helping to prevent drivers from falling asleep and causing an accident. Learning Objectives Students will: Explore the concept of the Loop Understand
Appendix Course Notes MIT Course Organizers. Chapter 7: LEGO Design
 EECS40/43 Appendix 4 Appendix 4 6.70 1999 Course Notes MIT 6.70 Course Organizers Chapter 7: LEGO Design 1 Chapter 7 LEGO Design When you're rst introduced to the LEGO Technic system, you may be amazed
Studuino Icon Programming Environment Guide
 Studuino Icon Programming Environment Guide Ver 0.9.6 4/17/2014 This manual introduces the Studuino Software environment. As the Studuino programming environment develops, these instructions may be edited
acknowledgments...xv introduction...xvii 1 LEGO MINDSTORMS NXT 2.0: people, pieces, and potential getting started with the NXT 2.0 set...
 acknowledgments...xv introduction...xvii about this book...xvii part I: introduction to LEGO MINDSTORMS NXT 2.0...xviii part II: building...xviii part III: programming...xviii part IV: projects...xix companion
EV3 Advanced Topics for FLL
 EV3 Advanced Topics for FLL Jim Keller GRASP Laboratory University of Pennsylvania August 14, 2016 Part 1 of 2 Topics Intro to Line Following Basic concepts Calibrate Calibrate the light sensor Display
Sample Pages. Classroom Activities for the Busy Teacher: NXT. 2 nd Edition. Classroom Activities for the Busy Teacher: NXT -
 Classroom Activities for the Busy Teacher: NXT 2 nd Edition Table of Contents Chapter 1: Introduction... 1 Chapter 2: What is a robot?... 5 Chapter 3: Flowcharting... 11 Chapter 4: DomaBot Basics... 15
A - Debris on the Track
 A - Debris on the Track Rocks have fallen onto the line for the robot to follow, blocking its path. We need to make the program clever enough to not get stuck! 2017 https://www.hamiltonbuhl.com/teacher-resources
A - Debris on the Track
 A - Debris on the Track Rocks have fallen onto the line for the robot to follow, blocking its path. We need to make the program clever enough to not get stuck! 2018 courses.techcamp.org.uk/ Page 1 of 7
Worksheet Answer Key: Tree Measurer Projects > Tree Measurer
 Worksheet Answer Key: Tree Measurer Projects > Tree Measurer Maroon = exact answers Magenta = sample answers Construct: Test Questions: Caliper Reading Reading #1 Reading #2 1492 1236 1. Subtract to find
Pre-Activity Quiz. building a robot to fight another robot by trying to push it out of a ring? in the competition? the way when racing?
 Sumobot - RaceCar Challenge Pre-Activity Quiz 1. What must you keep in mind when building a robot to fight another robot by trying to push it out of a ring? 2. How can you use gears to your advantage in
e d u c a t i o n Detect Dark Line Objectives Connect Teacher s Notes
 e d u c a t i o n Objectives Learn how to make the robot interact with the environment: Detect a line drawn on the floor by means of its luminosity. Hint You will need a flashlight or other light source
THE GREEN CLUB PROJECT
 tennis ball end cap finishing tape THE GREEN CLUB PROJECT duct tape How to make the ultimate recycled juggling club at home. BY JONATHAN POPPELE 16 or 20 oz bottle club body hardwood dowel collar finishing
A - Debris on the Track
 A - Debris on the Track Rocks have fallen onto the line for the robot to follow, blocking its path. We need to make the program clever enough to not get stuck! Step 1 2017 courses.techcamp.org.uk/ Page
Parts of a Lego RCX Robot
 Parts of a Lego RCX Robot RCX / Brain A B C The red button turns the RCX on and off. The green button starts and stops programs. The grey button switches between 5 programs, indicated as 1-5 on right side
Mindstorms NXT. mindstorms.lego.com
 Mindstorms NXT mindstorms.lego.com A3B99RO Robots: course organization At the beginning of the semester the students are divided into small teams (2 to 3 students). Each team uses the basic set of the
Chapter 14. using data wires
 Chapter 14. using data wires In this fifth part of the book, you ll learn how to use data wires (this chapter), Data Operations blocks (Chapter 15), and variables (Chapter 16) to create more advanced programs
I.1 Smart Machines. Unit Overview:
 I Smart Machines I.1 Smart Machines Unit Overview: This unit introduces students to Sensors and Programming with VEX IQ. VEX IQ Sensors allow for autonomous and hybrid control of VEX IQ robots and other
In order to do this project you should review the following concepts:
 Catapult In order to do this project you should review the following concepts: Catapult 18 Rope Lego Band Rubber Band Catapult: Arm Catapult: Arm Catapult: Arm Leave the other end of the rubber band loose
The Robot Olympics: A competition for Tribot s and their humans
 The Robot Olympics: A Competition for Tribot s and their humans 1 The Robot Olympics: A competition for Tribot s and their humans Xinjian Mo Faculty of Computer Science Dalhousie University, Canada xmo@cs.dal.ca
Robot Programming Manual
 2 T Program Robot Programming Manual Two sensor, line-following robot design using the LEGO NXT Mindstorm kit. The RoboRAVE International is an annual robotics competition held in Albuquerque, New Mexico,
Line-Follower Challenge
 Line-Follower Challenge Pre-Activity Quiz 1. How does a color sensor work? Does the color sensor detect white or black as a higher amount of light reflectivity? Absorbance? 2. Can you think of a method
LS Creative Learnings Pvt Ltd. STEM-Robotics Education. Report for Sep S.B. Patil Public School, Pune
 LS Creative s Pvt Ltd. STEM-Robotics Education Report for Sep 2017 S.B. Patil Public School, Pune 1 Sept 2017 Grade: III Helicopter To understand about different modes of transportation like airways. Science
Force multipliers and speed multipliers Machines can make work easier by reducing the amount of force necessary to move an object or increasing the
 MACHINES A machine is a device that makes work easier by transmitting or transforming energy. They have been used since ancient times to help people move heavy objects, bring substances like water from
1-11. Mini Sumo Bot. Building Instructions. Fun Projects for your LEGO MINDSTORMS NXT! Home Projects Help Contacts. Building: Program:
 Fun Projects for your LEGO MINDSTORMS NXT! Home Projects Help Contacts Mini Sumo Bot Building: Program: Building Instructions 1-11 Start by building the Castor Bot. Click the picture for building instructions.
Cardboard Circuit Playground Express Inchworm Robot
 Cardboard Circuit Playground Express Inchworm Robot Created by Kathy Ceceri Last updated on 2018-10-25 05:41:17 PM UTC Guide Contents Guide Contents Overview Parts List -- Electronics Materials List --
Dual Fidgety Art Bot. We enjoyed building our Trashy Art Bot just as much as our Fidgety Art Bot.
 Dual Fidgety Art Bot Our instructions will take you through the step by step procedure to build a Dual Fidgety Art Bot, an Art Bot built with two fidget spinners stacked together. Since our investigation
Welcome to Lego Rovers
 Welcome to Lego Rovers Aim: To control a Lego robot! How?: Both by hand and using a computer program. In doing so you will explore issues in the programming of planetary rovers and understand how roboticists
Simple Machines. Contact the National Museum of the U.S. Navy for Field Trip and School Visit opportunities!
 Simple Machines In this packet, we will be learning the basic physics behind simple machines! We are then going to practice these principles in easy and fun activities that can be done in the classroom
Learn about the RoboMind programming environment
 RoboMind Challenges Getting Started Learn about the RoboMind programming environment Difficulty: (Easy), Expected duration: an afternoon Description This activity uses RoboMind, a robot simulation environment,
FLL Robot Design Workshop
 FLL Robot Design Workshop Tool Design and Mechanism Prepared by Dr. C. H. (Tony) Lin Principal Engineer Tire and Vehicle Mechanics Goodyear Tire & Rubber Company tony_lin@goodyear.com Description Mechanism
Name & SID 1 : Name & SID 2:
 EE40 Final Project-1 Smart Car Name & SID 1 : Name & SID 2: Introduction The final project is to create an intelligent vehicle, better known as a robot. You will be provided with a chassis(motorized base),
STOP! READ THIS FIRST
 STOP! READ THIS FIRST 1 Getting Started With Your Meistergram Embroidery System (the quick guide) Thank you for choosing Pantograms for your embroidery system provider. We encourage you to read the following
Toeing the Line Experiments with Line-following Algorithms
 Toeing the Line Experiments with Line-following Algorithms Grade 9 Contents Abstract... 2 Introduction... 2 Purpose... 2 Hypothesis... 3 Materials... 3 Setup... 4 Programming the robot:...4 Building the
Note to Teacher. Description of the investigation. Time Required. Materials. Procedures for Wheel Size Matters TEACHER. LESSONS WHEEL SIZE / Overview
 In this investigation students will identify a relationship between the size of the wheel and the distance traveled when the number of rotations of the motor axles remains constant. It is likely that many
BY ALIEN TECHNOLOGIES CORP
 BY ALIEN TECHNOLOGIES CORP Assembly Instructions TopLift Pros YOU MAY ALSO REVIEW OUR ASSEMBLY VIDEO, PLAY AND PAUSE AT YOUR CONVENIENCE. JUST VISIT US AT WWW.TOPLIFTPROS.COM AND GO TO Customer Support
Note to the Teacher. Description of the investigation. Time Required. Additional Materials VEX KITS AND PARTS NEEDED
 In this investigation students will identify a relationship between the size of the wheel and the distance traveled when the number of rotations of the motor axles remains constant. Students are required
AUDI A8 D3 REPLACING THE OUTSIDE DRIVER DOOR HANDLE
 AUDI A8 D3 REPLACING THE OUTSIDE DRIVER DOOR HANDLE The keyless entry system in the D3 is a great feature. If you have the car key fob in your pocket, putting your hand under the door handle will unlock
TeacherGeek Sumo Bot Vehicle Application Guide
 SUMO BOT VEHICLE EXAMPLE BUILD TeacherGeek Sumo Bot Vehicle Application Guide TeacherGeek, 011 SUMO BOT VEHICLE EXAMPLE BUILD TeacherGeek TeacherGeek s Sumo Bot Vehicle Activity is the perfect way to encourage
Screw. Introduction This Rokenbok STEM-Maker lesson will use the following steps to learn about the screw. Learning Objectives. Resources.
 Screw Progression: Applications in Design & Engineering - Section 6 Curriculum Packet v2.0 Introduction This Rokenbok STEM-Maker lesson will use the following steps to learn about the screw. 1. Learn 2.
ANATOMY OF A BIT TM how you can tell top from bottom. four on the floor!
 ARCADE GAME BASICS 1 Learn BITSNAP ANATOMY OF A BIT TM how you can tell top from bottom. TOP BOTTOM BIT FEET 2 which COLOR-CODED BY FUNCTION Bits TM are grouped into four different categories, are color-coded.
MAKE SURE THE COLECOVISION OR ADAM IS OFF BEFORE INSERTING OR REMOVING A CARTRIDGE.
 Bump 'n' Jump Use with: * Coleco's Expansion Module #2 * ColecoVision Controllers * Super Action Controllers * For One or Two Players * Select from Four Skill Levels GAME DESCRIPTION BUMP 'N' JUMP is no
Activity Template. Subject Area(s): Science and Technology Activity Title: Header. Grade Level: 9-12 Time Required: Group Size:
: Science and Technology Activity Title: Header. Grade Level: 9-12 Time Required: Group Size:") Activity Template Subject Area(s): Science and Technology Activity Title: What s In a Name? Header Image 1 ADA Description: Picture of a rover with attached pen for writing while performing program. Caption:
Activity Template Subject Area(s): Science and Technology Activity Title: What s In a Name? Header Image 1 ADA Description: Picture of a rover with attached pen for writing while performing program. Caption:
Agent-based/Robotics Programming Lab II
 cis3.5, spring 2009, lab IV.3 / prof sklar. Agent-based/Robotics Programming Lab II For this lab, you will need a LEGO robot kit, a USB communications tower and a LEGO light sensor. 1 start up RoboLab
Automatic Headlights
 Automatic Headlights Design car features that will improve nighttime driving safety. Learning Objectives Students will: Explore the concept of Inputs and the way to control them Explore the concept of
3. Draw a side-view picture of the situation below, showing the ringstand, rubber band, and your hand when the rubber band is fully stretched.
 1 Forces and Motion In the following experiments, you will investigate how the motion of an object is related to the forces acting on it. For our purposes, we ll use the everyday definition of a force
1 Day Robot Building (MC40A + Aluminum Base) for Edubot 2.0
 for Edubot 2.0") 1 Day Robot Building (MC40A + Aluminum Base) for Edubot 2.0 Have you ever thought of making a mobile robot in 1 day? Now you have the chance with MC40A Mini Mobile Robot Controller + some accessories.
1 Day Robot Building (MC40A + Aluminum Base) for Edubot 2.0 Have you ever thought of making a mobile robot in 1 day? Now you have the chance with MC40A Mini Mobile Robot Controller + some accessories.
Roborodentia Robot: Tektronix. Sean Yap Advisor: John Seng California Polytechnic State University, San Luis Obispo June 8th, 2016
 Roborodentia Robot: Tektronix Sean Yap Advisor: John Seng California Polytechnic State University, San Luis Obispo June 8th, 2016 Table of Contents Introduction... 2 Problem Statement... 2 Software...
BEGINNER PROGRAMMING LESSON
 Basic Line Follower (NXT) By Sanjay and Arvind Seshan BEGINNER PROGRAMMING LESSON LESSON OBJECTIVES 1. Learn how humans and robots follow lines 2. Learn how to get a robot to follow a line using the NXT
Unit 4: Robot Chassis Construction
 Unit 4: Robot Chassis Construction Unit 4: Teacher s Guide Lesson Overview: Paul s robotic assistant needs to operate in a real environment. The size, scale, and capabilities of the TETRIX materials are
ORTOP Modular Robot v3.0 Arm Assembly
 Base Plate Assembly Parts Needed: Arm Assembly BAG 1 2 Socket Head Cap Screw, 1-1/4" 2 Socket Head Cap Screw, 1/2" 2 Button Head Cap Screw, 3/8" 6 Nuts 1 Gear Hub Spacer 1 Flat Building Plate 1 Single
contents in detail PART I GETTING STARTED acknowledgments...xvii
 contents in detail acknowledgments...xvii introduction...xix why this book?...xix is this book for you?...xix how does this book work?...xix the discoveries...xix what to expect in each chapter...xx getting
FRICTION PERFORMANCE ASSESSMENT
 1 FRICTION PERFORMANCE ASSESSMENT SECTION I Your Name: (Last) (First) Male or Female Date of Birth: (please circle) (month day year) Today's Date: (month day year) INSTRUCTIONS In this activity you will
Hatchback Wing Riser Kit
 Hatchback Wing Riser Kit 2015-06-11 Thank you for purchasing this PERRIN product for your car! Installation of this product should only be performed by persons experienced with installation of aftermarket
Robot Olympics: Programming Robots to Perform Tasks in the Real World
 Robot Olympics: Programming Robots to Perform Tasks in the Real World Coranne Lipford Faculty of Computer Science Dalhousie University, Canada lipford@cs.dal.ca Raymond Walsh Faculty of Computer Science
1. ASSEMBLING THE PCB 2. FLASH THE ZIP LEDs 3. BUILDING THE WHEELS
 V1.0 :MOVE The Kitronik :MOVE mini for the BBC micro:bit provides an introduction to robotics. The :MOVE mini is a 2 wheeled robot, suitable for both remote control and autonomous operation. A range of
Final Review Powerpoint
 Final Review Powerpoint Simple Machines- A device that makes work easier, faster, or changes the direction of force using few or no moving parts Rube Goldberg- a complex machine that does a simple task
SuperTrack Parts List
 SuperTrack Parts List [indicates number for 6 lane tracks] SuperTrack Installation Instructions www.supertimer.com 1-800-654-2088 1 Track Instruction Manual (this booklet) 2 Start sections [3] Start Gate
HTC VIVE Installation Guide
 HTC VIVE Installation Guide Thank you for renting from Hartford Technology Rental. Get ready for an amazing experience. To help you setup the VIVE, we highly recommend you follow the steps below. Please
Removing and Replacing the Y-truck
 Service Documentation Removing and Replacing the Y-truck To remove and replace the Y-truck you will need the following tools: 4mm Allen wrench 12mm stamped flat wrench #2 Phillips screwdriver (magnetic
Assembly Guide for Printrbot - Simple Maker s Edition 1405
 Assembly Guide for Printrbot - Simple Maker s Edition 1405 Last update: March 2016 Please Note: be careful on the steps that are underlined 1 Contents Tools Needed:... 3 First step: Check components and
Congratulations on your decision to purchase the Triquetra Auto Zero Touch Plate for All Three Axis.
 Congratulations on your decision to purchase the Triquetra Auto Zero Touch Plate for All Three Axis. This user guide along with the videos included on the CD should have you on your way to perfect zero
A Day in the Life CTE Enrichment Grades 3-5 mblock Robotics - Simple Programs
 Activity 1 - Play Music A Day in the Life CTE Enrichment Grades 3-5 mblock Robotics - Simple Programs Computer Science Unit One of the simplest things that we can do, to make something cool with our robot,
2.4 Sensorized robots
 66 Chap. 2 Robotics as learning object 2.4 Sensorized robots 2.4.1 Introduction The main objectives (competences or skills to be acquired) behind the problems presented in this section are: - The students
Motorized Balancing Toy
 Motorized Balancing Toy Category: Physics: Force and Motion, Electricity Type: Make & Take Rough Parts List: 1 Coat hanger 1 Motor 2 Electrical Wire 1 AA battery 1 Wide rubber band 1 Block of wood 1 Plastic
V-MOTION LITE USER GUIDE. Rat Rig All rights reserved.
 V-MOTION LITE USER GUIDE Rat Rig 2017. All rights reserved. PACKAGE CONTENTS 1 1x V-Motion Motor 2 1x Belt 3 1x 3mm Hex Key 4 1x AA Battery Pack (for 8x AA batteries)* 5 1x V-Motion Controller 6 2x Knob
OWEN Walking Robot Install Guide
 OWEN Walking Robot Install Guide The 3D printed parts are as follows: - Left Foot - Right Foot - Ankles (both are identical) - Pelvis Servo, arm, and screws: FIRST STEPS Connect the battery to the ODROID-C0.
Basic Tutorials Series: Import A Photograph. RenoWorks Support Team Document #HWPRO0003
 Basic Tutorials Series: Import A Photograph RenoWorks Support Team Document #HWPRO0003 Import A Photograph 2 1 Import Your Own Photograph The Photo Import Wizard The Photo Import Wizard is the first tool
Design and Technologies: Engineering principles and systems Motion, mechanisms and motors
 Sample assessment task Year level 7 Learning area Subject Title of task Task details Description of task Type of assessment Purpose of assessment Assessment strategy Evidence to be collected Technologies
Let There Be Light. Opening Files. Deleting National Technology and Science Press
 Let There Be Light 2 Better to light a candle than to curse the darkness. Chinese Proverb The Hello World program demonstrates only the output aspect of a computer program. Now let s write a program that
Easy Engineering Guide
 Index: Unleash Your Creativity! Page 1: The Basics Page 2: Sorting Dowels Page 3: Measuring and Cutting Page 4: Dowels and Holes (Reaming Holes) Page 5: Reaming, Screws, Slide-Stop Material Page 6: Hydraulics/Pneumatics
RoboCup Sumo Workshop. Margaux Edwards July 2018
 RoboCup Sumo Workshop Margaux Edwards July 2018 Plan for today: The Challenge Designing your Robot Programming your Robot Ultrasonic Sensor Light/Colour Sensor Competition Time! The Challenge: What is
Flowcharts and Programs
 Flowcharts and Programs Engineering with Labview Laptop Program Schematic Editor Front Panel & Block Diagram Block Diagram: Program Code Front Panel: Virtual Dashboard Front Panel Block Diagram
DISCO DICING SAW SOP. April 2014 INTRODUCTION
 DISCO DICING SAW SOP April 2014 INTRODUCTION The DISCO Dicing saw is an essential piece of equipment that allows cleanroom users to divide up their processed wafers into individual chips. The dicing saw
Inspiring Creative Fun Ysbrydoledig Creadigol Hwyl. Kinect2Scratch Workbook
 Inspiring Creative Fun Ysbrydoledig Creadigol Hwyl Workbook Scratch is a drag and drop programming environment created by MIT. It contains colour coordinated code blocks that allow a user to build up instructions
Low/High Tunnel Greenhouse Plans
 Low/High Tunnel Greenhouse Plans Tools Needed (See the complete list of Greenhouse Tools) Hacksaw or Reciprocating Saw Socket Wrench, Adjustable Wrench or Nut Drivers Electric Drill with Drill Bits Sledge
Programming PIC Microchips
 Programming PIC Microchips Fís Foghlaim Forbairt Programming the PIC microcontroller using Genie Programming Editor Workshop provided & facilitated by the PDST www.t4.ie Page 1 DC motor control: DC motors
EMO. Service Instruction. created by Frank Weithöner. Table of contents: Special Tools Assembling Mixing Chamber
 EMO Service Instruction created by Frank Weithöner Table of contents: - Special Tools Disassembling Mixing Chamber Assembling Mixing Chamber Adjustment Rotor / Level Indicator Unit Temperature Compensating
C - Underground Exploration
 C - Underground Exploration You've discovered an underground system of tunnels under the planet surface, but they are too dangerous to explore! Let's get our robot to explore instead. 2017 courses.techcamp.org.uk/
Activity 1 Position, Velocity, Acceleration PHYS 010
 Name: Date: Partners: Purpose: To investigate and analyse basic properties of motion using a Vernier Go! Motion Detector and logging software. Materials: 1. PC with Logger Lite Software installed. 2. Go!