understanding sensors
|
|
|
- Sydney O’Brien’
- 5 years ago
- Views:
Transcription

1 The LEGO MINDSTORMS EV3 set includes three types of sensors: Touch, Color, and Infrared. You can use these sensors to make your robot respond to its environment. For example, you can program your robot to make a sound when it sees you, avoid obstacles while driving, or follow colored lines. This part of the book will teach you how to create working robots that use these sensors. 6 understanding sensors To learn how to work with sensors, we ll expand the EXPLOR3R robot by adding a bumper that detects obstacles using the Touch Sensor, as shown in Figure 6-1. Once you have a handle on how to make programs that use the Touch Sensor, you ll learn how to use the other sensors in subsequent chapters. Figure 6-1: The EXplor3R uses a bumper with a Touch Sensor to detect objects it runs into.

 as well as some built-in sensors.")
 measures the approximate distance to a nearby object, and it receives signals from the infrared remote.")

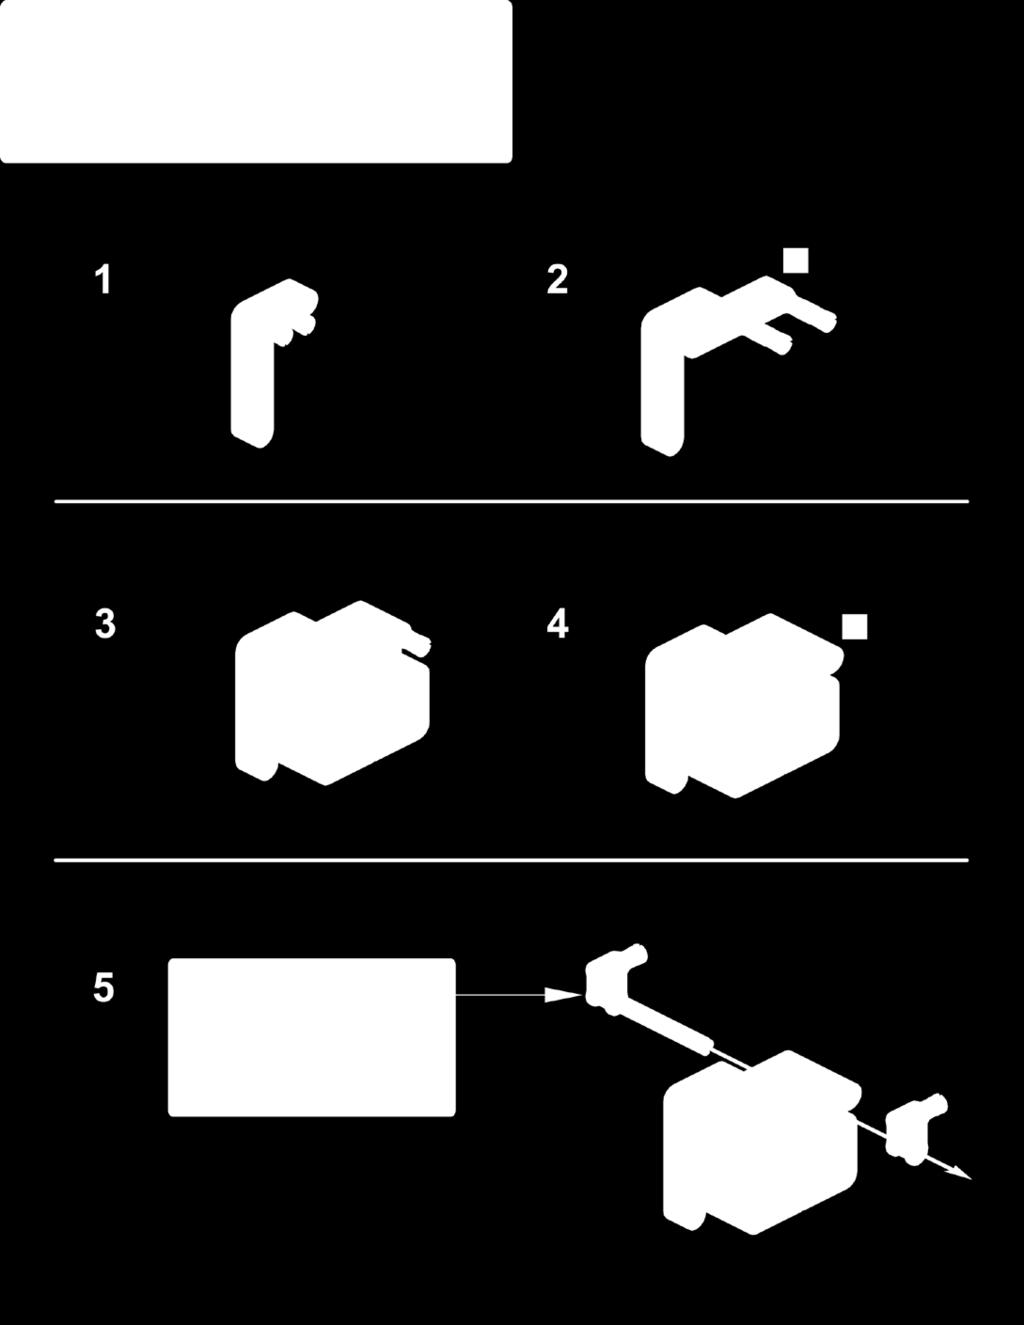
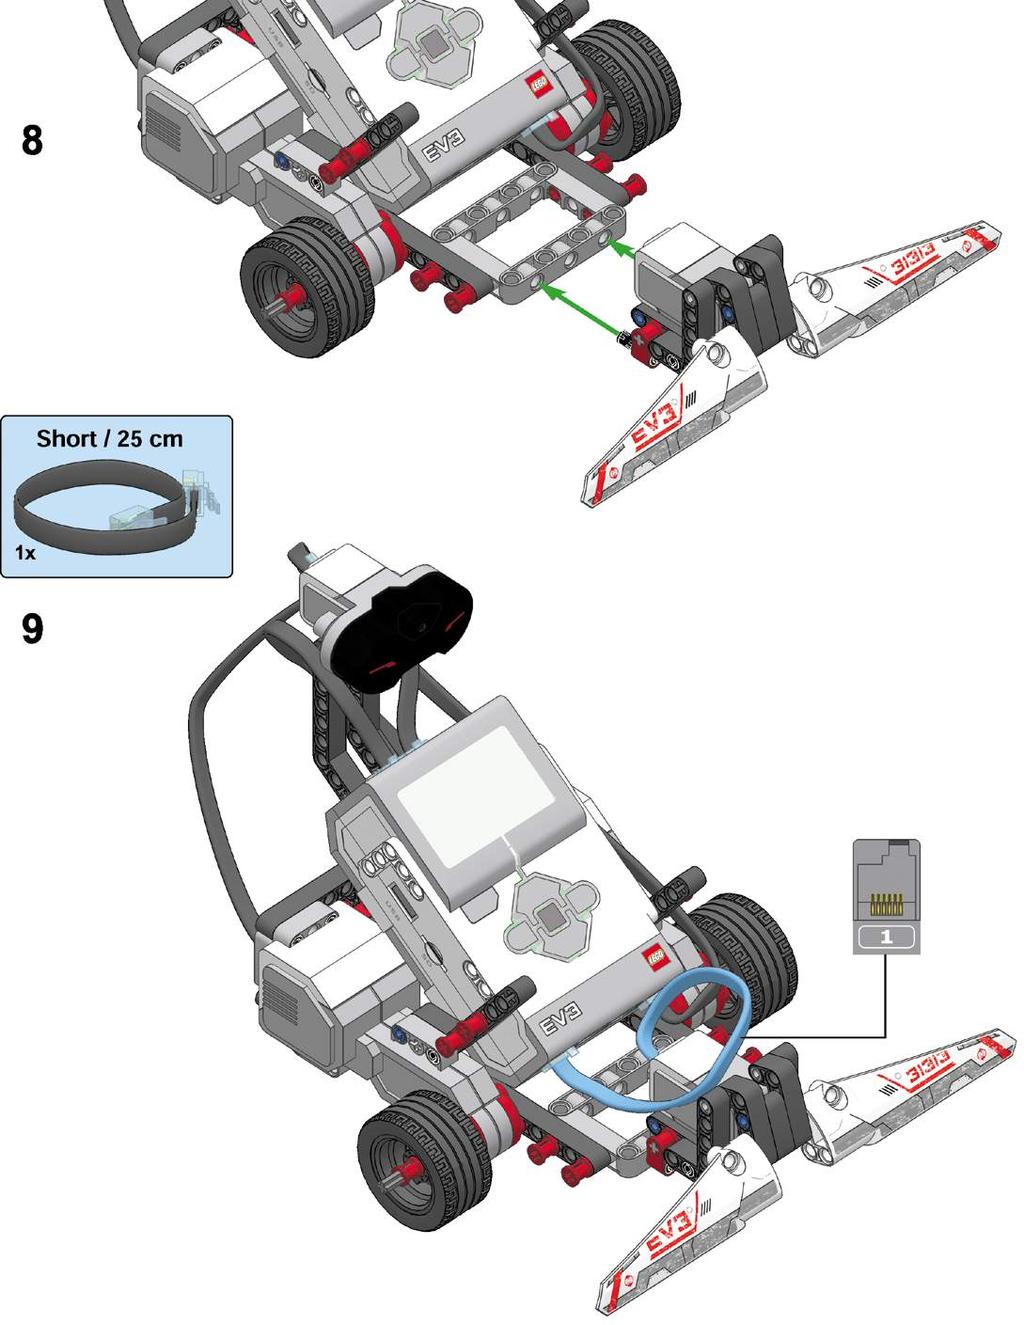
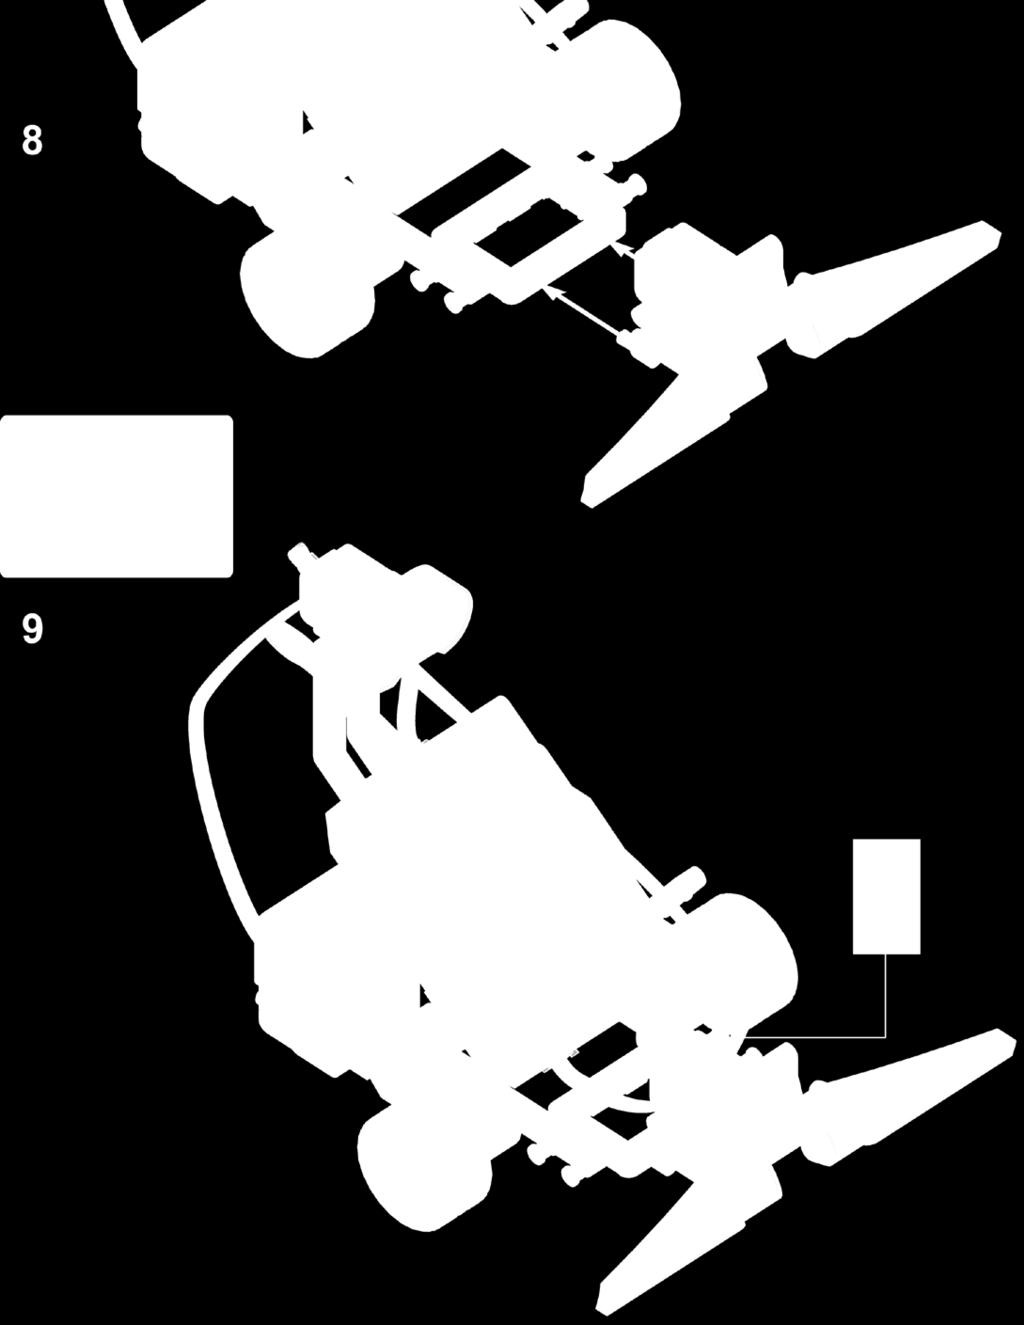
2 what are sensors? LEGO MINDSTORMS robots can t actually see or feel the way humans do, but you can add sensors to them so they can collect and report information about their environment. By designing programs that can interpret this sensor information, you can make your robots seem intelligent by having them respond to their environment. For instance, you could create a program that makes the robot say blue when one of its sensors sees a piece of blue paper. understanding the sensors in the EV3 set Your EV3 set contains three sensors that you can attach to your robot (see Figure 6-2) as well as some built-in sensors. The Touch Sensor detects whether the red button on the sensor is pressed or released. The Color Sensor detects the color of a surface and the intensity of a light source, as you ll see in Chapter 7. The Infrared Sensor (covered in Chapter 8) measures the approximate distance to a nearby object, and it receives signals from the infrared remote. In addition, each motor in the EV3 set has a built-in Rotation Sensor to measure the motor s position and speed, and the EV3 brick can detect which of its Brick Buttons are pressed (see Chapter 9). understanding the touch sensor The Touch Sensor allows your robot to feel by detecting whether the red button on the sensor is currently pressed or released, as shown in Figure 6-3. The EV3 retrieves this information from the sensor and can use it in programs. For example, you could make your robot say hello whenever you press the Touch Sensor. Figure 6-3: The Touch Sensor detects whether the red button is pressed (left) or released (right). Despite its simplicity, the Touch Sensor is useful for many applications. For example, robots can use the Touch Sensor to detect obstacles in front of them. You can also use the Touch Sensor to detect that a mechanism in your robot has reached a certain position. In Chapter 18, for example, you ll use the sensor to detect whether a robotic arm is lifted all the way. creating the bumper with the touch sensor If you build a bumper and attach it to the Touch Sensor, then anytime the EXPLOR3R runs into an object with its bumper, the sensor will become pressed. The program on your EV3 can use this information to decide to move the robot in a different direction. Build the bumper and attach it to the robot as shown on the following pages. Be sure to connect the Touch Sensor to input port 1 using a short cable. Figure 6-2: The EV3 set comes with a Touch Sensor (left), a Color Sensor (middle), and an Infrared Sensor (right). 62 Chapter 6

3 understanding sensors 63


4 64 Chapter 6
5 understanding sensors 65

 to see more details regarding each sensor. programming with sensors Now let s look at how you can use these measurements in your programs.")

.")

6 viewing sensor values You can see the measurements reported by each sensor by opening the Port View application on the Brick Apps tab of your EV3 brick, as shown in Figure 6-4. For the Touch Sensor, a measurement of 1 means that it s pressed, while 0 indicates that it s released. The Touch Sensor is pressed. Figure 6-4: The Port View application on the Brick Apps tab. The EV3 brick automatically determines which sensors you ve connected to the EV3 and displays their measurements on the screen. Use the buttons (Left, Right, Up, and Down) to see more details regarding each sensor. programming with sensors Now let s look at how you can use these measurements in your programs. Let s try using the Touch Sensor in a program that has the robot play a sound when the Touch Sensor is pressed. Several programming blocks let you use sensors in your program, including the Wait, Loop, and Switch blocks. In this chapter, you ll learn how each of these blocks work with the Touch Sensor, and the same principles apply to the other sensors in the EV3 set as well. sensors and the wait block Earlier, you used a Wait block to pause the program for a set amount of time (say, five seconds). But you can also use a Wait block to pause a program until a sensor is triggered. For example, you can configure a Wait block to pause until the Touch Sensor is pressed by selecting the Touch Sensor mode, as shown in Figure 6-6. You can use the buttons on the EV3 to navigate to measurements of the other sensors. At the bottom right of your screen (port 4), you should see the distance measurement of the Infrared Sensor (48% in this example). The two values at the top ( 41 and 52) indicate the positions of the motors on ports B and C on your robot. Some sensors can take more than one type of measurement. To see other measurements of the Infrared Sensor, for example, navigate to port 4, press the Center button, and choose a sensor mode. You ll learn more about the meaning of each value as you read on. If your robot is connected to the computer, you can also view sensor measurements on the Hardware Page in the EV3 software, as shown in Figure 6-5. Just use the method you find most convenient. Port Figure 6-5: You can also view sensor measurements from within the EV3 software. If the values aren t being updated continuously, download a program to the robot to refresh the connection. Click one of the sensors to choose which type of measurement you want to see. State Measured Value Figure 6-6: The WaitForTouch program makes the robot play a sound when the Touch Sensor is pressed. 66 Chapter 6
7 After selecting this mode, you must also choose between Compare and Change mode. In Compare mode, you specify with the State setting whether the program should wait until the sensor is released (0), pressed (1), or bumped (2). If you choose bumped, the program waits for a press followed by a release. In Change mode, the program waits until the state of the sensor changes: If the sensor is pressed when the block begins running, the program waits until it s released. If it s released at first, the program pauses until the sensor is pressed. The Port setting lets you specify which input port your sensor is connected to (in this case, port 1). Finally, the Measured Value plug allows you to use the last sensor measurement later on in your program (we ll get back to this in Part V of the book). sensors and the wait block in action Create a new project called EXPLOR3R-Touch with a program called WaitForTouch, as shown in Figure 6-6. The mode of the Wait block is set to Touch Sensor Compare State. When you run the program, nothing will happen at first, but when you press the Touch Sensor (by pushing the bumper), the robot should say Hello. Now keep the Touch Sensor pressed as you start the program again. The sound plays immediately because the Wait block has nothing to wait for the sensor is already pressed. Discovery #23: Hello and Goodbye! Can you create a program that has the robot say Hello when you press the bumper on the robot and then Goodbye when you release the bumper? Hint Add another pair of Wait and Sound blocks to the WaitForTouch program (see Figure 6-6). The first Wait block should wait for a press, and the second should wait for a release. Where do you place these new blocks? avoiding obstacles with the touch sensor Now that you re familiar with the Touch Sensor and the Wait block, you re ready to make some more exciting programs. The next program, TouchAvoid, will make the EXPLOR3R robot drive around a room and turn around when it feels something, such as a wall or chair, with its bumper. You can see an overview of the program in Figure 6-7. Turn on the motors to go forward. Wait until the Touch Sensor is pressed. Repeat. Reverse for one rotation. Turn to the right. Figure 6-7: The program flow in the TouchAvoid program. After turning right, the program returns to the beginning and repeats. You can accomplish each action in this diagram with one programming block. You ll use a Move Steering block in On mode to turn on the motors and then use a Wait block to wait for the sensor to be pressed. (Note that while the program waits, the robot keeps moving forward.) Once the sensor is triggered, you use a Move Steering block to reverse and then another to turn around, both in On For Rotations mode. After the robot turns around, the program returns to the beginning, which is why you must place the four blocks you use inside a Loop block configured in Unlimited mode. Create the program now, as shown in Figure 6-8. Discovery #24: Avoid Obstacles and a Bad Mood! Expand the TouchAvoid program by making it display a happy face on the EV3 s display as the robot moves forward and a sad face when it s reversing and turning. Hint Place two Display blocks somewhere in the Loop block. understanding sensors 67

 Hint You ll need a Loop block, two Wait blocks, and two Move Steering blocks (one in On mode and one in Off mode).")
8 Figure 6-8: The TouchAvoid program. The Wait block is configured in Touch Sensor - Compare - State mode. Discovery #25: Easy Push! Can you make the EXPLOR3R drive backward as long as you press the bumper, and can you make the robot stop when you release the bumper? This behavior should continue until you end the program manually. Test your program by keeping the bumper pressed manually. (This makes it seem as though you re pushing the robot backward, but actually the robot is doing all the hard work.) Hint You ll need a Loop block, two Wait blocks, and two Move Steering blocks (one in On mode and one in Off mode). For most programs, it s best to use the Compare mode because doing so makes predicting your robot s behavior easier. Regardless of the initial state of the sensor, the robot will always wait to change its behavior until the Touch Sensor reaches the state of your choice. sensors and the loop block As you learned in Chapter 5, you can configure a Loop block to loop a certain number of times, loop for a specified number of seconds, or loop endlessly. You can also program a Loop block to stop repeating based on sensor input. For example, you can make your robot drive back and forth until the Touch Sensor is pressed. To configure the Loop block like this, select the Touch Sensor State mode, as shown in Figure As before, choose 1 in the Port setting. Create the LoopUntilTouch program and run it to see how it works. You should notice that the program checks the sensor measurement only once each time the blocks inside the loop have completed. For the loop to end, the sensor will need to using change mode So far we ve used the Wait block in Compare mode to make the program pause until the Touch Sensor reaches a state of your choice (pressed or released). Now we ll create a program with a Wait block in Change mode that will pause the program until the sensor state changes (either from released to pressed or from pressed to released). Create and run the WaitForChange program, as shown in Figure 6-9. If the bumper is released when the program starts, the robot should drive until it hits an object and then stop. If the bumper is already pressed when the program starts, the robot should continue to try to go forward until the sensor is released and then stop. Figure 6-9: The WaitForChange program 68 Chapter 6

9 Touch Sensor State State Port Figure 6-10: The LoopUntilTouch program. To configure the Loop block, click the Mode Selector and choose Touch Sensor State. be pressed just after the robot moves forward. If the sensor is not pressed at this point in the loop, the robot moves back and forth once more before checking the state of the Touch Sensor again. This is the expected behavior for the Loop block, but sometimes you ll want the loop to end even if you don t press the sensor at exactly the right time. To accomplish this, set the state setting to Bumped (2) and run the program again. In this configuration, the loop doesn t check whether the Touch Sensor is pressed at the end of the loop; rather, it checks whether you bump (press and release) the sensor at any time during the loop. If you do, the blocks should stop repeating after they complete the current run. (The EV3 continuously monitors the state of the Touch Sensor while the loop runs so that you don t have to worry about it.) sensors and the switch block You can use a Switch block to have a robot make a decision based on a sensor measurement. For example, you can make your robot drive backward if the Touch Sensor is pressed or say No Object when it s not pressed, as shown in Figure Is the Touch Sensor pressed? Yes No Drive backward. Say No Object. Discovery #26: Happy Tunes! Use a Loop block to make the robot play a tune until the robot s bumper is pressed, at which point the robot should scream and quickly turn around. Hint You can use the My Block that you made in Discovery #19 on page 56 for your tune. If you have yet to create your own tune, simply select a sound file from the list in a Sound block. Figure 6-11: A robot can make a decision based on a sensor measurement. The Switch block checks whether a given condition (such as The Touch Sensor is pressed ) is true or false, as shown in Figure The Switch block in this example contains two sequences of blocks; the switch decides which sequence to run based on whether the condition is true or not. If the condition is true, the block in the upper part of the switch is run, and the robot moves backward; if the condition is false, the lower blocks are run, and the robot should say No Object. understanding sensors 69


10 Condition: The Touch Sensor on port 1 is pressed. This block is run if the condition is true. These blocks are run if the condition is false. Figure 6-12: The Switch block checks whether the condition is true or false and runs the appropriate blocks. You specify the condition using the mode and settings on the Switch block. configuring a switch block You define the condition by configuring the mode and settings of the Switch block. Once the program arrives at the Switch block, the robot checks whether the condition is true. Then, it decides which set of programming blocks in the switch to run. There s a mode for each sensor; in this case, you ll choose the one for the Touch Sensor, namely Touch Sensor Compare State (the only available option). Once you ve chosen this mode, you can specify in the state setting whether the Touch Sensor must be pressed (1) or released (0) for the condition to be true. As before, set Port to 1 to specify how the Touch Sensor is connected to your EV3. sensors and the switch block in action The TouchSwitch program you ll now create makes the robot drive forward for three seconds. Then, if the Touch Sensor is pressed, the robot reverses for a short while. If the sensor is not pressed, the robot instead says No Object. Finally, regardless of the Switch block s decision, the robot plays a tone. Now create the program, as shown in Figure Figure 6-13: The TouchSwitch program has the robot decide what to do based on a sensor reading. 70 Chapter 6

11 Try running this program a few times, and determine when you need to press the Touch Sensor to make the robot go backward. Your experiments should show that the robot takes a measurement when the Switch block runs and that it uses this single measurement to determine whether the condition is true. In this program, the sensor measurement is taken just after the robot finishes going forward. When either the reverse action or the no object action is complete, the tone plays. adding blocks to a switch block There s no limit to the number of blocks you can place inside a Switch block. If one part of a switch has multiple blocks, they re simply run one by one. You can also leave one of the two parts of a Switch block empty, as shown in Figure Run this modified program to see what happens. If the condition is true (the bumper is pressed), the robot should say Object and move backward, and the program should continue by playing the tone. If the condition is false (the sensor is not pressed), the program will find no blocks in the lower part of the switch and instantly move on to the Sound block after the switch. Discovery #27: Stay or Move? Make the robot stand still for three seconds. Then, if the Touch Sensor is released, the robot should turn around and drive forward for five wheel rotations. But if the sensor is pressed, the robot should do nothing, and the program should end immediately. Discovery #28: difficult Decisions! Let s practice with the Switch block! Create a program to implement the decision tree shown in Figure How do you configure the Switch block, and why do you have to put a Wait block at the end of the program? Drive backward for two seconds. Is the Touch Sensor released? Yes Make the left motor turn forward for two rotations. No Display a happy face on the EV3 screen. Wait five seconds. Make the right motor turn backward for three rotations. Figure 6-15: The program flow for Discovery #28 Figure 6-14: A modified version of the TouchSwitch program. The switch does not have any blocks to run if the condition is false, so the program immediately plays a tone after moving forward if the sensor is not pressed. understanding sensors 71


12 using flat view and tabbed view Normally, you see the complete Switch block on your screen in Flat View. When you make large programs containing Switch blocks, it s easy to lose track of how your program works. In such cases, you can display the block in Tabbed View to decrease the size of the Switch block, as shown in Figure Both parts of the switch are still in the program, but they re on separate tabs, which you can open by clicking them. repeating switches Every time your program arrives at the Switch block, it checks the state of the Touch Sensor to decide whether the blocks in the true or false part of the switch should be run. To have a robot check a condition more than once, you can drag a Switch block into a Loop block. For example, you could program a robot to say Yes if the Touch Sensor is pressed and to say No otherwise. If you place a Switch block with this configuration in a Loop block, the robot will keep checking the sensor reading and continue to say Yes or No accordingly. Now create the RepeatSwitch program shown in Figure Toggle between Flat View and Tabbed View. Click a tab to show the desired part of the Switch block. Figure 6-16: Decrease the size of the Switch block by changing to Tabbed View. This option just changes your view of the block; it won t affect the way the program works. Figure 6-17: The RepeatSwitch program 72 Chapter 6

13 understanding compare, change, and measure mode If you use sensor input in any programs with Wait, Loop, and Switch blocks, you often have to choose among Compare, Change, and Measure when configuring a block s mode. You ll see more examples of these modes as you read on, but let s take some time to look at them side by side to see how they work. compare mode Compare mode ( ) makes your robot take a sensor value and check it against the condition as specified in the block s settings. A condition is a statement like The Touch Sensor is pressed, The measured light intensity is less than 37%, or The Color Sensor sees red or blue. N A Wait block in Compare mode keeps taking new sensor measurements until the condition becomes true. When it s true, the program moves on to the next block in line (see Figure 6-6). N A Loop block in Compare mode checks the condition against a new sensor value each time it s done running the blocks inside the loop. If the condition is true, the program moves on to the block after the loop; if it s false, the loop runs again (see Figure 6-10). Loop blocks are always in Compare mode. N A Switch block in Compare mode runs the sequence of blocks at the top if the condition is true; it runs the blocks at the bottom if it s false (see Figure 6-13). change mode Change mode ( ) is available only in Wait blocks. A Wait block in Change mode takes an initial measurement and keeps taking new measurements until it finds one that s different from the first one. For example, if the Touch Sensor is pressed when the block starts, it waits until the Touch Sensor is released. Then, the program continues with the next block (see Figure 6-9). measure mode Measure mode ( ) is available only in Switch blocks. A Switch block in Measure mode contains a set of blocks to run for each possible sensor value. You ll see how this works in Chapter 7 when you create a program that does something different for each color the Color Sensor can see. configuring the modes The text usually makes clear which mode you should use for the example programs in this book, but all of the information you need is also visible in the programming diagrams. If you re not sure which mode to choose, just look at the icons on each block, as shown in Figure Once you ve selected the sensor (1) and made a choice of Compare, Change, or Measure (2), you choose the sensor operation mode (3). The Touch Sensor measures just one thing (the state of the red button), but the Color Sensor has three operation modes, as shown in Figure As you practice with each mode in the next chapters, you ll be able to create your own programs with sensors in no time. Sensor operation mode Figure 6-18: When you see Wait, Loop, or Switch blocks in the example programs in this book, choose the menu items to match the icons shown on the blocks. Begin by choosing the correct sensor (1) and then choose Compare, Change, or Measure (2). Finally, choose the sensor operation mode (3). understanding sensors 73
14 further exploration In this chapter, you ve learned that robots use sensors to gather input from their environment. You ve also learned how to create programs for robots with sensors using Wait, Loop, and Switch blocks. You ve been using only the Touch Sensor so far, but you can use all the programming techniques you ve learned in this chapter when working with the other sensors. You ll continue with the Color Sensor in Chapter 7, you ll learn about the Infrared Sensor in Chapter 8, and you ll meet the built-in Rotation Sensors and the Brick Buttons in Chapter 9. Before you continue, practice your sensor-programming skills by solving these Discoveries. Discovery #29: Choosing directions! Expand the TouchAvoid program from Figure 6-8 to make the robot go right after running into the first object and left when the sensor is pressed again. The next obstacle should result in a right turn again, and so on. Hint Duplicate the four blocks inside the loop so there are eight blocks in the loop, and change the steering setting in the second set of blocks. Discovery #31: Brick Buttons! Difficulty: Time: As you ll see in Chapter 9, you can use most of the Brick Buttons the same way you ve used the Touch Sensor. Without skipping ahead, can you make the robot say Left if you press the Left button on the EV3 Brick and Right if you press the Right button? Can you make it say Up and Down when you push the Up and Down buttons as well? Design Discovery #4: Intruder Alarm! Building: Programming: Can you turn your robot into an alarm that alerts you to intruders entering the room? Use the Touch Sensor as a switch that gets activated when someone breaks into the room. Play a loud beeping sound when this happens. Hint Place something heavy, like a book, in front of your robot, pressing the bumper. Then, design a contraption that automatically pulls the book away when someone enters the room. Your robot should play the sound as soon as the Touch Sensor is no longer pressed. Discovery #30: Wait, Loop, or Switch? Program the robot to wait for a Touch Sensor press. Then, if the sensor is still pressed after five more seconds, make the robot say Yes. Otherwise, make it say No. Hint You ll need a combination of Switch and Wait blocks. Design Discovery #5: Light Switch! Building: Programming: Design a robot that toggles the light switch in your room whenever you press the Touch Sensor. Each time you press the sensor, the robot should switch the light on or off. You can add the Medium Motor to the EXPLOR3R to do this, or you can design a completely new robot dedicated to this task. 74 Chapter 6
Robotics using Lego Mindstorms EV3 (Intermediate)
") Robotics using Lego Mindstorms EV3 (Intermediate) Facebook.com/roboticsgateway @roboticsgateway Robotics using EV3 Are we ready to go Roboticists? Does each group have at least one laptop? Do you have
Robotics using Lego Mindstorms EV3 (Intermediate) Facebook.com/roboticsgateway @roboticsgateway Robotics using EV3 Are we ready to go Roboticists? Does each group have at least one laptop? Do you have
Chapter 14. using data wires
 Chapter 14. using data wires In this fifth part of the book, you ll learn how to use data wires (this chapter), Data Operations blocks (Chapter 15), and variables (Chapter 16) to create more advanced programs
The light sensor, rotation sensor, and motors may all be monitored using the view function on the RCX.
 Review the following material on sensors. Discuss how you might use each of these sensors. When you have completed reading through this material, build a robot of your choosing that has 2 motors (connected
An Introduction to Programming using the NXT Robot:
 An Introduction to Programming using the NXT Robot: exploring the LEGO MINDSTORMS Common palette. Student Workbook for independent learners and small groups The following tasks have been completed by:
Ev3 Robotics Programming 101
 Ev3 Robotics Programming 101 1. EV3 main components and use 2. Programming environment overview 3. Connecting your Robot wirelessly via bluetooth 4. Starting and understanding the EV3 programming environment
How Do You Make a Program Wait?
 How Do You Make a Program Wait? How Do You Make a Program Wait? Pre-Quiz 1. What is an algorithm? 2. Can you think of a reason why it might be inconvenient to program your robot to always go a precise
LEGO Mindstorms Class: Lesson 1
 LEGO Mindstorms Class: Lesson 1 Some Important LEGO Mindstorm Parts Brick Ultrasonic Sensor Light Sensor Touch Sensor Color Sensor Motor Gears Axle Straight Beam Angled Beam Cable 1 The NXT-G Programming
Laboratory 7: CONTROL SYSTEMS FUNDAMENTALS
 Laboratory 7: CONTROL SYSTEMS FUNDAMENTALS OBJECTIVES - Familiarize the students in the area of automatization and control. - Familiarize the student with programming of toy robots. EQUIPMENT AND REQUERIED
Your EdVenture into Robotics 10 Lesson plans
 Your EdVenture into Robotics 10 Lesson plans Activity sheets and Worksheets Find Edison Robot @ Search: Edison Robot Call 800.962.4463 or email custserv@ Lesson 1 Worksheet 1.1 Meet Edison Edison is a
PHYSICS 220 LAB #1: ONE-DIMENSIONAL MOTION
 /53 pts Name: Partners: PHYSICS 22 LAB #1: ONE-DIMENSIONAL MOTION OBJECTIVES 1. To learn about three complementary ways to describe motion in one dimension words, graphs, and vector diagrams. 2. To acquire
EV3 Advanced Topics for FLL
 EV3 Advanced Topics for FLL Jim Keller GRASP Laboratory University of Pennsylvania August 14, 2016 Part 1 of 2 Topics Intro to Line Following Basic concepts Calibrate Calibrate the light sensor Display
Agent-based/Robotics Programming Lab II
 cis3.5, spring 2009, lab IV.3 / prof sklar. Agent-based/Robotics Programming Lab II For this lab, you will need a LEGO robot kit, a USB communications tower and a LEGO light sensor. 1 start up RoboLab
contents in detail PART I GETTING STARTED acknowledgments...xvii
 contents in detail acknowledgments...xvii introduction...xix why this book?...xix is this book for you?...xix how does this book work?...xix the discoveries...xix what to expect in each chapter...xx getting
FLL Programming Workshop Series
 FLL Programming 2017 Workshop Series 2017 1 Prerequisites & Equipment Required Basic computer skills Assembled EV3 Educational robot or equivalent Computer or Laptop with LEGO Mindstorms software installed
Robotics Workshop. for Parents and Teachers. September 27, 2014 Wichita State University College of Engineering. Karen Reynolds
 Robotics Workshop for Parents and Teachers September 27, 2014 Wichita State University College of Engineering Steve Smith Christa McAuliffe Academy ssmith3@usd259.net Karen Reynolds Wichita State University
Robot Programming Manual
 2 T Program Robot Programming Manual Two sensor, line-following robot design using the LEGO NXT Mindstorm kit. The RoboRAVE International is an annual robotics competition held in Albuquerque, New Mexico,
Erik Von Burg Mesa Public Schools Gifted and Talented Program Johnson Elementary School
 Erik Von Burg Mesa Public Schools Gifted and Talented Program Johnson Elementary School elvonbur@mpsaz.org Water Sabers (2008)* High Heelers (2009)* Helmeteers (2009)* Cyber Sleuths (2009)* LEGO All Stars
Overview. The Game Idea
 Page 1 of 19 Overview Even though GameMaker:Studio is easy to use, getting the hang of it can be a bit difficult at first, especially if you have had no prior experience of programming. This tutorial is
University of Toronto. Companion Robot Security. ECE1778 Winter Wei Hao Chang Apper Alexander Hong Programmer
 University of Toronto Companion ECE1778 Winter 2015 Creative Applications for Mobile Devices Wei Hao Chang Apper Alexander Hong Programmer April 9, 2015 Contents 1 Introduction 3 1.1 Problem......................................
Some prior experience with building programs in Scratch is assumed. You can find some introductory materials here:
 Robotics 1b Building an mbot Program Some prior experience with building programs in Scratch is assumed. You can find some introductory materials here: http://www.mblock.cc/edu/ The mbot Blocks The mbot
Lab book. Exploring Robotics (CORC3303)
") Lab book Exploring Robotics (CORC3303) Dept of Computer and Information Science Brooklyn College of the City University of New York updated: Fall 2011 / Professor Elizabeth Sklar UNIT A Lab, part 1 : Robot
Lab book Exploring Robotics (CORC3303) Dept of Computer and Information Science Brooklyn College of the City University of New York updated: Fall 2011 / Professor Elizabeth Sklar UNIT A Lab, part 1 : Robot
Deriving Consistency from LEGOs
 Deriving Consistency from LEGOs What we have learned in 6 years of FLL and 7 years of Lego Robotics by Austin and Travis Schuh 1 2006 Austin and Travis Schuh, all rights reserved Objectives Basic Building
Studuino Icon Programming Environment Guide
 Studuino Icon Programming Environment Guide Ver 0.9.6 4/17/2014 This manual introduces the Studuino Software environment. As the Studuino programming environment develops, these instructions may be edited
Parts of a Lego RCX Robot
 Parts of a Lego RCX Robot RCX / Brain A B C The red button turns the RCX on and off. The green button starts and stops programs. The grey button switches between 5 programs, indicated as 1-5 on right side
Line Detection. Duration Minutes. Di culty Intermediate. Learning Objectives Students will:
 Line Detection Design ways to improve driving safety by helping to prevent drivers from falling asleep and causing an accident. Learning Objectives Students will: Explore the concept of the Loop Understand
Chapter 1. Robots and Programs
 Chapter 1 Robots and Programs 1 2 Chapter 1 Robots and Programs Introduction Without a program, a robot is just an assembly of electronic and mechanical components. This book shows you how to give it a
Automatic Headlights
 Automatic Headlights Design car features that will improve nighttime driving safety. Learning Objectives Students will: Explore the concept of Inputs and the way to control them Explore the concept of
Introduction to Robotics Rubrics
 Introduction to Robotics Rubrics Students can evaluate their project work according to the learning goals. Each rubric includes four levels: Bronze, Silver, Gold, and Platinum. The intention is to help
COSC343: Artificial Intelligence
 COSC343: Artificial Intelligence Lecture 2: Starting from scratch: robotics and embodied AI Alistair Knott Dept. of Computer Science, University of Otago Alistair Knott (Otago) COSC343 Lecture 2 1 / 29
A - Debris on the Track
 A - Debris on the Track Rocks have fallen onto the line for the robot to follow, blocking its path. We need to make the program clever enough to not get stuck! 2017 https://www.hamiltonbuhl.com/teacher-resources
A - Debris on the Track
 A - Debris on the Track Rocks have fallen onto the line for the robot to follow, blocking its path. We need to make the program clever enough to not get stuck! 2018 courses.techcamp.org.uk/ Page 1 of 7
Mindstorms NXT. mindstorms.lego.com
 Mindstorms NXT mindstorms.lego.com A3B99RO Robots: course organization At the beginning of the semester the students are divided into small teams (2 to 3 students). Each team uses the basic set of the
RoboCup Sumo Workshop. Margaux Edwards July 2018
 RoboCup Sumo Workshop Margaux Edwards July 2018 Plan for today: The Challenge Designing your Robot Programming your Robot Ultrasonic Sensor Light/Colour Sensor Competition Time! The Challenge: What is
A - Debris on the Track
 A - Debris on the Track Rocks have fallen onto the line for the robot to follow, blocking its path. We need to make the program clever enough to not get stuck! Step 1 2017 courses.techcamp.org.uk/ Page
Flowcharts and Programs
 Flowcharts and Programs Engineering with Labview Laptop Program Schematic Editor Front Panel & Block Diagram Block Diagram: Program Code Front Panel: Virtual Dashboard Front Panel Block Diagram
Revision for Grade 7 in Unit #1&3
 Your Name:.... Grade 7 / SEION 1 Matching :Match the terms with its explanations. Write the matching letter in the correct box. he first one has been done for you. (1 mark each) erm Explanation 1. electrical
I.1 Smart Machines. Unit Overview:
 I Smart Machines I.1 Smart Machines Unit Overview: This unit introduces students to Sensors and Programming with VEX IQ. VEX IQ Sensors allow for autonomous and hybrid control of VEX IQ robots and other
Robotic Programming. Skills Checklist
 Robotic Programming Skills Checklist Name: Motors Motors Direction Steering Power Duration Complete B & C Forward Straight 75 3 Rotations B & C Forward Straight 100 5 Rotatins B & C Forward Straight 50
FLL Coaches Clinic Chassis and Attachments. Patrick R. Michaud
 FLL Coaches Clinic Chassis and Attachments Patrick R. Michaud pmichaud@pobox.com Erik Jonsson School of Engineering and Computer Science University of Texas at Dallas September 23, 2017 Presentation Outline
Sketch-Up Project Gear by Mark Slagle
 Sketch-Up Project Gear by Mark Slagle This lesson was donated by Mark Slagle and is to be used free for education. For this Lesson, we are going to produce a gear in Sketch-Up. The project is pretty easy
STRUCTURE SENSOR QUICK START GUIDE
 STRUCTURE SENSOR 1 TABLE OF CONTENTS WELCOME TO YOUR NEW STRUCTURE SENSOR 2 WHAT S INCLUDED IN THE BOX 2 CHARGING YOUR STRUCTURE SENSOR 3 CONNECTING YOUR STRUCTURE SENSOR TO YOUR IPAD 4 Attaching Structure
Line-Follower Challenge
 Line-Follower Challenge Pre-Activity Quiz 1. How does a color sensor work? Does the color sensor detect white or black as a higher amount of light reflectivity? Absorbance? 2. Can you think of a method
acknowledgments...xv introduction...xvii 1 LEGO MINDSTORMS NXT 2.0: people, pieces, and potential getting started with the NXT 2.0 set...
 acknowledgments...xv introduction...xvii about this book...xvii part I: introduction to LEGO MINDSTORMS NXT 2.0...xviii part II: building...xviii part III: programming...xviii part IV: projects...xix companion
Nebraska 4-H Robotics and GPS/GIS and SPIRIT Robotics Projects
 Name: Club or School: Robots Knowledge Survey (Pre) Multiple Choice: For each of the following questions, circle the letter of the answer that best answers the question. 1. A robot must be in order to
CURIE Academy, Summer 2014 Lab 2: Computer Engineering Software Perspective Sign-Off Sheet
 Lab : Computer Engineering Software Perspective Sign-Off Sheet NAME: NAME: DATE: Sign-Off Milestone TA Initials Part 1.A Part 1.B Part.A Part.B Part.C Part 3.A Part 3.B Part 3.C Test Simple Addition Program
Robotics 2a. What Have We Got to Work With?
 Robotics 2a Introduction to the Lego Mindstorm EV3 What we re going to do in the session. Introduce you to the Lego Mindstorm Kits The Design Process Design Our Robot s Chassis What Have We Got to Work
Introduction 1. Download socket (the cable plugs in here so that the GENIE microcontroller can talk to the computer)
") Introduction 1 Welcome to the magical world of GENIE! The project board is ideal when you want to add intelligence to other design or electronics projects. Simply wire up your inputs and outputs and away
Introduction 1 Welcome to the magical world of GENIE! The project board is ideal when you want to add intelligence to other design or electronics projects. Simply wire up your inputs and outputs and away
Instructors. Manual GEARED. After-School Robotics Program By Haley Hanson
 Instructors GEARED UP Manual After-School Robotics Program By Haley Hanson Table of Contents Introduction 3 Before you Start 4 Program Overview 5 Proposed Timeline 6 Itemized Materials List and Sample
Installation guide. Activate. Install your Broadband. Install your Phone. Install your TV. 1 min. 30 mins
 Installation guide 1 Activate Install your Broadband Install your TV 4 Install your Phone 1 min 0 mins 0 mins 5 mins INT This guide contains step-by-step instructions on how to: 1 Activate Before we do
GAME:IT Junior Bouncing Ball
 GAME:IT Junior Bouncing Ball Objectives: Create Sprites Create Sounds Create Objects Create Room Program simple game All games need sprites (which are just pictures) that, in of themselves, do nothing.
2D Platform. Table of Contents
 2D Platform Table of Contents 1. Making the Main Character 2. Making the Main Character Move 3. Making a Platform 4. Making a Room 5. Making the Main Character Jump 6. Making a Chaser 7. Setting Lives
Unit 4: Robot Chassis Construction
 Unit 4: Robot Chassis Construction Unit 4: Teacher s Guide Lesson Overview: Paul s robotic assistant needs to operate in a real environment. The size, scale, and capabilities of the TETRIX materials are
Scratch for Beginners Workbook
 for Beginners Workbook In this workshop you will be using a software called, a drag-anddrop style software you can use to build your own games. You can learn fundamental programming principles without
UNIT1. Keywords page 13-14
 UNIT1 Keywords page 13-14 What is a Robot? A robot is a machine that can do the work of a human. Robots can be automatic, or they can be computer-controlled. Robots are a part of everyday life. Most robots
Pre-Activity Quiz. 2 feet forward in a straight line? 1. What is a design challenge? 2. How do you program a robot to move
 Maze Challenge Pre-Activity Quiz 1. What is a design challenge? 2. How do you program a robot to move 2 feet forward in a straight line? 2 Pre-Activity Quiz Answers 1. What is a design challenge? A design
EdPy app documentation
 EdPy app documentation This document contains a full copy of the help text content available in the Documentation section of the EdPy app. Contents Ed.List()... 4 Ed.LeftLed()... 5 Ed.RightLed()... 6 Ed.ObstacleDetectionBeam()...
Thanks to Autocheck function, it is possible to perform a complete check-up of the robot thanks to a stepby-step
 2.3.23 Autocheck Thanks to Autocheck function, it is possible to perform a complete check-up of the robot thanks to a stepby-step procedure. In order to carry out the procedure, it is important to establish
Programming Design ROBOTC Software
 Programming Design ROBOTC Software Computer Integrated Manufacturing 2013 Project Lead The Way, Inc. Behavior-Based Programming A behavior is anything your robot does Example: Turn on a single motor or
Mechatronics Project Report
 Mechatronics Project Report Introduction Robotic fish are utilized in the Dynamic Systems Laboratory in order to study and model schooling in fish populations, with the goal of being able to manage aquatic
Competitive VEX Robot Designer. Terminal Objective 1.4: program and operate the Tumbler
 Skill Set 1: Driver/Operator Competitive VEX Robot Designer Terminal Objective 1.4: program and operate the Tumbler Performance Objective: Program and operate the Tumbler in Tank (stick), Arcade, and Tank
Let There Be Light. Opening Files. Deleting National Technology and Science Press
 Let There Be Light 2 Better to light a candle than to curse the darkness. Chinese Proverb The Hello World program demonstrates only the output aspect of a computer program. Now let s write a program that
Learn about the RoboMind programming environment
 RoboMind Challenges Getting Started Learn about the RoboMind programming environment Difficulty: (Easy), Expected duration: an afternoon Description This activity uses RoboMind, a robot simulation environment,
Inspiring Creative Fun Ysbrydoledig Creadigol Hwyl. Kinect2Scratch Workbook
 Inspiring Creative Fun Ysbrydoledig Creadigol Hwyl Workbook Scratch is a drag and drop programming environment created by MIT. It contains colour coordinated code blocks that allow a user to build up instructions
What Is Bluetooth? How Does It Differ from a Wired Connection?
 What Is Bluetooth? How Does It Differ from a Wired Connection? What Is Bluetooth? Pre-Quiz 1. What is an electrical connection? 2. Give an example of a wireless electrical connection. 2 What Is Bluetooth?
FIRST FIRING INSTRUCTIONS FOR L&L KILNS WITH A DYNATROL
 WHEN TO DO A FIRST TEST FIRING? Once your kiln is set up, leveled properly (very important), control panel hooked up to the kiln correctly and all the power wired properly, you are ready for your first
Create a game in which you have to guide a parrot through scrolling pipes to score points.
 Raspberry Pi Projects Flappy Parrot Introduction Create a game in which you have to guide a parrot through scrolling pipes to score points. What you will make Click the green ag to start the game. Press
Where C= circumference, π = 3.14, and D = diameter EV3 Distance. Developed by Joanna M. Skluzacek Wisconsin 4-H 2016 Page 1
 Instructor Guide Title: Distance the robot will travel based on wheel size Introduction Calculating the distance the robot will travel for each of the duration variables (rotations, degrees, seconds) can
HTC VIVE Installation Guide
 HTC VIVE Installation Guide Thank you for renting from Hartford Technology Rental. Get ready for an amazing experience. To help you setup the VIVE, we highly recommend you follow the steps below. Please
A New Simulator for Botball Robots
 A New Simulator for Botball Robots Stephen Carlson Montgomery Blair High School (Lockheed Martin Exploring Post 10-0162) 1 Introduction A New Simulator for Botball Robots Simulation is important when designing
Moving Game X to YOUR Location In this tutorial, you will remix Game X, making changes so it can be played in a location near you.
 Moving Game X to YOUR Location In this tutorial, you will remix Game X, making changes so it can be played in a location near you. About Game X Game X is about agency and civic engagement in the context
Image 1, Ref - see slide WHAT IS A ROBOT? A look at characteristics of robots using the LEGO EV3 as a specific example (50 minutes)
") 1 Image 1, Ref - see slide 17-18 WHAT IS A ROBOT? A look at characteristics of robots using the LEGO EV3 as a specific example (50 minutes) PRE/POST-ASSESSMENT SHEET - What is a robot? 1. Describe in one
1 Image 1, Ref - see slide 17-18 WHAT IS A ROBOT? A look at characteristics of robots using the LEGO EV3 as a specific example (50 minutes) PRE/POST-ASSESSMENT SHEET - What is a robot? 1. Describe in one
2.4 Sensorized robots
 66 Chap. 2 Robotics as learning object 2.4 Sensorized robots 2.4.1 Introduction The main objectives (competences or skills to be acquired) behind the problems presented in this section are: - The students
Begin at the beginning," the King said, very gravely, "and go on till you come to the end
 An Introduction to Alice Begin at the beginning," the King said, very gravely, "and go on till you come to the end By Teddy Ward Under the direction of Professor Susan Rodger Duke University, May 2013
STRUCTURE SENSOR & DEMO APPS TUTORIAL
 STRUCTURE SENSOR & DEMO APPS TUTORIAL 1 WELCOME TO YOUR NEW STRUCTURE SENSOR Congrats on your new Structure Sensor! We re sure you re eager to start exploring your Structure Sensor s capabilities. And
The Future. of History
 The Future Non-Linear History option allows you to undo a state and try a new version of the image while the previous states remain available for reference (Figure 2). of History The Photoshop 5.0 History
Experiment #3: Micro-controlled Movement
 Experiment #3: Micro-controlled Movement So we re already on Experiment #3 and all we ve done is blinked a few LED s on and off. Hang in there, something is about to move! As you know, an LED is an output
Robotic Manipulation Lab 1: Getting Acquainted with the Denso Robot Arms Fall 2010
 15-384 Robotic Manipulation Lab 1: Getting Acquainted with the Denso Robot Arms Fall 2010 due September 23 2010 1 Introduction This lab will introduce you to the Denso robot. You must write up answers
University of Florida Department of Electrical and Computer Engineering EEL 5666 Intelligent Machines Design Laboratory GetMAD Final Report
 Date: 12/8/2009 Student Name: Sarfaraz Suleman TA s: Thomas Vermeer Mike Pridgen Instuctors: Dr. A. Antonio Arroyo Dr. Eric M. Schwartz University of Florida Department of Electrical and Computer Engineering
Next Back Save Project Save Project Save your Story
 What is Photo Story? Photo Story is Microsoft s solution to digital storytelling in 5 easy steps. For those who want to create a basic multimedia movie without having to learn advanced video editing, Photo
ADMS-847 Programming Software for the Yaesu FT-847
 for the Yaesu FT-847 Memory Types Memories Limit Memories VFO A VFO B Home Satellite Memories One Touch Memory Channel Functions Transmit Frequency Offset Frequency Offset Direction CTCSS DCS Skip The
In this project we ll make our own version of the highly popular mobile game Flappy Bird. This project requires Scratch 2.0.
 Flappy Parrot Introduction In this project we ll make our own version of the highly popular mobile game Flappy Bird. This project requires Scratch 2.0. Press the space bar to flap and try to navigate through
CNC Using the FlexiCam CNC and HMI Software. Guldbergsgade 29N, P0 E: T:
 CNC Using the FlexiCam CNC and HMI Software Guldbergsgade 29N, P0 E: makerlab@kea.dk T: +46 46 03 90 This grey box is the NC controller. Let s start by turning the red switch to the ON position, then press
LESSON 1 CROSSY ROAD
 1 CROSSY ROAD A simple game that touches on each of the core coding concepts and allows students to become familiar with using Hopscotch to build apps and share with others. TIME 45 minutes, or 60 if you
OverDrive for Kindle, Kindle Paperwhite, Kindle Voyage, and Kindle Oasis (not Kindle Fire and Fire Tablet) Contents
 Contents") OverDrive for Kindle, Kindle Paperwhite, Kindle Voyage, and Kindle Oasis (not Kindle Fire and Fire Tablet) Contents Optimizing OverDrive for your Kindle Searching and Browsing Borrowing and Downloading
OverDrive for Kindle, Kindle Paperwhite, Kindle Voyage, and Kindle Oasis (not Kindle Fire and Fire Tablet) Contents Optimizing OverDrive for your Kindle Searching and Browsing Borrowing and Downloading
Motions and Forces Collision I
 Motions and Forces Collision I Discovery Question What happens when two objects collide? Introduction Thinking About the Question Materials Safety Trial I: Weighing the cart with the Force probe Trial
How to use Photo Story 3
 How to use Photo Story 3 Photo Story 3 helps you to make digital stories on the computer using photos (or other images), text and sound. You can record your voice and write your own text. You can also
FIRST LEGO LEAGUE. PowerUp Summer Game. Presented by FRC 6328
 FIRST LEGO LEAGUE PowerUp Summer Game 2018 Presented by FRC 6328 FLL POWER UP OVERVIEW The purpose of the FLL PowerUP game is to provide an engaging summer program for FLL students that will help prepare
ChatBot. Introduction. Scratch. You are going to learn how to program your own talking robot! Activity Checklist. Test your Project.
 Scratch 1 ChatBot Introduction You are going to learn how to program your own talking robot! Activity Checklist Test your Project Save your Project Follow these INSTRUCTIONS one by one Click on the green
E Technology: A. Innovations Activity: Introduction to Robotics
 Science as Inquiry: As a result of their activities in grades 5 8, all students should develop Understanding about scientific inquiry. Abilities necessary to do scientific inquiry: identify questions,
DISCO DICING SAW SOP. April 2014 INTRODUCTION
 DISCO DICING SAW SOP April 2014 INTRODUCTION The DISCO Dicing saw is an essential piece of equipment that allows cleanroom users to divide up their processed wafers into individual chips. The dicing saw
Capstone Python Project Features
 Capstone Python Project Features CSSE 120, Introduction to Software Development General instructions: The following assumes a 3-person team. If you are a 2-person team, see your instructor for how to deal
Congratulations on your decision to purchase the Triquetra Auto Zero Touch Plate for All Three Axis.
 Congratulations on your decision to purchase the Triquetra Auto Zero Touch Plate for All Three Axis. This user guide along with the videos included on the CD should have you on your way to perfect zero
_ Programming Manual RE729 Including Classic and New VoX Interfaces Version 3.0 May 2011
 _ Programming Manual RE729 Including Classic and New VoX Interfaces Version 3.0 May 2011 RE729 Programming Manual to PSWx29 VoX.docx - 1 - 1 Content 1 Content... 2 2 Introduction... 2 2.1 Quick Start Instructions...
GAME:IT Junior Bouncing Ball
 GAME:IT Junior Bouncing Ball Objectives: Create Sprites Create Sounds Create Objects Create Room Program simple game All games need sprites (which are just pictures) that, in of themselves, do nothing.
Set Up Your Domain Here
 Roofing Business BLUEPRINT WordPress Plugin Installation & Video Walkthrough Version 1.0 Set Up Your Domain Here VIDEO 1 Introduction & Hosting Signup / Setup https://s3.amazonaws.com/rbbtraining/vid1/index.html
Adding Content and Adjusting Layers
 56 The Official Photodex Guide to ProShow Figure 3.10 Slide 3 uses reversed duplicates of one picture on two separate layers to create mirrored sets of frames and candles. (Notice that the Window Display
Inspiring Creative Fun Ysbrydoledig Creadigol Hwyl. LEGO Bowling Workbook
 Inspiring Creative Fun Ysbrydoledig Creadigol Hwyl LEGO Bowling Workbook Robots are devices, sometimes they run basic instructions via electric circuitry or on most occasions they can be programmable.
A Day in the Life CTE Enrichment Grades 3-5 mblock Robotics - Simple Programs
 Activity 1 - Play Music A Day in the Life CTE Enrichment Grades 3-5 mblock Robotics - Simple Programs Computer Science Unit One of the simplest things that we can do, to make something cool with our robot,
Instructional Technology Center
 Partner Teacher Night March 2017 - Lego WeDo 2.0 What are Lego WeDos? WeDos are lego sets that come with a power source and a motor that allows students to create lego constructions that move like robots.
e d u c a t i o n Detect Dark Line Objectives Connect Teacher s Notes
 e d u c a t i o n Objectives Learn how to make the robot interact with the environment: Detect a line drawn on the floor by means of its luminosity. Hint You will need a flashlight or other light source