Amray 3600 FESEM. Standard Operating Procedure. v2.2 modified by Bryan Cord. General Notes...3. Sample Loading...5. System Loading...
|
|
|
- Madeline Harris
- 5 years ago
- Views:
Transcription

1 Amray 3600 FESEM Standard Operating Procedure v2.2 modified by Bryan Cord Contents General Notes...3 Sample Loading...5 System Loading...8 Imaging...12 Saving Data...16 System Unloading...18 Troubleshooting
2 2
3 General Notes This guide is intended as a quick reference for doing basic imaging on the Amray It assumes you re familiar with the system and is NOT a substitute for training. Contact Bryan Cord (bcord@umn.edu) for training if you need it. The system has a lot of advanced capabilities that aren t covered here. Fortunately, it also has a comprehensive help file. The help menu will give you a detailed explanation of every element in each of the different control windows. There s also a manual (linked on the desktop) that goes over everything in a more how-to format. Due to low-level incompatibility between Windows 7 and the 35-year-old SEM control hardware, moving the mouse from the Windows PC screen to the SEM display screen will cause the mouse to double across both screens. The mouse pointer on the PC screen is just a ghost and won t affect anything; move the pointer off the SEM display to get the Windows pointer back. Good SEM imaging takes practice, especially on this system. If you re not getting the resolution you feel like you should be getting, experiment with different settings or ask for help. 3
4 4
5 Sample Loading 1. For small pieces, mount your samples on one of the provided stubs using carbon tape discs. Please do not tape samples directly to the block! a. To make life easier, you may want to put some gold nanoparticles near the part of the sample you want to image to make it easier to locate in the SEM. Use the syringe in the toolbox to deposit ~5 µl of particles from the bottle on your sample. Make sure you put the syringe back in its protective tube when finished. b. If you re using nanoparticles, make sure you give the drop time to dry before pumping down the airlock! Even sucking up a small amount of water will shorten the lifetime of the airlock pump. 2. Place the stem of your sample stub in one of the holes on the raised block in the center of the chuck. Use the small allen wrench near the load lock to tighten the set screw that holds it in place. 5
6 3. For full wafers, remove the piece-part block from the chuck using the larger allen wrench in the toolbox and put it in a safe place. Clamp your wafer into the chuck using the spring clips. Be sure to replace the piece-part block when finished! 4. To view samples at an angle (for cross-sections and the like), use the provided angle chuck. Mount it on the wafer holder using the same two screws as the piece-part chuck. The arrows scribed on top of the block should point toward the SEM chamber when the chuck is attached properly. Attach your sample to either the 45 or 85 degree tilt using the copper clips. If the clips are in the way feel free to take some of them off while you re working as long as you put them back on when you finish. 6


7 7


8 System Loading 1. Slide the chuck, with your sample mounted on it, into the load lock per the picture below. 2. Close the load lock door and press the Load button on the nearby panel a. You can also use the Sample load command in the Vac menu on the SEM Control software panel to do this. If you re getting errors about stage referencing, this way usually works better. 3. If the SEM software isn t already on, start it using the Start SEM icon on the desktop. If the PC is logged out for some reason, use the username 3600 without a password to log 8

9 into it. 4. Wait a few minutes while the system evacuates the load lock and transfers the chuck into the chamber. When you see the gate valve door close on the camera display screen, the sample is loaded. 5. Load the correct holder profile for the holder with the File/Open command in the Stage Control window. If the piece-part block is attached, use 4in_stub.stg ; use 4inch.stg if you re imaging a full wafer and angle.stg if you re using the angle chuck. The holder profile is what keeps the stage from crashing into the final lens, so don t forget to do this! 6. Double-click on the stage map in SEM Control to move the stage to the approximate location of your sample. If using the piece-part stub, the crosshairs represent the different mounting sites along the stub. 7. Set the z-axis to the approximate working distance you d like to use (6-8mm is good) by dragging the line in the Z window of the Stage Control window up and down. Make sure you set the working distance in the SEM Control window too (the FL setting) so the system knows where to focus. 9
 current will give you better signal to noise but increase charging and contamination.")
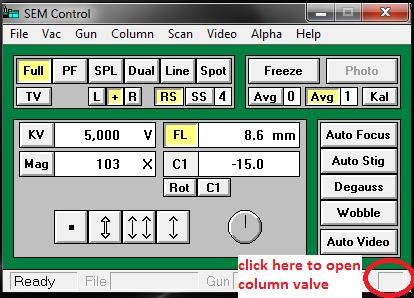
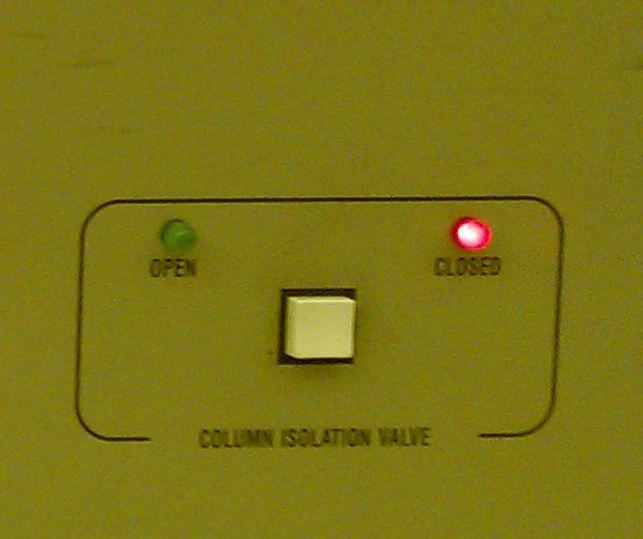
10 8. Set the operating voltage in the SEM Control window (the KV box) to the desired value. 5000V is fine for most imaging, but when imaging surfaces or thin features it may be useful to go to 1-2 kv. 9. Set the probe current by adjusting the C1 value in the SEM Control window. A higher (larger negative) current will give you better signal to noise but increase charging and contamination. -12 is a good starting point with this setting; you can go to -15 or higher if the image is too noisy, or -10 or even lower if charging is a major issue. 10. Open the column valve, either by pressing the column isolation valve button on the column controls or by double-clicking the blank box in the lower-right corner of the SEM Control window. 10
11 11


12 Imaging 1. To change magnification, use the six buttons on the lower-left corner of the console. You can also type new magnifications in SEM control or use the labeled function keys to get to pre-set magnification levels. Moving around can be accomplished with the joystick, the stage control software, or the beam shift knob. 2. Brightness and contrast can be adjusted using the knobs of the same name on the console. The auto video setting will automatically optimize brightness and contrast. 3. Focus can be changed using the large knob under the joystick on the console. Note that the autofocus/auto-stigmation capabilities don t really work well and are not recommended. 4. The easiest way to calibrate your imaging settings is to zoom out to the lowest mag and find an easily-visible garbage feature like a scratch, dust speck, etc. Try not to use the thing you re actually imaging to calibrate your settings, as charging and/or contamination could ruin it before you get a chance to actually image it. a. Moving around can be done with the joystick, the SEM display screen (right-click to change the mouse icon into a target, then double-click the target to bring the double-click site to the screen center), the Stage Control window, or the X and Y beam shift knobs. b. This is much easier to do with a fast scan speed. Turn off slow scan on the console and adjust the RS value to 1 or 2 in the SEM Control window (click on RS, then right-click to lower the value or left-click to raise it) for best results. 12
 setting in the SEM Control window and make sure it s approximately what you were looking for; drag the z-axis up or down accordingly (in the Stage Control window) if")
13 5. Once you ve found a feature to use for calibration, zoom in a bit and twist the focus knob to bring it into focus. Check the working distance (FL) setting in the SEM Control window and make sure it s approximately what you were looking for; drag the z-axis up or down accordingly (in the Stage Control window) if it isn t and refocus. 6. With the feature in focus, degauss the detector using the Degauss button in the SEM Control window. This will cause the image to jump out of focus. Refocus the image and degauss again. The detector is fully de-magnetized when degaussing doesn t affect the focus. Degaussing is critical if you re doing quantitative imaging, as a magnetized detector can cause spatial distortions in your image. 7. Zoom in on your calibration feature until you have problems getting it into focus. At this point, you ll need to align the aperture. Press the wobble button on the console (or use the equivalent software setting/hotkey). You should see the image wobbling in the x and/or y axes. Use the X and Y aperture alignment knobs on the column (see below) to adjust the aperture until the feature stops wobbling and just breathes in and out of focus in one place. Turn off the wobble when finished. 13


14 a. If adjusting the apertures is causing the screen to go black, the beam is out of alignment. Stop the focus wobble and twist the x and y axes of the beam alignment knob until the image is as bright as possible, then continue. b. Try not to lean on the column while adjusting the aperture knobs, as this will make aligning them even harder. 8. With the aperture aligned, continue to zoom in and focus until you re again having problems focusing on a feature. Now focus as much as possible and adjust the x and y stigmators until the image comes fully into focus. a. There are coarse and fine stigmator knobs on the console. For best results, move both fine stigmator knobs to the 12 o clock position and use the coarse stigmator knobs to get as close as possible to the optimum setting. Then use the fine knobs to fine-tune, as well as compensate for any stigmation drift that occurs while imaging. 14
 will let you use a much smaller image to adjust stigmation.")

15 b. Continue to refocus while adjusting stigmation. c. Using a reduced scan field (pressing the reduced field button on the console) will let you use a much smaller image to adjust stigmation. Since this image refreshes much more quickly than a full-screen image, you ll get more immediate visual feedback that can make your life much easier. You can adjust the sized and position of the reduced field using the mouse on the display monitor. 9. Aperture adjustment, focus, and stigmation are an iterative process. Continue to zoom in and adjust all three settings (using the focus wobble for aperture alignment) until you have a clear image at the desired magnification. 15
 setting between 1 and 4 (click SS then left/right click to raise and lower the scan speed in SEM Control).")
16 Saving Data 1. Once you have a good image with optimized settings, you ll want to save a high-quality scan of it. The best way to do this is to use a slow scan ( Slow Scan button on the console) setting between 1 and 4 (click SS then left/right click to raise and lower the scan speed in SEM Control). Press Freeze during the scan to freeze the scan at the end of the frame. a. It should be mentioned that the Photo button, which was originally connected to an old-timey film camera, doesn t do anything anymore. 2. You can add annotations if you want (see appendix) at this point. For measurement, you can simply draw a line/box on the image with the mouse on the SEM display monitor. To add extra text, use the Alpha menu in the SEM Control window. 3. To save images, use the Image Control window. You can change the resolution of the saved images here, as well as click or unclick the G icon to either save or not save (respectively) annotations and the data zone at the bottom of the image. a. If you re planning to publish an image, it s a good idea to save a high-res version without annotations and a low-res version with annotations. That way you ll know all the dimensions, but you can add your own (better-looking) decorations to the high-res image later. 4. Once you ve got your save settings the way you want them, click the fourth icon from the left (or File/Save) to save your image. Because this is an old SEM, you re restricted to 8- character filenames. Live with it. a. Try to save in the c:\userdata directory, after creating a subdirectory with your name on it, just for the sake of organization. 5. You can upload saved images to your UMN Netfiles locker for download later. Open Google Chrome (on the desktop) and log in using your X.500 username. a. PLEASE DO NOT USE USB STICKS TO TRANSFER FILES! USB sticks are major virus-transmission vectors on Windows machines. Netfiles is fast and 16
17 convenient. You can access it from any PC at b. Anything left on the hard drive is subject to deletion at any time, so make sure anything important is backed up somewhere else. 17
18 Unloading 1. Close the column valve with either the button on the column or the control in the corner of the SEM Control window 2. Unload your sample by pressing the Unload button on the load lock or doing Vac/Unload in the SEM Control menu. The system will pump the airlock, unload your sample, and vent automatically. When the load lock button stops flashing, your sample can be removed. 3. Remove your sample from the stage and clean off any carbon tape or other residue you may have left in the process 4. The load lock stays vented when the system isn t actively loading and unloading, so make sure the door is closed to minimize contamination. 18
19 19
20 Troubleshooting Problem Stage has crashed into the final lens; alarm is beeping. Stage has crashed into electron detector Stage won t move Loadlock reference error on SEM display Can t type user annotations onto the SEM display Scan Rot button won t turn off (other buttons might do this too) Solution Find the BNC cable plugged into a port with the ground symbol near it on the side of the main SEM chamber. Unplug that cable to stop the touch alarm and unlock the stage. Reference the stage with the reference command in the stage menu of the Stage Control window to drop it away from the final lens. Confirm that the lens isn t damaged by focusing on something and make a note in CORAL that a stage crash occurred. Crashing into the electron detector is more problematic than crashing into the lens, since it doesn t trigger the touch alarm. If the stage looks like it s contacting the detector (check the IR cam) IMMEDIATELY hit the STOP button in the Stage Control. Re-reference the stage if necessary (see final lens crash procedure above) and drop the z-axis to 20mm or some other large working distance. Make a note in CORAL that a detector crash occurred. The stage is probably out of reference. The lower-right corner of the Stage Control window will say UNREF in this case. Reference the stage using the reference command in the stage menu of the Stage Control window. Re-reference the load lock, either by pushing the REF button on the load lock or using the Reference Airlock command in the Vac menu of the SEM Control window. Click the mouse on the PC monitor. For some reason, the PC monitor has to be focused for user annotations to work. Push it twice quickly. You may have to do it a few times. I ll get around to cleaning the contact on it eventually. 20
21 Typing on the PC just causes annotation letters to appear on the SEM display. Can t get rid of unwanted annotations on SEM display Can t save images (TIFFERROR message when you try) Software appears to be locked up Go into the alpha menu in the SEM Control window and turn off user annotation. On the PC monitor, click the SEM Control window and hit ESC then 0. Once you restart scanning, that should clear all annotations. Due to a weird software bug, the system can t save images if thumbnail images are displayed in an open directory window. If you have a directory window open, either close it or switch to list or detail view. Reset it using the Stop SEM and Start SEM desktop icons. IMMEDIATELY run a stage reference ( reference command in the stage menu of the Stage Control window) after doing this or you risk crashing the stage! If the column chamber valve is open (check that first), the beam is probably mis-aligned. No image visible (black screen at all B/C levels) Image goes black during aperture alignment Scan the beam alignment knobs (near the focus control) around until you find the setting where the image is brightest (at 5kV, this should be around 12 o clock, but it could be very different at other voltages). Note that you ll probably have to do quite a bit of aperture realignment after changing this setting. If the beam is partially mis-aligned, certain aperture positions may block it completely. When it goes black, use the beam alignment controls to find a position where the image is restored. You may have to adjust the beam and aperture alignments iteratively to get everything lined up just right. 21
22 Check to make sure the video is working, first of all (see No image visible above). If that seems to be OK, try finding a large feature (scratch, speck of dust, nanoparticles) and get the column aligned and focused before you go looking for your features. Can t find features you re attempting to image If you re imaging very thin features, going to a lower beam voltage may be useful; try 2500V and work downward in 500V steps. You ll have to realign the column and aperture at each voltage, unfortunately. Set the high voltage back to 5kV when you re done! A useful trick for locating sparsely-placed features on a sample is to diamond-scribe a circle around the area of interest (assuming you can see it optically). Alternately, using the syringe in the toolbox to put a drop of gold nanoparticles on or near the area of interest can make locating your features much easier too. Make sure you let the drop dry before pumping down the airlock! Can t image features smaller than nm This is likely a vibration issue. The source of the vibrations is currently unknown, but in the meantime imaging at night (when there s no construction and much less activity in the building) may give you better resolution. Alternately, use the Charfac SEMs for your ultra-high-res needs. Can t image thin features or surface detail Turn down the accelerating voltage. The system has a LEAP lens capable of going to voltages as low as 500V without distortion, so you have some headroom here. Lower voltage means more interaction between the beam and the surface, so you ll see more details and may be able to resolve thin features that were invisible at 5000V. Note that the tradeoff here is often increased charging, due to increased beam-surface interaction. No good way around that one. 22
23 There are a few solutions to this. The most obvious is to make sure the sample is solidly grounded (carbon tape holding it on a metal stub will usually work for conductive samples). If possible, coat the sample with a thin layer of metal (preferably Au or Au-Pd) to aid charge dissipation. Sample is charging If you re still having problems, turn down the beam current by setting C1 to a lower negative value in the SEM Control window. -12 is the default; you can go all the way to -4 if needed. You ll need to refocus/realign after each change, so go down in steps of 2-4 for your own sanity. If that still isn t helping, you can sometimes work around charging by getting your focus/stigmation settings optimized at another site, then moving to your imaging site and quickly taking a single slow scan before charging has affected it much. 23
Standard Operating Procedure for the Amray 1810 Scanning Electron Microscope Version: 29 NOVEMBER 2014
 Standard Operating Procedure for the Amray 1810 Scanning Electron Microscope Version: 29 NOVEMBER 2014 1. Utility Requirements a. System power is supplied by two 120 VAC/20 A circuits. When doing maintenance
JEOL 6500 User Manual
 LOG IN to your session on the computer to the left of the microscope. Starting Conditions 1. Press Ctrl-Alt-Del and log on to the microscope computer. Click on JEOL PC SEM 6500 icon. Click yes if message
Using the Hitachi 3400-N VP-SEM
 Using the Hitachi 3400-N VP-SEM Opening the Chamber to Load Specimens (This may also be done later using the software) 1. Click the AIR button on the front of the machine: 2. Wait a few minutes until you
1. Preliminary sample preparation
 FEI Helios NanoLab 600 standard operating procedure Nicholas G. Rudawski ngr@ufl.edu (352) 392 3077 (office) (805) 252-4916 (cell) Last updated: 03/02/18 What this document provides: an overview of basic
Title: Amray 1830 SEM#2 Semiconductor & Microsystems Fabrication Laboratory Revision: D Rev Date: 03/18/2016
 Approved by: Process Engineer / / / / Equipment Engineer 1 SCOPE The purpose of this document is to detail the use of the Amray 1830 SEM. All users are expected to have read and understood this document.
RAITH e-line OPERATING INSTRUCTIONS
 RAITH e-line OPERATING INSTRUCTIONS 1) LOADING A SAMPLE a. Start the system i. On the Column PC (Right side monitor [R]), select the SmartSEM icon to on the desktop to begin the column software. ii. On
JEOL 6700 User Manual 05/18/2009
 JEOL 6700 User Manual 05/18/2009 LOG IN to your session on the computer to the right of the microscope. Starting Conditions 1. Click the button and read the Penning Gauge to ensure that the microscope
Scanning Electron Microscope FEI INSPECT F50. Step by step operation manual
 Scanning Electron Microscope FEI INSPECT F50 Step by step operation manual Scanning Electron Microscope, FEI Inspect F50 FE-SEM-F Observation Flow Saving Data And Analysis Specimen preparation Error check
Basic Operating Instructions for Strata Dual Beam 235 FIB/SEM
 Basic Operating Instructions for Strata Dual Beam 235 FIB/SEM Warning Always adjust your specimen height before closing the chamber door to make sure your specimen will not hit the bottom of the lens;
SEM Training Notebook
 SEM Training Notebook Lab Manager: Dr. Perry Cheung MSE Fee-For-Service Facility Materials Science and Engineering University of California, Riverside December 21, 2017 (rev. 3.4) 1 Before you begin Complete
Figure 1 The Raith 150 TWO
 RAITH 150 TWO SOP Figure 1 The Raith 150 TWO LOCATION: Raith 150 TWO room, Lithography area, NanoFab PRIMARY TRAINER: SECONDARY TRAINER: 1. OVERVIEW The Raith 150 TWO is an ultra high resolution, low voltage
SEM Training Notebook
 SEM Training Notebook Lab Manager: Dr. Perry Cheung MSE Fee-For-Service Facility Materials Science and Engineering University of California, Riverside March 8, 2018 (rev. 3.5) 1 Before you begin Complete
Check that the pneumatic hose is disconnected!!!! (unless your using the BSE detector, of course)
") JEOL 7000F BASIC OPERATING INSTRUCTIONS-Ver.-2.0 Note: This is minimal operation checklist and does not replace the other reference manuals. Read the manual for Specimen Exchange (JEOL 7000 Specimen Exchange
JEOL 7000F BASIC OPERATING INSTRUCTIONS-Ver.-2.0 Note: This is minimal operation checklist and does not replace the other reference manuals. Read the manual for Specimen Exchange (JEOL 7000 Specimen Exchange
1.1. Log on to the TUMI system (you cannot proceed further until this is done).
.") FEI DB235 SEM mode operation Nicholas G. Rudawski ngr@ufl.edu (805) 252-4916 1. Sample loading 1.1. Log on to the TUMI system (you cannot proceed further until this is done). 1.2. The FIB software (xp)
FEI DB235 SEM mode operation Nicholas G. Rudawski ngr@ufl.edu (805) 252-4916 1. Sample loading 1.1. Log on to the TUMI system (you cannot proceed further until this is done). 1.2. The FIB software (xp)
SEM OPERATION IN LOW VACUUM MODE
 SEM OPERATION IN LOW VACUUM MODE Instructions for JEOL 5800 LV The EVAC light of the SEM specimen chamber should be already lit when you approach the SEM & the SEM will have been left in the high vacuum
Instructions for Tecnai a brief start up manual
 Instructions for Tecnai a brief start up manual Version 3.0, 8.12.2015 Manual of Tecnai 12 transmission electron microscope located at Aalto University's Nanomicroscopy Center. More information of Nanomicroscopy
FE-SEM SU-8020 Operating manual (Preliminary version)
") FE-SEM SU-8020 Operating manual (Preliminary version) 2016/04/11 Seimitsu Bunseki sitsu lab. Starting up 1.Turn on the Display switch. Windows OS is starting up 2. Select the user SU-8000. 3. Click the
FE-SEM SU-8020 Operating manual (Preliminary version) 2016/04/11 Seimitsu Bunseki sitsu lab. Starting up 1.Turn on the Display switch. Windows OS is starting up 2. Select the user SU-8000. 3. Click the
JSM 6060 LV SCANNING ELECTRON MICROSCOPE STANDARD OPERATING PROCEDURES
 JSM 6060 LV SCANNING ELECTRON MICROSCOPE STANDARD OPERATING PROCEDURES RULES All users must go through a series of standard operation procedure training. For more information contact: Longlong Liao Teaching
The ideal K-12 science microscope solution. User Guide. for use with the Nova5000
 The ideal K-12 science microscope solution User Guide for use with the Nova5000 NovaScope User Guide Information in this document is subject to change without notice. 2009 Fourier Systems Ltd. All rights
Dickinson College Department of Geology
 Dickinson College Department of Geology Title: Equipment: BASIC OPERATION OF THE SCANNING ELECTRON MICROSCOPE (SEM) JEOL JSM-5900 SCANNING ELECTRON MICROSCOPE Revision: 2.2 Effective Date: 1/29/2003 Author(s):
Basic Users Manual for Tecnai-F20 TEM
 Basic Users Manual for Tecnai-F20 TEM NB: This document contains my personal notes on the operating procedure of the Tecnai F20 and may be used as a rough guide for those new to the microscope. It may
Installation guide. Activate. Install your Broadband. Install your Phone. Install your TV. 1 min. 30 mins
 Installation guide 1 Activate Install your Broadband Install your TV 4 Install your Phone 1 min 0 mins 0 mins 5 mins INT This guide contains step-by-step instructions on how to: 1 Activate Before we do
SOP for Hitachi S-2150 Scanning Electron Microscope For review purposes only
 SOP for Hitachi S-2150 Scanning Electron Microscope For review purposes only Version 1.0 Prepared by D. Turnbull February 21, 2007. Please submit any omissions to the Author Note: This SEM is a recent
OPERATION OF THE HITACHI S-450 SCANNING ELECTRON MICROSCOPE. by Doug Bray Department of Biological Sciences University of Lethbridge
 OPERATION OF THE HITACHI S-450 SCANNING ELECTRON MICROSCOPE by Doug Bray Department of Biological Sciences University of Lethbridge Revised September, 2000 Note: The terms in bold in this document represent
FEI Quanta 200 ESEM Basic instructions
 FEI Quanta 200 ESEM Basic instructions Desktop and then start the UI. If the computer has restarted and you need to login, Username: supervisor and Password: supervisor Log-in to the Microscope using the
Operating Checklist for using the Scanning Electron. Microscope, JEOL JSM 6400.
 Smith College August 2009 Operating Checklist for using the Scanning Electron Microscope, JEOL JSM 6400. CONTENT, page no. Pre-Check 1 Startup 1 Specimen Insertion 2 Filament Saturation 2 Beam Alignment
Operating Checklist for using the Scanning Electron Microscope, JEOL JSM 6400.
 Smith College August 2005 Operating Checklist for using the Scanning Electron Microscope, JEOL JSM 6400. CONTENT, page no. Pre-Check, 1 Specimen Insertion, 1 Startup, 2 Filament Saturation, 2 Beam Alignment,
FEI Tecnai G 2 F20 Operating Procedures
 FEI Tecnai G 2 F20 Operating Procedures 1. Startup (1) Sign-up in the microscope log-sheet. Please ensure you have written an account number for billing. (2) Log in to the computer: Login to your account
Horiba LabRAM ARAMIS Raman Spectrometer Revision /28/2016 Page 1 of 11. Horiba Jobin-Yvon LabRAM Aramis - Raman Spectrometer
 Page 1 of 11 Horiba Jobin-Yvon LabRAM Aramis - Raman Spectrometer The Aramis Raman system is a software selectable multi-wavelength Raman system with mapping capabilities with a 400mm monochromator and
Model SU3500 Scanning Electron Microscope
 Model SU3500 Scanning Electron Microscope Modified and Parts taken from Hitachi Easy Operation Guide. Before using the Model SU3500 SEM, be sure to read the [GENERAL SAFETY GUIDELINES] in the instruction
PANalytical X pert Pro Gazing Incidence X-ray Reflectivity User Manual (Version: )
") University of Minnesota College of Science and Engineering Characterization Facility PANalytical X pert Pro Gazing Incidence X-ray Reflectivity User Manual (Version: 2012.10.17) The following instructions
University of Minnesota College of Science and Engineering Characterization Facility PANalytical X pert Pro Gazing Incidence X-ray Reflectivity User Manual (Version: 2012.10.17) The following instructions
Contents STARTUP MICROSCOPE CONTROLS CAMERA CONTROLS SOFTWARE CONTROLS EXPOSURE AND CONTRAST MONOCHROME IMAGE HANDLING
 Operations Guide Contents STARTUP MICROSCOPE CONTROLS CAMERA CONTROLS SOFTWARE CONTROLS EXPOSURE AND CONTRAST MONOCHROME IMAGE HANDLING Nikon Eclipse 90i Operations Guide STARTUP Startup Powering Up Fluorescence
Installation guide. Activate. Install your TV. Uninstall. 1 min 10 mins. 30 mins
 Installation guide 1 Activate 2 Uninstall 3 Install your TV 1 min 10 mins 30 mins INT This guide contains step-by-step instructions on how to: 1 Activate Before we do anything else, reply GO to the text
1.3. Before loading the holder into the TEM, make sure the X tilt is set to zero and the goniometer locked in place (this will make loading easier).
.") JEOL 200CX operating procedure Nicholas G. Rudawski ngr@ufl.edu (805) 252-4916 1. Specimen loading 1.1. Unlock the TUMI system. 1.2. Load specimen(s) into the holder. If using the double tilt holder, ensure
JEOL 200CX operating procedure Nicholas G. Rudawski ngr@ufl.edu (805) 252-4916 1. Specimen loading 1.1. Unlock the TUMI system. 1.2. Load specimen(s) into the holder. If using the double tilt holder, ensure
This document assumes the user is already familiar with basic operation of the instrument in TEM mode and use of the Microscope Control interface.
 FEI Tecnai F20 S/TEM: imaging in STEM mode Nicholas G. Rudawski ngr@ufl.edu (805) 252-4916 (352) 392-3077 Last updated: 05/10/18 This document assumes the user is already familiar with basic operation
LEO 912 TEM Short Manual. Prepared/copyrighted by RH Berg Danforth Plant Science Center
 LEO 912 TEM Short Manual Prepared/copyrighted by RH Berg Danforth Plant Science Center Specimen holder [1] Never touch the holder (outside of the O-ring, double-headed arrow) because finger oils will contaminate
General information. If you see the instrument turned off, notify MIC personnel. MIC personnel will help you insert your samples into the instrument.
 JEOL JSM-7400F Table of contents General information.. 3 The operation panel. 4 The different sample holders and inserting the samples.. 5 Turning on the beam... 6 Stage map control... 8 Correcting astigmatism...
1.2. Make sure the viewing screen is covered (exposure to liquid N 2 may cause it to crack).
.") FEI Tecnai F20 S/TEM: imaging in TEM mode Nicholas G. Rudawski ngr@ufl.edu (805) 252-4916 (352) 392-3077 Last updated: 01/21/18 1. Filling the cold trap (if needed) 1.1. Prior to use, the cold trap needs
FEI Tecnai F20 S/TEM: imaging in TEM mode Nicholas G. Rudawski ngr@ufl.edu (805) 252-4916 (352) 392-3077 Last updated: 01/21/18 1. Filling the cold trap (if needed) 1.1. Prior to use, the cold trap needs
Bruker Dimension Icon AFM Quick User s Guide
 Bruker Dimension Icon AFM Quick User s Guide March 3, 2015 GLA Contacts Jingjing Jiang (jjiang2@caltech.edu 626-616-6357) Xinghao Zhou (xzzhou@caltech.edu 626-375-0855) Bruker Tech Support (AFMSupport@bruker-nano.com
Nanoscale Fabrication & Characterization Facility. Raith e-line EBL Users Guide (updated:aug 2 nd, 2017)
") Nanoscale Fabrication & Characterization Facility Raith e-line EBL Users Guide (updated:aug 2 nd, 2017) Overview: The Raith e-line EBL system is designed to write features with critical dimensions as small
Nanoscale Fabrication & Characterization Facility Raith e-line EBL Users Guide (updated:aug 2 nd, 2017) Overview: The Raith e-line EBL system is designed to write features with critical dimensions as small
This procedure assumes the user is already familiar with basic operation of the SEM and the MiraTC interface.
 Tescan MIRA3 SEM: EDS using EDAX TEAM Nicholas G. Rudawski ngr@ufl.edu Cell: (805) 252-4916 Office: (352) 392-3077 Last updated: 12/04/17 This procedure assumes the user is already familiar with basic
Standard Operating Procedure of Atomic Force Microscope (Anasys afm+)
") Standard Operating Procedure of Atomic Force Microscope (Anasys afm+) The Anasys Instruments afm+ system incorporates an Atomic Force Microscope which can scan the sample in the contact mode and generate
Standard Operating Procedure of Atomic Force Microscope (Anasys afm+) The Anasys Instruments afm+ system incorporates an Atomic Force Microscope which can scan the sample in the contact mode and generate
Procedures for Performing Cryoelectron Microscopy on the FEI Sphera Microscope
 Procedures for Performing Cryoelectron Microscopy on the FEI Sphera Microscope The procedures given below were written specifically for the FEI Tecnai G 2 Sphera microscope. Modifications will need to
2. Raise HT to 200kVby following the procedure explained in 1.6.
 JEOL 2100 MANUAL Quick check list 1. If needed, fill the reservoir with LN2 2. Raise HT to 200kVby following the procedure explained in 1.6. 3. Insert specimen holder into TEM (Insert holder in airlock,
Vinyl Cutter Instruction Manual
 Vinyl Cutter Instruction Manual 1 Product Inventory Inventory Here is a list of items you will receive with your vinyl cutter: Product components (Fig.1-4): 1x Cutter head unit complete with motor, plastic
CNC Using the FlexiCam CNC and HMI Software. Guldbergsgade 29N, P0 E: T:
 CNC Using the FlexiCam CNC and HMI Software Guldbergsgade 29N, P0 E: makerlab@kea.dk T: +46 46 03 90 This grey box is the NC controller. Let s start by turning the red switch to the ON position, then press
SYNGUIDER USER'S MANUAL
 SYNGUIDER USER'S MANUAL GETTING STARTED PREPARING THE SYNGUIDER BASIC OPERATIONS OPERATION UNDER THE NIGHT SKY SPECIFICATIONS 1 3 4 9 15 060613V1 Thank you for choosing the SynGuider. The SynGuider can
Operating the Hitachi 7100 Transmission Electron Microscope Electron Microscopy Core, University of Utah
 Operating the Hitachi 7100 Transmission Electron Microscope Electron Microscopy Core, University of Utah Follow the procedures below when you use the Hitachi 7100 TEM. Starting Session 1. Turn on the cold
Game Making Workshop on Scratch
 CODING Game Making Workshop on Scratch Learning Outcomes In this project, students create a simple game using Scratch. They key learning outcomes are: Video games are made from pictures and step-by-step
ENSC 470/894 Lab 3 Version 6.0 (Nov. 19, 2015)
") ENSC 470/894 Lab 3 Version 6.0 (Nov. 19, 2015) Purpose The purpose of the lab is (i) To measure the spot size and profile of the He-Ne laser beam and a laser pointer laser beam. (ii) To create a beam expander
ENSC 470/894 Lab 3 Version 6.0 (Nov. 19, 2015) Purpose The purpose of the lab is (i) To measure the spot size and profile of the He-Ne laser beam and a laser pointer laser beam. (ii) To create a beam expander
DISCO DICING SAW SOP. April 2014 INTRODUCTION
 DISCO DICING SAW SOP April 2014 INTRODUCTION The DISCO Dicing saw is an essential piece of equipment that allows cleanroom users to divide up their processed wafers into individual chips. The dicing saw
UNIVERSITY OF WATERLOO Physics 360/460 Experiment #2 ATOMIC FORCE MICROSCOPY
 UNIVERSITY OF WATERLOO Physics 360/460 Experiment #2 ATOMIC FORCE MICROSCOPY References: http://virlab.virginia.edu/vl/home.htm (University of Virginia virtual lab. Click on the AFM link) An atomic force
Full-screen mode Popup controls. Overview of the microscope user interface, TEM User Interface and TIA on the left and EDS on the right
 Quick Guide to Operating FEI Titan Themis G2 200 (S)TEM: TEM mode Susheng Tan Nanoscale Fabrication and Characterization Facility, University of Pittsburgh Office: M104/B01 Benedum Hall, 412-383-5978,
CHAPTER1: QUICK START...3 CAMERA INSTALLATION... 3 SOFTWARE AND DRIVER INSTALLATION... 3 START TCAPTURE...4 TCAPTURE PARAMETER SETTINGS... 5 CHAPTER2:
 Image acquisition, managing and processing software TCapture Instruction Manual Key to the Instruction Manual TC is shortened name used for TCapture. Help Refer to [Help] >> [About TCapture] menu for software
Optika ISview. Image acquisition and processing software. Instruction Manual
 Optika ISview Image acquisition and processing software Instruction Manual Key to the Instruction Manual IS is shortened name used for OptikaISview Square brackets are used to indicate items such as menu
05/20/14 1. Philips CM200T. Standby Condition
 05/20/14 1 Philips CM200T Standby Condition HT and filament off, HT setting at 200kV. RESET HOLDER, center sample tilt knobs, and remove sample. Mag ~ 5-10kX Objective and SA apertures out, C2 aperture
Protective Equipment Nitrile gloves for handling sample holder and safety glasses for filling liquid nitrogen dewar.
 Emergency Information: 1. Medical Emergencies: Contact 911 and McGill Security 514.398.3000 2. Leave TEM as is. Do NOT shut down the vacuum system. 3. If possible, turn off High Tension and Close Column
Strata DB235 FESEM FIB
 Strata DB235 FESEM FIB Standard Operating Procedure Revision: 5.0 Last Updated: August 16/2016, revised by Li Yang Overview This document will provide a detailed operation procedure of the Focused Ion
ZEISS EVO SOP. May 2017 ELECTRON OPTICS
 ZEISS EVO SOP May 2017 ELECTRON OPTICS The patented EVO column is the area of the SEM, where electrons are emitted, accelerated, deflected, focused, and scanned. Main characteristics of the EVO optics
GXCapture 8.1 Instruction Manual
 GT Vision image acquisition, managing and processing software GXCapture 8.1 Instruction Manual Contents of the Instruction Manual GXC is the shortened name used for GXCapture Square brackets are used to
Stitching MetroPro Application
 OMP-0375F Stitching MetroPro Application Stitch.app This booklet is a quick reference; it assumes that you are familiar with MetroPro and the instrument. Information on MetroPro is provided in Getting
Fusion M2/32/40 focus, home and table calibration
 Fusion M2/32/40 focus, home and table calibration The purpose of this document is to provide step by step instructions for calibrating the focus gauge, auto-focus, table home, x-y home, squaring of vector
ACCU-GOLD QUICK START MANUAL
 ACCU-GOLD Now includes support for the light sensor (AGLS) and Accu Gold+ digitizers and sensors (AGDM+, AGMS DM+) Nomenclature AGDM Accu-Gold Digitizer Module RGDM Rapid-Gold Digitizer Module RGDM-MA
AgilEye Manual Version 2.0 February 28, 2007
 AgilEye Manual Version 2.0 February 28, 2007 1717 Louisiana NE Suite 202 Albuquerque, NM 87110 (505) 268-4742 support@agiloptics.com 2 (505) 268-4742 v. 2.0 February 07, 2007 3 Introduction AgilEye Wavefront
SOP-P051. Scanning of Optical Filters With USB2000. Objective: To determine the spectral transmittance properties of an optical filter.
 Purdue University Cytometry Laboratories SOP-P051 Scanning of Optical Filters With USB2000 Objective: To determine the spectral transmittance properties of an optical filter. Procedure: 1. Ensure that
Please follow these instructions for use of the Philips CM100 TEM. Adopted from website below.
 Please follow these instructions for use of the Philips CM100 TEM. Adopted from website below. http://staff.washington.edu/wpchan/if/cm100_inst.shtml Instructions for the Philips CM100 TEM and peripherals
JEOL 5DII. Operation introduction. By Serge Charlebois
 JEOL 5DII Operation introduction By Serge Charlebois July 2003 General procedure Loading the cassette in the load lock Selecting EOS mode, table and aperture Setting and maximising current Observation
R I T. Title: Wyko RST Plus. Semiconductor & Microsystems Fabrication Laboratory Revision: A Rev Date: 05/23/06 1 SCOPE 2 REFERENCE DOCUMENTS
 Approved by: Process Engineer / / / / Equipment Engineer 1 SCOPE The purpose of this document is to detail the use of the Wyko RST Plus. All users are expected to have read and understood this document.
Start Here. Installing your Microtek ScanMaker 9800XL Plus PC:
 Start Here Installing your Microtek ScanMaker 98XL Plus Step : Unpack Contents. Optional package items depend on the scanner configuration that you purchased. Unpack your scanner package and check for
2020 DRAWBOT INSTALLATION AND USE. Robert Ashford Henry Arnold 4-H OABB
 2020 DRAWBOT INSTALLATION AND USE Robert Ashford Henry Arnold 4-H OABB 2020 DrawBot Software If you are viewing this document, you probably just finished assembling your 2020 DrawBot. In order to use your
reference guide reference guide reference guide
 hp photosmart 240 series reference guide reference guide reference guide contents 1 welcome..................................... 1 find more information.............................. 1 what s in the box.................................
OverDrive for Kindle, Kindle Paperwhite, Kindle Voyage, and Kindle Oasis (not Kindle Fire and Fire Tablet) Contents
 Contents") OverDrive for Kindle, Kindle Paperwhite, Kindle Voyage, and Kindle Oasis (not Kindle Fire and Fire Tablet) Contents Optimizing OverDrive for your Kindle Searching and Browsing Borrowing and Downloading
OverDrive for Kindle, Kindle Paperwhite, Kindle Voyage, and Kindle Oasis (not Kindle Fire and Fire Tablet) Contents Optimizing OverDrive for your Kindle Searching and Browsing Borrowing and Downloading
User Operation of JEOL 1200 EX II
 **Log onto Computer** Open item program Start Up Procedure User Operation of JEOL 1200 EX II 1. If scope is not running, locate an electron microscopy technician (EMT) to find out why not. 2. Turn up brightness
Horiba Jobin-Yvon LabRam Raman Confocal Microscope (GERB 120)
") Horiba Jobin-Yvon LabRam Raman Confocal Microscope (GERB 120) Please contact Dr. Amanda Henkes for training requests and assistance: 979-862-5959, amandahenkes@tamu.edu Hardware LN 2 FTIR FTIR camera 1
Horiba Jobin-Yvon LabRam Raman Confocal Microscope (GERB 120) Please contact Dr. Amanda Henkes for training requests and assistance: 979-862-5959, amandahenkes@tamu.edu Hardware LN 2 FTIR FTIR camera 1
SWIFT SERIES M2252DGL MICROSCOPE
 SWIFT SERIES M2252DGL MICROSCOPE The M2252DGL Series is ideal for elementary to high school classrooms. Built to withstand student use, this series has locked-on eyepieces, objectives, illuminator housing
Leica DMi8A Quick Guide
 Leica DMi8A Quick Guide 1 Optical Microscope Quick Start Guide The following instructions are provided as a Quick Start Guide for powering up, running measurements, and shutting down Leica s DMi8A Inverted
ADD A REALISTIC WATER REFLECTION
 ADD A REALISTIC WATER REFLECTION In this Photoshop photo effects tutorial, we re going to learn how to easily add a realistic water reflection to any photo. It s a very easy effect to create and you can
Digital Portable Overhead Document Camera LV-1010
 Digital Portable Overhead Document Camera LV-1010 Instruction Manual 1 Content I Product Introduction 1.1 Product appearance..3 1.2 Main functions and features of the product.3 1.3 Production specifications.4
Sketch-Up Guide for Woodworkers
 W Enjoy this selection from Sketch-Up Guide for Woodworkers In just seconds, you can enjoy this ebook of Sketch-Up Guide for Woodworkers. SketchUp Guide for BUY NOW! Google See how our magazine makes you
Bruker Dimension Icon AFM Quick User s Guide
 Bruker Dimension Icon AFM Quick User s Guide August 8 2014 GLA Contacts Jingjing Jiang (jjiang2@caltech.edu 626-616-6357) Xinghao Zhou (xzzhou@caltech.edu 626-375-0855) Bruker Tech Support (AFMSupport@bruker-nano.com
Guide to AmScope SZM Series Dissecting Scope for Sample Imaging with MU Series Camera
 Guide to AmScope SZM Series Dissecting Scope for Sample Imaging with MU Series Camera The following guide is an adaptation of the AmScope Manual for use with DNA barcoding samples. Please refer to the
Zygo Optical Interferometer SOP
 Zygo Optical Interferometer SOP Open MetroPro Click on Mirco7k.app to open measurement application Films7k application Micro7k application Click on Live display window in the task bar. Make sure the objective
Welcome 1. Precaution
 Table of Contents EN Precaution....2 Preparation.. 4 Standard accessories....4 Parts Names & Functions...5 Computer System requirements.... 6 Technical Specifications 7 Install the software.. 7 Start Microscope.8
Scratch for Beginners Workbook
 for Beginners Workbook In this workshop you will be using a software called, a drag-anddrop style software you can use to build your own games. You can learn fundamental programming principles without
CCD User s Guide SBIG ST7E CCD camera and Macintosh ibook control computer with Meade flip mirror assembly mounted on LX200
 Massachusetts Institute of Technology Department of Earth, Atmospheric, and Planetary Sciences Handout 8 /week of 2002 March 18 12.409 Hands-On Astronomy, Spring 2002 CCD User s Guide SBIG ST7E CCD camera
PANalytical X pert Pro High Resolution Specular and Rocking Curve Scans User Manual (Version: )
") University of Minnesota College of Science and Engineering Characterization Facility PANalytical X pert Pro High Resolution Specular and Rocking Curve Scans User Manual (Version: 2012.10.17) The following
University of Minnesota College of Science and Engineering Characterization Facility PANalytical X pert Pro High Resolution Specular and Rocking Curve Scans User Manual (Version: 2012.10.17) The following
The operation manual of spotlight 300 IR microscope
 The operation manual of spotlight 300 IR microscope Make sure there is no sample under the microscope and then click spotlight on the desktop to open the software. You can do imaging with the image mode
Using the AmScope Microscope Cameras
 Using the AmScope Microscope Cameras Part 1 Setup. In order to use the camera, you will need: a) the camera system; b) a computer running the camera software. The camera system is contained in a Pelican
Recording EPR spectra using the Loop Gap Resonator (LGR)
") Recording EPR spectra using the Loop Gap Resonator (LGR) This protocol gives step-by-step instructions for recording EPR spectra of spin labeled proteins (Nitroxide label like MTSSL) using the LGR assuming
Recording EPR spectra using the Loop Gap Resonator (LGR) This protocol gives step-by-step instructions for recording EPR spectra of spin labeled proteins (Nitroxide label like MTSSL) using the LGR assuming
LumaSpec 800S User Manual
 LumaSpec 800S User Manual Worldwide distribution VERSION 09112014 Prior Scientific, Ltd Cambridge, UK Prior Scientific, Inc Rockland, MA. USA Prior Scientific, GmbH Jena, Germany Prior Scientific KK Tokyo,
Visioneer OneTouch Scanner. Installation Guide FOR WINDOWS
 Visioneer OneTouch Scanner Installation Guide FOR WINDOWS TABLE OF CONTENTS i TABLE OF CONTENTS Getting Started with your new Scanner....................... 1 Step 1: Installing the Scanner Software.......................
STEM Spectrum Imaging Tutorial
 STEM Spectrum Imaging Tutorial Gatan, Inc. 5933 Coronado Lane, Pleasanton, CA 94588 Tel: (925) 463-0200 Fax: (925) 463-0204 April 2001 Contents 1 Introduction 1.1 What is Spectrum Imaging? 2 Hardware 3
so you want to get to know Onsrud... Onsrud1 : machine set up
 so you want to get to know Onsrud... Onsrud1 : machine set up What does CNC mean? CNC: Computer Numerical Control The router is controlled by a computer, that tells the router where to go through a series
CHROMACAL User Guide (v 1.1) User Guide
 User Guide") CHROMACAL User Guide (v 1.1) User Guide User Guide Notice Hello and welcome to the User Guide for the Datacolor CHROMACAL Color Calibration System for Optical Microscopy, a cross-platform solution that
CHROMACAL User Guide (v 1.1) User Guide User Guide Notice Hello and welcome to the User Guide for the Datacolor CHROMACAL Color Calibration System for Optical Microscopy, a cross-platform solution that
QUICK-START FOR UNIVERSAL VLS 4.6 LASER! FRESH 21 SEPTEMBER 2017
 QUICK-START FOR UNIVERSAL VLS 4.6 LASER! FRESH 21 SEPTEMBER 2017 The laser is quite safe to use, but it is powerful; using it requires your full caution, attention and respect. Some rules of the road:
MSE 460 TEM Lab 2: Basic Alignment and Operation of Microscope
 MSE 460 TEM Lab 2: Basic Alignment and Operation of Microscope Last updated on 1/8/2018 Jinsong Wu, jinsong-wu@northwestern.edu Aims: The aim of this lab is to familiarize you with basic TEM alignment
Installing Your New Creature From The Black Lagoon Tail Light DMD Panel MOD
 Installing Your New Creature From The Black Lagoon Tail Light DMD Panel MOD A few things before we start: The wooden speaker panel provided in this MOD was manufactured using a Precision CNC machine and
ALTURA EDS. Rev. 0915
 ALTURA EDS Rev. 0915 Enable the Oxford PC Enable the Altura-EDS under Dual Beam Tools in Coral. Or enter your NETID and password directly into the Oxford PC. Warning: Ion-milling, GISs/microprobe, and
Service Manual for XLE/XLT Series Laser Engravers
 Service Manual for XLE/XLT Series Laser Engravers Table of Contents Maintenance...1 Beam alignment...3 Auto focus alignment...8 Bridge alignment...10 Electronics panel replacement...11 X motor change...12
WELCOME WHAT S IN THE BOX
 WELCOME Congratulations on purchasing your Visioneer PaperPort flatbed scanner. With your scanner, you can quickly scan paper documents and color photos to place their electronic images on your computer.