QUICK-START FOR UNIVERSAL VLS 4.6 LASER! FRESH 21 SEPTEMBER 2017
|
|
|
- Gordon Barber
- 5 years ago
- Views:
Transcription
1 QUICK-START FOR UNIVERSAL VLS 4.6 LASER! FRESH 21 SEPTEMBER 2017
2 The laser is quite safe to use, but it is powerful; using it requires your full caution, attention and respect. Some rules of the road:
3 Rules of the road If you re not sure DON T! Get the help you need, even if it means waiting.
4 Rules of the road Don t bypass or disable any of the safety features. (I m not sure how or why you would, but art students do strange things.)
5 Rules of the road Work in pairs. It always helps to have a second set of eyes in case you miss a detail.
6 Rules of the road Never leave the laser unattended while cutting. If your material catches fire, the laser will shut down, but that doesn t put the fire out
7 Rules of the road Know where there fire extinguisher is located. (As you enter the room, it s right next to the door.)
8 Rules of the road Bring extra material for testing. Especially if you are new to the laser, or are trying a material you ve never used before, it may take some trial and error to get the settings right.
9 Rules of the road Only use safe materials. Not sure if the material you want to use will generate poisonous gasses? Ask your faculty BEFORE cutting.
10
11
12 The rule of thumb: if you can burn it with a cigarette lighter, you can cut it with the laser.
13 Rules of the road Clean up after yourself. If you brought it in with you, take it back out. Store materials and projects in your locker, in your studio, or someplace designated by your faculty. Keep the lab clean and uncluttered.
14 the laser station
15 This is the laser.

16 This device extracts the fumes from the laser while it is running.


17 This computer has the software for the laser; it is the only one that can send jobs.
18 workflow

19 Power on the fume extractor.

20 Log into the laser workstation.

21 Once you are logged in, you can power up the laser

22 Power on the laser.
23 For general use, it s easiest to print from Adobe Illustrator. We ve created an Illustrator template file that s set up with stuff that s handy for the laser. Get the template from your instructor, or download a copy from the lab s wordpress blog (more on that later.)
24 When you open the template, the document will look something like this.
25 It is sized to 18 x 24 (the size of the cutting table.)
26 You ll also see some tips. They are in a non-printing layer.

27 The tips let you know which specific colors tell the laser to perform specific functions.
28 You can hide the tips by toggling off the view icon (the eyeball) next to the Tips layer in the layers palette.
29 The laser can do three basic things: + vector cut + vector engrave + raster engrave
30 If you want to cut clean through a material, you use vector art to specify a path that the laser will follow. Vector art is typically created in programs like Adobe Illustrator.
31 If you want a clean hairline that is engraved on the material, but not cutting all the way through, you will vector engrave. Again, you are specifying a path that the laser will follow using vector art.
32 If you want to mark a material with anything other than a hairline without cutting through, you will raster engrave. Any vector art that has a fill, a stroke greater than 0.01pt, or raster art (anything with pixels) will raster engrave.)
33 Let s see all three in action
34 I ll start by drawing a rectangle

35 We want this to be a cut, so we ll set the STROKE to 0.01pt.
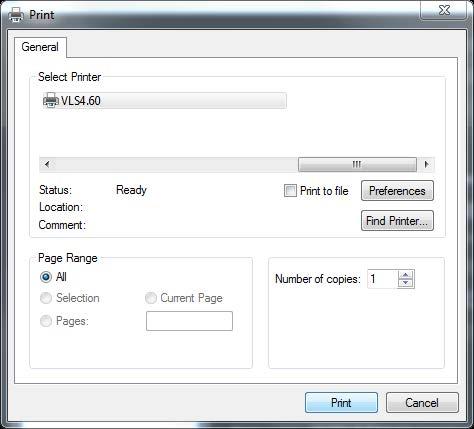
36 We need to change the FILL and STROKE colors as well. (The defaults, WHITE and BLACK won t give us the right results.)
37 Notice these 8 swatches. These aren t the default illustrator swatches. Rather, we ve created these in the template file because they are specific RGB values that the laser software knows. For the purposes of this tutorial, the specific swatches you care about are RED, BLUE, and BLACK.

38 For cutting, set the FILL to NONE.
39 And set the STROKE to RGB RED.

40 Next, I ll add a path to engrave, rather than cut. The stroke width is set to 0.01pt and set the STROKE to RGB BLUE.
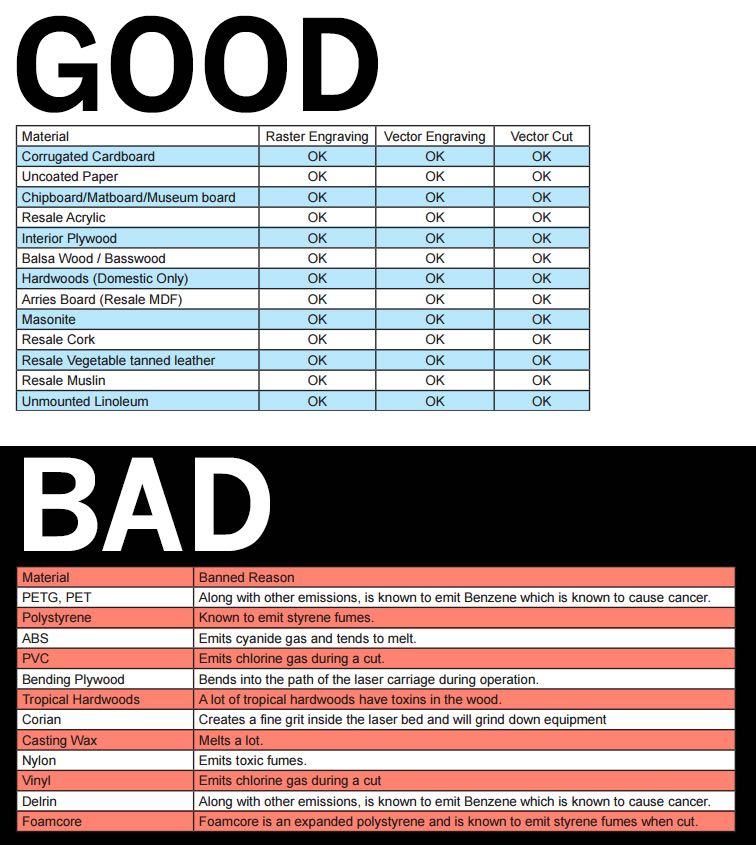
41 Finally, I ll add some text. It has a BLACK fill and no stroke.
42 Remember, anything with a FILL, no matter what color, will automatically turn into a raster engraving. Same goes for anything with a stroke greater than 0.01pt.

43 OK, we re ready to send the art to the laser now. Go to the FILE menu and select PRINT.
44 Looks like a normal PRINT dialog.

45 Make sure Printer is set to VLS4.60
46 But we need to change the SETUP
47 which happens in the device PREFERENCES.
48 This SETTINGS window is where you specify the material you are using, and its thickness.

49 Here are the materials you can work with.
50 What about glass and metal? Our laser isn t powerful enough to cut metal,* but can mark metal using a special compound applied to the surface. It can t cut glass either, but can engrave it by creating micro-fractures. *There are caveats to both of these, but beyond the scope of this tutorial.
51 What about other materials that aren t in the database? Custom settings can be created for other materials, but that s beyond the scope of this tutorial.
52 Not sure? Ask your instructor!

53 I m going to demo using mat board.
54 It turns out mat board is in the database.

55 This thickness is left over from a previous job. Is it correct? Important, because the laser needs to know what depth to focus on.

56 Calipers are a handy tool for fabrication in general. I treated myself to nice digital calipers from JAPAN! Awesome addition to my tool kit.

57 Precise to 4 decimal places!
58 Punched it. The software rounds to 3 decimal places.
59 OK!
60 Print

61 Really PRINT!
62 OK ummm nothing happened. DON T PANIC!

63 Because we need to go the laser s control panel. It s found in the dock at the bottom of the screen.
64 This is where we ll take care of the last few things. But first I m going to put the mat board on the cutting table

65 Gently lift the top of the laser.

66 Place the material to be cut on the cutting table. For the moment leave the top of the laser open.
67 Back in the control panel, click on the FOCUS VIEW button.
68 Clicking on the image area moves the lens around the cutting table

69 like so. This way you can figure out EXACTLY where the laser will hit the material. That red dot isn t the cutting laser, it s just a pointer.
70 I usually check a few spots to make sure my art fits where I want it to on the material.

71 What if my art needs to be someplace else on the cutting material? Use the focus view to point to where you want to start cutting
72 then switch to RELOCATE VIEW
73 Click on a corner tab of the art to align to the current location of the lens (default is upper-left, usually fine.)
74 Then click on TO POINTER.
75 And the art is repositioned relative to the cutting table.
76 How long will it take to run the job? Click on that last button to switch to this view
77 Then click START.

78 Estimated time is 1 minute and 20 seconds FAST!

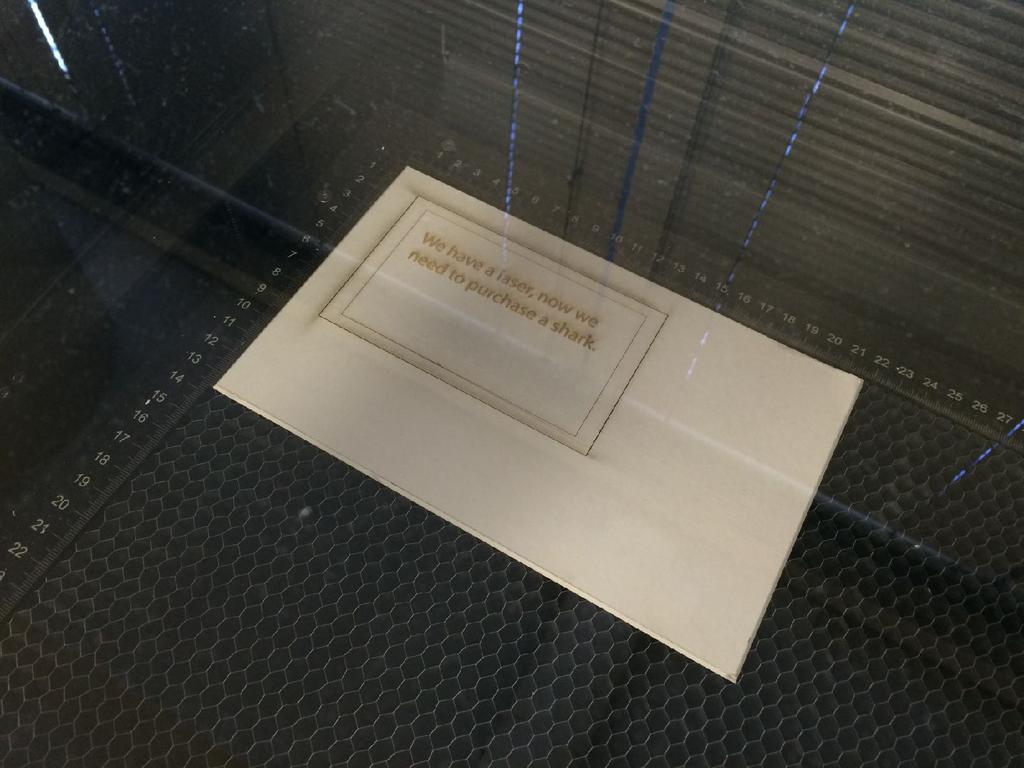
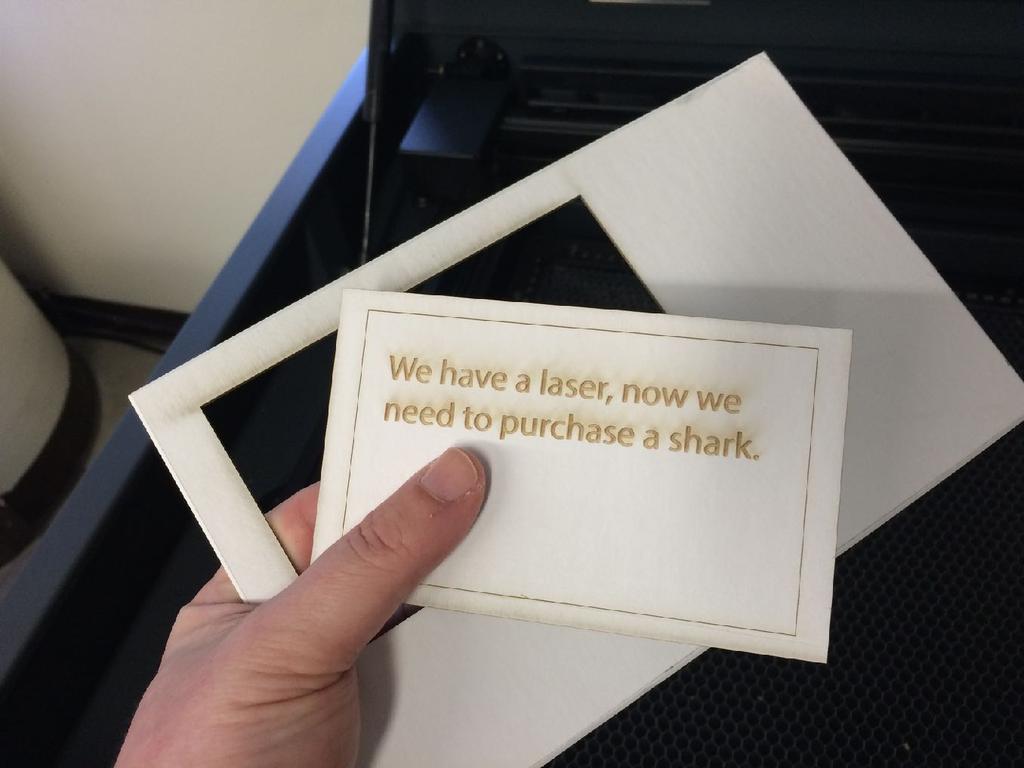
79 TIP: Make sure Auto Z is enabled under the System tab. Sometimes this gets unchecked. If it is unchecked, it s possible that the cutting table will be at the wrong height, so that the laser won t be properly focused on the material you are cutting.

80 CLOSE THE TOP. The laser will not operate while it is open!
81 Now hit the ginormous START BUTTON.
82 Once you start the job, do NOT leave the laser unattended. If the material you are cutting catches fire, stop the job; if YOU need to put out the fire. Know where the fire extinguisher is!
83 If there is a small flash fire on the laser, DON T PANIC! It s contained in the cutting chamber, so it won t get out of control. IF you use the fire extinguisher, then
84 1. Make sure fire is completely extinguished. 2. Call UPD s non-emergency number ( ) and let them know that there was a small fire that has been put out. The need to file a report indicating it wasn t arson! 3. James (sprtwst@gwu.edu) so he can make sure the extinguisher gets recharged.
85 TIP: if your job takes a long time, make sure the computer doesn t fall asleep. If the computer falls asleep the laser will shut down in the middle of the job. Move the mouse every few minutes.

86 Starting to cook!
87 A minute-and-a-half later!
88 After the job is done, wait seconds before opening the top. This gives the system time to vent any fumes and allows your material to cool.
89 DONE!
90 Once you are finished cutting, clear the job queue to save space on the computer for other folks. To do that, click on this little open folder icon.
91 You ll a list of the recent jobs on the left. To clear everything out, click the Purge button.
92 DO IT!

93 Cool, we re done.
94 When everything is done, clear any debris from the cutting table, close the laser control panel, quit out of Illustrator, log out of the computer (which shuts off the laser) and power down the fume extractor.
95 When we started the lab a couple of years ago, we created a blog to capture all the tips and tricks we were learning as we went along. It includes all of the manuals and documentation that we could get our hands on:

96 Goodies here.

97 At the bottom of the homepage, you ll see categories for hardware and software in the lab, including the laser.

98 There s a post in the laser category that has all of the documentation, including tip sheets for specific materials.
QUICK-START FOR UNIVERSAL VLS 4.6 LASER!
 QUICK-START FOR UNIVERSAL VLS 4.6 LASER! The laser is quite safe to use, but it is powerful; using it requires your full caution, attention and respect. Some rules of the road: Rules of the road If you
IxD Lab, IT University in Copenhagen. March Lasercutting 101
 Lasercutting 101 File Storage The lasercutting PC has the common storage location T: mapped as a temporary volume. Use the folder T:\DIRTY_LAB_TEMP_STORAGE to transfer files between your own system and
SAVING, LOADING AND REUSING LAYER STYLES
 SAVING, LOADING AND REUSING LAYER STYLES In this Photoshop tutorial, we re going to learn how to save, load and reuse layer styles! Layer styles are a great way to create fun and interesting photo effects
Using the CMPE118 Laser Cutter
 Using the CMPE118 Laser Cutter Overview: As part of the CE118 course, you will use a MornTech MT-L1290 CNC laser cutting machine. This is a precision machine that allows you to cut geometry from a two-dimensional.ai
ULS Laser Cutter Manual College of Design Computer Labs
 ULS Laser Cutter Manual College of Design Computer Labs Safety Information Please read carefully before using the cutter! The laser cutters can be very dangerous if used improperly, or inadequately supervised.
GCC LaserPro Laser-cutter
 2/9/17 p. 1/10 Overview Reads Adobe Illustrator files Can cut: along a vector path (for lines, contours, etc) in a raster pattern (for filled areas) Can cut a variety of materials Examples: mat board,
Laser Cutting at CAP Fab Lab
 09/14/2015 Laser Cutting at CAP Fab Lab 1) Cut your material to 18 x 32 or smaller (or 18 x 24 for the smaller laser cutters). 2) Turn on the laser cutter (if it is not already on) by flipping the wall
7.0 - MAKING A PEN FIXTURE FOR ENGRAVING PENS
 7.0 - MAKING A PEN FIXTURE FOR ENGRAVING PENS Material required: Acrylic, 9 by 9 by ¼ Difficulty Level: Advanced Engraving wood (or painted metal) pens is a task particularly well suited for laser engraving.
Chief Architect X3 Training Series. Layers and Layer Sets
 Chief Architect X3 Training Series Layers and Layer Sets Save time while creating more detailed plans Why do you need Layers? Setting up Layer Lets Adding items to layers Layers and Layout Pages Layer
Okay, that s enough talking. Let s get things started. Here s the photo I m going to be using in this tutorial: The original photo.
 add visual interest with the rule of thirds In this Photoshop tutorial, we re going to look at how to add more visual interest to our photos by cropping them using a simple, tried and true design trick
Step 1: Open A Photo To Place Inside Your Text
 Place A Photo Or Image In Text In Photoshop In this Photoshop tutorial, we re going to learn how to place a photo or image inside text, a very popular thing to do in Photoshop, and also a very easy thing
Clipping Masks And Type Placing An Image In Text With Photoshop
 Clipping Masks And Type Placing An Image In Text With Photoshop Written by Steve Patterson. In a previous tutorial, we learned the basics and essentials of using clipping masks in Photoshop to hide unwanted
Universal Camera Registration User Guide for ILS 9.75 & 12.75
 User Guide for ILS 9.75 & 12.75 www.ulsinc.com Overview Camera Registration allows the laser system to automate the alignment of a vector path with the material for the purpose of tightening process control
Tinker Tuesday Project - Fabric Engraving
 Tinker Tuesday Project - Fabric Engraving 1. Open CorelDRAW and create a new document. On the toolbar on the left side of the screen, select the Basic Shapes tool icon. This will allow you to create simple
Here s the photo I ll be starting with: The original photo. Let s get started! The final result.
 How To Lighten And Brighten Eyes In this Photo Retouching tutorial, we ll learn a fast and easy way to lighten and brighten someone s eyes in a photo using nothing more than a simple adjustment layer,
ADDING RAIN TO A PHOTO
 ADDING RAIN TO A PHOTO Most of us would prefer to avoid being caught in the rain if possible, especially if we have our cameras with us. But what if you re one of a large number of people who enjoy taking
Creating Photo Borders With Photoshop Brushes
 Creating Photo Borders With Photoshop Brushes Written by Steve Patterson. In this Photoshop photo effects tutorial, we ll learn how to create interesting photo border effects using Photoshop s brushes.
FLAMING HOT FIRE TEXT
 FLAMING HOT FIRE TEXT In this Photoshop text effects tutorial, we re going to learn how to create a fire text effect, engulfing our letters in burning hot flames. We ll be using Photoshop s powerful Liquify
ILLUSTRATOR BASICS FOR SCULPTURE STUDENTS. Vector Drawing for Planning, Patterns, CNC Milling, Laser Cutting, etc.
 ILLUSTRATOR BASICS FOR SCULPTURE STUDENTS Vector Drawing for Planning, Patterns, CNC Milling, Laser Cutting, etc. WELCOME TO THE ILLUSTRATOR TUTORIAL FOR SCULPTURE DUMMIES! This tutorial sets you up for
UNDERSTANDING LAYER MASKS IN PHOTOSHOP
 UNDERSTANDING LAYER MASKS IN PHOTOSHOP In this Adobe Photoshop tutorial, we re going to look at one of the most essential features in all of Photoshop - layer masks. We ll cover exactly what layer masks
PHOTOSHOP PUZZLE EFFECT
 PHOTOSHOP PUZZLE EFFECT In this Photoshop tutorial, we re going to look at how to easily create a puzzle effect, allowing us to turn any photo into a jigsaw puzzle! Or at least, we ll be creating the illusion
The original image. Let s get started! The final effect.
 Non-Destructive Infrared Glow Effect In this Photoshop tutorial, we ll learn how to quickly and easily add a dream-like infrared glow effect to an image, and we ll do it non-destructively using Smart Filters
Getting Started. with Easy Blue Print
 Getting Started with Easy Blue Print User Interface Overview Easy Blue Print is a simple drawing program that will allow you to create professional-looking 2D floor plan drawings. This guide covers the
The original photo. The final result.
 giving a photo painted edges In this Adobe Photoshop tutorial, we re going to combine a couple of different effects. First, we ll give the photo easy-tocreate painted edges, and then we ll make it look
Manual LaserPro Mercury
 Manual LaserPro Mercury CONTENTS 1. OBJECTIVE p 2 2. INTRODUCTION AND MATERIALS p 2 3. PREPARING YOUR DRAWING p 3 4. WORK FLOW p 4 4.1. Preparation 4.2. Printing 4.3. On the laser cutter 4.4. Control 4.5.
Intro to CO 2 Laser Cutting
 MAKERSPACE Intro to CO 2 Laser Cutting What Can I Do With the CO 2 Laser? CO 2 laser cutters and engravers are excellent for making precise 2-dimensional cuts in a variety of materials, as well as engraving
1
 Viewing Brushes Brushes have their own window in Adobe Illustrator called Brushes panel called the Three easy ways to access your brushes. If not already showing in your tools you can open it from the
The final wrap text in 3D result.
 WRAPPING TEXT IN 3D In this Photoshop tutorial, we re going to learn how to easily wrap text around a 3D object in Photoshop, without the need for any 3D software. We re going to be wrapping our text around
Using Adobe Photoshop
 Using Adobe Photoshop 6 One of the most useful features of applications like Photoshop is the ability to work with layers. allow you to have several pieces of images in the same file, which can be arranged
NMC Second Life Educator s Skills Series: How to Make a T-Shirt
 NMC Second Life Educator s Skills Series: How to Make a T-Shirt Creating a t-shirt is a great way to welcome guests or students to Second Life and create school/event spirit. This article of clothing could
MIRROR IMAGING. Author: San Jewry LET S GET STARTED. Level: Beginner+ Download: None Version: 1.5
 Author: San Jewry Level: Beginner+ Download: None Version: 1.5 In this tutorial, you will learn how to create a mirror image of your work. Both sides will look exactly the same no matter how much you tweak
CR7: Common Problems and Their Solutions
 CR7: Common Problems and Their Solutions Index Page 2-4: Device Not Connecting Page 5-6: Error When Starting VetExam Plus Page 7: What Are These Marks On My Images? Page 7: Scratch Marks Page 8: Dirty
Photo Within A Photo - Photoshop
 Photo Within A Photo - Photoshop Here s the image I ll be starting with: The original image. And here s what the final "photo within a photo" effect will look like: The final result. Let s get started!
Photoshop: Manipulating Photos
 Photoshop: Manipulating Photos All Labs must be uploaded to the University s web server and permissions set properly. In this lab we will be manipulating photos using a very small subset of all of Photoshop
ADD TRANSPARENT TYPE TO AN IMAGE
 ADD TRANSPARENT TYPE TO AN IMAGE In this Photoshop tutorial, we re going to learn how to add transparent type to an image. There s lots of different ways to make type transparent in Photoshop, and in this
Section 1. Introduction and Review. Objectives: Log on to the computer Launch AutoCAD Create, open, and save a drawing Review AutoCAD basics
 Section 1 Introduction and Review Objectives: Log on to the computer Launch AutoCAD Create, open, and save a drawing Review AutoCAD basics Drawing Assignments: NCAA Basketball Court Plot Style Table (Check-off)
TM Quick Start Guide
 TM Quick Start Guide Contacting Pazzles By Phone In the US: 866-729-9537 International: +1-208-922-3558 Phone Hours: Mon - Fri, 9am - 5pm Mountain Time By Email Customer Service: Technical Support: Sales:
10 Steps To a Faster PC
 10 Steps To a Faster PC A Beginners Guide to Speeding Up a Slow Computer Laura Bungarz This book is for sale at http://leanpub.com/10stepstoafasterpc This version was published on 2016-05-18 ISBN 978-0-9938533-0-2
12. Creating a Product Mockup in Perspective
 12. Creating a Product Mockup in Perspective Lesson overview In this lesson, you ll learn how to do the following: Understand perspective drawing. Use grid presets. Adjust the perspective grid. Draw and
RDworks and Basic Rabbit Laser Operation Tutorial
 RDworks and Basic Rabbit Laser Operation Tutorial File Setup Layer color is how the Rabbit Software designates different operations so, regardless of design software, you will want to organize geometry
Creative Cut-Outs. 1Go to File>New>Blank File to create a new document and enter. Projects EXTRAS: GET MORE ONLINE!
 ALL IMAGES MIKE RODRIGUEZ Creative Cut-Outs By Mike Rodriguez Are you interested in applying some of your rapidly developing layer skills? In the May/June issue, we covered the basics of layers (Layers
Photoshop 1. click Create.
 Photoshop 1 Step 1: Create a new file Open Adobe Photoshop. Create a new file: File->New On the right side, create a new file of size 600x600 pixels at a resolution of 300 pixels per inch. Name the file
A quick overview of the basics of my workflow in. Those gaps in Photoshop s Histogram indicate missing information.
 Another Photoshop tutorial by Bruce Philpott Copyright 2007 Bruce Philpott A quick overview of the basics of my workflow in Adobe Camera Raw This short tutorial certainly won t cover everything about Adobe
Vectorworks Architect Tutorial Manual by Jonathan Pickup. Sample
 Vectorworks Architect Tutorial Manual by Jonathan Pickup Table of Contents Introduction...iii Step 1 Layer and Model Setup... 1 Document Setup...1 Layer Setup (Model Setup)...7 Step 2 Property Line...
Daniels Laser Cutter Manual
 Daniels Laser Cutter Manual Hours of Operation: Daytime: Monday to Friday: 10am - 6pm Booking: Please book Daytime and Afterhours with Paul or Deagan, laser time may also be booked with Johnny. After Hours:
COLORIZE A PHOTO WITH MULTIPLE COLORS
 COLORIZE A PHOTO WITH MULTIPLE COLORS In this Photoshop photo effects tutorial, we re going to learn how to colorize a photo using multiple colors. It s an effect I ve seen used quite a bit in ads for
An Introduction to Lasercut 5.3 Preparing the Artwork
 An Introduction to Lasercut 5.3 Preparing the Artwork Version 0.1, December 8th 2015 Precautions Introduction Importing from.dxf Setting up the layers Checking the Operations Tips, Mistakes and Problems
Tinker Tuesday Project - Wood Book Covers
 Tinker Tuesday Project - Wood Book Covers 1. On the laser engraver computer, click on the folder icon on the task bar. Then, select Thaw Space and open the document titled Living Hinge Template. 2. Measure
Transforming Your Photographs with Photoshop
 Transforming Your Photographs with Photoshop Jesús Ramirez PhotoshopTrainingChannel.com Contents Introduction 2 About the Instructor 2 Lab Project Files 2 Lab Objectives 2 Lab Description 2 Removing Distracting
BRUSHES AND LAYERS We will learn how to use brushes and illustration tools to make a simple composition. Introduction to using layers.
 Brushes BRUSHES AND LAYERS We will learn how to use brushes and illustration tools to make a simple composition. Introduction to using layers. WHAT IS A BRUSH? A brush is a type of tool in Photoshop used
ADD A REALISTIC WATER REFLECTION
 ADD A REALISTIC WATER REFLECTION In this Photoshop photo effects tutorial, we re going to learn how to easily add a realistic water reflection to any photo. It s a very easy effect to create and you can
Mount Holyoke College Makerspace Art Building 211. Epilog Laser Manual. Operating Guide. Guide edited from Kennesaw State University
 Mount Holyoke College Makerspace Art Building 211 Epilog Laser Manual Operating Guide Guide edited from Kennesaw State University 1 Table of Contents Epilog Laser Manual NOTICES... 3 MATERIALS... 3 Three
College for Creative Studies Alfred Taubman Center-Model Shop Laser Usage Guide
 College for Creative Studies Alfred Taubman Center-Model Shop Laser Usage Guide LASER CUTTER USER GUIDE Introduction The College for Creative Studies Model Shop is equipped with 1 ILS12.150D Universal
Colorizing A Photo With Multiple Colors In Photoshop
 Colorizing A Photo With Multiple Colors In Photoshop Written by Steve Patterson. In this Photoshop Effects tutorial, we re going to learn how to colorize a photo using multiple colors. It s an effect I
Add Transparent Type To An Image With Photoshop
 Add Transparent Type To An Image With Photoshop Written by Steve Patterson. In this Photoshop Effects tutorial, we re going to learn how to add transparent type to an image. There s lots of different ways
33-2 Satellite Takeoff Tutorial--Flat Roof Satellite Takeoff Tutorial--Flat Roof
 33-2 Satellite Takeoff Tutorial--Flat Roof Satellite Takeoff Tutorial--Flat Roof A RoofLogic Digitizer license upgrades RoofCAD so that you have the ability to digitize paper plans, electronic plans and
Principles of Art / Design Rhythm / Movement - Pattern - Balance - Scale / Proportion - Unity - Emphasis
 Project Description - For this project you will be creating a very Zen Coloring page. Your design will Focus on three elements of Art/Design - Shape, Color and Scale / Proportion. Your design will also
Universal Laser Systems VLS3.50 Laser Cutter/Engraver. Safety and Operation Guide
 Universal Laser Systems VLS3.50 Laser Cutter/Engraver Safety and Operation Guide Table of Contents System Specifications 2 General Capability 3 Laser Cutter Safety 3 General Safety 3 Fire Protocol 4 Laser
ADD A SPARKLE TRAIL TO A PHOTO
 ADD A SPARKLE TRAIL TO A PHOTO In this Adobe Photoshop tutorial, we re going to learn how to add a sparkle trail to a photo, using a custom Photoshop brush we ll be creating. I got the idea for this tutorial
ANU MAKERSPACE TROTEC USER GUIDE
 revised june17 ANU MAKERSPACE TROTEC USER GUIDE! Save time! Before beginning this process make sure your job is suitable for Laser Cutting - 2D designs using approved materials only** Using the laser is
Design Digital Lab INTRODUCTION TO LASER CUTTING
 Design Digital Lab INTRODUCTION TO LASER CUTTING Terminology Terms you may need to know Terminology Raster: The process where the laser beam makes a series of bi-directional, horizontal scan lines to produce
Getting Started Guide
 SOLIDWORKS Getting Started Guide SOLIDWORKS Electrical FIRST Robotics Edition Alexander Ouellet 1/2/2015 Table of Contents INTRODUCTION... 1 What is SOLIDWORKS Electrical?... Error! Bookmark not defined.
The original image. Let s get started! The final light rays effect. Photoshop adds a new layer named Layer 1 above the Background layer.
 Add Rays Of Light To A Photo In this photo effects tutorial, we ll learn how to quickly and easily add rays of sunlight to an image with Photoshop! I ll be using Photoshop CS5 throughout this tutorial
ADOBE PHOTOSHOP CS 3 QUICK REFERENCE
 ADOBE PHOTOSHOP CS 3 QUICK REFERENCE INTRODUCTION Adobe PhotoShop CS 3 is a powerful software environment for editing, manipulating and creating images and other graphics. This reference guide provides
This Photoshop Tutorial 2012 Steve Patterson, Photoshop Essentials.com. Not To Be Reproduced Or Redistributed Without Permission.
 How To Replace The Sky In A Photo In this Photoshop tutorial, we ll learn how to easily replace the sky in a photo! We ll use a basic selection tool and a layer mask to separate the sky from the area below
BLACKBOARD LEARN 9.1: BASIC TRAINING- PART 1
 BLACKBOARD LEARN 9.1: BASIC TRAINING- PART 1 Beginning of Part 1 INTRODUCTION I m Karissa Greathouse, for those of you that don t know me. I think I know almost everybody in here, but some of you may not
Photoshop Elements Hints by Steve Miller
 2015 Elements 13 A brief tutorial for basic photo file processing To begin, click on the Elements 13 icon, click on Photo Editor in the first box that appears. We will not be discussing the Organizer portion
House Design Tutorial
 House Design Tutorial This House Design Tutorial shows you how to get started on a design project. The tutorials that follow continue with the same plan. When you are finished, you will have created a
House Design Tutorial
 Chapter 2: House Design Tutorial This House Design Tutorial shows you how to get started on a design project. The tutorials that follow continue with the same plan. When we are finished, we will have created
ONYX White Paper DESIGNING WITH WHITE & SPECIALTY INK
 ONYX White Paper DESIGNING WITH WHITE & SPECIALTY INK ONYX White Paper Designing with Specialty Ink OCT 2012 This document is intended to assist in the setup for files with specialty ink data in a digital
TURN A PHOTO INTO A PATTERN OF COLORED DOTS (CS6)
") TURN A PHOTO INTO A PATTERN OF COLORED DOTS (CS6) In this photo effects tutorial, we ll learn how to turn a photo into a pattern of solid-colored dots! As we ll see, all it takes to create the effect is
TURN A PHOTO INTO A PATTERN OF COLORED DOTS (CS6) In this photo effects tutorial, we ll learn how to turn a photo into a pattern of solid-colored dots! As we ll see, all it takes to create the effect is
2809 CAD TRAINING: Part 1 Sketching and Making 3D Parts. Contents
 Contents Getting Started... 2 Lesson 1:... 3 Lesson 2:... 13 Lesson 3:... 19 Lesson 4:... 23 Lesson 5:... 25 Final Project:... 28 Getting Started Get Autodesk Inventor Go to http://students.autodesk.com/
WORN, TORN PHOTO EDGES EFFECT
 Photo Effects: CC - Worn, Torn Photo Edges Effect WORN, TORN PHOTO EDGES EFFECT In this Photoshop tutorial, we ll learn how to take the normally sharp, straight edges of an image and make them look all
The original image. Let s get started! The final rainbow effect. The photo sits on the Background layer in the Layers panel.
 Add A Realistic Rainbow To A Photo In this Photoshop photo effects tutorial, we ll learn how to easily add a rainbow, and even a double rainbow, to a photo! As we ll see, Photoshop ships with a ready-made
The original image. As I said, we ll be looking at a few different variations on the effect. Here s the first one we ll be working towards:
 DIGITAL PIXEL EFFECT In this Photoshop tutorial, we re going to look at how to create a digital pixel effect, which is often used in ads that sell anything to do with digital. We re going to first pixelate
Preparing Images For Print
 Preparing Images For Print The aim of this tutorial is to offer various methods in preparing your photographs for printing. Sometimes the processing a printer does is not as good as Adobe Photoshop, so
Exploring Photoshop Tutorial
 Exploring Photoshop Tutorial Objective: In this tutorial we will create a poster composed of three distinct elements: a Bokeh, an image and title text. The Bokeh is an effect which is sometimes seen in
Adobe Photoshop CC 2018 Tutorial
 Adobe Photoshop CC 2018 Tutorial GETTING STARTED Adobe Photoshop CC 2018 is a popular image editing software that provides a work environment consistent with Adobe Illustrator, Adobe InDesign, Adobe Photoshop,
Tinker Tuesday Project - Pumpkin Carving
 Tinker Tuesday Project - Pumpkin Carving 1. Acquire a small pumpkin (between six and seven inches tall excluding the stem). A full size pumpkin will not fit in the engraver. 2. Use a knife to remove the
House Design Tutorial
 House Design Tutorial This House Design Tutorial shows you how to get started on a design project. The tutorials that follow continue with the same plan. When you are finished, you will have created a
Designing with White and Specialty Ink
 ONYX WHITE PAPER 03/29/2013 Designing with White and Specialty Ink This document is intended to assist in the setup for files with specialty ink data in a digital print environment. This covers designing
Digital Photography 1
 Digital Photography 1 Photoshop Lesson 1 Photoshop Workspace & Layers Name Date Default Photoshop workspace A. Document window B. Dock of panels collapsed to icons C. Panel title bar D. Menu bar E. Options
Photoshop: Manipulating Photos
 Photoshop: Manipulating Photos All Labs must be uploaded to the University s web server and permissions set properly. In this lab we will be manipulating photos using a very small subset of all of Photoshop
LAUNCHPAD. Getting Started Guide
 LAUNCHPAD Getting Started Guide Overview Launchpad Thank you for buying Launchpad, the iconic grid instrument for Ableton Live. You re now part of the evolution in the creation of electronic music! The
The Joy of SVGs CUT ABOVE. pre training series 3. svg design Course. Jennifer Maker. CUT ABOVE SVG Design Course by Jennifer Maker
 CUT ABOVE svg design Course pre training series 3 The Joy of SVGs by award-winning graphic designer and bestselling author Jennifer Maker Copyright Jennifer Maker page 1 please Do not copy or share Session
A quick note: We hope that you will find something from the Tips and Tricks that will add a little pizazz to your yearbook pages!
 A quick note: The following pages are tips and tricks for Basic Photoshop users. You may notice that some instructions indicate that non-awpc fonts were used, and that some colors were created using the
Mesh density options. Rigidity mode options. Transform expansion. Pin depth options. Set pin rotation. Remove all pins button.
 Martin Evening Adobe Photoshop CS5 for Photographers Including soft edges The Puppet Warp mesh is mostly applied to all of the selected layer contents, including the semi-transparent edges, even if only
House Design Tutorial
 Chapter 2: House Design Tutorial This House Design Tutorial shows you how to get started on a design project. The tutorials that follow continue with the same plan. When you are finished, you will have
Chapter 6 Title Blocks
 Chapter 6 Title Blocks In previous exercises, every drawing started by creating a number of layers. This is time consuming and unnecessary. In this exercise, we will start a drawing by defining layers
How To Create a Stylish Skull Based Vector Illustration
 How To Create a Stylish Skull Based Vector Illustration The skull and crossed pistons mark is a popular adaption of the tradition skull and crossbones symbol and is commonly seen in motorcycle culture,
Epilog Laser Cutter Moira Gannon Denson, MA Allison Steele, MAT
 Epilog Laser Cutter Moira Gannon Denson, MA Allison Steele, MAT What is It? The Epilog laser cutter uses a high powered laser to make precision cuts in a variety of materials, from paper and wood to acrylic
VERY. Note: You ll need to use the Zoom Tools at the top of your PDF screen to really see my example illustrations.
 VERY This tutorial is written for those of you who ve found or been given some version of Photoshop, and you don t have a clue about how to use it. There are a lot of books out there which will instruct
it.med.harvard.edu/ris UMAX PowerLook 1120 Flatbed Scanner WQGF
 it.med.harvard.edu/ris UMAX PowerLook 1120 WQGF Research Imaging Solutions RIS@hms.harvard.edu it.med.harvard.edu/ris Beth Beighlie Digital Imaging Coordinator Research Imaging Solutions Information Technology
Rotary Fixture M/V/X CLASS LASER SYSTEMS. Installation and Operation Instructions
 Rotary Fixture M/V/X CLASS LASER SYSTEMS Installation and Operation Instructions 02/01/2000 Introduction The Rotary Fixture controls in the Printer Driver are used along with the optional Rotary Fixture
[ENG] Instruction manual for laser cutter
![[ENG] Instruction manual for laser cutter](/thumbs/85/91502053.jpg "[ENG] Instruction manual for laser cutter") [ENG] Instruction manual for laser cutter Version 1.0 By Niklas Valentin Roed Jensen 23/4-2018 201707900@post.au.dk Contents Instruction manual for laser cutter... 1 Installation of software... 3 Download
[ENG] Instruction manual for laser cutter Version 1.0 By Niklas Valentin Roed Jensen 23/4-2018 201707900@post.au.dk Contents Instruction manual for laser cutter... 1 Installation of software... 3 Download
ARCHICAD Introduction Tutorial
 Starting a New Project ARCHICAD Introduction Tutorial 1. Double-click the Archicad Icon from the desktop 2. Click on the Grey Warning/Information box when it appears on the screen. 3. Click on the Create
through all your theme fabrics. So I told you you needed four half yards: the dark, the two mediums, and the light. Now that you have the dark in your
 Hey everybody, it s Rob from Man Sewing. And I cannot believe I get to present this quilt to you today. That s right. This is the very first quilt I ever made. My first pattern I ever designed, originally
Digital Photo Guide. Version 8
 Digital Photo Guide Version 8 Simsol Photo Guide 1 Simsol s Digital Photo Guide Contents Simsol s Digital Photo Guide Contents 1 Setting Up Your Camera to Take a Good Photo 2 Importing Digital Photos into
SMART 3 IN 1 HOLLYWOOD PHOTOS: SETTING UP YOUR BOOTH FOR WEDDING/EVENT MODE
 SMART 3 IN 1 HOLLYWOOD PHOTOS: SETTING UP YOUR BOOTH FOR WEDDING/EVENT MODE Start the Hollywood Photo Booth program. Rightclick anywhere on the screen and choose Setup. Click Next until you get to Screen
COLORIZING IMAGES WITH GRADIENT MAPS
 COLORIZING IMAGES WITH GRADIENT MAPS In this Photoshop tutorial, we ll learn how to add complex colorizing effects to images using custom gradients! Specifically, we ll look at the Gradient Map image adjustment