ELECTRON MICROSCOPY PROCEDURES MANUAL
|
|
|
- Amanda Davis
- 5 years ago
- Views:
Transcription

1 ELECTRON MICROSCOPY PROCEDURES MANUAL JULY 2010 Electron Microscopy Lab Thomas Building, DE
2
3 PROTOCOLS... 1 Specimen Preparation Protocol Fixation: Dehydration: Embedding: Sectioning: Post Staining:... 2 Fixing Cells for Electron Microscopy... 3 Method 1: Scrape Cells with Cell Scraper... 3 Method 2: Permeabilize Cells from Plate... 4 Method 3: Leave on Petri Dish, Permanox Chamber Slides or Coverslips... 4 Method 4: Transwell Permeable Supports... 4 LRW Embedding... 5 Post-Embedding Immunogold Labeling on LRW Sections of Cells... 6 Primary Antibodies:... 6 Secondary Antibodies:... 6 Dilutions:... 6 Protocol:... 6 Negative Staining Procedure... 8 Scanning Electron Microscopy Protocol Using HMDS... 9 OPERATIONS JEOL 1230 TEM Operation Signing on: Sample removal and loading: Correcting Z-axis (Height of sample): Centering the Objective aperture (if needed): Using the Gatan Digital Imaging Camera and Software: July 2010 Page i
4 Shutting Down: Loading the sample holder into the JEOL 1230 microscope JEOL 1010 TEM Operation Gatan Digital Camera JEOL JSM-5800 SEM Operation Specimen Loading and Exchange: Observation: Viewing Image and Setting Parameters: Imaging: Save Tiff images using the Orion Imaging System: Microscope shut down: ADDITIONAL INFORMATION AND RESOURCES General Electron Microscopy Resources Introduction to Electron Microscopy What are Electron Microscopes? Electron Microscopy Web Course Notes and References Transmission Electron Microscopy (TEM) Basics Listserv for Electron Microscopy Information Specific Protocol or Technique Resources Binning Explained EM info for Caenorhabditis elegans Immunocytochemistry Immunogold labeling Immunogold questions Kohler Illumination Negative Staining Optical Image Processing Page ii July 2010
5 PROTOCOLS SPECIMEN PREPARATION PROTOCOL 1. FIXATION: Tissue can be fixed by immersion or perfusion. The most commonly used method is immersion. Fixation time is variable, depending on tissue, but usually from 4 hours to overnight at 4 degrees (refrigerator). a. Primary Fixative: 1/2 strength Karnovsky s. 2% Paraformaldehyde/2.5% Glutaraldehyde This is buffered with a 0.2M Cacodylate Buffer Note: Always use the fixative in the fume hood and wear gloves. Glutaraldehyde fixes skin and cacodylate buffer contains arsenic. b. 0.1M Cacodylate Buffer wash c. Post Fixative: 2% aqueous OsO4/0.2 M Cacodylate Buffer A 1:1 solution for 2 hours in the refrigerator d. 0.1 M Cacodylate Buffer wash 2. DEHYDRATION: Dehydration with ethanol: 35% ETOH 15 min. and decant (optional) 50% ETCH 15 min. and decant 70% ETOH 15 min. and decant 95% ETOH 15 min. and decant 100%ETOH 15 min. and decant 100% ETOH 15 min. and decant Propylene Oxide Propylene Oxide 15 min. and decant 15 min. and decant 1:1 PO/Epon resin overnight July 2010 EM Protocols Page 1
6 l The dehydrating times should be adjusted to size and kind of tissue. The resin is an Epon 812 recipe 3. EMBEDDING: Embedding with Epon: Next morning, change out to fresh Epon 812 for 1-3 hours. Embed (always) in fresh Epon 812 Polyethylene capsules are placed in a holder and numbered strips of paper are inserted. A drop of fresh Epon 812 is placed in the capsules and the specimen is transferred to the appropriate capsule. The blocks are cured for 48 hours in a 60 degree oven. 4. SECTIONING: 1 micron or thick sections are taken to find the area of interest Take ultra thin sections (~70nm) and place on grids 5. POST STAINING: Stain grids in uranyl acetate for 2 hrs. Stain grids in lead citrate for 5 min. ** This procedure is the basic TEM procedure. Each and every sample that comes to us is evaluated and the procedure is adjusted to make sure the best results will be obtained. Page 2 EM Protocols July 2010
7 FIXING CELLS FOR ELECTRON MICROSCOPY METHOD 1: SCRAPE CELLS WITH CELL SCRAPER **We need 1-5 million cells in order to do our procedure** Fixation: Fixative = 1/2 Karnovsky's Use fixative (from refrigerator) and warm it up to room temp. or 37 degrees. Add fixative to media (1:1) and let it sit for 10 min to fix. Take off fix and media (don't let cells dry out) leave a small amount to cover cells and then add pure fix for 30 min - 1 hr. Scrape cells, put them into an Eppendorf tube, and spin down at a very low speed (1400 rpm). Pipette off fix (Keep a little fix on to not let the cells dry out) and put on new fixative and then resuspend cells. Put cells in refrigerator. Overnight with fix or bring them down to the EM lab in fix. Or Wash media off with 0.1M Cacodylate buffer quickly and add ½ Karnovsky s fixative and then scrape after 30min 1 hr. Wash: Wash cells 3 x 5 minutes in 0.1M Cacodylate buffer. Spin down each time. Post Fixation: 1% Osmium Tetroxide in 0.1M Cacodylate buffer for 1-2 hr. at 4 degrees in the refrigerator. Wash: Wash 3 x 5 minutes in 0.1M Cacodylate buffer. Dehydration: In graded series of ETOH - 50%, 70%, 95%, 2 x 100% ETOH for 15 min. and 2 x Propylene Oxide for 15 min. Embed: 1:1 PO/Epon resin overnight with Eppendorf tubes capped. July 2010 EM Protocols Page 3
8 l Next day, spin down cells and uncap Eppendorf tubes. Add Fresh 100% Epon resin for 2-4 hrs. Polymerize: In 60 degree C oven overnight in Eppendorf tubes. METHOD 2: PERMEABILIZE CELLS FROM PLATE Fixation: Do as above but permeabilize cells from plate instead of scrape. METHOD 3: LEAVE ON PETRI DISH, PERMANOX CHAMBER SLIDES OR COVERSLIPS Fixation: Do as above but leave cells on the plate in the fixative for 1 hr. Embed: Change 2x to fresh Epon resin and then invert beam capsules full of slightly hardened resin over relevant areas. Polymerize: In 60 degree C oven overnight and then pop off beam capsules which contain the cells. METHOD 4: TRANSWELL PERMEABLE SUPPORTS Fixation: Fix the attached supports containing cells in plate for 2 hr. or overnight. Wash, Post fixation, Dehydration: Same as above. Embed: 100% fresh Epon resin for 1 hr., then punch out supports with an 8mm biopsy punch on wax containing resin. Cut out relevant pieces and flat embed. Polymerize: in 60 degree C oven overnight. Page 4 EM Protocols July 2010
9 LRW EMBEDDING **Note: Do not use OSO4 fixed tissue or cells 1. Fix tissue or cells in primary fixative. 2. Wash tissue 3X-10 min. in 0.1M cacodylate buffer, ph Dehydrate in ethanol: 50% - 1X-5 min. sit in hood/ 2 min. spin for cells 70% - 1X-5 min. sit in hood/ 2 min. spin for cells 95% - 2X-7 min. sit in hood/ 2 min. spin for cells 100% - 2X-7 min. sit in hood/ 2 min. spin for cells 4. Infiltration with LRW: a) Mix LRW Resin with ETOH 1:1 in a scintillation vial. Put mixture in tissue or cells for 30 min. b) After 30 min., make a 2:1 mixture of LRW to ETOH % LRW Resin 3X-1 hour and leave overnight in the last change. 6. Embed in Ted Pella flat teflon mold or gelatin capsules. LRW will only polymerize anaerobically, seal tightly. 7. Next: a) Cure in UV light cryo-chamber in 4 degree C walk in refrigerator overnight. Put pans of ice on the bottom of the container. OR b) Polymerize in gelatin capsules in 50 degree C oven overnight. July 2010 EM Protocols Page 5
10 l POST-EMBEDDING IMMUNOGOLD LABELING ON LRW SECTIONS OF CELLS Example: Cell pellets were fixed for 3 hrs. with 0.025%glut./3% paraf.. and then worked up with short dehydration times (10 min starting at 50% ETOH) and polymerized at 4 degrees under UV light for 1.5 days with LRW in gelatin capsules. PRIMARY ANTIBODIES: Rabbit Preimmune sera Investigator supplies SECONDARY ANTIBODIES: Goat anti Rabbit 10 nm, IgG (H+L) from EMS Investigator supplies DILUTIONS: Primary - Preimmune sera 1:30 Secondary - 10 nm gold Straight or 1:25 Control - No Primary/ Straight gold PROTOCOL: **Everything is filtered with a 0.2 micron filter before use and purchased from EMS M Glycine 20 min. at room temp. 2. PBS- 3 drops 3. 5% BSA 45 min. at room temp. (optional) 4. BSA-C/PBS/Tween 20 3X5 min drops (PH 7.4) 5. Primary antibody 1 hr -? at room temp. or overnight at room temp. or at 4 degrees C in humidified petri dish. (spin Primary in a centrifuge for 5 min on high speed). 6. PBS 3 drops OR Dip into beaker of PBS 7. BSA-C/PBS/Tween 20 6X5 min drops (PH 7.4) 8. Secondary Gold 1 hr. -? at room temp. or overnight at 4 degrees C in humidified petri dish (spin Secondary in a centrifuge for 5 min on high speed. 9. BSA-C/PBS/Tween 20 6X5 min drops (PH 7.4) Page 6 EM Protocols July 2010
11 10. PBS 3 drops 11. 2% glut/pbs for 10 min at room temp 12. Warm ddh20 wash 13. Post-stain with UA for 1 min and Lead citrate for 30 sec. July 2010 EM Protocols Page 7
12 l NEGATIVE STAINING PROCEDURE 1. Use 200 or 300 mesh formvar/carbon coated grids. 2. Place a drop (approx. 25 ul) of specimen on wax plate and put the grid on top of the specimen. Leave for 15 min. to 1 hr. 3. Touch grids to drops of: ½ Karnovsky s Fixative 0.1M Cacodylate Buffer 3 drops d H Touch grids to a drop of U.A and onto a moistened filter paper to draw off excess U.A. The percentage varies with the sample. 5. Dry overnight in a Petri dish, in the desiccators, and view the next day in the microscope. Page 8 EM Protocols July 2010
13 SCANNING ELECTRON MICROSCOPY PROTOCOL USING HMDS 1. Fix tissue in ½ Karnovsky s Fixative and OsO4 as usual. 2. Wash tissue in 0.1M Cacodylate Buffer 3. Dehydrate using a series of ethanol washes: 50% Ethanol for min. 70% Ethanol for min. 95% Ethanol for min. 100% Ethanol for min. 100% Ethanol for min. 4. Immerse tissue in pure HMDS for 15 min. x 2 5. Just cover the sample with fresh HMDS and leave under the hood until the HMDS evaporates off. 6. Specimens will be ready to mount onto stubs and sputter coated with Au/Pd in the morning or store desiccated until coated. July 2010 EM Protocols Page 9
14 l OPERATIONS JEOL 1230 TEM OPERATION The following procedure is a general operating procedure that the majority of users will apply when working on the JEOL TEM. The following should be used as a starting point for your particular work. The settings can be modified to produce the best images of your samples. With that in mind please remember to return the scope to the standard mode of operation for the next user.. SIGNING ON: 1. After signing the paper log, sign on to the Gatan digital camera PC by choosing Ctrl-Alt-Delete and entering the password = gatan. 2. Next, you should Login to the JEOL computer. In the right field choose [Login ]. In the center field highlight the User field. Backspace to erase previous user s name and enter emlab. Press enter. Highlight [password] and enter your 4-digit password=3333. Hit enter then [Apply]. SAMPLE REMOVAL AND LOADING: **Please Note: If the 5-grid holder is in the Goniometer, be sure the Exchange white dot and the Number 1 (also with a white dot) are aligned before removing.** 1. Center the holder by choosing the Specimen Position [Spc Pos ] button in the left field, below the Spot Size and above Z Control, make sure the Point ON is green and click on the center of the grid. 2. Prepare to remove specimen holder by choosing Monitor in Right Field (CPU) and select Vacuum. All should Ready state. 3. Switch Goniometer from Pump to Air. Nothing should happen. 4. Pull Specimen holder straight out (only green bars should be showing on the PEG) of Goniometer ~7cm until it stops then turn ~75 degrees Counter-Clockwise until it stops. You can now let go and reposition your hand. 5. Pull Specimen holder straight out of Goniometer ~0.5cm until it stops then turn ~15 degrees Counter- Clockwise until it stops. Let go. The square seat should be at 12:00. You will hear the Goniometer venting to air and green light will turn off. On the CPU the Vacuum SPC field should now read Air and will climb to ~245. Page 10 Additional EM Information March 2010
15 6. Gently remove the holder straight out from the Goniometer. If there is resistance wait another ten seconds. Be careful not to touch the holder beyond the screw/collar, as this will introduce grease and dirt into the microscope. 7. Raise clamping mechanism on the specimen holder. Place your grid in the holder, then lower and clamp the mechanism. **Again Please Note: If you are using the 5-grid specimen holder, be sure the Exchange white dot and the Number 1 (also with a white dot) are aligned.** 8. When carefully replacing the specimen holder, align the small screw with opening in side of Gonimeter until seated in Goniometer. 9. With slight pressure pushing specimen holder in Toggle switch from Air to Pump. You should hear the valve opening and the CPU vacuum SPC field should still read Air but will drop to about (indicator will not change from Air to Ready but you can go ahead and turn the beam on). **Note: The pump-out of the Goniometer is on a timed cycle. If the reading does not reach 50, you will have to wait until the next pumping cycle begins. The pressure will rise but should not be more than 200.** 10.Once the SPC on the vacuum monitor reaches below 50 get a good grip on the specimen holder and turn clockwise ~15 degrees until it stops, then allow it to go into the chamber ~0.5cm. 11.Still with a good grip turn clockwise ~75 degrees until it stops and slowly allow it to go into the Goniometer until the square seat nestles into the Gonoimeter at 3:00. Eventually you will do both of these steps as one fluid step. (Please note: indicator will not change from Air to Ready but you can go ahead and turn the beam on) 12.Select HT in the Head field and confirm the HT is at 80 KV and is READY. In the Left or Center Field select the Beam Current and switch it to ON. CORRECTING Z-AXIS (HEIGHT OF SAMPLE): 1. On the Function box {FB} bring beam to crossover with Brightness control. Center beam be pressing {BEAM SHIFT} and using the right mouse button. 2. At around 5000X focus on the sample film or a section itself and select [Z-Control] in the left field of the Display. Select [Auto] in the Center Field. When you have focused on the sample, click [Okay]. 3. Refocus image if necessary. CENTERING THE OBJECTIVE APERTURE (IF NEEDED): This should be done at the beginning of your session and after changing aperture settings (turn smaller apertures clockwise, larger aperture counterclockwise) or after going from Low Mag back to Mag 1. March 2010 Additional EM Information Page 11
16 l 1. Move to a clear area on the grid away from grid bars and areas of interest but there must be some film, formvar, carbon, or section to focus the diffraction onto. 2. Bring the centered beam to crossover and select {DIFF} on the Function Box (FB). Focus the spot with diffraction Focus knob on {FB} and center the dark ring around the bright beam using the manual knobs on the aperture. (Do this quickly since a bright beam will burn the fluorescent screen) 3. Select Mag 1 or 2 and you are ready to begin observations. USING THE GATAN DIGITAL IMAGING CAMERA AND SOFTWARE: 1. Focus and center the area of interest. 2. Make sure the Gatan PC screen is on and make a folder on the desktop. Label with username or Hutch account_date. Example: jdoe_ No spaces please. 3. Open the Gatan Digital Micrograph application and insert the camera. 4. For the Ultrascan 1000 bottom mounted camera-lift up the screen by selecting [Screen] on the left microscope field. For the Orius side mounted camera-make sure illumination is very dim and then insert the camera. Then select [Start View] on the right panel of the Gatan software and you will see a continuous, quick scan of your sample resolution. Be sure in the intensity box that the box is within the green field. 5. If you would like to focus the image switch from the Search to the Focus mode and manually focus your sample. The focus lupe, when checked, will collect fast/low resolution images making it easier to focus manually. You can also focus on the fluorescent screen of microscope. 6. Now you can select {acquire Image}. You can save the image with micron bar under the File menu and by selecting Save display as. Include the magnification in the file name. At the end you can transfer images to Fred or burn a CD. 7. To go back to viewing your sample on the microscope screen, select {Stop View} and de-select the Screen on the microscope for the Ultrascan camera or just take the camera out for the Orius camera. SHUTTING DOWN: 1. Lower the magnification to ~1000x. 2. Spread the beam maximally. Turn off the beam. 3. Remove your sample from specimen holder. 4. Reinsert sample holder into the microscope. 5. Log off of TEM PC, Gatan PC, and the paper log. Cover fluorescent screen and turn off room lights. Page 12 Additional EM Information March 2010

17 LOADING THE SAMPLE HOLDER INTO THE JEOL 1230 MICROSCOPE March 2010 Additional EM Information Page 13
18 l JEOL 1010 TEM OPERATION 1. Log in (note the start time from the meter on the scope). 2. Beam current should be ~ 053 with HT button on. 3. Take out specimen holder: pull holder out until it stops, turn towards you (counterclockwise), and pull out slowly (vacuum will pull it in). 4. Open specimen clamps on the specimen holder with the forceps and put grids in. Position #1 is at the tip of the rod. 5. Put back specimen holder: push in until it stops, green light will go on, wait for the green light to go off (~40 sec), turn clockwise and put the holder in very gently (vacuum will try to draw it in). 6. Turn up the brightness and contrast knobs on the side of the TEM screen and go to the main menu Page 1 a. Should be at 80 KV 7. Choose Specimen select #1 position. 8. Turn on filament button: FIL. 9. Focus the black dot on the small screen with the eyepieces off the sample. 10. Set the height of the specimen with the goniometer when measuring is critical. 11. Focus image and center illumination: a. Bring small focus screen into view b. Turn wobbler on by pushing down image X button. c. Push on (16X) button and focus with coarse and fine knob d. Turn wobbler off e. Take small focus screen out of view f. Bring the illumination to a smaller spot with the brightness knob and center with the shift X and Y knobs g. Center image in brackets located on the fluorescent screen. 12. For digital images, see page 15, for the Gatan Digital Camera instructions. 13. When you are finished with your session: a. Turn off the filament button Page 14 Additional EM Information March 2010
19 b. Take your grids out of the holder c. Put the holder back into the scope d. Log out (note the elapsed time from the filament meter on the scope). e. Flip switch to turn off the Gatan Camera. f. Turn down brightness and contrast on monitor and turn off the room lights on the scope GATAN DIGITAL CAMERA **It is very important never to have the brightness all the way up on the microscope and to insert the camera. This will damage the scintillator! 1. On the camera box flip the camera switch to on. This is found on top of the microscope to the right. Both camera and shutter switches should be in the up position. 2. Turn on the computer and monitor a. Password = gatan 3. Make a new folder on the desktop by right clicking with the mouse on a blank area on the desktop, point to new, then click folder. Name folder as follows: username or Hutch account_date. Example: jdoe_ No spaces please. 4. Allow for communication between the microscope and camera by pushing the PF3 key on the keyboard and then Enter. 5. Double click on Digital Micrograph to bring up the software to run the camera. 6. Prepare a Gain Reference: Note: Need to be at 10,000X mag. a. This will optimize the signal to noise ratio of your image b. Pull the sample holder out to the middle position and turn slightly. c. Turn down the brightness knob so the beam is uniform and set the exposure time to approximately 10 sec., found on microscope menu. Remove small screen from view(optional). d. You may cover the viewing port if the room is bright e. Go to the Camera menu and prepare gain reference f. Insert the camera and answer ok to the prompts g. It will take a few seconds to acquire and a prompt will come up to let you know if it has been successfully acquired. March 2010 Additional EM Information Page 15
20 l 7. View Sample Area: a. Remove the camera and insert the sample into the microscope. b. Find an area of interest and focus. c. Dim the beam for a 3-5 sec exposure time (on microscope menu) adjusted with brightness knob, remove small screen, and insert the camera. d. Click on the Start View button to view a continuous image of the sample. This is found on the Camera View menu to the right of the screen. e. Use the Search mode (this gives the fastest image refresh rate on the monitor). f. Adjust the brightness on the intensity bar to the green zone with the brightness knob on the microscope if needed. 8. Adjust Focus (Focus Loupe): a. Click on Focus Loupe. This will allow continuous viewing of the image only from the selected sample area that is marked. b. Focus with the microscope focus knobs. c. Focus can also be obtained with the focus button under the TEM AutoTune menu (top right of the monitor). 9. Acquire the Final Image: a. After focus is set, click the Start Acquire button to record the final image. This is found on the Camera Acquire menu to the right of the screen. b. Adjust for contrast and brightness using the histogram and sliders. c. The image can be enlarged by dragging the corner of the image with the mouse and alt key held down. d. When viewing another specimen, stop view and take the camera out. 10. Saving Images: a. To save the image as a Full Resolution Tiff Image: b. Go to the Custom menu and SaveAsFullRestiff.s c. The micron bar will be saved with the image. d. Include the magnification of the microscope in the file name. e. To save the image in Gatan Digital Format dm3: Page 16 Additional EM Information March 2010
21 f. Go to the File menu and Save as g. Name it and save as the Gatan Format (*.dm3) h. The image can be saved in a Report View with image notes 11. Save Images to Fred: a. Follow the sheet on how to map a drive to Fred from a PC. 12. Printing Images: a. To print a non-pixelated image choose Report format to see page layout b. Click on the image to select it c. Under the Control palette (left side of the screen) make sure the print width(w) and height(h) are approximately 7 x 7 inches. d. Go to the File menu and Print and select the appropriate options. JEOL JSM-5800 SEM OPERATION SPECIMEN LOADING AND EXCHANGE: To Load Samples: 1. Screw in stubs to holder and load specimen holder on stage. 2. Push Evac button on the chamber door, and make sure the door is sealed properly. 3. Wait about 5 minutes for HT READY, located on LCD on front of microscope. To Exchange Samples: 1. Turn HT off and wait approximately 15 minutes to cool. 2. Select STAGE (LF5) menu on right CRT. 3. Click Init Position and Start. 4. Lower the working distance to approximately 20 with the T/Z button and joystick to avoid hitting the Backscattered Detector. WD is read out on the lower left of microscope on LCD. 5. Push Vent button on the chamber door and remove the samples after the beep. March 2010 Additional EM Information Page 17
22 l OBSERVATION: 1. Specimen(s) are loaded and HT button has been pushed and is ready. 2. Position the first specimen: 3. Select STAGE Menu. 4. Click LOAD, if not pushed already. 5. Position the curser on the desired stub 6. Click START. VIEWING IMAGE AND SETTING PARAMETERS: 1. TV2 on 2. Freeze L or R off 3. INST MAG on. 4. If still no image, manually move stage and adjust brightness, etc, until the specimen is found, then try AUTO IMAGE again. 5. The X/Y knob and the joystick will move the sample around. Choose Accelerating Voltage: 1. Press ACCV (F2) menu. See Figure. for explanation: Page 18 Additional EM Information March 2010
23 Set Z (WD) and T (tilt) as desired: 1. WD is the distance from the underside of the objective lens to the specimen surface. See Figure for explanation: March 2010 Additional EM Information Page 19
24 l Set Spot Size as desired: 1. Spot Size on. 2. Observe LCD graph while turning CRS/Fine knobs. 3. Return to Tone function. NOTES For Spot Size: Arrows (>>>) on LCD graph indicate spot size. (>>>>>>> ) = Spot Size 7. Spot sizes range from 1 to 24. Spot Size Current Resolution Noise 1 Small Low High Most 12 Medium Medium Medium Medium 24 Large High Poor Least Objective Aperture Size: #1 = 20uM (High Resolution) #2 = 30uM (Normal) #3 = 100uM (High Current for EDS) Centering Objective Aperture: 1. OL WOBB on. 2. Increase Mag. to see image movement. 3. Adjust aperture knobs to minimize movement. 4. OL WOBB off. Correct Stigmation: 1. The image is astigmatism-free if it has no unidirectional defocusing when the objective lens is changed to under- or over-focus. 2. This is done by adjusting the two knobs, x and y, of the stigmator with the STIG button pushed. **Note: Set Desired Magnification, Focus, and Stigmate before taking a photo.** Page 20 Additional EM Information March 2010
25 IMAGING: Brightness and Contrast can be set by pushing the Tone button and TV2 two times to bring up the screen for adjustment. Bring the two bars in the middle with the knobs. SAVE TIFF IMAGES USING THE ORION IMAGING SYSTEM: 1. A folder will be created for you on the desktop with your name and date Ex. Jdoe_ Another folder called Export will be in this folder. 2. Click on minimized JEOL Orion Go to the File menu and click on User Login and then click on your name and Login. 4. The EXT OFF button (in red) on the left of the screen is the position for the connection with viewing on the SEM. The EXT ON button (in blue) and the L for live is the position for collecting live images from the SEM. 5. Collection of the image defaults to 1280 resolution and 17 Sec. for scanning speed. If you choose a smaller number the refresh rate becomes faster and the resolution is less. For photography the resolution should be 1280 and 90 sec. (also can do 17 sec.). 6. Correct the brightness and contrast of the image by using the controls on the microscope or the Line Scan Profile button (in the image measurement selection) of the Orion image software. 7. In order to save the image it must be frozen. Press the L button one time and the image will freeze (F) after it scans to the end of the photo. If you press the L button 2 times if will freeze (F) the image right away. 8. On the bottom of the photo, type in the KV, Mag, and WD. This information will be saved along with the micron bar. 9. Press the Image File Handler button (To the right of the L, F button). Then press the Save button on top right and the Save Image Data Menu comes up. Press OK. 10. Put this image in the regular folder and not the export folder. 11. On the left side under File click the name of the file you just saved and click the Export button. Save Image Data Menu comes up and press OK. Put the image in the Export folder. This will export all data on the image. 12. Click on L button and EXT ON button to switch over to the microscope. 13. Minimize the JEOL Orion 5800 software. 14. Transfer files to your fred account or copy onto CD. March 2010 Additional EM Information Page 21
26 l MICROSCOPE SHUT DOWN: 1. HT button should be pushed off 2. Wait approximately 15 min to take the samples out or ask the EM Staff to do this. 3. Set Mag. to 300,000X and SL2 4. Turn down the screens all the way. For more information on SEM Operation, please see the handout sheet Introduction to the Principles of Operation and Applications of the Scanning Electron Microscope and Electron Microprobe by Vernon E. Robertson, published by JEOL USA INC., Peabody, MA. Page 22 Additional EM Information March 2010
27 ADDITIONAL INFORMATION AND RESOURCES GENERAL ELECTRON MICROSCOPY RESOURCES For more information on the topics listed below, please check the websites or publications listed below. INTRODUCTION TO ELECTRON MICROSCOPY and Select the PDF slides/lecture notes by Nestor Zaluzec WHAT ARE ELECTRON MICROSCOPES? ELECTRON MICROSCOPY WEB COURSE NOTES AND REFERENCES TRANSMISSION ELECTRON MICROSCOPY (TEM) BASICS LISTSERV FOR ELECTRON MICROSCOPY INFORMATION March 2010 Additional EM Information Page 23
28 l SPECIFIC PROTOCOL OR TECHNIQUE RESOURCES For more information on the topics listed below, please check the websites or publications listed below. BINNING EXPLAINED EM INFO FOR CAENORHABDITIS ELEGANS Electron Microscopy and Three-Dimensional Image Reconstruction. By David H. Hall, Department of Neuroscience, Albert Einstein College of Medicine, Bronx, New York Methods in Cell Biology, Vol. 48, Ch. 17, pages IMMUNOCYTOCHEMISTRY IMMUNOGOLD LABELING For additional information and literature, including company newsletters: IMMUNOGOLD QUESTIONS or Electron Microscopy Sciences Catalog KOHLER ILLUMINATION Page 24 Additional EM Information March 2010
29 NEGATIVE STAINING OPTICAL IMAGE PROCESSING Course notes by John Russ, Florida State University March 2010 Additional EM Information Page 25
JEOL 6500 User Manual
 LOG IN to your session on the computer to the left of the microscope. Starting Conditions 1. Press Ctrl-Alt-Del and log on to the microscope computer. Click on JEOL PC SEM 6500 icon. Click yes if message
JEOL 6700 User Manual 05/18/2009
 JEOL 6700 User Manual 05/18/2009 LOG IN to your session on the computer to the right of the microscope. Starting Conditions 1. Click the button and read the Penning Gauge to ensure that the microscope
Operating the Hitachi 7100 Transmission Electron Microscope Electron Microscopy Core, University of Utah
 Operating the Hitachi 7100 Transmission Electron Microscope Electron Microscopy Core, University of Utah Follow the procedures below when you use the Hitachi 7100 TEM. Starting Session 1. Turn on the cold
JSM 6060 LV SCANNING ELECTRON MICROSCOPE STANDARD OPERATING PROCEDURES
 JSM 6060 LV SCANNING ELECTRON MICROSCOPE STANDARD OPERATING PROCEDURES RULES All users must go through a series of standard operation procedure training. For more information contact: Longlong Liao Teaching
Operating Checklist for using the Scanning Electron. Microscope, JEOL JSM 6400.
 Smith College August 2009 Operating Checklist for using the Scanning Electron Microscope, JEOL JSM 6400. CONTENT, page no. Pre-Check 1 Startup 1 Specimen Insertion 2 Filament Saturation 2 Beam Alignment
JEOL JEM-1400 Transmission Electron Microscope Operating Instructions
 JEOL JEM-1400 Transmission Electron Microscope Operating Instructions Anti-contamination device Objective aperture Objective aperture translation knobs Specimen holder Pump/air switch Left hand control
Procedures for Performing Cryoelectron Microscopy on the FEI Sphera Microscope
 Procedures for Performing Cryoelectron Microscopy on the FEI Sphera Microscope The procedures given below were written specifically for the FEI Tecnai G 2 Sphera microscope. Modifications will need to
Using the Hitachi 3400-N VP-SEM
 Using the Hitachi 3400-N VP-SEM Opening the Chamber to Load Specimens (This may also be done later using the software) 1. Click the AIR button on the front of the machine: 2. Wait a few minutes until you
Basic Users Manual for Tecnai-F20 TEM
 Basic Users Manual for Tecnai-F20 TEM NB: This document contains my personal notes on the operating procedure of the Tecnai F20 and may be used as a rough guide for those new to the microscope. It may
1. Specimen Holder Removal, Loading, and Insertion
 OPERATION OF THE PHILIPS CM-200 FEG-TEM When not in use, the CM-200 should be in the MICROSCOPE ON configuration with the HIGH TENSION ON (illuminates green when the high tension is on).. The microscope
Scanning Electron Microscope FEI INSPECT F50. Step by step operation manual
 Scanning Electron Microscope FEI INSPECT F50 Step by step operation manual Scanning Electron Microscope, FEI Inspect F50 FE-SEM-F Observation Flow Saving Data And Analysis Specimen preparation Error check
Operating Checklist for using the Scanning Electron Microscope, JEOL JSM 6400.
 Smith College August 2005 Operating Checklist for using the Scanning Electron Microscope, JEOL JSM 6400. CONTENT, page no. Pre-Check, 1 Specimen Insertion, 1 Startup, 2 Filament Saturation, 2 Beam Alignment,
OPERATION OF THE HITACHI S-450 SCANNING ELECTRON MICROSCOPE. by Doug Bray Department of Biological Sciences University of Lethbridge
 OPERATION OF THE HITACHI S-450 SCANNING ELECTRON MICROSCOPE by Doug Bray Department of Biological Sciences University of Lethbridge Revised September, 2000 Note: The terms in bold in this document represent
User Operation of JEOL 1200 EX II
 **Log onto Computer** Open item program Start Up Procedure User Operation of JEOL 1200 EX II 1. If scope is not running, locate an electron microscopy technician (EMT) to find out why not. 2. Turn up brightness
SEM Training Notebook
 SEM Training Notebook Lab Manager: Dr. Perry Cheung MSE Fee-For-Service Facility Materials Science and Engineering University of California, Riverside December 21, 2017 (rev. 3.4) 1 Before you begin Complete
1. Preliminary sample preparation
 FEI Helios NanoLab 600 standard operating procedure Nicholas G. Rudawski ngr@ufl.edu (352) 392 3077 (office) (805) 252-4916 (cell) Last updated: 03/02/18 What this document provides: an overview of basic
SEM OPERATION IN LOW VACUUM MODE
 SEM OPERATION IN LOW VACUUM MODE Instructions for JEOL 5800 LV The EVAC light of the SEM specimen chamber should be already lit when you approach the SEM & the SEM will have been left in the high vacuum
Please follow these instructions for use of the Philips CM100 TEM. Adopted from website below.
 Please follow these instructions for use of the Philips CM100 TEM. Adopted from website below. http://staff.washington.edu/wpchan/if/cm100_inst.shtml Instructions for the Philips CM100 TEM and peripherals
2. Raise HT to 200kVby following the procedure explained in 1.6.
 JEOL 2100 MANUAL Quick check list 1. If needed, fill the reservoir with LN2 2. Raise HT to 200kVby following the procedure explained in 1.6. 3. Insert specimen holder into TEM (Insert holder in airlock,
Check that the pneumatic hose is disconnected!!!! (unless your using the BSE detector, of course)
") JEOL 7000F BASIC OPERATING INSTRUCTIONS-Ver.-2.0 Note: This is minimal operation checklist and does not replace the other reference manuals. Read the manual for Specimen Exchange (JEOL 7000 Specimen Exchange
JEOL 7000F BASIC OPERATING INSTRUCTIONS-Ver.-2.0 Note: This is minimal operation checklist and does not replace the other reference manuals. Read the manual for Specimen Exchange (JEOL 7000 Specimen Exchange
1.3. Before loading the holder into the TEM, make sure the X tilt is set to zero and the goniometer locked in place (this will make loading easier).
.") JEOL 200CX operating procedure Nicholas G. Rudawski ngr@ufl.edu (805) 252-4916 1. Specimen loading 1.1. Unlock the TUMI system. 1.2. Load specimen(s) into the holder. If using the double tilt holder, ensure
JEOL 200CX operating procedure Nicholas G. Rudawski ngr@ufl.edu (805) 252-4916 1. Specimen loading 1.1. Unlock the TUMI system. 1.2. Load specimen(s) into the holder. If using the double tilt holder, ensure
Instructions for Tecnai a brief start up manual
 Instructions for Tecnai a brief start up manual Version 3.0, 8.12.2015 Manual of Tecnai 12 transmission electron microscope located at Aalto University's Nanomicroscopy Center. More information of Nanomicroscopy
Standard Operating Procedure for the Amray 1810 Scanning Electron Microscope Version: 29 NOVEMBER 2014
 Standard Operating Procedure for the Amray 1810 Scanning Electron Microscope Version: 29 NOVEMBER 2014 1. Utility Requirements a. System power is supplied by two 120 VAC/20 A circuits. When doing maintenance
SEM Training Notebook
 SEM Training Notebook Lab Manager: Dr. Perry Cheung MSE Fee-For-Service Facility Materials Science and Engineering University of California, Riverside March 8, 2018 (rev. 3.5) 1 Before you begin Complete
Model SU3500 Scanning Electron Microscope
 Model SU3500 Scanning Electron Microscope Modified and Parts taken from Hitachi Easy Operation Guide. Before using the Model SU3500 SEM, be sure to read the [GENERAL SAFETY GUIDELINES] in the instruction
2 How to operate the microscope/obtain an image
 Morgagni Operating Instructions 50079 010912 2-1 2 ow to operate the microscope/obtain an image 2.1 Starting the microscope 2.1.1 Starting the microscope with several manually-operated steps 1. Turn on
Dickinson College Department of Geology
 Dickinson College Department of Geology Title: Equipment: BASIC OPERATION OF THE SCANNING ELECTRON MICROSCOPE (SEM) JEOL JSM-5900 SCANNING ELECTRON MICROSCOPE Revision: 2.2 Effective Date: 1/29/2003 Author(s):
FE-SEM SU-8020 Operating manual (Preliminary version)
") FE-SEM SU-8020 Operating manual (Preliminary version) 2016/04/11 Seimitsu Bunseki sitsu lab. Starting up 1.Turn on the Display switch. Windows OS is starting up 2. Select the user SU-8000. 3. Click the
FE-SEM SU-8020 Operating manual (Preliminary version) 2016/04/11 Seimitsu Bunseki sitsu lab. Starting up 1.Turn on the Display switch. Windows OS is starting up 2. Select the user SU-8000. 3. Click the
RAITH e-line OPERATING INSTRUCTIONS
 RAITH e-line OPERATING INSTRUCTIONS 1) LOADING A SAMPLE a. Start the system i. On the Column PC (Right side monitor [R]), select the SmartSEM icon to on the desktop to begin the column software. ii. On
Jeol JEM Responsible personell: Endy ( ) Online booking is compulsory!
 Online booking is compulsory!") Jeol JEM 1230 Responsible personell: Endy (45279377) Online booking is compulsory! After training you will have access to working alone on the instrument. All insertion of samples is done by responsible
Jeol JEM 1230 Responsible personell: Endy (45279377) Online booking is compulsory! After training you will have access to working alone on the instrument. All insertion of samples is done by responsible
1.2. Make sure the viewing screen is covered (exposure to liquid N 2 may cause it to crack).
.") FEI Tecnai F20 S/TEM: imaging in TEM mode Nicholas G. Rudawski ngr@ufl.edu (805) 252-4916 (352) 392-3077 Last updated: 01/21/18 1. Filling the cold trap (if needed) 1.1. Prior to use, the cold trap needs
FEI Tecnai F20 S/TEM: imaging in TEM mode Nicholas G. Rudawski ngr@ufl.edu (805) 252-4916 (352) 392-3077 Last updated: 01/21/18 1. Filling the cold trap (if needed) 1.1. Prior to use, the cold trap needs
Full-screen mode Popup controls. Overview of the microscope user interface, TEM User Interface and TIA on the left and EDS on the right
 Quick Guide to Operating FEI Titan Themis G2 200 (S)TEM: TEM mode Susheng Tan Nanoscale Fabrication and Characterization Facility, University of Pittsburgh Office: M104/B01 Benedum Hall, 412-383-5978,
Basic Operating Instructions for Strata Dual Beam 235 FIB/SEM
 Basic Operating Instructions for Strata Dual Beam 235 FIB/SEM Warning Always adjust your specimen height before closing the chamber door to make sure your specimen will not hit the bottom of the lens;
FEI Tecnai G 2 F20 Operating Procedures
 FEI Tecnai G 2 F20 Operating Procedures 1. Startup (1) Sign-up in the microscope log-sheet. Please ensure you have written an account number for billing. (2) Log in to the computer: Login to your account
COMPACT MANUAL FOR GI USERS OF THE JEM 1400 FLASH BEGINNERS (For internal use only) Gray means additional information at the end of this mini-manual
 Gray means additional information at the end of this mini-manual") 1 COMPACT MANUAL FOR GI USERS OF THE JEM 1400 FLASH BEGINNERS (For internal use only) Gray means additional information at the end of this mini-manual ABOUT THIS MICROSCOPE (room HG01.240) The JEM-1400Flash
1 COMPACT MANUAL FOR GI USERS OF THE JEM 1400 FLASH BEGINNERS (For internal use only) Gray means additional information at the end of this mini-manual ABOUT THIS MICROSCOPE (room HG01.240) The JEM-1400Flash
MSE 460 TEM Lab 2: Basic Alignment and Operation of Microscope
 MSE 460 TEM Lab 2: Basic Alignment and Operation of Microscope Last updated on 1/8/2018 Jinsong Wu, jinsong-wu@northwestern.edu Aims: The aim of this lab is to familiarize you with basic TEM alignment
1.1. Log on to the TUMI system (you cannot proceed further until this is done).
.") FEI DB235 SEM mode operation Nicholas G. Rudawski ngr@ufl.edu (805) 252-4916 1. Sample loading 1.1. Log on to the TUMI system (you cannot proceed further until this is done). 1.2. The FIB software (xp)
FEI DB235 SEM mode operation Nicholas G. Rudawski ngr@ufl.edu (805) 252-4916 1. Sample loading 1.1. Log on to the TUMI system (you cannot proceed further until this is done). 1.2. The FIB software (xp)
MSE 595T Transmission Electron Microscopy. Laboratory III TEM Imaging - I
 MSE 595T Basic Transmission Electron Microscopy TEM Imaging - I Purpose The purpose of this lab is to: 1. Make fine adjustments to the microscope alignment 2. Obtain a diffraction pattern 3. Obtain an
Title: Amray 1830 SEM#2 Semiconductor & Microsystems Fabrication Laboratory Revision: D Rev Date: 03/18/2016
 Approved by: Process Engineer / / / / Equipment Engineer 1 SCOPE The purpose of this document is to detail the use of the Amray 1830 SEM. All users are expected to have read and understood this document.
Things to check before start-up.
 Byeong Cha Page 1 11/24/2009 Manual for Leica SP2 Confocal Microscope Enter you name, the date, the time, and the account number in the user log book. Things to check before start-up. Make sure that your
1.1. In regular TEM imaging mode, find a region of interest and set it at eucentric height.
 JEOL 2010F operating procedure Covers operation in STEM mode (See separate procedures for operation in TEM mode and operation of EDS system) Nicholas G. Rudawski ngr@ufl.edu (805) 252-4916 NOTE: this operating
Operation Guide. Hitachi S-3400N. Variable Pressure Scanning Electron Microscope. with. Deben Peltier Coolstage
 Operation Guide Hitachi S-3400N Variable Pressure Scanning Electron Microscope with Deben Peltier Coolstage www.deben.co.uk www.taltos.stanford.edu www.hitachi-hta.com Index Main Unit 3 Electron Optical
STEM alignment procedures
 STEM alignment procedures Step 1. ASID alignment mode 1. Write down STD for TEM, and then open the ASID control window from dialogue. Also, start Simple imager viewer program on the Desktop. 2. Click on
05/20/14 1. Philips CM200T. Standby Condition
 05/20/14 1 Philips CM200T Standby Condition HT and filament off, HT setting at 200kV. RESET HOLDER, center sample tilt knobs, and remove sample. Mag ~ 5-10kX Objective and SA apertures out, C2 aperture
Brightfield Microscopy and Image Acquisition on Spotcam1. by Ryan Taylor/Nancy Kleene Last modified 10/02/05 by Birgit Ehmer
 Brightfield Microscopy and Image Acquisition on Spotcam1 by Ryan Taylor/Nancy Kleene Last modified 10/02/05 by Birgit Ehmer Log onto the computer. Enter your username and password to log onto the server.
FEI Quanta 200 ESEM Basic instructions
 FEI Quanta 200 ESEM Basic instructions Desktop and then start the UI. If the computer has restarted and you need to login, Username: supervisor and Password: supervisor Log-in to the Microscope using the
BX-61: Brightfield Instruction /Continue to scroll for Fluorescent Instuctions
 BX-61: Brightfield Instruction /Continue to scroll for Fluorescent Instuctions Starting up: Schematic of Olympus BX-61. 1. Turn on Olympus microscope power box (left of microscope) with toggle switch on
Figure 1 The Raith 150 TWO
 RAITH 150 TWO SOP Figure 1 The Raith 150 TWO LOCATION: Raith 150 TWO room, Lithography area, NanoFab PRIMARY TRAINER: SECONDARY TRAINER: 1. OVERVIEW The Raith 150 TWO is an ultra high resolution, low voltage
General information. If you see the instrument turned off, notify MIC personnel. MIC personnel will help you insert your samples into the instrument.
 JEOL JSM-7400F Table of contents General information.. 3 The operation panel. 4 The different sample holders and inserting the samples.. 5 Turning on the beam... 6 Stage map control... 8 Correcting astigmatism...
Nikon Ti-E Microscope Manual. Rightmire Hall Ohio State University. Director: Tony Brown Rightmire
 Nikon Ti-E Microscope Manual Rightmire Hall Ohio State University Director: Tony Brown Rightmire 060 292-1205 brown.2302@osu.edu Facility Manager: Paula Monsma Rightmire 062 293-0939 292-1367 monsma.1@osu.edu
How to use the Jeol 1010 TEM of GI (Liesbeth own GI version)
") How to use the Jeol 1010 TEM of GI (Liesbeth own GI version) 1.Load the specimen Load a grid into the rod holder: USE ONLY THE TOP POSITION (blue arrow), Specimen selection on 1 (The rear one is only a
How to use the Jeol 1010 TEM of GI (Liesbeth own GI version) 1.Load the specimen Load a grid into the rod holder: USE ONLY THE TOP POSITION (blue arrow), Specimen selection on 1 (The rear one is only a
Zeiss AxioImager.Z2 Brightfield Protocol
 Zeiss AxioImager.Z2 Brightfield Protocol 1) System Startup Please note put sign-up policy. You must inform the facility at least 24 hours beforehand if you can t come; otherwise, you will receive a charge
Protective Equipment Nitrile gloves for handling sample holder and safety glasses for filling liquid nitrogen dewar.
 Emergency Information: 1. Medical Emergencies: Contact 911 and McGill Security 514.398.3000 2. Leave TEM as is. Do NOT shut down the vacuum system. 3. If possible, turn off High Tension and Close Column
LEO 912 TEM Short Manual. Prepared/copyrighted by RH Berg Danforth Plant Science Center
 LEO 912 TEM Short Manual Prepared/copyrighted by RH Berg Danforth Plant Science Center Specimen holder [1] Never touch the holder (outside of the O-ring, double-headed arrow) because finger oils will contaminate
Nikon SIM-E & A1-R System
 Nikon SIM-E & A1-R System USER GUIDE LSU Health Sciences Center Shreveport Research Core Facility June 01 2017 Chaowei Shang 1 Table of Content 1. Start Up the System... Page 3 Hardware and microscope
Using the Nikon TE2000 Inverted Microscope
 Wellcome Trust Centre for Human Genetics Molecular Cytogenetics and Microscopy Core Using the Nikon TE2000 Inverted Microscope Fluorescence image acquisition using Scanalytic s IPLab software and the B&W
LSM 780 Confocal Microscope Standard Operation Protocol
 LSM 780 Confocal Microscope Standard Operation Protocol Basic Operation Turning on the system 1. Sign on log sheet according to Actual start time 2. Check Compressed Air supply for the air table 3. Switch
Zeiss LSM 880 Protocol
 Zeiss LSM 880 Protocol 1) System Startup Please note put sign-up policy. You must inform the facility at least 24 hours beforehand if you can t come; otherwise, you will receive a charge for unused time.
JEOL 2010 FasTEM & DigitalMicrograph User's Guide
 JEOL 2010 FasTEM & DigitalMicrograph User's Guide Electron Microscopy Laboratory Instititute of Materials Science University of Connecticut The purpose of this manual is to remind you of the essential
Nanoscale Fabrication & Characterization Facility. Raith e-line EBL Users Guide (updated:aug 2 nd, 2017)
") Nanoscale Fabrication & Characterization Facility Raith e-line EBL Users Guide (updated:aug 2 nd, 2017) Overview: The Raith e-line EBL system is designed to write features with critical dimensions as small
Nanoscale Fabrication & Characterization Facility Raith e-line EBL Users Guide (updated:aug 2 nd, 2017) Overview: The Raith e-line EBL system is designed to write features with critical dimensions as small
Guide to Confocal 5. Starting session
 Guide to Confocal 5 Remember that when booking and before starting session you can check for any problems at https://www.bris.ac.uk/biochemistry/uobonly/cif/index.html Starting session Switch on microscope
ZEISS EVO SOP. May 2017 ELECTRON OPTICS
 ZEISS EVO SOP May 2017 ELECTRON OPTICS The patented EVO column is the area of the SEM, where electrons are emitted, accelerated, deflected, focused, and scanned. Main characteristics of the EVO optics
XTEM. --Software for Complex Transmission Electron Microscopy. Version 1.0
 XTEM --Software for Complex Transmission Electron Microscopy Version 1.0 1. Introduction XTEM is the software for complex microscopy on JEOL 3100 electron microscopes. The XTEM software consists of a suite
CAPTURING IMAGES ON THE HIGH-MAGNIFICATION MICROSCOPE
 University of Virginia ITC Academic Computing Health Sciences CAPTURING IMAGES ON THE HIGH-MAGNIFICATION MICROSCOPE Introduction The Olympus BH-2 microscope in ACHS s microscope lab has objectives from
Olympus Time-lapse Microscope Basic operation
 Olympus Time-lapse Microscope Basic operation To start up the microscope 1. Switch on the Olympus UCB. (label as ) 1 Power Switch 2 2. Switch on the MT10. (label as ) Power Switch Page 1 of 18 3 3. Switch
Contents STARTUP MICROSCOPE CONTROLS CAMERA CONTROLS SOFTWARE CONTROLS EXPOSURE AND CONTRAST MONOCHROME IMAGE HANDLING
 Operations Guide Contents STARTUP MICROSCOPE CONTROLS CAMERA CONTROLS SOFTWARE CONTROLS EXPOSURE AND CONTRAST MONOCHROME IMAGE HANDLING Nikon Eclipse 90i Operations Guide STARTUP Startup Powering Up Fluorescence
Heidelberg µpg 101 Laser Writer
 Heidelberg µpg 101 Laser Writer Standard Operating Procedure Revision: 3.0 Last Updated: Aug.1/2012, Revised by Nathanael Sieb Overview This document will provide a detailed operation procedure of the
STANDARD OPERATING PROCEDURE: JEOL TEM-2100
 STANDARD OPERATING PROCEDURE: JEOL TEM-2100 Purpose of this Instrument: Essential tool for structural characterization of natural or synthesized nanostructures. Location: WVU - Engineering Sciences Building
MAKE SURE YOUR SLIDES ARE CLEAN (TOP & BOTTOM) BEFORE LOADING DO NOT LOAD SLIDES DURING SOFTWARE INITIALIZATION
 BEFORE LOADING DO NOT LOAD SLIDES DURING SOFTWARE INITIALIZATION") Olympus VS120-L100 Slide Scanner Standard Operating Procedure Startup 1) Red power bar switch (behind monitor) 2) Computer 3) Login: UserVS120 account (no password) 4) Double click: WAIT FOR INITIALIZATION
Olympus VS120-L100 Slide Scanner Standard Operating Procedure Startup 1) Red power bar switch (behind monitor) 2) Computer 3) Login: UserVS120 account (no password) 4) Double click: WAIT FOR INITIALIZATION
User Manual. Digital Compound Binocular LED Microscope. MicroscopeNet.com
 User Manual Digital Compound Binocular LED Microscope Model MD82ES10 MicroscopeNet.com Table of Contents i. Caution... 1 ii. Care and Maintenance... 2 1. Components Illustration... 3 2. Installation...
Leica SP8 TCS Users Manual
 Version : 07/08/0 Leica SP8 TCS Users Manual Start up:. Turn the PC Microscope, Scanner Power, Laser Power, and the Laser Emission key to on (bottom right of desk).. Turn on the fluorescent lamp (top left
Nikon Eclipse Ti2-E Widefield/Spinning Disk Confocal Microscope Standard Operation Protocol
 Nikon Eclipse Ti-E Widefield/Spinning Disk Confocal Microscope Standard Operation Protocol Please sign on the log sheet before switching on system. Turn on system Turn on A only if confocal mode or laser
Zeiss Axio Imager.A1 manual
 Zeiss Axio Imager.A1 manual Power-up protocol 1. Mercury lamp 2. Power strip on shelf 3. Computer The Mercury lamp should always be first-on and last-off. This prevents any electrical surges caused by
LSM 710 Confocal Microscope Standard Operation Protocol
 LSM 710 Confocal Microscope Standard Operation Protocol Basic Operation Turning on the system 1. Switch on Main power switch 2. Switch on System / PC power button 3. Switch on Components power button 4.
Biology 29 Cell Structure and Function Spring, 2009 Springer LABORATORY 1: THE LIGHT MICROSCOPE
 Biology 29 Cell Structure and Function Spring, 2009 Springer LABORATORY 1: THE LIGHT MICROSCOPE Prior to lab: 1) Read these instructions (p 1-6) 2) Go through the online tutorial, the microscopy pre-lab
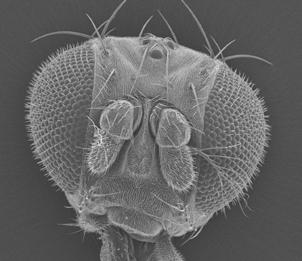
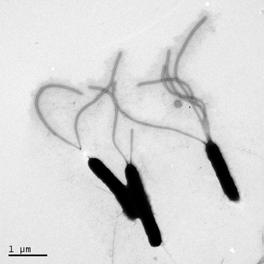
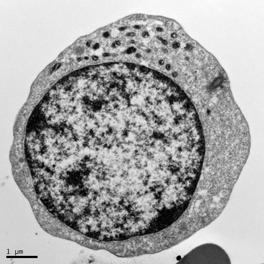
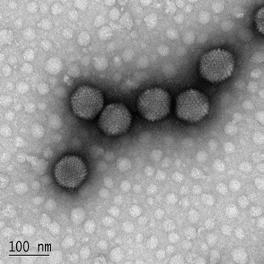
Cryo-Electron Microscopy of Viruses
 Blockkurs Biophysic and Structural Biology 2013 Praktikumsversuch at C-CINA Cryo-Electron Microscopy of Viruses In this practical we will compare electron microscopy of negatively stained and frozen-hydrated
Olympus xcellence Software - basic user guide
 Olympus xcellence Software - basic user guide This is a basic overview of setting up time lapse experiments using Olympus's xcellence software on BIU's IX81 inverted phase contrast system - the software
Training Guide for Carl Zeiss AxioZoom V16 Stereo Microscope
 Training Guide for Carl Zeiss AxioZoom V16 Stereo Microscope ZEN 2012 Optical Imaging & Vital Microscopy Core Baylor College of Medicine (2017) Power ON Routine 1 2 If you require fluorescence imaging,
Characterization Microscope Nikon LV150
 Characterization Microscope Nikon LV150 Figure 1: Microscope Nikon LV150 Introduction This upright optical microscope is designed for investigating up to 150 mm (6 inch) semiconductor wafers but can also
Nikon AZ100. Laser Scanning Macro Confocal Microscope. Jordan Briscoe Adam Fries Kyle Marchuk Kaitlin Corbin. May 2017.
 Nikon AZ100 Laser Scanning Macro Confocal Microscope Jordan Briscoe Adam Fries Kyle Marchuk Kaitlin Corbin May 2017 Contents 1 Introduction 2 2 Hardware - Startup 2 3 Software/Operation 4 3.1 Multidimensional
Quick Guide for Zeiss 710 Laser Scanning Confocal MGH Cancer Center
 Quick Guide for Zeiss 710 Laser Scanning Confocal MGH Cancer Center For any questions or concerns, please contact: Linda Nieman lnieman@mgh.harvard.edu Office: (617) 643-9684 Cell: (512) 565-8076 Chenyue
Zeiss LSM 780 Protocol
 Zeiss LSM 780 Protocol 1) System Startup F Please note the sign-up policy. You must inform the facility at least 24 hours beforehand if you can t come; otherwise, you will receive a charge for unused time.
SOP for Hitachi S-2150 Scanning Electron Microscope For review purposes only
 SOP for Hitachi S-2150 Scanning Electron Microscope For review purposes only Version 1.0 Prepared by D. Turnbull February 21, 2007. Please submit any omissions to the Author Note: This SEM is a recent
FEI Titan Image Corrected STEM
 05/03/16 1 FEI Titan 60-300 Image Corrected STEM Standby Condition HT setting at 300kV, Col. Valves Closed RESET Holder and remove sample. Mag ~ 5-10kX Objective and SA apertures out, C2 aperture at 150µm
Operating Instructions for Zeiss LSM 510
 Operating Instructions for Zeiss LSM 510 Location: GNL 6.312q (BSL3) Questions? Contact: Maxim Ivannikov, maivanni@utmb.edu 1 Attend A Complementary Training Before Using The Microscope All future users
SHORT INSTRUCTIONS FOR OPERATING LSM1/2 (Zeiss LSM510) AT CIAN Version 1.4, September 2014
 AT CIAN Version 1.4, September 2014") CIAN LSM1 or LSM2 short instructions, version 1.4, September 2014 page 1 of 6 SHORT INSTRUCTIONS FOR OPERATING LSM1/2 (Zeiss LSM510) AT CIAN Version 1.4, September 2014 Before starting To work with LSM1
CIAN LSM1 or LSM2 short instructions, version 1.4, September 2014 page 1 of 6 SHORT INSTRUCTIONS FOR OPERATING LSM1/2 (Zeiss LSM510) AT CIAN Version 1.4, September 2014 Before starting To work with LSM1
Recording EPR spectra using the Loop Gap Resonator (LGR)
") Recording EPR spectra using the Loop Gap Resonator (LGR) This protocol gives step-by-step instructions for recording EPR spectra of spin labeled proteins (Nitroxide label like MTSSL) using the LGR assuming
Recording EPR spectra using the Loop Gap Resonator (LGR) This protocol gives step-by-step instructions for recording EPR spectra of spin labeled proteins (Nitroxide label like MTSSL) using the LGR assuming
Figure 1. Oil-immersion objectives available for use with the Lionheart FX.
 Tech Note Oil Objective Introduction The Lionheart FX automated imager is compatible with high numerical aperture oil immersion objectives. These objectives offer magnification up to 100X and significantly
START-UP PROCEDURE 1 THE MICROSCOPE STAND 3 OBJECTIVES 5 STARTING WITH LAS (SOFTWARE) AND SETTING UP THE MICROSCOPE STAND 7
 AND SETTING UP THE MICROSCOPE STAND 7") Leica DMI AF6000LX Table of contents START-UP PROCEDURE 1 THE MICROSCOPE STAND 3 OBJECTIVES 5 STARTING WITH LAS (SOFTWARE) AND SETTING UP THE MICROSCOPE STAND 7 ACQUIRE MODULE 6 SETTING THE LIGHTPATH 6
Leica DMI AF6000LX Table of contents START-UP PROCEDURE 1 THE MICROSCOPE STAND 3 OBJECTIVES 5 STARTING WITH LAS (SOFTWARE) AND SETTING UP THE MICROSCOPE STAND 7 ACQUIRE MODULE 6 SETTING THE LIGHTPATH 6
TRAINING MANUAL. Olympus FV1000
 TRAINING MANUAL Olympus FV1000 September 2014 TABLE OF CONTENTS A. Start-Up Procedure... 1 B. Visual Observation under the Microscope... 1 C. Image Acquisition... 4 A brief Overview of the Settings...
Tecnai T12 Operating Procedures
 Tecnai T12 Operating Procedures I. Initial Procedures 1 II. Accelerating Voltage 3 III. Specimen Loading and Holder Insertion/Removal 3 IV. Emission Current 7 V. Alignment 7 VI. Camera Control and Imaging
CM20 USER GUIDE. Duncan Alexander, CIME 2010
 CM20 USER GUIDE Duncan Alexander, CIME 2010 CM20 START UP AND CHECK LIST 2 SPECIMEN EXCHANGE 5 - REMOVING SAMPLE HOLDER 6 - INSERTING SAMPLE HOLDER 7 TURNING ON HT 8 STARTING THE FILAMENT 9 GUN TILT ALIGNMENT
This procedure assumes the user is already familiar with basic operation of the SEM and the MiraTC interface.
 Tescan MIRA3 SEM: EDS using EDAX TEAM Nicholas G. Rudawski ngr@ufl.edu Cell: (805) 252-4916 Office: (352) 392-3077 Last updated: 12/04/17 This procedure assumes the user is already familiar with basic
JEOL JEM 2010 TRAINING TRANSMISSION ELECTRON MICROSCOPE USER MANUAL
 JEOL JEM 2010 TRAINING TRANSMISSION ELECTRON MICROSCOPE USER MANUAL Version 5.1 EM Facility CMSE-SEF Massachusetts Institution of Technology TABLE OF CONTENTS 1. Specifications...2 1.1 Performance...2
Widefield 1. Switching on
 Widefield 1 Switching on 1. Ignite DG5 lamp - must be switched on first (if previous user has switched off, wait 30 min before igniting) 2. Wait 5s and then turn on the main DG5 controller switch. 3. DG5
TEM SAMPLE-PREPARATION PROCEDURES FOR THIN-FILM MATERIALS
 TEM SAMPLE-PREPARATION PROCEDURES FOR THIN-FILM MATERIALS Initial Set-Up: Heat up a hot plate to around 150-200 C Plan view Mounting/Grinding/Dimpling/Polishing: 1) Cleave a square-ish piece of sample.
Zeiss LSM880 Operating Instructions. UTMB Optical Microscopy Core Jan. 16, 2018
 Zeiss LSM880 Operating Instructions UTMB Optical Microscopy Core Jan. 16, 2018 1 1. Power up the microscope Sing the LOGBOOK Steps below will provide power to the computer and all of the microscope components.
Olympus Fluoview 1000S Spectral Confocal Microscope Introduction to the NRI-MCDB Microscopy Facility Spectral Confocal Microscope
 Olympus Fluoview 1000S Spectral Confocal Microscope Introduction to the NRI-MCDB Microscopy Facility Spectral Confocal Microscope Improved Optics More Lasers 405 diode 440 diode 488 Argon 515 Argon 559
Motorized Axio Observer Start-up instructions
 Start-up instructions 1. If using fluorescence turn on Fluorescent light source. TL light Source (Hal 100) 2. Turn on microscope using switch on lower left side of the microscope. 3. If imaging, turn on
Tissue Preparation ORGANISM IMAGE TISSUE PREPARATION. 1) Fixation: halts cell metabolism, preserves cell/tissue structure
 Fixation: halts cell metabolism, preserves cell/tissue structure") Lab starts this week! ANNOUNCEMENTS - Tuesday or Wednesday 1:25 ISB 264 - Read Lab 1: Microscopy and Imaging (see Web Page) - Getting started on Lab Group project - Organ for investigation - Lab project
Lab starts this week! ANNOUNCEMENTS - Tuesday or Wednesday 1:25 ISB 264 - Read Lab 1: Microscopy and Imaging (see Web Page) - Getting started on Lab Group project - Organ for investigation - Lab project